

Page 1

ANSWERS WITH INTELLIGENCE
®
TALKSWITCH DOCUMENTATION
ADDING IP PHONES
TO TALKSWITCH
RELEASE 6.50
CT.TS005.008104
Page 2

COPYRIGHT INFORMATION
Copyright © 2011 Fortinet, Inc. All rights reserved. Fortinet®, FortiGate®, FortiGuard®,
FortiCare®, FortiManager®, FortiAnalyzer®, and TalkSwitch® are registered trademarks of
Fortinet, Inc. and other Fortinet names herein may also be registered trademarks and/or
common law trademarks of Fortinet. Other product or company names may be trademarks
of their respective owners.
Reproduction, adaptation or translation without prior written permission is prohibited,
except as allowed under the copyright laws.
Information in this guide is subject to change without notice and does not represent any
commitment on the part of TalkSwitch. No part of this document may be reproduced or
transmitted in any form or by any means, electronic or mechanical, including photocopying,
recording, or information storage and retrieval systems, or translated to another language,
for any purpose other than the licensee’s personal use and, as specifically allowed in the
licensing agreement, without the express written permission of TalkSwitch.
July 2011
CT.TS005.008104
Page 3

TABLE OF CONTENTS
INTRODUCTION . . . . . . . . . . . . . . . . . . . . . . . . . . . . . . . . . . . . . . . . . . . . . . . . . . . . . . . . . . . . . . . . . . . . . . . . . . . 1
Supported IP phones. . . . . . . . . . . . . . . . . . . . . . . . . . . . . . . . . . . . . . . . . . . . . . . . . . . . . . . . . . . . . . . . . . 1
Overview. . . . . . . . . . . . . . . . . . . . . . . . . . . . . . . . . . . . . . . . . . . . . . . . . . . . . . . . . . . . . . . . . . . . . . . . . . . . 1
External IP extensions . . . . . . . . . . . . . . . . . . . . . . . . . . . . . . . . . . . . . . . . . . . . . . . . . . . . . . . . . . . . . . . . . 2
Configuring the router . . . . . . . . . . . . . . . . . . . . . . . . . . . . . . . . . . . . . . . . . . . . . . . . . . . . . . . . . . . . 2
Configuring the router manually . . . . . . . . . . . . . . . . . . . . . . . . . . . . . . . . . . . . . . . . . . . . . . . . 4
CONFIGURING YOUR IP PHONE. . . . . . . . . . . . . . . . . . . . . . . . . . . . . . . . . . . . . . . . . . . . . . . . . . . . . . . . . . . . . . . 5
Adding TalkSwitch TS-350i, TS-450i and TS-550i IP phones . . . . . . . . . . . . . . . . . . . . . . . . . . . . . . . . . . 5
Connecting the TalkSwitch IP phone to the network . . . . . . . . . . . . . . . . . . . . . . . . . . . . . . . . . . . . 5
Adding the extension to the TalkSwitch system . . . . . . . . . . . . . . . . . . . . . . . . . . . . . . . . . . . . . . . . 5
IP extension details area. . . . . . . . . . . . . . . . . . . . . . . . . . . . . . . . . . . . . . . . . . . . . . . . . . . . . . 7
About programmable function keys. . . . . . . . . . . . . . . . . . . . . . . . . . . . . . . . . . . . . . . . . . . . . . . . . . 7
Programming TS-350i function keys . . . . . . . . . . . . . . . . . . . . . . . . . . . . . . . . . . . . . . . . . . . . . . . . . 7
Saving a key assignment template . . . . . . . . . . . . . . . . . . . . . . . . . . . . . . . . . . . . . . . . . . . . . . . . . . 8
Using a key assignment template . . . . . . . . . . . . . . . . . . . . . . . . . . . . . . . . . . . . . . . . . . . . . . . . . . . 8
Programming TS-450i function keys . . . . . . . . . . . . . . . . . . . . . . . . . . . . . . . . . . . . . . . . . . . . . . . . . 8
Programming TS-550i function keys . . . . . . . . . . . . . . . . . . . . . . . . . . . . . . . . . . . . . . . . . . . . . . . . . 9
Programming the TalkSwitch TS-350i, TS-450i or TS-550i IP phone as an external IP extension 10
If registration does not work . . . . . . . . . . . . . . . . . . . . . . . . . . . . . . . . . . . . . . . . . . . . . . . . . . . . . . 11
Adding TalkSwitch TS-9112i, TS-9133i, TS-9143i and TS-480i IP phones . . . . . . . . . . . . . . . . . . . . . . 12
Connecting the TS-9112i, TS-9133i, TS-9143i and TS-480i IP phones to the network . . . . . . . . 12
Adding the extension to the TalkSwitch system . . . . . . . . . . . . . . . . . . . . . . . . . . . . . . . . . . . . . . . 13
IP extension details area. . . . . . . . . . . . . . . . . . . . . . . . . . . . . . . . . . . . . . . . . . . . . . . . . . . . . 15
About programmable function keys. . . . . . . . . . . . . . . . . . . . . . . . . . . . . . . . . . . . . . . . . . . . . . . . . 16
Programming TS-9133i or TS-9143i function keys. . . . . . . . . . . . . . . . . . . . . . . . . . . . . . . . . . . . . 16
Programming TS-480i softkeys . . . . . . . . . . . . . . . . . . . . . . . . . . . . . . . . . . . . . . . . . . . . . . . . . . . . 16
Programming the TalkSwitch IP phone as an external IP extension . . . . . . . . . . . . . . . . . . . . . . . 17
If registration does not work . . . . . . . . . . . . . . . . . . . . . . . . . . . . . . . . . . . . . . . . . . . . . . . . . . . . . . 18
Further configuration . . . . . . . . . . . . . . . . . . . . . . . . . . . . . . . . . . . . . . . . . . . . . . . . . . . . . . . . . . . . 18
Adding TalkSwitch TS-850i and TS-860i IP phones (United States and Canada only) . . . . . . . . . . . . . 19
Installing the base . . . . . . . . . . . . . . . . . . . . . . . . . . . . . . . . . . . . . . . . . . . . . . . . . . . . . . . . . . . . . . 19
Configuring the TS-850i or TS-860i as an IP extension . . . . . . . . . . . . . . . . . . . . . . . . . . . . . . . . . 19
Configuring the TS-850i or TS-860i for use within the office . . . . . . . . . . . . . . . . . . . . . . . . . . . . . 19
IP extension details area . . . . . . . . . . . . . . . . . . . . . . . . . . . . . . . . . . . . . . . . . . . . . . . . . . . 21
Programming the TalkSwitch TS-850i or TS-860i IP phone as an external IP extension . . . . . . . 21
Using the TS-850i or TS-860i with a traditional phone line. . . . . . . . . . . . . . . . . . . . . . . . . . . . . . 22
Further configuration . . . . . . . . . . . . . . . . . . . . . . . . . . . . . . . . . . . . . . . . . . . . . . . . . . . . . . . . . . . . 22
Checking and updating firmware. . . . . . . . . . . . . . . . . . . . . . . . . . . . . . . . . . . . . . . . . . . . . . . . . . . 22
TalkSwitch Phone Programmable Key Functions . . . . . . . . . . . . . . . . . . . . . . . . . . . . . . . . . . . . . . . . . . . 23
Adding Polycom IP Phones . . . . . . . . . . . . . . . . . . . . . . . . . . . . . . . . . . . . . . . . . . . . . . . . . . . . . . . . . . . . 25
ADDING IP PHONES TO TALKSWITCH I
Page 4

Adding a Polycom phone to the TalkSwitch system configuration. . . . . . . . . . . . . . . . . . . . . . . . . 25
IP extension details area . . . . . . . . . . . . . . . . . . . . . . . . . . . . . . . . . . . . . . . . . . . . . . . . . . . . . . . . 26
Configuring the system for external IP extensions . . . . . . . . . . . . . . . . . . . . . . . . . . . . . . . . . . . . . 26
Configuring the router . . . . . . . . . . . . . . . . . . . . . . . . . . . . . . . . . . . . . . . . . . . . . . . . . . . . . . . . . . . 27
Configuring the router manually . . . . . . . . . . . . . . . . . . . . . . . . . . . . . . . . . . . . . . . . . . . . . . . 28
Connecting the Polycom phone to the network. . . . . . . . . . . . . . . . . . . . . . . . . . . . . . . . . . . . . . . . 29
Confirming the Polycom firmware version . . . . . . . . . . . . . . . . . . . . . . . . . . . . . . . . . . . . . . . . . . . . 29
Programming the Polycom IP phone . . . . . . . . . . . . . . . . . . . . . . . . . . . . . . . . . . . . . . . . . . . . . . . . 29
Further configuration . . . . . . . . . . . . . . . . . . . . . . . . . . . . . . . . . . . . . . . . . . . . . . . . . . . . . . . . . . . . 29
Updating the Polycom firmware. . . . . . . . . . . . . . . . . . . . . . . . . . . . . . . . . . . . . . . . . . . . . . . . . . . . 30
Installing a TFTP application . . . . . . . . . . . . . . . . . . . . . . . . . . . . . . . . . . . . . . . . . . . . . . . . . . 30
Downloading and extracting firmware files . . . . . . . . . . . . . . . . . . . . . . . . . . . . . . . . . . . . . . 30
Configuring the phone to point to the firmware files . . . . . . . . . . . . . . . . . . . . . . . . . . . . . . . 30
Adding Grandstream IP phones . . . . . . . . . . . . . . . . . . . . . . . . . . . . . . . . . . . . . . . . . . . . . . . . . . . . . . . . 32
Adding a Grandstream phone to the TalkSwitch system configuration. . . . . . . . . . . . . . . . . . . . . 32
IP extension details area . . . . . . . . . . . . . . . . . . . . . . . . . . . . . . . . . . . . . . . . . . . . . . . . . . . 33
Configuring the system for external IP extensions . . . . . . . . . . . . . . . . . . . . . . . . . . . . . . . . . . . . . 33
Configuring the router . . . . . . . . . . . . . . . . . . . . . . . . . . . . . . . . . . . . . . . . . . . . . . . . . . . . . . . . . . . 34
Configuring the router manually . . . . . . . . . . . . . . . . . . . . . . . . . . . . . . . . . . . . . . . . . . . . . . . 35
Connecting the Grandstream phone to the network. . . . . . . . . . . . . . . . . . . . . . . . . . . . . . . . . . . . 36
Confirming the Grandstream firmware version . . . . . . . . . . . . . . . . . . . . . . . . . . . . . . . . . . . . . . . . 36
Programming a Grandstream IP phone . . . . . . . . . . . . . . . . . . . . . . . . . . . . . . . . . . . . . . . . . . . . . . 36
Further configuration . . . . . . . . . . . . . . . . . . . . . . . . . . . . . . . . . . . . . . . . . . . . . . . . . . . . . . . . . . . . 37
Updating the Grandstream firmware. . . . . . . . . . . . . . . . . . . . . . . . . . . . . . . . . . . . . . . . . . . . . . . . 37
Installing a TFTP application . . . . . . . . . . . . . . . . . . . . . . . . . . . . . . . . . . . . . . . . . . . . . . . . . . 37
Downloading and extracting firmware files . . . . . . . . . . . . . . . . . . . . . . . . . . . . . . . . . . . . . . 38
Configuring the phone to point to the firmware files . . . . . . . . . . . . . . . . . . . . . . . . . . . . . . . 38
Adding Counterpath IP phones . . . . . . . . . . . . . . . . . . . . . . . . . . . . . . . . . . . . . . . . . . . . . . . . . . . . . . . . . 39
Adding a Counterpath phone to the TalkSwitch system configuration . . . . . . . . . . . . . . . . . . . . . 39
IP extension details area . . . . . . . . . . . . . . . . . . . . . . . . . . . . . . . . . . . . . . . . . . . . . . . . . . . . . . . . 40
Configuring the system for external IP extensions . . . . . . . . . . . . . . . . . . . . . . . . . . . . . . . . . . . . . 40
Configuring the router . . . . . . . . . . . . . . . . . . . . . . . . . . . . . . . . . . . . . . . . . . . . . . . . . . . . . . . . . . . 41
Configuring the router manually . . . . . . . . . . . . . . . . . . . . . . . . . . . . . . . . . . . . . . . . . . . . . . . 42
Configuring a new SIP account. . . . . . . . . . . . . . . . . . . . . . . . . . . . . . . . . . . . . . . . . . . . . . . . . . . . . 43
Further configuration . . . . . . . . . . . . . . . . . . . . . . . . . . . . . . . . . . . . . . . . . . . . . . . . . . . . . . . . . . . . 44
Updating eyeBeam software . . . . . . . . . . . . . . . . . . . . . . . . . . . . . . . . . . . . . . . . . . . . . . . . . . . . . . 44
Adding Other IP Phones. . . . . . . . . . . . . . . . . . . . . . . . . . . . . . . . . . . . . . . . . . . . . . . . . . . . . . . . . . . . . . . 45
ADDING IP PHONES TO TALKSWITCH II
Page 5

INTRODUCTION
This guide describes how to configure an IP phone as a local extension. An IP phone can be
internal (located in the office) or external (located outside the office).
SUPPORTED IP PHONES
We recommend TalkSwitch® IP phones and supported third-party IP phones for ease of
configuration. TalkSwitch currently supports the following IP phones:
• TalkSwitch TS-350i, TS-450i and TS-550i
• TalkSwitch TS-9112i, TS-9133i, TS-9143i and TS-480i
• TalkSwitch TS-850i and TS-860i cordless IP phones
• Polycom IP 301, IP 320, IP 330, IP 430, IP 501, IP 550, IP 601 and IP 650
• Grandstream GXP2000 and GXP2020
• Counterpath eyeBeam softphone
Visit http://global.talkswitch.com for information on which models are available in your
region and useful resources such as quick reference cards, user guides and firmware files. To
access the IP phone guides, choose Start > Programs > TalkSwitch 6.50 > Documentation > IP
Phone Guides.
OVERVIEW
For each supported IP phone, this guide describes how to:
• Add the IP phone to the TalkSwitch system configuration.
• Configure the router, if setting up an external IP extension.
• Connect the IP phone to the network.
• Check and update the IP phone firmware version, if required.
• Program the IP phone.
Refer to Adding Other IP Phones on page 45 for configuration information of non-supported
IP phones.
ADDING IP PHONES TO TALKSWITCH 1
Page 6

EXTERNAL IP EXTENSIONS
An external IP extension is an IP phone located outside the office that is configured as a
local extension.
External IP extensions can be assigned to any VoIP-equipped TalkSwitch unit that can connect
to the phone over a public or private network. See Configuring the router below. For additional
information see Connecting to a network in the VoIP Network Configuration Guide.
All VoIP lines are shared by default. If necessary, you can reserve VoIP lines for external IP
extensions. See Reserving VoIP lines in the VoIP Network Configuration Guide.
External IP extensions will use the preferred codec selected for the TalkSwitch profile. The
default preferred codec is G.729. You can select a different preferred codec for the TalkSwitch
profile. See Setting code options in the VoIP Network Configuration Guide.
Warning: Calls to an emergency service number using an external IP extension will not send
the correct address to the emergency operator. We strongly recommend that you apply a
warning label to any external IP extension stating:
If an emergency call is made from this phone, you must provide your address to the
emergency operator.
Configuring the router
If you are setting up an external IP extension, you must ensure the router is configured. There
should be no adjustments required for the firewall at the remote (phone) location.
The Router Port Forwarding area of the IP Configuration page displays the type of gateway
device (i.e. the type of router), the IP address of the gateway (i.e. router), and whether router
configuration is required.
A router is a gateway between the local area network and the Internet. Most routers have a
firewall to block unwanted data from the Internet. For voice data to reach the TalkSwitch system
through the firewall, port forwarding is required. Port forwarding allows the router to map ports
to the IP addresses of the TalkSwitch units. Valid Internet data will use the ports to go through
the firewall to the TalkSwitch units.
If you are setting up external IP extensions, a TalkSwitch VoIP network, or a VoIP service that
doesn’t handle port forwarding, port forwarding is required.
If port forwarding is required, and your router supports uPNP (Universal Plug and Play), ensure
uPNP is enabled. The TalkSwitch system will use uPNP to automatically set up port forwarding,
and the Automatic (uPNP Enabled) link will appear. No router configuration is required.
If port forwarding is required but your router doesn’t support uPNP, or automatic port
forwarding doesn’t work, the Manual Port Mapping Required link will appear. You will need to
configure the router as described below.
1. Select the IP Configuration page.
ADDING IP PHONES TO TALKSWITCH 2
Page 7
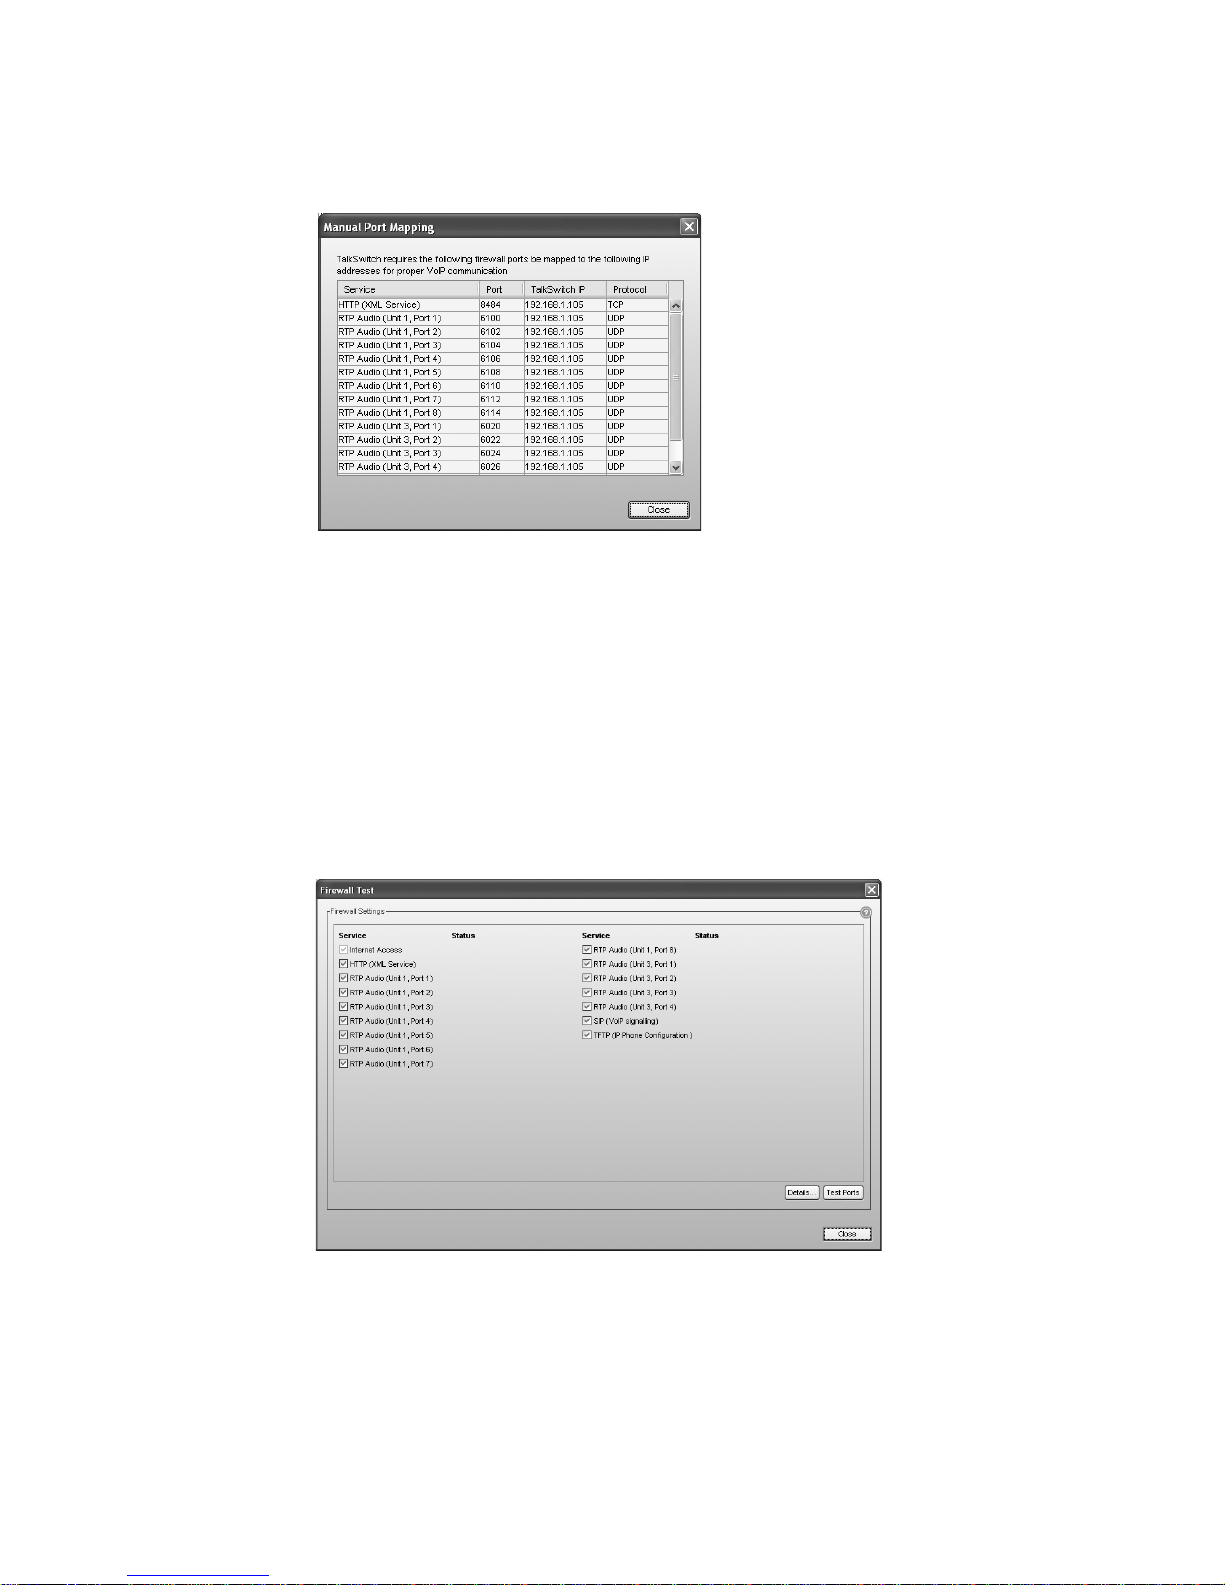
2. If required, click the Manual Port Mapping Required link. The Manual Port Mapping
window appears. It lists the packet type, labels to aid in port identification, port number, IP
address and protocol of each required port.
3. To access the router configuration:
a) Click the link containing the IP address of the gateway. The default browser starts, and
prompts you for the router’s user name and password.
b) Enter the router’s user name and password. The browser shows a setup screen.
c) Navigate to the screen used to set up port forwarding. See your router documentation.
d) Set up port forwarding using the information from the Manual Port Mapping window.
See your router documentation for instructions on how to map ports. For information on
configuring routers and mapping ports, visit www.portforward.com/english/routers/
port_forwarding/routerindex.htm.
4. To check the status of each port through the firewall, click Check Firewall. The Firewall
Test window appears.
5. Select the services you want to check.
6. Click Test Ports. The system will check the ports for the selected services.
ADDING IP PHONES TO TALKSWITCH 3
Page 8

Configuring the router manually
If you cannot access the router configuration through the IP Configuration page, configure the
router manually.
1. Open the router configuration and navigate to the screen used to set up port forwarding.
See your router documentation.
2. Map port 5060 (Type: UDP) to the TalkSwitch unit acting as local proxy. Port 5060 is the
default port for forwarding SIP signaling data to the TalkSwitch system.
If required, you can map a different port. In this case, enter the port in the SIP signalling
port box of the VoIP Settings window.
3. Map the following ports (Type: UDP) to the TalkSwitch units. These RTP ports forward voice
traffic to the TalkSwitch system by default.
VoIP Lines/Unit Unit 1 Unit 2 Unit 3 Unit 4
4 6000–6006 6010–6016 6020–6026 6030–6036
8 6100–6114 6200–6214 6300–6314 6400–6414
If required, you can map different ports. In this case enter the first port in the Starting RTP
port box of the VoIP Settings window.
4. Map port 69 (Type: UDP) to the TalkSwitch unit acting as local proxy. Port 69 allows the
TalkSwitch system to configure external IP extensions.
5. Map port 8484 (Type: TCP) to the TalkSwitch unit acting as local proxy. Port 8484 allows the
TalkSwitch system to configure TalkSwitch IP phones as external IP extensions.
6. Map port 9393 (Type: TCP) to the TalkSwitch unit acting as local proxy. Port 9393 allows
remote configuration of the TalkSwitch system.
7. If available, enable Quality of Service (QoS) to give voice traffic priority over data.
8. Save the configuration to the router.
ADDING IP PHONES TO TALKSWITCH 4
Page 9

CONFIGURING YOUR IP PHONE
ADDING TALKSWITCH TS-350i, TS-450i AND TS-550i IP PHONES
Connecting the TalkSwitch IP phone to the network
1. Connect a network cable between the LAN port on the phone (marked ) and your network
(i.e. router or LAN connection). The TalkSwitch TS-350i, TS-450i and TS-550i IP phones also
have a PC port. The PC port can be used to connect the PC to the network if only one
network connection is available.
2. Connect power to the phone, either using the optional power adapter or an 802.3af PowerOver-Ethernet (POE) source.
If the phone is connected to the same network as the TalkSwitch system, and an extension
has been configured with the phone’s MAC address, the system will automatically register
and configure the phone. When complete, the phone will display the extension name and
extension number.
If the phone is connected to the network and no extension has been configured with the
phone's MAC address, the phone will bootup with the model number showing in the display.
Adding the extension to the TalkSwitch system
1. Launch the TalkSwitch management software.
2. Select the Local Extensions/Fax page.
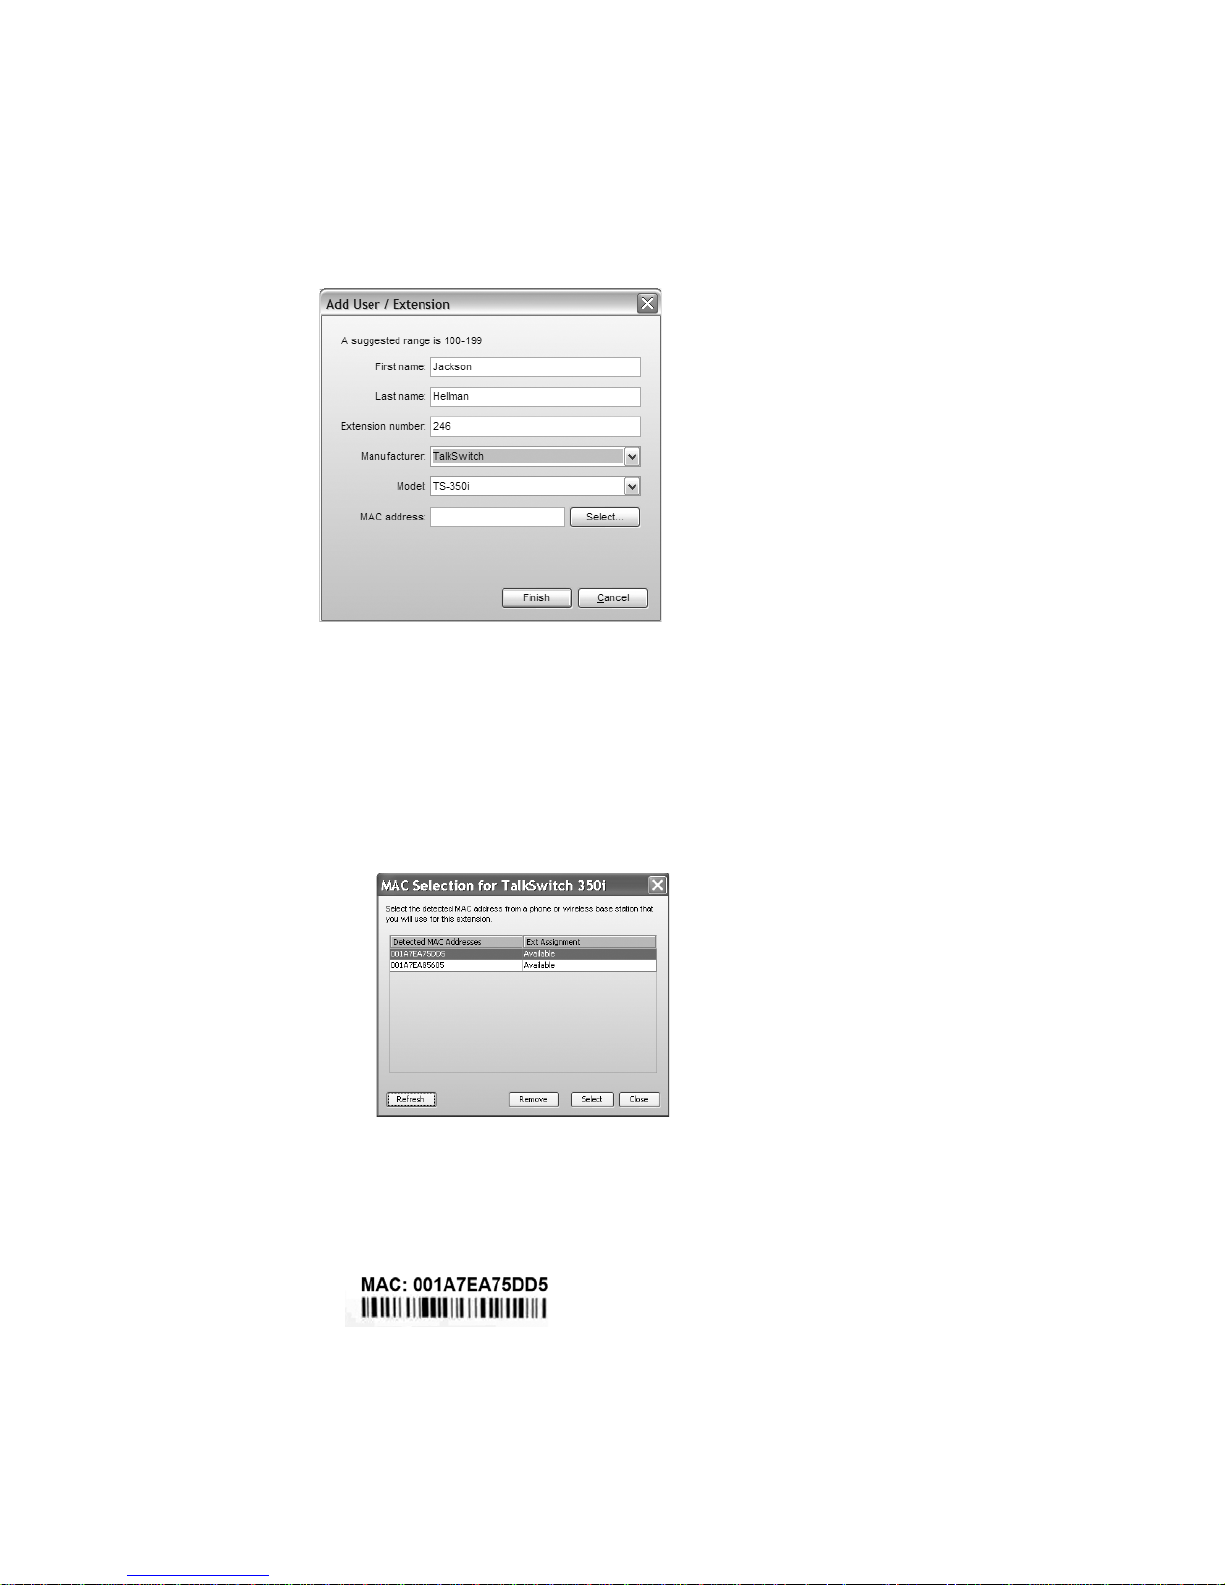
3. Click the Add button. The Add User / Extension window appears.
ADDING IP PHONES TO TALKSWITCH 5
Page 10
4. Set the Extension type to IP Extension.
5. In a multi-unit system, select the TalkSwitch unit the extension will be associated with. This
unit will hold the voicemail for the extension. Click Next.
6. Enter the user’s First Name and Last Name. The names are used for caller ID and the dial-by-
name directory.
7. Assign an Extension number.
8. If necessary, select TalkSwitch as the Phone type, and then select the model.
9. Enter the MAC address of the phone:
• You can select the Phone MAC Address from a list of automatically-detected phones
connected to your LAN. To use this method:
i) Click the Select button. A MAC Selection window appears and lists TalkSwitch IP
phones of the selected type.
ii) Select the MAC address of the IP phone associated to the extension, and then click
Select.
• You can enter the Phone MAC Address manually. This is the required method if you are
setting up an external IP extension. The MAC Address is a 12-digit alphanumeric string
located in the barcode on the bottom of the phone and the box the phone came in.
Click Finish.
ADDING IP PHONES TO TALKSWITCH 6
Page 11

10. In the Extension tab, select the language for prompts heard by the user of the extension in
the System Prompt Language list. Setting the prompt language will also change the language
for text displayed on the phone itself.
11. Choose File > Save. The system will create a configuration file that the phone will download
when the phone is restarted.
IP extension details area
1. Set the Location. Choices are:
• Internal — The phone is an internal IP extension located within the office, and is
connected to the same LAN as the TalkSwitch unit.
• External — The phone is an external IP extension located outside the office, and is
connected to the TalkSwitch unit over the internet. See External IP extensions on page 2
Warning: Calls to an emergency service number using an external IP extension will not send
the correct address to the emergency operator. We strongly recommend that you apply a
warning label to any external IP extension stating:
If an emergency call is made from this phone, you must provide your address to the
emergency operator.
2. If you set Location to External, select the Time Zone that matches the location of the IP
phone.
About programmable function keys
The TS-350i has 6 programmable functions keys, the TS-450i has 10 programmable keys, and the
TS-550i has 22 programmable keys. The keys allow the user to access TalkSwitch features, and to
monitor and engage lines, extensions and queued calls (i.e. line appearance).
Note that the keys cannot be programmed if the extension has hot line access enabled. In this
case, the phone will automatically connect the pre-configured resource (external number,
extension etc.)
Programming TS-350i function keys
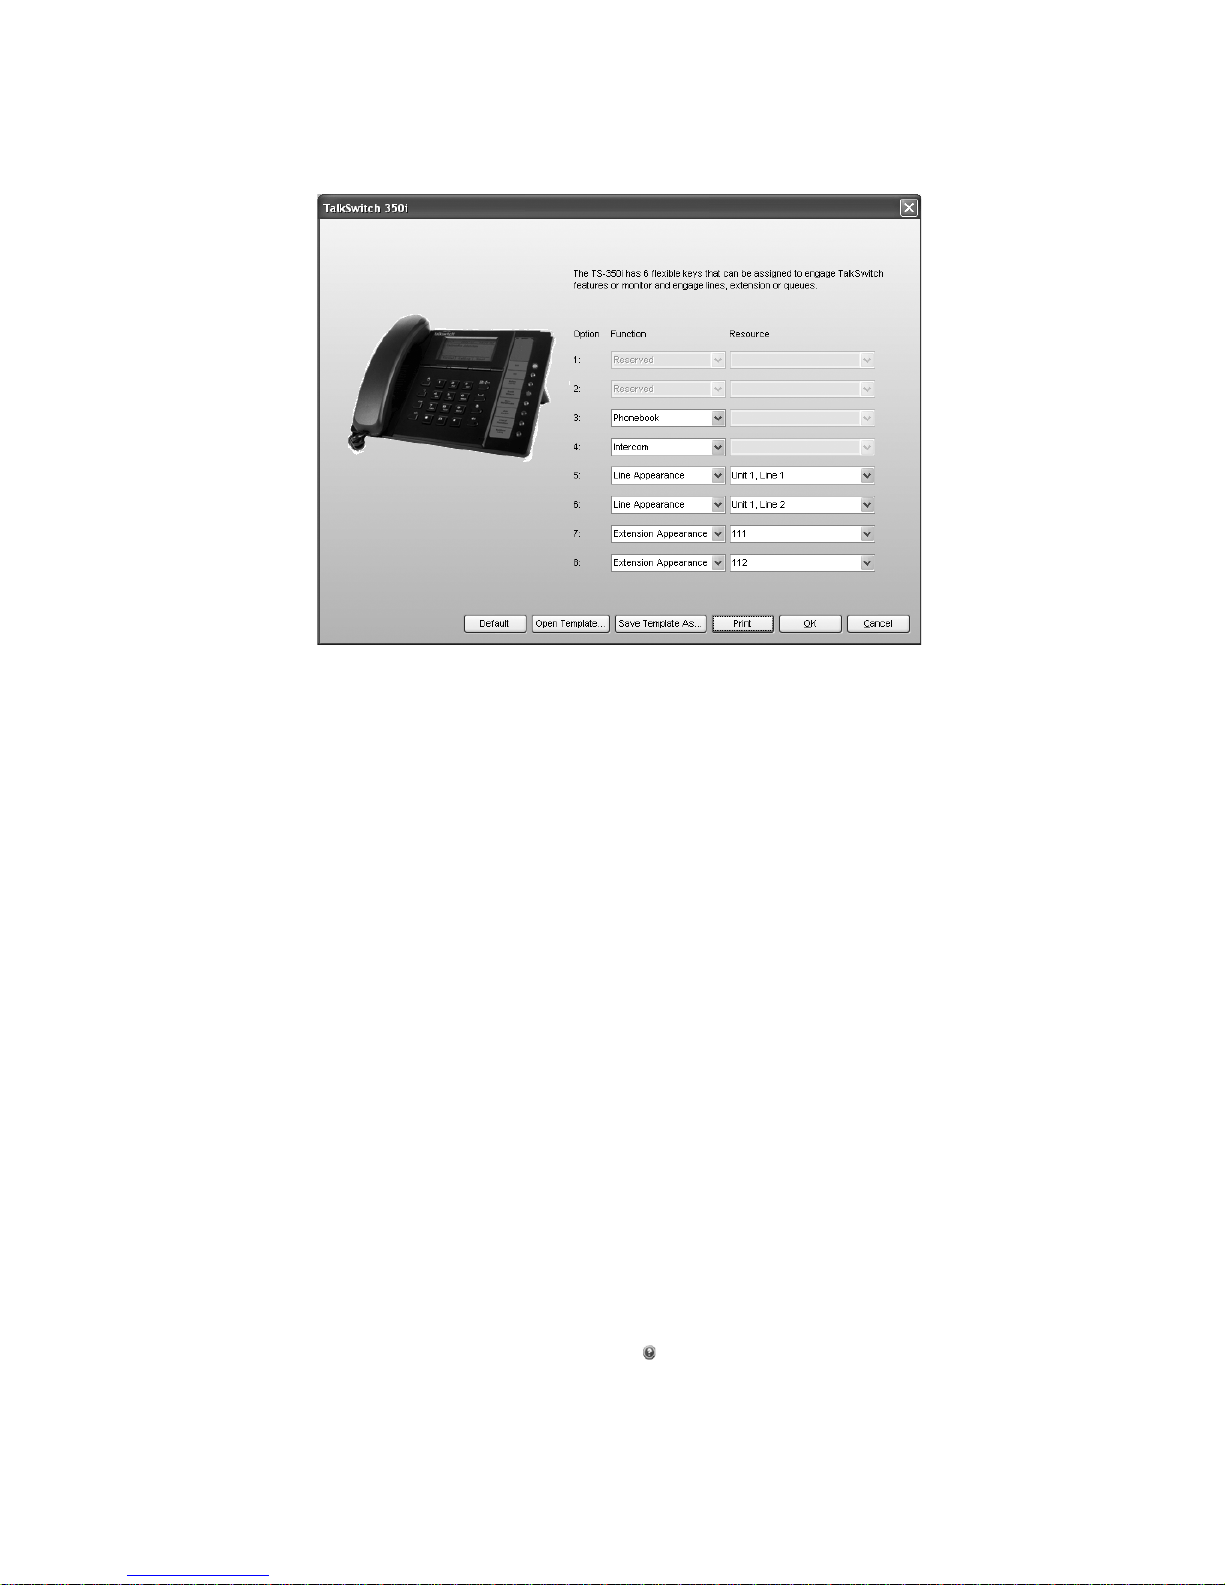
1. Click Configure Keys. This button is enabled if the IP Extension Details area is complete.
The TalkSwitch 350i window appears.
2. For each key, select the Function and the Resource (if applicable). The function keys can be
assigned for Line Appearance, Extension Appearance, Queue Appearance, Voicemail, Do Not
Disturb (DND), Speed Dial, Park, Unpark, Call Pickup (any or specific extension), Group Page,
Overhead Page, Phone Book configuration, or User Defined (phone). For further details, click
the Help icon in the IP Extension Details area.
ADDING IP PHONES TO TALKSWITCH 7
Page 12
3. Optionally, you can apply predefined key assignments from a template file using the Open
Template button. See Using a key assignment template on page 8.
If necessary, use the Default button to restore the keys to their default settings.
4. Use the Print button to print a label showing the key configuration. Cut out the printed
label and insert it in the phone next to the key lights.
5. Your key assignments can be saved as a template for programming additional phones. See
Saving a key assignment template on page 8.
Saving a key assignment template
You can use the template file as a starting point for the key assignments for another extension.
After setting up the key assignments:
1. Click Save Template As to save the key assignments to a template file. The Save Template
As window appears.
2. Enter the filename of the template file, and then click Save.
Using a key assignment template
1. To display the key assignments from a template file, click Open Template. The Open
Template window appears.
2. Select the template file, and then click Open Template.
Programming TS-450i function keys
1. Click Configure Keys. This button is enabled if the IP Extension Details area is complete.
The TalkSwitch 450i window appears.
2. Select up to 10 softkey options. For each option, select the Function and the Resource (if
applicable). The function keys can be assigned for Line Appearance, Extension Appearance,
Queue Appearance, Voicemail, Do Not Disturb (DND), Phone Book access, Speed Dial, Park,
Unpark, Call Pickup (any or specific extension), Group Page, Overhead Page, or User Defined
(phone). For further details, click the Help icon in the IP Extension Details area.
ADDING IP PHONES TO TALKSWITCH 8
Page 13
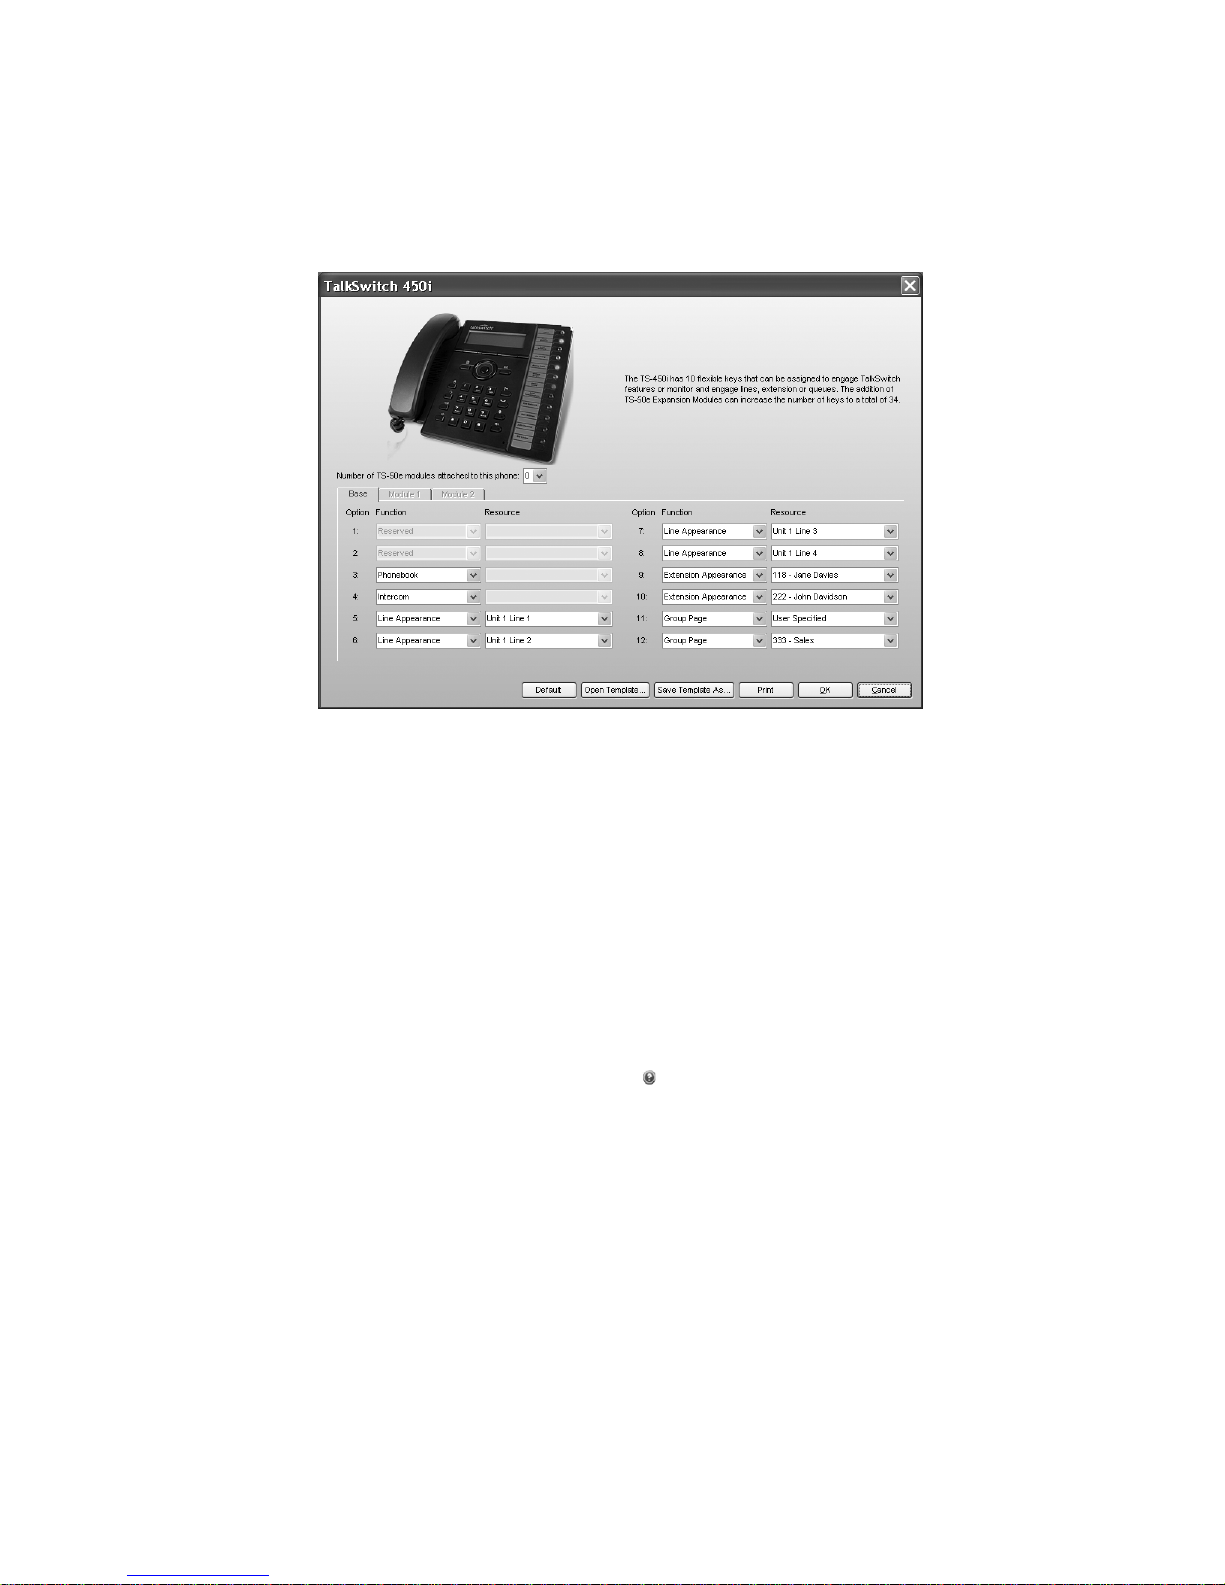
If the phone has TS-50e expansion modules installed, use the pull-down menu to select the
number of modules installed. Select the tab associated to each module and configure the
keys.
3. Optionally, you can apply predefined key assignments from a template file using the Open
Template button. See Using a key assignment template on page 8.
If necessary, use the Default button to restore the keys to their default settings.
4. Use the Print button to print a label showing the key configuration. Cut out the printed
label and insert it in the phone next to the key lights.
5. Your key assignments can be saved as a template for programming additional phones. See
Saving a key assignment template on page 8.
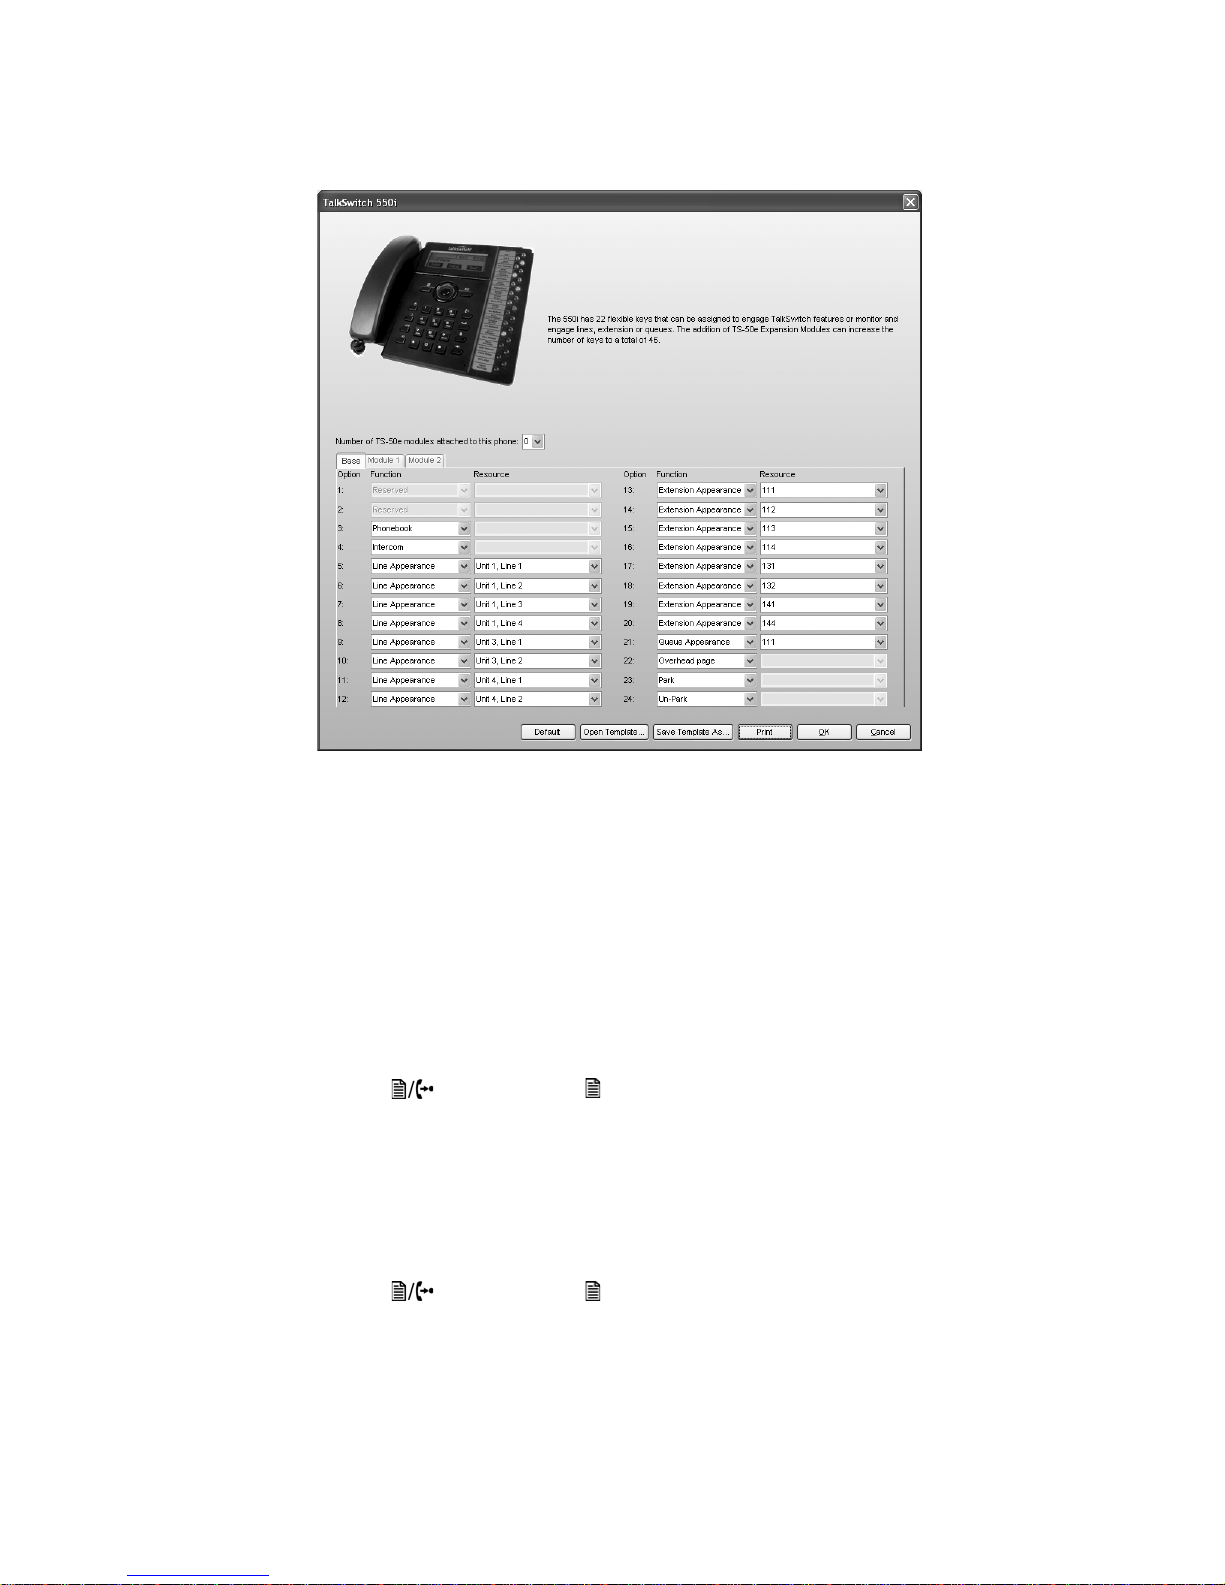
Programming TS-550i function keys
1. Click Configure Keys. This button is enabled if the IP Extension Details area is complete.
The TalkSwitch 550i window appears.
2. Select up to 22 softkey options. For each option, select the Function and the Resource (if
applicable). The function keys can be assigned for Line Appearance, Extension Appearance,
Queue Appearance, Voicemail, Do Not Disturb (DND), Phone Book access, Speed Dial, Park,
Unpark, Call Pickup (any or specific extension), Group Page, Overhead Page, or User Defined
(phone). For further details, click the Help icon in the IP Extension Details area.
If the phone has TS-50e expansion modules installed, use the pull-down menu to select the
number of modules installed. Select the tab associated to each module and configure the keys.
ADDING IP PHONES TO TALKSWITCH 9
Page 14
3. Optionally, you can apply predefined key assignments from a template file using the Open
Template button. See Using a key assignment template on page 8.
If necessary, use the Default button to restore the keys to their default settings.
4. Use the Print button to print a label showing the key configuration. Cut out the printed
label and insert it in the phone next to the key lights.
5. Your key assignments can be saved as a template for programming additional phones. See
Saving a key assignment template on page 8.
Programming the TalkSwitch TS-350i, TS-450i or TS-550i IP phone as an external IP extension
If you are setting up an external IP extension, you must ensure there is a communication path
over the network between your phone and your TalkSwitch systsem. See Configuring the router
on page 2.
Program the following settings into the phone. On the phone:
1. Press the button (TS-350i) / button (TS-450i, TS-550i).
2. Press 3 to enter the Phone Settings menu.
3. Press 7 to enter the Firmware Update menu.
4. Press 2 to enter the TFTP Server Address menu.
5. Use the keypad to enter the public IP address or FQDN of the TalkSwitch system, and then
press the OK softkey.
6. Press the button (TS-350i) / button (TS-450i, TS-550i) to exit the menu.
ADDING IP PHONES TO TALKSWITCH 10
Page 15

7. The phone will request you reboot the phone. Press the Yes softkey to initiate the reboot.
It should take no more than 1 minute for boot process to finish. During this process, the
phone contacts the TalkSwitch unit, which automatically registers and configures the
phone. When complete, the phone will display the extension name and extension number.
The phone is now ready for use.
If registration does not work
If the IP phone is not successfully registered and configured, perform the following steps. On
the phone:
1. button (TS-350i) / button (TS-450i, TS-550i).
2. Press 6 to enter the default all settings menu.
3. Press the Yes softkey to default the settings.
4. Press the button (TS-350i) / button (TS-450i, TS-550i) to exit the menu.
5. The phone will request you reboot the phone. Press the Yes softkey to initiate the reboot.
It should take no more than 1 minute for boot process to finish.
6. If setting up an external IP extension, follow the steps in Programming the TalkSwitch IP
phone as an external IP extension after the phone reboots.
7. Contact your reseller or TalkSwitch Customer Support if registration is still unsuccessful.
ADDING IP PHONES TO TALKSWITCH 11
Page 16

ADDING TALKSWITCH TS-9112i, TS-9133i, TS-9143i AND TS-480i
IP PHONES
To add a TalkSwitch TS-9112i, TS-9133i, TS-9143i or TS-480i IP phone within your office,
connect the phone to the LAN and follow the prompts on the phone to set the extension
number. The phone will work right away. Later you can complete the configuration in the
TalkSwitch management software.
Alternatively, you can connect the phone to the network, skip setting the extension number
and then do the configuration using the TalkSwitch management software.
Connecting the TS-9112i, TS-9133i, TS-9143i and TS-480i IP phones to the network
1. If you will select the extension using the phone itself, ensure the TalkSwitch management
software is closed.
2. Connect a network cable between the LAN port on the phone (marked ) and your network
(i.e. router or LAN connection). The TalkSwitch TS-9133i, TS-9143i and TS-480i IP phones
also have a PC port. The PC port can be used to connect the PC to the network if only one
network connection is available.
3. Connect power to the phone, either using the power adapter, or an 802.3af Power-OverEthernet (POE) source (TS-9133i, TS-9143i or TS-480i).
If the phone is connected to the same network as the TalkSwitch system, and an extension
has been configured with the phone’s MAC address, the system will automatically register
and configure the phone. When complete, the phone will display the extension name and
extension number.
If the phone is connected to a different network than the TalkSwitch system, the phone will
display the default time and date of Sat, Jan 1 12:00 am.
If the phone is connected to the same network as the TalkSwitch system, but no extension
has been configured with the phone’s MAC address, the following prompt appears on the
phone display.
TS-9112i TS-9133i, TS-9143i TS-480i
Ext Setup?
^=Cancel v=Enter
4. If you will select the phone’s MAC address later, and do not want to select the extension
using the phone itself, press the up arrow key on the TS-9112i, TS-9133i or TS-9143i, or
press the No softkey on the TS-480i.
5. To select the extension using the phone itself:
a) Press the down arrow key on the TS-9112i, TS-9133i or TS-9143i, or press the Yes softkey
on the TS-480i. The phone displays the following prompt.
TS-9112i TS-9133i, TS-9143i TS-480i
Ext Number?
_
^=Cancel v=Enter
Ext Setup?
^=Cancel v=Enter
Ext Number?
_
^=Cancel v=Enter
Extension Setup?
Extension Number?
ADDING IP PHONES TO TALKSWITCH 12
Page 17

b) Use the phone to enter a valid available extension number.
c) Press the down arrow key on the TS-9112i, TS-9133i or TS-9143i, or press the Enter
softkey on the TS-480i. The phone displays the following prompt.
TS-9112i TS-9133i, TS-9143i TS-480i
Done! Reboot Now
Done! Reboot Now
Success!
Reboot the phone
^=Cancel v=Enter
^=Cancel v=Enter
If you have not entered a valid available extension number, the phone returns to step a).
d) Press the down arrow key on the TS-9112i, TS-9133i or TS-9143i, or press the Reboot
softkey on the TS-480i. The phone reboots, and then displays the date, time, extension
number, and number of voicemails (if any). The phone is available for use, but you can
configure additional features with the TalkSwitch Management software.
Adding the extension to the TalkSwitch system
1. Launch the TalkSwitch management software.
2. Select the Local Extensions/Fax page.
3. Click the Add button. The Add User / Extension window appears.
4. Set the Extension type to IP Extension.
5. In a multi-unit system, select the TalkSwitch unit the extension will be associated with. This
unit will hold the voicemail for the extension. Click Next.
ADDING IP PHONES TO TALKSWITCH 13
Page 18

6. Enter the user’s First Name and Last Name. The names are used for caller ID and the dial-by-
name directory.
7. Assign an Extension number.
8. If necessary, select TalkSwitch as the Phone type, and then select the model.
9. Enter the MAC address of the phone:
• You can select the Phone MAC Address from a list of automatically-detected phones
connected to your LAN. To use this method:
i) Click the Select button. A MAC Selection window appears and lists TalkSwitch IP
phones of the selected type.
ii) Select the MAC address of the IP phone associated to the extension, and then click
Select.
ADDING IP PHONES TO TALKSWITCH 14
Page 19

• You can enter the Phone MAC Address manually. This is the required method if you are
setting up an external IP extension. The MAC Address is a 12-digit alphanumeric string
located in the barcode on the bottom of the phone and the box the phone came in.
Click Finish.
10. In the Extension tab, select the language for prompts heard by the user of the extension in
the System Prompt Language list. Setting the prompt language will also change the language
for text displayed on the phone itself.
11. Choose File > Save. The system will create a configuration file that the phone will download
when the phone is restarted.
IP extension details area
If you connected a TalkSwitch TS-9112i, TS-9133i, TS-9143i or TS-480i IP phone to the LAN and
used it to select an extension number, the IP Extension Details area for that extension will be
complete.
If necessary, perform the following steps:
1. Set the Location. Choices are:
• Internal — The phone is an internal IP extension located within the office, and is
connected to the same LAN as the TalkSwitch unit.
• External — The phone is an external IP extension located outside the office, and is
connected to the TalkSwitch unit over the internet. See External IP extensions on page 2.
Warning: Calls to an emergency service number using an external IP extension will not send
the correct address to the emergency operator. We strongly recommend that you apply a
warning label to any external IP extension stating:
If an emergency call is made from this phone, you must provide your address to the
emergency operator.
2. If you set Location to External, select the Time Zone that matches the location of the
IP phone.
ADDING IP PHONES TO TALKSWITCH 15
Page 20

About programmable function keys
The TS-9133i and TS-9143i have 7 programmable functions keys, and the TS-480i has 14
programmable ssoftkeys. The keys allow the user to access TalkSwitch features, and to monitor
and engage lines, extensions and queued calls (i.e. line appearance).
Note that the keys cannot be programmed if the extension has hot line access enabled. In this
case, pressing the top function key of the TS-9133i or TS-9143i, or the HotLine softkey of the
TS-480i connects to the resource.
Programming TS-9133i or TS-9143i function keys
1. Click Configure Keys. This button is enabled if the IP Extension Details area is complete. The
TalkSwitch 9133i window appears.
2. For each key, select the Function and the Resource (if applicable). The function keys can be
assigned for Line Appearance, Extension Appearance, Voicemail, Do Not Disturb (DND), Park,
Unpark, Call Pickup (any or specific extension), Intercom Page, or Overhead Page. For further
details, click the Help icon in the IP Extension Details area.
3. Optionally, you can apply predefined key assignments from a template file using the Open
Template button. See Using a key assignment template on page 8.
If necessary, use the Default button to restore the keys to their default settings.
4. Your key assignments can be saved as a template for programming additional phones. See
Saving a key assignment template on page 8.
Programming TS-480i softkeys
1. Click Configure Keys. This button is enabled if the IP Extension Details area is complete. The
TalkSwitch 480i window appears.
2. Select up to 14 softkey options. For each option, select the Function and the Resource (if
applicable). The function keys can be assigned for Line Appearance, Extension Appearance,
Queue Appearance, Voicemail, Do Not Disturb (DND), Park, Unpark, Call Pickup (any or
specific extension), show Queue, or Overhead Page. For further details click the Help icon
in the IP Extension Details area.
ADDING IP PHONES TO TALKSWITCH 16
Page 21

3. Optionally, you can apply predefined key assignments from a template file using the Open
Template button. See Using a key assignment template on page 8.
If necessary, use the Default button to restore the keys to their default settings.
4. Your key assignments can be saved as a template for programming additional phones. See
Saving a key assignment template on page 8.
Programming the TalkSwitch IP phone as an external IP extension
If you are setting up an external IP extension, you must ensure there is a communication path
over the network between your phone and your TalkSwitch system. See Configuring the router on
page 2.
Program the following settings into the phone. On the phone:
1. Press the Options key.
2. On the TS-9133i or TS-480i, navigate to the Network Settings menu, then press Enter
or Show. On the TS-9143i, navigate to the Admin menu, then press Enter.
3. Enter the password. By default this is 22222. When the TalkSwitch unit configures the
phone, it changes the password to 23646 (which spells “admin” on the telephone keypad).
4. On the TS-9133i or TS-480i, navigate to the TFTP Settings menu, and then press Enter or
Show. On the TS-9143i, navigate to the Config Server menu and press Enter, then select
TFTP Settings and press Enter.
5. Select Primary TFTP, and then press Enter or Show.
6. Use the keypad to enter the public IP address of the TalkSwitch system, then press Set or
Done.
7. Reboot the phone. After a short delay, the phone will indicate it is initializing the network,
checking for firmware updates, and following automatic programming steps. During this
process the phone contacts the TalkSwitch unit, which automatically registers and
configures the phone. When complete, the phone will display the extension name and
extension number. The phone is now ready for use.
ADDING IP PHONES TO TALKSWITCH 17
Page 22

If registration does not work
If the IP phone is not successfully registered and configured, perform the following steps.
On the TS-9133i or TS-480i phone:
1. Press the Options key.
2. Use the cursor keys to navigate to the Phone Status menu, then press Enter or Show.
3. Use the cursor keys to navigate to the Restore Defaults menu, then press Enter or Show.
4. Enter the password. By default this is 22222. When the TalkSwitch unit configures the
phone, it changes the password to 23646 (which spells “admin” on the telephone keypad).
5. Select All Defaults, then press Enter or Show.
6. Press # to confirm that you want to restore defaults.
7. If setting up an external IP extension, follow the steps in Programming the TalkSwitch IP
phone as an external IP extension after the phone reboots.
8. Contact your reseller or TalkSwitch Customer Support if registration is still unsuccessful.
On the TS-9143i phone:
1. Press the Options key.
2. Use the cursor keys to navigate to the Admin menu, then press Enter.
3. Enter the password. By default this is 22222. When the TalkSwitch unit configures the
phone, it changes the password to 23646 (which spells “admin” on the telephone keypad).
4. Navigate to the Factory Defaults menu, then press Enter.
5. Press # to confirm that you want to restore defaults.
6. If setting up an external IP extension, follow the steps in Programming the TalkSwitch IP
phone as an external IP extension after the phone reboots.
7. Contact your reseller or TalkSwitch Customer Support if registration is still unsuccessful.
Further configuration
The steps above will configure your TalkSwitch IP phone and will enable the programmable keys.
Click the Local Extension/Fax Help icons for instructions on configuring direct line access,
hunt group permissions, Caller ID settings (VoIP only), call handling, and voicemail.
For phone-specific configuration, refer to your phone user guide.
Contact your reseller or TalkSwitch Customer Support if you require further assistance with
special ports or network settings.
ADDING IP PHONES TO TALKSWITCH 18
Page 23

ADDING TALKSWITCH TS-850i AND TS-860i IP PHONES (United States
and Canada only)
Installing the base
1. Install the TS-850i or TS-860i base according to the instructions in the TS-850i and TS-860i
Start Guide.
2. Connect the Ethernet cable from the WAN port on the base to a LAN port on your router or
Ethernet switch. The TalkSwitch unit must be connected to the same LAN.
3. Install the TS-850i or TS-860i handset(s) and allow them to register with the base, according
to the instructions in the TS-850i and TS-860i Start Guide.
Configuring the TS-850i or TS-860i as an IP extension
After installing the TS-850i or TS-860i, configure your phone as an IP extension. The phone can
be located within the office, or outside the office (i.e. as an external IP extension).
Before configuring a phone, ensure that no handsets registered with the associated base are
being used. If a handset is on a call, the call will be terminated when the system resets the base
during configuration of the phone.
NOTE: The TS-850i requires version 6.11 or greater of the TalkSwitch Management software. The
TS-860i requires version 6.50 or greater.
Configuring the TS-850i or TS-860i for use within the office
If the TS-850i or TS-860i is located within the office, it connects to your TalkSwitch system over
the local area network (LAN).
1. Launch the TalkSwitch management software.
2. Select the Local Extensions/Fax page.
3. Click the Add button. The Add User / Extension window appears.
4. Set the Extension type to IP Extension.
5. In a multi-unit system, select the TalkSwitch unit the extension will be associated with. This
unit will hold the voicemail for the extension. Click Next.
ADDING IP PHONES TO TALKSWITCH 19
Page 24

6. Enter the user’s First Name and Last Name. The names are used for caller ID and the dial-by-
name directory.
7. Assign an Extension number.
8. Select TalkS witch as the Manufacturer, and then select the model.
9. Enter the MAC address of the phone:
• You can select the Phone MAC Address from a list of automatically-detected phones
connected to your LAN. To use this method:
i) Click the Select button. A MAC Selection window appears and lists TalkSwitch IP
phones of the selected type.
ii) Select the MAC address of the IP phone associated to the extension, and then click
Select.
• You can enter the Phone MAC Address manually. This is the required method if you are
setting up an external IP extension. The MAC Address is a 12-digit alphanumeric string
located in the barcode on the bottom of the phone and the box the phone came in.
Note that multiple IP extensions can share the same base.
ADDING IP PHONES TO TALKSWITCH 20
Page 25

10. Click Finish.
11. In the Extension tab, select the language for prompts heard by the user of the extension in
the System Prompt Language list. Setting the prompt language will also change the language
for text displayed on the phone itself.
12. Choose File > Save. The system will create a configuration file that the phone will download
when the phone is restarted.
IP extension details area
1. Set the Location. Choices are:
• Internal — The phone is an internal IP extension located within the office, and is
connected to the same LAN as the TalkSwitch unit.
• External — The phone is an external IP extension located outside the office, and is
connected to the TalkSwitch unit over the internet. See External IP extensions on page 2
Warning: Calls to an emergency service number using an external IP extension will not send
the correct address to the emergency operator. We strongly recommend that you apply a
warning label to any external IP extension stating:
If an emergency call is made from this phone, you must provide your address to the
emergency operator.
2. If you set Location to External, select the Time Zone that matches the location of the
IP phone.
3. Select the Handset ID for the extension. Use the handset name as shown on the
handset screen.
4. After configuring the extensions, choose File > Save. The TalkSwitch system will
automatically configure each handset.
Programming the TalkSwitch TS-850i or TS-860i IP phone as an external IP extension
If you are setting up an external IP extension, you must ensure there is a communication path
over the network between your phone and your TalkSwitch systsem. See Configuring the router
on page 2.
Before configuring a phone, ensure that no handsets registered with the associated base are
being used. If a handset is on a call, the call will be terminated when the system resets the base
during configuration of the phone.
1. In Idle mode, press the OK key on the handset to access the Main menu.
2. Choose Settings, and then press the OK key.
3. Choose Network settings, and then press the OK key.
4. Select Provision server, and then press the OK key.
5. Enter the Public IP address or FQDN (fully qualified domain name) of the TalkSwitch system
as provided by your administrator. To enter a period:
ADDING IP PHONES TO TALKSWITCH 21
Page 26

a) Press the Options softkey.
b) Choose Insert symbol, and then press the OK key.
c) Use the navigation keys to choose the period, and then press the OK key.
6. Press the Save softkey to accept the changes, and then press the Back key.
7. When prompted to reboot the base, select Yes. The TS-850i or TS-860i will automatically
download the configuration from the TalkSwitch system.
Using the TS-850i or TS-860i with a traditional phone line
NOTE: If you connected the telephone cable from the Line port on the base to the telephone wall
socket, you can use the TS-850i or TS-860i with a traditional phone line.
When connected to the traditional telephone network (PSTN) or to a TalkSwitch system as an
analog extension, FLASH is engaged by pressing the R# key on the TS-850i and the key on
the TS-860i. The key MUST be held for approximately 2 seconds until you connect to the other
caller (call waiting) or receive dial tone to initiate a calling feature.
Further configuration
The steps above will configure your TalkSwitch IP phone and will enable the programmable keys.
Click the Local Extension/Fax Help icons for instructions on configuring direct line access,
hunt group permissions, Caller ID settings (VoIP only), call handling, and voicemail.
For phone-specific configuration, refer to your phone user guide.
Contact your reseller or TalkSwitch Customer Support if you require further assistance with
special ports or network settings.
Checking and updating firmware
Occasionally, you may want to check and/or update the TS-850i or TS-860i firmware.
To check the firmware version:
1. In Idle mode, press the Increase Volume button on the left side of the handset. After a
brief delay the phone will display a System Status screen.
2. Press the down arrow button to show the second screen, which includes the firmware version
(next to the title "SW:").
NOTE: If your installation uses repeaters to extend the range of the handsets, turn the repeaters
off and bring the handsets within range of the bases before updating the firmware.
For instructions on obtaining firmware for your region and language, contact your Authorized
TalkSwitch reseller. If you purchased directly from TalkSwitch, visit http://
global.talkswitch.com to obtain further information or assistance.
For more information, refer to the Troubleshooting section in your phone user guide.
ADDING IP PHONES TO TALKSWITCH 22
Page 27

TALKSWITCH PHONE PROGRAMMABLE KEY FUNCTIONS
Many TalkSwitch IP phone models offer programmable keys. The function and associated
resources are assigned using TalkSwitch Management Software in the Local Extensions/Fax > IP
Extension Details > Configure Keys page. Supported functions for a phone model typically
include most of the items listed below.
• Line appearance — Select a telephone line or VoIP number as the resource. The
corresponding button or softkey will display the status of the line, and allow you to make
calls with a single press of the button or softkey.
For phones equipped with button lights, the button will light up when the line is in use,
flash if the line is ringing, or be off when the line is available.
For phones with softkeys, a status icon and line ID will be displayed beside the softkey.
The display will show an off-hook icon when the line is in use, show a ringing icon when the
line is ringing, and show an on-hook icon when the line is available.
• Extension appearance — Select a local extension as the resource.
The corresponding button or softkey will display the status of the selected extension, and
allow you to call the extension with a single press of the button or softkey.
For phones equipped with button lights, the button will light up when the selected
extension is in use, flash if the extension is ringing, or be off when the extension is
available.
For phones with softkeys, a status icon and extension call ID will be displayed beside the
softkey. The display will show an off-hook icon when the selected extension is in use, show
a ringing icon when the extension is ringing, and show an on-hook icon when the extension
is available. The extension call ID is also be displayed.
• Queue appearance — Select a local extension as the resource. The corresponding button or
softkey will indicate whether calls are queued at the selected extension, and allow you to
pick up the oldest queued call with a single press of the button or softkey.
For phones equipped with button lights, the button will flash if calls are queued for the
extension, or be off when there are no queued calls.
For phones with softkeys, a status icon, extension number and “Q” will be displayed beside
the softkey. The display will show a ringing icon if calls are queued for the extension, or an
on-hook icon when there are no queued calls.
• Voicemail — Do not select a resource. Press the button or softkey to access the voice mailbox
of the local extension. Lights or icons are not used for voicemail keys. Note: You can also
access Voicemail by pressing **#.
• DND — Do not select a resource. Press the button or softkey to toggle Do Not Disturb mode
on or off. Lights or icons are not used for DND keys. Note: You can also toggle DND mode by
pressing *62#.
• Park — Do not select a resource. Press the button or softkey to put the call on hold, in the
next available park orbit. The system will respond with the park orbit number (500 to 509).
Lights or icons are not used for Park keys. Note: You can also Park a call by pressing
*510# on a TS-350i, or *510# on a TS-450i or TS-550i, or *510# on a TS-9112i,
TS-9133i or TS-480i.
• Un-park — Do not select a resource. Press the button or softkey, select the park orbit
number (500 to 509), then press Unpark to retrieve the call. Softkey displays will show the
parked call ID beside the orbit number. Lights or icons are not used for Unpark keys. Note:
You can also Unpark a call by lifting the handset, pressing **, dialing the park orbit
number, then pressing #.
ADDING IP PHONES TO TALKSWITCH 23
Page 28

• Pickup any — Do not select a resource. Press the button or softkey to answer a call from an
outside number ringing any extension. Lights or icons are not used for Pickup keys. Note:
You can also pick up a call by pressing *9#.
• Pickup ext — Do not select a resource. Press the button or softkey, dial an extension, then
dial # (or softkey again) to answer a call from an outside number or extension ringing the
selected extension. Lights or icons are not used for Pickup keys. Note: You can also pick up
a call at a selected extension by pressing *7, dialing the extension, then pressing #.
• Intercom page — Do not select a resource. Press the button or softkey, dial an extension,
then press # to page the extension in Intercom mode. The intercom page function can only
page TalkSwitch phones. Lights or icons are not used for Page keys. Note: You can also page
a TalkSwitch phone by pressing *84, dialing the extension, then pressing #, or the Dial key
or softkey.
• Overhead page — Do not select a resource. Press the button or softkey to connect to an
attached external PA system. Lights or icons are not used for Page keys. Note: You can also
page the external PA system by pressing *0#.
• Queue (show list) — Do not select a resource. Press the Queue softkey, select a queued call,
then press Retrieve to connect to the selected call. This function is only available when
programmed as a function key on supported phone models (e.g. TS-480i).
• Phone book access — Select the phone book record two-digit speed dial number as the
resource. Press the button or softkey to place a call using the contact information from the
associated phone book record. When the button is pressed, it will light up for the duration
of the call. This function is available on the TS-350i, TS-450i and TS-550i models.
• User Defined (phone) — The button or softkey function is assigned using the phone's
configuration options, and is not assigned using TalkSwitch Management software.
• None — The button or softkey is not programmed.
ADDING IP PHONES TO TALKSWITCH 24
Page 29

ADDING POLYCOM IP PHONES
Adding a Polycom phone to the TalkSwitch system configuration
1. Launch the TalkSwitch management software.
2. Select the Local Extension/Fax page.
3. Click the Add button. The Add User / Extension window appears.
4. Set the Extension type to IP Extension.
5. In a multi-unit system, select the TalkSwitch unit the extension will be associated with. This
unit will hold the voicemail for the extension. Click Next.
6. Enter the user’s First Name and Last Name. The names are used for caller ID and the dial-by-
name directory.
7. Assign an Extension number.
8. Select Polycom as the Phone type, and then select the model.
ADDING IP PHONES TO TALKSWITCH 25
Page 30

9. Enter the MAC address of the phone. The MAC Address is a 12-digit alphanumeric string
located in the barcode on the bottom of the phone and the box the phone came in.
Click Finish.
10. In the Extension tab, select the language for prompts heard by the user of the extension in
the System Prompt Language list. Setting the prompt language will also change the language
for text displayed on the phone itself.
11. Choose File > Save. The system will create a configuration file that the phone will download
when the phone is restarted.
IP extension details area
1. Set the Location. Choices are:
• Internal — The phone is an internal IP extension located within the office, and is
connected to the same LAN as the TalkSwitch unit.
• External — The phone is an external IP extension located outside the office, and is
connected to the TalkSwitch unit over the internet. A VoIP-enabled TalkSwitch unit
is required.
Warning: Calls to an emergency service number using an external IP extension will not send
the correct address to the emergency operator. We strongly recommend that you apply a
warning label to any external IP extension stating:
If an emergency call is made from this phone, you must provide your address to the
emergency operator.
2. If you are setting up an external IP extension, select the Time Zone of the IP phone.
3. Choose File > Save. The system will create a configuration file that the phone will download
when the phone is restarted.
Configuring the system for external IP extensions
If you are setting up an external IP extension:
1. Ensure your TalkSwitch system is connected to a network.
2. Ensure that you have set up a public IP address for the TalkSwitch system.
3. Ensure the router is configured at the TalkSwitch location. There should be no need to make
any adjustments to the firewall at the remote location.
4. All VoIP lines are shared by default. You can also reserve VoIP lines for external IP
extensions.
ADDING IP PHONES TO TALKSWITCH 26
Page 31

5. External IP extensions will use the preferred codec selected for the TalkSwitch profile. The
default preferred codec is G.729. You can select a different preferred codec for the
TalkSwitch profile.
Configuring the router
If you are setting up an external IP extension, you must ensure the router is configured.
The Router Port Forwarding area of the IP Configuration page displays the type of gateway
device (i.e. the type of router), the IP address of the gateway (i.e. router), and whether router
configuration is required.
A router is a gateway between the local area network and the Internet. Most routers have a
firewall to block unwanted data from the Internet. For voice data to reach the TalkSwitch system
through the firewall, port forwarding is required. Port forwarding allows the router to map ports
to the IP addresses of the TalkSwitch units. Valid Internet data will use the ports to go through
the firewall to the TalkSwitch units.
If you are setting up external IP extensions, a TalkSwitch VoIP network, or a VoIP service that
doesn’t handle port forwarding, port forwarding is required.
If port forwarding is required, and your router supports uPNP (Universal Plug and Play), ensure
uPNP is enabled. The TalkSwitch system will use uPNP to automatically set up port forwarding,
and the Automatic (uPNP Enabled) link will appear. No router configuration is required.
If port forwarding is required but your router doesn’t support uPNP, or automatic port
forwarding doesn’t work, the Manual Port Mapping Required link will appear. You will need to
configure the router as described below.
1. Select the IP Configuration page.
2. If required, click the Manual Port Mapping Required link. The Manual Port Mapping
window appears. It lists the packet type, port number, IP address and protocol of each
required port.
3. To access the router configuration:
a) Click the link containing the IP address of the gateway. The default browser starts, and
prompts you for the router’s user name and password.
b) Enter the router’s user name and password. The browser shows a setup screen.
c) Navigate to the screen used to set up port forwarding. See your router documentation.
ADDING IP PHONES TO TALKSWITCH 27
Page 32

d) Set up port forwarding using the information from the Manual Port Mapping window.
See your router documentation for instructions on how to map ports. For information on
configuring routers and mapping ports, visit www.portforward.com/english/routers/
port_forwarding/routerindex.htm.
4. To check the status of each port through the firewall, click Check Firewall. The Firewall
Test window appears.
5. Select the services you want to check.
6. Click Test Ports. The system will check the ports for the selected services.
Configuring the router manually
If you cannot access the router configuration through the IP Configuration page, configure the
router manually.
1. Open the router configuration and navigate to the screen used to set up port forwarding.
See your router documentation.
2. Map port 5060 (Type: UDP) to the TalkSwitch unit acting as local proxy. Port 5060 is the
default port for forwarding SIP signaling data to the TalkSwitch system.
If required, you can map a different port. In this case, enter the port in the SIP signalling
port box of the VoIP Settings window.
3. Map the following ports (Type: UDP) to the TalkSwitch units. These RTP ports forward voice
traffic to the TalkSwitch system by default.
VoIP Lines/Unit Unit 1 Unit 2 Unit 3 Unit 4
4 6000–6006 6010–6016 6020–6026 6030–6036
8 6100–6114 6200–6214 6300–6314 6400–6414
If required, you can map different ports. In this case enter the first port in the Starting RTP
port box of the VoIP Settings window.
4. Map port 69 (Type: UDP) to the TalkSwitch unit acting as local proxy. Port 69 allows the
TalkSwitch system to configure external IP extensions.
5. Map port 9393 (Type: TCP) to the TalkSwitch unit acting as local proxy. Port 9393 allows
remote configuration of the TalkSwitch system.
ADDING IP PHONES TO TALKSWITCH 28
Page 33

6. If available, enable Quality of Service (QoS) to give voice traffic priority over data.
7. Save the configuration to the router.
Connecting the Polycom phone to the network
1. Connect a network cable between your router and the port marked LAN on the back of the
phone. The PC port on the phone can be used to connect the PC if only one LAN port
is available.
2. Connect the power adapter to the phone.
Confirming the Polycom firmware version
The TalkSwitch system requires the IP phone to have a specific firmware version.
1. Check the required firmware version from http://global.talkswitch.com.
2. Confirm the firmware version currently installed the IP phone. On the phone:
a) Press the Menu key and select Status > Platform > Application > Main.
b) Compare Vers ion to the required firmware version. If the firmware version is the same,
proceed to Programming the Polycom IP phone. If not, follow the instructions in
Updating the Polycom firmware on page 30.
Programming the Polycom IP phone
The TalkSwitch system automatically configures the necessary parameters required for the
proper operation of the Polycom phone with TalkSwitch. On the phone:
1. Press the Menu key and select Settings > Advanced.
2. Enter the password, and then press the Enter key. By default this is 456. When the
TalkSwitch unit configures the phone, it changes the password to 23646 (which spells
“admin” on the telephone keypad).
3. Select Admin Settings > Network Configuration.
4. Select Server Menu and change ServerType to TrivialFTP.
5. Select Server Address and press the Edit key. Press the 1/A/a key. If you are setting up an
internal IP extension, enter the IP address of the TalkSwitch unit acting as local proxy. If
you are setting up an external IP extension, enter the public IP address or FQDN of the
TalkSwitch system. Use the * key to enter decimal points.
6. Press the Exit button three times. Advanced appears at the top of the menu.
7. Select Restart Phone and confirm by selecting Yes.
The phone connects to the TalkSwitch local proxy and downloads the configuration file. If the
configuration is successful, the phone will reboot and show the time, date and extension
number. To ensure full functionality, dial another extension and check the audio transmission in
both directions.
Further configuration
The steps above will configure your Polycom IP phone as a local extension. For more
information, refer to the Troubleshooting section in your phone user guide.
ADDING IP PHONES TO TALKSWITCH 29
Page 34

See Local Extension/Fax in Chapter 2 of the TalkSwitch User Guide for instructions on configuring
direct line access, hunt group permissions, Caller ID settings (VoIP only), call handling,
and voicemail.
Updating the Polycom firmware
This procedure is only required if you need to update the Polycom firmware. To update
the firmware:
• Install a TFTP application.
• Download and extract firmware files.
• Configure the phone to point to the firmware files.
Installing a TFTP application
You require a TFTP server application to update the phone firmware. One such free TFTP utility
can be downloaded from Solarwinds at the following URL:
http://support.solarwinds.net/updates/New-customerFree.cfm?ProdId=52
1. Download and install the TFTP program.
2. Take note of the location of the TFTP program root directory location. The phone firmware
files are extracted to this directory in the next section. (i.e. for Solarwinds TFTP, the root
directory is C:\TFTP-Root).
Downloading and extracting firmware files
Firmware files for supported IP phones can be found at http://global.talkswitch.com.
1. Download the firmware file required for your phone from the URL above. The files are
contained in ZIP archives.
2. Extract the firmware files into the TFTP program root directory location.
Configuring the phone to point to the firmware files
Changing the phone Server Address setting to the IP address of the PC with the TFTP program
and the firmware files enables the update process. On the phone:
1. Press the Menu key and select Settings > Advanced.
2. Enter the password, and then press the Enter key. By default this is 456. When the
TalkSwitch unit configures the phone, it changes the password to 23646 (which spells
“admin” on the telephone keypad).
3. Select Admin Settings > Network Settings.
4. Select Server Menu and change ServerType to TrivialFTP.
5. Select Server Address and press the Edit key. Press the 1/A/a key and enter the IP address
of the PC running the TFTP server, using the * key to enter decimal points.
6. Press the Exit button three times. Advanced appears at the top of the menu.
7. Press 3 for Restart Phone and confirm by pressing the Yes button.
ADDING IP PHONES TO TALKSWITCH 30
Page 35

8. Once the firmware is updated, reconfigure the phone according to Programming the Polycom
IP phone on page 29. Note that some errors will occur for files not found. These are expected
and can be ignored.
For more information, refer to the Troubleshooting section in your phone user guide.
ADDING IP PHONES TO TALKSWITCH 31
Page 36

ADDING GRANDSTREAM IP PHONES
Adding a Grandstream phone to the TalkSwitch system configuration
1. Launch the TalkSwitch management software.
2. Select the Local Extension/Fax page.
3. Click the Add button. The Add User / Extension window appears.
4. Set the Extension type to IP Extension.
5. In a multi-unit system, select the TalkSwitch unit the extension will be associated with. This
unit will hold the voicemail for the extension. Click Next.
6. Enter the user’s First Name and Last Name. The names are used for caller ID and the dial-by-
name directory.
7. Assign an Extension number.
8. Select Grandstream as the Phone type.
ADDING IP PHONES TO TALKSWITCH 32
Page 37

9. Enter the MAC address of the phone. The MAC Address is a 12-digit alphanumeric string
located in the barcode on the bottom of the phone and the box the phone came in.
Click Finish.
10. In the Extension tab, select the language for prompts heard by the user of the extension in
the System Prompt Language list. Setting the prompt language will also change the language
for text displayed on the phone itself.
11. Choose File > Save. The system will create a configuration file that the phone will download
when the phone is restarted.
IP extension details area
1. Set the Location. Choices are:
• Internal — The phone is an internal IP extension located within the office, and is
connected to the same LAN as the TalkSwitch unit.
• External — The phone is an external IP extension located outside the office, and is
connected to the TalkSwitch unit over the internet. A VoIP-enabled TalkSwitch unit
is required.
Warning: Using an external IP extension to call an emergency service number will not send
the correct address to the emergency operator. We strongly recommend that you apply a
warning label to any external IP extension stating:
If an emergency call is made from this phone, you must provide your address to the
emergency operator.
2. If you are setting up an external IP extension, select the Time Zone of the IP phone.
3. Choose File > Save. The system will create a configuration file that the phone will download
when the phone is restarted.
Configuring the system for external IP extensions
If you are setting up an external IP extension:
1. Ensure your TalkSwitch system is connected to a network.
2. Ensure that you have set up a public IP address for the TalkSwitch system.
3. Ensure the router is configured at the TalkSwitch location. There should be no need to make
any adjustments to the firewall at the remote location.
ADDING IP PHONES TO TALKSWITCH 33
Page 38

4. All VoIP lines are shared by default. You can also reserve VoIP lines for external IP
extensions.
5. External IP extensions will use the preferred codec selected for the TalkSwitch profile. The
default preferred codec is G.729. You can select a different preferred codec for the
TalkSwitch profile.
Configuring the router
If you are setting up an external IP extension, you must ensure the router is configured.
The Router Port Forwarding area of the IP Configuration page displays the type of gateway
device (i.e. the type of router), the IP address of the gateway (i.e. router), and whether router
configuration is required.
A router is a gateway between the local area network and the Internet. Most routers have a
firewall to block unwanted data from the Internet. For voice data to reach the TalkSwitch system
through the firewall, port forwarding is required. Port forwarding allows the router to map ports
to the IP addresses of the TalkSwitch units. Valid Internet data will use the ports to go through
the firewall to the TalkSwitch units.
If you are setting up external IP extensions, a TalkSwitch VoIP network, or a VoIP service that
doesn’t handle port forwarding, port forwarding is required.
If port forwarding is required, and your router supports uPNP (Universal Plug and Play), ensure
uPNP is enabled. The TalkSwitch system will use uPNP to automatically set up port forwarding,
and the Automatic (uPNP Enabled) link will appear. No router configuration is required.
If port forwarding is required but your router doesn’t support uPNP, or automatic port
forwarding doesn’t work, the Manual Port Mapping Required link will appear. You will need to
configure the router as described below.
1. Select the IP Configuration page.
2. If required, click the Manual Port Mapping Required link. The Manual Port Mapping
window appears. It lists the packet type, port number, IP address and protocol of each
required port.
3. To access the router configuration:
a) Click the link containing the IP address of the gateway. The default browser starts, and
prompts you for the router’s user name and password.
b) Enter the router’s user name and password. The browser shows a setup screen.
ADDING IP PHONES TO TALKSWITCH 34
Page 39

c) Navigate to the screen used to set up port forwarding. See your router documentation.
d) Set up port forwarding using the information from the Manual Port Mapping window.
See your router documentation for instructions on how to map ports. For information on
configuring routers and mapping ports, visit www.portforward.com/english/routers/
port_forwarding/routerindex.htm.
4. To check the status of each port through the firewall, click Check Firewall. The Firewall
Test window appears.
5. Select the services you want to check.
6. Click Test Ports. The system will check the ports for the selected services.
Configuring the router manually
If you cannot access the router configuration through the IP Configuration page, configure the
router manually.
1. Open the router configuration and navigate to the screen used to set up port forwarding.
See your router documentation.
2. Map port 5060 (Type: UDP) to the TalkSwitch unit acting as local proxy. Port 5060 is the
default port for forwarding SIP signaling data to the TalkSwitch system.
If required, you can map a different port. In this case, enter the port in the SIP signalling
port box of the VoIP Settings window.
3. Map the following ports (Type: UDP) to the TalkSwitch units. These RTP ports forward voice
traffic to the TalkSwitch system by default.
VoIP Lines/Unit Unit 1 Unit 2 Unit 3 Unit 4
4 6000–6006 6010–6016 6020–6026 6030–6036
8 6100–6114 6200–6214 6300–6314 6400–6414
If required, you can map different ports. In this case enter the first port in the Starting RTP
port box of the VoIP Settings window.
4. Map port 69 (Type: UDP) to the TalkSwitch unit acting as local proxy. Port 69 allows the
TalkSwitch system to configure external IP extensions.
ADDING IP PHONES TO TALKSWITCH 35
Page 40

5. Map port 9393 (Type: TCP) to the TalkSwitch unit acting as local proxy. Port 9393 allows
remote configuration of the TalkSwitch system.
6. If available, enable Quality of Service (QoS) to give voice traffic priority over data.
7. Save the configuration to the router.
Connecting the Grandstream phone to the network
1. Connect a network cable between your router and the port marked LAN on the back of the
phone. The PC port on the phone can be used to connect the PC if only one LAN port
is available.
2. Connect the power adapter to the phone.
3. Once the phone boots up, it will attempt to obtain an IP address from a router DHCP server.
Confirming the Grandstream firmware version
The TalkSwitch system requires the IP phone to have a certain firmware version.
1. Check the required firmware version at http://global.talkswitch.com.
2. Confirm the firmware version currently installed the IP phone. On the phone:
a) Press the round key (surrounded by four arrow keys) to access the menu.
b) Select Status and press the round key again.
c) Scroll down until you see Prog.
d) Compare Prog to the required firmware version. If the firmware version is the same,
proceed to Programming a Grandstream IP phone. If not, follow the instructions in
Updating the Grandstream firmware on page 37.
Programming a Grandstream IP phone
1. Note the IP address that appears on the screen of the Grandstream phone.
2. In a web browser, enter the IP address in the Address field.
3. Enter the password. By default this is admin. When the TalkSwitch unit configures the
phone, it changes the password to 23646 (which spells “admin” on the telephone keypad).
The Grandstream Device Configuration page appears.
4. On the Grandstream Device Configuration page, click Advanced.
5. In the section for Firmware Upgrade and Provisioning, set Upgrade Via to TFTP.
6. If you are setting up an internal IP extension, set Config Server Path to the IP address of the
TalkSwitch unit acting as local proxy. If you are setting up an external IP extension, set
Config Server Path to the public IP address or FQDN of the TalkSwitch system.
ADDING IP PHONES TO TALKSWITCH 36
Page 41

7. Scroll to the bottom of the page and click the Update button to save the settings.
8. On the following screen, click the Reboot button to apply the settings.
Note: The reboot process will be completed when you see the extension number and IP
address on the display of the phone. When the phone successfully registers, you will see the
filled-in Ethernet icon.
9. Test to ensure the phone is configured properly by dialing another local extension.
Further configuration
The steps above will configure your Grandstream IP phone as a local extension. For more
information, refer to the Troubleshooting section in your phone user guide.
See Local Extension/Fax in Chapter 2 of the TalkSwitch User Guide for instructions on configuring
direct line access, hunt group permissions, Caller ID settings (VoIP only), call handling,
and voicemail.
Updating the Grandstream firmware
This procedure is only required if you need to update the Grandstream firmware. To update
the firmware:
• Install a TFTP application.
• Download and extract firmware files.
• Configure the phone to point to the firmware files.
Installing a TFTP application
You require a TFTP server application to update the phone firmware. One such free TFTP utility
can be downloaded from Solarwinds at the following URL:
http://support.solarwinds.net/updates/New-customerFree.cfm?ProdId=52
1. Download and install the TFTP program.
2. Take note of the location of the TFTP program root directory location. The phone firmware
files are extracted to this directory in the next section. (i.e. for Solarwinds TFTP, the root
directory is C:\TFTP-Root).
ADDING IP PHONES TO TALKSWITCH 37
Page 42

Downloading and extracting firmware files
Firmware files for supported IP phones can be found at http://global.talkswitch.com.
1. Download the firmware file required for your phone from the URL above. The files are
contained in ZIP archives.
2. Extract the firmware files into the TFTP program root directory location.
Configuring the phone to point to the firmware files
Changing the phone Firmware Server Path setting to the IP address of the PC with the TFTP
program and the firmware files enables the update process.
1. Note the IP address that appears on the screen of the Grandstream phone.
2. In a web browser, enter the IP address in the Address field.
3. Enter the password. By default this is admin. When the TalkSwitch unit configures the
phone, it changes the password to 23646 (which spells “admin” on the telephone keypad).
The Grandstream Device Configuration page appears.
4. On the Grandstream Device Configuration page, click Advanced.
5. In the section for Firmware Upgrade and Provisioning, set Upgrade Via to TFTP.
6. Set Firmware Server Path to the IP address of the PC running the TFTP server.
7. Scroll to the bottom of the page and click the Update button to save the settings.
8. On the following screen, click the Reboot button to apply the settings.
ADDING IP PHONES TO TALKSWITCH 38
Page 43

ADDING COUNTERPATH IP PHONES
Adding a Counterpath phone to the TalkSwitch system configuration
1. Launch the TalkSwitch management software.
2. Select the Local Extension/Fax page.
3. Click the Add button. The Add User / Extension window appears.
4. Set the Extension type to IP Extension.
5. In a multi-unit system, select the TalkSwitch unit the extension will be associated with. This
unit will hold the voicemail for the extension. Click Next.
6. Enter the user’s First Name and Last Name. The names are used for caller ID and the dial-by-
name directory.
7. Assign an Extension number.
8. Select Counterpath as the Phone type.
Click Finish.
9. In the Extension tab, select the language for prompts heard by the user of the extension in
the System Prompt Language list. Setting the prompt language will also change the language
for text displayed on the phone itself.
ADDING IP PHONES TO TALKSWITCH 39
Page 44

10. Choose File > Save. The system will create a configuration file that the phone will download
when the phone is restarted.
IP extension details area
1. Set the Location. Choices are:
• Internal — The phone is an internal IP extension located within the office, and is
connected to the same LAN as the TalkSwitch unit.
• External — The phone is an external IP extension located outside the office, and is
connected to the TalkSwitch unit over the internet. A VoIP-enabled TalkSwitch unit
is required.
• Both — The phone can be used as an internal or external IP extension. A VoIP-enabled
TalkSwitch unit is required.
Warning: Using an external IP extension to call an emergency service number will not send
the correct address to the emergency operator. We strongly recommend that you apply a
warning label to any external IP extension stating:
If an emergency call is made from this phone, you must provide your address to the
emergency operator.
2. If the phone can be used as an external IP extension, select the Time Zone of the IP phone.
3. Enter the Username and Password. The default settings are user[extension number] and
pass[extension number].
4. Choose File > Save. The system will create a configuration file that the phone will download
when the phone is restarted.
Configuring the system for external IP extensions
If you are setting up an external IP extension:
1. Ensure your TalkSwitch system is connected to a network.
2. Ensure that you have set up a public IP address for the TalkSwitch system.
3. Ensure the router is configured at the TalkSwitch location. There should be no need to make
any adjustments to the firewall at the remote location.
4. All VoIP lines are shared by default. You can also reserve VoIP lines for external IP
extensions.
5. External IP extensions will use the preferred codec selected for the TalkSwitch profile. The
default preferred codec is G.729. You can select a different preferred codec for the
TalkSwitch profile.
ADDING IP PHONES TO TALKSWITCH 40
Page 45

Configuring the router
If you are setting up an external IP extension, you must ensure the router is configured.
The Router Port Forwarding area of the IP Configuration page displays the type of gateway
device (i.e. the type of router), the IP address of the gateway (i.e. router), and whether router
configuration is required.
A router is a gateway between the local area network and the Internet. Most routers have a
firewall to block unwanted data from the Internet. For voice data to reach the TalkSwitch system
through the firewall, port forwarding is required. Port forwarding allows the router to map ports
to the IP addresses of the TalkSwitch units. Valid Internet data will use the ports to go through
the firewall to the TalkSwitch units.
If you are setting up external IP extensions, a TalkSwitch VoIP network, or a VoIP service that
doesn’t handle port forwarding, port forwarding is required.
If port forwarding is required, and your router supports uPNP (Universal Plug and Play), ensure
uPNP is enabled. The TalkSwitch system will use uPNP to automatically set up port forwarding,
and the Automatic (uPNP Enabled) link will appear. No router configuration is required.
If port forwarding is required but your router doesn’t support uPNP, or automatic port
forwarding doesn’t work, the Manual Port Mapping Required link will appear. You will need to
configure the router as described below.
1. Select the IP Configuration page.
2. If required, click the Manual Port Mapping Required link. The Manual Port Mapping
window appears. It lists the packet type, port number, IP address and protocol of each
required port.
3. To access the router configuration:
a) Click the link containing the IP address of the gateway. The default browser starts, and
prompts you for the router’s user name and password.
b) Enter the router’s user name and password. The browser shows a setup screen.
c) Navigate to the screen used to set up port forwarding. See your router documentation.
d) Set up port forwarding using the information from the Manual Port Mapping window.
See your router documentation for instructions on how to map ports. For information on
configuring routers and mapping ports, visit www.portforward.com/english/routers/
port_forwarding/routerindex.htm.
ADDING IP PHONES TO TALKSWITCH 41
Page 46

4. To check the status of each port through the firewall, click Check Firewall. The Firewall
Test window appears.
5. Select the services you want to check.
6. Click Test Ports. The system will check the ports for the selected services.
Configuring the router manually
If you cannot access the router configuration through the IP Configuration page, configure the
router manually.
1. Open the router configuration and navigate to the screen used to set up port forwarding.
See your router documentation.
2. Map port 5060 (Type: UDP) to the TalkSwitch unit acting as local proxy. Port 5060 is the
default port for forwarding SIP signaling data to the TalkSwitch system.
If required, you can map a different port. In this case, enter the port in the SIP signalling
port box of the VoIP Settings window.
3. Map the following ports (Type: UDP) to the TalkSwitch units. These RTP ports forward voice
traffic to the TalkSwitch system by default.
VoIP Lines/Unit Unit 1 Unit 2 Unit 3 Unit 4
4 6000–6006 6010–6016 6020–6026 6030–6036
8 6100–6114 6200–6214 6300–6314 6400–6414
If required, you can map different ports. In this case enter the first port in the Starting RTP
port box of the VoIP Settings window.
4. Map port 69 (Type: UDP) to the TalkSwitch unit acting as local proxy. Port 69 allows the
TalkSwitch system to configure external IP extensions.
5. Map port 9393 (Type: TCP) to the TalkSwitch unit acting as local proxy. Port 9393 allows
remote configuration of the TalkSwitch system.
6. If available, enable Quality of Service (QoS) to give voice traffic priority over data.
7. Save the configuration to the router.
ADDING IP PHONES TO TALKSWITCH 42
Page 47

Configuring a new SIP account
The following procedure describes setting up the eyeBeam software to register on the network
and to make itself available as a client for sending and receiving calls.
1. Install the eyeBeam software. The SIP Accounts window appears.
2. Click the Add button. The Properties of Account1 window appears.
3. Enter the User Details in the Account tab.
a) Set the Display Name to the name for Caller ID.
b) Set the User name to the local extension number.
c) Set the Password to the Password set up in step 3 of IP extension details area on page 40.
d) Set the Authorization user name to the Username set up in step 3 of IP extension details
area on page 40.
ADDING IP PHONES TO TALKSWITCH 43
Page 48

e) If setting up an internal IP extension, set Domain to the IP address of the TalkSwitch
unit acting as local proxy. If setting up an external IP extension, set Domain to the
public IP address or FQDN (Fully Qualified Domain Name) of the TalkSwitch system.
4. Set up the Domain Proxy area in the Account tab.
a) Select the Register with domain and receive incoming calls check box.
b) Select the target domain option.
5. Set up the Voicemail tab.
a) Select Check for voice mail.
b) Enter ** in the Number to dial for checking voicemail field.
c) Enter *<voicemail number> in the Number for sending calls to voicemail field.
6. Click OK to save settings and close the Properties of Account1 window.
7. Click Close to close the SIP Accounts window and enable the newly configured SIP account.
Once closed, the phone display will show:
• Discovering network…
•Registering…
• Ready, Your username is: [local extension number].
Further configuration
The steps above will configure your Counterpath phone as a local extension.
See Local Extension/Fax in Chapter 2 of the TalkSwitch User Guide for instructions on configuring
direct line access, hunt group permissions, Caller ID settings (VoIP only), call handling, and
voicemail.
Updating eyeBeam software
The latest release of eyeBeam can be found at www.counterpath.net/eyebeam.html
ADDING IP PHONES TO TALKSWITCH 44
Page 49

ADDING OTHER IP PHONES
Other IP phones with the G.711 codec may work with TalkSwitch but not all features may be
supported. We strongly recommend you use only the IP phones supported by TalkSwitch.
If you connect an unsupported IP phone, select Other as the Manufacturer. As TalkSwitch cannot
enable features, or customizations of these phones, further configuration will be limited to the
programmable options on the IP phone itself.
Refer to the specific IP phone user guide’s details for information on configuration.
ADDING IP PHONES TO TALKSWITCH 45
 Loading...