

Page 1

NETWORKING TALKSWITCH 48-CAs/48-CVAs
1. ATTACH TALKSWITCH UNITS TO A LAN
Connect your TalkSwitch 48-CA and/or 48-CVA units to a Local Area Network (LAN)
using one of the following methods:
NOTE: TalkSwitch unit enclosures are not designed for stacking. We recommend
wall-mounting units in a horizontal row to maximize airflow and keep the units from
overheating.
Option #1: Ethernet Switch
We recommend integrating your phone system into your existing LAN or running
TalkSwitch on its own LAN with an Ethernet switch. A switch provides direct communication between TalkSwitch units, thus keeping the TalkSwitch voice over LAN data
isolated from other data on the network.
Step A
Connect up to four TalkSwitch 48-CA and/or 48-CVA units (2 are shown here) to the
LAN switch.
Step B
Make sure a computer is connected to the phone system either via the LAN or directly
from the computer to the TalkSwitch through the USB or Serial port.
WWW.TALKSWITCH.COM 1
TALKSWITCH QUICK GUIDE
NETWORKING
TALKSWITCH
48-CAs/48-CVAs
CT.TS005.516.EN – 02
Serial
LAN
E4
TalkSwitch (unitID 1)
TalkSwitch (unitID 2)
Switch
PC running
TalkSwitch
Software
Phone
handset
USB
Page 2
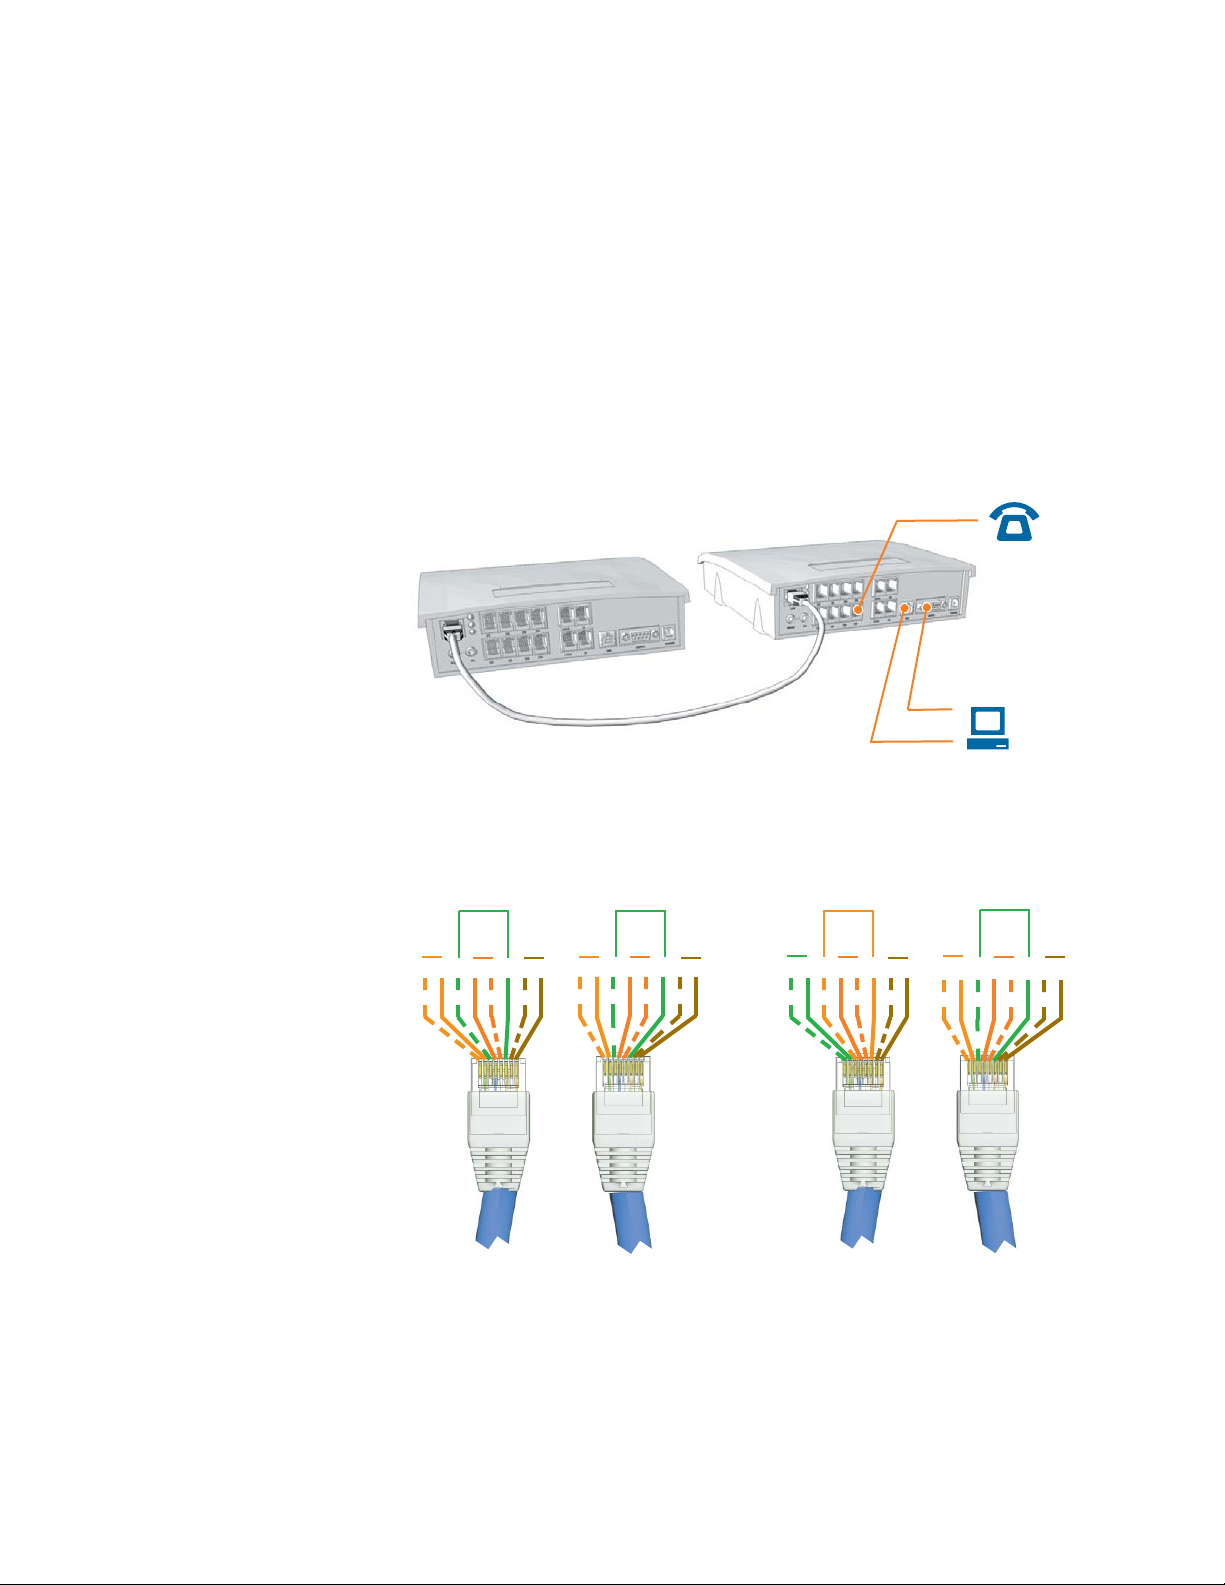
Option #2: Crossover Cable
If you plan to network only two TalkSwitch units, it is possible to network them via a
LAN crossover cable.
Step A
Connect the two TalkSwitch 48-CA and/or 48-CVA units with a crossover cable. Make
sure you are using a crossover cable and not a regular LAN cable — see diagram.
Step B
Make sure a computer is connected to the phone system either via the USB or Serial port.
WWW.TALKSWITCH.COM 2
NETWORKING TALKSWITCH 48-CAs/48-CVAs
Serial
E4
TalkSwitch (unitID 1)
TalkSwitch (unitID 2)
Crossover Cable
PC running
TalkSwitch Software
Phone handset
USB
Green
1234567
8
Blue
Brown
Orange
Orange
1234567
8
Blue
Brown
Green
Orange
1234567
8
Blue
Brown
Green
Orange
1234567
8
Blue
Brown
Green
SSttrraaiigghhtt tthhrroouugghh ccaabbllee::
Notice how both ends are identical
CCrroossssoovveerr ccaabbllee::
The ends are different. Pins 1 & 3 are reversed,
and pins 2 & 6 are reversed.
LLAANN CCaabblleess :: SSttrraaiigghhtt tthhrroouugghh aanndd CCrroossssoovveerr
Page 3

2. POWER UP ALLTALKSWITCH UNITS
Connect the AC adapters to each TalkSwitch unit and turn the unit on by pressing the
power button on the front of each unit. The lights on the front of the TalkSwitch
units will be flashing. This means that they are powered up, and connected to the
LAN, but their ID numbers conflict. Changing the unit ID numbers will resolve this.
See step 3 next.
3. CHANGING TALKSWITCH UNIT ID’S
What is a unit ID?
Each TalkSwitch unit identifies itself on the network with their unit ID number.
A conflict will arise if two units on the LAN have the same ID number. To avoid this
conflict, each unit's ID must be set to a unique number between 1 and 4. All units
shipped from the manufacturer will have been given ID number 1.
Use a phone to set the unit ID numbers
It is convenient to identify the second TalkSwitch on the LAN as ID 2, the third
TalkSwitch as ID 3 etc. The first TalkSwitch unit on the LAN does not need to be changed
as it's ID is already set at ID 1. Change the ID number for each of the remaining units on
the LAN by following these steps:
Step A
Connect a phone to jack E4 of TalkSwitch unit 2. (see diagram on previous page)
Step B
Make sure the TalkSwitch is on. If it is not, connect the AC adapter and turn the
power button on at the front of the unit.
Step C
Lift the phone handset, you should hear a system prompt indicating that there is a
conflict and a new unit ID needs to be chosen.
Step D
Select an available unit ID, such as 2 for TalkSwitch unit 2. Once the unit ID has been
accepted, the lights on the front panel will stop flashing.
Step E
Repeat the steps again for each additional TalkSwitch unit.
WWW.TALKSWITCH.COM 3
NETWORKING TALKSWITCH 48-CAs/48-CVAs
Page 4

Numbering for each unit on the LAN
After successfully changing each unit ID to a unique number, each unit can be identified
by the network. More importantly each local extension, remote extension, and voice
mailbox, has a unique numbering system where the second digit in the three digit
identifier becomes the unit ID number. See the table below.
TalkSwitch Numbering Scheme for Networked Units
Unit ID 1 Unit ID 2 Unit ID 3 Unit ID 4
Local Extensions 111-118 121-128 131-138 141-148
Remote Extensions 211-218 221-228 231-238 241-248
Local Mailboxes 111-118 121-128 131-138 141-148
Remote Mailboxes 211-218 221-228 231-238 241-248
General Mailboxes 410-419 420-429 430-439 440-449
4. INSTALL YOUR TALKSWITCH SOFTWARE
Install the TalkSwitch software on your PC. If you have not done so, you may follow
the instructions on the CD or see the “TalkSwitch User Guide”.
5. OPEN YOUR TALKSWITCH SOFTWARE
Step A
Ensure that a TalkSwitch unit is connected to the PC via the Serial or USB connection.
Alternatively, you can connect the PC to the phone system LAN using a LAN cable.
Details can be found in the “TalkSwitch User Guide”.
Step B
Open the TalkSwitch Configuration Software. Details can be found in the “TalkSwitch
User Guide”. The software will detect the number of units on the LAN.
Step C
In the main window, click on View System Information to view information about
the units in your system.
WWW.TALKSWITCH.COM 4
NETWORKING TALKSWITCH 48-CAs/48-CVAs
Example: three digit identifier 1 2 5
TalkSwitch unitID number “2”
“Local Extension”
Extension number “5”
Page 5

6. PROGRAMMING ACROSS THE NETWORK
Selecting a TalkSwitch Unit (tabs)
You have the ability to configure all the units on the LAN at the same time using the
TalkSwitch Configuration software. Each unit is identified with a tab at the top of the
configuration window. See below.
Configuration settings that use multiple tabs
System Information:
Telephone Lines, Local Extensions, Remote Extensions
Voicemail:
Local Ext. Voicemail, Remote Ext., Voicemail, General
Voicemail
Call Handling:
Telephone Lines, Local Extensions, Remote Extensions
Call Back/Call Bridge:
Auto Call Back
Options:
Audio Controls.
7. SPECIAL CONSIDERATIONS
Multiple units on a LAN will function as a single phone system. Some features are
global in nature and do not scale when you add more units, other features do scale.
The features below deserve special attention to make sure you get the most from your
TalkSwitch.
Auto Attendants
There are a total of 9 Auto Attendants shared by all units on the LAN, this means that
all inbound calls can be answered by the same Auto Attendant no matter which unit
the incoming call came to. When a new auto attendant is recorded on any unit, it is
automatically 'cloned' onto all the other units without further instruction from you.
Music on Hold
Each unit needs to be supplied with it's own audio source if you want music-on-hold
for the extensions associated with the unit. There are two possible solutions; the first
is to use an 1/8" audio splitter to put the same music source into all units (they can
be purchased from most electronics stores). The second is to use different audio
sources for each unit. In this situation the music on hold will change when the call is
transferred from one unit to another across the LAN.
WWW.TALKSWITCH.COM 5
NETWORKING TALKSWITCH 48-CAs/48-CVAs
‘TalkSwitch 1’ corresponds to the TalkSwitch with unit ID 1, ‘TalkSwitch 2’ with unit ID 2, etc.
Page 6

Call Back:
There are 4 Auto Call Back accounts per TalkSwitch unit. To use an announced message
for a particular Auto Call Back account, you need to record the announced message
on the same unit as the account. This means calling in on a line that is physically
connected to the unit with the account or using an extension connected to the unit.
Ring Groups:
There are 10 global ring groups. Each is capable of ringing any extension on the network.
Park Orbits:
There are 10 global Park Orbits. Any unit can park a call and retrieve a call from any
other unit.
8. OPTIMIZING TALKSWITCH FOR NETWORK USE
Line Hunt Groups
By default, the system tries to place outgoing calls on the same TalkSwitch unit the
call originates to reduce traffic across the LAN.
Voicemail
All local and remote extension voicemail data is stored on the unit where the extensions
physically reside. If a unit is completely filled with voicemail messages, new messages
will not be stored on other units, instead the system will respond with the prompt,
"voicemail is not available at this time" and not accept the messages for any mailbox
belonging to that unit.
Additional memory can be added to any unit using TalkSwitch memory cards.
9. WHAT HAPPENS IF THE NETWORK CRASHES?
Each TalkSwitch unit will still be able to answer incoming calls and transfer them to
local extensions, remote extensions and voicemail on their unit. In addition all auto
attendants and call handling parameters are cloned on each box, so incoming calls will
be handled with full auto attendant functionality. However because the TalkSwitch
units can no longer communicate with each other, no calls can be transferred to other
units. In this case callers will hear a message which says 'I'm sorry that extension is
not available at this time, please try again later'.
Once the network is up and working again, the TalkSwitch units will re-establish their
connections and automatically restore its call handling ability.
WWW.TALKSWITCH.COM 6
NETWORKING TALKSWITCH 48-CAs/48-CVAs
About TalkSwitch
TalkSwitch® is dedicated to providing small
and multi-location businesses with innovative
telecommunications solutions. Since 1990,
TalkSwitch has delivered rich features, high
functionality and unbeatable value. Ideal for
businesses with up to 32 telephone users per
office, TalkSwitch systems provide users with
options to connect to both the traditional
telephone network (PSTN) and Voice over IP
(VoIP) networks. TalkSwitch is headquartered
in Ottawa, Canada. For more information
call (888) 332-9322 or visit our website at
www.talkswitch.com
© TalkSwitch 2005
Under 'System Information', the software will have
'Hunt lines on same unit first' checked as the default
to facilitate this.
 Loading...