

Page 1

1
T
ALK ELECTRONICS LTD
. U
NIT
3 I
MAGE HOUSE
326 M
OLESEY ROAD
H
ERSHAM
S
URREY
KT12 3PD E
NGLAND
TEL: +44 (0)1276 709966 F
AX
: +44 (0)1276 682843 E-
MAIL
: [email protected] www.talkelectronics.com
Hurricane 2.2 Pre-amp
User Manual
Talk Electronics
Page 2

2
INTRODUCTION
Thank you for choosing a Talk Electronics
Hurricane pre-amplifier. We are confident
that it will provide you with many years of
musical enjoyment and reliable service.
However, please take the time to read this
guide thoroughly before using the amplifier.
It explains how to install and connect it,
and suggests how to ensure that you
always enjoy its optimum performance.
UNPACKING LIST
Pre-amplifier
Instruction manual
AC power cord
Remote control handset
Guarantee card
Mute Link cords x 2
NOTE: We recommend that the supplied AC
power cord is replaced with a high quality Merlin
Cables power cord for best results.
Please be aware that this unit is not supplied with
interconnects and we recommend the use of the
Merlin series of interconnect cables.
INSTALLATION INSTRUCTIONS
HOW TO SITE AND CONNECT YOUR HURRICANE PRE-
AMPLIFIER FOR BEST PERFORMANCE AND SAFE OPERATION
Please unpack your amplifier carefully and position it
on a stable, level surface close to a mains socket.
Before attempting to connect it into your system
please read this manual carefully.
The Hurricane will perform well placed on a coffee
table or bookshelf but if you wish to achieve the best
performance we suggest you place it on a specialist
hi-fi support. There are many suitable designs
available, which your dealer will be happy to advise
you about.
Position the amplifier so that it will not be subjected
to high ambient temperatures: avoid sites where it
will be in direct sunlight or close to a central heating
radiator. For your own safety – and your amplifier’s
Hurricane User Manual
well-being – do not allow it to come into contact with
water. Keep it away from potted plants to avoid
those all-too-common watering accidents! To clean
the amplifier’s case disconnect it from the wall
socket and wipe it with a barely damp, lint-free cloth
or chamois leather. If you suspect that water has
entered the casework, return the amplifier to your
dealer so that he can examine it.
Once you have installed the amplifier please retain
all packaging including the polythene bag which is
designed to protect the finish of the unit whilst in
transit. If you decide to upgrade or add a Whirlwind
power supply, the packaging will be required to
protect the Hurricane and ensure it arrives
undamaged at the factory or your distributor.
ELECTRICAL CONNECTIONS
The Hurricane comes with a ready assembled mains
lead and we suggest that you use this to connect it
to the mains supply. We strongly recommend that
you connect the lead directly to a wall socket and do
not use extension blocks, which degrade sound
quality. For the same reason we also advise against
“line filters” and “mains conditioners”. If your mains
supply is noisy or you have household appliances
that generate clicks and pops that can be heard
through your hi-fi system, have an electrician correct
the problem at its source. We do however
recommend the use of ‘Merlin Cables’ power chords
which do not interfere with the current flow and offer
a significant performance improvement
Should you need to replace the fuse in the mains
plug, please fit only the correct replacement types.
This is a standard 5A.
If, for any reason, you wish to replace the plug or
cable, please note that the lead must be connected
as follows.
NOTE: These instructions apply in the United
Kingdom only – consult your dealer about wiring
conventions in other countries.
Green and yellow wire connects to EARTH (E or
symbol )
Blue wire connects to NEUTRAL (N)
Brown wire connects to LIVE (L)
Please ensure that the replacement lead contains a
5A fuse.
Talk Electronics
Page 3

3
POWER CONNECTIONS
FOR MAINS POWERED UNITS
The Hurricane’s mains switch is fitted on the right of
the rear panel, when viewed from the rear. Use this
to switch off the pre-amplifier completely. Beside it is
an IEC socket into which the supplied mains lead
fits.
FOR UNITS USING A WHIRLWIND OUTBOARD POWER SUPPLY
This should be connected in accordance with the
instructions supplied with your Whirlwind, however, it
will still be necessary to connect it to the mains as
above.
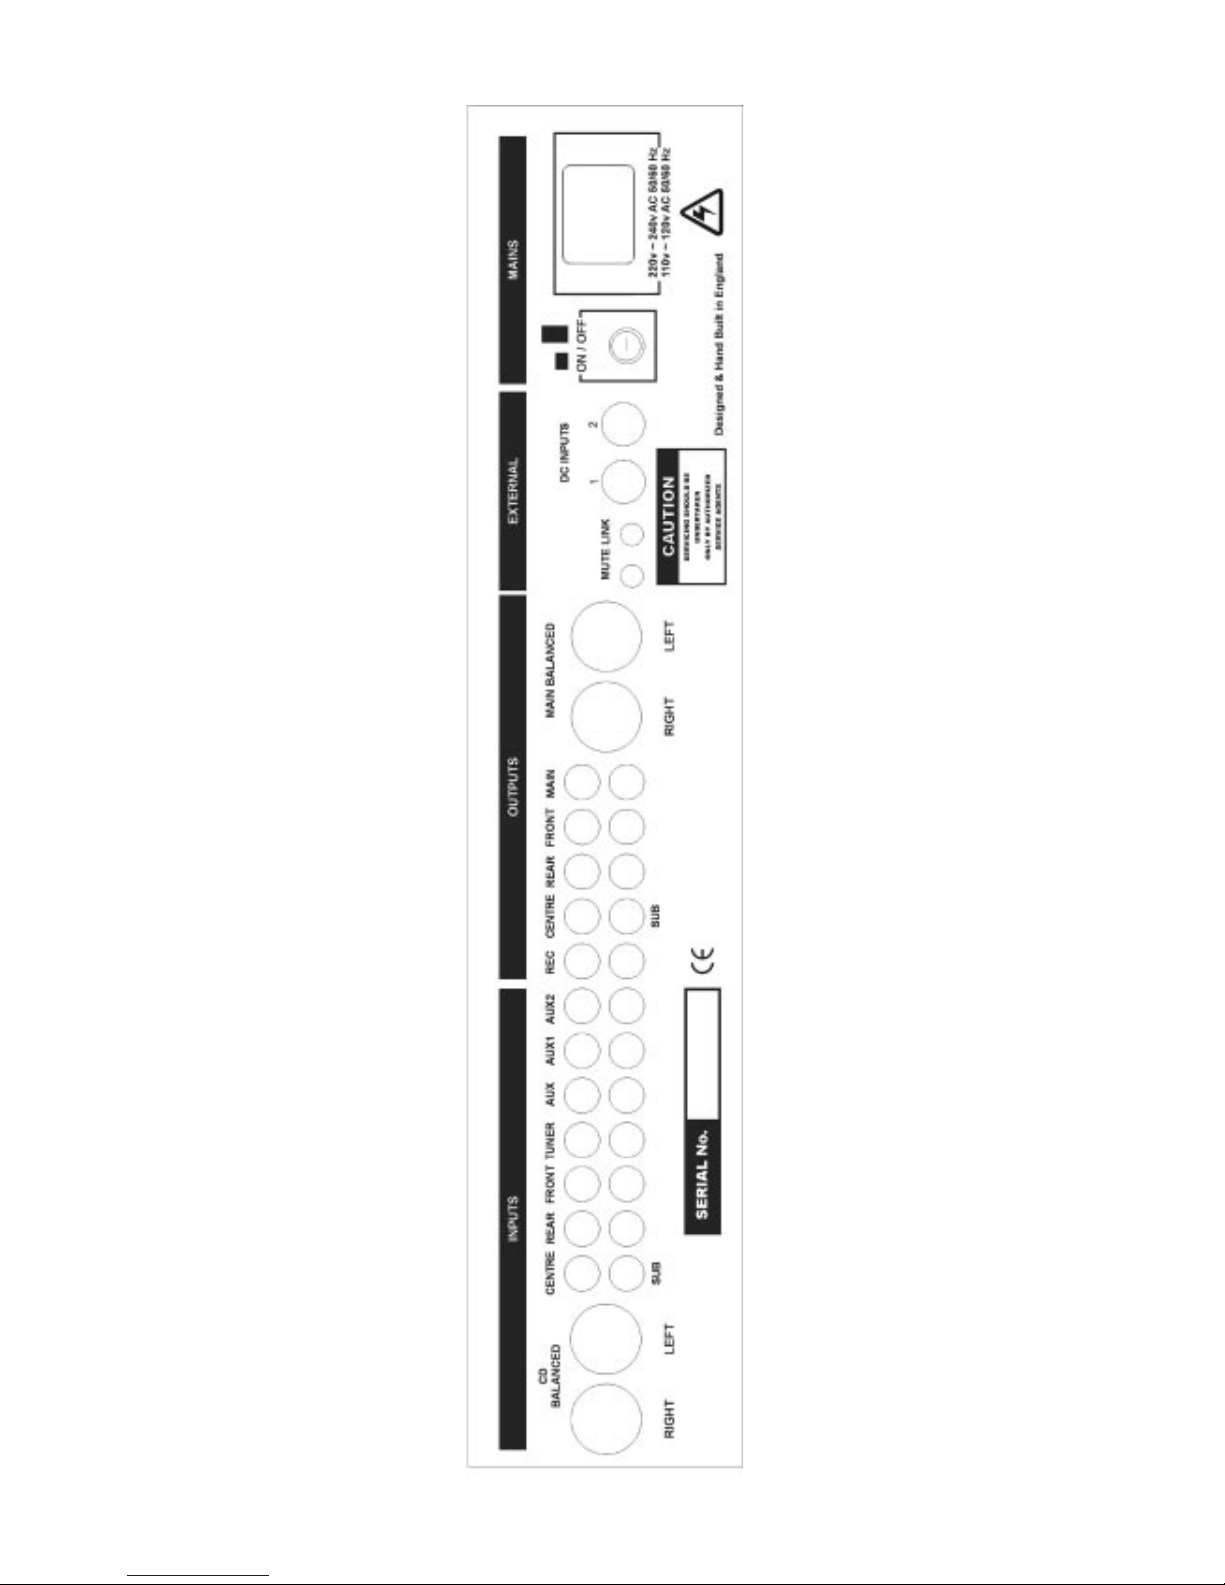
REAR PANEL
A diagram of the rear panel can be found on page 6
of this manual.
Mute Link: this is used to control the mute circuits
of the Tornado series of power amplifiers. When
connected, pressing the front panel mute button will
simultaneously silence the power amplifiers. They will
also be muted when switching inputs. If running in
full balanced mode this link is essential for the mute
to function as the balanced outputs from the
Hurricane have no output relay in series.
SIGNAL CONNECTIONS
The Hurricane Series was developed using High
quality interconnects and speaker cables from Merlin
Cables, these allow the amplifiers to operate as
intended and deliver their optimum performance. We
strongly recommend that you use these cables for all
connections. You can obtain these from your dealer
or distributor.
All signal connections for the Hurricane use either
RCA phono or XLR balanced sockets. These are
clearly identified by legends on the rear panel. The
uppermost connectors are for the left channel, and
the lower ones for the right. The balanced XLR
connections should be used where possible for best
results.
SWITCHING YOUR AMPLIFIER ON AND OFF
The rear panel switch on the Hurricane connects
mains power to the pre-amplifier. We suggest that
during normal use you leave this switch in the “on”
position and silence the pre-amplifier with the mute
button situated on the lower left hand corner of the
front panel or use the hand set. This ensures that the
Hurricane will always deliver its best performance as
soon as you begin listening. A blue LED indicates
that power is on and the red LED indicates that the
output is functional. When first powered up the preamplifier remains in a muted/standby state, to listen
just select the input required.
If you are going on holiday you can use the rear
panel switch to power down the pre-amplifier
completely. For absolute safety, disconnect the
mains lead from the wall socket. We also advise that
you do this during thunderstorms to avoid damage
from power line surges.
FRONT PANEL
USING THE FRONT PANEL CONTROLS
Mute: this button mutes the amplifier’s output. It
does not disconnect the Hurricane from the mains
supply. Push it once to silence the amplifier and push
it again to restore the audio output.
The red LED indicates whether the amplifier’s output
is operational: if it is glowing the amplifier’s output is
connected; if it is not the amplifier’s audio circuits are
muted. In AV mode the mute will only control the
main left and right speakers. In balanced mode you
must use the mute link option.
CD: select this button to listen to your CD player or
any other balanced source you have connected to
the CD input. If your CD player does not have
balanced outputs you should either use the auxiliary
input or you can have your dealer/distributor make
up the appropriate balanced XLR to RCA lead.
Tuner: select this button to listen to your tuner or
any other source you have connected to the Tuner
input.
Aux: select this button to listen to your CD player or
any line-level source you have connected to the Aux
input.
Aux 1: select this button to listen to any line-level
source you have connected to your Aux 1 input.
Aux 2: select this button to listen to any line-level
source you have connected to your Aux 2 input.
AV: select this button to listen to your processor or
any other source you have connected to the AV
input. See also 6 Channel AV Buffer section below.
Gain: this defaults to high or “off” for normal
operation. However for late-night listening or for
improved performance you should use this in low or
“on” mode. This allows for more flexible use of the
volume control by making it operate within its more
accurate region.
Note: when switching inputs the mute light will flash
momentarily and the switching software mutes the
output to avoid clicks and bangs.
Volume: this rotary control, not surprisingly, adjusts
the amplifier’s audio output.
Page 4

4
T
ALK ELECTRONICS LTD
. U
NIT
3 I
MAGE HOUSE
326 M
OLESEY ROAD
H
ERSHAM
S
URREY
KT12 3PD E
NGLAND
TEL: +44 (0)1276 709966 F
AX
: +44 (0)1276 682843 E-
MAIL
www.talkelectronics.com
SPECIFICATIONS HURRICANE 2.2
Maximum Output Voltage >6V
Input Impedance – Line Input 10k ohms
Distortion 20 - 20kHz 1v out <0.005%
Signal - to - Noise Awtd 1v out
Line Input -90dB
Mains Voltage 230V /115V/100V AC ± 10%
Dimensions width 440mm
height 89mm
depth 325mm (allow at least 400mm for connections)
Weight per unit unpacked 9.3kg
packed 11.1kg
6 CHANNEL AV BUFFER
INPUT / OUTPUT
The Hurricane 2.2 has an internal AV buffer circuit.
This allows master volume control over all 6
channels required for AV home theatre applications.
So if you have a DVD player with an internal Dolby
AC3* processor you can connect this directly to
your Hurricane 2.2 and simply add the appropriate
Tornado power amplifiers. It can also be used if you
have a separate stand alone processor which has
digital control over volume, just set it to maximum
output and connect it in the same way.
NOTE: A digital volume control work by reducing the
number of ‘bits’ used to describe the signal, this
means that at lower listening levels from maximum
you loose vital information which as a result makes the
sound flat and undynamic at lower listening levels -
*All trade marks acknowledged.
REMOTE CONTROL OPERATION
The Hurricane’s remote control window is situated at
the bottom of the front panel just to the left of the
volume control. The remote control handset must have
an unobstructed view of this window in order to pass
instructions to the amplifier. It should be noted that
direct sunlight or the use of spotlights may affect the
operation of your pre-amplifier. The handset duplicates
all the control functions of the amplifier’s front panel,
with the exception of the Gain control.
Talk Electronics’ policy of continued research and development means that the above specification may change without
notice.
The Thunder has been manufactured to conform with the protection requirements of the EC Council directive 89/336/EEC
relating to EMC by application of the following standards:
EN50081-1 1997 Emissions Standard
EN50082-1 1997 Immunity Standard
and also the requirements of the EC low voltage directive relating to electrical safety by application of the following standard
BSEN60065: 2002 Safety standard
For the purposes of testing the Thunder was used with the mains cables and high quality interconnects supplied by Merlin
Cables. Compliance with the above standards can only be made if the unit is installed as per this manual and using the
correct cables.
*Guarantee: 3 Years return to dealer.
To help us provide you with the most efficient service please return your guarantee card promptly. Your CD player is
guaranteed against manufacturing and component defects for a period of 3 years. The guarantee does not cover and
damage caused by accident, misuse, neglect or through incorrect installation, adjustment or repair by unauthorised
personnel or the cost of collecting the Thunder from you and returning it to the dealer. The above does not effect your
statutory rights as a consumer.
E & OE. Due to our policy of continued development we reserve the right to change the specifications at any time.
*Upon return of Guarantee Card
Talk Electronics
Page 5

5
GUARANTEE
To extend your guarantee from 1 year to 3 years FREE of charge please complete and return this form
T
ALK ELECTRONICS LTD
.
U
NIT
3 I
MAGE HOUSE
326 M
OLESEY ROAD
H
ERSHAM
S
URREY
KT12 3PD
E
NGLAND
FOLD HERE
FOLD HERE
Customer Name __________________________
Address _________________________________
________________________________________
________________________________________
Post Code _______________________________
E-mail address ___________________________
Data Protection Act
Your details will be held by Talk Electronics Ltd. for promotional and
statistical purposes.
■
■■
If you do not wish to receive marketing information please tick this box
Model: Hurricane 2.2
Purchase date ___________________________
Price paid _______________________________
Serial Number ____________________________
Colour:
■
■ ■
Black
■
■■
Silver
Where did you purchase your Hurricane 2.2?
________________________________________
How did you hear about Talk Electronics?
■
■ ■
Existing customer
■
■ ■
Family/Friend
■
■ ■
Dealer
■
■ ■
Advertising
■
■ ■
Review
■
■ ■
Internet
Other ___________________________________
Please tell us about the rest of your system
CD Player _______________________________
Power Amp ______________________________
Tuner ___________________________________
Speakers ________________________________
Mains Cables ____________________________
Interconnect Cables ______________________
Speaker Cables __________________________
Why did you choose the Hurricane 2.2?
________________________________________
________________________________________
Are you interested in Home Cinema?
■
■ ■
Yes
■
■ ■
No
■
■ ■
Undecided
Have you visited our website?
www.talkelectronics.com
■
■ ■
Yes
■
■ ■
No
■
■ ■
Do not have connection
Comments_______________________________
________________________________________
________________________________________
________________________________________
________________________________________
________________________________________
________________________________________
________________________________________
________________________________________
Page 6
6
REAR PANEL
LAYOUT
 Loading...