

Page 1

1
TALKCOM TC750
PMR with FM Radio
User’s Manual
Page 2

2
Content
Safe ty Instruc tions -------------------------------------------------- 3
Key Features -------------------------------------------------------- 4
LCD Display Icons -------------------------------------------------- 4
Features ------------------------------------------------------------- 5
Starting operation
Battery Installation ------------------------------------------- 5
Using Li-ION rechargeable battery --------- ------------- 5
Using Alkaline batteries ------------------------------------- 6
Recharging the battery -------------------------------------- 7
General operation
Powering the unit On/Off ------------------------------------ 8
Using the PMR ------------------------------------------------- 8
Speaking to other radio -------------------------------------- 8
Listening to other radio -------------------------------------- 8
Using a PTT Earphone -------------------------------------- 8
Adjusting speaker volume (15 Levels) ------------------- 9
TX Timeout function ----------------------------------------- 9
Talk Range ----------------------------------------------------- 9
Menu operation
Menu Flow chart ------------------------------------------- 9
Select channel ---------------------------------------------- 10
CTCSS code ------------------------------------------------ 10
FM Radio ------------------------------------------------ 10
Call Tone -------------------------------------------------- 11
Scramble Function ----------------------------------------- 12
VOX (Hands-free Function) ----------------------------- 12
Stop Watch ------------------------------------------------ 13
Baby Monitor --------- ------------------------------------- 13
Roger Beep (On/Off) ------------------------------------- 13
Auto Power Off -------------------------------------------- 14
Scanning Channel ----------------------------------------- 14
Key Lock --------------------------------------------------- 14
Technical Specification ----------------------------------------- 15
Page 3

3
Safety Instructions
Please read this information carefully before
you use the two-way radio.
General Instructions
z
Keep the antenn a at least 1 inch (2.5cm) away from your
head and body.
z Do not attempt to modify the radio. The radio is designed to
comply with CE & R&TTE.
Environmental conditions
z Avoid placing this radio for prolonged periods of time in
direct sunlight or temperatures below -20℃ or above 60℃.
z Turn off the radio wherever posted notices restrict the use
of radios or cellular telephones.
z The LCD display is made of glass & maybe damaged if
dropped or impacted.
z Don’t use the radio in a high humidity or dusty
environment.
Battery:
z
This radio is designed to use 3.7v Li-Ion rechargeable
battery . The battery included with the radio has a protection
circuit to protect the battery from internal short circuit and
over charge.
z Avoid any contact with conductive materials such as
jewelry, keys, or beaded chains and the exposed terminals
of the battery. Contact could complete an electrical circuit
(short circuit) and caused the battery to over heat and
could cause damage or injury.
z
Only replace batteries with the same or equivalent type
recommended by the manufacturer.
Page 4
4
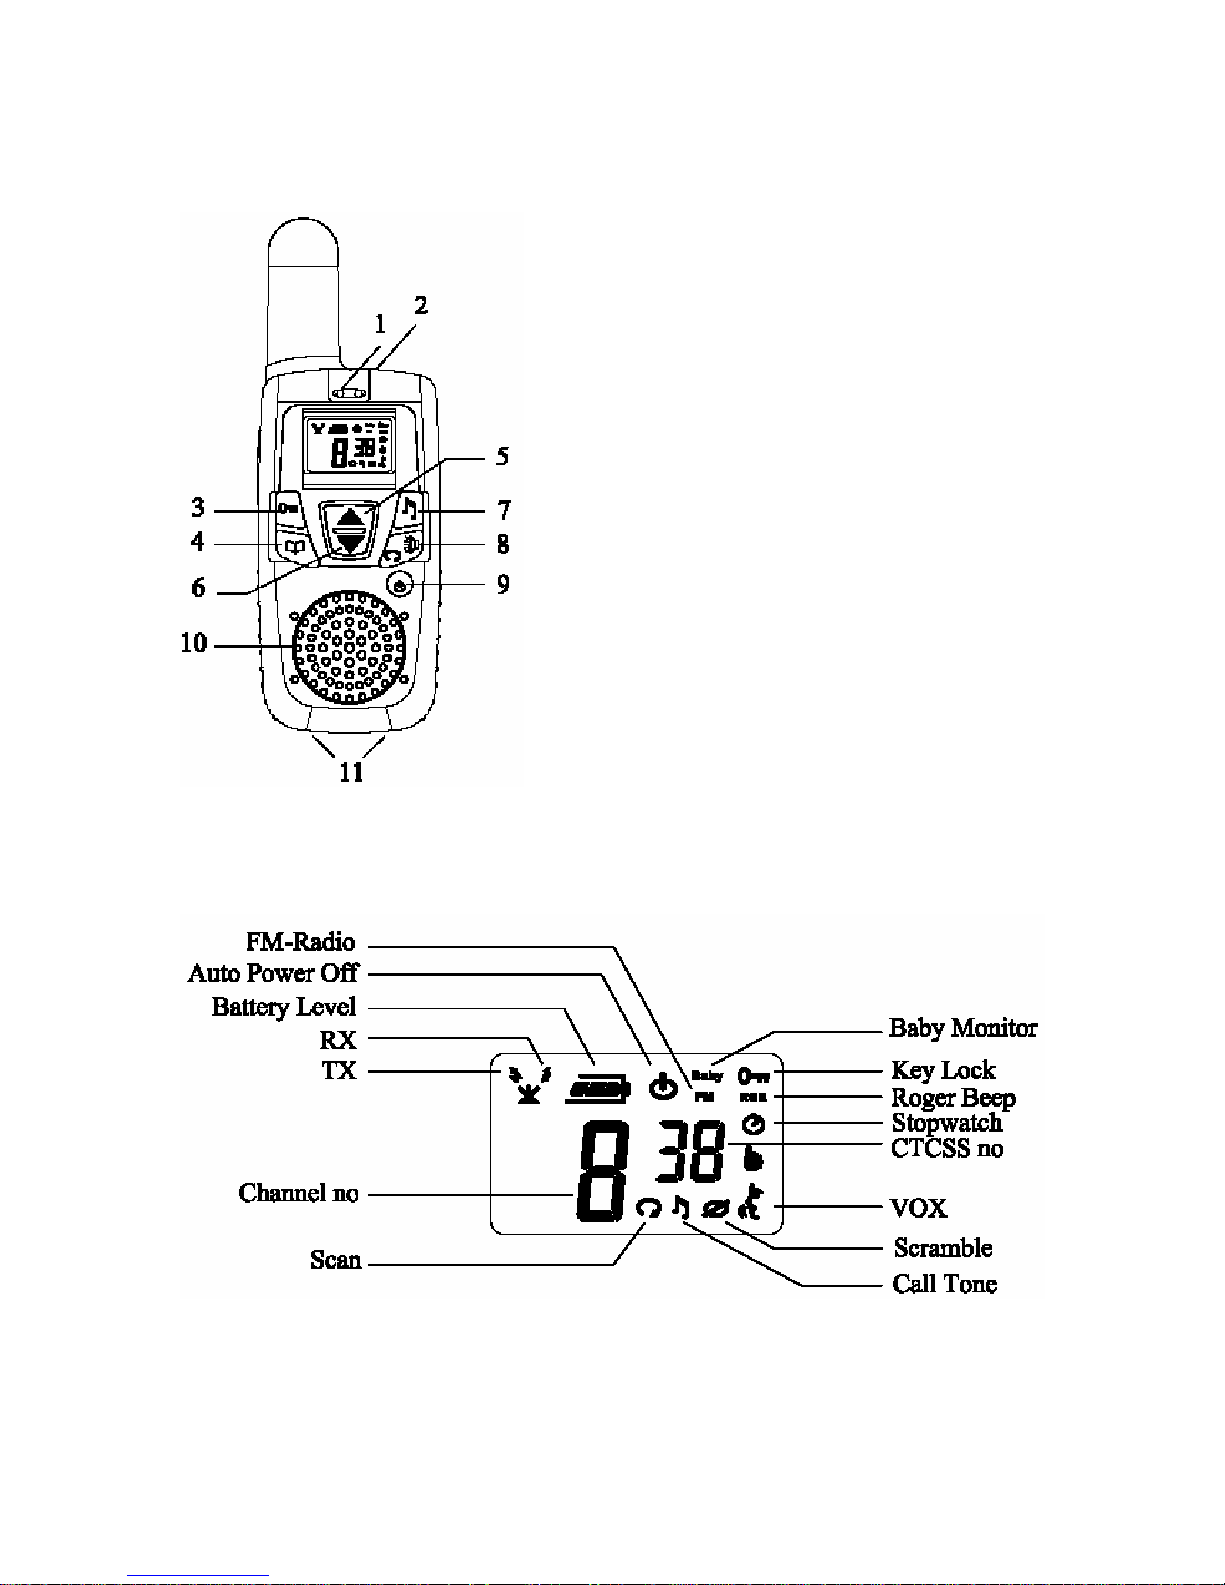
1. Microphone
2. Earphone & Wall Charger Jack
3. Key Lock Key
4. Menu Key
5. Up Key
6. Down Key
7. Call Tone Key
8. Scan / Monitor Key
9. Power On / Off Key
10. Speaker
11. Desk Top Charger Pin
Key Features
LCD Display Icons
Page 5
5
Features
PMR-446 MHz
8 Channels
38 CTCSS codes
FM Radio: 88 ~ 108 MHz
Scramble Function: 4 Formulae Select
VOX: 3 Levels of Sensitivity
Baby Monitor
Stop Watch
Roger Beep On / Off
Auto Power Off (APO)
Call Tone
Scan
Dual Power
- Li - ION Battery Pack included
- Optional Battery Case for AAA Size Alkaline Batteries x 3pcs
Starting Operation
Battery Installation
Using Li-ION rechar geable battery
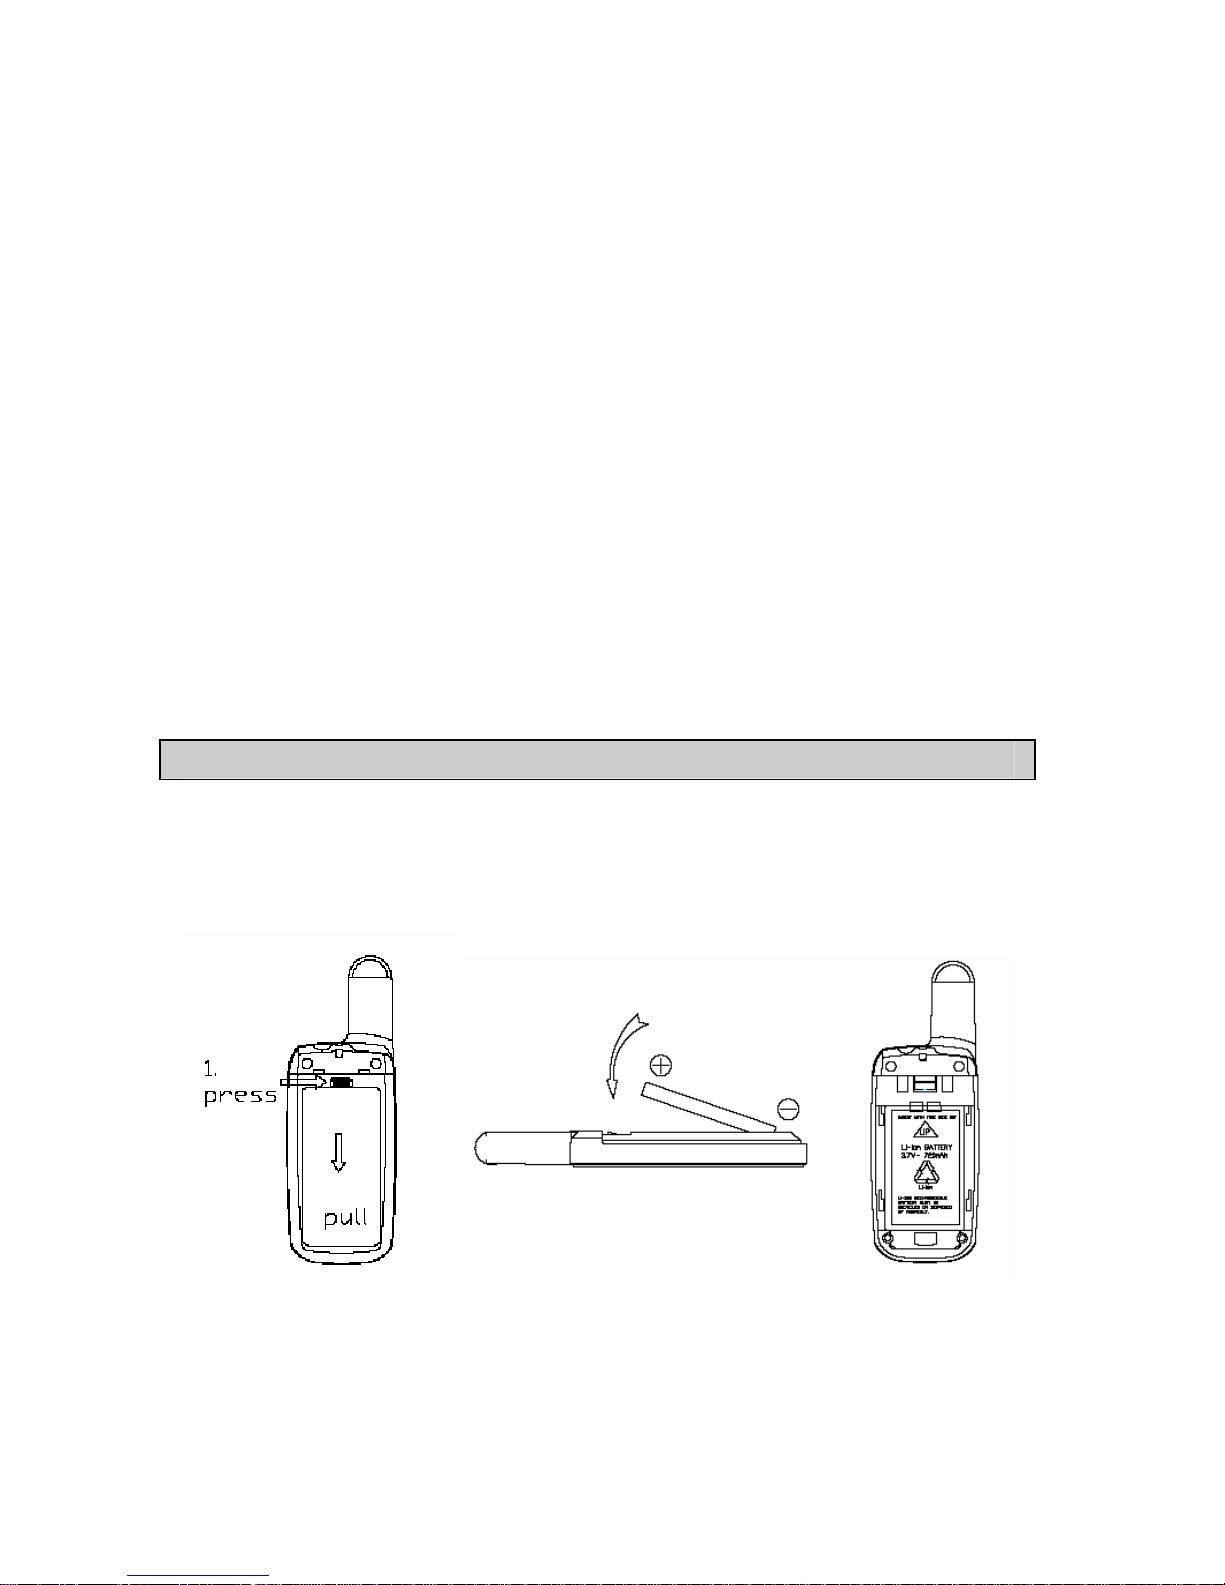
z Press the top end of battery door and slide it down
z Follow “This Side Out” & +/- direction to install the Li-ION
battery pack into the compartment
Page 6

6
z Then push up the battery door to close
Warning:
z Reversing the polarities of battery could damage the unit
and the battery.
z If you're not going to use the unit for a long period of time
e.g several weeks, please take out the battery.
z Please dispose of old and defective batteries in a safe &
environmentally friendly manner.
z Do not dispose of batteries in a fire.
Use Alkaline batteries
You can use normal AAA size batteries with the optional AAA
battery case:
Page 7

7
z Follow +/- direction to install 3 AAA size Alkaline batteries
into the 3A battery case (thick case).
z Power off the PMR, remove the thin battery door and the
Li-ION battery.
z Insert the top end of the AAA battery case and then push
down the battery knob to close.
Recharging the Battery
When the LCD display shows the battery level is low, you must
charge the battery with the enclosed AC/DC Adaptor or Desktop
Charger. The battery has a built-in charging current limit circuit,
when the battery fully charged, the circuit will cut the charge
current automatically to protect the battery.
Charging with the AC/DC Adaptor:
z Plug the adaptor into the wall socket and plug the other
end into the earphone jack.
z The unit will automatically turn off, LCD backlight turn on
in ‘RED’ and have no display.
z Charge time is around 4 hours. Once fully charged, the
LCD backlight will turn to ‘Green’.
During charging, the unit will slightly warm.
Charging with Desktop Charger
z Plug the adaptor into th e desktop charge r.
z Put the unit into the charger.
z During charging, the RED LED of the charger will be on &
the unit remains on.
z The charging time is around 6 hours. Once fully charged
the LED of the charger will turn Green. Take out the radio
out of the charger to stop charging
Warning: To avoid damage to the unit, use original accessories.
only
Page 8

8
General Operation
Powering the Unit On/Off
z To power on the unit, press “ ” Key for 2 seconds until
you hear a beep and the LCD display shows the Channel
no. and battery level icon.
z To power off the unit, press “
” Key for 2 seconds until
LCD display turns off.
Using the PMR
The unit has 8 main channels & 38 CTCSS codes. You can
communicate with any other PMR that is using the same main
channel & CTCSS code.
Speaking to other radios
z Press & hold the PTT key, the RED LCD Backlight turn on
& show
icon.
z Hold the unit in a vertical position with the Microphone
5-8cm from the mouth and then speak
z When you have finished speaking, release the PTT key
and you will hear a beep tone.
Listening to other radios
z The radio will automatically play received transmissions.
z
When you press the PTT key, you cannot listen to other
radios.
z Adjust volume control if necessary.
Using a PTT Earphone
z Plug the PTT Earphone into the earphone Jack
z Press & hold the PTT key on the earphone to speak.
z Release the PTT key to listen.
z Adjust volume control if necessary.
Page 9
9
Adjusting speaker volume (15 Levels)
z Press the key to increase the volume.
z Press the
key to decrease the volume.
TX Time Out Function
z TX time out function can avoid accidental transmission and
prolong the battery life.
z The unit will stop transmitting and sound a warning tone
when PTT is hold over 60 seconds. You then need to
release PTT and press it again for further transmission.
z In VOX mode, the unit will stop transmitting and sound a
warning tone after continuous transmission for 60 seconds.
You have to press PTT to stop the warning tone and
re-activate VOX for further transmission.
Talk Range
The communication range is optimal in open field conditions and
will vary in different environments:
z Optimal Range – range up to 3 km in open field conditions.
z Medium Range – reduced range in an area with obstacles
such as trees, houses & wall.
z Shortest Range – further r eduction in range in an area of
dense forest, high mountains & tall buildings.
Warning – Do not transmit within 1.5 meters of other radios
because of interference.
Menu Operation
Menu Flow chart
Press" " once to enter main channel selection. Press " "
again for next function selection.
Menu
Main channel CTCSS FM Radio Call
tone
Scramble VOX Stop watch Baby monitor
Roger beep APO Menu
Page 10
10
Select Channel
You can communicate with any other user who is using the same
channel.
To set the main channel
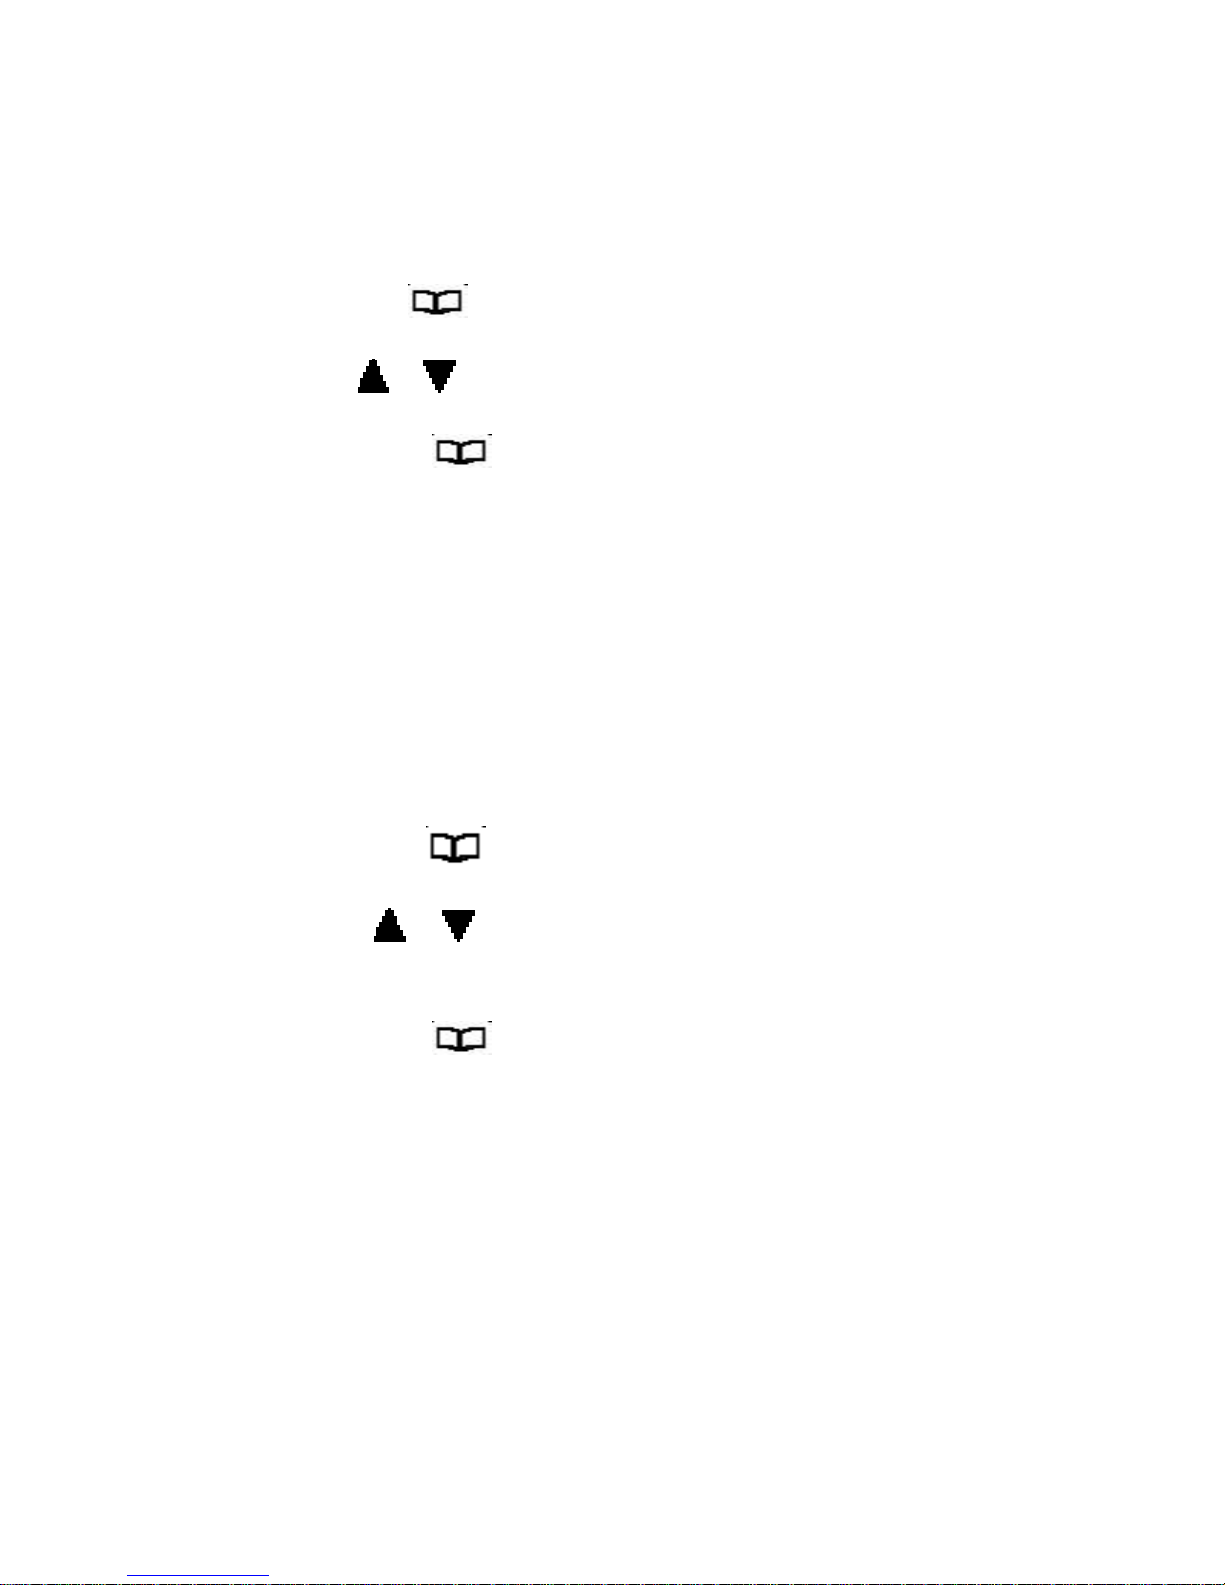
z Press the" " key once, the channel number display will
flash,
z Press"
"," " key to select your desired main channel.
z Press the “PTT” key to confirm and quit
z Or press "
" key once, the last selection will be
confirmed and enter into next function selection.
CTCSS code function
This function can help you to identify your group of users among
the same channel. Only the users with the same CTCSS tone can
listen and talk to each other, but all the users on the same main
channel can listen to the conversation.
To select a CTCSS cod e
z Press the " "key twice, the CTCSS code display will
flash,
z Press "
"," " key to select your desired the CTCSS
code (1~38, " 0 " is off)
z Press the “PTT” key to confirm and quit
z Or press "
" key once, the last selection will be
confirmed and enter into next function selection.
FM Radio
You can listen to FM Radio with the speaker or through earphone.
Page 11
11
Select FM Radio Frequency
z Press " " key 3 times.
LCD will display FM Radio Frequency.
z Press and hold " " or" " key to scan FM radio
frequency.
z It will stop when it finds a FM radio channel. The LCD will
display the frequency and you can listen to the FM radio.
z You can continue to scan for the FM radio frequency you
preferred.
z Press “
” Key to adjust the volume when listening to FM
radio.
z When you receive other PMR call signal, or you press PTT
key to transmit, the unit will automatically switch to PMR
mode.
z After finish PMR communication, you can press "
" Key
3 times again to enter FM mode. The unit will remain on the
last FM radio frequency you have selected.
Call Tone
You can use Call Tones to get the attention of other people with
radios on the same channel and CTCSS tone. You can also use
Call Tones as the signal of the start or end of a transmission.
z Press "
" key , LCD displays icon and your call tone will
be transmitted to nearby receivers set at the same
channel.
z There are 10 different call tones to choose from.
Selecting Call Tone
z Press " " key four times, LCD display shows the
icon and call tone number will flash,
z Press "
" or " " key to select your desired the call tone.
z Press the "PTT" Key to confirm and quit
z Or press "
" key once, the last selection will be
confirmed and enter into next function selection.
Page 12
12
Scramble Function
You can enjoy privacy to talk within your group by selecting a
same scramble formula as your group member does.
z Press "
" Key 5 times, LCD display icon.
z Press “
” or " " Key to select a formula from 1 to 4 . OF
is turn off the function..
z Press PTT to confirm and quit.
z Or press "
" key once, the last selection will be
confirmed and enter into next function selection.
z After turn on scramble function, LCD will display
icon.
z Please make sure other group member’s PMR has
scramble function and select the same formula.
VOX (Hands -Free Function)
The unit has a built-in Vo ice Activated Circuit (VOX) function. You
can enjoy talking and listening without pressing PTT Key. Y ou can
use this function with earphone (optional accessory).
To turn on VOX function
z Press " " key six times, LCD displays the icon and
the VOX sensitivity digit display will flash.
z Press"
" or " " key to select of, 1, 2, 3 for OFF, Low,
Medium & High Sensitivity.
z After turning on VOX, LCD will display
icon,
z Press PTT to confirm and quit
z Or press "
" key once, the last selection will be
confirmed and enter into next function selection.
z You can plug in the earphone for hands-free talking &
listening. Please speak close to the mic in order to activate
‘VOX’ function.
Page 13
13
Stop Watch
Press " " Key 7 times, LCD display.
z Press “ ” or " " Key to start and press “ ” or " " Key
to stop..
z And then press “
” Key to reset.
Lap Time
z To get a lap time, press “ ” or " " Key to start
z Press “
” Key , it will stop to show the lap time while stop
watch is running.
z Then press Key Lock Key again to switch back to stop
watch mode and show the running time.
z Press “
” or " " Key to stop and press “ ” Key to
reset.
z Press "
" Key 4 times to exist
Baby Monitor
z Press " " Key 8 times, LCD display “Baby” icon.
z Press “
” or " " Key to monitor sensitivity level from 1 to
3 (low to high level), OF is turn OFF this function.
z Press PTT to confirm and quit.
z Or press " " key once, the last selection will be
confirmed and enter into next function selection.
z After turn on this function, LCD display “Baby” icon.
Roger Beep (ON/ OFF)
z Press " " Key 9 times, LCD display “Roger”.
Press “ ” or " " Key to turn on (display icon) or turn
off (display
icon) Roger beep
z Press PTT to confirm and quit.
z Or press " " key once, the last selection will be
confirmed and enter into next function selection.
z After turn on Roger beep, LCD will display RGR icon.
Page 14
14
Auto Power Off (APO)
z Press " " Key 10 times, LCD display
icon.
z Press “ ” or " " Key to select auto power off time from 0
to 12 hours.
z
Press PTT button to confirm and quit.
z
Or press " " Key once to quit.
z
After turn on this function, LCD will display icon and
automatically turn off at designated time.
Scanning Channel
z Press “ ” Key, LCD displays icon. It will start to
scan channel automatically.
Note: If you press and hold the button over 2 seconds, it
will break the squelch noise and listen to the current
channel.
z The unit scans all channels one by one. It will stay on the
occupied channel. Press “
” or " " Key to continue
scanning.
z If there is no signal, it will continue to scan.
z Press the PTT key and it will stay on the scanned channel
and quit scan function.
z Or press "
" key once, the last selection will be
confirmed and enter into next function selection.
Key Lock
z Press and hold “ ” key for 1.5 seconds, LCD displays
the
icon.
z All keys are locked except the PTT and "
" keys.
z To unlock, press and hold "
" key for 1.5 seconds again.
Page 15
15
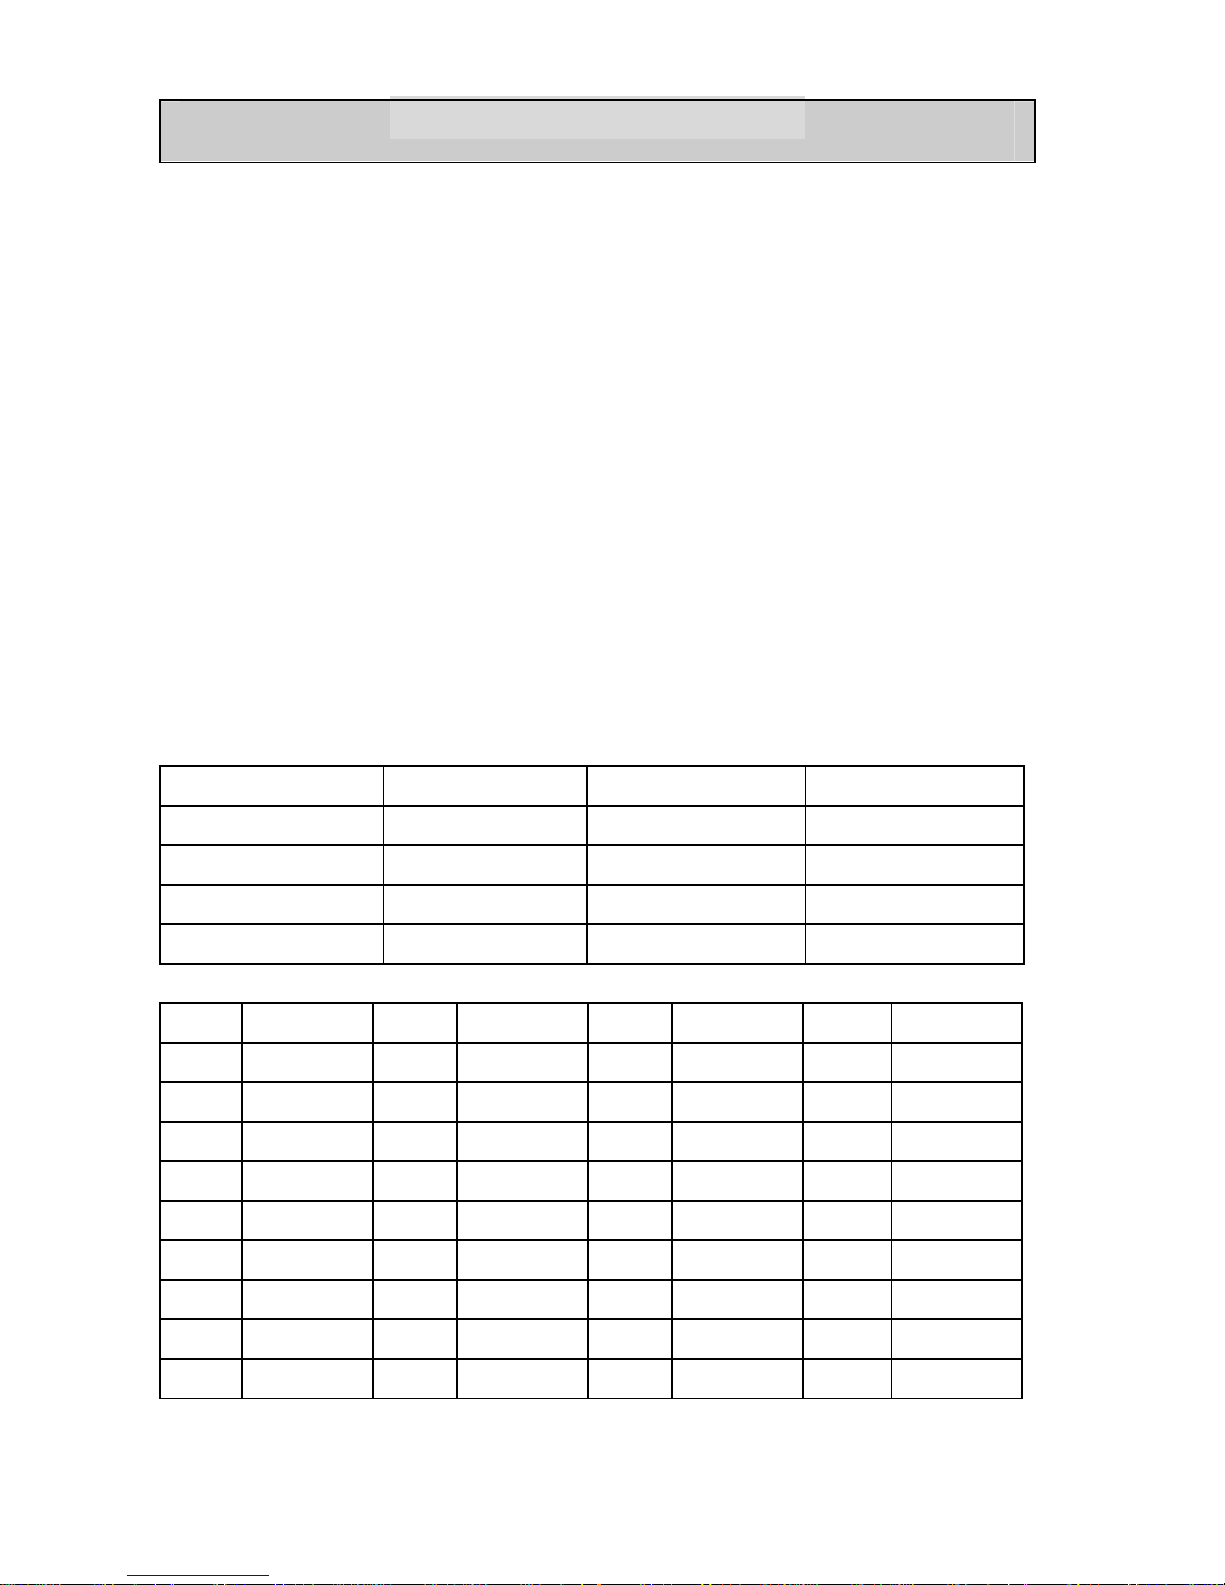
Technical Specification
Frequency Range 446.00625 ~ 446.09375 MHz
Channels 8 (12.5KHz spacing)
Modulation FM
Frequency Control PLL
RF Output Power PMR 500mW e.r.p
Power Supply 3.7V 720mAh Li-Ion rechargeable
battery
or 3 x AAA size Alkaline Battery
R&TTE Standard EN300 296
EN301 489
EN60065
EN55013
EN55020
Channel Frequency Table
Channel no. Frequency Channel no. Frequency
1 446.00625 5 446.05625
2 446.01875 6 446.06875
3 446.03125 7 446.08125
4 446.04375 8 446.09375
CTCSS Code
1 67.0 11 97.4 21 136.5 31 192.8
2 71.9 12 100.0 22 141.3 32 203.5
3 74.4 13 103.5 23 146.2 33 210.7
4 77.0 14 107.2 24 151.4 33 218.1
5 79.7 15 110.9 25 156.7 35 225.7
6 82.5 16 114.8 26 162.2 36 233.6
7 85.4 17 118.8 27 167.9 37 241.8
8 88.5 18 123.0 28 173.8 38 250.3
9 91.5 19 127.3 27 179.9
10 94.8 20 131.8 30 186.2
Page 16

Standards Compliance
This product complies with the regulations for PMR446 service and has been
independently approved to meet the requirements of standard ETS 300 296 and other
European standards.
Care and safety with radio transmitters
In order to provide optimal radio performance and make sure human exposure to radio
frequency electromagnetic energy is within the recommended parameters set forth in the
regulations, always adhere to the following procedures:
When operating a portable transmitter, hold the device in a vertical position with the
microphone 4 to 6 inches (10-15cm) away from your mouth. Keep the antenna at least 1
inch (2.5cm) away from your head and body. If wearing the device near your body,
ensure the antenna is at least 1 inch (2.5 cm) away from your body when transmitting.
Page 17

Electromagnetic interference/compatibility
Nearly every electronic device is susceptible to electromagnetic interference (EMI) if
inadequately shielded, designed, or otherwise configured for electromagnetic compatibility.
In order to avoid electromagnetic interference and/or compatibility problems, turn off your
radio in any location where posted notices instruct you to do so. Hospitals or health care
facilities may be using equipment that is sensitive to external radio frequency energy.
When instructed to do so, turn off your radio when on board an aircraft. Any use of a radio
must be in accordance with applicable regulations per airline crew instructions.
CARE AND MAINTANENCE
OPERATING PRECAUTION
Damaged antenna
Do not use a radio with a damaged antenna. If a damaged antenna comes into contact with
your skin, it could cause a minor burn. Send your equipment to technical service for repair
before using it again.
Batteries
All batteries can cause property damage and/or personal injury such as burns if a conductive
material such as jewelry, keys, or beaded chains touch exposed terminals. The conductive
material may complete an electrical circuit (short circuit) and heat up significantly. Exercise
care in handling any charged battery, particularly when placing it inside a pocket, purse, or
other container with metal objects.
OPERATING WARNING
Replacement parts
Use of replacement parts other than those recommended by the official product distributor
may violate the device certification. Use only the recommended replacement parts.
For vehicles with an air bag
Do not place a portable radio in the area over an air bag or in the field of air bag
deployment. Air bags inflate with high levels of pressure and force. If a portable phone
is placed in the air bag deployment area and the air bag inflates, the phone may be
propelled with great force and cause serious injury to the vehicle occupants.
Page 18

Potentially explosive environments
This product DOES NOT meet intrinsic safety regulations. Turn off your radio when in
any area with a potentially explosive environment. Sparks in such areas could cause an
explosion or fire resulting in bodily injury or even death.
Batteries
Do not replace or charge the batteries in an area with a potentially explosive
environment. Contact sparking may occur while installing or removing the batteries and
cause an explosion.
Blasting caps and areas
To avoid possible interference with blasting operations, turn off your radio when you
are near electrical blasting caps, in a "blasting area", or in areas posted: “Turn off twoway radio.” Obey all signs and instructions.
Note: Areas with potentially explosive environments are often, but not always, clearly
marked. They include fueling areas; below decks on boats; fuel or chemical transfer or
storage facilities; areas where the air contains chemicals or particles, such as grain, dust
or metal powders; and any other area where you would normally be advised to turn off
your vehicle engine.
Waste electrical products should not be disposed of with household waste. This
equipment should be taken to your local recycling center for sate treatment.
Page 19

IMPORTANT SAFETY INSTRUCTIONS
KEEP THESE INSTRUCTIONS
Before using the battery charger, read the instructions and precautions for the charger and
battery as well as the radio equipment.
PRECAUTION
To reduce the risk of sustaining injuries when using the charger, only charge the original
rechargeable batteries. Other types of batteries could explode, causing injury and harm.
1.- Do not expose the charger to rain or snow.
2.- Do not use the charger if it has received a sharp blow, or has been dropped or
damaged in any way.
3.- Do not disassemble the charger. If it is put back together incorrectly, it could result in
a risk of electric shock or fire.
4.- Never alter the power cable provided with the charger. If the plug does not fit in the
outlet, use an approved adaptor, or install the proper outlet. When unplugging the supply
from the outlet, always pull the plug rather than the cable to reduce the risk of damage
to the cable or plug.
5.- To reduce the risk of electric shock, unplug the charger from the outlet before
attempting any maintenance or cleaning. The use of any non-recommended accessory
may result in a risk of fire, electric shock, or personal injury.
IMPORTANT
If you experience any problems with the operation of your Talkcom TC750, restart your device
turning it off and removing the batteries. Replace the batteries with another set and turn on the
device again. Verify that the batteries are charged, since in many cases low batteries may cause
problems such as no transmission, weak signal reception or low volume.
Page 20

GUARANTEE
This electronic apparatus is considered a consumer good, and as such is guaranteed for
TWO YEARS under the terms foreseen in Directive 1999/44/EC on certain aspects of
the sale of consumer goods and associated guarantees, and the Act 23/2003 of the 10th
of July, for guarantees in the sale of consumer goods, or any other proceeding law that
expands or revokes the previous ones. This guarantee does not affect the rights of the
consumer according to the provisions of this law, and will be valid for Spain. The dated
proof-of-purchase must be presented to claim this guarantee, which does not cover
defects or damages that result from the following: improper use; incorrect operation;
modification or repair performed by people or shops other than the official technical
service without express authorization; dropping; crushing; effects from fire, liquids, or
batteries; use in inappropriate environments; normal wear and tear; acts of God; or in
general, all use contrary to that specified in this instruction manual.
Goods covered by the guarantee: radio telephone and supplied accessories. This
excludes the battery because it is considered to be expendable. The battery will be
covered by the guarantee for six months.
Name and address of the guarantor: TELCOM, S.A. (see information on last page).
For any claims, contact TELCOM, notwithstanding the corresponding legal actions.
Rights of the guarantee holder: according to the previously enumerated laws. The text
of the law is available to the customer at TELCOM, S.A. (see information on last page).
AUTHORIZED USE
This product can be used in the countries that have authorized the PMR446 service:
Austria, Belgium, Croatia, Czech Rep., Denmark, Estonia, Finland, France, Germany,
Greece, Holland, Iceland, Ireland, Italy, Latvia, Lithuania, Luxemburg, Malta, Netherlands,
Norway, Poland, Portugal, Slovenia, Spain, Sweden, Switzerland and United Kingdom.
However, in some countries usage restrictions may apply. Please contact the Radio
Communications Agency for further details for each country.
Page 21
IMPORTANT
Notice of intended product use in the EC countries:
This product is an FM radio receiver-transmitter (two-way) suitable for use under the
private mobile radio service 446 or PMR446. This is a license exempt service, but
restrictions of use might apply in some countries.
Product details:
Type Designation PMR-WT-206
T alkcom TC 750
Frequency Range
446-446.1 MHz
Transmitter Power 0.5 W
Modulation Type Frequency
Channel Spacing 12.5 KHz
Channel Protocol CTCSS
Declaration of conformity:
Telcom S.A., as the party responsible for introducing this product into the market,
declares under its own responsibility that this apparatus complies with the Directive
1999/05/EC, of the European Parliament and of the Council of 9 March, 1999,
transposed to the Spanish legislation under the Royal Decree 1890/2000, of November
20th. Hereby signed in Madrid on January 4 th, 2006.
Javier López Sánchez
General Manager, TE LCO M , S.A.
Relevant Specifications:
Radio:
EN 300 296-2 V1.1.1 (2001-03) ;
EMC: EN 301 489-5 V1.3.1 (2002-08)
Safety: EN60950-1:2001;
EMC FM Radio: EN55013:2001+ A1:2003 ; EN55020:2002+ A1:2003
RESPONSIBLE PARTY FOR COMMERCIALIZAT ION IN SPAIN
TELCOM, S.A.
Avda. de la Industria, 32
28108 Alcobendas (Madrid) Spain
Tel.: +34 91-103.30.00 FAX: +34 91-103.30.20
e-mail: [email protected] WEB: www.talkcom.es
Page 22

DECLARATION OF CONFORMITY
Name of the supplier: Telcom, s.a.
Address: Av. de la Industria, 32, 28108 Alcobendas (Madrid) Spain
Telephone / Fax: +34 91 103 3000 / +34 91 103 3020
CIF: A-28271823
As distributor of the manufacturer Daxian-Windsor Technology Limited., and the responsible
party for the introduction into the market of this product,
DECLARES UNDER ITS SOLE RESPONSIBILITY
THE CONFORMITY OF THE PRODUCT:
PMR 446 Portable radio telephone, model PMR-WT-206, commercialised as Talkcom TC 750,
manufactured by Daxian-Windsor Technology Limited, in P. R. of China, to which refers this
declaration, with the standards or other following regulatory documents:
Radio:
EN 300 296-2 V1.1.1 (2001-03) ;
EMC: EN 301 489-5 V1.3.1 (2002-08)
Safety: EN60950-1:2001;
EMC FM Radio: EN55013:2001+ A1:2003 ; EN55020:2002+ A1:2003
in accordance with the provisions of Directive 1999/05/EC of the European Parliament and the
Council of March 9, 1999, transposed to the Spanish legislation under the Royal Decree
1890/2000, of November 20th.
Hereby signed in Madrid, on January 4
th
, 2006:
Javier López Sánchez
General Manager, TE LCO M , S.A.
 Loading...