

Page 1
WEBS-ZPS Zone Paging System Instructions
I. Introduction
Model WEBS-ZPS Zone Paging System is a modular telephone zone paging and control system for use
with analog WEBS
to 99 zones and can page individual zones, groups of zones (up to 32), or all zones at once.
II. Contents
Before beginning installation, make sure you have all the included components. The WEBS-ZPS
includes:
III. Mounting
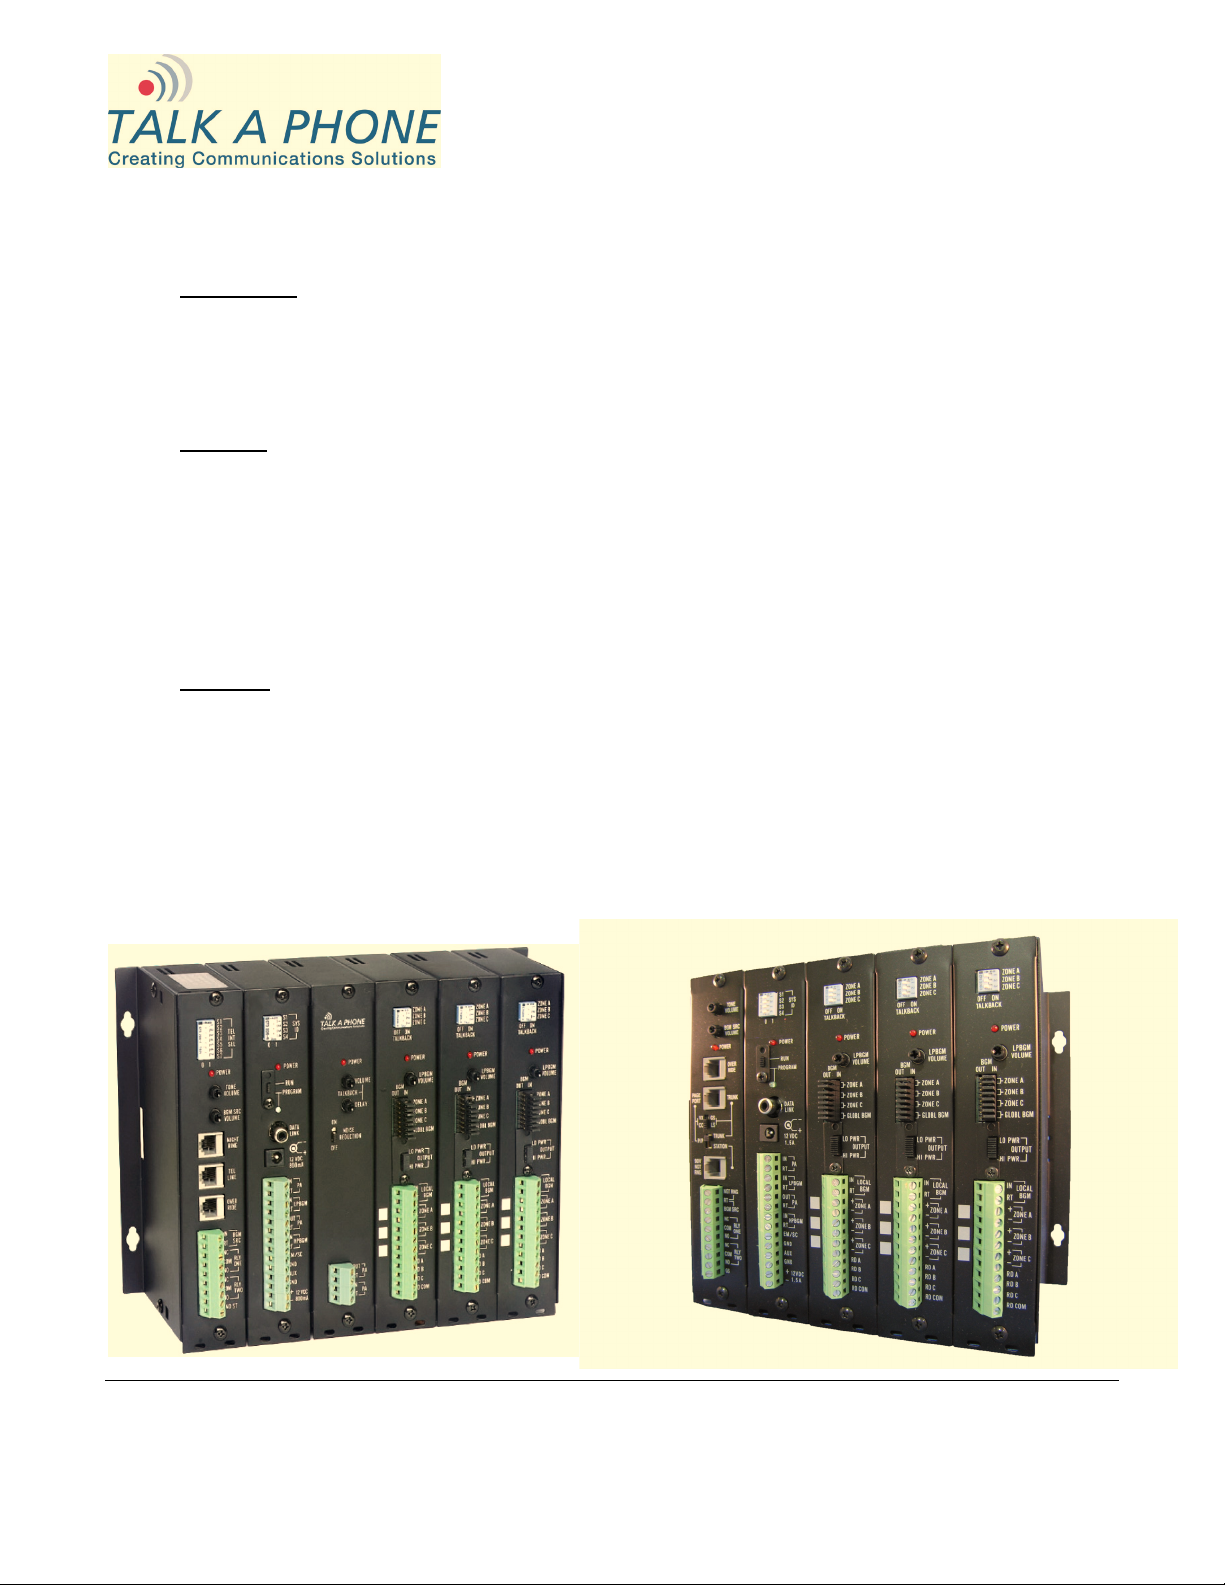
The WEBS-ZPS is designed to be wall mounted with the modules side-by-side like books. They should
be oriented so the zone modules are on the right as shown in Figure 1(a) and 1(b). Figure 1(a) illustrates
a WEBS-ZPS unit with a 7-pin dual inline pin (DIP) switch on the first module and Figure 1(b) illustrates a
WEBS-ZPS unit without a 7-pin DIP switch on the first module. There is no functional difference between
the two.
A rack mounting kit is available as Model WEBS-RMKT.
This system is powered by plugging the AC adaptor into the module second from the left.
®
stations (such as WEBS-MT/R, WEBS-WM and WEBS-PA-2A). It is expandable up
Qty. Part
1 WEBS-ZPS
1 AC Adapter
Figure 1(a). WEBS-ZPS (with 7-pin DIP switch). Figure 1(b). WEBS-ZPS (without 7-pin DIP switch).
Talk-A-Phone Co. • 7530 North Natchez Avenue • Niles, Illinois 60714-3804 Rev. 1/6/2010
Phone 773.539.1100 • Fax 773.539.1241 • info@talkaphone.com • www.talkaphone.com
All prices and specifications are subject to change without notice.
Talk-A-Phone, Talk-A-Lert, Scream Alert and WEBS are registered trademarks of Talk-A-Phone Co.
Copyright © 2011 Talk-A-Phone Co. All rights reserved.
Page 2

WEBS-ZPS Zone Paging System Instructions
IV. System Wiring
Option A:
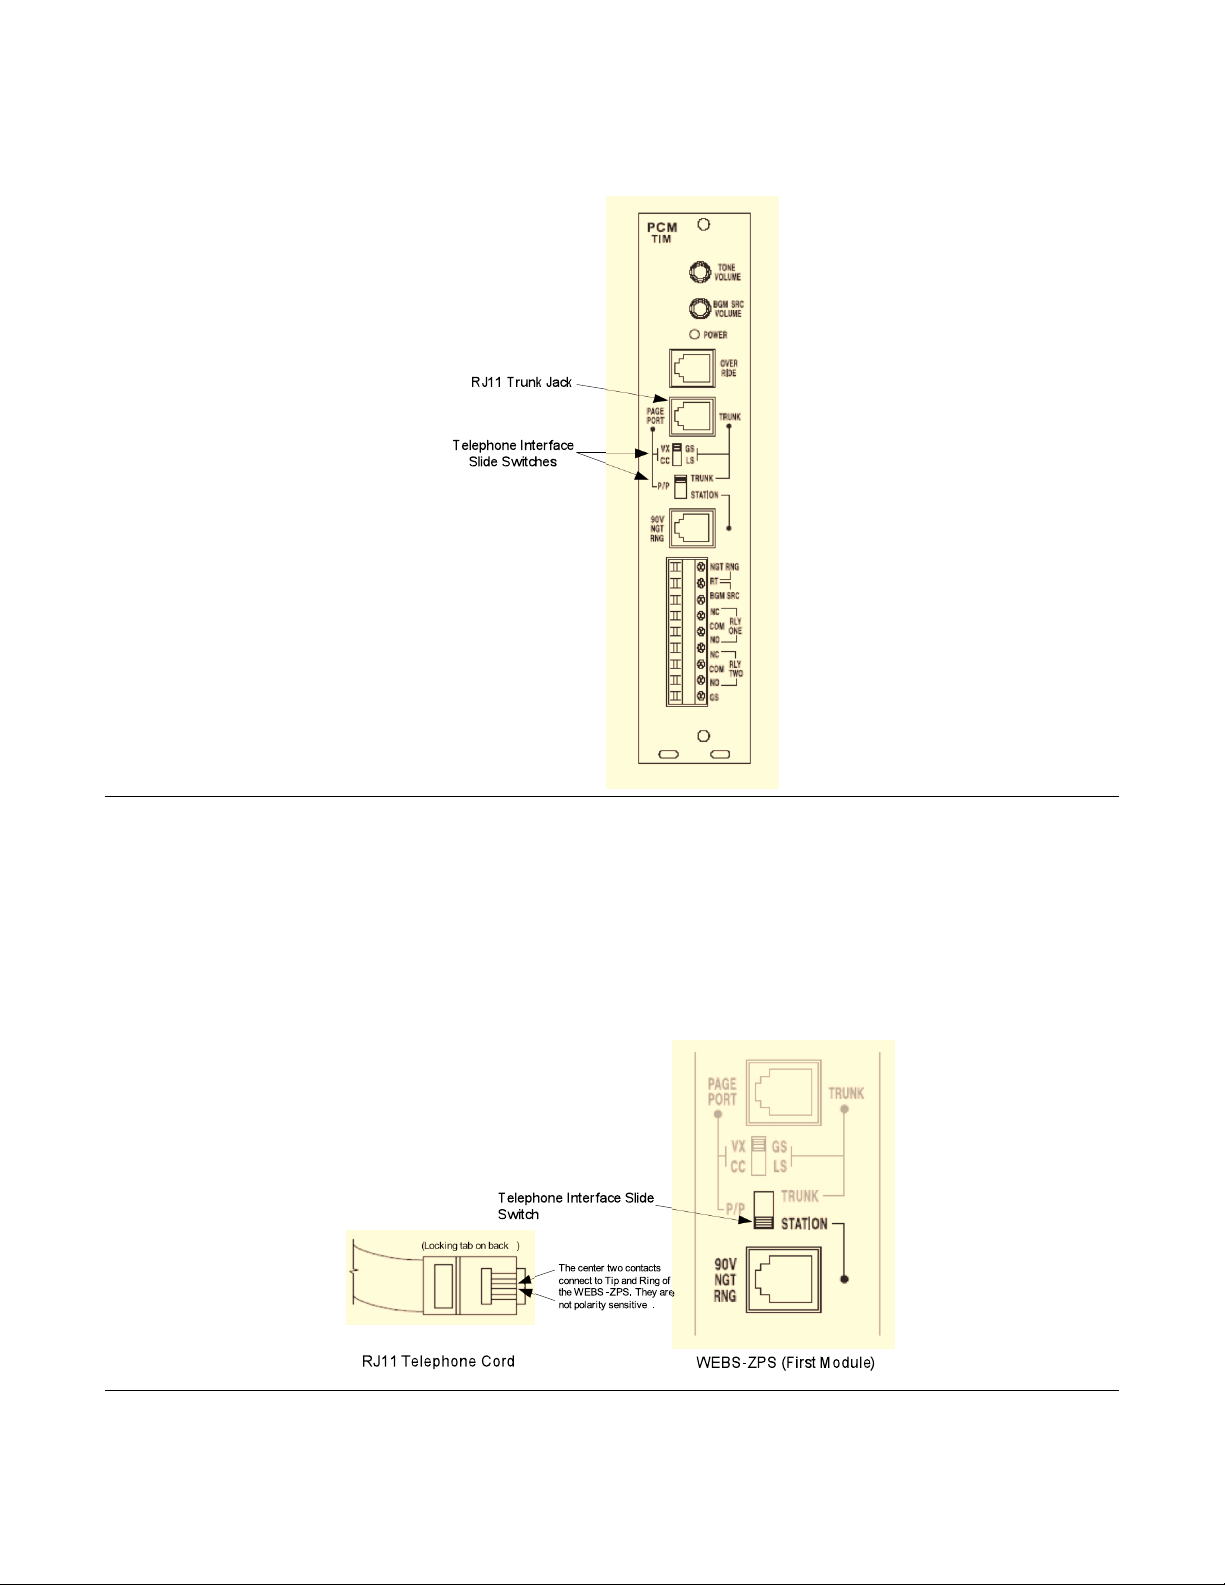
If the first module of the WEBS-ZPS unit has a 7-pin DIP switch (TEL INT SEL) as shown in Figure 2,
please refer to the following set of instructions:
Figure 2. WEBS-ZPS with 7-pin DIP switch (TEL INT SEL).
As shown in Figure 2, take the telephone cord from the interface system and wire it to the RJ11 TELLINE jack to pins 3 and 4 (red and green). Use a 4 or 6-pin modular cord to connect the RJ11 to the TELLINE input.
For PBX Station Access/CO Line Configuration, set the TEL-INT DIP switches on the WEBS-ZPS for
the following configuration: switch 6 ON (to the right) and 1, 2, 3, 4, 5, 6 and 7 OFF (to the left). Locate
the SYS-ID DIP switches and set them to the off position (to the left).
For PBX Loop Start Trunk Configuration, set the TEL-INT DIP switches on the module as: switches 3,
4, and 5 ON (to the right) and 1, 2, 6 and 7 OFF (to the left).
For PBX Ground Start Trunk Configuration, set the TEL-INT DIP switches on the module as: switches
2, 4, and 5 ON (to the right) and 1, 3, 6 and 7 OFF (to the left).
Talk-A-Phone Co. • 7530 North Natchez Avenue • Niles, Illinois 60714-3804 Page 2 of 7
Phone 773.539.1100 • Fax 773.539.1241 • info@talkaphone.com • www.talkaphone.com
All prices and specifications are subject to change without notice.
Talk-A-Phone, Talk-A-Lert, Scream Alert and WEBS are registered trademarks of Talk-A-Phone Co.
Copyright © 2011 Talk-A-Phone Co. All rights reserved.
Page 3
WEBS-ZPS Zone Paging System Instructions
Option B:
If the first module of the WEBS-ZPS unit does not have a 7-pin DIP switch (TEL INT SEL) as shown in
Figure 3, please refer to the following set of instructions:
Figure 3. WEBS-ZPS without 7-pin DIP switch (TEL INT SEL).
Use a modular RJ11 telephone cord (minimum 2-conductor) to connect the module to the phone interface
system.
For PBX Station Access/CO Line Configuration, move the TELEPHONE INTERFACE SLIDE switch on
the module to the position shown in Figure 4 (i.e. STATION). The two center conductors of the RJ11 cord
are TIP and RING and are not polarity sensitive. Plug one end of the RJ11 telephone cord to the PBX or
CO modular jack and the other end in to the STATION jack on the module.
Figure 4. WEBS-ZPS (without 7-pin DIP switch) for a PBX Station Access/CO Line configuration.
Copyright © 2011 Talk-A-Phone Co. All rights reserved.
Talk-A-Phone Co. • 7530 North Natchez Avenue • Niles, Illinois 60714-3804 Page 3 of 7
Phone 773.539.1100 • Fax 773.539.1241 • info@talkaphone.com • www.talkaphone.com
All prices and specifications are subject to change without notice.
Talk-A-Phone, Talk-A-Lert, Scream Alert and WEBS are registered trademarks of Talk-A-Phone Co.
Page 4

WEBS-ZPS Zone Paging System Instructions
For PBX Loop Start Trunk Configuration, move the TELEPHONE INTERFACE SLIDE switches on the
module to the positions shown in Figure 5 (i.e. LS and TRUNK). The two center conductors of the RJ11
cord are TIP and RING 48VDC and have a specific polarity. Plug one end of the cord into the Loop Start
Trunk of the PBX and the other end into the TRUNK jack on the module.
Figure 5. WEBS-ZPS (without 7-pin DIP switch) for a PBX Loop Start Trunk configuration.
For PBX Ground Start Trunk Configuration, move the TELEPHONE INTERFACE SLIDE switches on
the module to the positions shown in Figure 6 (i.e. GS and TRUNK). The two center conductors of the
RJ11 cord are TIP and RING 48VDC and have a specific polarity. Plug one end of the cord into the
Ground Start Trunk of the PBX and the other end into the TRUNK jack on the module.
Figure 6. WEBS-ZPS (without 7-pin DIP switch) for a PBX Ground Start Trunk configuration.
The second module should have all its SYS ID 4-pin DIP switches set to zero. Connect the 12VDC power
supply to the module. Remove the switch lock and place the PROGRAM/RUN switch on the second
module to the RUN position. Set the TALK BACK 3-pin DIP switch to the OFF position (to the left) for all
the zones. Set the OUTPUT switch to LO PWR position.
Locate the terminals labeled ZONE A and connect them to the WEBS-MT/R tower. Each WEBS-MT/R
tower is allocated to a single zone on the WEBS-ZPS. Zone A will be Zone 1 and can be paged by
following the directions in Section VI of this manual. Zone B will be Zone 2, Zone C will be Zone 3, and
Zone A of the next module will be Zone 4, etc. Follow the same procedure for the remaining zones. Refer
to Figure 7(a) or 7(b), to connect the WEBS-ZPS to the WEBS-MT/R Amplifier (black chassis) or the
WEBS-MT/R Amplifier (silver chassis) respectively.
Talk-A-Phone Co. • 7530 North Natchez Avenue • Niles, Illinois 60714-3804 Page 4 of 7
Phone 773.539.1100 • Fax 773.539.1241 • info@talkaphone.com • www.talkaphone.com
All prices and specifications are subject to change without notice.
Talk-A-Phone, Talk-A-Lert, Scream Alert and WEBS are registered trademarks of Talk-A-Phone Co.
Copyright © 2011 Talk-A-Phone Co. All rights reserved.
Page 5

WEBS-ZPS Zone Paging System Instructions
Figure 7(a). Connecting the WEBS-ZPS to the WEBS-MT/R Amplifier (black chassis)
Figure 7(b). Connecting the WEBS-ZPS to the WEBS-MT/R Amplifier (silver chassis) via the DIN Rail Terminal Block
Talk-A-Phone Co. • 7530 North Natchez Avenue • Niles, Illinois 60714-3804 Page 5 of 7
Phone 773.539.1100 • Fax 773.539.1241 • info@talkaphone.com • www.talkaphone.com
All prices and specifications are subject to change without notice.
Talk-A-Phone, Talk-A-Lert, Scream Alert and WEBS are registered trademarks of Talk-A-Phone Co.
Copyright © 2011 Talk-A-Phone Co. All rights reserved.
Page 6

WEBS-ZPS Zone Paging System Instructions
V. Zone Paging System Programming
1. To switch to programming mode, remove the switch lock and place the PROGRAM/RUN switch to
PROGRAM position. In the case of a WEBS-ZPS unit without a 7-pin DIP switch (TEL INT SEL) on
the first module, all programming is accomplished through the TRUNK jack on the first module, using
the appropriate installed interface. To simplify initial programming, it is suggested that you change the
interface type to loop start trunk as shown in Figure 5 and connect a single-line telephone to the
TRUNK jack. Once initial programming is completed, re-select the proper interface type and connect
the access line.
2. The third, fourth, and fifth modules (zone modules) are not changed during programming.
3. Access the WEBS-ZPS system by either going off-hook with a single line telephone connected to the
WEBS-ZPS or by dialing the paging access number for the telephone system.
Programming Zone Groups
1. Dial the paging access number for your telephone system.
2. The WEBS-ZPS will emit 3 beep tones, indicating access to the programming mode.
3. Dial [*] followed by the 2-digit number of the zone group (01-32) you want to create. Follow this with
the two-digit numbers of the zones you want to be in the zone group. To save the data press [#].
Example: If you want to create zone group 7 consisting of zones 2, 3, and 12, you would dial:
[*][0][7][0][2][0][3][1][2][#].
4. When finished programming return the PROGRAM/RUN switch to RUN.
To Erase a Zone Group
1. Dial the paging access number for your telephone system.
2. The WEBS-ZPS will emit 3 beep tones, indicating access to the programming mode.
3. Press [*] and the 2-digit zone group number you wish to erase and then press [#].
4. When finished programming return the PROGRAM/RUN switch to RUN.
To Disable the 30-Second Paging Time Out and 6-Second VOX Feature
1. Dial the paging access number for your telephone system.
2. The WEBS-ZPS will emit 3 beep tones, indicating access to the programming mode.
3. Dial 05000#
4. Dial 0510#
5. If the system accepts the code, you will hear a short double beep. Otherwise if the code is not
accepted, you will hear a busy tone. If the code is not accepted, hang up, re-access the system and
try again.
6. Hang up the phone and place the PROGRAM/RUN switch in the RUN position.
Talk-A-Phone Co. • 7530 North Natchez Avenue • Niles, Illinois 60714-3804 Page 6 of 7
Phone 773.539.1100 • Fax 773.539.1241 • info@talkaphone.com • www.talkaphone.com
All prices and specifications are subject to change without notice.
Talk-A-Phone, Talk-A-Lert, Scream Alert and WEBS are registered trademarks of Talk-A-Phone Co.
Copyright © 2011 Talk-A-Phone Co. All rights reserved.
Page 7

WEBS-ZPS Zone Paging System Instructions
VI. Zone Paging System Operation
Make sure the PROGRAM/RUN switch is in RUN position.
To Page a Zone
1. Dial the paging access number for your telephone system.
2. Listen for the confirmation tone (i.e. a double beep).
3. Dial the number of the zone you wish to page. All dialing must be two digits. For example:
[0][1] for zone 1 (Zone A of the first zone module)
[0][2] for zone 2, etc.
If a zone number does not exist, the caller will hear a busy tone.
4. Make the page. Hang up when finished.
To Make an All-Call Page
1. Dial the paging access number for your telephone system.
2. Listen for the confirmation tone (i.e. a double beep).
3. Dial [0][0] and make an All-Call page.
4. Make the page. Hang up when finished.
To Page a Zone Group
1. Dial the paging access number for your telephone system.
2. Listen for the confirmation tone (i.e. a double beep).
3. Dial [*] and the zone group number you wish to page. Zone group numbers consist of two digits.
[*][0][1] for zone group 1,
[*][0][1] for zone group 2, etc. up to 32 zones.
4. Make the page. Hang up when finished.
Talk-A-Phone Co. • 7530 North Natchez Avenue • Niles, Illinois 60714-3804 Page 7 of 7
Phone 773.539.1100 • Fax 773.539.1241 • info@talkaphone.com • www.talkaphone.com
All prices and specifications are subject to change without notice.
Talk-A-Phone, Talk-A-Lert, Scream Alert and WEBS are registered trademarks of Talk-A-Phone Co.
Copyright © 2011 Talk-A-Phone Co. All rights reserved.
 Loading...