

Page 1

WEBS-PM – Pedestal Mount
Emergency Phone Station with WEBS®
Installation Instructions
I. Introduction
WEBS-PM Pedestal Mount Emergency Phone Station with WEBS® is designed to mount to concrete
foundation using anchor bolts.
II. Contents
Before beginning installation, make sure you have all the included components. Each Pedestal consists
of three packages. Package #1 is the labeled WEBS-PM-KIT. Package #2 is labeled ETP-PM PARTS.
Package #3 contains the Pedestal itself.
WEBS-PM-KIT
Qty. Part Number Description
1 68642 2-Channel Amplifier
1 86396 Power Supply (12VDC, 5A)
2 83075 Loudspeaker
ETP-PM PARTS
Qty. Part Number Description
4 42838 J-Bolts
8 42839 3/4"-10 Hex Nut
8 42840 3/4" Washer
3 42867 10-24 x 1/2" Tamper Resistant Screws
2 42843 6-32 Hex Nut
1 68590 LED Panel Light (12-24VAC/DC, 120VAC)
1 67478 Polycarbonate Cover for LED Panel Light
1 24717 Pedestal Mount Aluminum Template
III. Installation
1. Electrical and telephone line conduits should be run through the foundation and into the center 4"
diameter hole of the Pedestal.
NOTE: To insure proper grounding of all electrical components, the tower mount should be effectively earth grounded
from the grounding stud (located across from the lower access panel) with 6 AWG or better insulated, stranded copper
wire to the metallic power service raceway (conduit) or an 8 foot or longer corrosion-resistant ground spike. It is the
installer's obligation to ensure compliance with all national, regional, and local regulations.
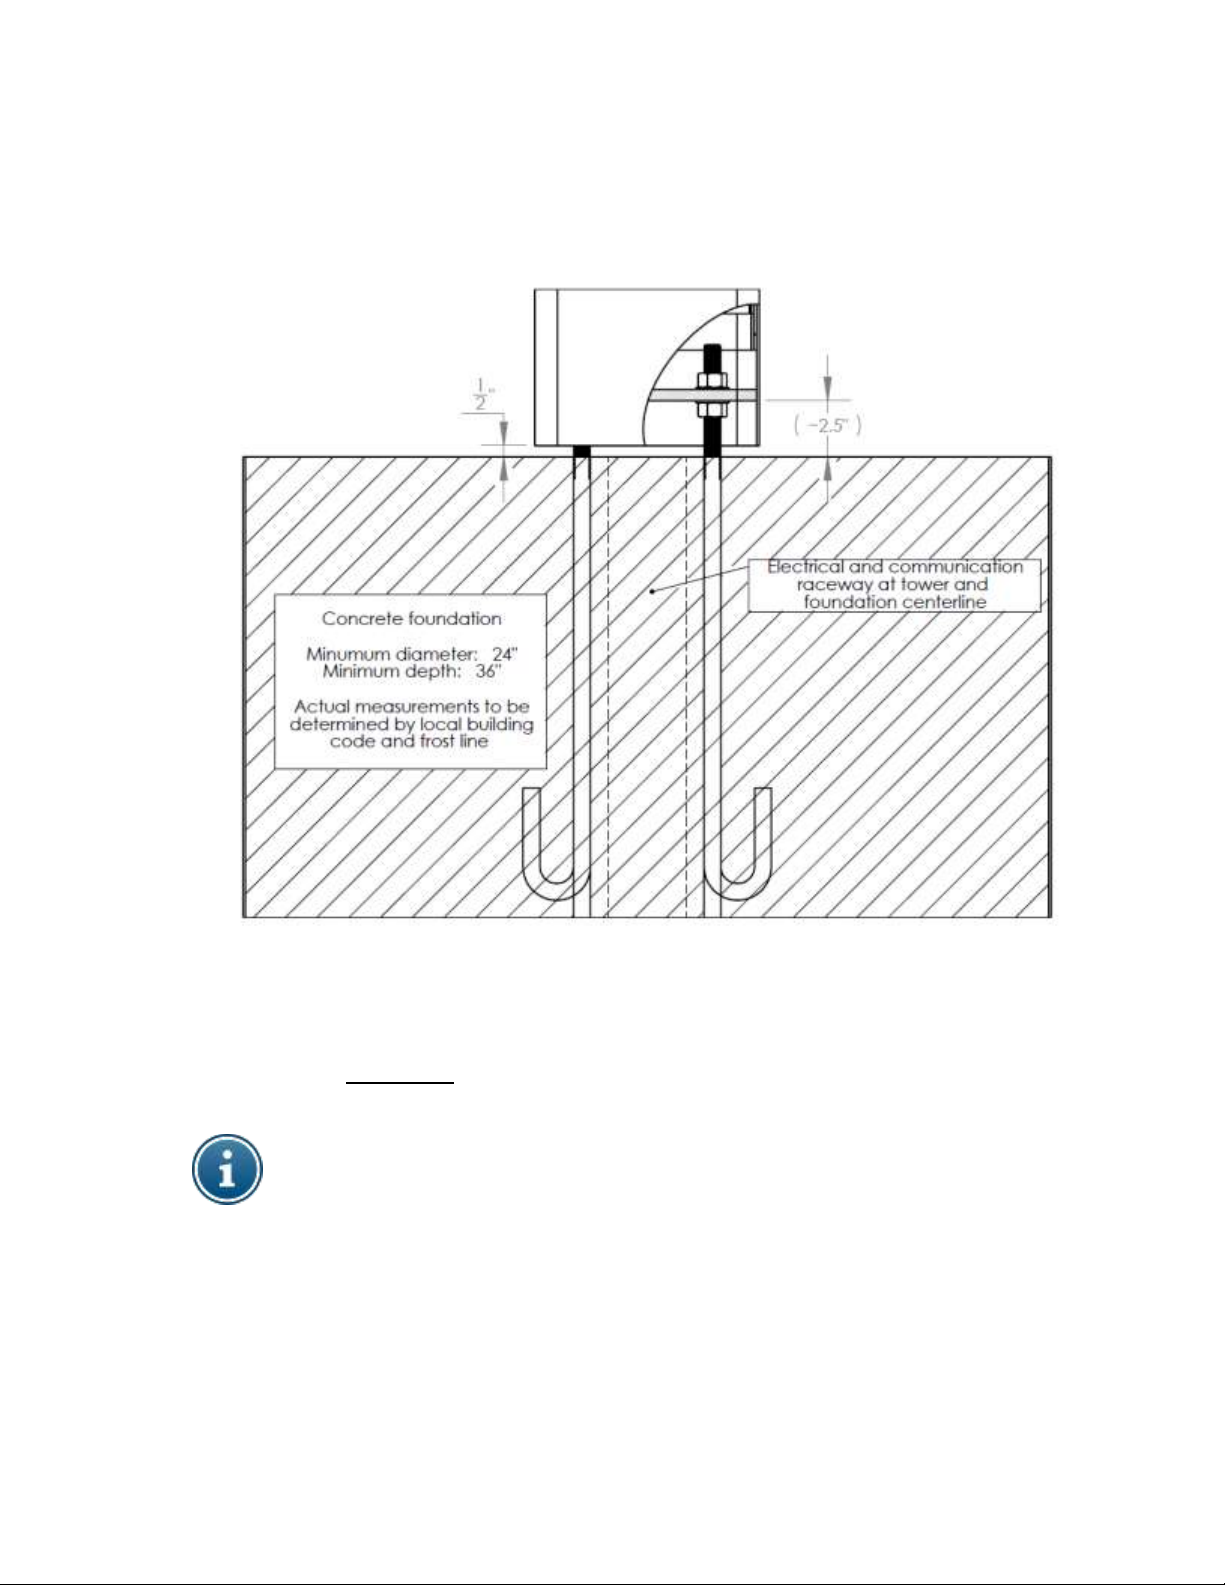
2. Pour the foundation at least 2-feet in diameter and 3-feet deep according to your local code and frost
line.
3. Install the four (4) 3/4” - 10 x 24” long anchor bolts below grade with five inches (5”) projecting
above grade. Use the template provided to properly position the bolts within the concrete
foundation.
All prices and specifications are subject to change without notice. Talk-A-Phone, Scream Alert, WEBS and WEBS Contact are registered trademarks of Talk-A-Phone Co. All rights reserved.
Rev. 4/7/2014
Copyright 2014 Talk-A-Phone Co. • 7530 North Natchez Avenue • Niles, Illinois 60714 • Phone 773.539.1100 • info@talkaphone.com • www.talkaphone.com.
Page 2
WEBS-PM – Pedestal Mount
Emergency Phone Station with WEBS®
Installation Instructions
4. Install one 3/4” nut and one washer on each anchor bolt 2.5”-3.5" above grade to top of washer. This
will allow for a 1/2" air gap between the foundation and the Pedestal which will allow airflow and
prevent moisture problems. Verify that the nuts are level (0° pitch).
NOTE: To insure proper grounding of all electrical components, the tower mount should be effectively earth
grounded from the grounding stud (located across from the lower access panel) with 6 AWG or better insulated,
stranded copper wire to the metallic power service raceway (conduit) or an 8' or longer corrosion-resistant ground
spike.
5. After removing the lower access panel of the Pedestal, install the tower onto the bolts with the
Emergency Phone opening oriented in the desired direction. Install second set of nuts and washers.
Tighten the upper nuts; the bottom set is used only for leveling.
All prices and specifications are subject to change without notice. Talk-A-Phone, Scream Alert, WEBS and WEBS Contact are registered trademarks of Talk-A-Phone Co. All rights reserved.
Copyright 2014 Talk-A-Phone Co. • 7530 North Natchez Avenue • Niles, Illinois 60714 • Phone 773.539.1100 • info@talkaphone.com • www.talkaphone.com.
Page 2 of 4
Page 3

WEBS-PM – Pedestal Mount
Text on Wire Label
Wire Color
CH1(+)
White
CH1(-)
White-Black
CH2(+)
Gray
CH2(-)
Gray-Black
Emergency Phone Station with WEBS®
Installation Instructions
IV. Wiring
1. Install conduit through the 4-inch diameter hole at the bottom of the Pedestal and bring power line
and/or communication line to the inside of the Pedestal.
2. The WEBS-AMP-2 amplifier and loudspeakers are provided in the WEBS-PM-KIT package.
3. Connect the WEBS-AMP-2 amplifier audio input (black and red flying leads from the interface labeled
“INPUT”) to the audio line level output of either the WEBS-CM-2 or VOIP-500 Series Phone.
4. Connect the WEBS-AMP-2 amplifier trigger pair (blue and orange-white) to any programmed Aux.
Output of either the WEBS-CM-2 or VOIP-500 Series Phone. Refer to the WEBS-CM-2 or VOIP-
500 Series Phone Manual for information regarding device configuration and programming.
5. For the WEBS-PM 120VAC - 240VAC power option, connect the input power supply of the WEBS-
AMP-2 amplifier to 120VAC - 240VAC, 60Hz (brown is positive, blue is neutral).
6. For the WEBS-PM 12/24 VDC power option, connect the WEBS-AMP-2 amplifier to 12VDC, 3A input
(white is positive, black is negative).
7. Mount the two (2) loudspeakers behind the appropriate speaker grilles inside the Pedestal.
8. Connect each of the two (2) loudspeakers to the WEBS-AMP-2 amplifier. Each wire is appropriately
labeled on both the loudspeaker end and the amplifier end. Match and connect the loudspeaker wire
to that of the WEBS-AMP-2 amplifier according to the color and labeling scheme defined in the table
below:
V. Amplifier and Loudspeakers
1. The WEBS-AMP-2 amplifier volume level is preset to the maximum. For configuration of the gain
setting of the audio line level output of the WEBS-CM-2 module or VOIP-500 Series Phone, please
refer to the WEBS-CM-2 or VOIP-500 Series Phone Manual for more information.
2. Exercise caution when adjusting the volume to maximum levels—ear protection is strongly
recommended. The loudspeakers are capable of reaching sound levels well above 110dBA.
All prices and specifications are subject to change without notice. Talk-A-Phone, Scream Alert, WEBS and WEBS Contact are registered trademarks of Talk-A-Phone Co. All rights reserved.
Copyright 2014 Talk-A-Phone Co. • 7530 North Natchez Avenue • Niles, Illinois 60714 • Phone 773.539.1100 • info@talkaphone.com • www.talkaphone.com.
Page 3 of 4
Page 4

WEBS-PM – Pedestal Mount
Emergency Phone Station with WEBS®
Installation Instructions
All dimensions are in inches and are provided for reference only.
All prices and specifications are subject to change without notice. Talk-A-Phone, Scream Alert, WEBS and WEBS Contact are registered trademarks of Talk-A-Phone Co. All rights reserved.
Copyright 2014 Talk-A-Phone Co. • 7530 North Natchez Avenue • Niles, Illinois 60714 • Phone 773.539.1100 • info@talkaphone.com • www.talkaphone.com.
Page 4 of 4
 Loading...