

Page 1
VOIP-500 Series Phone
Configuration and Operation Manual
v3.0.2
Rev. 7/31/12
All prices and specifications are subject to change without notice. Talk-A-Phone, Scream Alert, WEBS and WEBS Contact are registered trademarks of Talk-A-Phone Co. All rights reserved.
Copyright 2012 Talk-A-Phone Co. • 7530 North Natchez Avenue • Niles, Illinois 60714 • Phone 773.539.1100 • info@talkaphone.com • www.talkaphone.com.
Page 2

VOIP-500 Series Phone
Configuration and Operation Manual
Contents
1. Introduction ...................................................................................................................................................6
1.1. Overview of the Manual .............................................................................................................................6
1.2. Intended Audience .....................................................................................................................................6
1.3. Objective .....................................................................................................................................................6
1.4. Typographic Conventions ...........................................................................................................................6
1.5. Related Documents ....................................................................................................................................7
1.6. Technical Support / Help Desk ...................................................................................................................7
2. Overview ........................................................................................................................................................8
2.1. VOIP-500 Series Phone Overview ...............................................................................................................8
3. Getting Started ...............................................................................................................................................9
3.1. Pre-requisites..............................................................................................................................................9
3.2. Configuration Using the Web GUI ..............................................................................................................9
3.3. Configuration Using the Serial Console ................................................................................................... 10
4. Using the Web GUI ...................................................................................................................................... 12
4.1. Web GUI Layout ....................................................................................................................................... 12
4.2. Web Application Menu ............................................................................................................................ 14
4.3. Home ....................................................................................................................................................... 15
4.4. Network ................................................................................................................................................... 16
4.5. VoIP .......................................................................................................................................................... 19
4.6. Devices ..................................................................................................................................................... 26
4.7. Digital Outputs ......................................................................................................................................... 35
4.8. Voice Messages ....................................................................................................................................... 39
4.9. Authentication ......................................................................................................................................... 42
4.10. Maintaining the Phone ............................................................................................................................ 44
5. Operations................................................................................................................................................... 56
5.1. Calling Emergency/Information Numbers ............................................................................................... 56
5.2. Answering the Emergency/Information Call ........................................................................................... 56
5.3. Terminating Calls ..................................................................................................................................... 56
5.4. Activating/Deactivating Auxiliary Outputs .............................................................................................. 57
5.5. Activating/Deactivating the “Help on the Way” LED............................................................................... 57
Page 2 of 90
All prices and specifications are subject to change without notice. Talk-A-Phone, Scream Alert, WEBS and WEBS Contact are registered trademarks of Talk-A-Phone Co. All rights reserved.
Copyright 2012 Talk-A-Phone Co. • 7530 North Natchez Avenue • Niles, Illinois 60714 • Phone 773.539.1100 • info@talkaphone.com • www.talkaphone.com.
Page 3

VOIP-500 Series Phone
Configuration and Operation Manual
5.6. Activating/Deactivating Speaker and Microphone ................................................................................. 57
5.7. Adjusting Volume .................................................................................................................................... 57
5.8. Playing Voice Messages ........................................................................................................................... 57
5.9. Recording Voice Messages ...................................................................................................................... 58
5.10. Previewing Voice Messages ..................................................................................................................... 58
5.11. Feedback Tones ....................................................................................................................................... 59
5.12. Paging Operation ..................................................................................................................................... 59
5.13. Line Level Recording ................................................................................................................................ 59
5.14. Silent Monitoring ..................................................................................................................................... 59
5.15. Rebooting the Phone ............................................................................................................................... 60
5.16. Factory Default Settings .......................................................................................................................... 60
All prices and specifications are subject to change without notice. Talk-A-Phone, Scream Alert, WEBS and WEBS Contact are registered trademarks of Talk-A-Phone Co. All rights reserved.
Copyright 2012 Talk-A-Phone Co. • 7530 North Natchez Avenue • Niles, Illinois 60714 • Phone 773.539.1100 • info@talkaphone.com • www.talkaphone.com.
Page 3 of 90
Page 4

Acronyms
Definitions
ADA
Americans with Disabilities Act
AEC
Acoustic Echo Cancellation
AGC
Automatic Gain Control
ANSI
The American National Standards Institute a private non-profit organization that oversees the
development of voluntary consensus standards for products, services, processes, systems, and
personnel in the United States.
AUX
Auxiliary Input/Output. An Auxiliary Input accepts a contact closure from an external device,
such as a Vehicle Detector, Door Switch, Scream Alert™, and card swipe. An auxiliary output
produces a contact closure to an external device, such as a strobe light and motorized garage
gate.
BABT
British Approvals Board of Telecommunications
CNG/VAD
Comfort Noise Generator/Voice Activity Detector. It is used to reduce the transmission rate
during inactive speech periods while maintaining an acceptable level of output quality.
CSA
Canadian Standards Association
CE
The CE marking certifies that a product has met EU consumer safety, health or environmental
requirements.
DHCP
Dynamic Host Configuration Protocol — protocol for assigning dynamic IP addresses to
devices on a network.
DNS
Domain Name Server
DTMF
Dual Tone Multi Frequency signaling is used for telecommunication signaling over telephone
lines.
FCC
Federal Communications Commission
FTP
File Transfer Protocol
GUI
Graphical User Interface
G.711
G.711 is codec also known as Pulse Code Modulation (PCM). It is the ITU-T international
standard for encoding telephone audio on a 64 kbps channel.
G.723
G.723 is an ITU-T standard speech codec.
G.729
G.729 is an audio data compression algorithm. It is the ITU-T international standard for
encoding telephone audio on 8 kbps channel.
IVR
Interactive Voice Response
IP-PBX
It is an IP based switch for call handling through public and private exchanges.
IE
Internet Explorer
IETF
The Internet Engineering Task Force (IETF) develops and promotes Internet standards.
PCBA
Printed Circuit Board Assembly
PoE
Power over Ethernet, IEEE 802.3af standard.
VOIP-500 Series Phone
Configuration and Operation Manual
Acronyms and Abbreviations
The following acronyms and abbreviations are commonly used throughout the document:
Page 4 of 90
All prices and specifications are subject to change without notice. Talk-A-Phone, Scream Alert, WEBS and WEBS Contact are registered trademarks of Talk-A-Phone Co. All rights reserved.
Copyright 2012 Talk-A-Phone Co. • 7530 North Natchez Avenue • Niles, Illinois 60714 • Phone 773.539.1100 • info@talkaphone.com • www.talkaphone.com.
Page 5

Acronyms
Definitions
QoS
Quality of Service is of particular concern for the continuous transmission of high-bandwidth
video and multimedia information.
SIP
Session Initiation Protocol is a signaling protocol, widely used for setting up and tearing down
multimedia communication sessions over network.
TIA
Telecommunications Industry Association
UL
Underwriters Laboratories
VoIP
Voice over Internet Protocol
VOIP-500 Series Phone
Configuration and Operation Manual
All prices and specifications are subject to change without notice. Talk-A-Phone, Scream Alert, WEBS and WEBS Contact are registered trademarks of Talk-A-Phone Co. All rights reserved.
Copyright 2012 Talk-A-Phone Co. • 7530 North Natchez Avenue • Niles, Illinois 60714 • Phone 773.539.1100 • info@talkaphone.com • www.talkaphone.com.
Page 5 of 90
Page 6
Item
Convention
Sample
Acronyms
All uppercase
SIP
Chapter titles
Title caps
See Chapter 3 Getting Started
Command-line
commands and
options (switches)
All lowercase, bold
ifconfig command
/a option
Device names
All uppercase
VOIP-500
Directories
All lowercase
/flash
Error message
names
Initial caps
Update failed
File names
Title caps (internal caps in short file
names are acceptable for readability)
MainLogFile.txt
BackupLogFile.txt
Menu names
Bold; title caps
Insert menu
Programs and
applications
Usually title caps
HyperTerminal
Toolbar button
names
Usually title caps (follow the
interface); bold
Apply
Reset
URLs
All lowercase; break long URLs
before a forward slash, if necessary to
break; do not hyphenate.
http://www.talkaphone.com/
User input
Usually title caps; bold
Enter Password
VOIP-500 Series Phone
Configuration and Operation Manual
1. Introduction
1.1. Overview of the Manual
This manual provides detailed instructions for the configuration and operation of VOIP-500 Series Phones. It
is recommended to read this instructional manual completely before performing any configuration.
1.2. Intended Audience
This manual is targeted towards systems administrators, or any person who would configure and maintain
VOIP-500 Series Phones. Fundamental knowledge in computer networking and Voice over Internet Protocol
(VoIP) technologies is recommended for understanding this manual.
1.3. Objective
This manual provides a detailed examination of the features included in VOIP-500 Series Phones. It guides
an administrator through the configuration and optimization of phone features. While configuration of the
VOIP-500 Series Phones is covered in detail, configuration of other peripheral VoIP network elements is
beyond the scope of this document.
1.4. Typographic Conventions
The following guidelines are used as typographic conventions in this user manual:
Page 6 of 90
All prices and specifications are subject to change without notice. Talk-A-Phone, Scream Alert, WEBS and WEBS Contact are registered trademarks of Talk-A-Phone Co. All rights reserved.
Copyright 2012 Talk-A-Phone Co. • 7530 North Natchez Avenue • Niles, Illinois 60714 • Phone 773.539.1100 • info@talkaphone.com • www.talkaphone.com.
Page 7

VOIP-500 Series Phone
Configuration and Operation Manual
1.5. Related Documents
VOIP-500 Quick Installation Guide, v1.3.1
VOIP-500 Avaya IP Office Integration Guide, v1.1
VOIP-500 Cisco UCM 8.x Integration Guide, v1.2
VOIP-500 OmniPCX Integration Guide, v1.2
WEBS-Contact Configuration and Operation Manual, v1.4
1.6. Technical Support / Help Desk
For technical assistance beyond the scope of this document, contact your distributor or Talk-A-Phone
Technical Support for further information.
Talk-A-Phone Co.
7530 North Natchez Avenue
Niles, Illinois 60714
Phone: 773.539.1100
Fax: 773.539.1241
E-mail: support@talkaphone.com
Web: www.talkaphone.com
All prices and specifications are subject to change without notice. Talk-A-Phone, Scream Alert, WEBS and WEBS Contact are registered trademarks of Talk-A-Phone Co. All rights reserved.
Copyright 2012 Talk-A-Phone Co. • 7530 North Natchez Avenue • Niles, Illinois 60714 • Phone 773.539.1100 • info@talkaphone.com • www.talkaphone.com.
Page 7 of 90
Page 8

1
VOIP-500 Series Phone
Configuration and Operation Manual
2. Overview
2.1. VOIP-500 Series Phone Overview
The VOIP-500 series phones are outdoor-rated, ADA-compliant hands-free Voice over IP (VoIP)
Emergency/Information Phones for use in locations such as: parking facilities, college campuses, medical
centers, and industrial parks. VOIP-500 series phones are SIP1 compliant.
The VOIP-500 series of phones are categorized into various device modes based on the number of buttons,
keypad, handset and speaker/microphone present on the phone’s faceplate.
These device modes are also given different marketing names. A model with “Keypad” is denoted with a letter
“K” in its model number. A model with two buttons is denoted with a letter “D” in its model number. For
example, VOIP-500 corresponds to “Single button Emergency VoIP phone”. VOIP-500D is “Dual button
Emergency VoIP phone”. VOIP-500K is “Two-button Emergency VoIP Phone with Keypad”.
Some of the functionality described below may not be available depending on the phone device mode. The
rest of the document may use the term “phone” to refer to a “VOIP-500 series” phone.
NOTE: Not all features of the VOIP-500 series phones are available when used in conjunction with analog
telephony adapter devices or with the Public Switched Telephone Network (PSTN).
RFC 3261 and RFC 2833 for DTMF delay
Page 8 of 90
All prices and specifications are subject to change without notice. Talk-A-Phone, Scream Alert, WEBS and WEBS Contact are registered trademarks of Talk-A-Phone Co. All rights reserved.
Copyright 2012 Talk-A-Phone Co. • 7530 North Natchez Avenue • Niles, Illinois 60714 • Phone 773.539.1100 • info@talkaphone.com • www.talkaphone.com.
Page 9
VOIP-500 Series Phone
Configuration and Operation Manual
3. Getting Started
3.1. Pre-requisites
Prior to configuring a VOIP-500 Series Phone, ensure the unit is powered on and connected to the network.
The VOIP-500 can be configured from a computer with either a TCP/IP network connection or a DB-9 Serial
port. The VOIP-500 supports straight-through serial connections for basic programming. For access to the full
configurable feature set, a modern web browser will be required.
The VOIP-500 currently supports access from:
Internet Explorer 8 or greater
Firefox 3.5 or greater
3.2. Configuration Using the Web GUI
1. Ensure both the VOIP-500 and your PC are connected to the Local Area Network. A direct connection to
the VOIP-500 will require the use of a crossover network cable.
VOIP-500 Series Phones are pre-configured with the following default settings:
IP Address: 192.168.1.10
Username: admin
Password: admin@123
2. Configure the IP address of your PC to be on the same subnet as the VOIP-500. For example, 192.168.1.3
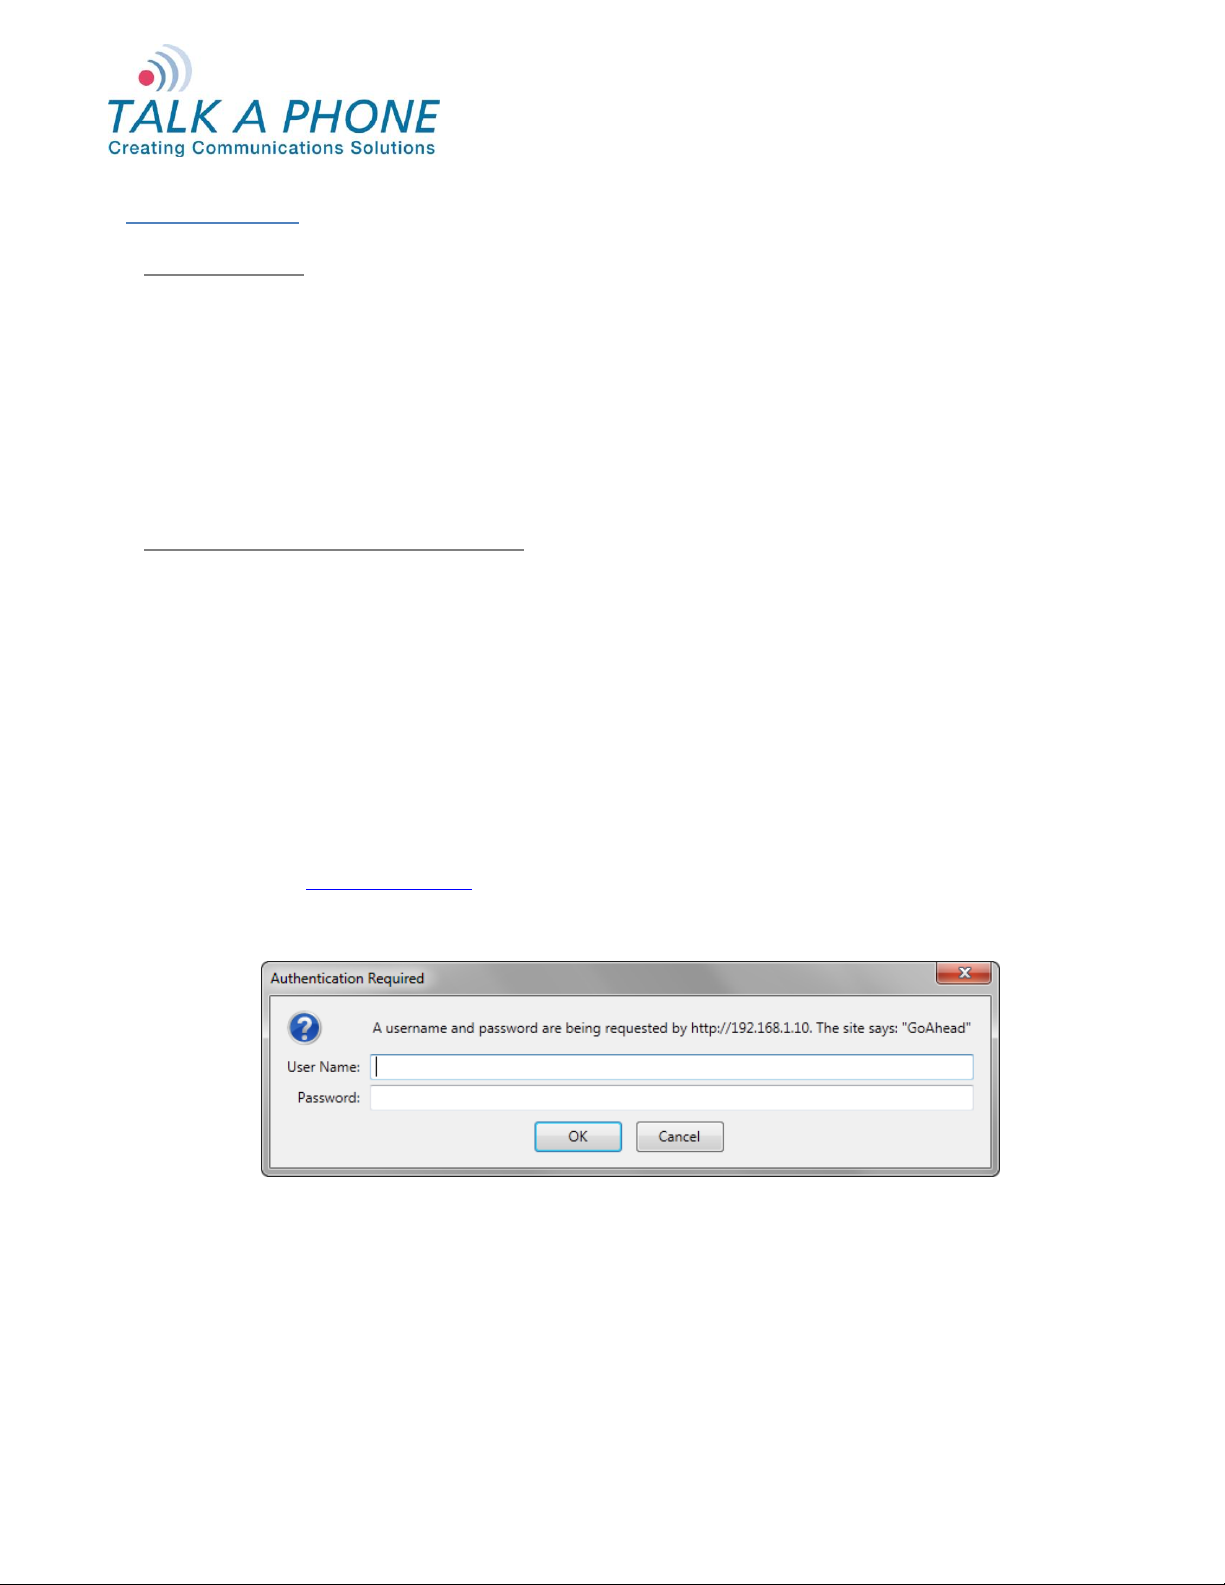
3. Open a supported web browser and direct it to the IP address of the VOIP-500. For example, enter the
following URL: http://192.168.1.10.
The browser prompts for authentication:
Figure 1 Authentication Required
4. Enter the default Username and Password. After authentication is successful, you are redirected to the
Home page.
5. Further configuration of VOIP-500 settings are examined in Section 4: Using the Web GUI.
All prices and specifications are subject to change without notice. Talk-A-Phone, Scream Alert, WEBS and WEBS Contact are registered trademarks of Talk-A-Phone Co. All rights reserved.
Copyright 2012 Talk-A-Phone Co. • 7530 North Natchez Avenue • Niles, Illinois 60714 • Phone 773.539.1100 • info@talkaphone.com • www.talkaphone.com.
Page 9 of 90
Page 10

VOIP-500 Series Phone
Configuration and Operation Manual
3.3. Configuration Using the Serial Console
Basic settings can be configured on VOIP-500 Series Phones through a serial console connection.
Knowledge of Linux shell commands is recommended for serial console configuration.
Most commonly, the serial console connection can be used to set the IP address, as described below.
1. Connect a straight-through serial cable (DB9 Male to DB9 Female) from the serial port on the phone to an
available COM port on the PC, noting which port was utilized.
2. Open your preferred serial console application (e.g., HyperTerminal or TeraTerm) on the PC and specify
the following settings:
Communications Port: <Determined in Step 1>
Baud rate (bits per second): 115200
Data bits: 8
Parity: None
Stop bits: 1
Flow control: None
3. Once connected, you will be presented with the following prompt:
root:/>
4. The /flash directory contains persistent files. It is highly recommended to switch to the /flash directory by
entering the following command, and pressing Enter.
Note the space between ‘cd’ and ‘/flash’:
root:/> cd /flash
5. Create a file where configuration parameters can be entered. For example, we create the config.txt file by
entering the following command, and pressing Enter.
Note the space between ‘vi’ and ‘config.txt’:
root:flash/> vi config.txt
6. While in the vi application, press i to force vi into “Insert Mode.”
7. The body of the config.txt file can now be created.
To set a new static IP address enter the following data:
NetworkMode = 3
IPAddress = <IP address, e.g. 192.168.1.10>
Netmask = <netmask, e.g. 255.255.255.0>
Gateway = <default gateway, e.g. 192.168.1.1>
8. Once the configuration options are entered, save the changes and exit vi by pressing Escape, then
entering :wq
To exit without saving changes press Escape, then enter :q!
Page 10 of 90
All prices and specifications are subject to change without notice. Talk-A-Phone, Scream Alert, WEBS and WEBS Contact are registered trademarks of Talk-A-Phone Co. All rights reserved.
Copyright 2012 Talk-A-Phone Co. • 7530 North Natchez Avenue • Niles, Illinois 60714 • Phone 773.539.1100 • info@talkaphone.com • www.talkaphone.com.
Page 11

VOIP-500 Series Phone
Configuration and Operation Manual
9. With the configuration file created, the final step is to apply these settings to the VOIP-500. Enter the
following command, and press Enter.
root:flash/> configApp admin admin@123 config.txt
10. A reboot is required after serial console configuration. Enter the following command, and press Enter.
root:flash/> reboot
11. All configurable options are available in Appendix E: Sample Serial Configuration File.
All prices and specifications are subject to change without notice. Talk-A-Phone, Scream Alert, WEBS and WEBS Contact are registered trademarks of Talk-A-Phone Co. All rights reserved.
Copyright 2012 Talk-A-Phone Co. • 7530 North Natchez Avenue • Niles, Illinois 60714 • Phone 773.539.1100 • info@talkaphone.com • www.talkaphone.com.
Page 11 of 90
Page 12
1
3b 2 3a
4
3c
VOIP-500 Series Phone
Configuration and Operation Manual
4. Using the Web GUI
This section describes various configurable options available from the Web Interface of the phone. It is the
primary interface for configuring and monitoring the phone. You must assign an IP address (Refer to 4.4.1 IP
Settings) before configuring the features of the phone.
4.1. Web GUI Layout
This section describes the layout of the Web GUI.
Figure 2 Using Web GUI
The Web GUI layout is divided into four sections:
1. Header: The Header section displays Talk-A-Phone Logo and product title “VoIP Phone”. The right side of
the header has the Refresh, Help, and Logout buttons. The Refresh button is used to reload the content
section. The Help button provides help content from the Talk-A-Phone website. The Logout button logs out
the user. The Apply button will not be grayed out if the content pane (3) contains configurable parameters.
The Apply button is used to save configuration changes to phone.
2. Menu: The menu page provides links to different menus and submenus available on the phone.
Page 12 of 90
All prices and specifications are subject to change without notice. Talk-A-Phone, Scream Alert, WEBS and WEBS Contact are registered trademarks of Talk-A-Phone Co. All rights reserved.
Copyright 2012 Talk-A-Phone Co. • 7530 North Natchez Avenue • Niles, Illinois 60714 • Phone 773.539.1100 • info@talkaphone.com • www.talkaphone.com.
Page 13

VOIP-500 Series Phone
Configuration and Operation Manual
3. Content: The top part of the content section is used for Page Title (3a) and Status (3b) for any operation.
Bottom part of content pane (3c) is used for displaying configurable fields when a menu or a submenu is
selected. All the fields (text boxes/dropdown) display allowed field ranges.
4. Footer: The Footer section displays the Talk-A-Phone copyright statement.
To update the phone configuration, the user must press the Apply button. After clicking Apply the status will
be displayed in the “Status” section of the Content section (3b).
Note: When a configuration change is in the process of being applied, an message appears.
An message appears for the successful update.
An message appears if the input is incorrect. Incorrect inputs are marked with red.
All prices and specifications are subject to change without notice. Talk-A-Phone, Scream Alert, WEBS and WEBS Contact are registered trademarks of Talk-A-Phone Co. All rights reserved.
Copyright 2012 Talk-A-Phone Co. • 7530 North Natchez Avenue • Niles, Illinois 60714 • Phone 773.539.1100 • info@talkaphone.com • www.talkaphone.com.
Page 13 of 90
Page 14
Configuration and Operation Manual
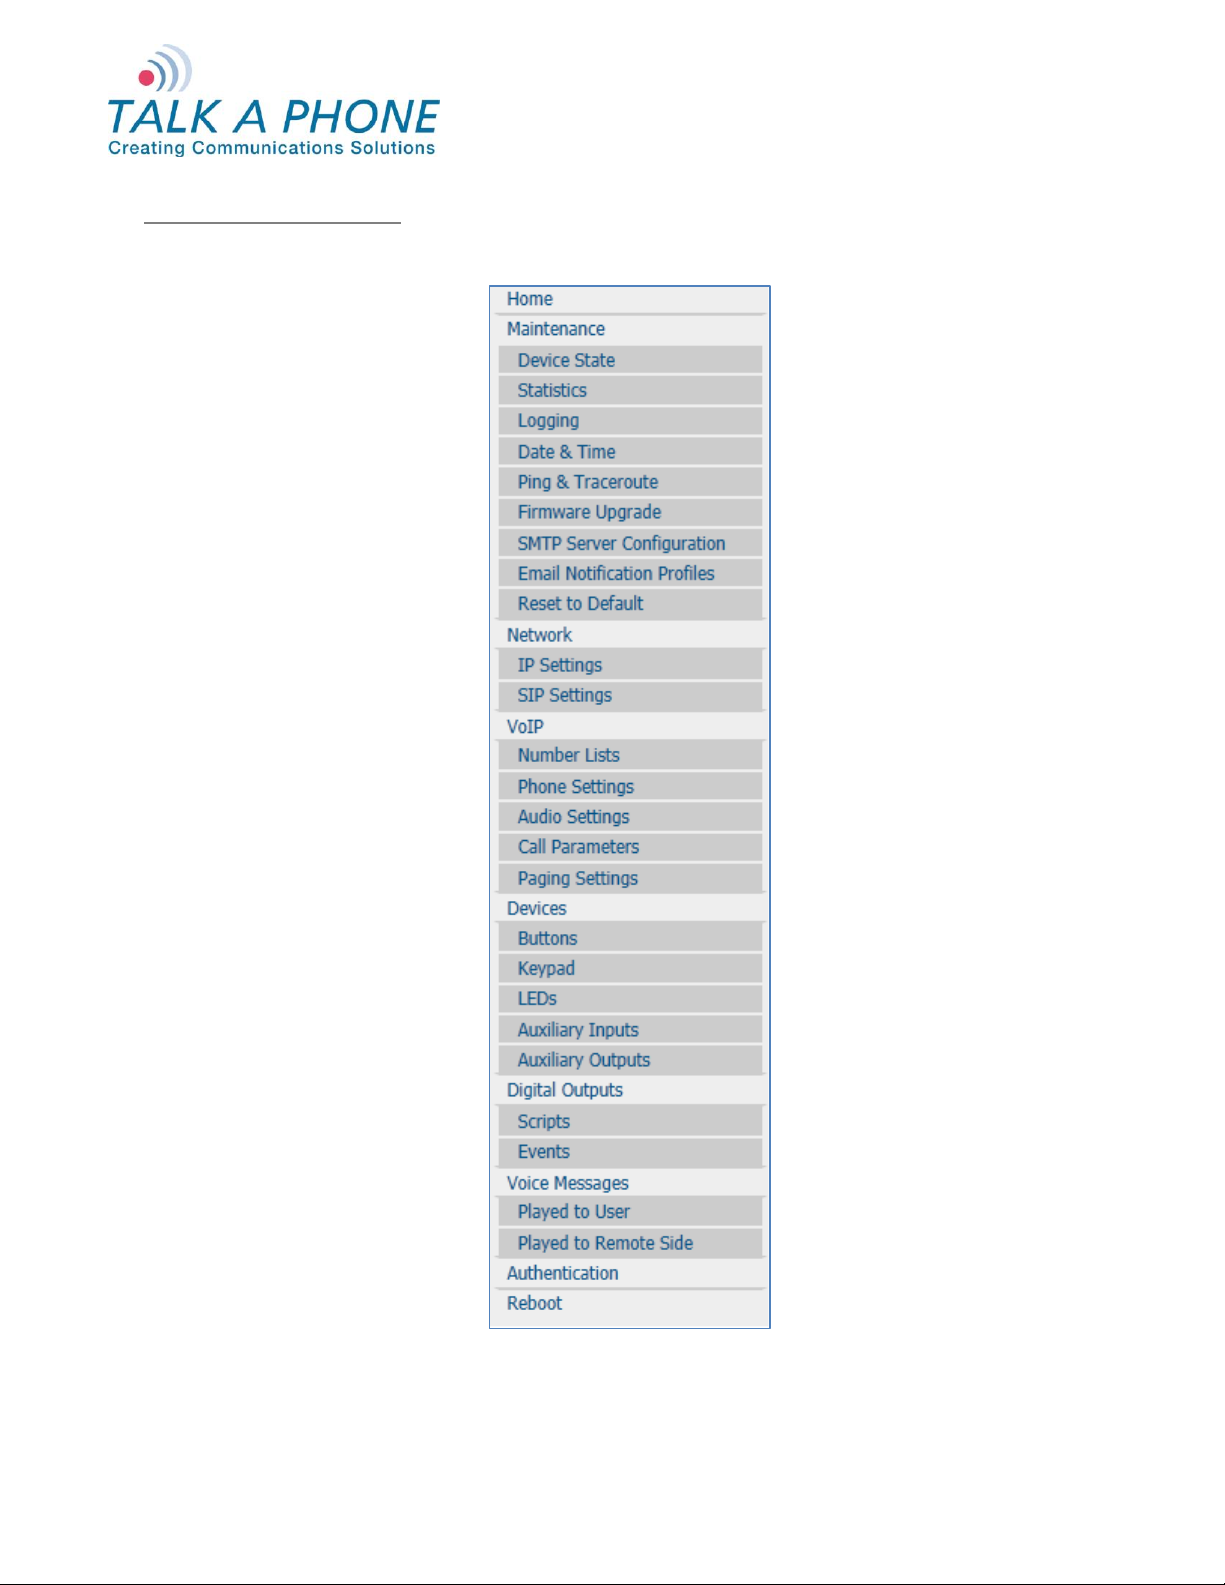
4.2. Web Application Menu
This section provides a preview of the phone’s Web Menu hierarchy/organization.
VOIP-500 Series Phone
Figure 3 Application Menu
Page 14 of 90
All prices and specifications are subject to change without notice. Talk-A-Phone, Scream Alert, WEBS and WEBS Contact are registered trademarks of Talk-A-Phone Co. All rights reserved.
Copyright 2012 Talk-A-Phone Co. • 7530 North Natchez Avenue • Niles, Illinois 60714 • Phone 773.539.1100 • info@talkaphone.com • www.talkaphone.com.
Page 15
Field Name
Description
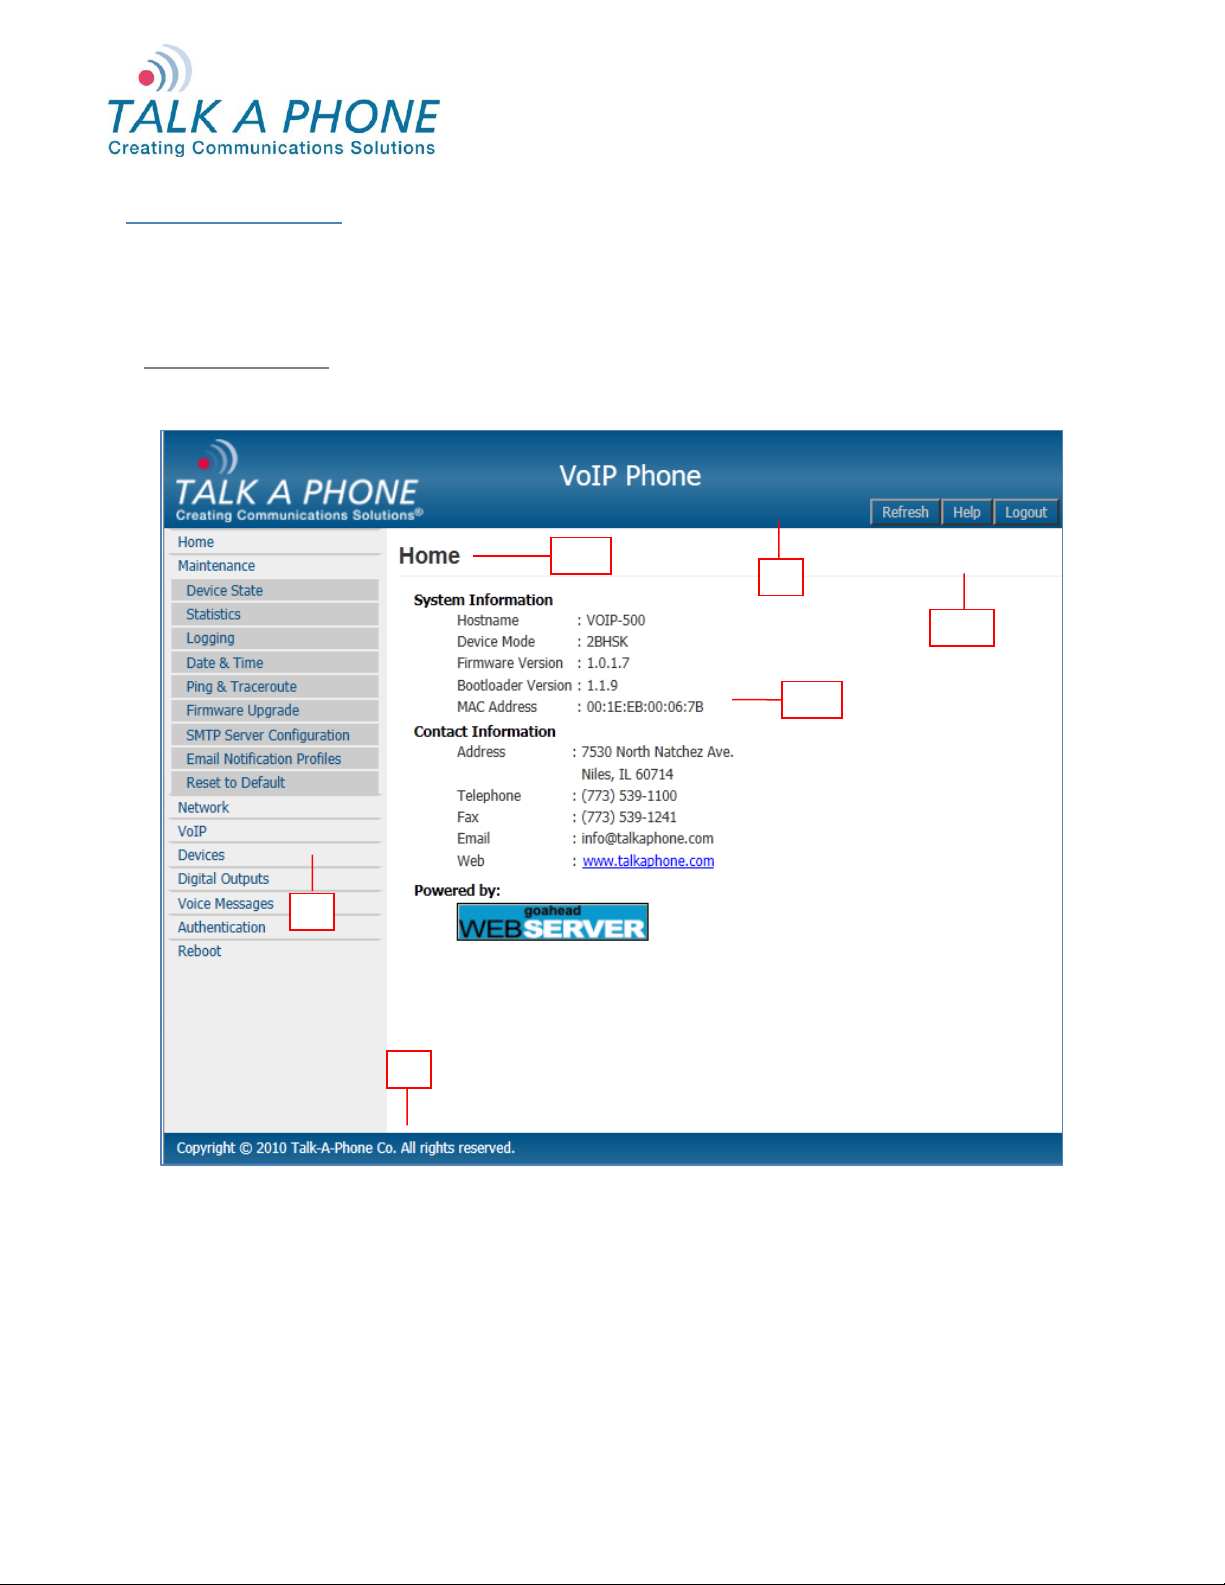
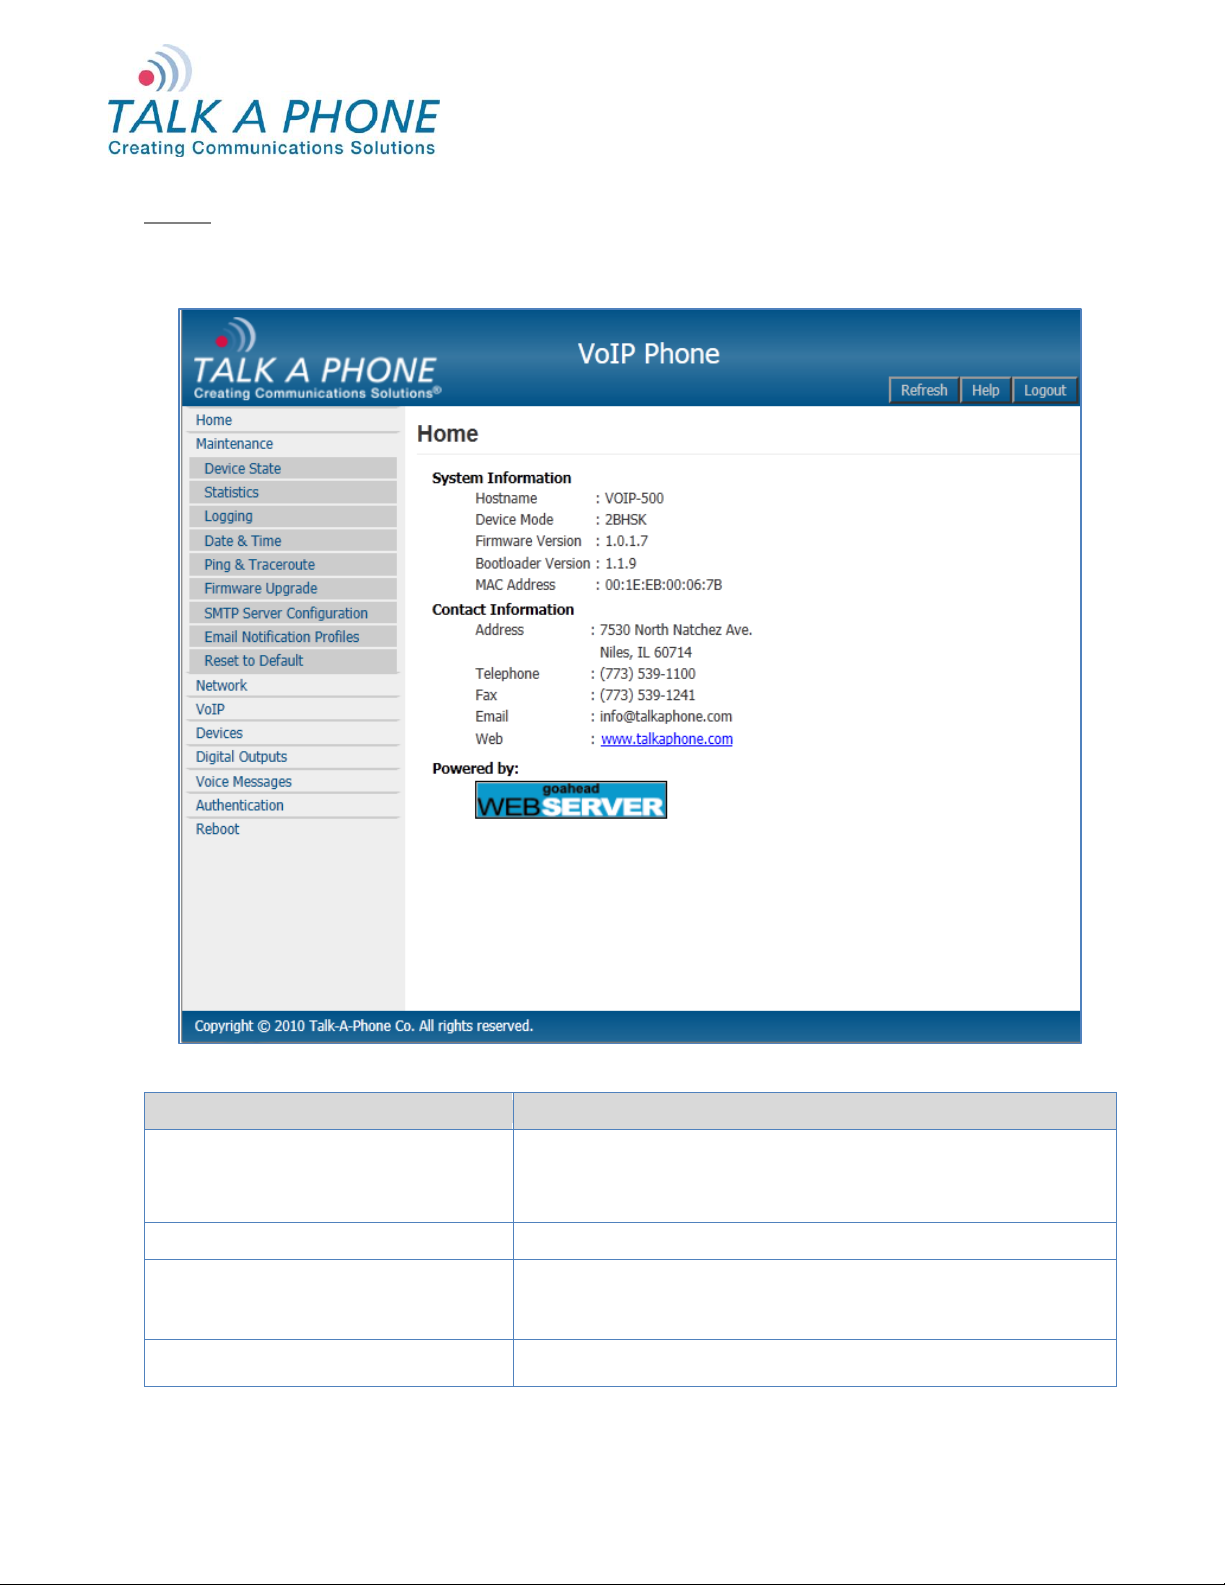
Device Mode
This indicates the type of device. For example, 2BHSK indicates
a device having two buttons, a handset, a keypad, and a
speaker. Refer to Appendix D: VOIP-500 Device Modes for
details on other device modes.
Firmware Version
Indicates the version of the phone’s firmware
Bootloader version
Indicates the version of the bootloader that is used during startup
(booting) of the phone. The bootloader version is independent of
the firmware version.
MAC Address
Indicates the number assigned as the phone’s unique MAC
address.
VOIP-500 Series Phone
Configuration and Operation Manual
4.3. Home
The Home page displays phone information and contact information for Talk-A-Phone.
Login → Home
All prices and specifications are subject to change without notice. Talk-A-Phone, Scream Alert, WEBS and WEBS Contact are registered trademarks of Talk-A-Phone Co. All rights reserved.
Copyright 2012 Talk-A-Phone Co. • 7530 North Natchez Avenue • Niles, Illinois 60714 • Phone 773.539.1100 • info@talkaphone.com • www.talkaphone.com.
Figure 4 Home
Page 15 of 90
Page 16
1
2
3
5
4
VOIP-500 Series Phone
Configuration and Operation Manual
4.4. Network
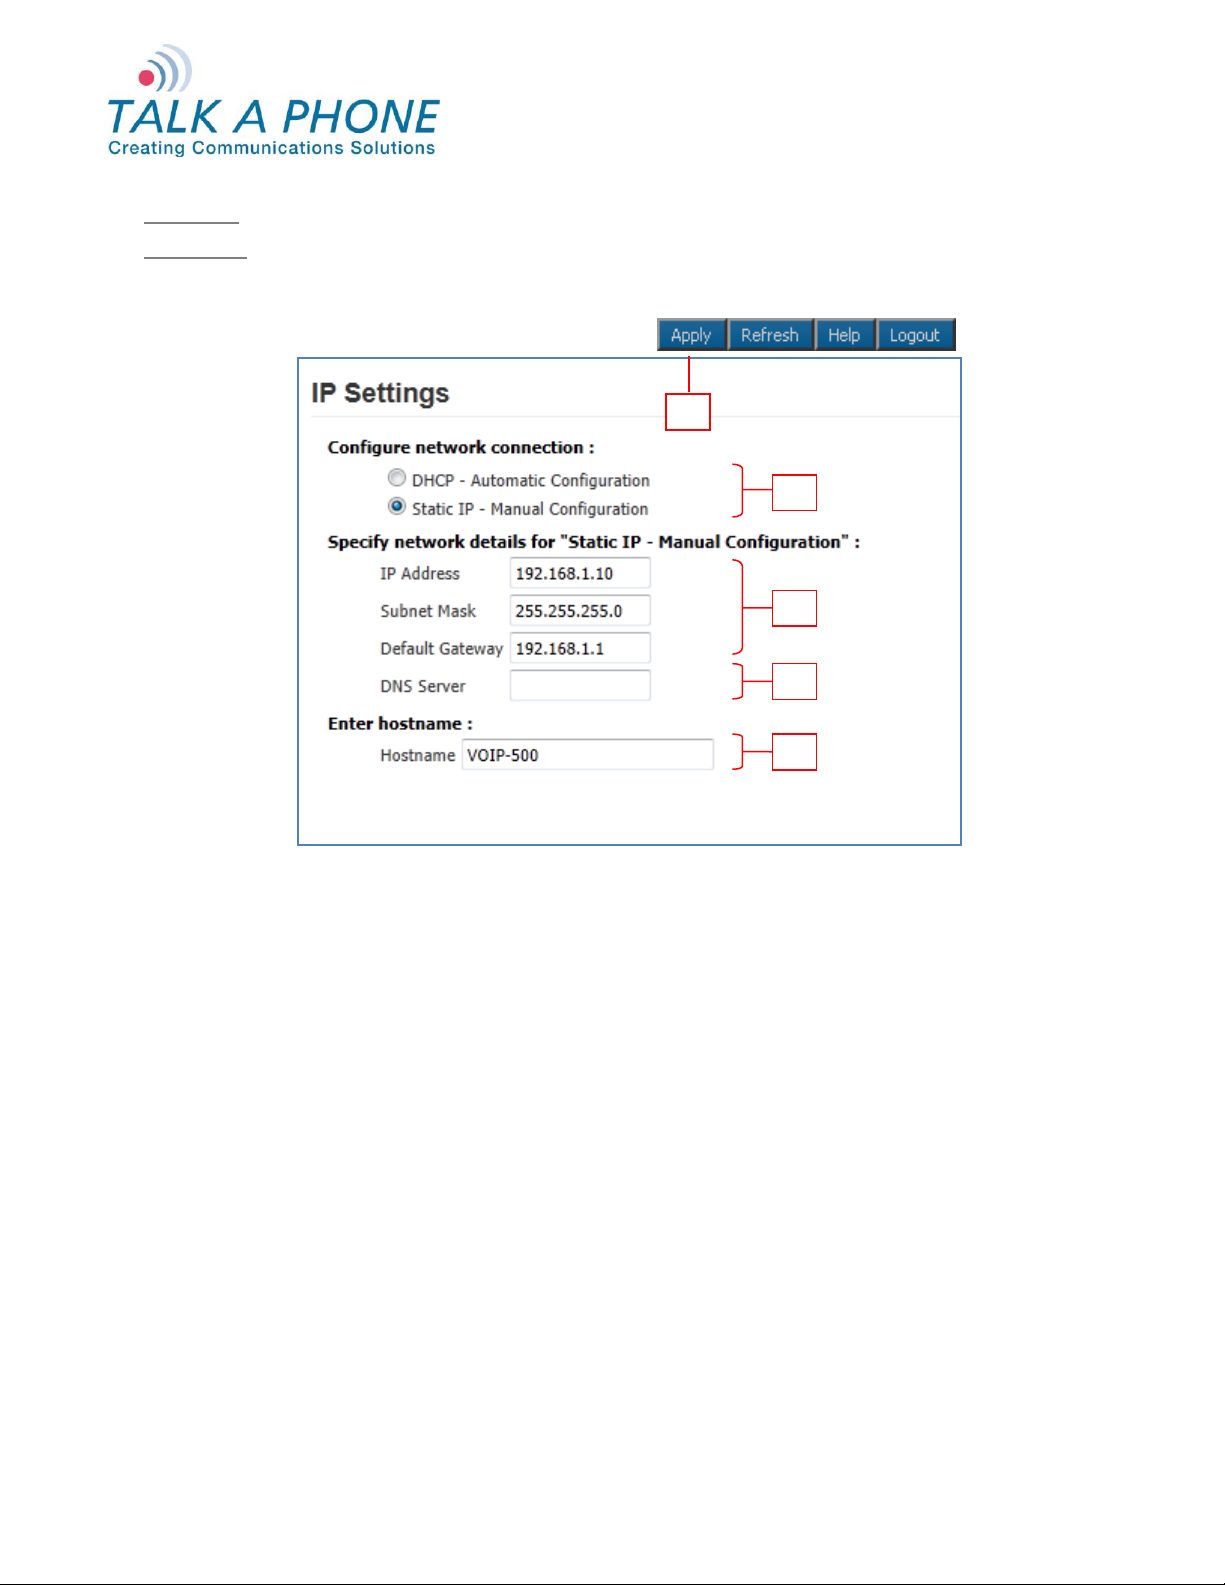
4.4.1. IP Settings
The IP Settings page allows you to configure the IP settings and the hostname of the phone.
Login → Network → IP Settings
Figure 5 IP Settings
To set IP settings:
1. Select DHCP – Automatic Configuration OR Static IP - Manual Configuration.
2. Enter network details IP Address, Subnet Mask, Default Gateway of your network for Static IP - Manual
Configuration.
3. Enter DNS Server to resolve domain names.
4. Enter Hostname. Use unique identifier for each device on the network.
5. Click Apply to save settings.
Page 16 of 90
All prices and specifications are subject to change without notice. Talk-A-Phone, Scream Alert, WEBS and WEBS Contact are registered trademarks of Talk-A-Phone Co. All rights reserved.
Copyright 2012 Talk-A-Phone Co. • 7530 North Natchez Avenue • Niles, Illinois 60714 • Phone 773.539.1100 • info@talkaphone.com • www.talkaphone.com.
Page 17
1
3
4
6
2
5
VOIP-500 Series Phone
Configuration and Operation Manual
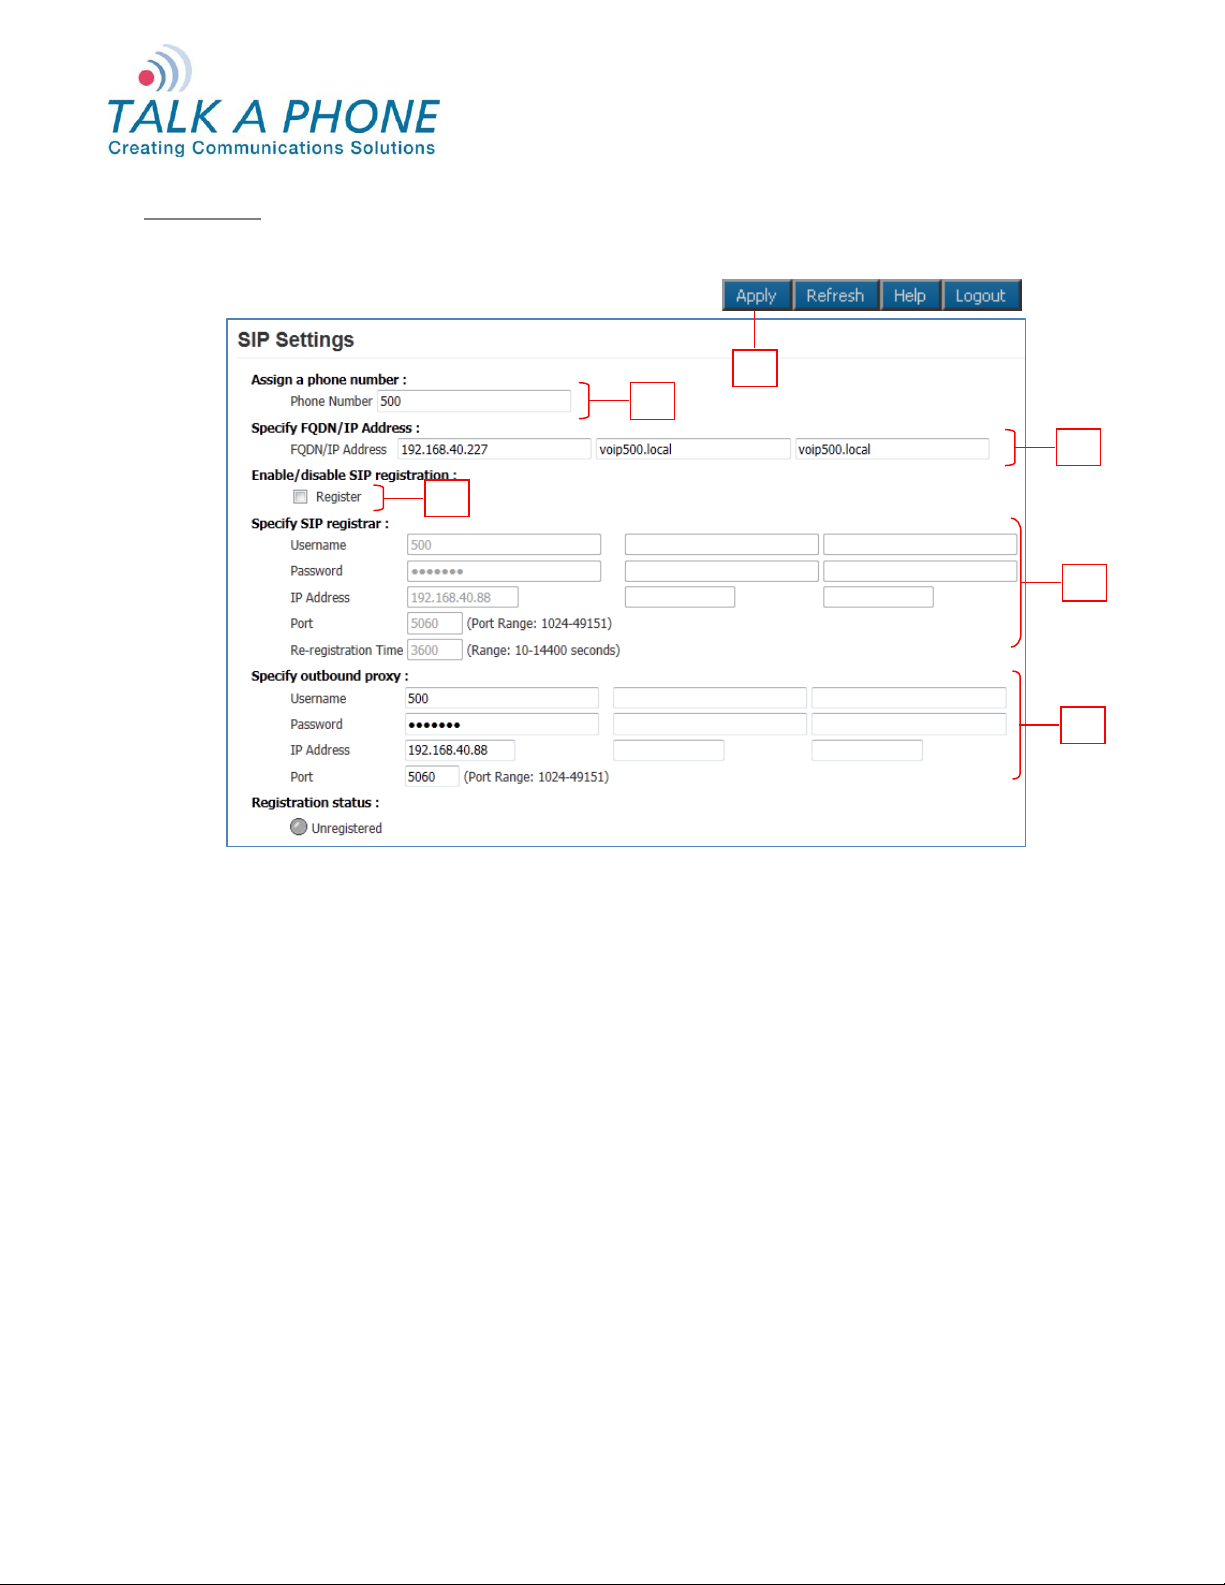
4.4.2. SIP Settings
This page is used to configure the phone number, SIP registrars and outbound proxy details.
Login → Network → SIP Settings
Figure 6 SIP Settings
To configure SIP settings:
1. Enter the Phone Number (number used to call from other SIP endpoints).
2. Enter the Fully Qualified Domain Name or the IP Address of the SIP Gateway/Proxy. Secondary and
Tertiary FQDN or IP Addresses can be assigned for failover. There is a 30 character limit for this field. The
voip500.local is the default placeholder.
3. Check or Uncheck Register to enable or disable the SIP registration.
4. Enter SIP registrar details: (Secondary and Tertiary details can be assigned for failover)
Username: This is an optional field however it is required when Authentication is enabled on the SIP
registrar. Valid entries include alphanumeric and special characters (underscore “_” and period “.”)
Password: This is an optional field however it is required when Authentication is enabled on the SIP
registrar. Valid entries include alphanumeric and special characters (except “&”).
IP Address and Port: Configure the IP Address and Port of the SIP registrar on which you want to
register the phone. Valid port range is 1024-49151.
Re-registration Time: Configure the registration refresh time. On expiration of this time interval, the
phone automatically sends a new register request to the registrar. Default re-registration time is
3600 seconds. Valid range is 10-14400 seconds.
All prices and specifications are subject to change without notice. Talk-A-Phone, Scream Alert, WEBS and WEBS Contact are registered trademarks of Talk-A-Phone Co. All rights reserved.
Copyright 2012 Talk-A-Phone Co. • 7530 North Natchez Avenue • Niles, Illinois 60714 • Phone 773.539.1100 • info@talkaphone.com • www.talkaphone.com.
Page 17 of 90
Page 18

VOIP-500 Series Phone
Configuration and Operation Manual
5. Enter Outbound Proxy details: If a separate outbound proxy is not being used please enter the SIP
registrar information again. (Secondary and Tertiary details can be assigned for failover)
Username: This is an optional field however it is required when Authentication is enabled on the SIP
registrar. Valid entries include alphanumeric and special characters (underscore “_” and period “.”)
Password: This is an optional field however it is required when Authentication is enabled on the SIP
registrar. Valid entries include alphanumeric and special characters (except “&”).
IP Address and Port: Configure the IP Address and Port of the SIP registrar on which you want to
register the phone. Valid port range is 1024-49151.
6. Click Apply. The following type of registration status appears based on your selection:
Registering as <Phone Number> @ <Domain Name> - Registration is in progress with SIP registrar.
Registered as <Phone Number> @ <Domain Name> - Registration is completed and phone is able
to receive incoming calls on the registered phone number.
Unregistered as <Phone Number> @ <Domain Name> - Phone is not registered for incoming calls.
Outbound calls can still be established via outbound proxy.
Page 18 of 90
All prices and specifications are subject to change without notice. Talk-A-Phone, Scream Alert, WEBS and WEBS Contact are registered trademarks of Talk-A-Phone Co. All rights reserved.
Copyright 2012 Talk-A-Phone Co. • 7530 North Natchez Avenue • Niles, Illinois 60714 • Phone 773.539.1100 • info@talkaphone.com • www.talkaphone.com.
Page 19

1 2 3
VOIP-500 Series Phone
Configuration and Operation Manual
4.5. VoIP
4.5.1. Number Lists
A phone can have seven lists of phone numbers. Each list can contain up to six numbers for round robin
dialing. If the first number dialed is busy or does not answer after a specified number of rings, the phone dials
the next number in the phone number list. The phone continues trying the numbers in the list in order until it
reaches the last number programmed in the list. If the last phone number is also busy or does not answer
after the specified number of rings, the phone should go back to dialing the first number, then the second
number, etc. until the call is completed, or until the time limit defined by Call Conversation Timer expires.
The numbers from these lists are dialed on call initiation when the associated buttons are pressed or when
the associated Auxiliary Inputs are activated (Refer to 4.6.5 Auxiliary Inputs).
Login → VoIP → Number Lists
Figure 7 Number Lists
To set numbers in the number lists:
1. Use the drop-down menu to select the number list to be configured (List1 is the default list assigned to
Button 1.)
2. Provide up to six numbers. Numbers can be in the format of plain numbers/aliases or as number@ip
address. Valid range is up to 30 characters.
3. Click Apply to save settings.
All prices and specifications are subject to change without notice. Talk-A-Phone, Scream Alert, WEBS and WEBS Contact are registered trademarks of Talk-A-Phone Co. All rights reserved.
Copyright 2012 Talk-A-Phone Co. • 7530 North Natchez Avenue • Niles, Illinois 60714 • Phone 773.539.1100 • info@talkaphone.com • www.talkaphone.com.
Page 19 of 90
Page 20
1
2
3
4
VOIP-500 Series Phone
Configuration and Operation Manual
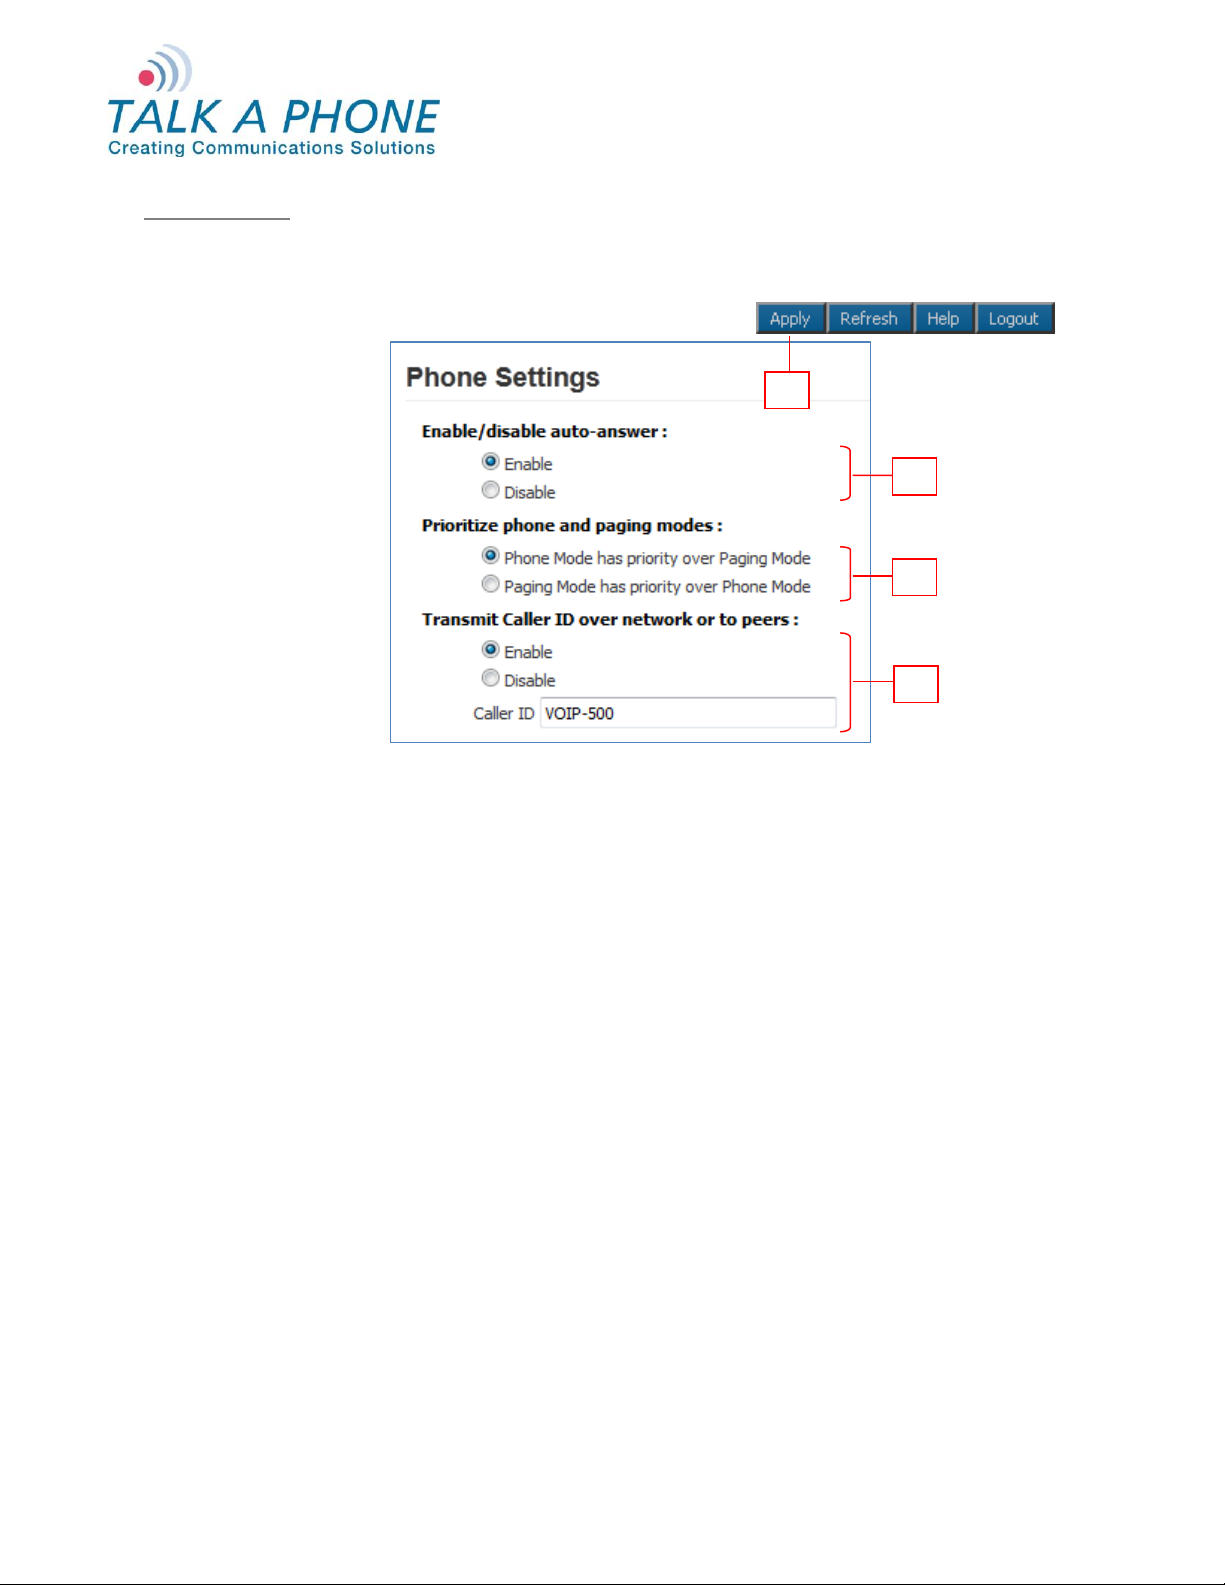
4.5.2. Phone Settings
The Phone Settings page allows you to configure the VoIP protocol for communication, auto answer mode of
operation, prioritization between phone and paging operation, and caller ID settings.
Login → VoIP → Phone Settings
Figure 8 Phone Settings
To configure the phone settings:
1. Select Enable if you want the VOIP-500 to answer any incoming calls automatically (only applicable to
VOIP-500 phones with a built-in hands-free speaker).
When this option is set to Disable, incoming calls are answered by either picking up the handset or by
pressing any button configured as a hook switch. If the VOIP-500 does not have a handset option and
cannot be configured with a hook switch button, a manual answer method will not be available.
2. Select and assign the priority between phone mode and paging mode. When the “phone mode” has
priority over the “paging mode,” the incoming paging request is processed when the phone is in idle state.
When the phone mode has a higher priority, all paging operations stop and phone operations are
processed. When the paging mode has a higher priority, all phone operations stop when the paging mode
has a higher priority and the paging request is processed.
3. Select Enable or Disable to transmit a Caller ID over the network or to peers. This field allows
alphanumeric characters only. Some phone systems require Caller ID assignment from within the phone
system management.
4. Click Apply to save settings.
Page 20 of 90
All prices and specifications are subject to change without notice. Talk-A-Phone, Scream Alert, WEBS and WEBS Contact are registered trademarks of Talk-A-Phone Co. All rights reserved.
Copyright 2012 Talk-A-Phone Co. • 7530 North Natchez Avenue • Niles, Illinois 60714 • Phone 773.539.1100 • info@talkaphone.com • www.talkaphone.com.
Page 21
1
2
3 6 4
5
VOIP-500 Series Phone
Configuration and Operation Manual
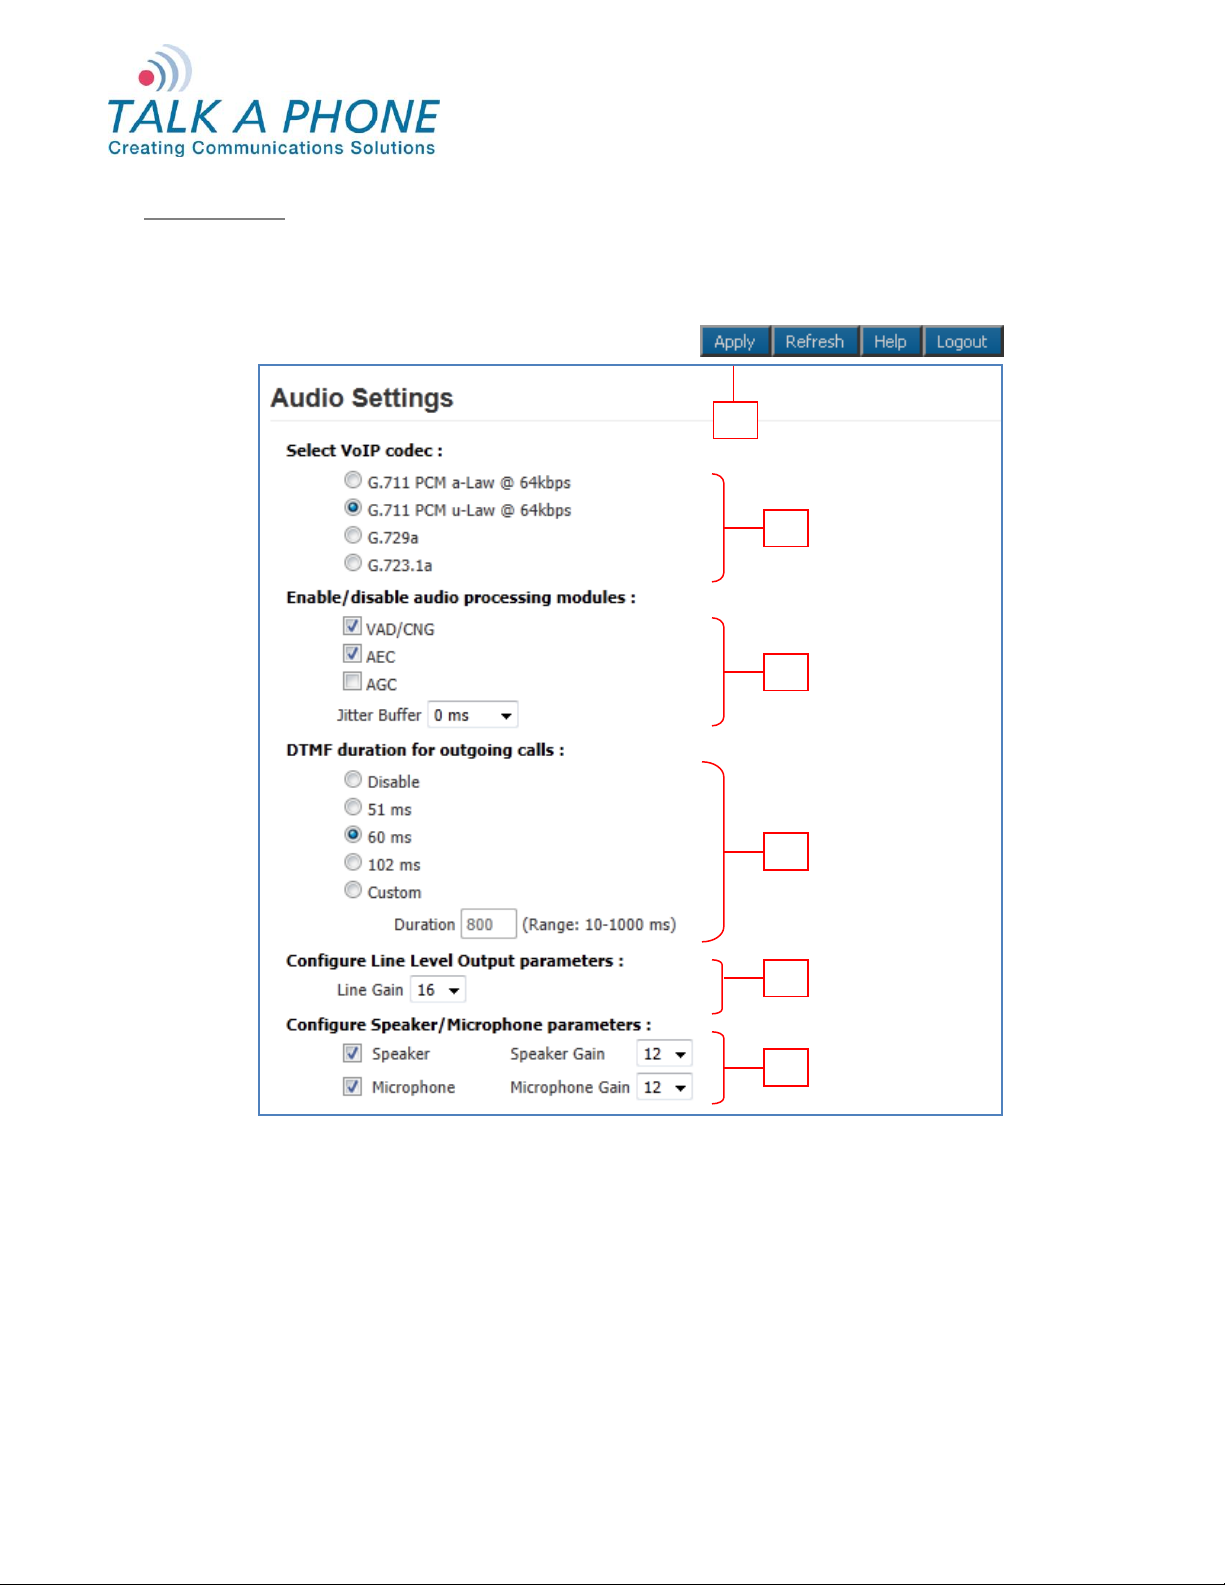
4.5.3. Audio Settings
The Audio Settings page allows you to configure settings for preferred VoIP codec, enable/disable audio
processing modules, outbound DTMF duration, line level output gain, and the microphone and speaker
parameters.
Login → VoIP → Audio Settings
Figure 9 Audio Settings
To configure audio settings:
1. Select G.711 PCM a-Law @ 64kbps, G.711 PCM u-Law @ 64kbps, G.729A or G.723.1a for the
preferred VoIP codec. The selected codec is used for outgoing call negotiation. (Default is G.711 PCM uLaw @ 64kbps.)
All prices and specifications are subject to change without notice. Talk-A-Phone, Scream Alert, WEBS and WEBS Contact are registered trademarks of Talk-A-Phone Co. All rights reserved.
Copyright 2012 Talk-A-Phone Co. • 7530 North Natchez Avenue • Niles, Illinois 60714 • Phone 773.539.1100 • info@talkaphone.com • www.talkaphone.com.
Page 21 of 90
Page 22

2
VOIP-500 Series Phone
Configuration and Operation Manual
2. Check or uncheck VAD/CNG, AEC, or AGC to enable/disable the audio processing modules.
VAD/CNG (Voice Activity Detection / Comfort Noise Generation) is enabled by default. VAD/CNG is
used to reduce background noise and also produces as low but audible comfort noise.
AEC (Acoustic Echo Cancellation) is enabled by default. AEC is used to remove the echo from voice
communications in a speakerphone environment.
AGC (Automatic Gain Control) is disabled by default. AGC can be used where audio input levels
vary widely in an effort to enhance/reduce the audio input to the phone.
3. Select the Outbound DTMF2 duration of 51 msec, 60 msec, 102 msec, or Custom to be used for sending
DTMF packets during a call. Select Disable if Outbound DTMF is not required. This configuration option is
only available for a device mode with a “K” designator (e.g., 1BKH, 4BHSK).
4. Click the drop-down menu to select Line Gain for the Line Level Output parameter. Each level
increases/decreases the line gain in steps of approximately 3dB.
5. Enable or disable the Speaker and/or Microphone. Configuration changes made to the Speaker
parameters will affect the built-in hands-free speaker and the optional handset speaker. Configuration
changes made to the Microphone parameters will affect the built-in hands-free microphone and the
optional handset microphone.
6. The Speaker Gain and the Microphone Gain can be individually adjusted. Each level
increases/decreases gain in steps of approximately 3dB.
7. During an active call, the Speaker/Microphone gains can be adjusted during an active call using DTMF
Operation codes (Refer to Appendix A: Remote Operation Key Codes – Quick Reference: Speaker
Enable/Disable and Microphone Enable/Disable). Gain adjustments made via DTMF only takes effect for
the instance of the phone call where the DTMF Operation Code was applied.
8. Click Apply to save settings.
Out-of-band RTP
Page 22 of 90
All prices and specifications are subject to change without notice. Talk-A-Phone, Scream Alert, WEBS and WEBS Contact are registered trademarks of Talk-A-Phone Co. All rights reserved.
Copyright 2012 Talk-A-Phone Co. • 7530 North Natchez Avenue • Niles, Illinois 60714 • Phone 773.539.1100 • info@talkaphone.com • www.talkaphone.com.
Page 23
1
2
4
6
3
5
VOIP-500 Series Phone
Configuration and Operation Manual
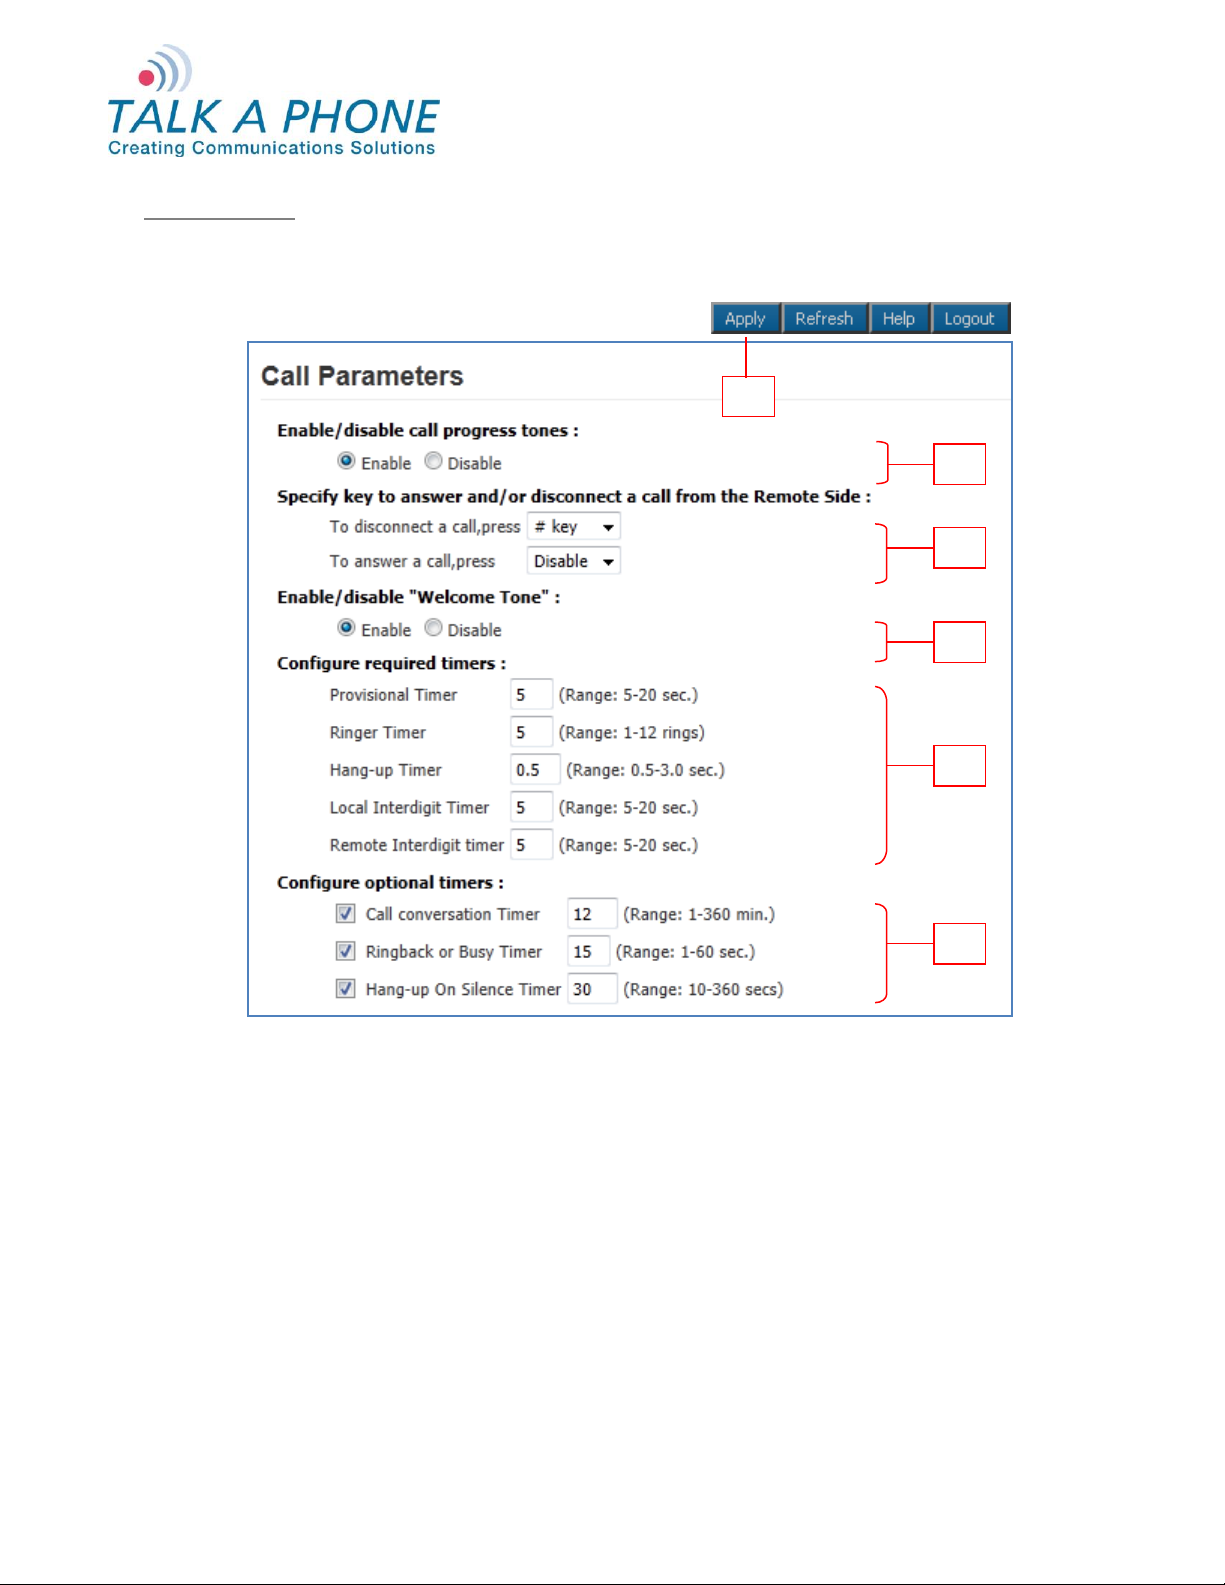
4.5.4. Call Parameters
The Call Parameters page is used to configure the mandatory and the optional call related parameters such
as call progress tones, answer/disconnect key, welcome tone, and timers.
Login → VoIP → Call Parameters
Figure 10 Call Parameters
To set the call parameters:
1. Select Enable/Disable to allow/mute call progress tones to be heard by the user until the call is answered
by the remote side.
2. Click the drop-down menu to set a key to answer a call and/or disconnect a call from the remote side. You
can assign a key within the range of 0-9, *, #, or Disable.
3. Select Enable or Disable to enable or disable the “Welcome Tone”. When enabled, a tone is played to the
remote side when a call is placed to the VOIP-500 phone that auto-answers the call. The “Welcome Tone”
assists with distinguishing ETP-400 Series Phones from the VOIP-500 Series Phones.
All prices and specifications are subject to change without notice. Talk-A-Phone, Scream Alert, WEBS and WEBS Contact are registered trademarks of Talk-A-Phone Co. All rights reserved.
Copyright 2012 Talk-A-Phone Co. • 7530 North Natchez Avenue • Niles, Illinois 60714 • Phone 773.539.1100 • info@talkaphone.com • www.talkaphone.com.
Page 23 of 90
Page 24

3
4. Configure required timers:
Provisional Timer is the time interval for which the phone waits for the call initiation
acknowledgement from the remote side. This timer is started when the call is initiated. This timer is
useful in situations where the remote phone is unreachable for unknown reasons. The default value
is set to five seconds. This timer is used only during round robin dialing.
Ringer Timer is the number of rings (one ring = six seconds) the phone waits before dialing the next
number. The default value is five rings. This timer is used only during round robin dialing.
Hang-up Timer is the time interval for which the phone waits before initiating a new call after
hanging up the current call. The default value is 0.5 seconds.
Local Inter-digit Timer is the time interval between two consecutive dialed digits. The inter-digit
timer is started when the first digit is entered and is restarted after each new digit is entered. When
the user dials a number, a call gets initiated after the expiry of this timer. This timer also applies
during local key code translations for performing the operations. The default value is five seconds.
Remote Inter-digit Timer is the time interval for which the phone is expecting a digit to be received
from remote side during key press to answer and for DTMF Operation Codes3 that require remote
key codes for activation/deactivation. The default value is five seconds.
VOIP-500 Series Phone
Configuration and Operation Manual
5. Configure optional timers:
Call Conversation Timer is the time interval after which the call is terminated automatically. The
default value is 12 minutes. If the call conversation time is disabled the conversation lasts for an
indefinite duration.
Ringback or Busy Timer is the time interval for which the phone waits on the call queue before
dialing the next number from the number list. The default value is 15 seconds. The phone waits for
indefinite time if this timer is disabled. This timer is used only during round robin dialing.
Hang-up on Silence Timer is the time interval after which a call is terminated automatically if the
voice or audio channel is idle. The default value is 30 seconds.
6. Click Apply to save settings.
For example, the remote key code sequence 123 is used for activating Aux output #1.During a call, the remote side presses 12, now the
phone is expecting key 3 to be received before the expiry of this timer, if key 3 is pressed before expiry of this timer, a single beep is heard at
the remote side followed by Aux Output #1 Activation at the local end. If not, the phone considers this as an unsuccessful operation and will
play two beeps to the remote side.
Page 24 of 90
All prices and specifications are subject to change without notice. Talk-A-Phone, Scream Alert, WEBS and WEBS Contact are registered trademarks of Talk-A-Phone Co. All rights reserved.
Copyright 2012 Talk-A-Phone Co. • 7530 North Natchez Avenue • Niles, Illinois 60714 • Phone 773.539.1100 • info@talkaphone.com • www.talkaphone.com.
Page 25
1
2 5 3
4
VOIP-500 Series Phone
Configuration and Operation Manual
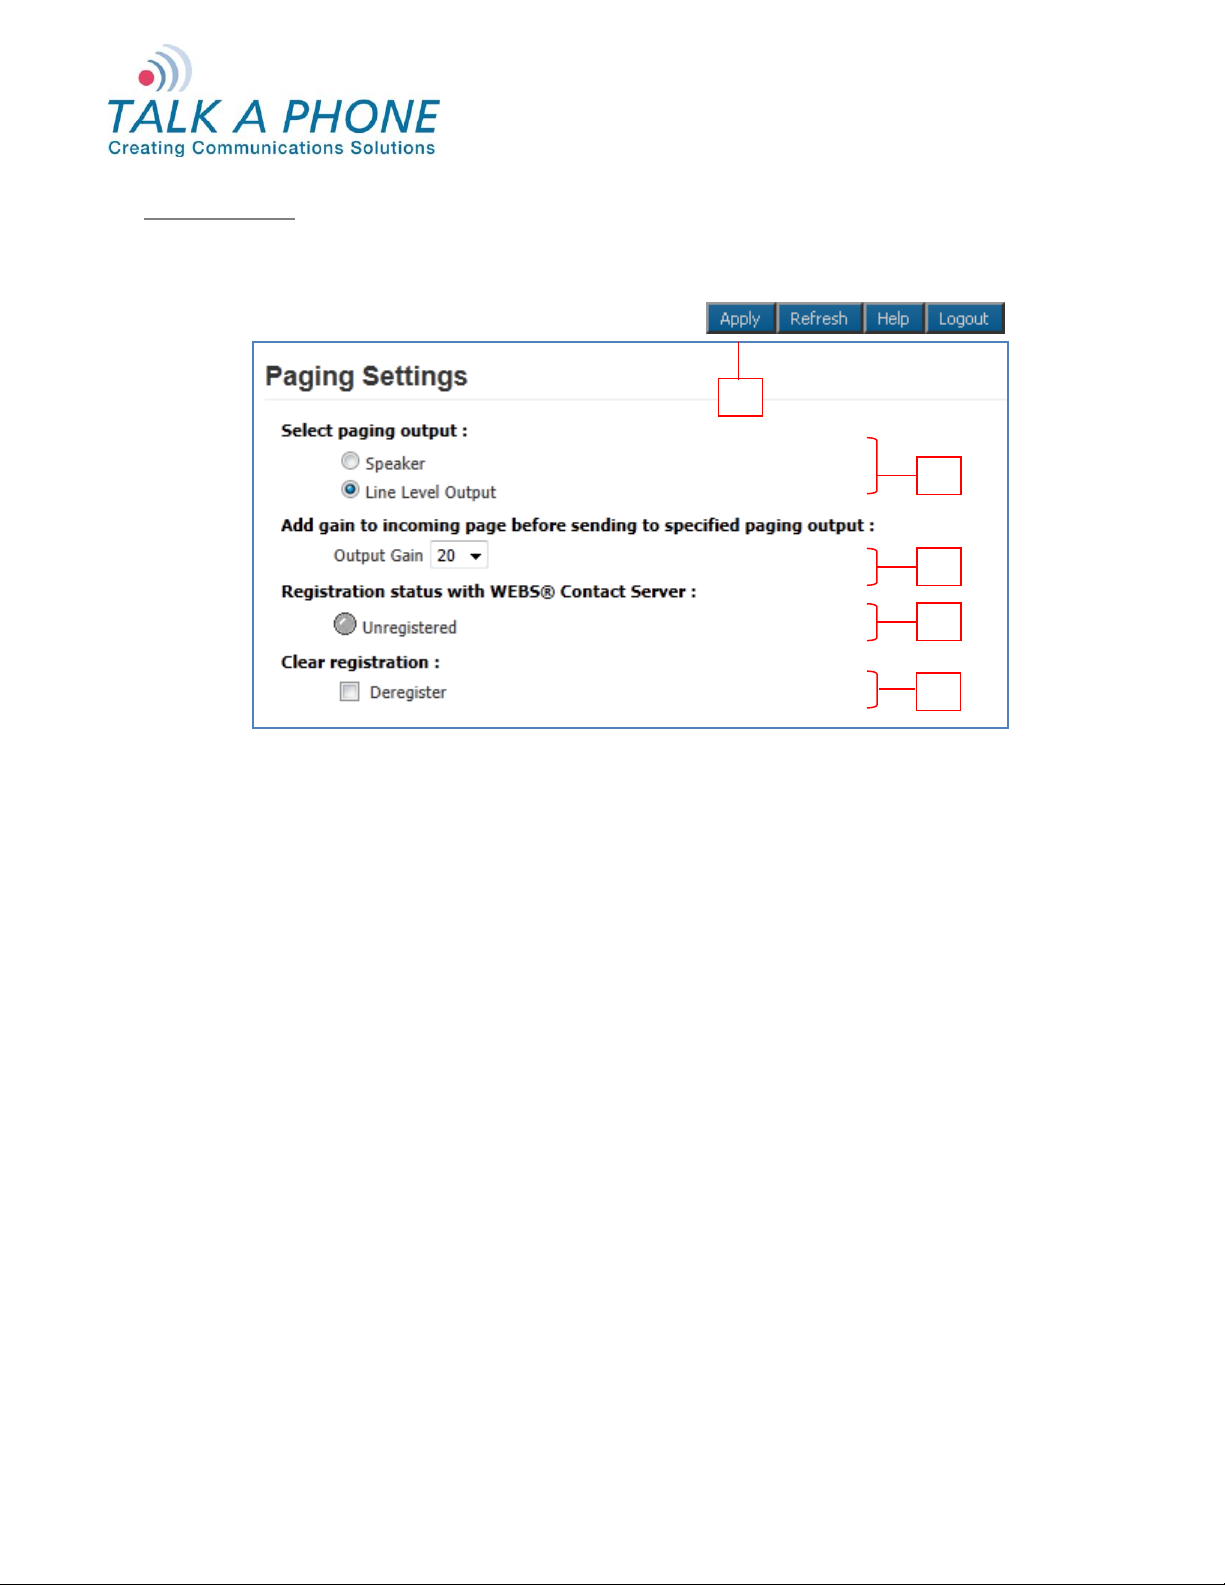
4.5.5. Paging Settings
The VOIP-500 Series Phone can be used as a paging device by a WEBS Contact® Server. The page can be
output through either the built-in hands-free speaker or the line level output.
Login → VoIP → Paging Settings
Figure 11 Paging Settings
To configure paging settings:
1. Select Speaker or Line Level Output to send the incoming audio page to the built-in hands-free speaker
or the line level output. The speaker option is only available for device modes with an “S” designator (e.g.,
1BS, 4BHSK).
2. Click the drop-down menu to adjust the Output Gain for all incoming pages before sending to the selected
audio paging output. Each level adjustment corresponds to approximately 3dB.
3. The phone displays Unregistered or Registered @ <WEBS_Contact_Server_IP_Address> for Registration
Status on the WEBS Contact® Server.
4. If it deregistration is required from the WEBS Contact® Server in error situations where the WEBS
Contact® Server is unable to deregister the device, select Deregister check box to clear the registration
status.
5. Click Apply to save settings.
All prices and specifications are subject to change without notice. Talk-A-Phone, Scream Alert, WEBS and WEBS Contact are registered trademarks of Talk-A-Phone Co. All rights reserved.
Copyright 2012 Talk-A-Phone Co. • 7530 North Natchez Avenue • Niles, Illinois 60714 • Phone 773.539.1100 • info@talkaphone.com • www.talkaphone.com.
Page 25 of 90
Page 26
3
1
2(i)
2(ii)
2(iii)
VOIP-500 Series Phone
Configuration and Operation Manual
4.6. Devices
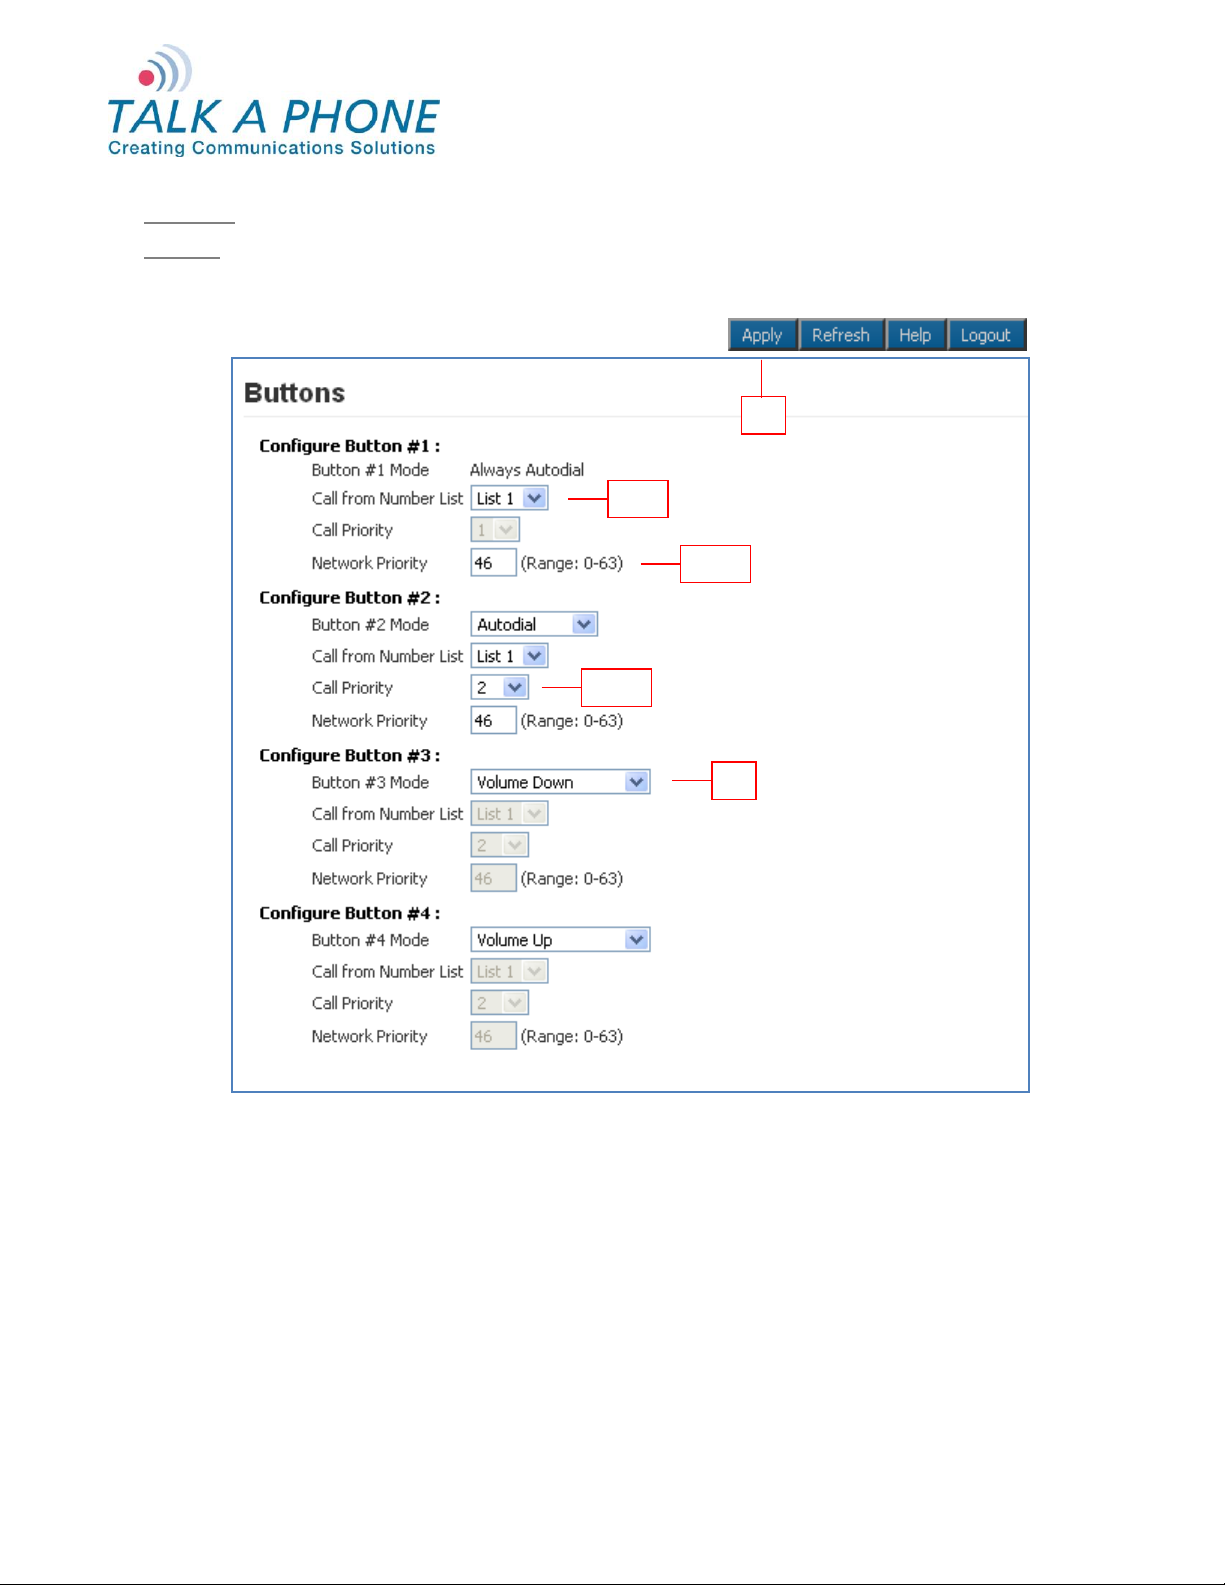
4.6.1. Buttons
The Buttons configuration page allows for programming of the buttons depending on the device mode.
Login → Devices → Buttons
Figure 12 Buttons
To configure buttons:
1. Select the button mode for each button you want to configure. The mode for Button #1 is not configurable
and is always set to Autodial.
Buttons #2, #3, and #4 can be configured to Autodial or Hook-switch. Optionally, Buttons #3 and #4 can
be configured as Volume Up/Volume Down/Play Voice Message. The number of buttons available for
configuration will be based on the Device Mode (e.g., Device Mode 2BS will have Button #1 and #2
available for configuration).
Page 26 of 90
All prices and specifications are subject to change without notice. Talk-A-Phone, Scream Alert, WEBS and WEBS Contact are registered trademarks of Talk-A-Phone Co. All rights reserved.
Copyright 2012 Talk-A-Phone Co. • 7530 North Natchez Avenue • Niles, Illinois 60714 • Phone 773.539.1100 • info@talkaphone.com • www.talkaphone.com.
Page 27

4
VOIP-500 Series Phone
Configuration and Operation Manual
2. When a Button is configured for Autodial mode, configure the following:
i. Use the drop-down menu to assign the Number List. Phone Numbers from the Number List are
dialed in round robin fashion when the corresponding button is pressed.
ii. Select the Call Priority. This parameter assigns a priority to the call that is generated when the
corresponding button is pressed. A call with a “Call Priority” of 1 terminates all the existing calls
having the call priority in the range of 2–10.
iii. Select the Network Priority4 to assign a network priority to the placed call. The value is utilized by
the network to prioritize voice traffic. The default value is 46.
3. Click Apply to save settings.
Note Button #1 has the highest call priority and this cannot be changed. Pressing Button #1 cancels all
operations and places a call.
Network priority is the same as Differentiated Services Code Point (DSCP). Do not change this unless absolutely required as it might
degrade the voice quality of the phone.
All prices and specifications are subject to change without notice. Talk-A-Phone, Scream Alert, WEBS and WEBS Contact are registered trademarks of Talk-A-Phone Co. All rights reserved.
Copyright 2012 Talk-A-Phone Co. • 7530 North Natchez Avenue • Niles, Illinois 60714 • Phone 773.539.1100 • info@talkaphone.com • www.talkaphone.com.
Page 27 of 90
Page 28

5
1
2
4
3
VOIP-500 Series Phone
Configuration and Operation Manual
4.6.2. Hook Switch
The Hook switch configuration page configures the numbers to be dialed when the handset goes off-hook.
This configuration page is only available for the 0BH device mode.
Login → Devices → Hookswitch
Figure 13 Hookswitch
To configure the Hook switch:
1. Click the drop-down menu to assign a Number List. Phone Numbers from the Number List are dialed in
round robin fashion when the handset goes off-hook.
2. Select the Call Priority. This parameter assigns a priority to the call that is generated when the handset
goes off-hook. A call with a “Call Priority” of 1 terminates all the existing calls having the call priority in the
range of 2–10.
3. Select the Network Priority5 to assign a network priority to the placed call. The value is utilized by the
network to prioritize the voice traffic. The default value is 46.
4. Click Apply to save settings.
Network priority is the same as Differentiated Services Code Point (DSCP). Do not change this unless absolutely required as it might
degrade the voice quality of the phone.
Page 28 of 90
All prices and specifications are subject to change without notice. Talk-A-Phone, Scream Alert, WEBS and WEBS Contact are registered trademarks of Talk-A-Phone Co. All rights reserved.
Copyright 2012 Talk-A-Phone Co. • 7530 North Natchez Avenue • Niles, Illinois 60714 • Phone 773.539.1100 • info@talkaphone.com • www.talkaphone.com.
Page 29

3
1
2
VOIP-500 Series Phone
Configuration and Operation Manual
4.6.3. Keypad
The Keypad configuration page allows administrator to configure the keypad of the phone for “normal” or
“speed dial” mode. This configuration page is only available for phones with a keypad.
Login → Devices → Keypad
Figure 14 Keypad – Normal Dial Mode
To configure the Keypad:
1. Select the dial mode – Normal Dial Mode or Speed Dial Mode. Normal Dial Mode allows for manual
dialing of an “analog style” phone number. If the phone is off-hook, dialing numbers on the keypad will
place a call after the local inter-digit timer expires (Refer to 4.5.4 Call Parameters: Local Inter-digit Timer).
2. For Speed Dial Mode, enter the number for each keypad button (0–9). The number can be in the format of
an analog phone number, an IP address, an alias, or a number@domain. When the phone is taken offhook, a call can be placed directly to the number by pressing the corresponding keypad buttons.
3. Click Apply to save settings.
All prices and specifications are subject to change without notice. Talk-A-Phone, Scream Alert, WEBS and WEBS Contact are registered trademarks of Talk-A-Phone Co. All rights reserved.
Copyright 2012 Talk-A-Phone Co. • 7530 North Natchez Avenue • Niles, Illinois 60714 • Phone 773.539.1100 • info@talkaphone.com • www.talkaphone.com.
Page 29 of 90
Page 30

6
7
1
3
2
Configuration and Operation Manual
4.6.4. LEDs
The LEDs configuration page allows for the configuration of LED #3.
Login → Devices → LEDs
VOIP-500 Series Phone
Figure 15 LED Settings
To configure the LEDs:
1. Enter the Key code sequence and duration LED #3 should be activated.
i. Key code sequence to be used by the remote side to activate LED #36.
ii. Click the drop-down menu to select the duration for which LED #3 should remain active (i.e. ENTIRE
CALL (deactivates after the termination of the call), CONTINUOUS (activated indefinitely until
deactivated by deactivation event), or CUSTOM (activated for the specified duration in seconds).
2. Enter the Key code sequence to be used by the remote side to deactivate LED #37.
3. Click Apply to save settings.
If DTMF Authentication is enabled (see section 4.8) the Guard Access Code will need to be entered before any other code may be used.
If DTMF Authentication is enabled (see section 4.8) the Guard Access Code will need to be entered before any other code may be used.
Page 30 of 90
All prices and specifications are subject to change without notice. Talk-A-Phone, Scream Alert, WEBS and WEBS Contact are registered trademarks of Talk-A-Phone Co. All rights reserved.
Copyright 2012 Talk-A-Phone Co. • 7530 North Natchez Avenue • Niles, Illinois 60714 • Phone 773.539.1100 • info@talkaphone.com • www.talkaphone.com.
Page 31

8
4
1, 2, 3
VOIP-500 Series Phone
Configuration and Operation Manual
4.6.5. Auxiliary Inputs
The Auxiliary Inputs configuration page configures the numbers to be dialed on activation of Auxiliary Input
devices.
Login → Devices → Auxiliary Inputs
Figure 16 Auxiliary Inputs
To configure the auxiliary inputs:
1 Click the drop-down menu to assign the Number List. Numbers from the Number List are dialed in round
robin fashion when the corresponding Auxiliary Input is activated. Select None if this feature is not desired
upon activation of an Auxiliary Input.
2 Select the Call Priority. This parameter assigns a priority to the call that is generated upon activation of
the corresponding Auxiliary Input. A call with a “Call Priority” of 1 terminates all the existing calls having the
call priority in the range of 2–10.
3 Select the Network Priority8 to assign a network priority to the placed call. The value is utilized by the
network to prioritize the voice traffic. The default value is 46.
4 Click Apply to save settings.
Network priority is the same as Differentiated Services Code Point (DSCP). Do not change this unless absolutely required as it might
degrade the voice quality of the phone.
All prices and specifications are subject to change without notice. Talk-A-Phone, Scream Alert, WEBS and WEBS Contact are registered trademarks of Talk-A-Phone Co. All rights reserved.
Copyright 2012 Talk-A-Phone Co. • 7530 North Natchez Avenue • Niles, Illinois 60714 • Phone 773.539.1100 • info@talkaphone.com • www.talkaphone.com.
Page 31 of 90
Page 32

1
2 (i)
4
2 (ii)
2 (iii)
2 (iv)
VOIP-500 Series Phone
Configuration and Operation Manual
4.6.6. Auxiliary Outputs
The Auxiliary Output page allows events to activate/deactivate the auxiliary output device.
Login → Devices → Auxiliary Outputs
Page 32 of 90
All prices and specifications are subject to change without notice. Talk-A-Phone, Scream Alert, WEBS and WEBS Contact are registered trademarks of Talk-A-Phone Co. All rights reserved.
Copyright 2012 Talk-A-Phone Co. • 7530 North Natchez Avenue • Niles, Illinois 60714 • Phone 773.539.1100 • info@talkaphone.com • www.talkaphone.com.
Page 33

3 (i)
3 (ii)
3 (iii)
3 (iv)
3 (v)
3 (vi)
VOIP-500 Series Phone
Configuration and Operation Manual
Figure 17 Auxiliary Outputs
To configure the auxiliary outputs:
1. Use the drop-down menu to select the Auxiliary Output. If desired, assign a label to the Auxiliary Output.
2. Configure various events that should activate an Auxiliary Output.
i. Button Events
The button events are available only when the Buttons are programmed for Autodial mode (Refer to
4.6.1 Buttons: for Autodial).
Configure Auxiliary Output activation on Button #1 and/or Button #2 when a call is INITIATED,
ANSWERED, or TERMINATED.
Use the drop-down menu to select the duration for which the Auxiliary Output should remain
active (i.e. ENTIRE CALL (deactivates after the termination of the call), CONTINUOUS
(activated indefinitely until deactivated by a deactivation event), or CUSTOM (activated for the
specified duration in seconds).
ii. Auxiliary Input Events
Configure the Auxiliary Output activation on activation/deactivation of Auxiliary Input #1,
Auxiliary Input #2, and Auxiliary Input #3.
Configure the duration separately for the idle state and the active call state. Use the drop-down
menu to select the duration for which the Auxiliary Output should remain active (i.e. ENTIRE
CALL (deactivates after the termination of the call), CONTINUOUS (activated indefinitely until
deactivated by a deactivation event), or CUSTOM (activated for the specified duration in
seconds).
All prices and specifications are subject to change without notice. Talk-A-Phone, Scream Alert, WEBS and WEBS Contact are registered trademarks of Talk-A-Phone Co. All rights reserved.
Copyright 2012 Talk-A-Phone Co. • 7530 North Natchez Avenue • Niles, Illinois 60714 • Phone 773.539.1100 • info@talkaphone.com • www.talkaphone.com.
Page 33 of 90
Page 34

9
10
VOIP-500 Series Phone
Configuration and Operation Manual
iii. Remote Side Key Codes
Configure the Key Code sequence to be used by the remote side to activate the corresponding
Auxiliary Output.
Use the drop-down menu to select the duration for which the Auxiliary Output should remain
active (i.e. ENTIRE CALL (deactivates after the termination of the call), CONTINUOUS
(activated indefinitely until deactivated by a deactivation event), or CUSTOM (activated for the
specified duration in seconds).
iv. Local Key Codes
Configure the Key Code sequence to be used by the Local User to activate the corresponding
Aux Output device9.
Use the drop-down menu to select the duration for which the Auxiliary Output should remain
active (i.e. ENTIRE CALL (deactivates after the termination of the call), CONTINUOUS
(activated indefinitely until deactivated by a deactivation event), or CUSTOM (activated for the
specified duration in seconds).Configure the Key Code sequence to be used by the remote side
to activate the corresponding Auxiliary Output.
3. Configure various events on which the Auxiliary Output(s) needs to be deactivated.
i. Button Events
The button events are available only when the Buttons are programmed for Autodial mode (Refer to
4.6.1 Buttons: for Autodial).
Configure the Auxiliary Output deactivation on Button #1 and/or Button #2 when a call is
INITIATED, ANSWERED, or TERMINATED.
ii. Auxiliary Input Events
Configure the Auxiliary Output deactivation on activation/deactivation of Auxiliary Input #1,
Auxiliary Input #2, and Auxiliary Input #3.
iii. Remote Side Key Codes
Configure the Key Code sequence to be used by the remote side to for deactivation of the
corresponding Auxiliary Output10.
iv. Local Key Codes
Configure the Key Code sequence to be used by the Local User for deactivation of the
corresponding Auxiliary Output.
v. On Selected Events
Configure the Auxiliary Output deactivation on selected events as specified above.
vi. On Call Transfer
Configure the Auxiliary Output deactivation on call transfer.
4. Click Apply to save settings.
Note You cannot use the same event for activation and deactivation of the same Auxiliary Output.
If DTMF Authentication is enabled (see section 4.8) the Guard Access Code will need to be entered before any other code may be used.
If DTMF Authentication is enabled (see section 4.8) the Guard Access Code will need to be entered before any other code may be used.
Page 34 of 90
All prices and specifications are subject to change without notice. Talk-A-Phone, Scream Alert, WEBS and WEBS Contact are registered trademarks of Talk-A-Phone Co. All rights reserved.
Copyright 2012 Talk-A-Phone Co. • 7530 North Natchez Avenue • Niles, Illinois 60714 • Phone 773.539.1100 • info@talkaphone.com • www.talkaphone.com.
Page 35

1
3
2
VOIP-500 Series Phone
Configuration and Operation Manual
4.7. Digital Outputs
4.7.1. Digital Output Scripts
The VOIP-500 supports ASCII digital outputs to third-party devices. The Digital Outputs – Scripts page allows
for creation of scripts that will run when activated on the Digital Outputs – Events page.
Login → Digital Outputs → Scripts
Figure 18 Digital Outputs - Scripts
To create Digital Output Scripts:
1. Use the drop-down menu to select the Digital Output Script slot, and assign a label.
2. Enter a script that should be executed when activated.
Valid commands for scripts are ‘echo’ and ‘nc’. The ‘+’ sign can be used for separating multiple
commands.
The echo command contains the body of the message. Proper usage is:
echo “Body_of_the_message”
Example: echo “activate cam_1”
The nc (netcat) command establishes the communications link. Proper usage is:
nc <IP_ADDRESS> <PORT>
Example: nc 192.168.1.100 23
Commands are often combined to create a relationship between a message and its destination. This can
be achieved through use of the ‘|’ (pipe).
The | (pipe) is used to pass one command into another. For example, I can pipe a message into its
destination.
Example: echo “activate cam_1” | nc 192.168.1.100 23
3. Click Apply to save settings.
All prices and specifications are subject to change without notice. Talk-A-Phone, Scream Alert, WEBS and WEBS Contact are registered trademarks of Talk-A-Phone Co. All rights reserved.
Copyright 2012 Talk-A-Phone Co. • 7530 North Natchez Avenue • Niles, Illinois 60714 • Phone 773.539.1100 • info@talkaphone.com • www.talkaphone.com.
Page 35 of 90
Page 36

1
4
2
Configuration and Operation Manual
4.7.2. Digital Output Events
The Digital Output Events page allows events to activate the digital output of scripts.
Login → Digital Outputs → Events
VOIP-500 Series Phone
Page 36 of 90
All prices and specifications are subject to change without notice. Talk-A-Phone, Scream Alert, WEBS and WEBS Contact are registered trademarks of Talk-A-Phone Co. All rights reserved.
Copyright 2012 Talk-A-Phone Co. • 7530 North Natchez Avenue • Niles, Illinois 60714 • Phone 773.539.1100 • info@talkaphone.com • www.talkaphone.com.
Page 37

11
2
VOIP-500 Series Phone
Configuration and Operation Manual
Figure 19 Digital Outputs - Events
To configure the auxiliary outputs:
1. Configure various events that should activate a Digital Output.
i. Button Events
The button events are available only when the Buttons are programmed for Autodial mode (Refer to
4.6.1 Buttons: for Autodial).
Configure Primary Digital Output activation on Button #1 and/or Button #2 when a call is
INITIATED, ANSWERED, or TERMINATED.
ii. Auxiliary Input Events
Configure the Primary Digital Output activation on activation/deactivation of Auxiliary Input #1,
Auxiliary Input #2, and Auxiliary Input #3.
iii. Remote Side Key Codes
Configure the Key Code sequence to be used by the remote side to activate the corresponding
Digital Output.
iv. Local Key Codes
Configure the Key Code sequence to be used by the Local User to activate the corresponding
Digital Output11.
2. Configure various events on which the Secondary Digital Output(s) needs to be deactivated. Secondary
Digital Outputs are commonly used to send a deactivation script.
i. Button Events
The button events are available only when the Buttons are programmed for Autodial mode (Refer to
4.6.1 Buttons: for Autodial).
Configure the Secondary Digital Output activation on Button #1 and/or Button #2 when a call is
INITIATED, ANSWERED, or TERMINATED, after the defined duration of time has elapsed.
If DTMF Authentication is enabled (see section 4.8) the Guard Access Code will need to be entered before any other code may be used.
All prices and specifications are subject to change without notice. Talk-A-Phone, Scream Alert, WEBS and WEBS Contact are registered trademarks of Talk-A-Phone Co. All rights reserved.
Copyright 2012 Talk-A-Phone Co. • 7530 North Natchez Avenue • Niles, Illinois 60714 • Phone 773.539.1100 • info@talkaphone.com • www.talkaphone.com.
Page 37 of 90
Page 38

12
VOIP-500 Series Phone
Configuration and Operation Manual
ii. Auxiliary Input Events
Configure the Secondary Digital Output activation on activation/deactivation of Auxiliary Input
#1, Auxiliary Input #2, and Auxiliary Input #3, during an Active call or while Idle.
iii. Remote Side Key Codes
Configure the Key Code sequence to be used by the remote side to for activation of the
corresponding Secondary Digital Output12, after the defined duration of time has elapsed.
iv. Local Key Codes
Configure the Key Code sequence to be used by the Local User for activation of the
corresponding Secondary Digital Output, during and Active call or while Idle.
v. On Selected Events
Configure the Secondary Digital Output activation on selected events as specified above.
vi. On Call Transfer
Configure the Secondary Digital Output activation on call transfer.
3. Click Apply to save settings.
Note You cannot use the same event for activation and deactivation of the same Digital Output.
If DTMF Authentication is enabled (see section 4.8) the Guard Access Code will need to be entered before any other code may be used.
Page 38 of 90
All prices and specifications are subject to change without notice. Talk-A-Phone, Scream Alert, WEBS and WEBS Contact are registered trademarks of Talk-A-Phone Co. All rights reserved.
Copyright 2012 Talk-A-Phone Co. • 7530 North Natchez Avenue • Niles, Illinois 60714 • Phone 773.539.1100 • info@talkaphone.com • www.talkaphone.com.
Page 39

1
2
5
3
4
VOIP-500 Series Phone
Configuration and Operation Manual
4.8. Voice Messages
4.8.1. Played to the User
This configuration page allows the administrator to configure the voice message to be played to the local user
on hands-free speaker or handset depending on the device mode.
Login → Voice Messages → Played to User
Figure 20 Voice Messages Played to User
To configure the voice messages played to user:
1. Use the drop-down menu to select the voice message to be configured.
2. The voice message is played to the user on the selection of one of the following events:
i. Select On inbound calls when answered to play the voice message to the user when the phone
answers an inbound call.
ii. Select Auxiliary Input Activation/Deactivation events to play the voice message on the
activation/deactivation of an Auxiliary Input device
All prices and specifications are subject to change without notice. Talk-A-Phone, Scream Alert, WEBS and WEBS Contact are registered trademarks of Talk-A-Phone Co. All rights reserved.
Copyright 2012 Talk-A-Phone Co. • 7530 North Natchez Avenue • Niles, Illinois 60714 • Phone 773.539.1100 • info@talkaphone.com • www.talkaphone.com.
Page 39 of 90
Page 40

13
14
VOIP-500 Series Phone
Configuration and Operation Manual
iii. Select and enter the Key Code sequence13 entered by the remote side to play the voice message to
the User when the corresponding key sequence is entered by the remote side during an active call.
iv. Select and enter the Key Code sequence14 entered locally on the phone keypad to play the voice
message to the User when the corresponding key sequence is entered by the local User during
idle/active call state.
v. Select the Button #3 and Button #4 events to play the voice message when the Button #3 or Button
#4 is pressed by the local User on the phone. The Button #3 and Button #4 events are available only
for the buttons programmed as “Play Voice Message” (Refer to 4.6.1 Buttons).
3. Select Looping – Yes/No to play the voice message in a loop until the “stop message” event occurs.
4. The selected voice message stops playing on the selection of one of the following events:
i. Select On inbound calls when answered to stop playing the current voice message when the
phone answers an inbound call.
ii. Select Auxiliary Input Activation/Deactivation events to stop playing the current voice message on
activation/deactivation of an Auxiliary Input Device.
iii. Select and enter the Key Code sequence entered by the remote side to stop playing the current
voice message when the corresponding key sequence is entered by the remote side during an
active call.
iv. Select and enter the Key Code sequence entered locally on the phone keypad to stop playing the
current voice message when the corresponding key sequence is entered by the local User during
idle/active call state.
v. Select the Button #3 and Button #4 events to stop playing the current voice message when the
Button #3 or Button #4 is pressed by local User on the phone. The Button #3 and Button #4 events
are available only for buttons programmed as “Play Voice Message” (Refer to 4.6.1 Buttons).
5. Click Apply to save settings.
Note: You cannot use the same event to activate and deactivate the same voice message.
If DTMF Authentication is enabled (see section 4.8) the Guard Access Code will need to be entered before any other code may be used.
If DTMF Authentication is enabled (see section 4.8) the Guard Access Code will need to be entered before any other code may be used.
Page 40 of 90
All prices and specifications are subject to change without notice. Talk-A-Phone, Scream Alert, WEBS and WEBS Contact are registered trademarks of Talk-A-Phone Co. All rights reserved.
Copyright 2012 Talk-A-Phone Co. • 7530 North Natchez Avenue • Niles, Illinois 60714 • Phone 773.539.1100 • info@talkaphone.com • www.talkaphone.com.
Page 41

1
2
5
3
4
VOIP-500 Series Phone
Configuration and Operation Manual
4.8.2. Played to Remote Side
Note Not all VoIP topologies support this feature. Contact Talk-A-Phone for further information.
This configuration page allows the administrator to configure the voice message that needs to be played to
the remote side.
Login → Voice messages → Played to Remote Side
Figure 21 Voice Messages Played to Remote Side
To configure the voice messages played to remote side:
1. Use the drop-down menu to select the voice message to be configured.
2. The voice message is played to the remote side on selection of one of the following events:
i. Select Guard Answers Call to play the voice message to remote side when the remote phone
answers the call.
ii. Select and enter the Key Code sequence entered by remote side to play the voice message to the
remote side when the corresponding key sequence is entered by the remote side during an active
call.
3. Select Looping – Yes/No to loop the voice message until the “stop message” event occurs.
4. The selected voice message stops playing on selection of the following events:
i. Select and enter the Key code sequence entered by Remote Side to stop playing the voice
message to remote side when the corresponding key sequence is entered by the remote side during
an active call.
5. Click Apply to save settings.
Note You cannot use the same event to activate and deactivate the same voice message.
All prices and specifications are subject to change without notice. Talk-A-Phone, Scream Alert, WEBS and WEBS Contact are registered trademarks of Talk-A-Phone Co. All rights reserved.
Copyright 2012 Talk-A-Phone Co. • 7530 North Natchez Avenue • Niles, Illinois 60714 • Phone 773.539.1100 • info@talkaphone.com • www.talkaphone.com.
Page 41 of 90
Page 42

15
16
1
2 6 3
4
5
VOIP-500 Series Phone
Configuration and Operation Manual
4.9. Authentication
The Authentication page allows the administrator to change the user credentials used to access the phone
through the Web interface, set the guard access code, and enable/disable the DTMF authentication
requirement for specific DTMF operation codes.
Login → Authentication
Figure 22 Authentication
To configure the authentication details:
1. Enter the user credentials to access the Web interface:
Username15 accepts alphanumeric and special characters (e.g., underscore “_” and period “.”).
Password16 accepts alphanumeric values and special characters (except “&”).Configure the Key
Code sequence to be used by the Local User for deactivation of the corresponding Auxiliary Output.
Confirm password requires you to type the password again for reconfirmation.
2. Enter the Guard Access Code. It is used for authentication when the remote side phone supports the
sending of DTMF. The length of the Guard Access Code can be up to eight characters.
The maximum number of characters in username is 30.
The maximum number of characters in password is 30.
Page 42 of 90
All prices and specifications are subject to change without notice. Talk-A-Phone, Scream Alert, WEBS and WEBS Contact are registered trademarks of Talk-A-Phone Co. All rights reserved.
Copyright 2012 Talk-A-Phone Co. • 7530 North Natchez Avenue • Niles, Illinois 60714 • Phone 773.539.1100 • info@talkaphone.com • www.talkaphone.com.
Page 43

VOIP-500 Series Phone
Configuration and Operation Manual
3. Check/uncheck the check boxes to enable/disable the DTMF authentication code requirement for specific
DTMF operation codes.
4. Check/uncheck the check box to Enable SSH access to the VOIP-500 phone.
5. Enter Username and Password to configure/modify Authentication for SSH user.
6. Click Apply to save settings.
All prices and specifications are subject to change without notice. Talk-A-Phone, Scream Alert, WEBS and WEBS Contact are registered trademarks of Talk-A-Phone Co. All rights reserved.
Copyright 2012 Talk-A-Phone Co. • 7530 North Natchez Avenue • Niles, Illinois 60714 • Phone 773.539.1100 • info@talkaphone.com • www.talkaphone.com.
Page 43 of 90
Page 44

VOIP-500 Series Phone
Configuration and Operation Manual
4.10. Maintaining the Phone
4.10.1. Device State
The Device State page displays the current state of the devices that are attached to the phone. If the status
indicator is green the device is active, otherwise grey indicates that the device is inactive.
Login → Maintenance → Device State
Figure 23 Device state
Note The contents of this page will vary depending on the device mode.
Page 44 of 90
All prices and specifications are subject to change without notice. Talk-A-Phone, Scream Alert, WEBS and WEBS Contact are registered trademarks of Talk-A-Phone Co. All rights reserved.
Copyright 2012 Talk-A-Phone Co. • 7530 North Natchez Avenue • Niles, Illinois 60714 • Phone 773.539.1100 • info@talkaphone.com • www.talkaphone.com.
Page 45

Field
Description
Outgoing Calls
Total outgoing call attempts
Count of outgoing call attempts made from Buttons, Keypad, and
Auxiliary Input activations.
Total unanswered outgoing calls
Count of unsuccessful calls unanswered by the remote side.
Total failed outgoing calls
Count of failed calls due to events such as remote side is busy,
network issues, or unreachable destination.
Total outgoing call duration
Total duration of the successful outgoing calls (hh:mm:ss)
1
2
3
VOIP-500 Series Phone
Configuration and Operation Manual
4.10.2. Statistics
The Statistics page allows you to manage and maintain the details of the phone calls, current state of the
phone, call statistics, call details, and auxiliary details. It also allows you to clear the statistics and provides a
link to download the statistics to a text file.
Login → Maintenance → Statistics
Figure 24 Statistics
To download the statistics file:
1. Select or unselect a specific category of statistics. By default, all options are selected.
2. Click the Download link to download the statistics file to the local computer. A prompt should appear
requesting to “save or open” the Statistics File. Click the Save option to save the file on the local PC.
3. Click Apply to save settings.
Note To clear statistics, check the checkbox next to “Clear statistics” and click Apply. Executing the “Clear
statistics” option will erase all of the selected statistics from the phone.
Description of Fields in the Statistics File:
Call Statistic Fields:
All prices and specifications are subject to change without notice. Talk-A-Phone, Scream Alert, WEBS and WEBS Contact are registered trademarks of Talk-A-Phone Co. All rights reserved.
Copyright 2012 Talk-A-Phone Co. • 7530 North Natchez Avenue • Niles, Illinois 60714 • Phone 773.539.1100 • info@talkaphone.com • www.talkaphone.com.
Page 45 of 90
Page 46

Field
Description
between call answer and call termination events.
Incoming Calls
Total incoming call requests
Total number of incoming call request from the remote side.
Total missed calls
Counts the missed calls (calls that are not answered).
Total failed calls
Counts the total number of failed calls (e.g., rejecting an incoming
call when an Emergency Call is in progress).
Total incoming call duration
Total duration (hh:mm:ss) of successful incoming calls between
call answer and call termination events.
Incoming Pages
Total incoming page requests
Count of total number of incoming page requests from a WEBS
Contact® Server.
Total unsuccessful pages
Count of unsuccessful page requests to the phone (e.g., rejecting
a page request when an Emergency Call is in progress and has a
higher operation mode priority over paging).
Total voice page time
Total duration (hh:mm:ss) of successful pages.
Field
Description
Date
mm:dd:yyyy hh:mm:ss
The starting time of a call event or a page event.
Type
Indicates whether the event was an incoming call, outgoing call,
or a page.
Status
Displays the status of the call/page (i.e. whether the call/page
was completed successfully or not).
Originator
The interface on the phone which initiated the call. The valid
entries are:
Button #1/Button #2/Button #3/Button #4
AuxIn #1/AuxIn #2/AuxIn #3
Keypad
Remote
For paging, the Originator is always Remote.
Source URL
URL of the source of the call (maximum of 30 characters).
Destination URL
URL of the destination of the call (maximum of 30 characters).
Duration
hh:mm:ss
This indicates how long (in seconds) the call event or page event
lasted.
This field is only valid for successful calls/pages.
Voice Codec Used
The voice codec being used for a given call.
The valid entries are:
G.723, G.729, G.711 A law, and G.711 U law
VOIP-500 Series Phone
Configuration and Operation Manual
Call Logs Fields:
Page 46 of 90
All prices and specifications are subject to change without notice. Talk-A-Phone, Scream Alert, WEBS and WEBS Contact are registered trademarks of Talk-A-Phone Co. All rights reserved.
Copyright 2012 Talk-A-Phone Co. • 7530 North Natchez Avenue • Niles, Illinois 60714 • Phone 773.539.1100 • info@talkaphone.com • www.talkaphone.com.
Page 47

Field
Description
This field is only valid for successful calls/pages.
Mode
The VoIP protocol used for a particular call (SIP).
Fail Code
The reason code for the failure of a particular call/page.
This field is only valid for unsuccessful calls.
Field
Description
Date
mm:dd:yyyy hh:mm:ss
The date and time for an Auxiliary activation/deactivation.
Aux Type
Aux Input 1/2/3 or Aux Output 1/2/3
Aux State
Displays the status of an Aux Input or Aux Output
(Activated/Deactivated).
Aux Logs Fields:
VOIP-500 Series Phone
Configuration and Operation Manual
All prices and specifications are subject to change without notice. Talk-A-Phone, Scream Alert, WEBS and WEBS Contact are registered trademarks of Talk-A-Phone Co. All rights reserved.
Copyright 2012 Talk-A-Phone Co. • 7530 North Natchez Avenue • Niles, Illinois 60714 • Phone 773.539.1100 • info@talkaphone.com • www.talkaphone.com.
Page 47 of 90
Page 48

1
2
3
4
VOIP-500 Series Phone
Configuration and Operation Manual
4.10.3. Logging
Log messages generated by the phone can be captured for review. Enabling the “DEBUG” option may
degrade the phone’s performance. It is recommended to not use this option unless required.
Login → Maintenance → Logging
Figure 25 Logging
To configure logging over the network:
1. Select the Network option. This option enables Logging Server fields.
2. Enter the Logging Server IP Address and the Logging Server Port.
3. Select the log levels for different modules from the drop-down menu.
4. Click Apply to save the settings.
Note To disable logging, select Nowhere (Disable)
Note To download and save the log file on the computer, click the Download link.
Note A maximum of 500 KB of logging data can be collected. On exceeding this limit, the older 250 KB of
logging data are purged from the log file.
Page 48 of 90
All prices and specifications are subject to change without notice. Talk-A-Phone, Scream Alert, WEBS and WEBS Contact are registered trademarks of Talk-A-Phone Co. All rights reserved.
Copyright 2012 Talk-A-Phone Co. • 7530 North Natchez Avenue • Niles, Illinois 60714 • Phone 773.539.1100 • info@talkaphone.com • www.talkaphone.com.
Page 49

1
6
2
3 4 5
Configuration and Operation Manual
4.10.4. Date and Time
The Date and Time page allows you to set the date and time of the phone.
Login → Maintenance → Date & Time
VOIP-500 Series Phone
Figure 26 Date and Time Setting
To set the date and time:
1. Select Enable NTP to set the VOIP-500 to use Network Time Protocol.
2. If using NTP, enter the IP Address of the NTP Server.
3. If using NTP, select the Time Zone from the drop-down menu.
4. If manually entering the date and time, enter the Date in MM/DD/YYYY format.
5. If manually entering the date and time, enter the Time in HH:MM:SS 24-hour format.
6. Click Apply to save settings. NTP settings will automatically update the date / time.
All prices and specifications are subject to change without notice. Talk-A-Phone, Scream Alert, WEBS and WEBS Contact are registered trademarks of Talk-A-Phone Co. All rights reserved.
Copyright 2012 Talk-A-Phone Co. • 7530 North Natchez Avenue • Niles, Illinois 60714 • Phone 773.539.1100 • info@talkaphone.com • www.talkaphone.com.
Page 49 of 90
Page 50

1
2
3
5
4
VOIP-500 Series Phone
Configuration and Operation Manual
4.10.5. Ping and Traceroute
The Ping and Traceroute page is used to perform connectivity tests. The Ping command can be used to
determine whether a destination is reachable from the phone or not. Traceroute helps in determining
intermediate hops to the destination IP address.
Login → Maintenance → Ping and Traceroute
Figure 27 Ping and Traceroute
To ping or traceroute:
1. Enter an IP Address.
2. Select Ping or Traceroute.
3. Click Apply.
4. The status bar indicates the command executed.
5. The Results section displays the results of the executed command.
Page 50 of 90
All prices and specifications are subject to change without notice. Talk-A-Phone, Scream Alert, WEBS and WEBS Contact are registered trademarks of Talk-A-Phone Co. All rights reserved.
Copyright 2012 Talk-A-Phone Co. • 7530 North Natchez Avenue • Niles, Illinois 60714 • Phone 773.539.1100 • info@talkaphone.com • www.talkaphone.com.
Page 51

17
18
1
2
3
4
5
Configuration and Operation Manual
4.10.6. Firmware Upgrade
The Firmware Upgrade page is used to update phone to new firmware releases.
Login → Maintenance → Firmware Upgrade
VOIP-500 Series Phone
Figure 28 Firmware Upgrade
To upgrade the firmware:
1. Select either the FTP or HTTP protocol to download the firmware image.
2. Enter the Server IP Address, Username17, and Password18 for authentication. If the username and
password is preferred to be retained for a future upgrade, select the Save Username and Password
check box.
3. In the Filename box, enter the filename with its complete path. The filename is generally in the format of
(EVP_A_B_C_D). This filename needs to be prefixed with directory relative to the HTTP or FTP root
directory. For example, /tftpboot/EVP_images/EVP_1_0_0_0). Consult the Administrator for FTP/HTTP
settings.
4. Select the Upgrade check box.
5. Click Apply. One of the following progress messages is displayed:
The maximum number of characters in username is 30.
The maximum number of characters in password is 30.
All prices and specifications are subject to change without notice. Talk-A-Phone, Scream Alert, WEBS and WEBS Contact are registered trademarks of Talk-A-Phone Co. All rights reserved.
Copyright 2012 Talk-A-Phone Co. • 7530 North Natchez Avenue • Niles, Illinois 60714 • Phone 773.539.1100 • info@talkaphone.com • www.talkaphone.com.
Page 51 of 90
Page 52

3
1
2
VOIP-500 Series Phone
Configuration and Operation Manual
Firmware upgrade initiated. Do not reboot...: The firmware upgrade has been initiated; the
firmware upgrade request is processed only when phone is in an idle state. For example, a call is in
progress and administrator requests for a firmware upgrade through the Web GUI. The phone checks
for an active call every five seconds and starts the process once the active call is terminated.
The following are considered to be idle phone states: no active call, no dialing, no voice message is
being played, and the Auxiliary Output is deactivated.
Firmware upgrade in progress. Do not reboot...: The firmware upgrade is in progress. The process
generally takes around 1-2 min to complete.
Firmware upgrade done. Going to reboot...: The firmware upgrade is complete and a reboot has
been initiated. After approximately one minute, the phone will be accessible once again.
4.10.7. SMTP Server Configuration
The SMTP Server Configuration page is used to configure the mail settings for email notifications.
Login → Maintenance → SMTP Server Configuration
Figure 29 SMTP Server Configuration
To setup SMTP:
1. Check the Enable SMTP check box.
2. Enter the SMTP Address and Port where emails should be sent.
3. Click Apply to save settings.
Page 52 of 90
All prices and specifications are subject to change without notice. Talk-A-Phone, Scream Alert, WEBS and WEBS Contact are registered trademarks of Talk-A-Phone Co. All rights reserved.
Copyright 2012 Talk-A-Phone Co. • 7530 North Natchez Avenue • Niles, Illinois 60714 • Phone 773.539.1100 • info@talkaphone.com • www.talkaphone.com.
Page 53

1
2
4
VOIP-500 Series Phone
Configuration and Operation Manual
4.10.8. Email Notification Profiles
The Email Notification Profiles page is used to create email notification profiles and select the events that will
trigger an email message being sent.
Login → Maintenance → Email Notification Profiles
Figure 30 Email Notification Profiles
To setup an Email Notification Profile:
1. Check the Notification Profile Number you wish to modify. A total of 3 profiles are available.
2. Check the box for each Notification Event that should trigger an email notification being sent.
3. Enter the Email Addresses that the email notification should be sent to.
4. Click Apply to save settings.
All prices and specifications are subject to change without notice. Talk-A-Phone, Scream Alert, WEBS and WEBS Contact are registered trademarks of Talk-A-Phone Co. All rights reserved.
Copyright 2012 Talk-A-Phone Co. • 7530 North Natchez Avenue • Niles, Illinois 60714 • Phone 773.539.1100 • info@talkaphone.com • www.talkaphone.com.
Page 53 of 90
Page 54

4
1
2
3
VOIP-500 Series Phone
Configuration and Operation Manual
4.10.9. Reset to Defaults
The Reset to Defaults page allows the phone configuration parameters to be set to their default values. It also
provides an option to retain the IP address and/or the username and password.
Login → Maintenance → Reset to Defaults
Figure 31 Reset to Defaults
To reset to defaults:
1. Select Network IP Address, if the IP address of the phone needs to be retained. If this option is not
selected the IP address of the phone will default to 192.168.1.10.
2. Select Username and Password if the Web Interface credentials need to be retained. If the option is not
selected the username will default to admin and the password will default to admin@123.
3. Select SIP if the SIP settings need to be retained. If this option is not selected the SIP Settings will be
deleted.
4. Click Apply. The phone automatically reboots with the default settings.
Page 54 of 90
All prices and specifications are subject to change without notice. Talk-A-Phone, Scream Alert, WEBS and WEBS Contact are registered trademarks of Talk-A-Phone Co. All rights reserved.
Copyright 2012 Talk-A-Phone Co. • 7530 North Natchez Avenue • Niles, Illinois 60714 • Phone 773.539.1100 • info@talkaphone.com • www.talkaphone.com.
Page 55

1
2
4.10.10. Reboot
The reboot page allows the device to be rebooted via the GUI.
Login → Reboot
VOIP-500 Series Phone
Configuration and Operation Manual
Figure 32 Reboot
To reboot the device:
1. Select Yes.
2. Click Apply. The phone automatically reboots with the default settings.
All prices and specifications are subject to change without notice. Talk-A-Phone, Scream Alert, WEBS and WEBS Contact are registered trademarks of Talk-A-Phone Co. All rights reserved.
Copyright 2012 Talk-A-Phone Co. • 7530 North Natchez Avenue • Niles, Illinois 60714 • Phone 773.539.1100 • info@talkaphone.com • www.talkaphone.com.
Page 55 of 90
Page 56

19
20
VOIP-500 Series Phone
Configuration and Operation Manual
5. Operations
The phone takes approximately one minute to boot. While the first and second LED’s are flash, the unit is still
booting (Refer to Figure 1 Front View). After all LED’s clear, wait for an additional twenty seconds before
initiating a call.
The phone needs to be programmed in accordance with the instructions provided in Chapter 4 (Refer to 4
Using the Web GUI).
5.1. Calling Emergency/Information Numbers
In case of an emergency, the phone can dial a list of numbers (Refer to 4.5.1 Number Lists) in round robin
fashion. Depending on the device mode and programming, a call is automatically initiated when:
Push button is pressed
Auxiliary Input is activated
Handset goes off-hook (0BH device mode only)
If the first number does not answer within a specified time (Refer to 4.5.4 Call Parameters) the phone dials
the next number from the number list. It continues to dial in round robin fashion until the call is answered, or
the call conversation timer expires (Refer to 4.5.4 Call Parameters: Call Conversation Timer).
5.2. Answering the Emergency/Information Call
One of the following scenarios occurs upon answering the emergency call on the remote side:
The VOIP-500 Series Phone may transmit its location by playing a recorded message (Refer to 4.7.2
Played to Remote Side). If no such feature is enabled or when the voice message completes playing,
the caller may talk and listen hands-free19 without using any controls.
The VOIP-500 Series Phone may transmit a voice message and request that the remote side user to
press a specific key on the keypad of the remote side phone (Refer to 4.5.4 Call Parameters: answer
a call) to answer this call. Providing the incorrect key sequence within three attempts will terminate
the call. Once the call is terminated, a new call is made to the next number on the list. On providing
the correct key sequence, the VOIP-500 Series Phone may transmit its location by playing a recorded
message (Refer to 4.7.2 Played to Remote Side). If no such feature is enabled, the caller may talk
and listen hands-free20 without using any controls.
5.3. Terminating Calls
Round robin calls can be terminated only from the remote side by going on-hook or by pressing a specific call
termination key on the remote keypad (Refer to 4.5.4 Call Parameters). Calls placed from the keypad can be
terminated locally using button(s) programmed as a hook switch (Refer to 4.6.1 Buttons) or from the remote
side by going on-hook/pressing a specific call termination key.
For phones with just a handset and no speaker, calls (both round robin and keypad calls) can be terminated
locally by going on-hook.
Depends on device mode
Depends on device mode
Page 56 of 90
All prices and specifications are subject to change without notice. Talk-A-Phone, Scream Alert, WEBS and WEBS Contact are registered trademarks of Talk-A-Phone Co. All rights reserved.
Copyright 2012 Talk-A-Phone Co. • 7530 North Natchez Avenue • Niles, Illinois 60714 • Phone 773.539.1100 • info@talkaphone.com • www.talkaphone.com.
Page 57

VOIP-500 Series Phone
Configuration and Operation Manual
5.4. Activating/Deactivating Auxiliary Outputs
To provide additional visible or audible alerts upon an event, the phone is equipped with 3 Auxiliary Outputs.
The Auxiliary Outputs can be used to connect devices such as a siren, a strobe light, a PTZ camera, etc.
These devices can then be activated and deactivated locally or remotely (Refer to 4.6.6 Auxiliary Outputs).
5.5. Activating/Deactivating the “Help on the Way” LED
The phone is equipped with 3 LEDs; each of the LEDs has a specific function assigned to it. The third LED is
used for indicating “Help on the Way” and is activated/deactivated through DTMF operation codes on the
remote side (Refer to 4.6.4 LEDs).
5.6. Activating/Deactivating Speaker and Microphone
During a call, the speaker (both Hands-free and Handset) and microphone (both Hands-free and Handset)
can be enabled/disabled using DTMF operation codes *5*/*6* & *7*/*8* respectively.
Note: The settings made above are temporary, which are valid for current call only. Once the call is
terminated, the settings will reset to the values defined in the Web GUI (Refer to 4.5.3 Audio Settings: Enable
or disable the Speaker and/or Microphone).
5.7. Adjusting Volume
During a call, the speaker gain and the microphone gain can be adjusted remotely using DTMF operation
codes *32*level* and *31*level* (where level ranges from 1-20), respectively.
During a call, the User can also locally adjust the speaker volume using Button #3 and Button #4 (Refer to
4.6.1 Buttons). This option is only available for phones with four buttons.
Note: The volume adjustments made above are temporary and are valid for a single active call instance.
Once the call is terminated, the settings will reset to the values defined in the Web GUI (Refer to 4.5.3 Audio
Settings: Speaker Gain and the Microphone Gain).
5.8. Playing Voice Messages
This feature is used to play pre-recorded voice messages on the phone’s built-in speaker/handset or to the
remote side upon occurrence of certain events (e.g., Call Initiation events, local/remote key press events). For
configuration details, refer to Section 4.7.1 Played to the User and Section 4.7.2 Played to Remote Side.
All prices and specifications are subject to change without notice. Talk-A-Phone, Scream Alert, WEBS and WEBS Contact are registered trademarks of Talk-A-Phone Co. All rights reserved.
Copyright 2012 Talk-A-Phone Co. • 7530 North Natchez Avenue • Niles, Illinois 60714 • Phone 773.539.1100 • info@talkaphone.com • www.talkaphone.com.
Page 57 of 90
Page 58

VOIP-500 Series Phone
Configuration and Operation Manual
5.9. Recording Voice Messages
The VOIP-500 Series Phone has the capability of recording up to six different voice messages (each up to
one minute in length).
To record a voice message on the phone from the remote side:
1. Call the VOIP-500 Series Phone.
2. Once the call is answered, enter the DTMF authentication code. The default DTMF authentication code is
*4**.
3. To initiate voice message recording, press *91*<message num>* where message num is from 0-5. The
voice message programmed for message num 0 is used for the “Key Press to Answer” feature.
4. After the single beep, begin recording the voice message.
5. Press any key to stop the voice recording.
Note The maximum voice message length is one minute. If no key is pressed within one minute or the call is
disconnected, the voice message recording stops automatically.
5.10. Previewing Voice Messages
To preview your recorded voice messages from the remote side:
1. Call the VOIP-500 Series Phone.
2. Once the call is answered, enter the DTMF authentication code. The default DTMF authentication code is
*4**.
3. To initiate voice message previewing, press *92*<message num>* where message num is from 0-5. The
voice message programmed for message num 0 is used for the “Key Press to Answer” feature.
4. After the single beep, the voice message will begin playing.
5. Press any key to stop the preview.
Page 58 of 90
All prices and specifications are subject to change without notice. Talk-A-Phone, Scream Alert, WEBS and WEBS Contact are registered trademarks of Talk-A-Phone Co. All rights reserved.
Copyright 2012 Talk-A-Phone Co. • 7530 North Natchez Avenue • Niles, Illinois 60714 • Phone 773.539.1100 • info@talkaphone.com • www.talkaphone.com.
Page 59

VOIP-500 Series Phone
Configuration and Operation Manual
5.11. Feedback Tones
Feedback tones/beeps are used to indicate the status of the requested operation from the local keypad or
from the remote side.
1. One beep is played after successful translation of local/remote key codes. For example, to activate
Auxiliary Output #1 the local key code is 123. When the User presses 123, the phone plays a single beep
on the built-in speaker or handset before activating Auxiliary Output #1. Similarly, when the remote side
enters the correct code the remote user hears a single beep before the phone performs the requested
operation.
2. Two beeps are played indicating an incorrect key code. For example, to activate an Auxiliary Output #1 the
local key code is 123. If the User presses 124 the phone plays two beeps. Similarly, when the remote side
enters the incorrect code the remote user hears a double beep indicating an error.
3. Three beeps are played to the remote side in a case where DTMF authentication is required for a
particular operation. For example, key code 123 requires DTMF authentication to activate Auxiliary Output
#1. After pressing 123 the phone plays three beeps to the remote side indicating DTMF authentication is
required in order to perform the requested operation.
5.12. Paging Operation
The phone can receive one-way paging messages from the WEBS Contact® server either on the line level
output or on the built-in hands-free speaker. The phone must be registered with the WEBS Contact® server in
order to receive incoming pages.
The system administrator can prioritize (Refer to 4.5.2 Phone Settings: assign the priority) the paging
operation over the phone operations to facilitate high priority paging messages.
5.13. Line Level Recording
This feature is used to locally record communication between the calling party and the called party once the
call is established. This feature is enabled only when the paging output mode is set to the built-in hands-free
speaker. Configuring the paging output to line level output automatically disables this feature.
5.14. Silent Monitoring
Silent Monitoring is used to monitor locations as required. This feature is only supported by phones with a
built-in hands-free speaker and microphone. To use this feature:
1. Disable the speaker (Refer to 4.5.3 Audio Settings: Enable or disable the Speaker and/or Microphone) and
enable the auto answer mode of operation.
2. Place an incoming call to the VOIP-500 Series Phone. The phone will answer the call silently. The remote
phone can be used to monitor the nearby situation without any audible or visual indication on the phone.
3. Please be certain to follow all federal, state, and local laws when using this feature.
All prices and specifications are subject to change without notice. Talk-A-Phone, Scream Alert, WEBS and WEBS Contact are registered trademarks of Talk-A-Phone Co. All rights reserved.
Copyright 2012 Talk-A-Phone Co. • 7530 North Natchez Avenue • Niles, Illinois 60714 • Phone 773.539.1100 • info@talkaphone.com • www.talkaphone.com.
Page 59 of 90
Page 60

VOIP-500 Series Phone
Configuration and Operation Manual
5.15. Rebooting the Phone
The phone can be rebooted using the Reset button (Refer to 2.1.2 Internal View: RESET BUTTON) on the
phone. Pressing the Reset button once will reboot the phone. The phone can also be rebooted via the Web
GUI (Refer to 4.10 Reboot).
5.16. Factory Default Settings
The phone can be reset to factory settings using the Reset button (Refer to 2.1.2 Internal View: RESET
BUTTON). Press and hold the Reset button for 10 seconds. The phone will reboot with factory default
settings.
Note: All data including IP address and username/password will be reset to factory defaults.
Page 60 of 90
All prices and specifications are subject to change without notice. Talk-A-Phone, Scream Alert, WEBS and WEBS Contact are registered trademarks of Talk-A-Phone Co. All rights reserved.
Copyright 2012 Talk-A-Phone Co. • 7530 North Natchez Avenue • Niles, Illinois 60714 • Phone 773.539.1100 • info@talkaphone.com • www.talkaphone.com.
Page 61

Operation
Key Code
Function
DTMF
Authentication
Code Required
(if configured)
Enter Configuration
Mode
*4*<authentication code>*
Code is used to control
access to the device.
Microphone Gain
Adjustment
*31*<Level>*
Valid Level range : 1-20
Code is used to control
microphone gain levels.
This applies to both
handset and hands-free
models. The code takes
effect for the current call
only.
Yes
Speaker Gain
Adjustment
*32*<Level>*
Valid Level range : 1-20
Code is used to control
speaker gain levels. This
applies to both handset and
hands-free models. The
code takes effect for the
current call only.
Yes
Speaker
Enable/Disable
*5* Enable Speaker
*6* Disable Speaker
Code is used to
enable/disable the speaker.
This applies to both
handset and hands-free
models. The code takes
effect for the current call
only.
Yes
Microphone
Enable/Disable
*7* Enable Microphone
*8* Disable Microphone
Code is used to
enable/disable the
microphone. This applies to
both handset and handsfree models. The code
Yes
21
VOIP-500 Series Phone
Configuration and Operation Manual
Appendix A: Remote Operation Key Codes – Quick Reference
During a call, the following operations can be performed on the phone by dialing a key code sequence from
the remote side phone which supports the sending of DTMF21. If configured, these operations may require
DTMF authentication codes (Refer to 4.8 Authentication: DTMF Authentication Code).
Here is an example of how to use the DTMF operation codes during an active call.
For example, to adjust the volume of speaker from a remote phone, follow these steps:
Authenticate using key sequence *4*<authentication code>*. Successful authentication is indicated by a
single beep. This step is required only when DTMF authentication is enabled for volume adjustments (Refer
to 4.8 Authentication: enable/disable the DTMF authentication)
Dial the key sequence *31*8*. This sets the volume level of the speaker to 8. Successful operation is
indicated by a single beep.
Note The DTMF Authentication Code is only required once during a call and is valid until the call is
terminated.
Out-of-band RTP
All prices and specifications are subject to change without notice. Talk-A-Phone, Scream Alert, WEBS and WEBS Contact are registered trademarks of Talk-A-Phone Co. All rights reserved.
Copyright 2012 Talk-A-Phone Co. • 7530 North Natchez Avenue • Niles, Illinois 60714 • Phone 773.539.1100 • info@talkaphone.com • www.talkaphone.com.
Page 61 of 90
Page 62

Operation
Key Code
Function
DTMF
Authentication
Code Required
(if configured)
takes effect for the current
call only.
AUX Output
Activation/Deactivation
*11* Aux 1 Activation
*12* Aux 2 Activation
*13* Aux 3 Activation
*21* Aux 1 Deactivation
*22* Aux 2 Deactivation
*23* Aux 3 Deactivation
These are the default codes
and can be changed from
Web GUI.
Code is used for
activation/deactivation of
the Auxiliary Output by the
remote side phone during
the conversation.
Yes
Voice Message
Recording
*91*<Message Number>*
Message Number : 0-5
Note: Voice message
programmed for Message
Number 0 is used for the
“Key Press to Answer”
feature.
Code is used for recording
the message after the
beep. Pressing a key stops
the recording.
Yes
Voice message
previewing
*92*<Message num>*
Message num : 0-5
Voice message
programmed for Message
Number 0 is used for the
“Key Press to Answer”
feature.
Code is used for previewing
a recorded voice message.
Pressing a key stops the
previewing.
Yes
“Help on the Way”
LED Activation
*98* Enable
*97* Disable
These are the default codes
and can be changed from
the Web GUI.
Code is used to
enable/disable the “Help on
the Way” LED.
Yes
Call Termination
# To disconnect current
call
This is the default code and
can be changed from the
Web GUI.
Single digit key code to be
used to disconnect the call.
No
VOIP-500 Series Phone
Configuration and Operation Manual
Page 62 of 90
All prices and specifications are subject to change without notice. Talk-A-Phone, Scream Alert, WEBS and WEBS Contact are registered trademarks of Talk-A-Phone Co. All rights reserved.
Copyright 2012 Talk-A-Phone Co. • 7530 North Natchez Avenue • Niles, Illinois 60714 • Phone 773.539.1100 • info@talkaphone.com • www.talkaphone.com.
Page 63

Problem
Possible Causes & Corrective measures
Unable to access the
phone’s Web GUI
1. The IP address being used in the Web browser is incorrect. Connect the
serial console and check the phone’s IP address.
2. IP address of the phone is conflicting with another network device. Reassign
a new IP address to the phone.
3. The phone’s Web server is not responding. Reboot the phone.
Unable to login to
the phone’s Web GUI
1. The phone’s database is corrupt. Reset to factory default settings using the
Reset button (Refer to Error! Reference source not found. Error!
ference source not found.).IP address of the phone is conflicting with
another network device. Reassign a new IP address to the phone.
“Call Placed” and
“Call Received”
LED’s are constantly
blinking
1. The phone’s Ethernet link is down. Check the Ethernet connection.
2. The phone is unable to register to a SIP Registrar. Check SIP settings.
3. A firmware upgrade is in progress. Wait until the process is complete.
Unable to make
outgoing calls
1. The Phone is not on the network. Check network settings.
2. The destination is not reachable. Check SIP settings.
Unable to receive
incoming calls
1. The Phone is not on the network. Check network settings.
2. The Phone is off-hook. Check the hook switch status.
Not able to recognize
the DTMF codes
from remote side
1. The phone’s DTMF settings are not compatible with remote side. Check the
DTMF settings of the remote side. It should be RFC 2833 compliant.
2. The DTMF digit duration of the phone is not compatible with the remote
phone. Check the DTMF settings at the remote side. It should be RFC 2833
compliant.
Configuration and Operation Manual
Appendix B: Troubleshooting & Maintenance
VOIP-500 Series Phone
All prices and specifications are subject to change without notice. Talk-A-Phone, Scream Alert, WEBS and WEBS Contact are registered trademarks of Talk-A-Phone Co. All rights reserved.
Copyright 2012 Talk-A-Phone Co. • 7530 North Natchez Avenue • Niles, Illinois 60714 • Phone 773.539.1100 • info@talkaphone.com • www.talkaphone.com.
Page 63 of 90
Page 64

VOIP-500 Series Phone
Configuration and Operation Manual
Appendix C: Frequently Asked Questions
1. I am experiencing audio problems on the phone such as echo, distorted sound, or choppiness. How do I
fix this?
i. Verify whether proper bandwidth is allocated for VoIP traffic. You can utilize various mechanisms
(RTP header compression and QoS) on the network.
ii. Check the network priority configuration on the Buttons configuration page (Refer to 4.6.1 Buttons:
Network Priority).
2. How do I determine the IP address of the phone?
To determine the IP address:
i. Connect a computer to the phone in question using a serial port and serial console.
ii. Open HyperTerminal or similar console application on the connected computer.
iii. At the command prompt, enter the ifconfig command. The IP address of the phone will be
displayed.
To determine the IP address through the Web GUI:
i. Follow the directions under Section 4.4.1 IP Settings.
ii. The IP Address field will display the IP Address of the phone.
3. The phone is not receiving paging requests from the WEBS Contact® server. How do I fix this?
i. Refer to Section 4.5.5 Paging Settings.
ii. Check the Registration status with the WEBS Contact® server.
iii. If the status is Unregistered then you will need to contact the Administrator of the WEBS Contact®
server in order to reregister the phone for paging requests.
iv. If the status is registered at <WEBS Contact® server> then refer to Section 4.5.2 Phone Settings.
v. Check whether Phone Mode has priority over Paging Mode or Paging Mode has priority over Phone
Mode.
vi. If Phone Mode has priority over Paging Mode, then check for any phone activity – Is the phone
dialing? Is the handset off-hook? In order to receive pages, the phone should be idle.
Note It is not recommended to use the deregister option as it deregisters the phone with the WEBS Contact®
Server. Phone will stop sending events to WEBS Contact® Server.
Page 64 of 90
All prices and specifications are subject to change without notice. Talk-A-Phone, Scream Alert, WEBS and WEBS Contact are registered trademarks of Talk-A-Phone Co. All rights reserved.
Copyright 2012 Talk-A-Phone Co. • 7530 North Natchez Avenue • Niles, Illinois 60714 • Phone 773.539.1100 • info@talkaphone.com • www.talkaphone.com.
Page 65

Model Number
Device Mode
Number of
Buttons
Handset
Hands-free
Spekear/Microphone
Keypad
VOIP-500HNS
0BH
0
Yes
No
No
VOIP-500KHNS
0BKH
0
Yes
No
Yes
VOIP-500H
1BH
1
Yes
No
No
VOIP-500
1BS
1
No
Yes
No
VOIP-500H2
1BSH
1
Yes
Yes
No
VOIP-500KS
1BSK
1
No
Yes
Yes
VOIP-500KSH2
1BSKH
1
Yes
Yes
Yes
VOIP-500KSH
1BKH
1
Yes
No
Yes
VOIP-500DH
2BH
2
Yes
No
No
VOIP-500D
2BS
2
No
Yes
No
VOIP-500DH2
2BSH
2
Yes
Yes
No
VOIP-500K
2BSK
2
No
Yes
Yes
VOIP-500KH2
SBSKH
2
Yes
Yes
Yes
VOIP-500KH
2BKH
2
Yes
No
Yes
VOIP-500-OEM
4BSKH
4
Yes
Yes
Yes
WEBS-CM-2
0BS
0
No
Yes (Speaker only)
No
VOIP-500 Series Phone
Configuration and Operation Manual
Appendix D: VOIP-500 Device Modes
This section provides detail about the various device modes of the VOIP-500 Series Phone. The device mode
is specified under the Home page of the Web GUI (Refer 4.3 Home).
Note 0BS device mode is also referred to as Communications Module.
All prices and specifications are subject to change without notice. Talk-A-Phone, Scream Alert, WEBS and WEBS Contact are registered trademarks of Talk-A-Phone Co. All rights reserved.
Copyright 2012 Talk-A-Phone Co. • 7530 North Natchez Avenue • Niles, Illinois 60714 • Phone 773.539.1100 • info@talkaphone.com • www.talkaphone.com.
Page 65 of 90
Page 66

VOIP-500 Series Phone
Configuration and Operation Manual
Appendix E: Sample Serial Configuration File
+++++++++++++++++++++++++++++++++++++++++++++++++++++++++++++++++++++++++++++++
++ This Configuration file has all the default and allowed values for
++ configurable attributes.
++ Admin/Programmer can modify the values as per permissible value/range for
++ defined parameters as described in comments given for each parameter.
++
+++++++++++++++++++++++++++++++++++++++++++++++++++++++++++++++++++++++++++++++
+++++++++++++++++++++++++++++++++++++++++++++++++++++++++++++++++++++++++++++++
++ Field name : VoIPProtocol
++ Description : Protocol to be used for originating calls
++ Valid values : VoIPProtocol = 1 for SIP (Default Value)
++ VoIPProtocol = 2 for H.323
++ Note : Changing this value will cause the phone to reboot.
+++++++++++++++++++++++++++++++++++++++++++++++++++++++++++++++++++++++++++++++
VoIPProtocol = 1
+++++++++++++++++++++++++++++++++++++++++++++++++++++++++++++++++++++++++++++++
++ Field name : AutoAnswer
++ Description : Enables/disable auto answer mode of phone operation.
++ Valid values : AutoAnswer = 0 - Disable
++ AutoAnswer = 1 - Enable (Default Value)
++ Note : None
+++++++++++++++++++++++++++++++++++++++++++++++++++++++++++++++++++++++++++++++
AutoAnswer = 1
+++++++++++++++++++++++++++++++++++++++++++++++++++++++++++++++++++++++++++++++
++ Field name : OperationPriority
++ Description : Operation Priority between Phone and Paging operations.
++ Valid values : OperationPriority = 1 Phone Mode has priority over Paging
++ Mode(Default)
++ OperationPriority = 2 Paging Mode has priority over Phone
++ Mode
++ Note : None
+++++++++++++++++++++++++++++++++++++++++++++++++++++++++++++++++++++++++++++++
OperationPriority = 1
+++++++++++++++++++++++++++++++++++++++++++++++++++++++++++++++++++++++++++++++
++ Field name : CallerIDPresentation
++ Description : Caller ID presentation to the Remote party.
++ Valid values : CallerIDPresentation = 0 - Disable
++ CallerIDPresentation = 1 - Enable (Default Value)
++ Note : None
+++++++++++++++++++++++++++++++++++++++++++++++++++++++++++++++++++++++++++++++
CallerIDPresentation = 1
+++++++++++++++++++++++++++++++++++++++++++++++++++++++++++++++++++++++++++++++
++ Field name : CallerID
++ Description : Caller ID to be present to Remote Party.
Page 66 of 90
All prices and specifications are subject to change without notice. Talk-A-Phone, Scream Alert, WEBS and WEBS Contact are registered trademarks of Talk-A-Phone Co. All rights reserved.
Copyright 2012 Talk-A-Phone Co. • 7530 North Natchez Avenue • Niles, Illinois 60714 • Phone 773.539.1100 • info@talkaphone.com • www.talkaphone.com.
Page 67

VOIP-500 Series Phone
Configuration and Operation Manual
++ Valid values : 30 chars long, a-z,A-Z,*,0-9,.,- , No spaces allowed.
++ Default value is VOIP-500
++ Note : This will be sent when CallerIDPresentation = 1
+++++++++++++++++++++++++++++++++++++++++++++++++++++++++++++++++++++++++++++++
CallerID = VOIP-500
+++++++++++++++++++++++++++++++++++++++++++++++++++++++++++++++++++++++++++++++
++ Field name : AudioCodec
++ Description : Preferred Audio Codec to be used for Outgoing Calls.
++ Valid values : AudioCodec = 1 - G.711 PCM A Law
++ AudioCodec = 2 - G.711 PCM u Law (Default Value)
++ AudioCodec = 3 - G.729a
++ AudioCodec = 4 - G.723.1a
++ Note : None
+++++++++++++++++++++++++++++++++++++++++++++++++++++++++++++++++++++++++++++++
AudioCodec = 2
+++++++++++++++++++++++++++++++++++++++++++++++++++++++++++++++++++++++++++++++
++ Field name : AEC
++ Description : Enable/Disable Acoustic Echo Cancellation.
++ Valid values : AEC = 1 - Enable (Default Value)
++ AEC = 0 - Disable
++ Note : None
+++++++++++++++++++++++++++++++++++++++++++++++++++++++++++++++++++++++++++++++
AEC = 1
+++++++++++++++++++++++++++++++++++++++++++++++++++++++++++++++++++++++++++++++
++ Field name : VAD_CNG
++ Description : Enable/Disable Voice Activity detection/generation of
++ Silence packets.
++ Valid values : VAD_CNG = 1 - Enable (Default Value)
++ VAD_CNG = 0 - Disable
++ Note : None
+++++++++++++++++++++++++++++++++++++++++++++++++++++++++++++++++++++++++++++++
VAD_CNG = 1
+++++++++++++++++++++++++++++++++++++++++++++++++++++++++++++++++++++++++++++++
++ Field name : AGC
++ Description : Enable/Disable Automatic Gain Control
++ Valid values : AGC = 0 - Disable (Default Value)
++ AGC = 1 - Enable
++ Note : None
+++++++++++++++++++++++++++++++++++++++++++++++++++++++++++++++++++++++++++++++
AGC = 0
+++++++++++++++++++++++++++++++++++++++++++++++++++++++++++++++++++++++++++++++
++ Field name : JitterBuffer
++ Description : Size of Jitter buffer (millseconds)
++ Valid values : 0 (Default Value), 30, 60, 90 , 120
++ Note : None
All prices and specifications are subject to change without notice. Talk-A-Phone, Scream Alert, WEBS and WEBS Contact are registered trademarks of Talk-A-Phone Co. All rights reserved.
Copyright 2012 Talk-A-Phone Co. • 7530 North Natchez Avenue • Niles, Illinois 60714 • Phone 773.539.1100 • info@talkaphone.com • www.talkaphone.com.
Page 67 of 90
Page 68

VOIP-500 Series Phone
Configuration and Operation Manual
+++++++++++++++++++++++++++++++++++++++++++++++++++++++++++++++++++++++++++++++
JitterBuffer = 30
+++++++++++++++++++++++++++++++++++++++++++++++++++++++++++++++++++++++++++++++
++ Field name : LineLevelOutputGain
++ Description : Line level output gain to be used during Recording or
++ Amplifying.
++ Valid values : 1 to 20, Default value is 16
++ Note : None
+++++++++++++++++++++++++++++++++++++++++++++++++++++++++++++++++++++++++++++++
LineLevelOutputGain = 16
+++++++++++++++++++++++++++++++++++++++++++++++++++++++++++++++++++++++++++++++
++ Field name : Speaker
++ Description : Enable/disable Speaker state, applicable to both Handset
++ and Handsfree
++ Valid values : Speaker = 0 - Disabled
++ Speaker = 1 - Enabled (Default value)
++ Note : None
+++++++++++++++++++++++++++++++++++++++++++++++++++++++++++++++++++++++++++++++
Speaker = 1
+++++++++++++++++++++++++++++++++++++++++++++++++++++++++++++++++++++++++++++++
++ Field name : SpeakerGain
++ Description : Speaker gain, applicable to both Handset and Handsfree.
++ Valid values : 1 to 20, Default value is 12
++ Note : None
+++++++++++++++++++++++++++++++++++++++++++++++++++++++++++++++++++++++++++++++
SpeakerGain = 12
+++++++++++++++++++++++++++++++++++++++++++++++++++++++++++++++++++++++++++++++
++ Field name : Mic
++ Description : Enable/disable Mic state, applicable to both Handset
++ and Handsfree
++ Valid values : Mic = 0 - Disabled
++ Mic = 1 - Enabled (Default value)
++ Note : None
+++++++++++++++++++++++++++++++++++++++++++++++++++++++++++++++++++++++++++++++
Mic = 1
+++++++++++++++++++++++++++++++++++++++++++++++++++++++++++++++++++++++++++++++
++ Field name : MicGain
++ Description : Mic gain, applicable to both Handset and Handsfree.
++ Valid values : 1 to 20, Default value is 12
++ Note : None
+++++++++++++++++++++++++++++++++++++++++++++++++++++++++++++++++++++++++++++++
MicGain = 12
+++++++++++++++++++++++++++++++++++++++++++++++++++++++++++++++++++++++++++++++
Page 68 of 90
All prices and specifications are subject to change without notice. Talk-A-Phone, Scream Alert, WEBS and WEBS Contact are registered trademarks of Talk-A-Phone Co. All rights reserved.
Copyright 2012 Talk-A-Phone Co. • 7530 North Natchez Avenue • Niles, Illinois 60714 • Phone 773.539.1100 • info@talkaphone.com • www.talkaphone.com.
Page 69

VOIP-500 Series Phone
Configuration and Operation Manual
++ Field name : CallProgressTones
++ Description : Enable/Disable Call Progress Tones (Dial tone,Ringback
++ tone, Ringing tone, Busy Tone etc)
++ Valid values : CallProgressTone = 0 - Disabled
++ CallProgressTone = 1 - Enabled (Default Value)
++ Note : None
+++++++++++++++++++++++++++++++++++++++++++++++++++++++++++++++++++++++++++++++
CallProgressTones = 1
+++++++++++++++++++++++++++++++++++++++++++++++++++++++++++++++++++++++++++++++
++ Field name : KeyToAnswer
++ Description : Key to be pressed by Remote party for answering the call.
++ Valid values : 0-9, *, #, disable (default value)
++ Note : Only applicable for Outbound Round Robin calls.
+++++++++++++++++++++++++++++++++++++++++++++++++++++++++++++++++++++++++++++++
KeyToAnswer = Disable
+++++++++++++++++++++++++++++++++++++++++++++++++++++++++++++++++++++++++++++++
++ Field name : KeyToDisconnect
++ Description : Key to be pressed by Remote party to disconnect the call
++ from remote.
++ Valid values : 0-9, *, # (default value), disable.
++ Note : None
+++++++++++++++++++++++++++++++++++++++++++++++++++++++++++++++++++++++++++++++
KeyToDisconnect = #
+++++++++++++++++++++++++++++++++++++++++++++++++++++++++++++++++++++++++++++++
++ Field name : WelcomeTone
++ Description : Enable/disable playing of Welcome Tone to remote party.
++ Valid values : WelcomeTone = 0 - To not play
++ WelcomeTone = 1 - To Play (Default Value)
++ Note : Only played when AutoAnswer = 1.
+++++++++++++++++++++++++++++++++++++++++++++++++++++++++++++++++++++++++++++++
WelcomeTone = 1
+++++++++++++++++++++++++++++++++++++++++++++++++++++++++++++++++++++++++++++++
++ Field name : TimerNetResponse
++ Description : Network Response Timer
++ Valid values : 5 - 20 sec, in increment of 1 sec.
++ Default value is 5 secs
++ Note : Only applicable to Outbound Round Robin Calls
+++++++++++++++++++++++++++++++++++++++++++++++++++++++++++++++++++++++++++++++
TimerNetResponse = 5
+++++++++++++++++++++++++++++++++++++++++++++++++++++++++++++++++++++++++++++++
++ Field name : TimerRinger
++ Description : Ringer Timer in number of rings.
++ Valid values : 1 - 12. Default value is 5 rings
++ Note : Only applicable to Outbound Round Robin Calls
+++++++++++++++++++++++++++++++++++++++++++++++++++++++++++++++++++++++++++++++
All prices and specifications are subject to change without notice. Talk-A-Phone, Scream Alert, WEBS and WEBS Contact are registered trademarks of Talk-A-Phone Co. All rights reserved.
Copyright 2012 Talk-A-Phone Co. • 7530 North Natchez Avenue • Niles, Illinois 60714 • Phone 773.539.1100 • info@talkaphone.com • www.talkaphone.com.
Page 69 of 90
Page 70

VOIP-500 Series Phone
Configuration and Operation Manual
TimerRinger = 5
+++++++++++++++++++++++++++++++++++++++++++++++++++++++++++++++++++++++++++++++
++ Field name : TimerHangup
++ Description : Hangup Timer
++ Valid values : 0.5 - 3.0 seconds, in increment of 0.1 second.
++ Default value is 0.5 secs
++ Note : None
+++++++++++++++++++++++++++++++++++++++++++++++++++++++++++++++++++++++++++++++
TimerHangup = 0.500000
+++++++++++++++++++++++++++++++++++++++++++++++++++++++++++++++++++++++++++++++
++ Field name : TimerInterDigitLocal
++ Description : Local Inter digit timer, used during dialing numbers.
++ Valid values : 5 - 20 seconds, in increment of 1 sec
++ Default value is 5 secs
++ Note : None
+++++++++++++++++++++++++++++++++++++++++++++++++++++++++++++++++++++++++++++++
TimerInterDigitLocal = 5
+++++++++++++++++++++++++++++++++++++++++++++++++++++++++++++++++++++++++++++++
++ Field name : TimerInterDigitRemote
++ Description : Remote Inter digit timer, used during Remote DTMF
++ operations
++ Valid values : 5 - 20 secs, in increment of 1 sec
++ Default value is 5 secs
++ Note : None
+++++++++++++++++++++++++++++++++++++++++++++++++++++++++++++++++++++++++++++++
TimerInterDigitRemote = 5
+++++++++++++++++++++++++++++++++++++++++++++++++++++++++++++++++++++++++++++++
++ Field name : CallConversation
++ Description : Used for limiting Call Conversation time.
++ Valid values : CallConversation = 0 , Calls lasts indefinite
++ CallConversation = 1 Calls lasts for definite time
++
++ Field name : TimerCallConversation
++ Description : Call Conversation time, call only lasts for this time,
++ applicable when CallConversation = 1
++ Valid values : 1 - 360 minutes in increments of 1 minute.
++ Default value is 12 minutes
++ Note : None
+++++++++++++++++++++++++++++++++++++++++++++++++++++++++++++++++++++++++++++++
CallConversation = 1
TimerCallConversation = 12
+++++++++++++++++++++++++++++++++++++++++++++++++++++++++++++++++++++++++++++++
++ Field name : RingBackBusy
++ Description : Enable/Disable Ringback Busy Timer.
++ Valid values : RingBackBusy = 0 , Call waits for indefinite
Page 70 of 90
All prices and specifications are subject to change without notice. Talk-A-Phone, Scream Alert, WEBS and WEBS Contact are registered trademarks of Talk-A-Phone Co. All rights reserved.
Copyright 2012 Talk-A-Phone Co. • 7530 North Natchez Avenue • Niles, Illinois 60714 • Phone 773.539.1100 • info@talkaphone.com • www.talkaphone.com.
Page 71

VOIP-500 Series Phone
Configuration and Operation Manual
++ RingBackBusy = 1 Calls waits for definite time before
++ switching to next number
++
++ Field name : TimerRingBackBusy
++ Description : Ringback busy time, call switch to next number after
++ waiting for this time, applicable when RingBackBusy = 1
++ Valid values : 1 - 60 seconds in increments of 1 sec.
++ Default value is 15 seconds
++ Note : Only applicable to Outbound Round Robin Calls
+++++++++++++++++++++++++++++++++++++++++++++++++++++++++++++++++++++++++++++++
RingBackBusy = 1
TimerRingBackBusy = 15
+++++++++++++++++++++++++++++++++++++++++++++++++++++++++++++++++++++++++++++++
++ Field name : HangupOnSilence
++ Description : Enable/Disable Hanging of call on silence
++ Valid values : HangupOnSilence = 0 - Disable
++ HangupOnSilence = 1 - Call disconnect on silence.
++
++ Field name : TimerHangupOnSilence
++ Description : Duration after which call disconnects automatically, if no
++ voice received.
++ Valid values : 10 - 360 seconds, in increments of 1 second.
++ Default value is 30 seconds
++ Note : None
+++++++++++++++++++++++++++++++++++++++++++++++++++++++++++++++++++++++++++++++
HangupOnSilence = 1
TimerHangupOnSilence = 30
+++++++++++++++++++++++++++++++++++++++++++++++++++++++++++++++++++++++++++++++
++ Field name : PagingOut
++ Description : Output device for Paging messages.
++ Valid values : PagingOut = 1 - To Handsfree Speaker
++ PagingOut = 2 - To Line Level Out (Default Value)
++ Note : None
+++++++++++++++++++++++++++++++++++++++++++++++++++++++++++++++++++++++++++++++
PagingOut = 2
+++++++++++++++++++++++++++++++++++++++++++++++++++++++++++++++++++++++++++++++
++ Field name : PagingOutGain
++ Description : Paging output gain.
++ Valid values : 1 - 20, Default value is 20
++ Note : None
+++++++++++++++++++++++++++++++++++++++++++++++++++++++++++++++++++++++++++++++
PagingOutGain = 20
+++++++++++++++++++++++++++++++++++++++++++++++++++++++++++++++++++++++++++++++
++ Field name : SIPPhoneNum
++ Description : This parameter is used to define phone number for the
++ purpose of receiving incoming calls.
++ Valid values : 30 chars long, a-z,A-Z,*,0-9,.,-, No spaces allowed
All prices and specifications are subject to change without notice. Talk-A-Phone, Scream Alert, WEBS and WEBS Contact are registered trademarks of Talk-A-Phone Co. All rights reserved.
Copyright 2012 Talk-A-Phone Co. • 7530 North Natchez Avenue • Niles, Illinois 60714 • Phone 773.539.1100 • info@talkaphone.com • www.talkaphone.com.
Page 71 of 90
Page 72

VOIP-500 Series Phone
Configuration and Operation Manual
++ Default is VOIP-500
++ Note : Mandatory Parameter
+++++++++++++++++++++++++++++++++++++++++++++++++++++++++++++++++++++++++++++++
SIPPhoneNum = VOIP-500
+++++++++++++++++++++++++++++++++++++++++++++++++++++++++++++++++++++++++++++++
++ Field name : SIPDomainName
++ Description : This parameter is used to define domain to which this
++ phone belongs to.
++ Valid values : 30 chars long, a-z,A_Z,*, 0-9,., No spaces allowed
++ Default is voip500.local
++ Note : Mandatory Parameter
+++++++++++++++++++++++++++++++++++++++++++++++++++++++++++++++++++++++++++++++
SIPDomainName_p = voip500.local
SIPDomainName_s = voip500.local
SIPDomainName_t = voip500.local
+++++++++++++++++++++++++++++++++++++++++++++++++++++++++++++++++++++++++++++++
++ Field name : SIPRegister
++ Description : This parameter is used to define Phone SIP Registration.
++ If enable then Phone will try to register at given
++ registrar.
++ Valid values : SIPRegister = 0 - Disable SIP Registration (Default Value)
++ SIPRegister = 1 - Enable SIP Registration
++ Note : For Cases when SIPRegister = 1 configure following
++ parameters.
++
++ Field name : SIPRegistrarIP
++ Field name : SIPRegistrarPort
++ Field name : SIPReregistrationTime
++ Description : SIPRegistrarIP - Registrar IP address
++ SIPRegistrarPort - Registrar Port
++ SIPReregistrationTime - Registration Refresh time
++ Valid Values : SIPRegistrarPort : 1024 - 49151, 5060 (Default value)
++ SIPReregistrationTime : 10 - 14400 secs, 3600 (Def value)
++
++ Field name : SIPRegistrarUserName
++ Field name : SIPRegistrarUserPassword
++ Description : Optional parameters, required when using authenticating
++ Registrar.
++ Valid values : 30 chars long, a-z,A-Z,*,0-9,.,- , No spaces allowed
++ Note : Only used when using authenticating Registrar.
+++++++++++++++++++++++++++++++++++++++++++++++++++++++++++++++++++++++++++++++
SIPRegister = 0
SIPRegistrarIP_p = 0
SIPRegistrarIP_s = 0
SIPRegistrarIP_t = 0
SIPRegistrarPort= 5060
SIPReregistrationTime = 3600
SIPRegistrarUserName_p = 0
SIPRegistrarUserName_s = 0
SIPRegistrarUserName_t = 0
Page 72 of 90
All prices and specifications are subject to change without notice. Talk-A-Phone, Scream Alert, WEBS and WEBS Contact are registered trademarks of Talk-A-Phone Co. All rights reserved.
Copyright 2012 Talk-A-Phone Co. • 7530 North Natchez Avenue • Niles, Illinois 60714 • Phone 773.539.1100 • info@talkaphone.com • www.talkaphone.com.
Page 73

VOIP-500 Series Phone
Configuration and Operation Manual
SIPRegistrarUserPassword_p = 0
SIPRegistrarUserPassword_s = 0
SIPRegistrarUserPassword_t = 0
+++++++++++++++++++++++++++++++++++++++++++++++++++++++++++++++++++++++++++++++
++ Field name : SIPOutBoundProxyIPAddress & SIPOutBoundProxyPort
++ Description : Optional parameters. Used when using Outbound Proxy.
++ Valid values : SIPOutBoundProxyPort : 1024 - 49151, 5060 (Default value)
++
++ Field name : SIPOutBoundProxyUserName
++ Field name : SIPOutBoundProxyUserPassword
++ Description : Optional parameters, required when using authenticating
++ proxy.
++ Valid values : 30 chars long, a-z,A-Z,*,0-9,.,- , No spaces allowed
++ Note : None
+++++++++++++++++++++++++++++++++++++++++++++++++++++++++++++++++++++++++++++++
SIPOutBoundProxyIPAddress_p = 0
SIPOutBoundProxyIPAddress_s = 0
SIPOutBoundProxyIPAddress_t = 0
SIPOutBoundProxyPort = 5060
SIPOutBoundProxyUserName_p = 0
SIPOutBoundProxyUserName_s = 0
SIPOutBoundProxyUserName_t = 0
SIPOutBoundProxyUserPassword_p = 0
SIPOutBoundProxyUserPassword_s = 0
SIPOutBoundProxyUserPassword_t = 0
+++++++++++++++++++++++++++++++++++++++++++++++++++++++++++++++++++++++++++++++
++ Field name : H323gkip & H323gkmode & H323gkport
++ Description : Whether u are using gatekeeper or not ,if yes its ip and port
+++++++++++++++++++++++++++++++++++++++++++++++++++++++++++++++++++++++++++++++
H323gkip =
H323gkmode = 1
H323gkport = 1719
+++++++++++++++++++++++++++++++++++++++++++++++++++++++++++++++++++++++++++++++
++ Field name : isReg
++ Description : used for correct Gui behaviour
++ Valid values : 0 and 1
++
++ Field name : H323loginid & H323passwd
++ Description : H323 gatekeeper login id and password
+++++++++++++++++++++++++++++++++++++++++++++++++++++++++++++++++++++++++++++++
isReg = 0
H323loginid = VOIP-500
H323passwd =
+++++++++++++++++++++++++++++++++++++++++++++++++++++++++++++++++++++++++++++++
++ Field name : H323re_reg_time
++ Description : Re-Registration Timer time
++ Valid values : 0 - 14400 seconds
+++++++++++++++++++++++++++++++++++++++++++++++++++++++++++++++++++++++++++++++
All prices and specifications are subject to change without notice. Talk-A-Phone, Scream Alert, WEBS and WEBS Contact are registered trademarks of Talk-A-Phone Co. All rights reserved.
Copyright 2012 Talk-A-Phone Co. • 7530 North Natchez Avenue • Niles, Illinois 60714 • Phone 773.539.1100 • info@talkaphone.com • www.talkaphone.com.
Page 73 of 90
Page 74

VOIP-500 Series Phone
Configuration and Operation Manual
H323re_reg_time = 3600
+++++++++++++++++++++++++++++++++++++++++++++++++++++++++++++++++++++++++++++++
++ Field name : H323username
++ Description : This parameter is used to define phone number for the
++ purpose of receiving incoming calls.
++ Valid values : 30 chars long, a-z,A-Z,*,0-9,.,-, No spaces allowed
++ Default is VOIP-500
++ Note : Mandatory Parameter
+++++++++++++++++++++++++++++++++++++++++++++++++++++++++++++++++++++++++++++++
H323username =
+++++++++++++++++++++++++++++++++++++++++++++++++++++++++++++++++++++++++++++++
++ Field name : NumberList
++ Description : Numbers to dial be dialed on press of Emergency and Info
++ Buttons and also on on Activation of Auxiliary Inputs.
++ Valid values : Max 30 chars, for IP Addresses, Analog Numbers, Aliases
++ and URLs
++ Example:
++ NumberList1CN1 = 10.112.71.85
++ NumberList1CN2 = 100@10.112.71.82
++ NumberList1CN3 = 1005
++ NumberList1CN4 = test@example.com
++ NumberList1CN5 =
++ NumberList1CN6 =
++ Note : Admin can similarly configure Number List 2 to Number
++ List 7
+++++++++++++++++++++++++++++++++++++++++++++++++++++++++++++++++++++++++++++++
NumberList1CN1 =
NumberList1CN2 =
NumberList1CN3 =
NumberList1CN4 =
NumberList1CN5 =
NumberList1CN6 =
NumberList2CN1 =
NumberList2CN2 =
NumberList2CN3 =
NumberList2CN4 =
NumberList2CN5 =
NumberList2CN6 =
NumberList3CN1 =
NumberList3CN2 =
NumberList3CN3 =
NumberList3CN4 =
NumberList3CN5 =
NumberList3CN6 =
NumberList4CN1 =
NumberList4CN2 =
NumberList4CN3 =
Page 74 of 90
All prices and specifications are subject to change without notice. Talk-A-Phone, Scream Alert, WEBS and WEBS Contact are registered trademarks of Talk-A-Phone Co. All rights reserved.
Copyright 2012 Talk-A-Phone Co. • 7530 North Natchez Avenue • Niles, Illinois 60714 • Phone 773.539.1100 • info@talkaphone.com • www.talkaphone.com.
Page 75

VOIP-500 Series Phone
Configuration and Operation Manual
NumberList4CN4 =
NumberList4CN5 =
NumberList4CN6 =
NumberList5CN1 =
NumberList5CN2 =
NumberList5CN3 =
NumberList5CN4 =
NumberList5CN5 =
NumberList5CN6 =
NumberList6CN1 =
NumberList6CN2 =
NumberList6CN3 =
NumberList6CN4 =
NumberList6CN5 =
NumberList6CN6 =
NumberList7CN1 =
NumberList7CN2 =
NumberList7CN3 =
NumberList7CN4 =
NumberList7CN5 =
NumberList7CN6 =
+++++++++++++++++++++++++++++++++++++++++++++++++++++++++++++++++++++++++++++++
++ Field name : Button1CallList
++ Description : List of numbers to be dialed from a specific List.
++ Valid values : 1 - 7. 1 (Default value)
++
++ Field name : Button1CallNetworkPriority
++ Description : Network priority to priortize the Emergency Traffic.
++ Valid values : 1 - 63. 46 (Default value)
++ Note : This field is only valid for phones having atleast 1
++ button.
+++++++++++++++++++++++++++++++++++++++++++++++++++++++++++++++++++++++++++++++
Button1CallList = 1
Button1CallNetworkPriority = 46
+++++++++++++++++++++++++++++++++++++++++++++++++++++++++++++++++++++++++++++++
++ Field name : Button2Type
++ Description : Type of Button.
++ Valid values : Button2Type = 1 - As AutoDial
++ Button2Type = 2 - As Hookswitch (Default Value)
++
++ Field name : Button2CallList
++ Field name : Button2CallPriority
++ Field name : Button2CallNetworkPriority
++ Description : Required when Button programmed as AutoDial.
++ Description : Required when Button programmed as AutoDial.
++ Valid values : Button2CallPriority : 2 - 10 , 2 (default value)
++ Button2CallNetworkPriority: 1 - 63. 46 (Default value)
++ Note : This field is only valid for phones having more than 1
All prices and specifications are subject to change without notice. Talk-A-Phone, Scream Alert, WEBS and WEBS Contact are registered trademarks of Talk-A-Phone Co. All rights reserved.
Copyright 2012 Talk-A-Phone Co. • 7530 North Natchez Avenue • Niles, Illinois 60714 • Phone 773.539.1100 • info@talkaphone.com • www.talkaphone.com.
Page 75 of 90
Page 76

VOIP-500 Series Phone
Configuration and Operation Manual
++ buttons.
+++++++++++++++++++++++++++++++++++++++++++++++++++++++++++++++++++++++++++++++
Button2Type = 1
Button2CallList = 1
Button2CallPriority = 2
Button2CallNetworkPriority = 46
+++++++++++++++++++++++++++++++++++++++++++++++++++++++++++++++++++++++++++++++
++ Field name : Button3Type
++ Description : Type of Button.
++ Valid values : Button3Type = 1 - As AutoDial
++ Button3Type = 2 - As Hookswitch (Default Value)
++
++ Field name : Button3CallList
++ Field name : Button3CallPriority
++ Field name : Button3CallNetworkPriority
++ Description : Required when Button programmed as AutoDial.
++ Description : Required when Button programmed as AutoDial.
++ Valid values : Button3CallPriority : 2 - 10 , 2 (default value)
++ Button3CallNetworkPriority: 1 - 63. 46 (Default value)
++ Note : This field is only valid for phones having more than 1
++ buttons.
+++++++++++++++++++++++++++++++++++++++++++++++++++++++++++++++++++++++++++++++
Button3Type = 5
Button3CallList = 1
Button3CallPriority = 0
Button3CallNetworkPriority = 0
+++++++++++++++++++++++++++++++++++++++++++++++++++++++++++++++++++++++++++++++
++ Field name : Button4Type
++ Description : Type of Button.
++ Valid values : Button4Type = 1 - As AutoDial
++ Button4Type = 2 - As Hookswitch (Default Value)
++
++ Field name : Button4CallList
++ Field name : Button4CallPriority
++ Field name : Button4CallNetworkPriority
++ Description : Required when Button programmed as AutoDial.
++ Description : Required when Button programmed as AutoDial.
++ Valid values : Button4CallPriority : 2 - 10 , 2 (default value)
++ Button4CallNetworkPriority: 1 - 63. 46 (Default value)
++ Note : This field is only valid for phones having more than 1
++ buttons.
+++++++++++++++++++++++++++++++++++++++++++++++++++++++++++++++++++++++++++++++
Button4Type = 4
Button4CallList = 1
Button4CallPriority = 0
Button4CallNetworkPriority = 0
+++++++++++++++++++++++++++++++++++++++++++++++++++++++++++++++++++++++++++++++
++ Field name : AuxIn1CallList
++ Description : List of numbers to be dialed from a specific List.
Page 76 of 90
All prices and specifications are subject to change without notice. Talk-A-Phone, Scream Alert, WEBS and WEBS Contact are registered trademarks of Talk-A-Phone Co. All rights reserved.
Copyright 2012 Talk-A-Phone Co. • 7530 North Natchez Avenue • Niles, Illinois 60714 • Phone 773.539.1100 • info@talkaphone.com • www.talkaphone.com.
Page 77

VOIP-500 Series Phone
Configuration and Operation Manual
++ Valid values : 1 - 7, none (Disable)
++ AuxIn1CallList = 1 (Default value)
++
++ Field name : AuxIn1CallPriority
++ Description : Call priority for the call originated on activation
++ of AuxIn 1.
++ Valid values : 2 - 10. 2 (Default Value)
++
++ Field name : AuxIn1NetworkPriority
++ Description : Network priority to be used for packets of the call. Used
++ for prioritizing the traffic.
++ Valid values : 1 - 63. 46 (Default value)
++ Note : Admin can similarly program values for AuxIn2 and AuxIn3
+++++++++++++++++++++++++++++++++++++++++++++++++++++++++++++++++++++++++++++++
AuxIn1CallList = 1
AuxIn1CallPriority = 2
AuxIn1NetworkPriority = 46
AuxIn2CallList = 1
AuxIn2CallPriority = 2
AuxIn2NetworkPriority = 46
AuxIn3CallList = 1
AuxIn3CallPriority = 2
AuxIn3NetworkPriority = 46
+++++++++++++++++++++++++++++++++++++++++++++++++++++++++++++++++++++++++++++++
++ Field name : AuxOp1ActOnHandsetCall, AuxOp2ActOnHandsetCall ,
++ AuxOp3ActOnHandsetCall,
++ AuxOp1ActOnBut1Call, AuxOp1ActOnBut2Call,
++ AuxOp1ActOnBut3Call, AuxOp1ActOnBut4Call,
++ AuxOp2ActOnBut1Call, AuxOp2ActOnBut2Call,
++ AuxOp2ActOnBut3Call, AuxOp2ActOnBut4Call,
++ AuxOp3ActOnBut1Call, AuxOp3ActOnBut2Call,
++ AuxOp3ActOnBut3Call, AuxOp3ActOnBut4Call,
++
++ Description : Auxiliary Output activation on Activation/Deactivation of
++ Button events
++
++ Valid values : 0 - 3
++ 0- Disable
++ 1- Call Initiation
++ 2- Call Answer
++ 3- Call Termination
+++++++++++++++++++++++++++++++++++++++++++++++++++++++++++++++++++++++++++++++
AuxOp1ActOnHandsetCall = 0
AuxOp1ActOnBut1Call = 1
AuxOp1ActOnBut2Call = 1
AuxOp1ActOnBut3Call = 0
AuxOp1ActOnBut4Call = 0
AuxOp2ActOnHandsetCall = 0
All prices and specifications are subject to change without notice. Talk-A-Phone, Scream Alert, WEBS and WEBS Contact are registered trademarks of Talk-A-Phone Co. All rights reserved.
Copyright 2012 Talk-A-Phone Co. • 7530 North Natchez Avenue • Niles, Illinois 60714 • Phone 773.539.1100 • info@talkaphone.com • www.talkaphone.com.
Page 77 of 90
Page 78

VOIP-500 Series Phone
Configuration and Operation Manual
AuxOp2ActOnBut1Call = 1
AuxOp2ActOnBut2Call = 1
AuxOp2ActOnBut3Call = 0
AuxOp2ActOnBut4Call = 0
AuxOp3ActOnHandsetCall = 0
AuxOp3ActOnBut1Call = 1
AuxOp3ActOnBut2Call = 1
AuxOp3ActOnBut3Call = 0
AuxOp3ActOnBut4Call = 0
+++++++++++++++++++++++++++++++++++++++++++++++++++++++++++++++++++++++++++++++
++ Field name : AuxOp1ActOnAuxIn1Act, AuxOp1ActOnAuxIn2Act ,
++ AuxOp1ActOnAuxIn3Act, AuxOp1ActOnAuxIn1DeAct,
++ AuxOp1ActOnAuxIn2DeAct & AuxOp1ActOnAuxIn3DeAct
++
++ Description : Auxiliary Output activation on Activation/Deactivation of
++ Auxiliary Inputs
++
++ Valid values : 0 - 1
++ 0- Disable
++ 1- Aux Activation when Auxiliary Input is activated or
++ deactivated
++
++ AuxOp1ActOnAuxIn1Act = 0 (Default value)
++
++ Note : Admin can similarly program values for AuxOutput 2 and 3
+++++++++++++++++++++++++++++++++++++++++++++++++++++++++++++++++++++++++++++++
AuxOp1ActOnAuxIn1Act = 0
AuxOp1ActOnAuxIn2Act = 0
AuxOp1ActOnAuxIn3Act = 0
AuxOp1ActOnAuxIn1DeAct = 0
AuxOp1ActOnAuxIn2DeAct = 0
AuxOp1ActOnAuxIn3DeAct = 0
AuxOp2ActOnAuxIn1Act = 0
AuxOp2ActOnAuxIn2Act = 0
AuxOp2ActOnAuxIn3Act = 0
AuxOp2ActOnAuxIn1DeAct = 0
AuxOp2ActOnAuxIn2DeAct = 0
AuxOp2ActOnAuxIn3DeAct = 0
AuxOp3ActOnAuxIn1Act = 0
AuxOp3ActOnAuxIn2Act = 0
AuxOp3ActOnAuxIn3Act = 0
AuxOp3ActOnAuxIn1DeAct = 0
AuxOp3ActOnAuxIn2DeAct = 0
AuxOp3ActOnAuxIn3DeAct = 0
Page 78 of 90
All prices and specifications are subject to change without notice. Talk-A-Phone, Scream Alert, WEBS and WEBS Contact are registered trademarks of Talk-A-Phone Co. All rights reserved.
Copyright 2012 Talk-A-Phone Co. • 7530 North Natchez Avenue • Niles, Illinois 60714 • Phone 773.539.1100 • info@talkaphone.com • www.talkaphone.com.
Page 79

VOIP-500 Series Phone
Configuration and Operation Manual
+++++++++++++++++++++++++++++++++++++++++++++++++++++++++++++++++++++++++++++++
++ Field name : AuxOp1ActOnRemoteKeyCode, AuxOp2ActOnRemoteKeyCode,
++ AuxOp3ActOnRemoteKeyCode
++
++ Description : Auxiliary Output activation on specified remote keycode
++
++ Valid values : Disable,
++ Max 4 chars containing 0-9, * and #.
++ Default values are *11*, *12*, *13* correspondingly
++
++ AuxOp1ActOnRemoteKeyCode = *11* (Default value)
++ AuxOp2ActOnRemoteKeyCode = *12* (Default value)
++ AuxOp3ActOnRemoteKeyCode = *13* (Default value)
++
++ Note : None
+++++++++++++++++++++++++++++++++++++++++++++++++++++++++++++++++++++++++++++++
AuxOp1ActOnRemoteKeyCode = Disable
AuxOp2ActOnRemoteKeyCode = Disable
AuxOp3ActOnRemoteKeyCode = Disable
+++++++++++++++++++++++++++++++++++++++++++++++++++++++++++++++++++++++++++++++
++ Field name : AuxOp1ActOnLocalKeyCode,AuxOp2ActOnLocalKeyCode,
++ AuxOp3ActOnLocalKeyCode
++
++ Description : Auxiliary Output activation on specified local keycode
++
++ Valid values : Disable, Max 8 chars containing 0-9, * and #.
++
++ AuxOp1ActOnLocalKeyCode = Disable (Default value)
++ AuxOp2ActOnLocalKeyCode = Disable (Default value)
++ AuxOp3ActOnLocalKeyCode = Disable (Default value)
++
++ Note : None
+++++++++++++++++++++++++++++++++++++++++++++++++++++++++++++++++++++++++++++++
AuxOp1ActOnLocalKeyCode = Disable
AuxOp2ActOnLocalKeyCode = Disable
AuxOp3ActOnLocalKeyCode = Disable
+++++++++++++++++++++++++++++++++++++++++++++++++++++++++++++++++++++++++++++++
++ Field name : AuxOp1DeActOnRemoteKeyCode, AuxOp2DeActOnRemoteKeyCode,
++ AuxOp3DeActOnRemoteKeyCode
++
++ Description : Auxiliary Output deactivation on specified remote keycode
++
++ Valid values : Disable,
++ Max 4 chars containing 0-9, * and #.
++ Default values are *21*, *22*, *23* correspondingly
++
++ AuxOp1DeActOnRemoteKeyCode = *21* (Default value)
++ AuxOp2DeActOnRemoteKeyCode = *22* (Default value)
++ AuxOp3DeActOnRemoteKeyCode = *23* (Default value)
++
++ Note : None
All prices and specifications are subject to change without notice. Talk-A-Phone, Scream Alert, WEBS and WEBS Contact are registered trademarks of Talk-A-Phone Co. All rights reserved.
Copyright 2012 Talk-A-Phone Co. • 7530 North Natchez Avenue • Niles, Illinois 60714 • Phone 773.539.1100 • info@talkaphone.com • www.talkaphone.com.
Page 79 of 90
Page 80

VOIP-500 Series Phone
Configuration and Operation Manual
+++++++++++++++++++++++++++++++++++++++++++++++++++++++++++++++++++++++++++++++
AuxOp1DeActOnRemoteKeyCode = Disable
AuxOp2DeActOnRemoteKeyCode = Disable
AuxOp3DeActOnRemoteKeyCode = Disable
+++++++++++++++++++++++++++++++++++++++++++++++++++++++++++++++++++++++++++++++
++ Field name : AuxOp1DeActOnLocalKeyCode,AuxOp2DeActOnLocalKeyCode,
++ AuxOp3DeActOnLocalKeyCode
++
++ Description : Auxiliary Output deactivation on specified local keycode
++
++ Valid values : Disable, Max 8 chars containing 0-9, * and #.
++
++ AuxOp1DeActOnLocalKeyCode = Disable (Default value)
++ AuxOp2DeActOnLocalKeyCode = Disable (Default value)
++ AuxOp2DeActOnLocalKeyCode = Disable (Default value)
++
++ Note : None
+++++++++++++++++++++++++++++++++++++++++++++++++++++++++++++++++++++++++++++++
AuxOp1DeActOnLocalKeyCode = Disable
AuxOp2DeActOnLocalKeyCode = Disable
AuxOp3DeActOnLocalKeyCode = Disable
+++++++++++++++++++++++++++++++++++++++++++++++++++++++++++++++++++++++++++++++
++ Field name : AuxOp1DeActOnHandsetCall, AuxOp2DeActOnHandsetCall,
++ AuxOp3DeActOnHandsetCall,
++ AuxOp1DeActOnBut1Call, AuxOp1DeActOnBut2Call,
++ AuxOp1DeActOnBut3Call, AuxOp1DeActOnBut4Call,
++ AuxOp2DeActOnBut1Call, AuxOp2DeActOnBut2Call,
++ AuxOp2DeActOnBut3Call, AuxOp2DeActOnBut4Call,
++ AuxOp3DeActOnBut1Call, AuxOp3DeActOnBut2Call,
++ AuxOp3DeActOnBut3Call, AuxOp3DeActOnBut4Call,
++
++ Description : Auxiliary Output 1 deactivation on call through Button #1
++ - 4 or handset.
++
++ Valid values : 0 - 3
++ 0- Disable
++ 1- Aux Deactivation when call is initiated through Button
++ 2- Aux Deactivation when call initiated through Button is
++ connected
++ 3- Aux Deactivation when call initiated through Button is
++ disconnected
++
++ AuxOp1DeActOnBut1Call = 0 (Default value)
++
++ Note : Admin can similarly program values for AuxOutput 2 and 3
+++++++++++++++++++++++++++++++++++++++++++++++++++++++++++++++++++++++++++++++
AuxOp1DeActOnHandsetCall = 0
AuxOp1DeActOnBut1Call = 0
AuxOp1DeActOnBut2Call = 0
AuxOp1DeActOnBut3Call = 0
Page 80 of 90
All prices and specifications are subject to change without notice. Talk-A-Phone, Scream Alert, WEBS and WEBS Contact are registered trademarks of Talk-A-Phone Co. All rights reserved.
Copyright 2012 Talk-A-Phone Co. • 7530 North Natchez Avenue • Niles, Illinois 60714 • Phone 773.539.1100 • info@talkaphone.com • www.talkaphone.com.
Page 81

VOIP-500 Series Phone
Configuration and Operation Manual
AuxOp1DeActOnBut4Call = 0
AuxOp2DeActOnHandsetCall = 0
AuxOp2DeActOnBut1Call = 0
AuxOp2DeActOnBut2Call = 0
AuxOp2DeActOnBut3Call = 0
AuxOp2DeActOnBut4Call = 0
AuxOp3DeActOnHandsetCall = 0
AuxOp3DeActOnBut1Call = 0
AuxOp3DeActOnBut2Call = 0
AuxOp3DeActOnBut3Call = 0
AuxOp3DeActOnBut4Call = 0
+++++++++++++++++++++++++++++++++++++++++++++++++++++++++++++++++++++++++++++++
++ Field name : AuxOp1DeActOnAuxIn1Act, AuxOp1DeActOnAuxIn2Act ,
++ AuxOp1DeActOnAuxIn3Act, AuxOp1DeActOnAuxIn1DeAct,
++ AuxOp1DeActOnAuxIn2DeAct & AuxOp1DeActOnAuxIn3DeAct
++
++ Description : Auxiliary Output deactivation on Activation/Deactivation of
++ Auxiliary Inputs
++
++ Valid values : 0 - 1
++ 0- Disable
++ 1- Aux Deactivation when Auxiliary Input is activated or
++ deactivated
++
++ AuxOp1DeActOnAuxIn1Act = 0 (Default value)
++
++ Note : Admin can similarly program values for AuxOutput 2 and 3
+++++++++++++++++++++++++++++++++++++++++++++++++++++++++++++++++++++++++++++++
AuxOp1DeActOnAuxIn1Act = 0
AuxOp1DeActOnAuxIn2Act = 0
AuxOp1DeActOnAuxIn3Act = 0
AuxOp1DeActOnAuxIn1DeAct = 0
AuxOp1DeActOnAuxIn2DeAct = 0
AuxOp1DeActOnAuxIn3DeAct = 0
AuxOp2DeActOnAuxIn1Act = 0
AuxOp2DeActOnAuxIn2Act = 0
AuxOp2DeActOnAuxIn3Act = 0
AuxOp2DeActOnAuxIn1DeAct = 0
AuxOp2DeActOnAuxIn2DeAct = 0
AuxOp2DeActOnAuxIn3DeAct = 0
AuxOp3DeActOnAuxIn1Act = 0
AuxOp3DeActOnAuxIn2Act = 0
AuxOp3DeActOnAuxIn3Act = 0
AuxOp3DeActOnAuxIn1DeAct = 0
AuxOp3DeActOnAuxIn2DeAct = 0
All prices and specifications are subject to change without notice. Talk-A-Phone, Scream Alert, WEBS and WEBS Contact are registered trademarks of Talk-A-Phone Co. All rights reserved.
Copyright 2012 Talk-A-Phone Co. • 7530 North Natchez Avenue • Niles, Illinois 60714 • Phone 773.539.1100 • info@talkaphone.com • www.talkaphone.com.
Page 81 of 90
Page 82

VOIP-500 Series Phone
Configuration and Operation Manual
AuxOp3DeActOnAuxIn3DeAct = 0
+++++++++++++++++++++++++++++++++++++++++++++++++++++++++++++++++++++++++++++++
++ Field name : VMActionOnBut1CallInit, VMActionOnBut2CallInit ,
++ VMActionOnInboundCallsAns, VMActionOnAuxIn1Act,
++ VMActionOnAuxIn2Act & VMActionOnAuxIn3Act
++
++ Description : Configured VM will be played to the user upon call
++ initiation by the specified button
++
++ Valid values : 1 - 5,Disable
++ Disable - Disable the field
++ 1 - 5 Specifies the number of the VM to be played to the
++ user.
++
++ VMActionOnBut1CallInit = Disable (Default value)
++
++ Field name : VMActionOnInboundCallsAns
++
++ Description : Configuring the specified VM to start playing or stop
++ playing when the inbound calls are answered.
++
++ Valid values : 1 - 10, Disable
++ Disable - Disable the field
++ 1 - 5 Specifies the number of the VM to be played to the user.
++ 6 - Stops the VM #1(if playing)
++ 7 - Stops the VM #2(if playing).Similarly the values 8 to 10
++ can be configured to stop the VM #3 TO VM #5
++
++ Note : Admin can similarly program values for VMActionOnAuxIn1Act,
++ VMActionOnAuxIn2Act & VMActionOnAuxIn3Act on the guidelines
++ for the VMActionOnInboundCallsAns
+++++++++++++++++++++++++++++++++++++++++++++++++++++++++++++++++++++++++++++++
VMActionOnInboundCallsAns= Disable
VMActionOnAuxIn1Act = Disable
VMActionOnAuxIn2Act = Disable
VMActionOnAuxIn3Act = Disable
VMActionOnAuxIn1DeAct = Disable
VMActionOnAuxIn2DeAct = Disable
VMActionOnAuxIn3DeAct = Disable
VMActionOnBut1CallInit = Disable
VMActionOnBut2CallInit = Disable
VMActionOnBut3CallInit = Disable
VMActionOnBut4CallInit = Disable
+++++++++++++++++++++++++++++++++++++++++++++++++++++++++++++++++++++++++++++++
++ Field name : VM1PlayOnRemoteKeyCode, VM1StopOnRemoteKeyCode
++
++ Description : The specified VM will be played/stopped to the user upon
++ dialing the configured keycode from the remote side.
++
++ Valid values : Disable, Combination of 0-9,*,# with maximum of 4 characters
++ Disable - Disable the field
Page 82 of 90
All prices and specifications are subject to change without notice. Talk-A-Phone, Scream Alert, WEBS and WEBS Contact are registered trademarks of Talk-A-Phone Co. All rights reserved.
Copyright 2012 Talk-A-Phone Co. • 7530 North Natchez Avenue • Niles, Illinois 60714 • Phone 773.539.1100 • info@talkaphone.com • www.talkaphone.com.
Page 83

VOIP-500 Series Phone
Configuration and Operation Manual
++ *12# - can be used to either start or stop VM #1 play to
++ user when dialed from the remote side.
++
++ VM1PlayOnRemoteKeyCode = Disable(Default value)
++
++ Field name : VM1PlayOnLocalKeyCode,VM1StopOnLocalKeyCode
++
++ Description : The specified VM will be played/stopped to the user upon
++ dialing the configured keycode from the local keypad.
++
++ Valid values : Disable, Combination of 0-9,*,# with maximum of 8 characters
++ Disable - Disable the field
++ *123456# - can be used to either start or stop VM #1 play to
++ user when dialed from the local keypad.
++
++ VM1PlayOnLocalKeyCode = Disable(Default value)
++
++ Note : Admin can similarly program values for VM #2 to VM #5
++ Avoid using the same keycode for start and stop of the same
++ VM.
+++++++++++++++++++++++++++++++++++++++++++++++++++++++++++++++++++++++++++++++
VM1PlayOnRemoteKeyCode = Disable
VM1PlayOnLocalKeyCode = Disable
VM1StopOnRemoteKeyCode = Disable
VM1StopOnLocalKeyCode = Disable
VM2PlayOnRemoteKeyCode = Disable
VM2PlayOnLocalKeyCode = Disable
VM2StopOnRemoteKeyCode = Disable
VM2StopOnLocalKeyCode = Disable
VM3PlayOnRemoteKeyCode = Disable
VM3PlayOnLocalKeyCode = Disable
VM3StopOnRemoteKeyCode = Disable
VM3StopOnLocalKeyCode = Disable
VM4PlayOnRemoteKeyCode = Disable
VM4PlayOnLocalKeyCode = Disable
VM4StopOnRemoteKeyCode = Disable
VM4StopOnLocalKeyCode = Disable
VM5PlayOnRemoteKeyCode = Disable
VM5PlayOnLocalKeyCode = Disable
VM5StopOnRemoteKeyCode = Disable
VM5StopOnLocalKeyCode = Disable
+++++++++++++++++++++++++++++++++++++++++++++++++++++++++++++++++++++++++++++++
++ Field name : VM1PlayToUserInLoop
++
++ Description : The VM #1 will be played to the user in loop
++
++ Valid values : 0 - 1
++ 0- Disable, the VM play in loop
All prices and specifications are subject to change without notice. Talk-A-Phone, Scream Alert, WEBS and WEBS Contact are registered trademarks of Talk-A-Phone Co. All rights reserved.
Copyright 2012 Talk-A-Phone Co. • 7530 North Natchez Avenue • Niles, Illinois 60714 • Phone 773.539.1100 • info@talkaphone.com • www.talkaphone.com.
Page 83 of 90
Page 84

VOIP-500 Series Phone
Configuration and Operation Manual
++ 1- Enable, the VM play in loop
++
++ VM1PlayToUserInLoop = 0 (Default value)
++
++ Note : Admin can similarly program values for VM #2 to VM #5
+++++++++++++++++++++++++++++++++++++++++++++++++++++++++++++++++++++++++++++++
VM1PlayToUserInLoop = 0
VM2PlayToUserInLoop = 0
VM3PlayToUserInLoop = 0
VM4PlayToUserInLoop = 0
VM5PlayToUserInLoop = 0
+++++++++++++++++++++++++++++++++++++++++++++++++++++++++++++++++++++++++++++++
++ Field name : VMActionOnBut1CallInitRemote, VMActionOnBut2CallInitRemote
++
++ Description : Configured VM will be played to the guard upon call
++ initiation by the specified button
++
++ Valid values : 1 - 5,Disable
++ Disable - Disable the field
++ 1 - 5 Specifies the number of the VM to be played to the
++ user.
++
++ VMActionOnBut1CallInitRemote = Disable (Default value)
++
++Filed name : VMActionOnAuxIn1ActRemote, VMActionOnAuxIn2ActRemote,
VMActionOnAuxIn3ActRemote
++ VMActionOnAuxIn1DeActRemote, VMActionOnAuxIn2DeActRemote,
VMActionOnAuxIn3DeActRemote
++Valid Value : Disable , 1-10
++ : 1-5 (for playing of voice message #1 to #5
++ : 6-10 (for stop of voice message play #1 to #5
++ Field name : VMActionOnOutboundCallsAns
++
++ Description : The specified VM will be played to the guard, once the call
++ is being answered by the the guard.
++
++ Valid values : Disable 1 - 5
++ Disable - Diable the option of playing the VM
++ 1 - 5 Specifies the number of the VM which needs to be
++ played to the guard phone, when the call is being
++ answered by guard.
++
++ VMActionOnOutboundCallsAns = Disable (Default value)
++
++ Field name : VM1PlayToGuardOnRemoteKeyCode, VM1StopToGuardOnRemoteKeyCode
++
++ Description : The VM #1 will be played/stopped to the guard, once the
++ configured key is dialed by the the guard.
++
++ Valid values : Disable, Combination of 0-9,*,# with maximum of 4 characters
++ Disable - Disable the field
++ *12# - can be used to either start or stop VM #1 play to
++ guard when dialed from the remote side.
Page 84 of 90
All prices and specifications are subject to change without notice. Talk-A-Phone, Scream Alert, WEBS and WEBS Contact are registered trademarks of Talk-A-Phone Co. All rights reserved.
Copyright 2012 Talk-A-Phone Co. • 7530 North Natchez Avenue • Niles, Illinois 60714 • Phone 773.539.1100 • info@talkaphone.com • www.talkaphone.com.
Page 85

VOIP-500 Series Phone
Configuration and Operation Manual
++
++ VM1PlayToGuardOnRemoteKeyCode = Disable (Default value)
++ VM1StopToGuardOnRemoteKeyCode = Disable (Default value)
++
++ Note : Admin can similarly program values for VM2 to VM5.
++ Avoid using the same keycode for start and stop of the same
++ VM.
+++++++++++++++++++++++++++++++++++++++++++++++++++++++++++++++++++++++++++++++
VMActionOnAuxIn1ActRemote = Disable
VMActionOnAuxIn2ActRemote = Disable
VMActionOnAuxIn3ActRemote = Disable
VMActionOnAuxIn1DeActRemote = Disable
VMActionOnAuxIn2DeActRemote = Disable
VMActionOnAuxIn3DeActRemote = Disable
VMActionOnHandsetOffhookRemote = Disable
VMActionOnBut1CallInitRemote = Disable
VMActionOnBut2CallInitRemote = Disable
VMActionOnBut3CallInitRemote = Disable
VMActionOnBut4CallInitRemote = Disable
VMActionOnOutboundCallsAns = Disable
VM1PlayToGuardOnRemoteKeyCode = Disable
VM1StopToGuardOnRemoteKeyCode= Disable
VM2PlayToGuardOnRemoteKeyCode = Disable
VM2StopToGuardOnRemoteKeyCode= Disable
VM3PlayToGuardOnRemoteKeyCode = Disable
VM3StopToGuardOnRemoteKeyCode= Disable
VM4PlayToGuardOnRemoteKeyCode = Disable
VM4StopToGuardOnRemoteKeyCode= Disable
VM5PlayToGuardOnRemoteKeyCode = Disable
VM5StopToGuardOnRemoteKeyCode= Disable
+++++++++++++++++++++++++++++++++++++++++++++++++++++++++++++++++++++++++++++++
++ Field name : VM1PlayToGuardInLoop
++
++ Description : The VM #1 will be played to the guard in loop
++
++ Valid values : 0 - 1
++ 0- Disable, the VM play in loop
++ 1- Enable, the VM play in loop
++
++ VM1PlayToGuardInLoop = 0 (Default value)
++
++ Note : Admin can similarly program values for VM #2 to VM #5
+++++++++++++++++++++++++++++++++++++++++++++++++++++++++++++++++++++++++++++++
VM1PlayToGuardInLoop = 0
VM2PlayToGuardInLoop = 0
VM3PlayToGuardInLoop = 0
VM4PlayToGuardInLoop = 0
VM5PlayToGuardInLoop = 0
+++++++++++++++++++++++++++++++++++++++++++++++++++++++++++++++++++++++++++++++
++ Field name : KeypadMode
++ Description : Mode of keypad to be used for dialing.
All prices and specifications are subject to change without notice. Talk-A-Phone, Scream Alert, WEBS and WEBS Contact are registered trademarks of Talk-A-Phone Co. All rights reserved.
Copyright 2012 Talk-A-Phone Co. • 7530 North Natchez Avenue • Niles, Illinois 60714 • Phone 773.539.1100 • info@talkaphone.com • www.talkaphone.com.
Page 85 of 90
Page 86

VOIP-500 Series Phone
Configuration and Operation Manual
++ Valid values : KeypadMode = 1 - Normal dial (Default Value)
++ KeypadMode = 2 - Speed dial
++ Note : If Keypad is in speed dial, then Admin should configure
++ the speeddial numbers (Max 30 chars) .
++ Admin can configure IP Addresses, Analog Numbers, Aliases
++ and URLs. (Max 30 chars)
+++++++++++++++++++++++++++++++++++++++++++++++++++++++++++++++++++++++++++++++
KeypadMode = 1
SpeedDialKey0 =
SpeedDialKey1 =
SpeedDialKey2 =
SpeedDialKey3 =
SpeedDialKey4 =
SpeedDialKey5 =
SpeedDialKey6 =
SpeedDialKey7 =
SpeedDialKey8 =
SpeedDialKey9 =
+++++++++++++++++++++++++++++++++++++++++++++++++++++++++++++++++++++++++++++++
++ Field name : Led3
++ Description : Admin can configure Led3 Mode for specific purposes
++ Valid values : Led3 = 1 - Help on The Way
++ Led3 = 2 - Out Of Service
++
++ Note : For Options 1 and 3, Configure following parameters
++
++ Field name : Led3SwitchOn
++ Description : Admin can configure Led3 to switch on when remote user
++ enters specific key sequence.
++ Valid values : Max 8 chars containing 0-9, * and #.
++ Default is *98*
++ Note : None
++
++ Field name : Led3DurationType
++ Description : Admin can configure Led3 duration of activation.
++ Valid values : Led3Duration = 1 - For Entire Call (Default Value)
++ Led3Duration = 2 - For indefinite duration
++ Led3Duration = 3 - For Custom duration
++ Note : If Led3Duration = 3 then configure duration time.
++
++ Field name : Led3Duration
++ Valid values : 1 - 3600 sec,in increments of 1 sec. 10 (Default Value)
++
++ Field name : Led3SwitchOff
++ Description : Admin can configure key sequence to switch off when remote
++ Admin enters specific key sequence.
++ Valid values : Max 8 chars containing 0-9, * and #.
++ Default is *97*
++ Note : None
+++++++++++++++++++++++++++++++++++++++++++++++++++++++++++++++++++++++++++++++
Led3 = 3
Led3SwitchOn = *98*
Page 86 of 90
All prices and specifications are subject to change without notice. Talk-A-Phone, Scream Alert, WEBS and WEBS Contact are registered trademarks of Talk-A-Phone Co. All rights reserved.
Copyright 2012 Talk-A-Phone Co. • 7530 North Natchez Avenue • Niles, Illinois 60714 • Phone 773.539.1100 • info@talkaphone.com • www.talkaphone.com.
Page 87

VOIP-500 Series Phone
Configuration and Operation Manual
Led3DurationType = 1
Led3Duration = 10
Led3SwitchOff = *97*
+++++++++++++++++++++++++++++++++++++++++++++++++++++++++++++++++++++++++++++++
++ Field name : GuardAccessCode
++ Description : Admin can set the guard access code using this field.
++ Valid values : Maximum length 8 digits(0-9).
++ GuardAccessCode = *4** (Default Guard access code)
++ It will accept the values in the following format.
++ *4*<xxxxxxxx>* , x can be 0-9 or blank
++ Note : None
+++++++++++++++++++++++++++++++++++++++++++++++++++++++++++++++++++++++++++++++
GuardAccessCode = *4**
+++++++++++++++++++++++++++++++++++++++++++++++++++++++++++++++++++++++++++++++
++ Field name : AuthVolAdjust , AuthSpkrMicCtrl, AuthVoiceMessage ,
++ AuthAuxOPOperation , AuthLED3Operation
++ Description : Admin can configure the authetication for different
++ operations.
++ a. Volume Adjustment During Call
++ b. Speaker and Microphone Control During Call
++ c. Voice Messages
++ d. Aux o/p Activation Deactivation
++ e. Help on the way LED activation and deactivation
++ Valid values : 0 - To disable Authentication
++ 1 - To enable Authentication
++ Note : None
+++++++++++++++++++++++++++++++++++++++++++++++++++++++++++++++++++++++++++++++
AuthVolAdjust = 0
AuthSpkrMicCtrl = 1
AuthVoiceMessage = 1
AuthAuxOPOperation = 1
AuthLED3Operation = 0
+++++++++++++++++++++++++++++++++++++++++++++++++++++++++++++++++++++++++++++++
++ Field name : NetworkMode
++ Description : It configures the Phone IP address Type.
++ Valid values : NetworkMode = 1 - DHCP
++ NetworkMode = 3 - STATIC (Default Value)
++ Note : If NetworkMode = 3, must configure following
++ Field name : IPAddress
++ Field name : Netmask
++ Field name : DNSServerIP
++
++ Description : IPAddress - Phone IP Address - mandatory
++ Netmask - The Subnet Mask Address - mandatory
++ Gateway - The Default Gateway address - mandatory
++ DNSServerIP - The DNS Server IP Address - optional
++ Example:
++ NetworkMode = 3
++ IPAddress = 192.168.1.10 (Default)
++ Netmask = 255.255.255.0 (Default)
All prices and specifications are subject to change without notice. Talk-A-Phone, Scream Alert, WEBS and WEBS Contact are registered trademarks of Talk-A-Phone Co. All rights reserved.
Copyright 2012 Talk-A-Phone Co. • 7530 North Natchez Avenue • Niles, Illinois 60714 • Phone 773.539.1100 • info@talkaphone.com • www.talkaphone.com.
Page 87 of 90
Page 88

VOIP-500 Series Phone
Configuration and Operation Manual
++ Gateway = 192.168.1.1 (Default)
++ DNSServerIP = (Default blank)
++
++ Note : NetworkMode = 3 (Static) should not applied in bulk update.
++ If applied then all phones will have same Network
++ Settings.
+++++++++++++++++++++++++++++++++++++++++++++++++++++++++++++++++++++++++++++++
NetworkMode = 3
IPAddress = 192.168.1.10
Netmask = 255.255.255.0
Gateway = 192.168.1.1
DNSServerIP =
+++++++++++++++++++++++++++++++++++++++++++++++++++++++++++++++++++++++++++++++
++ Field name : Hostname
++ Description : It configures the unique indetifier of the phone at
++ network level
++ Valid Values : 30 chars long, a-z,A-Z,*,0-9,.,-, No space allowed.
++ Default Value is VOIP-500.
++ Note : This Parameter should not be applied in bulk update.
++ If applied then all phones will have same hostname.
+++++++++++++++++++++++++++++++++++++++++++++++++++++++++++++++++++++++++++++++
Hostname = VOIP-500
+++++++++++++++++++++++++++++++++++++++++++++++++++++++++++++++++++++++++++++++
++ Field name : LogRedirection
++ Field name : LogServerIP
++ Field name : LogServerPort
++ Description : Admin can enable the logging, and route to specific
++ location.
++ Valid values : LogRedirection = 0 - To Disable Logging
++ LogRedirection = 1 - To Console
++ LogRedirection = 2 - To Network
++ LogRedirection = 3 - To File (Append)(Default Value)
++ LogRedirection = 4 - To File (New)
++ Note : If LogRedirection = 2 must configure LogServerIP &
++ LogServerPort
++ Example:
++ LogRedirection = 2
++ LogServerIP = 10.112.71.35
++ LogServerPort = 514
+++++++++++++++++++++++++++++++++++++++++++++++++++++++++++++++++++++++++++++++
LogRedirection = 3
LogServerIP =
LogServerPort =
+++++++++++++++++++++++++++++++++++++++++++++++++++++++++++++++++++++++++++++++
++ Field name : LogLevel
++ Description : Admin can configure the log levels of following modules
++ of EVP
++ a. AudioLogLevel - For Audio Module
++ b. CallControlLogLevel - For Call Control Module
Page 88 of 90
All prices and specifications are subject to change without notice. Talk-A-Phone, Scream Alert, WEBS and WEBS Contact are registered trademarks of Talk-A-Phone Co. All rights reserved.
Copyright 2012 Talk-A-Phone Co. • 7530 North Natchez Avenue • Niles, Illinois 60714 • Phone 773.539.1100 • info@talkaphone.com • www.talkaphone.com.
Page 89

VOIP-500 Series Phone
Configuration and Operation Manual
++ c. CommandModLogLevel - For Webs Contact Client Module
++ d. DevCtrlLogLevel - For Device Control Module
++ e. H323LogLevel - For H323 Module
++ f. SIPLogLevel - For SIP Module
++ g. TimerLogLevel - For Timer Module
++
++ Valid values : 1 - Error
++ 3 - Error + Warning (Default value)
++ 7 - Error + Warning + Info
++ 15 - Error + Warning + Info + Debug
++ Note : None
+++++++++++++++++++++++++++++++++++++++++++++++++++++++++++++++++++++++++++++++
AudioLogLevel = 3
CallControlLogLevel = 3
CommandModLogLevel = 3
DevCtrlLogLevel = 3
H323LogLevel = 3
SIPLogLevel = 3
TimerLogLevel = 3
+++++++++++++++++++++++++++++++++++++++++++++++++++++++++++++++++++++++++++++++
++
++ End Of the File
++
+++++++++++++++++++++++++++++++++++++++++++++++++++++++++++++++++++++++++++++++
All prices and specifications are subject to change without notice. Talk-A-Phone, Scream Alert, WEBS and WEBS Contact are registered trademarks of Talk-A-Phone Co. All rights reserved.
Copyright 2012 Talk-A-Phone Co. • 7530 North Natchez Avenue • Niles, Illinois 60714 • Phone 773.539.1100 • info@talkaphone.com • www.talkaphone.com.
Page 89 of 90
Page 90

Service/Module
Port
Port Type
Mode
HTTP
80
TCP/UDP
Inbound
FTP
21
TCP
Inbound
SSH
22
TCP
Inbound
Paging
5000
UDP
Inbound
SIP Signaling
5060
UDP
Inbound/Outbound
SIP Secure
5061
UDP
Inbound/Outbound
SIP Start RTP
8000 to 65535
UDP
Inbound/Outbound
STUN
3478
UDP
Inbound/Outbound
WEBS Contact Port
3001
UDP
Inbound/Outbound
SMTP Server Port
25
TCP/UDP
Inbound/Outbound
Configuration and Operation Manual
Appendix F: Network Port Requirements
The network for VOIP-500 Series phones should allow the following:
IPv4 enabled
Allow the following protocols:
o SIP
o RTP
o HTTP/HTTPS
o SMTP
Routed network
DHCP Server (Optional)
Network elements:
VOIP-500 Series Phone
SIP Proxy/Registrar
SIP end points
Layer-2 Switch
WEBS Contact Server
Ports:
The following ports needs to be enabled on the VOIP-500 Series phones and allowed across the firewall and
routers in the network.
Page 90 of 90
All prices and specifications are subject to change without notice. Talk-A-Phone, Scream Alert, WEBS and WEBS Contact are registered trademarks of Talk-A-Phone Co. All rights reserved.
Copyright 2012 Talk-A-Phone Co. • 7530 North Natchez Avenue • Niles, Illinois 60714 • Phone 773.539.1100 • info@talkaphone.com • www.talkaphone.com.
 Loading...