

Talitor 3001077m, 3001077c, 3001077ma, 3001077ca Quick Manual
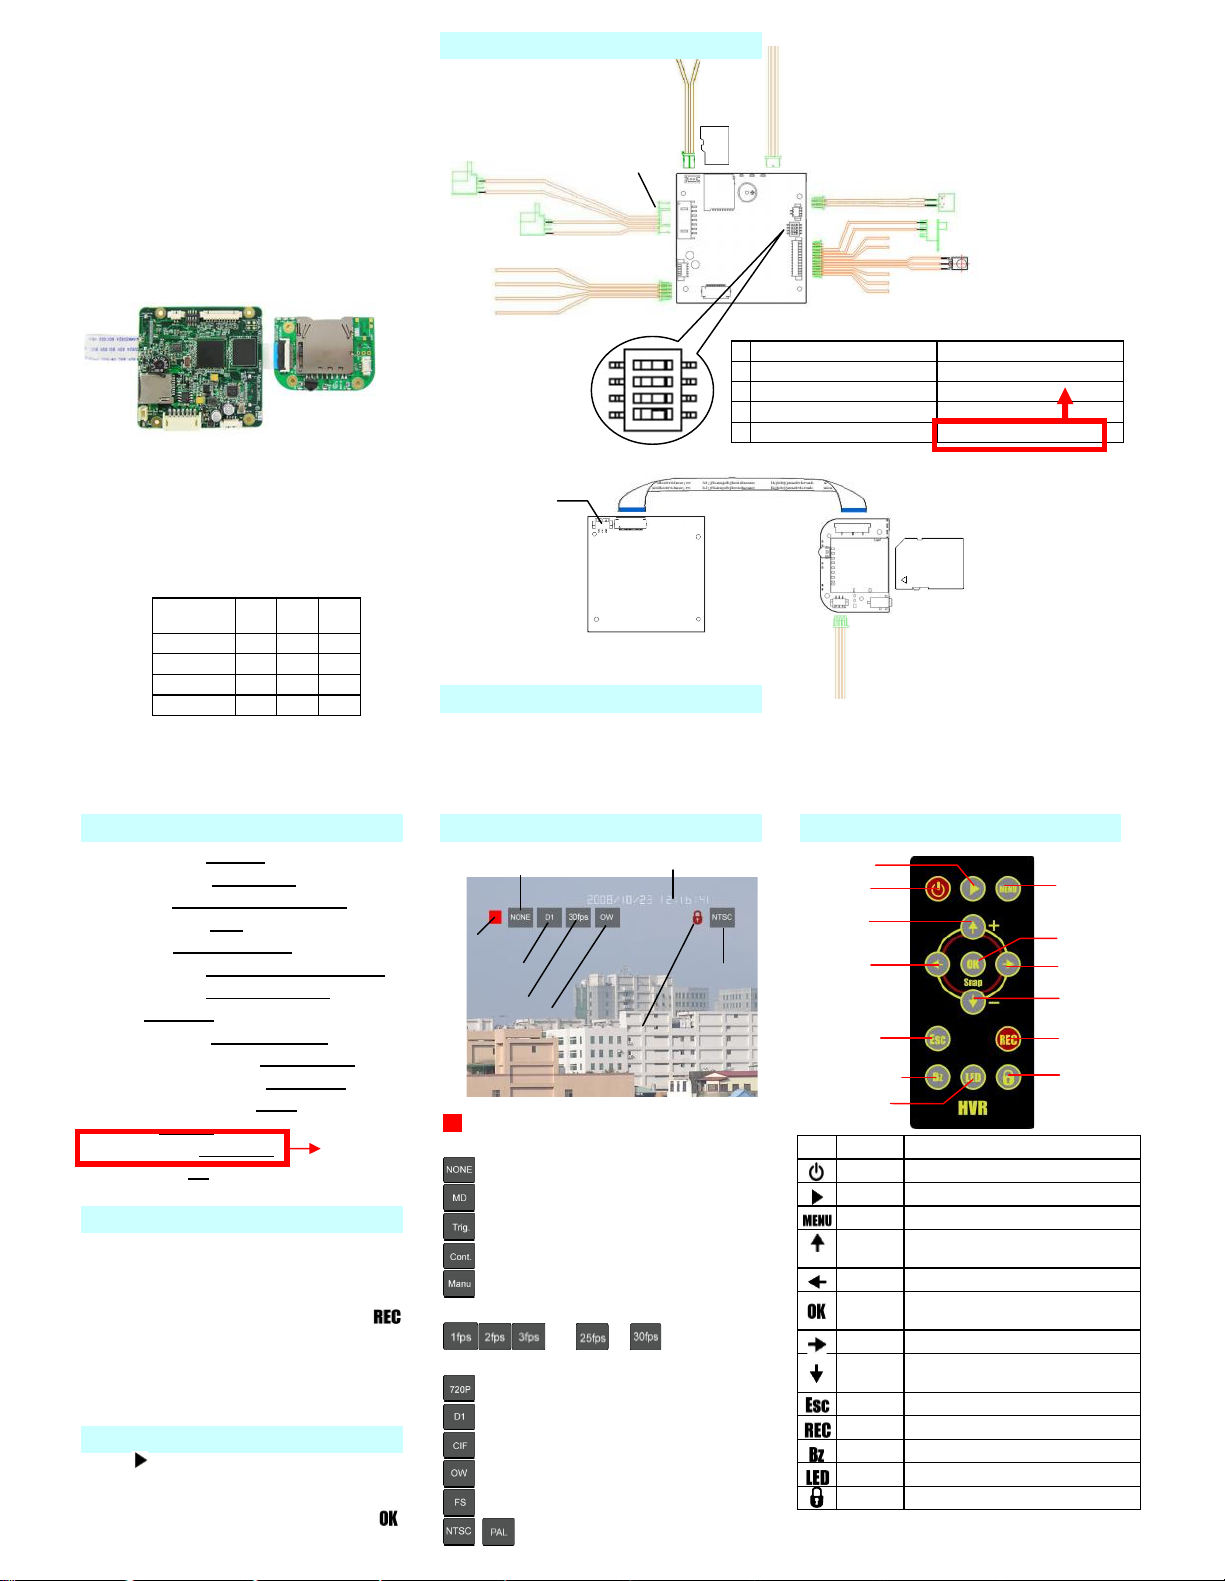
Basic Connection
Main board
Main board + optional I/O board
Power up the board
There are 2 kinds of power switch – mechanical
slide switch and electronic tact switch . Refer
to your supplier on which kind you would get.
Default Value
Video Resolution: 720x480
Recording Quality: Fair (1.2Mb)
Frame Rate: 25/30 frames per second
Motion Sensitivity: High
Motion Area: All area effective
Schedule Setting: All (Sunday to Saturday)
motion recording
Storage: Overwrite
Recording Length: 30 minutes a file
Date/Time Stamp Format: YYYY/MM/DD
Date/Time Stamp Position: Upper right
Date / Time Stamp Color: White
Language: English
External Trigger: Deactivate
Status Display: On
Start to record
Once power on unit, recording is factory preset
at motion activated. It can be reset as
continuous recording, having schedule, and
external trigger activation thru MENU. Manual
recording can always take place when
button is pressed. (Refer to “Remote Control” )
* Please press “menu” key before take away
the SD card, otherwise the recording will not be
saved onto SD/MicroSD card.
Playback Function
Press key on remote control to get i nto
playback menu. You can use “Quick search”,
and enter the date/time which you would like to
view. Or get into “List all”, and press
button to playback from a selected recording.
Screen Icons
: The red square will sh ow up continuously
when device is recording
: Standby but not at recording
: Schedule on motion detection activated
: External trigger activate recording
: Schedule continuous recording
: Manual recording by pressing “REC”
button on remote controller
…… / : Frame rate
per second
: Resolution: 1280 x 720
: Resolution: 720 x 480
: Resolution: 320 x 240
: Overwrite old files when SD card is full
: Stop recording when SD card is full
: Video system (NTSC/PAL)
Remote Control Diagram
Name
Function
Power
Power on/off the device
Playback
Playback the recording files
Menu
Enter the menu setting
Up
Move upward or increase
While playback - Volume up
Left
Move left, fast backward
OK
Confirm the setting/change
Still image (snapshot)
Right
Move right, fast forward
Down
Move downward or decrease
While playback - Volume down
Esc
Escape current menu
REC
Manual record
Bz
Buzzer on/off
LED
LED on/off
Keylock
Key lock/unlock
* Power key will not work when board is using
mechanical power switch
P/N: F40077004
Hidden Video Recorder
Quick Guide
HVR-D1
Version: 090724
H VR – D1
Model No. 300107 7
Time/Date stamp
Recording method
Resolution
Frame rate
SD card method
Video
system
Key lock
OK
Buzzer on/off
Down
Power
Playback
Up
Left
Escape
LED on/off
Right
Menu
Record
Key lock/
Un-lock
Optional models:
Main
board
I/O
board
Audio
3001077m
✔
x
x
3001077ma
✔x✔
3001077c
✔
✔
x
3001077ca
✔✔✔
* Please backup/format SD card regularly
in order to keep efficiency of SD card
Recording
* The default value of LED indicators and buzzer are
ON, please turn it off via remote control if required.
* LED indicators and buzzer will be ON when powering
on, and then on or off according to user ’s setting.
Keypad connection
Red: power; green: reference;
black: ground
IR receiver (Only for main board)
External trigger (2 blue cables )
Power switch
Microphone (Optional)
5V power out
Red: power; black: ground
Camera power out and
video in
Red: power
Black: ground
Yellow: video
Black: ground
12V DC input
Reserved battery pin
12V DC output
MicroSD
Card
(Optional)
ON
1
2
3
4
On board IR
receiver
SD card (Optional)
FFC cable
Bottom of main board
Dip switch:
Off
On
1
NTSC system
PAL system
2
Main board IR
I/O board IR
3
Analog video in
Digital YUV in
4
Mechanical power switch
Electronic power switch
Main
board
Audio/Video output (connector is on bottom of PCB)
Yellow: video; white: audio; black: ground
Audio/Video output
Yellow: video; white: audio; black: ground
A/V output
connector of
main board
* Please power off before connecting
or dis-connecting the I/O board
On
Off
LED status
Red
LED
On
Power on
X
Off
Power off
Green
LED
On
System
ready, SD
card normal,
and has
schedule
Blinking
System and SD
card normal,
but doesn’t
have schedule
Off
System not
ready or SD
card
abnormal
Yellow
LED
On
Battery
charging
Blinking
Running out of
battery, please
charge it
Off
Battery not
charging
Recording Duration
NTSC @ 30 fps (unit: hour)
NTSC
1GB
4GB
8GB
16GB
1280x720 @ Better
0.59
2.38
4.77
9.54
720 x 480 @ Fair
2.00
7.99
15.98
31.96
320 x 240
4.13
16.52
33.04
66.08
PAL @ 25 fps (unit: hour)
PAL
1GB
4GB
8GB
16GB
1280x720@ Better
0.71
2.86
5.72
11.45
720 x 480@ Fair
2.39
9.58
19.17
38.35
320 x 240
4.95
19.82
39.64
79.29
* The recording duration may vary from image
complication and frame rate setting
* Please safely remove SD/MicroSD card on computer.
* Please press Menu or Playback key, or power off the
board through electronic power switch before taking
away the SD/microSD card.
* 1280x720 is reserved for high resolution video input.
The most frequent use and important
functions
File name explanation
T 2008 09 26 14 19 20 .AVI
To turn off date/time display on screen
System Setting > Date/Time > Stamp Format > Off
To set schedule
Default of schedule is All motion activate.
All means whole week from Sunday, Monday, to
Saturday. You can simply set “All” and it will
apply to whole week, or y ou can set certain
schedule of an individual day. Just press “OK”
on the day to settle the interval.
OK: To confirm the interval setting, and it will go
to next interval for the same date and same
recording method.
NO: Will go to next schedule setting without
saving the current interval
Schedule setting order:
1. All > Motion → All > Continuous (end)
2. Sun > Motion → Sun > Continuous → Mon
> Motion → Mon > Continuous → Tue >
Motion → … Until Sat > Continuous (end)
Finish: To escape schedule setting. Or you
can press “Esc” button on remote control , too.
To set interval up to 24:00
This recorder does not have 24:00 in the
schedule setting. For interval end with 24:00,
please set 23:59 instead.
To delete schedule
In motion/continuous recording, if the interval is
from 00:00 to 00:00, and select “OK”, then the
interval will be canceled (erase).
FAQ
Q1. What player software should I use to
playback the recording files?
Ans. “Media Player Classic ” is most
recommended, and can be downloaded
freely at http://ftp.freenet.de/pub/filepilot/win
dows/multimedia/video/k-lite_codec_pack/klc
odec425f.exe. If you use Windows Media
Player” you may need to install mpeg -4
decoder. A lot more other mpeg -4 capable
player can playback the record files, such as
VLC, Storm Video Codec, …etc.
Q2. How long can date/time last without the
power supply?
Ans. RTC battery can last for 3 months without
power supply (including battery supply)
Q3. Can both SD card slot and microSD ca rd
slot work at the same time? Which is
the higher priority?
Ans. SD card is first priority. If there is no SD
card, recorder board will record onto
microSD card. So far, two SD card slot s
cannot work simultaneously
Q4. Since there is a microSD card slot , why
there is optional I/O board?
Ans. SD card is larger sized and larger capacity
available. There is a flexible cable between
main board and I/O board, so the recorder
board can match mechanism design.
Q5. Why does the device not turn on
according to schedule?
Ans. The schedule will take place only when
device is turned on. If the device is on, it
will get into sleeping mode when out of
schedule and no operation for 30 seconds.
In sleeping mode, the device will auto -turn on
according to the schedule. If the device is
off, it won’t auto-turn on when schedule.
Specifications
Video system
NTSC / PAL
Compression
MPEG-4
Video resolution
1280x720 / 720x480 / 320 x
240
Recording quality
Best / Better / Fair
Recording frame
rate
1, 2, 3, 5, 13/15, 25/30 fps
Video size
Approx. 2 hours for 1GB
(@720x480, Fair quality)
Recording mode
Manual, Schedule
continuous, Schedule
motion, external trigger
Audio recording
Yes (Optional)
External trigger
Alarm signal input (NC/NO)
A/V connection
Composite AV input / output
Power supply
12V DC or reserved battery
connection
Power output
12V DC 200mA / 5V DC
300mA
Storage Media
SD / Micro SD card(1G to
16G, SDHC Class 6 is most
recommended)
Control
IR remote control or keypad
(reserved circuitry)
Date/time stamp
Yes, position adjustable
Power failure
Auto Recovery
Firmware
Upgradeable, through SD
Card
Current
consumption
(w/o camera & battery)
Operation mode : 100mA
Standby mode : 90mA
Sleep mode : 10mA
Operation temp.
+0~+50°C
Dimension
60x60 mm (main board)
+50x36.5mm (I/O board)
* If there is no schedule , external trigger is
deactivated, and using Electronic power
switch, the board will e nter sleep mode
after 30 seconds without control.
Accessories
7-pin 12V DC input & output cable
12-pin Power switch + External trigger + IR
receiver + Keypad connection cable
4-pin Camera video-in and power out cable
2-pin Microphone
3-pin Audio/Video output cable
2-pin 5V power out cable
IR remote control
SD card and SD card reader (o ptional)
3.7V 4800mA Li-polymer battery (optional)
Charger cradle for Li-polymer battery (optional)
12V 1A power adapter (optional)
Year
Month
Date
Hour
Minute
Second
# F10071502
# F12121500
# F13041500
# F14021500
# F15031500
# F10021500
# F30207700
* Erase the schedule before settling is recommended.
 Loading...