

Page 1
TP10613010 Rev.02 Copyright © 2009 by Talaris Ltd., Basingstoke (UK) Page 1 of 2
Talaris House, Crockford Lane, Chineham Business Park, Basingstoke, Hampshire RG24 8QZ, England.
Telephone +44 (0)1256 368000 Fax +44 (0)1256 368001 www.talaris.com
Model: Nvision (Virtual Pocket Processing) Quick User Guide
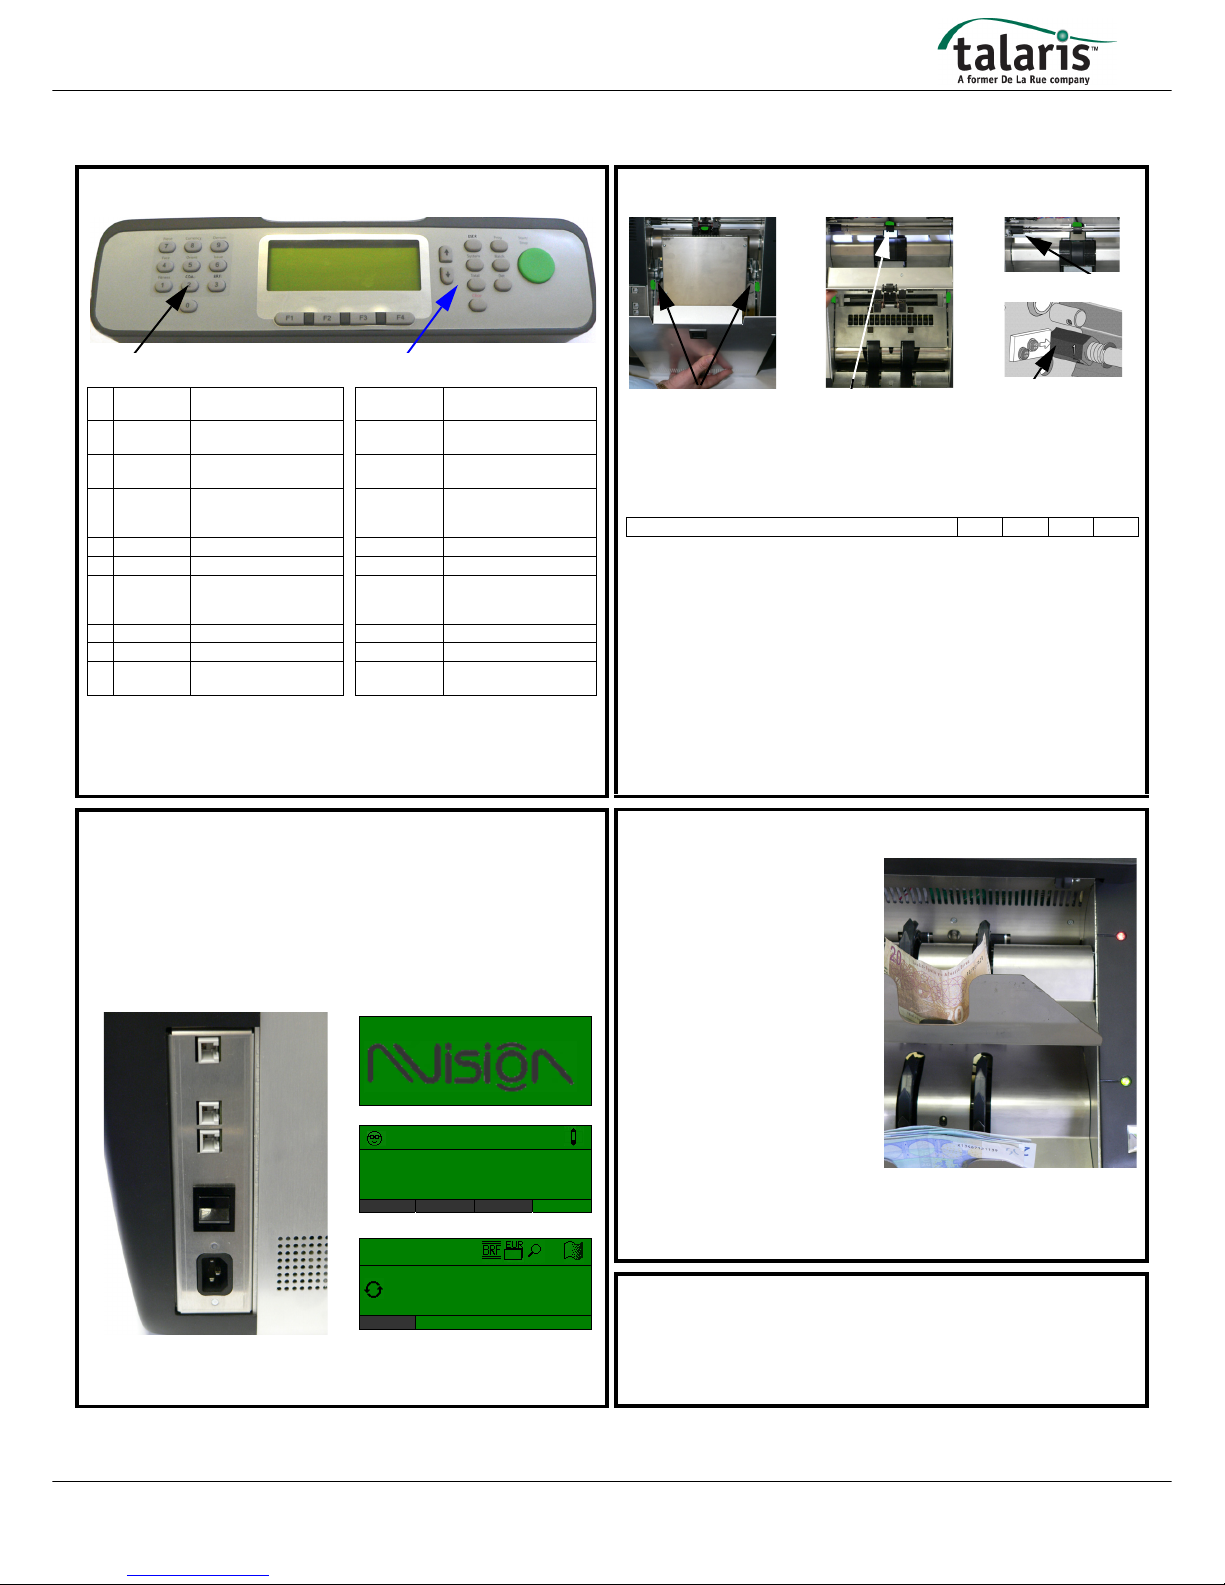
1. Display / Control Panel
Process Selection
Function Selection
0 Zero Returns you to standard
note authentication.
Scroll arrow
keys
Scrolling through display
options.
1
Fitness
1
Turns fitness sorting on
or off.
User Change operator or
password.
2 CDA Turns authentication off. Prog Save, load, delete
programs.
3
BRF
1
Turns on and off the
Banknote Recycling
Framework process.
System Configuration or Version
information.
4 Face Facing the notes. Batch Batch totals.
5 Orient Orientation of the notes. Total Details of count.
6 Issue Issue splitting of the
notes.
Det
1
Switching on/off
detectors and adjusting
detector sensitivity.
7 Piece Piece counting paper. Clear Clear information.
8 Currency Selecting a currency. Start/Stop Manual start/stop key.
9 Denom Selecting a
denomination.
Function keys Selecting functions from
the display.
Note: Once in the BRF process, no other processes
can be selected. You must have
BRF switched off, to run the other processes.
3. Powering up the Machine
Connect the mains lead to the socket on the rear of the machine.
Plug the machine’s power lead into a mains socket and switch on the mains supply.
Switch on the machine’s on / off switch. The machine will power up and complete a self
test routine while the Nvision logo is being displayed. This may take about 20 seconds.
At this time the lights on each stacker pocket will flash from red to green. Next select
operator or supervisor mode by using the scroll key, then enter your password (if set) or
press OK (F1) to go to the count display.
The machine will then automatically be configured to the operating settings that were
previously saved for that user.
Note: If the display comes up with a warning, check that the metal tab on the top left
hand side of the rear cover has activated the safety switch correctly See section
“2.2 Machine Overview (Rear View)” on page 4” of the Nvision User Guide.
TM
SUPERVISOR
ENTER PASS WORD : _
OK
Å CLEAR
READY FOR NEW BATCH
BACK
2. Feed Gap Adjustment
Feed gap adjuster (Fig 3)
Moveable Plate release
latches (Fig 1)
Feed guide release clip
(Fig 2)
Pull back and rotate
Feed gap adjustment is required for the following reasons:
• The counting of new or mint condition notes.
• The counting thin or poor condition notes.
• The counting of average condition notes.
The adjuster nut is graduated with numbers: 1 2 3 4
Remove the rear cover to adjust the feed gap on the machine.
Carefully press in both of the green moveable plate latches and slowly pull the assembly
back towards you (Fig 1). Care point: You should always support this assembly as you
lower it due to its weight.
Next, release the green feed guide clip and the feed guide will pivot down (Fig 2).
Now you can pull the feed gap adjuster nut towards the centre of the machine and rotate
the nut in the required direction (Fig 3). The feed gap number selected must have the
white arrow pointing towards it.
The default setting for the note feed gap is 3.
New or mint notes may require a slightly smaller gap to count than average notes (i.e. 2).
Old notes may require a slightly larger gap than average notes (i.e. 4).
The higher the setting (i.e. 4), the larger the gap.
Adjust, then re-check the feed.
4. Stacker Pocket Indicator Lights
The stacker pocket indicator lights by the
side of each stacker pocket will tell you
what type of event has happened in each
pocket.
A solid green light is for a correct and
authenticated count (stacker 1). It can
also apply to stacker 2, depending on the
process you are using.
A flashing green indicates an
authenticated count but has a note of the
wrong denominational value in that count.
(Not applicable in the BRF Process.)
A solid red light is for an un-recognisable
note or is for an invalid count.
A flashing red light indicates a note that
has failed an authentication check (stacker 2).
Note: For further information on all the different process and functions selections, see
sections 4 and 5 of the Nvision User Guide.
Note: For display messages and error codes, See section “8 Display Messages and
Error Codes” on page 65” of the Nvision User Guide.
Stacker 2
Stacker 1
This Quick User Guide explains the more frequently used features of the Nvision note sorter. However, the features available will vary depending on the machine type and the detector
packages fitted. Features that are only available on specific models will be identified with a number added to the feature name, these are explained on page 2 of this guide.
Suzo nr: 177-0700
Page 2
TP10613010 Rev.02 Copyright © 2009 by Talaris Ltd., Basingstoke (UK) Page 2 of 2
Talaris House, Crockford Lane, Chineham Business Park, Basingstoke, Hampshire RG24 8QZ, England.
Telephone +44 (0)1256 368000 Fax +44 (0)1256 368001 www.talaris.com
Model: Nvision (Virtual Pocket Processing) Quick User Guide
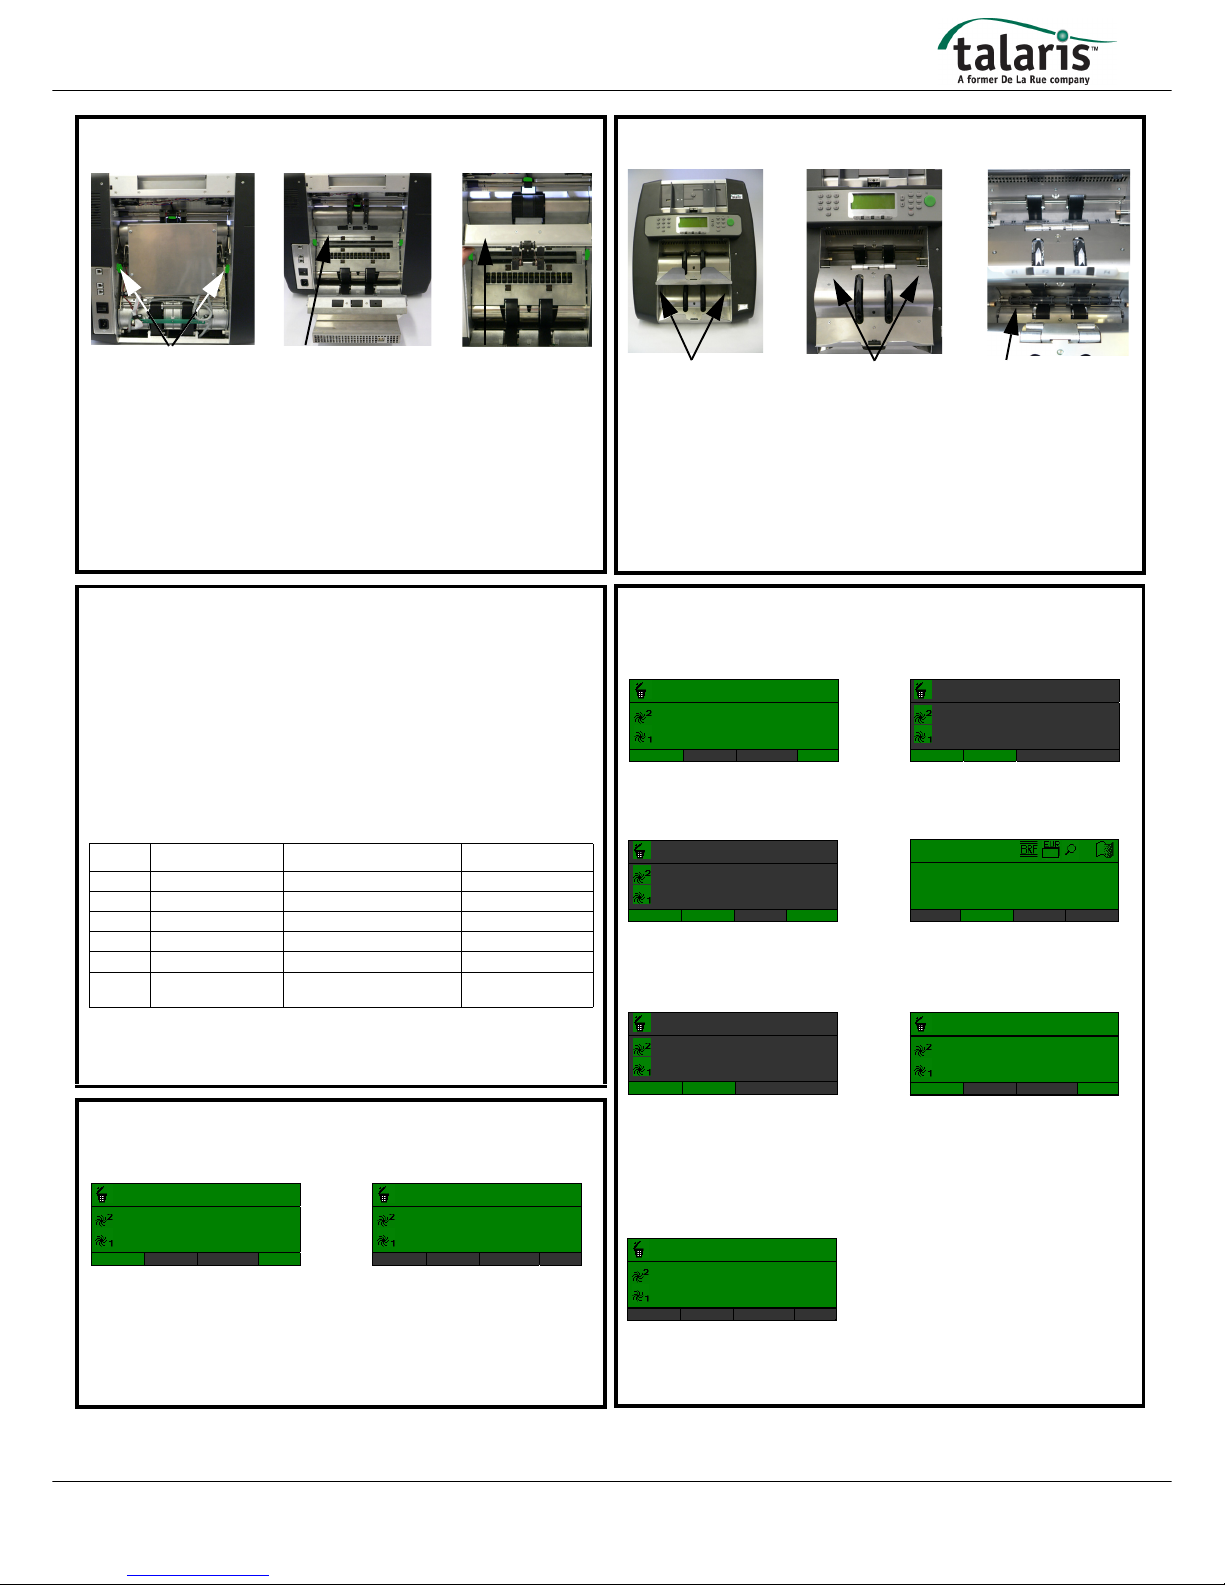
5. Rear Note Path Access
Moveable Plate release latches
(Fig 1)
Transport path (Fig 2) Feed guide assembly
(Fig 3)
First remove the rear cover to gain access to the rear note path.
Carefully press in both of the green moveable plate latches and slowly pull the
assembly back towards you (Fig 1 and Fig 2). Care point: You should always support
this assembly as you lower it due to its weight.
You now have access to any notes which may have got stuck in the rear transport path.
If the notes are stuck between the feed rollers and the feed guide, release the green
feed guide clip and the feed guide will pivot down (Fig 3). After the notes have been
removed, re-secure the feed guide with the green clip and lift and lock the moveable
plate back into place using the green latches.
Please make sure both latches are secure.
7. BRF Sorting1
(Banknote Recycling Framework)
Place a bundle of single or mixed denomination notes on the feed hopper, the machine
will start, count and authenticate the notes. It will also separate the BRF FIT notes into
stacker pocket 1 and UNFIT genuine notes, suspect counterfeit notes and
unrecognised banknotes into stacker pocket 2.
If stacker pocket 2 only contains unfit genuine notes, the indicator light will be a solid
green (Refer to section 9).
If a suspect counterfeit note is in with unfit notes in stacker pocket 2, the indicator light
will flash red (Refer to section 8).
If a unrecognised note is in with the unfit notes in stacker pocket 2, the indicator light
will be a solid red (Refer to section 8).
Stacker Indicator light Description Displayed Value
2 Solid green Genuine unfit note Yes
2 Solid red Contains unrecognised note No
2 Flashing red Suspect counterfeit note No
1 Solid green Genuine and fit note Yes
1 Solid green Genuine unfit note after Split Yes
1 Solid red Transport error, re-feed
notes
No
Post processing of notes in stacker 2
To find out why the notes were rejected to stacker pocket 2, refer to section 3.2.1
(stacker pocket indicator lights) in the user guide.
9. BRF1 (Virtual Pocket Process)
Below are typical count display shots for solid green indication light on stacker 2.
STACKER 1 SOLID GREEN / STACKER 2 SOLID GREEN
1. If after feeding the notes and a
solid green light is shown on
stacker 1 & 2. Remove the FIT notes
from stacker pocket 1 and the UNFIT
notes from stacker pocket 2.
AUTO-ADD CULLS automatically
adds the notes from the CULL display
on a Solid Green light.
2. The operator can now CONTINUE
the count, REMOVE stacker 2 notes
from the total or END that current
batch. If END is pressed the display
will show:
“READY FOR NEW BATCH”.
€ 0 0
€ 30 2
€ 70 4
CONT. DETAIL
REMOVE
€ 0 0
€ 30 2
€ 70 4
CONT. DETAIL
REMOVE END
6. Front Note Path Access
Stacker 2 release latches
(Fig 1)
Location posts / slots (Fig 2) Note diverter (Fig 3)
To gain access to the note path at the front of the machine, un-clip the left and right
hand side latches on the underside of stacker pocket 2 (Fig 1). Now pull the stacker
assembly slowly out towards you. It will rest on top of stacker pocket 1 (Fig 2).
You now have access to the note path, belts, sensors, diverter and rollers (Fig 3).
If you have to remove a note that is stuck behind the diverter, you will also have to lower
the moveable plate at the rear of the machine. Then hand wind the belts backwards and
remove the note from the rear.
To return the stacker assembly back into position, carefully lift it up and make sure you
locate the stacker assembly slots onto the two posts on each side of the machine. Then
gently push it back in until you hear it click and lock into position (Fig 2).
8. BRF1 (Virtual Pocket Process)
Below are typical count display shots for a solid red or flashing red indicator light.
STACKER 1 SOLID GREEN / STACKER 2 SOLID OR FLASHING RED
1. If after feeding notes and a solid
red or flashing red is shown on
stacker 2. The display above will be
shown. Press SPLIT.
2. Remove the FIT notes from
stacker 1. Remove the UNFIT and
suspect notes from stacker 2.
3. Re-feed the UNFIT and suspect
notes from stacker 2.
3a. If you have not re-fed the notes
within 5 seconds this display will
appear. Press NO to continue the
SPLIT. The Nvision will re-show
display number 3.
4. The notes have now been SPLIT.
Authentic but UNFIT notes will
physically be in stacker 1 but shown
on stacker 2 of the display. Suspect
notes will physically be in stacker 2 but
shown as CULL on the display.
Press CLOSE.
5. Remove the UNFIT notes from
stacker pocket 1 and the suspect note
from stacker pocket 2.
6. Continue the count or END the
current batch. If END is pressed, the
display will show:
“READY FOR NEW BATCH”.
€ 0 2
€ 0 0
€ 90 5
CONT. DETAIL
SPLIT
€ 0 2
€ 0 0
€ 90 5
CLOSE DETAIL
€ 0 2
€ 0 0
€ 90 5
CLOSE DETAIL
END
IS THE BATCH COMPLETE ?
NO
DELETE YES
€ 0 1
€ 10 1
€ 90 5
CLOSE DETAIL
€ 0 1
€ 10 1
€ 90 5
CONT. DETAIL
SPLIT
€ 0 1
€ 10 1
€ 90 5
CONT. DETAIL
SPLIT END
Additional Notes: Feature1 These features are only available on machines fitted with Fitness Detection.
 Loading...