

Takara Belmont EX-2000_Installation X-Caliber CM EX-2000 Panoramic & Cephalometric X-Ray Installation Instructions

EX-2000
PANORAMIC &
Cephalometric X-RAY
INSTALLATION
INSTRUCTIOINS
REV. 02


INDEX
SECTION ONE : TECHNICAL DATA
1) ELECTRICAL AND RADIATION DATA ...............................................................
2) MAJOR PARTS IDENTIFICATION ........................................................................
3) PHYSICAL DIMENSIONS ......................................................................................
4) TUBEHEAD THERMAL CHARACTERISTICS ....................................................
SECTION TWO : PRE-INSTALLATION INSTRUCTIONS
1) CERTIFIED COMPONENT COMPATIBILITY ......................................................
2) SUPPORT REQUIREMENTS ..................................................................................
3) ELECTRICAL REQUIREMENTS ...........................................................................
4) LOCATION OF COMPONENTS ...........................................................................
SECTION THREE : INSTALLATION INSTRUCTIONS
1) INSTALLATION REQUIREMENTS .....................................................................
2) COLUMN/COUNTERWEIGHT ASSEMBLY .......................................................
3) ROTATION UNIT (INCL. HEAD & CASSETTE HOLDER) ASSEMBLY .........
4) CHINREST SUPPORT ASSEMBLY ......................................................................
5) CONNECTION OF WIRES ...................................................................................
6) CEPHALO ARM/CEPHALOSTAT ASS’Y (X-CALIBER CM ONLY) ................
SECTION FOUR : POST-INSTALLATION CALIBRATION
1) LINE VOLTAGE AND LINE VOLTAGE REGULATION ....................................
2) TUBE CURRENT ...................................................................................................
3) EXPOSURE TIME ..................................................................................................
4) X-RAY FIELD SIZE AND ALIGNMENT .............................................................
APPENDIX ONE : CERTIFICATION ..............................................................................20
10
10
11
14
15
15
16
17
18
18
19
4
6
7
8
9
9
9
APPENDIX TWO : LAYOUT & FUNCTION OF CONTROLS .....................................21
APPENDIX THREE : CIRCUIT DIAGRAM ...................................................................22
APPENDIX FOUR : PARTS LIST ....................................................................................23
CAUTION !
This manual provides information and instructions for the installation, assem-
bly, calibration and certication procedures for the “X-CALIBER” panoramic
x-ray.
The instructions contained in this book should be thoroughly read and under-
stood before attempting to install the “X-CALIBER” unit. After the installation
is completed, file this manual and refer back to it when performing periodic
maintenance.

- 4 -
SECTION ONE : TECHNICAL DATA
[1] ELECTRICAL AND RADIATION DATA
1. Maximum rated peak tube potential .............. 90 kVp
2 Rated peak tube potential ...............................
3 Rated tube current ...........................................
4 Rated line voltage ...........................................
5 Line voltage range ..........................................
6 Range of line voltage regulation .....................
7 Maximum rated line current ...........................
8 Exposure time .................................................
15 sec. at TMJ mode
0.3 - 3.2 sec. (15 steps) at cephalometric mode
9 Minimum ltration .........................................
10 Focal point measurement ..............................
11 S. I. D. ...........................................................
1650 mm at cephalometric mode
NOTE :
Effective focal spot size ................. 0.5 mm X 1.0 mm
60 - 90 kVp (5 kVp in 7 steps)
10 mA
120 VAC
110 - 130 VAC
1 - 3 %
10 A at 90 kVp, 10 mA
12 sec. at panoramic mode
2.6 mmAl
1.0 mm X 1.0 mm
490 mm at panoramic & TMJ mode
12 Duty cycle .....................................................
NOTE :
13. Leakage technique factor ..............................
NOTE :
14. Film size .......................................................
15. Magnication rate .........................................
16. Tomographic orbit Single axis, continuous rotation
17. Nominal roentgen output at the end of beam limiting device*
a. Panoramic mode: 2.3 R/12 sec.
b. TMJ mode : 2.9 R/15 sec.
NOTE :
The exposure time in panoramic mode is 12 sec., therefore, 3 min. interval
or “Non Use” period requires the user to wait before making another expo-
sure. Because of the 15 sec. exposure time in TMJ mode, 3.75 min. waiting
time must be allowed after each series of 2 exposures.
0.63 mA is maximum rated continuous current for 10 mA with a duty cycle of 1 : 15.
40% at 90 kVp, 10 mA
±
40% at 90 kVp, 10 mA
±
at the distance of 450 mm from focal spot
1:15 (refer to NOTE below)
90 kVp, 0.63 mA
6 inch X 12 inch
1.25

18. Half value layer*
a. Approx. 3.3 mmAl equiv. at 90 kVp
b. Approx. 2.4 mmAl equiv. at 60 kVp
19. Maximum deviation of tube potential and tube current*
a. Tube potential : the selected kVp
b. Tube current : 10 mA
*NOTE :
20. Timer accuracy : ±5 %
21. Measurement basis of technique factors
a. Peak tube potential
The potential difference across the x-ray tube during the conducting half cycle and results
in an accuracy tolerance of ±15 %, as stated below:
From 0 - 0.3 sec., kVp may vary +35/-45 %
b. Tube current
The average mA value during a complete power line cycle, results in an accuracy tolerance
of ±10 %, except as stated below:
From 0 - 0.09 sec., mA may vary +150/-100 %
Approx. variation may be realized to measurement instrumentation, manu-
facturing tolerances, age, installation variables and use history.
10 %
±
15 %
±
From 0.1 - 0.19 sec., mA may vary +100/- 75 %
From 0.2 - 0.3 sec., mA may vary + 35/- 45 %
c. Exposure time
Impulse time is directly related to power line frequency.
Exposure time applies from the beginning of rst conducting line impulse to the end of last
impulse, results in an accuracy tolerance of ±5 %.
- 5 -

- 6 -
[2] MAJOR PARTS IDENTIFICATION
9
3
4
7
6
2
5
1
8
10
14
20
22
12
13
11
17
16
18
19
15
24
23
21
25
27
34
26
33
32
31
29
28
30
35
36
ID No. DESCRIPTION ID No. DESCRIPTION
1 Column Assembly 19 Ear Holding Rod (TMJ)
2 Column 20 Holding Rod Adjuster Knob
3 Top Cover 21 X-ray Head Assembly
4 Wall Bracket 22 Exposure Switch
5 Counterweight 23 Power Supply Cable
6 Sliding Unit Assembly 24 Base Plate (Option)
7 Sliding Unit Body 25 Cephalostat Arm
8 Electro-Magnetic Lock Switch 26 Electro-Magnetic Lock Switch
9 Driving Unit Cover 27 Ear Holding Rod Adjuster Knob
10 Rotation Unit Assembly 28 Ear Holding Rod (Cephalo)
11 Reset Switch 29 Forehead
12 Cassette Holder Assembly 30 Cassette Holder
13 Shield Plate 31 Cassette Holder Knob
14 Cover for Controller 32 Cassette Position Lock
15 Chinrest Assembly 33 Cassette Position Scale
16 Chinrest 34 Cephalostat Assembly
17 Chinrest Adjuster Knob 35 Beam Limiting Device
18 Head Holding Rod (Panorama) 36 Rotation Lock

[3] PHYSICAL DIMENSIONS
17.1"
435
mm
55.5"
1,410
mm
59.1"
1,500
mm
91.3"
2,320
mm
37.0"~70.9"
940~1,800
mm
42.0"
1,066
mm
33.3"
846
mm
59.1"
1,500
mm
240˚
- 7 -

- 8 -
[4] TUBE HEAD THERMAL CHARACTERISTICS
0
0
1 2 3 4 5
100000
200000
300000
400000
500000
1. Tu b e h ou s i n g c oo l in g c u rv e
3. M ax i mum ra t in g c h ar t
2. A no d e t he r ma l c h ar a ct e ri s ti c s c u r ve
H E A T S T O R A G E I N H U
T U B E C U R R E N T I N m A
H E A T S T O R A G E I N H U
T I M E I N H O U R S
0.1
0.5 0.7
1 5 7 10
T I M E I N S E C O N D S
T I M E I N M I N U T E S
0
0 2 4 6 8 10
5000
10000
15000
20000
25000
30000
35000
0
5
10
15
20
25
70kV
80k
V
90k
V
100k
V
A. INTERVAL BETWEEN EACH EXPOSURE
The temperature inside of the tube head rises when an exposure is made.
The value of the heat generated is measured in Heat Units (HU), which is the product of tube potential, tube current and exposure time. Excessive heat may damage
the x-ray tube, high voltage generator or both.
B. DUTY CYCLE
To avoid the accumulation of excessive heat in an effort to prolong the tube head
life, a cool down interval of 3 min. at panoramic mode or 3.75 min. at TMJ mode
must be allowed between each exposure.
C. TUBE HEAD COOLING CURVE

SECTION TWO : PRE-INSTALLATION INSTRUCTIONS
[1] CERTIFIED COMPONENT COMPATIBILITY
[2] SUPPORT REQUIREMENTS
1) The X-CALIBER unit must be securely bolted to the oor with 3/8 inch diameter fasteners
appropriate to the oor construction (lag screw into concrete, etc.)
NOTE :
2) Upper bracket must be attached to wall studs with minimum of two 5/16 x 3 inch lag
screws. Pre-bore holes with a maximum 3/16 inch diameter.
If studs are not available at the appropriate installation point of if stud wall construction is
not used, a rigid structure capable of supporting 100 lbs. pull out must be provided.
NOTE :
3) Screw slots are oversized to allow for positioning/levelling. Appropriate washers must be
used on all fasteners.
IN GENERAL, MAJOR STRUCTURAL MODIFICATIONS ARE NOT REQUIRED. HOWEVER THE FLOOR ON WHICH THE X-CALIBER CM IS
PLACED SHOULD BE ABLE TO SUPPORT 600 lbs. DEAD LOAD.
DO NOT USE THIS UNIT WITHOUT CORRECT BRACING.
[3] ELECTRICAL REQUIREMENTS
1) POWER SUPPLY
The X-CALIBER panoramic x-ray will operate on a power supply of 120 + 10 VAC. A three wire
GROUNDED circuit, separately connected to the central distribution panel with an over current
protection device rate for 20 amperes. Recommended wire size is 12 AWG. But if the wire run
distance is to exceed 50 feet, 10 AWG is required. For wire run distance in excess of 75 feet, upto 125 feet, 8 AWG is required. Line voltage regulation must exceed 3 % at 12.5 amps.
2) All connections, workmanship and materials used must comply with the national Electric Code
and local codes.
- 9 -

- 10 -
[4] LOCATION OF COMPONENTS
NOTE :
When determining the location for the X-CALIBER unit, the following radiation requirements concerning operator’s positioning must be considered.
The operator must:
1. Have full view of the patient.
2. Have full view of the technique factors before the exposure begins.
3. Be a minimum of 6 feet away from the source of radiation.
4. Be out of line of the useful beam of radiation or be positioned behind a protective device with
x-ray protection equivalent of 1 mm of lead.
Considering the conditions above, determine the correct location for the installation of the X-CAL-
IBER unit.
STATE AND LOCAL REQUIREMENTS SUPERSEDE GUIDE LINES INDICATED
BELOW.
SECTION THREE : INSTALLATION INSTRUCTIONS
Within the installation and calibration procedures are inspection/test steps which the installer
must perform to insure that the installation meets the manufacturer’s specications. These
steps are identied as “TEST” steps on the following pages.
[1] INSTALLATION REQUIREMENTS
1) TOOLS
* Standard tool kit
* Metric allen keys
* Jeweler’s screw driver
2) INSTRUMENTS
* Digital multimeter with an accuracy of 1%, capable of measuring 150 VAC and 20
mA DC, and capable of indicating true RMS value within one second
(Fluke 8026B or equivalent)
* Voltage impulse counter, capable of registering 1 to 999 half wave primary voltage
impulses at a rate of 60 per second over a range of 90 to 100 Vrms 60 Hz

[2] COLUMN/COUNTERWEIGHT ASSEMBLY
Column
Bottom Cover
Sliding Unit
Rear-side Cover
Sliding Unit
Column
Steel Rod
Lower Hole
Upper Hole
Covers
Counter Weight Frame
Column
1) Lay the column face up as shown, sup-
porting it with approximately 6" of lumber
covered with cloth, at the top end.
Put the bottom cover over the column and
slide it down all the way to the bottom of
the column.
2) Remove rear-side cover plates of sliding
unit by loosening three screws on each
plate, then slide the sliding unit over the
column and move it downward.
3) Turn the column face down as shown.
Insert the steel rod (provided) into lower
hole on column sides.
NOTE:
There are two pairs of holes on
the column sides. At this point, steel rod
should be inserted lower holes.
Remove rear cover of column.
4) Rem ove two covers of counterw eight
frame, and insert the counterweight frame
into column half the way.
- 11 -

- 12 -
5) Attach wire cable to the top of counterweight frame with two blocks as shown.
Wire Cable
Wire Cable
Counter Weight Frame
Counter Weight Frame
Blocks
Blocks
Cover
Adjusting Weight
Counter Weight
Steel Rod
Counter Weight
Frame
Cover
Adjusting Weight
Counter Weight
Steel Rod
Counter Weight
Frame
6) Push down the counterweight frame until it hits the steel rod, and set the counterweight
and adjusting weights in the upper box of the frame. Attach one cover of counterweight
frame.
7) Pull up the counterweight frame by pulling wire cable so that lower box of the counter-
weight frame meets the cutout on the column.
Set the counterweight and adjusting weights in lower box of the frame. Attach the other
cover of counterweight frame.
8) Pull out the steel rod from lower holes and insert it into upper holes.
Push down the counterweight frame until it hit the rod.

9) Attach wall bracket on top of the column.
Column
Wall Bracket
Pulley Assembly
Rear Cover
Sliding Unit
Column
Rear Side Cover
10) Attach pulley assembly on top of the column, and pass the wire cable of counterweight
over the pulleys.
11) Slide down the sliding unit until wire cables are fully extended.
12) Attach rear cover of column and two rear side cover plates of sliding unit.
13) Erect the column and mount it on the oor.
- 13 -

- 14 -
[3] ROTATION UNIT ASSEMBLY
Hook
Sliding
Unit
Rotation Unit
Carriage Holder
Sliding Unit
Electrical Connector
Bolt
Taper Pins
Rotation Unit
Carriage Holder
Rotation Unit Ass'y
1) By holding carriage holders with two
men, hook the rotation unit ass’y onto
the sliding unit.
NOTE:
To make this job easier, it is
recommended to pull down the sliding
unit, and reinsert the steel rod into up-
per hole so that counter weight frame
rests on the steel rod (sliding unit stays
at lower position).
2) Pull out the electrical connectors from
the sliding unit, and lead cable through
the hole on rotation unit body.
3) Insert taper pins with a hammer.
NOTE:
When knocking taper pins, be
sure the nut on each pin is fully loos-
ened.
4) Take the carriage holders off the rota-
tion unit assembly.

[4] CHINREST ASSEMBLY
Chinrest Ass'y
Connector
Wire
Slot
Chinrest Ass'y
Chinrest
Head Holding Rod
(for PANORAMA)
Head Holding Rod
(for T.M.J.)
Bite Piece
Connector
Top Cover
1) Connect cables from the sliding unit with
the cable in chinrest assembly by connec-
tors.
2) While pulling the wires through front lower
slot, attach chinrest ass’y to the sliding unit.
Insert the wires into the slot.
3) Install the chinrest in place.
[5] CONNECTION OF WIRES
1) Electromagnetic lock
Place the top cover of column, then connect cable to
the connecter at top rear of column.
2) In rotation unit
Cables from sliding unit must be connected as follows;
(a) C o nnecto rs “C N 16”, “ CN17” , “CN24 ” and
“CNX2” should be connected to corresponding
terminals on CN Board B.
(b) Connector “CNL”, “CNB”, “CNb1” and “CNb2”
are to be connected to the connectors of same I.D..
- 15 -

- 16 -
[6] CEPHALO ARM/CEPHALOSTAT ASSEMBLY
Cephalo Arm
Set Screws
Screws
Supporting Rod
Cassette Holder
Screws
Cephalo Arm
Taper Pin
CNb1
1) Cephalo arm
(a) Attach the cephalo arm to the side
of sliding unit with three screws
[Do not fully Tighten].
(b) Insert two taper pins (w/nut).
(c) Tighten three screws rmly.
(d) Connect cables by connectors
CNb1.
2) Cephalostat assembly
(a) Insert two supporting rods of
ceph alo s tat in t o t he hole s of
cephalo arm from underneath as
far as they go, then x them with
four set screws.
(b) Attach cassette holder with two
screws.

SECTION FOUR : POST-INSTALLATION CALIBRATION
SW 3
TE ST CE
SHE E T S W.
CPU B OAR D
O
F
F
VN ( ) - VL ( )
R = = x 100 = %
VL ( )
No-load line voltage VN [VAC] = (VAC)
Loaded line voltage VL [VAC] = (VAC)
Calculation of line voltage regulation : R = (VN - VL) √ VL x 100
1
2
1 2
2
3
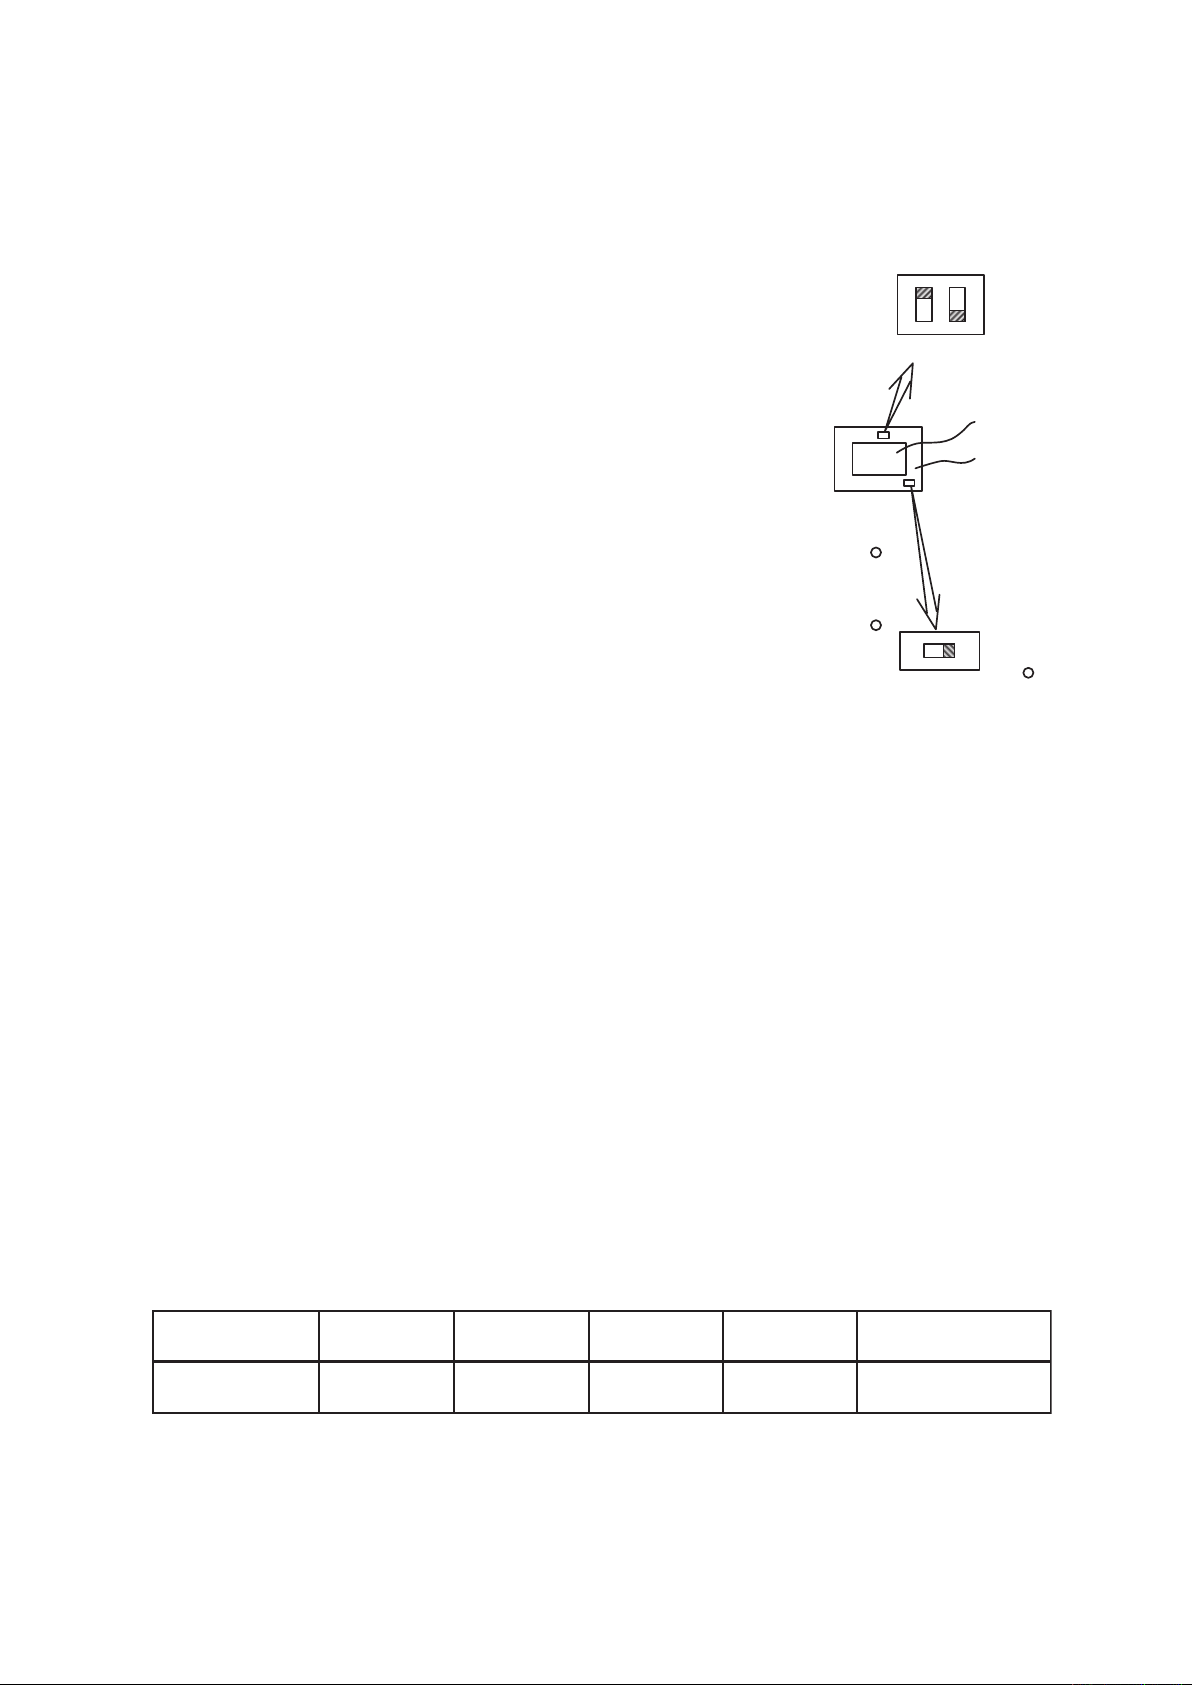
[1] LINE VOLTAGE AND LINE VOLTAGE REGULATION
1. Make sure the main power switch is OFF.
Remove the top cover of the driving unit.
2. Select a range in excess of 150 VAC of multimeter. Connect
probes of the meter to the terminal L1 and L2 of the connector
marked CN L on the CN BOARD C. (See gure right)
3. Set switch marked “TEST” of the Dip SW3, which is located
on CPU BOARD, to ON position.
4. Turn ON the main power switch.
5. Select 90 kVp and depress the ready switch on the control
panel.
6. Record the no-load line voltage (VN), indicated by the multimeter before exposure, into line (1) below.
7. Make an exposure and record the loaded line voltage (VL)
indicated by the multimeter during exposure into the line (2)
below.
8. Calculate line voltage regulation (R) in % by substituting VN
and VL values in the formula below. [Insert in item (3) below.]
R = (VN - VL) ÷ VL x 100
NOTE:
LINE REGULATION MUST NOT EXCEED 3%. IF
IT IS GREATER THAN 3%, THE SIZE OF POWER
SUPPLY WIRES MUST BE INCREASED. REFER
TO THE POWER SUPPLY REQUIREMENTS OUTLINED ON PAGE 7 TO DETERMINE THE CORRECT WIRE SIZE.
9. Set the switch marked “TEST” of the Dip SW3 to OFF position.
10. Put the driving unit cover back on.
[INSERT VALUE BELOW ]
- 17 -
- 18 -
[2] TUBE CURRENT
SW 3
TE S T ��CE
SHEE T S W.
CPU B O A R D
CP+
CPI
JPI
CP-
OFF
Se t ti n g s 0.3 0. 5 0. 8 3. 2 un i t: s e c o n d
Li m it 18 ±2 30 ±2 48 ±3 19 2 ± 5 un i t: p u l s e
1. Make sure the main power switch is OFF.
2. Select a range in excess of 20 mA DC of multimeter. Connect
probes of the meter to the check points CP+ and CP- of the CPU
BOARD. Set JP1 switch to the OFF position.
3. Set the switch marked “TEST” of the Dip SW3, which is located
on the CPU BOARD, to ON position.
4. Turn ON the main power switch.
5. Select 75 kVp and depress the ready switch on the control panel.
6. Point the x-ray head away from all personnel.
7. Make an exposure and record a mA indication on the multimeter
during exposure.
NOTE:
8. Select 90 kVp and make an exposure and record the reading again.
9. Select 60 kVp and make an exposure and record the reading again.
10. Make sure all readings are within the range of 10 ±1 mA DC.
11. Set the switch marked “TEST” of the Dip SW3 to OFF position,
and set JP1 to ON position.
12. Put the cover for the controller back on.
ALLOW 3 MINUTES COOLING TIME BETWEEN
EXPOSURES.
[3] EXPOSURE TIME
1. Make sure the main power switch is OFF. Remove the top cover of the rotation unit.
2. Connect probes of the voltage impulse counter to the check point CP T1 and CP T2 of the
POWER BOARD.
3. Turn ON the main power switch.
4. Depress the reset switch.
5. Select 75 kVp and depress the ready switch on control panel.
6. Make an exposure at panoramic mode, allowing the rotation unit to cycle fully to auto
stop position.
7. Make sure the registered reading is within the range of 720 ±36 impulses.
NOTE:
8. Repeat the procedures 4 thru 6 at TMJ mode.
9. Make sure the registered reading is within the range of 900 ±45 impulses.
NOTE:
10. Depress the Cephalometric mode switch, select 75 kVp and make exposures at 0.3sec.,
0.5sec., 0.8sec., and 3.2sec..
11. Read the reading of the voltage impulse counter and make sure the reading are within the
ALLOW 3 MINUTES COOLING TIME BETWEEN EXPOSURES.
ALLOW 3.75 MINUTES COOLING TIME BEFORE NEXT STEP.
following limits.
12. Put the top cover of the rotation unit back on.

[4] X-RAY FIELD SIZE AND ALIGNMENT
A. Panoramic mode
1. Set the panoramic cassette onto the panoramic cassette holder.
NOTE:
2. Turn the Main power switch ON and depress the Reset switch.
3. Select 60 kVp and depress the cephalo switch on the control panel to select the exposure
time of 0.3 Sec.
4. Depress the ready switch and make an exposure of 0.3 sec.
5. Develop the lm.
6. Make sure that the radiation eld dose not extend beyond any edge of the slit of the
shield plate and the dimension is not greater than 15 x 150 mm.
B. Cephalometric mode
7. Set the cephalometric cassette onto the cephalo cassette holder.
NOTE:
8. Engage the Rotation lock to secure the Rotation unit in cephalometric position.
9. Depress the ready switch and make an exposure of 0.3 sec. at 60 kVp.
10. Develop the lm.
11. Make sure that the radiation eld dose not extend beyond any edge of the lm.
T-MAT G FILM SHOULD BE LOADED.
T-MAT G FILM SHOULD BE LOADED.
- 19 -

- 20 -
APPENDIX ONE : CERTIFICATION
FOR FDA USE ONLY
a. NAME OF HOSPITAL, DOCTOR OR OFFICE WHERE INSTALLED
a. THIS REPORT IS FOR ASSEMBLY OF CERTIFIED COMPONENTS WHICH ARE(Check appropriate box(es))
b. INTENDED USE(S)(Check applicable box(es))
c. THE X-RAY SYSTEM IS (Check one) d. THE MASTER CONTROL IS IN ROOM
e. DATE OF ASSEMBLY
(mo.) (day) (yr.)
STATIONARY
MOBILE
a. THE MASTER CONTROL IS
f. SELECTED COMPONENTS
f.
(Enter number of each installed in appropriate blocks)
b. CONTROL MANUFACTURER
c. CONTROL MODEL NUMBER
a. PRINTED NAME b. SIGNATURE c. DATE
d. COMMENTS
Complete the following information for the certified components listed below which you installed. For beam limited device, tables and CT gantries the manufacturer and Model number in the
indicated spaces. For other certified components, enter in the appropriate block how many of each you installed in this system.
b. CONTROL SERIAL NUMBER
OTHER CERTIFIED COMPONENTS
X-RAY CONTROL
HIGH VOLTAGE GENERATOR
VERTICAL CASSETTE HOLDER
TUBE HOUSING ASSEMBLY
(Medical)
DENTAL TUBE HEAD
DATE MANUFACTURED
DATE MANUFACTURED
DATE MANUFACTURED
DATE MANUFACTURED
DATE MANUFACTURED
MODEL NUMBER
MODEL NUMBER
MODEL NUMBER
MODEL NUMBER
MODEL NUMBER
MANUFACTURER
MANUFACTURER
BEAM
LIMITING
DEVICE
TABLES
CT
GANTRY
MANUFACTURER
MANUFACTURER
MANUFACTURER
CRADLE
FILM CHANGER
IMAGE INTENSIFIER
SPOT FILM DEVICE
OTHER (Specify)
c. SYSTEM MODEL NAME (CT Systems Only)
A NEW INSTALLATION
EXISTING (Certified)
EXISTING (Non-certified)
ANGIOGRAPY
TOMOGRAPHY (Other than CT)
GENERAL PURPOSE FLUOROSCOPY
GENERAL PURPOSE RADIOGRAPHY
CHEST
CHIROPRACTIC
MAMMOGRAPHY
UROLOGY
PODIATRY
DENTAL - INTRAORAL
DENTAL - CEPHALOMETRIC
HEAD - NECK (Medical)
REASSEMBLY - MIXED SYSTEM (Both certified and uncertified components)
REASSEMBLY - FULLY CERTIFIED SYSTEM
NEW ASSEMBLY - FULLY CERTIFIED SYSTEM
AN ADDITION TO AN EXISTING SYSTEM
REPLACEMENT COMPONENTS IN AN EXISTING SYSTEM
CT WHOLE BODY SCANNER
CT HEAD SCANNER
DIGITAL
OTHER (Specify in comments)
C - ARM FLUOROSCOPIC
RADIATION THERAPY SIMULATOR
DENTAL PANORAMIC
b. STREET ADDRESS
c. CITY d. STATE
e. ZIP CODE
a. COMPANY NAME
b. STREET ADDRESS
c. CITY
e. ZIP CODEf. TELEPHONE NUMBER
d. STATE
From Approved: OMB No. 0910-0213
Expiration Date: December 31, 1992
See reverse for OMB statement.
D
XXXXXX
f. TELEPHONE NUMBER
1. EQUIPMENT LOCATION
3. GENERAL INFORMATION
4. COMPONENT INFORMATION
(If additional space is needed for this section use another form, replacing the preprinted number
Number and complete items 1,4, and 5 only)
5. ASSEMBLER CERTIFICATION
FORM FDA 2579(7/92)
PREVIOUS EDITION IS OBSOLETE
White Copy - FDA, HFX490 , 5600 Fishers :Lace, Rockville, MD 20857
2. ASSEMBLER INFORMATION
DEPARTMENT OF HEALTH AND HUMAN SERVICES
PUBLIC HEALTH SERVICE
REPORT OF ASSEMBLY
OF A DIAGNOSTIC X-RAY SYSTEM
FOOD AND DRUG ADMINISTRATION
I affirm that all certified components assembled or installed by me for which this report is being made, were adjusted and tested by me according to the instructions provided by the
manufacturer(s), were of the type required by the diagnostic x-ray performance standard (21 CFR Part 1020), were not modified to adversely affect performance, and were installed in
accordance with provisions of 21 CFR Part 1020. I also affirm that all instruction manuals and other information required by 21 CFR Part 1020 for this assembly have been furnished to the
purchaser and within 15 days from the date of assembly, each copy of this report will be distributed as indicated at the bottom of each copy.
1
1
Belmont Equipment Corp.
Location of Control Box
Belmont Equipment
X-Caliber-C
X-Caliber CM-B

APPENDIX TWO : LAYOUT & FUNCTION OF CONTROLS
2
1
6
8 3 4
5
7
9
CE
DN
UP
DN
UP
RESET
READY
OFF
ON
POWER
EXP OSURE
TMJ
INDICATOR
seckV
WA RN I N G
THIS X-RAY UNIT MAY BE
DANGEROUS TO PATIENT AND OPERATOR UNLESS
SAFE EXPOSURE FACTORS AN D OPE RATING
IN ST RUC TIO N ARE O BS ERV ED
BELMONT
10 mA
LAYOUT OF CONTROLS
(1) MAIN POWER “ON” AND “OFF” SWITCHES
Depressing POWER “ON” switch will turn the main power ON.
NOTE:
Indicators show standard conditions of 75 kVp and 12 Sec. when the main power is
turned ON.
(2) kVp “UP” & “DOWN” SWITCHES
Tube potential can be adjusted by depressing “UP” or “DN (Down)” switch between 60 and
90 kVp by 5 kVp increment or decrement.
(3) RESET SWITCH
Depressing this switch moves x-ray head assembly and cassette holder to the starting position for panoramic or TMJ radiography.
NOTE:
The switch located on the rotation arm has the same function. Refer to page 4, I.D.
No.11.
(4) READY SWITCH
Depress this switch after all the radiographing conditions are set, lm cassette is mounted
and patient is properly positioned.
An exposure can be made after the indicator lamp ashes three times and stays lit.
READY switch should be activated again after rst exposure of TMJ radiography.
NOTE 1:
READY switch turns ON only when the x-ray head assembly and the cassette
holder are at starting position.
NOTE 2:
Ready status will be cancelled unless an exposure starts within 15 seconds. (If you
are making an exposure after 15 seconds, depress READY switch again.)
NOTE 3:
READY switch will not function for 15 seconds after the main power switch is
turned ON.
(5) TMJ SWITCH
TMJ radiography can be made by depressing this switch.
(6) INDICATOR SWITCH
By depressing INDICATOR switch, following three beam lines are available for
50 seconds.
1) Median Line
2) Frankfort Line
3) Focal Trough Line
(7) EXPOSURE INDICATOR
This lamp will remain illuminated while
x-ray is being generated.
(8) CEPHALOMETRIC SWITCH (MODEL
X-CALIBER CM ONLY)
By depressing this switch, cephalometric
mode can be selected.
(9) SEC. “UP” & “DN” SWITCHES
Exposure time can be adjusted by de-
pressing “UP” or “DN” switch.
- 21 -

- 22 -
P
S P11
1
1
5
S
P
1 2
21
CNTH(2P)
(2P)
(2P)
S
P
S
P
S
P
S
P
PA
CE
SW
S
S
P
1
1
S
P
1
1
S
P
S
P
S
P
(0.3mm
2
)
STYLE1638 X 2
STYLE1007 x 4
CIRCUIT :818-41272
PCB :308-02093
ASSY :408-05230-03
4
5
5
5
5
9
4
9
9
4
9
5
5
7
ASSY:408-06037
PCB:308-02039
CIRCUIT:818-41271
CIRCUIT:818-31256
PCB:308-02097
ASSY:408-05236-02
CIRCUIT:818-31256
PCB:308-02097
ASSY:408-05236-02
CIRCUIT:818-41258
PCB:308-02255
ASSY:408-05847
CIRCUIT:818-41258
PCB:308-02255
ASSY:408-05847
CIRCUIT:818-21255
PCB:208-01730
ASSY:408-05885
CIRCUIT:818-31254
PCB:308-02267
5
7
4
4
(0.3mm
2
)
(0.5mm
2
)
(0.5mm
2
)
(1.25mm
2
)
(1.25mm
2
)
STYLE1638 X 2
(0.3mmm
2
)
STYLE1638 X 2
(0.3mm
2
)
STYLE1638 X 6
4
4
2
4
4 4
BOARD
3
2
10
3
2
2
1
44
4
4
2
6
S
P
321
321
(3P)
CNS1
2 2
2 2
P
1
S
CNK2
(2P)
1
P
1
S
(2P)
CNK1
1
7
5
SW
K-BR
14
13
4
4
STYLE1638 X 2
12V
5
5
(6P)
99
7
BOARD
7
CN BOARD B
7
7
5
7
555
5
4
4
4
4
4
2
(2P)
CNL4
(4P)
(2P)
CNL2
(3P)
CNL1
2
4
2
10
R2
STYLE1007
(1.25mm
2
)
STYLE1007
(1.25mm
2
)
STYLE1007
(1.25mm
2
)
9
1
5
2
1
2
1
CNB
K-BR
POWER ON SW
K-OF
14
13
POWER OFF
1.5kVA
230V 50Hz
POWER SUPPLY
GN/YW
GN/YW
GN/YW
GN/YW
76J
432
1
432
1
BNBLGN/YW
13A
PLUG
K-L1
14
13
CNL3
N
L
ENL
NF
LINE SW
250V,8A
CN16
CN16
CN27
CN27
200J
2
1
2
1
+
-
BRAKE
D1
H05VV-F
STYLE1007
CN16, 2
CN16, 1
CN17, 2
CN17, 1
CNX, 1
CNX, 2
CPU BOARD
ORGRBK
GY
LAMP
LAMP
LAMP
INCISOR
MEDIAN
FRANKFURT
CN6, 1
CN6, 2
CN21, 1
CN21, 3
CN21, 4
CN21, 5
CNX, 1
CNX, 2
CN6, 1
CN6, 2
CN21, 1
CN21, 3
CN21, 4
CN21, 5
CNX, 1
CNX, 2
CN6, 1
CN6, 2
CN21, 1
CN21, 3
CN21, 4
CN21, 5
CNX, 1
CNX, 2
CN6, 1
CN6, 2
CN21, 1
CN21, 3
CN21, 4
CN21, 5
CNX, 1
CNX, 2
CN6, 1
CN6, 2
CN21, 1
CN21, 3
CN21, 4
CN21, 5
CN6, 1
CN6, 2
CN21, 1
CN21, 3
CN21, 4
CN21, 5
HOUSING
X-RAY TUBE
NE
NC0C
T2
T1
818-41269
(0.75mm
2
)
2
2
CNl,3,4
CNl,1,2
CNL,3,4
CNL,1,2
CNT,1
CNT,2
CNI,1
CNI,2
CNB,1
CNB,2
CNL,2
CNL,1
(1.25mm
2
)
(0.3mm
2
)
2
1
250V,8A
STYLE1638 x 2
(1.25mm
2
)
E
(1mm
2
)
G
N
L
PULSE MOTOR
974-00048
AUTO TRANS
PTC BOARD
POWER BOARD
MOTOR
ARM
CN BOARD B
27J
CNH
2
CN10, 1
CN10, 4
CN10, 2
R1
80 X 2
R3
(40W)
20
CN10, 3
CN19, 1
CN19, 3
CN19, 2
CN27, 1
CN27, 2
SW
RESET
REMOTE
DETECTOR
POSITION
START
PA CASSETTE
DETECTOR
POSITION
START
ARM
DETECTOR
POSITION
START
EXP
MOTOR
CASSETE
CNJ
CN70J
CN72J
CN74J
CN76J
CN78J
CN70J
CN72J
CN74J
CN76J
CN78J
ASSY:408-05844
PULSE MOTOR
7
CN3
GOVGO
V
GOV
CNZ 6
CNZ 5
CNZ 4
24P
0P
12M
0M
6L
0L
78J
0J
32F
0F
16D
0D
8C
0C
4B
0B
2A
0A
3J
220J
180J
0U
15U
33S
0S
14T
0T
0R
18R
70Q
35Q
0Q
CN35, 1
CN35, 2
CN35, 3
CN18, 1
CN18, 2
CN14, 1
CN14, 2
CN33, 1
CN33, 2
CN15, 1
CN15, 2
CND, 1
CND, 2
CN35, 1
CN35, 2
CN35, 3
CN18, 1
CN18, 2
CN14, 1
CN14, 2
CN33, 1
CN33, 2
CN15, 1
CN15, 2
CND, 1
CND, 2
CN35, 1
CNF, 1
CNF, 2
CNE, 1
CNE, 2
CN35, 2
CN35, 3
CN18, 1
CN18, 2
CN14, 1
CN14, 2
CN33, 1
CN33, 2
CN15, 1
CN15, 2
CNJ, 2
CNJ, 1
CNK2, 3
CNK2, 2
CNK2, 1
CNV2, 3
CNV2, 2
CNV2, 5
CNV2, 4
CNR3, 1
CNR3, 2
CNR2, 1
CNR2, 2
CNR1, 1
CNS, 6
CNS, 5
CNS, 4
CNS, 3
CNS, 2
CNS, 1
CNR1, 2
CNV1, 3
CNV1, 2
CNV1, 5
CNV1, 4
CNN, 6
CNN, 5
CNN, 4
CNA
CNV1, 1
CNK1, 3
CNK1, 2
CNK1, 1
CNJ, 3
CNJ, 4
CNZ 1
2
CN9
CN23, 1
CN23, 3
CN23, 4
CN23, 5
CN20, 1
CN20, 2
CN20, 3
CN20, 4
CN20, 5
CN20, 6
CN20, 7
CN20, 8
CN20, 9
CN20, 10
BLRDWHYWBRVYBKGYOR
GR
CN9
CN23, 1
CN23, 3
CN23, 4
CN23, 5
964-00008
SHEET SWITCH
CN20, 1
CN20, 2
CN20, 3
CN20, 4
CN20, 5
CN20, 6
CN20, 7
CN20, 8
CN20, 9
CN20, 10
BLRDWHYWBR
VY
CN24, 1
CN24, 2
CN24, 1
CN24, 2
12
(40W)
(40W)
CNB, 2
CNB, 1
CNB, 2
CNB, 1
CNB, 2
CNB, 1
CNB, 2
CNB, 1
CNI, 2
CNI, 1
CNI, 2
CNI, 1
CNB
70J
72J
74J
(1.25mm2)
CN BOARD C
S
ISOLATION CIRCUIT
LIVE CIRCUIT
SW3
P
S
P
S
PSP
S 4
4
1 2 3 4 1 2
214321
21321
21321
S
P
33
P
2
1
P
2
1
S
2
1
S
2
1
P
2
1
S
GN/YW
230V
T 1
SW5
CNZ 3CNZ 1 (4P)
CNZ 4
SW6
961-00020-54
OHD3-55B
THERMAI GUARD
CNZ 2 (4P)
SW2
SW1
SW4
2
1
2
1
9
K-L1
1
9
K-OFF
8
12
K-L1
SW
EXP
2
1
2
1
CNX
2
1
2
1
212
1
2
1
12345
6
12345
6
2
1
BRAKESWBRAKE
CN b
CN b 1CN b 3
CN b 2
ISOLATION CIRCUIT
LIVE CIRCUIT
(0.75mm2)
(0.75mm2)
(0.75mm2)
(0.75mm2)
(1.25mm2)
(1.25mm2)
APPENDIX THREE : CIRCUIT DIAGRAM

APPENDIX FOUR : PARTS LIST
- 23 -

- 24 -
X-Caliber Major Components and Parts

- 25 -

NOTE


BELMONT EQUIPMENT CORP.
101 Belmont Drive Somerset, New Jersey 08873 U.S.A.
TEL.:(732) 469-5000 / (800) 223-1192 Fax.:(732)526-6322 / (800) 280-7504
TAKARA CO, CANADA LTD.
2076 S. Sheridan Way, Mississauga, Ont., L5J2M4, Can.
TEL.:(905) 822-2755 Fax.:(905)822-6203
Printed in Japan 0603 MA
 Loading...