

Page 1
RDU 1
530
Mode
CA
R RADIO BLUETOOTH
Manuel d»instruction
d»emploi
Français Page
1-16
English Page 17-31
Nederlands Pagina 32-46
Italiano Pagina 47-61
Deutsch Seite
62- 76
Español Página 77-92
Português P
ágina 93-107
Page 2
RDU 1530
Mode
d»emploi
CAR RADIO BLUETOOTH
1
Page 3

MMAIRE
SO
Inst
allation .......................................... 3
Retrait des vis de blocage avant
installation ............................................ 3
Installation dans tableau de bord
(forme DIN) .......................................... 3
Installation de l’appareil........................ 3
Désinstaller l’appareil ........................... 5
Installation dans ouverture DIN
arrière................................................... 5
Utilisation façade avant
.
détachable
..........................................
6
Connexion électrique......................... 7
Localisation des touches de
fonctions ............................................. 8
Utilisation basique ............................. 9
Mettre l’appareil en/hors fonction ......... 9
Retirer la façade avant de l’appareil..... 9
Ajustement du volume.......................... 9
Reglage du systeme
..............................9
Information d'affichage......................... 9
Regler l'horloge ................................... 9
Réglage égaliseur ................................ 9
Muet...................................................... 9
Utilisation du port Entrée Série Bus ..11
Sélection d’une piste .........................11
Mise en Pause d’une lecture............ .11
Balayage de lecture des pistes
Répétitio
n fonction
........................................
..
.............
.
.1
12
2
Lecture aléatoire de toutes les plages
.
................................................................................
.....
lection d'un folder (album) ............12
Sé
12
Sélection d'un piste ...........................12
Information d'affichage .................... 12
Utilisation du lecteur de cartes
mémoires.............................................12
SUPPORT MP3 DECODING MODE
...............................................................12
’utilisation du système Bluetooth.
L
..........13
Specification........................................15
Que faire en cas de disfonctionnement
..............................................................16
Affichage à cristaux liquides........................ 9
Raccordement d’un appareil auxiliaire . 10
Réinstallation des réglages d’usine
(Reset) ................................................. 10
Utilisation de la radio......................... 10
........
.
Sélection de la bande de fréquence
Recherche
d’une station....................... 10
10
Mise automatique en mémoire et
balayage des programmations...... ……10
Mise en mémoire d’une station............. 10
Utilisation du système ANS .................. 10
2
Page 4
INST
N
ALLATION
otes:
• Monter l’unité de façon à ce que sa
présence n’interfère pas avec la conduite.
• Avant d’installer l’unité définitivement,
effectuer les connexions électriques et
s’assurer que tout soit branché
correctement et que l’unité et le système
fonctionnent bien aussi correctement.
• Utiliser seulement les parties fournies afin
de garantir une installation correcte.
L’emploi de parties non autorisées
pourrait causer des mauvais
fonctionnements.
g Au cas où l’installation demanderait de
faire des trous ou d’autres modifications
du véhicule s’adresser au revendeur le
plus près.
• Installer l’unité de façon à ce qu’ elle
n’interfère pas avec les mouvements du
conducteur et ne blesse pas le passager
en cas d’arrêt imprévu, par exemple en
cas de coup de frein d’urgence.
g Ne pas installer l’unité dans des endroits
exposés aux hautes températures, à la
lumière solaire, à l’air chaud ou à la
poussière, à la saleté et aux vibrations
excessives.
INSTALLATION DIN
FRONTALE/POSTERIEURE
Cette unité peut être correctement installée
“frontalement” (installation DIN frontale
conventionnelle) ou bien
“postérieurement” (installation DIN
postérieure, en utilisant les trous pour vis
filetées sur les côtés du châssis).
Pour des informations supplémentaires,
se reporter aux instructions d’installation
ci-après illustrées.
INSTALLATION DIN FRONTALE
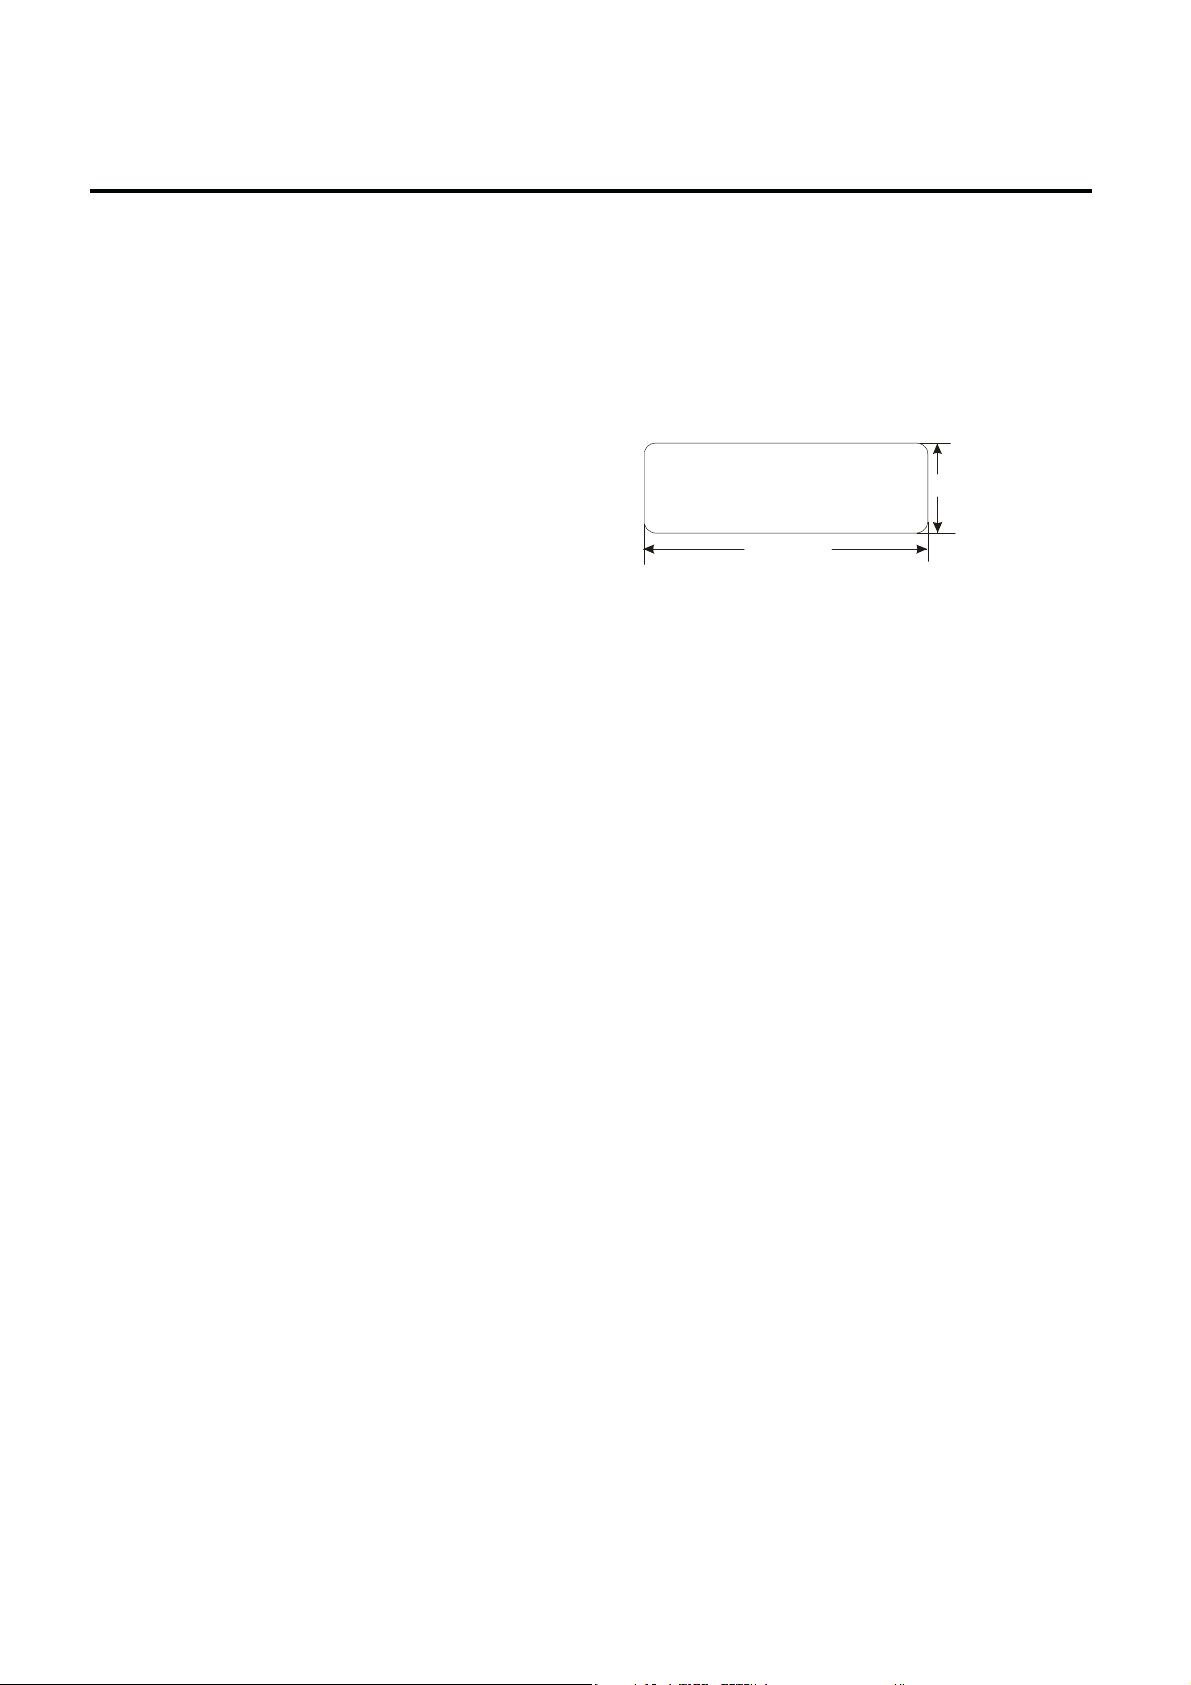
(MéthodeA)
Début de l»installation
Cette unité peut mtre installée sur tous les
tableaux de bord ayant une ouverture
comme ci-après indiqué:
53m
m
182mm
Installer l»unité
Avant tout, s’assurer que le moteur soit
éteint, ensuite suivre la procédure indiquée
ci-dessous pour installer l’unité.
1. S’assurer que le moteur soit éteint, puis
débrancher le cable du terminal negatif (-)
de la batterie.
2. Débrancher les cables électriques et
l’antenne.
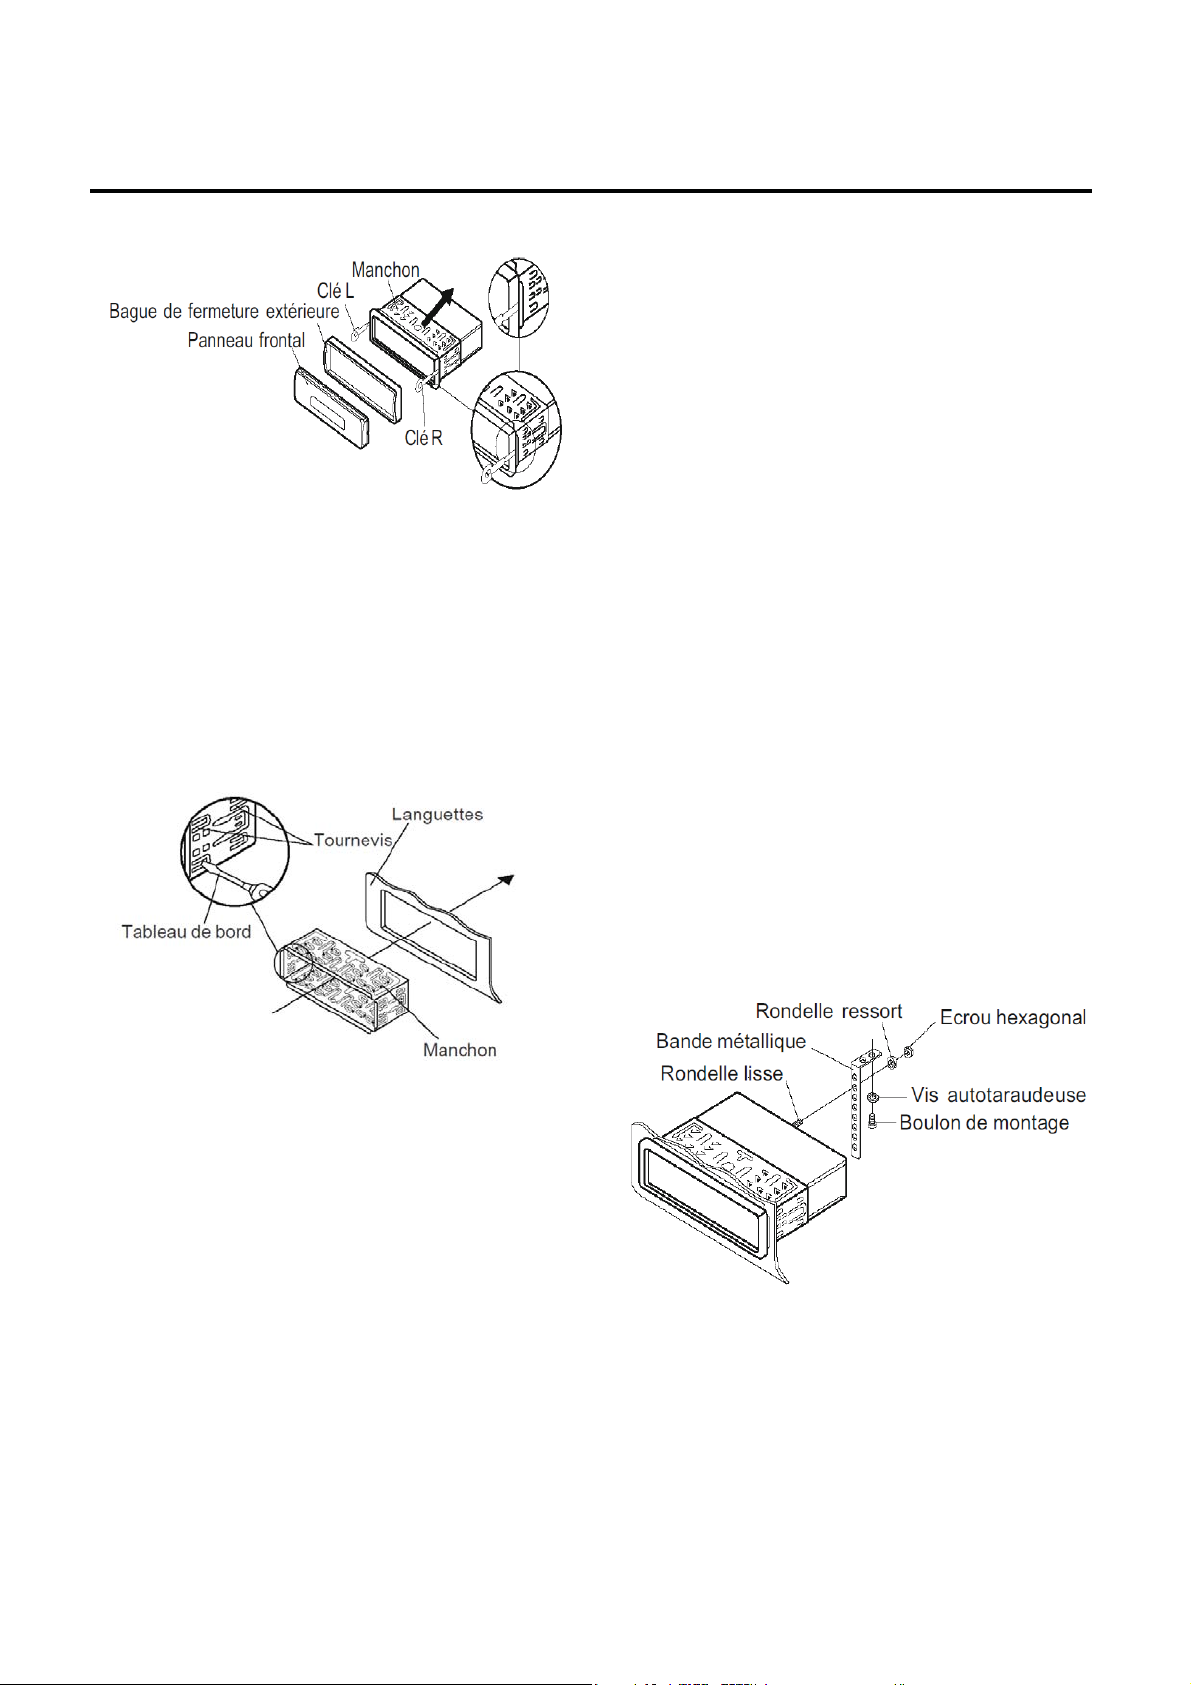
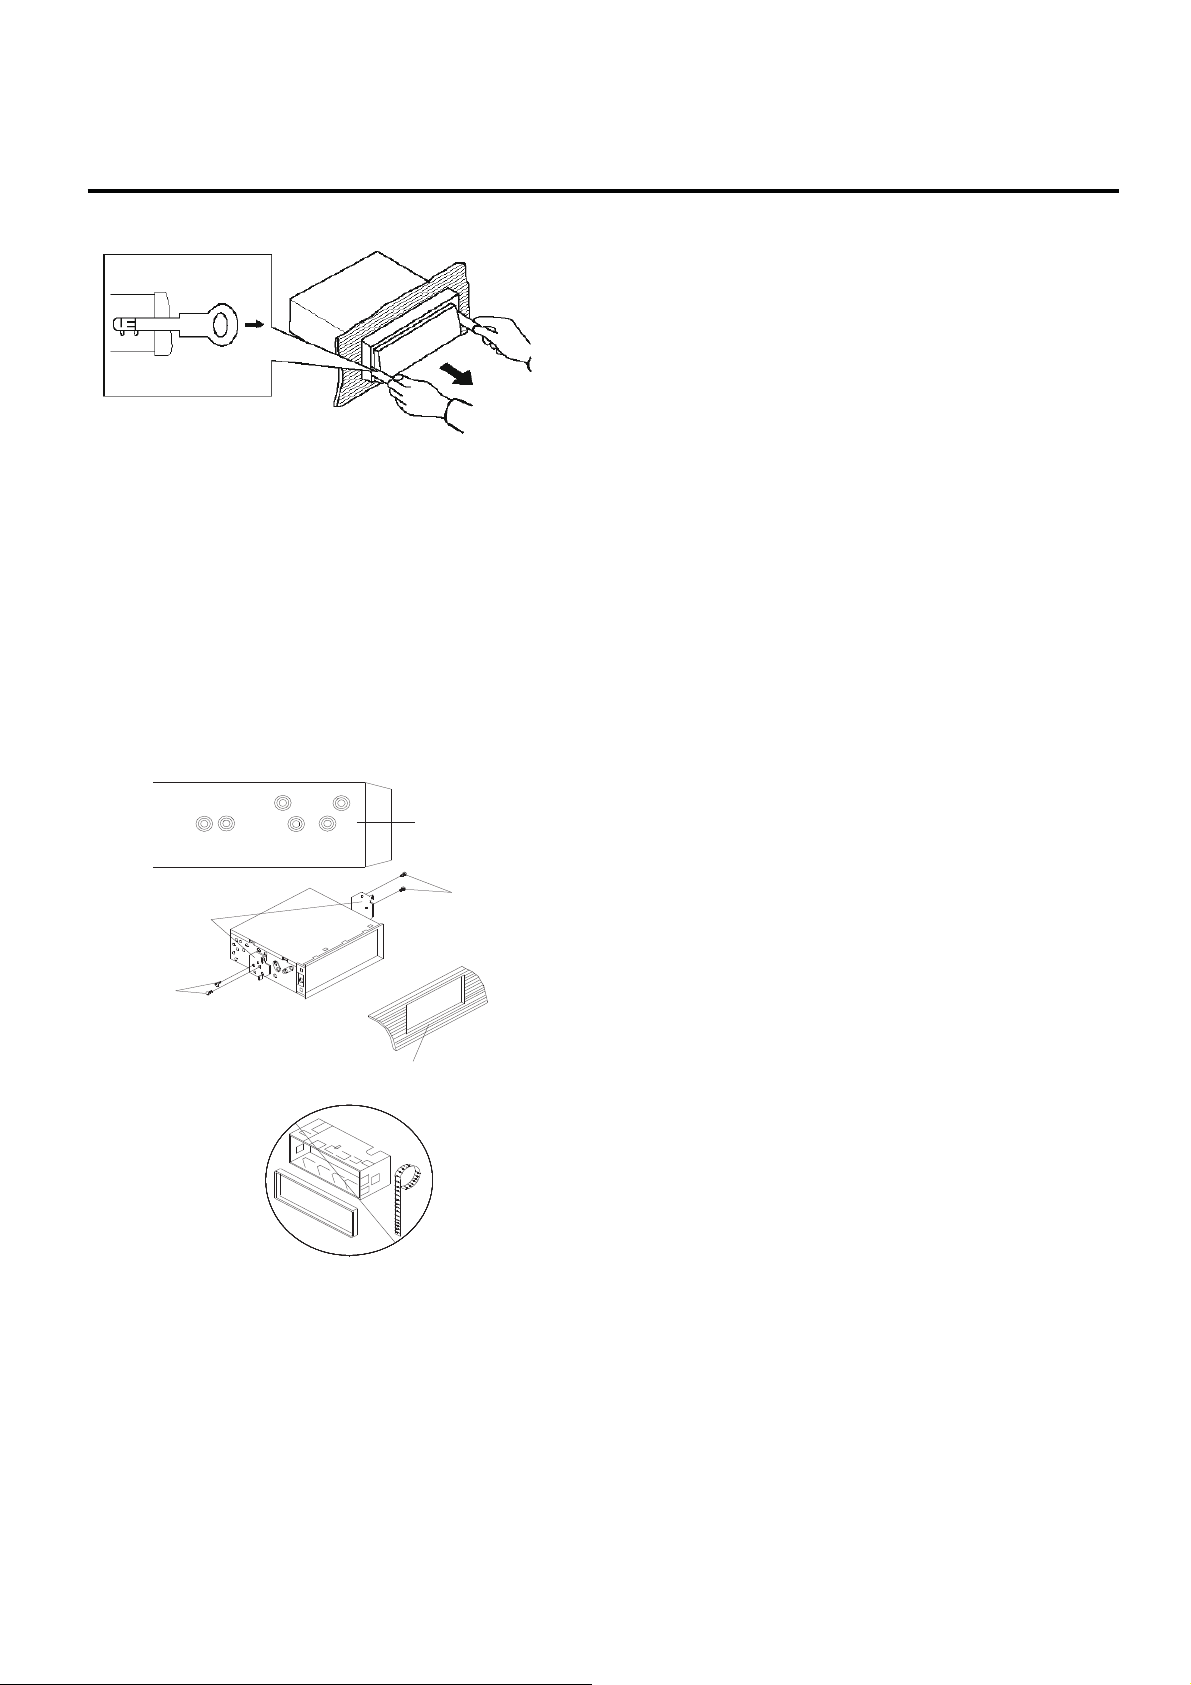
ppuyer sur la touche de relâche sur le
3. A
panneau frontal et enlever le panneau de
commande (voir “comment utiliser le
panneau frontal extractible”).
4. Soulever la partie supérieure de la bague
de fermeture extérieure et tirer vers
l’extérieur pour le retirer.
5. Les deux clés fournies permettent de
débloquer les languettes situées à
l’intérieur du manchon et de pouvoir ainsi
le retirer. Insérer les clés le plus possible
(en tenant la partie gravée tournée vers le
haut) dans les fentes spéciales situées au
centre des côtés droit et gauche de l’unité.
Faire ensuite glisser le manchon hors de
la partie postérieure de l’unité.
3
Page 5
INST
6. M
ALLATION
onter le manchon en l’insérant dans
l’ouverture du tableau de bord et soulever
les languettes situées autour du manchon
à l’aide d’un tournevis. Pas toutes les
languettes ne pourront faire contact, il
faudra donc établir lesquelles sont les
plus efficaces; les tenir donc soulevées
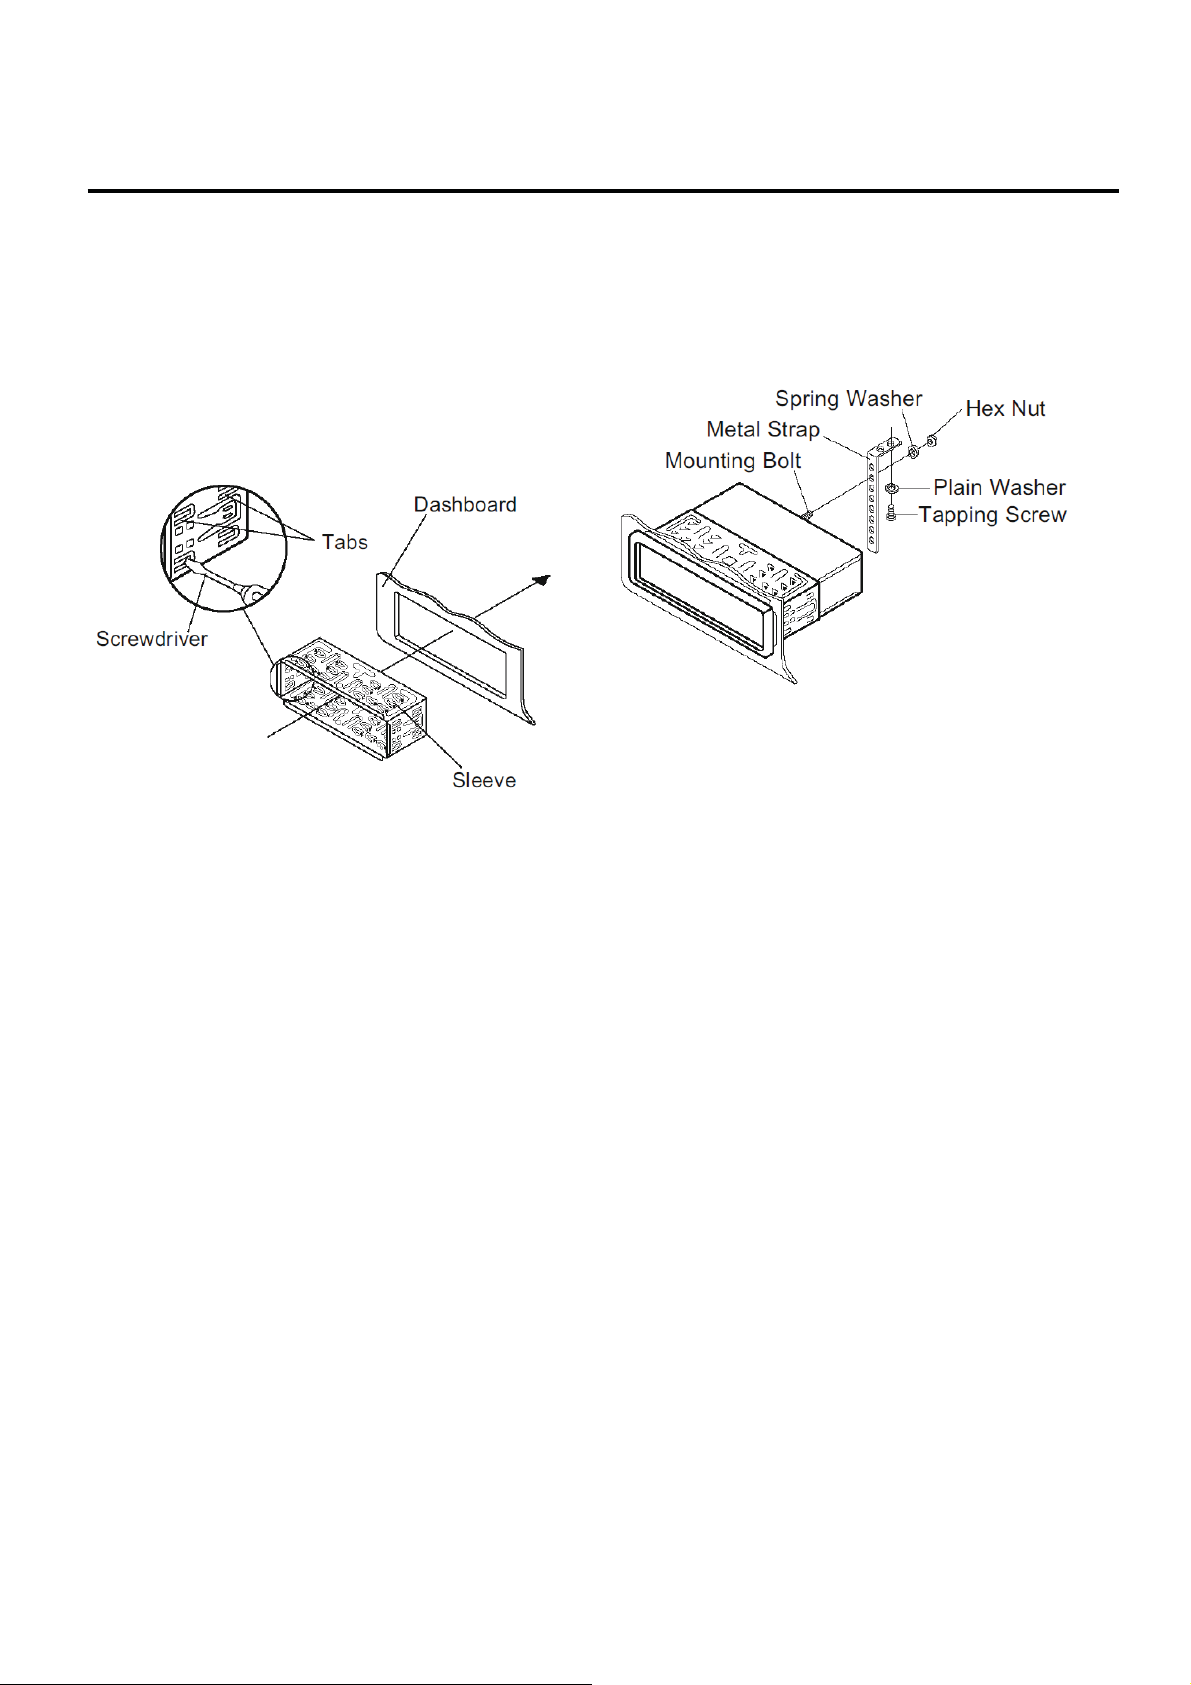
pour fixer le manchon dans le point prévu.
9. Pour fixer l’unité ultérieurement, utiliser la
bande en métal fournie afin de fixer la
partie postérieure de l’unité. Utiliser le
matériel de montage fourni (Ecrou
hexagonal (M5mm) et rondelle ressort)
pour attacher une terminaison de la
bande métallique au boulon de montage
sur la partie postérieure du véhicule. Au
cas où il serait nécessaire, soulever la
bande métallique pour adapter l’aire de
montage du véhicule. Utiliser ensuite le
matériel fourni (vis autotaraudeuse–
5x25mm et rondelle lisse) pour attacher
l’autre terminaison de la bande
métallique à une partie métallique fixe du
véhicule sous le tableau de bord. Cette
bande aide aussi à assurer une mise à la
terre adaptée.
7. Rétablir les connexions électriques,
rebrancher l’antenne et faire attention à
n’écraser aucun fil ou câble.
8. Faire glisser l’unité à l’intérieur du
manchon jusqu’à l’introduction complète.
Note: pour installer la partie terminale à filet
court du boulon de montage à la partie
postérieure de l’unité et l’autre terminal à
filet long au tableau de bord.
4
Page 6
INSTALLATION
10. Reconnecter le câble au terminal
négatif (-) de la batterie. Ensuite
substituer la bague de fermeture
extérieure et installer le panneau frontal
de l’unité (voir“comment utiliser le
panneau frontal extractible”).
Enlever l»unité
1. S’assurer que le moteur soit éteint, puis
débrancher le câble du terminal négatif(-)
de la batterie.
2. Enlever la bande métallique attachée à la
partie postérieure de l’unité (si attachée).
3. Appuyer sur la touche de relâche pour
retirer le panneau frontal.
4. Soulever la partie supérieure de la bague
de fermeture extérieure et le tirer vers
l’extérieur pour le retirer.
5. Insérer les deux clés fournies dans
les fentes spéciales situées au centre des
côtés droit et gauche de l’unité, ensuite
extraire l’unité du tableau de bord.
Aligner les trous pour les vis présentes sur
le panneau à ceux qui sont présents sur
l’unité, visser les vis (5x5mm) sur tous les
côtés.
Note: la bague de fixage extérieure, le
manchon et la bande métallique ne sont
pas utilisés pour l’installation de type B.
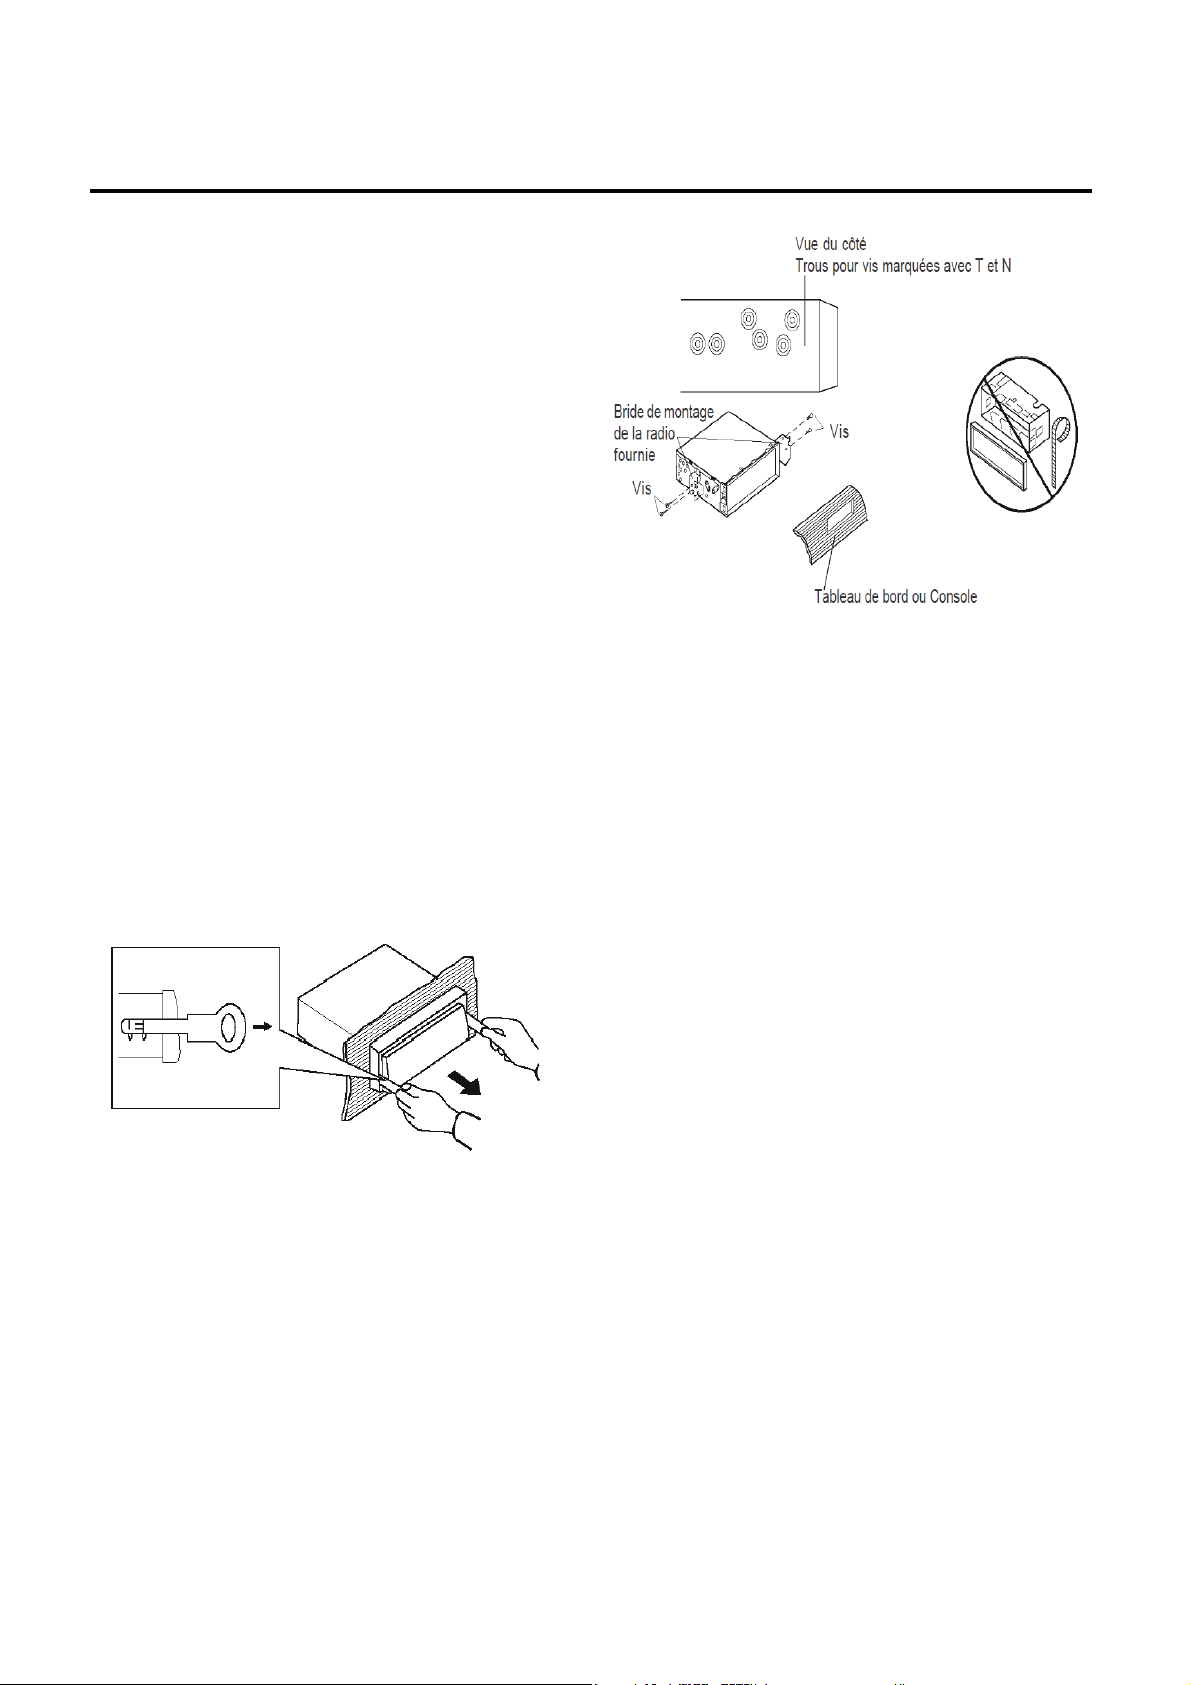
INSTALLATION DIN POSTERIEURE
(Méthode B)
Si vous possédez un véhicule Nissan ou
Toyota, suivre les instructions de montage
reportées ci-après.
Utiliser les trous pour les vis marquées avec
T (Toyota), N (Nissan) situés sur les deux
côtés de l’unité pour la fixer aux brides de
montage en dotation avec le véhicule.
Comment fixer l’unité aux brides de montage.
5
Page 7
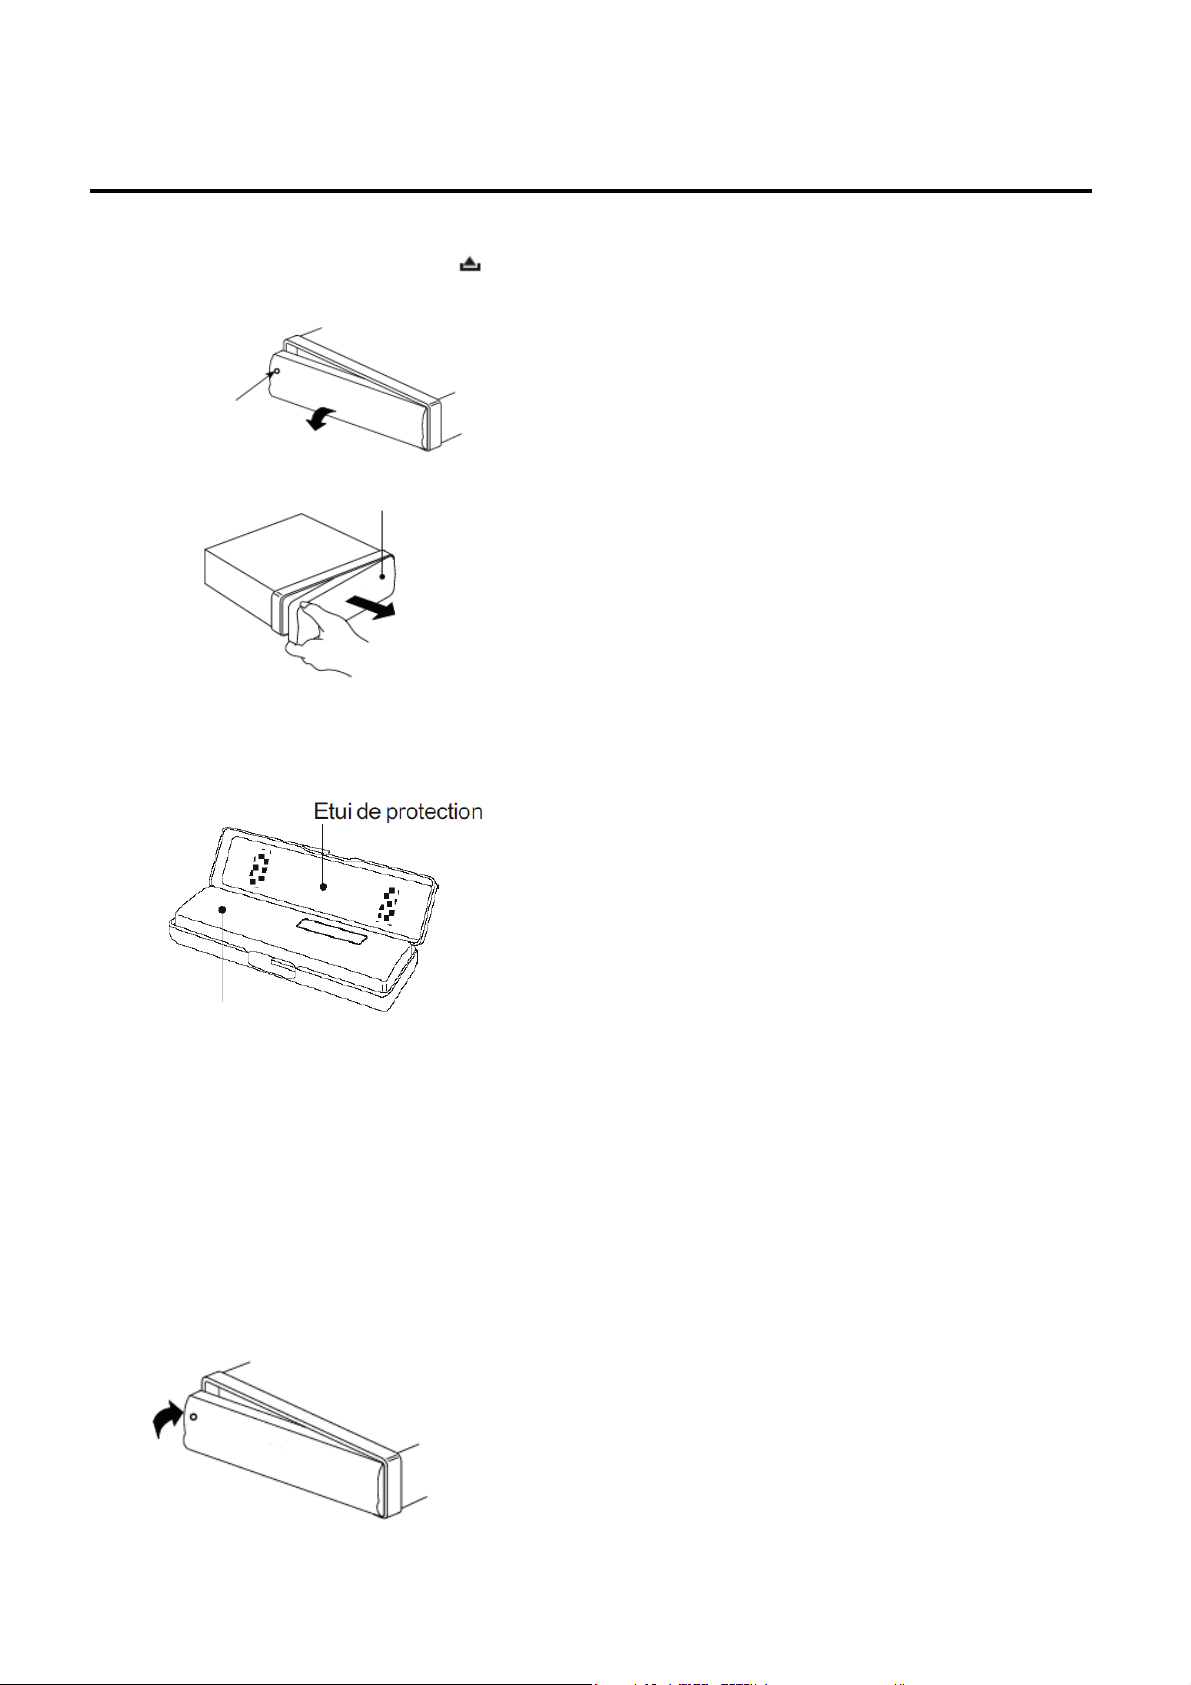
UTILISER
LA FACADE AVANT DETACHABLE
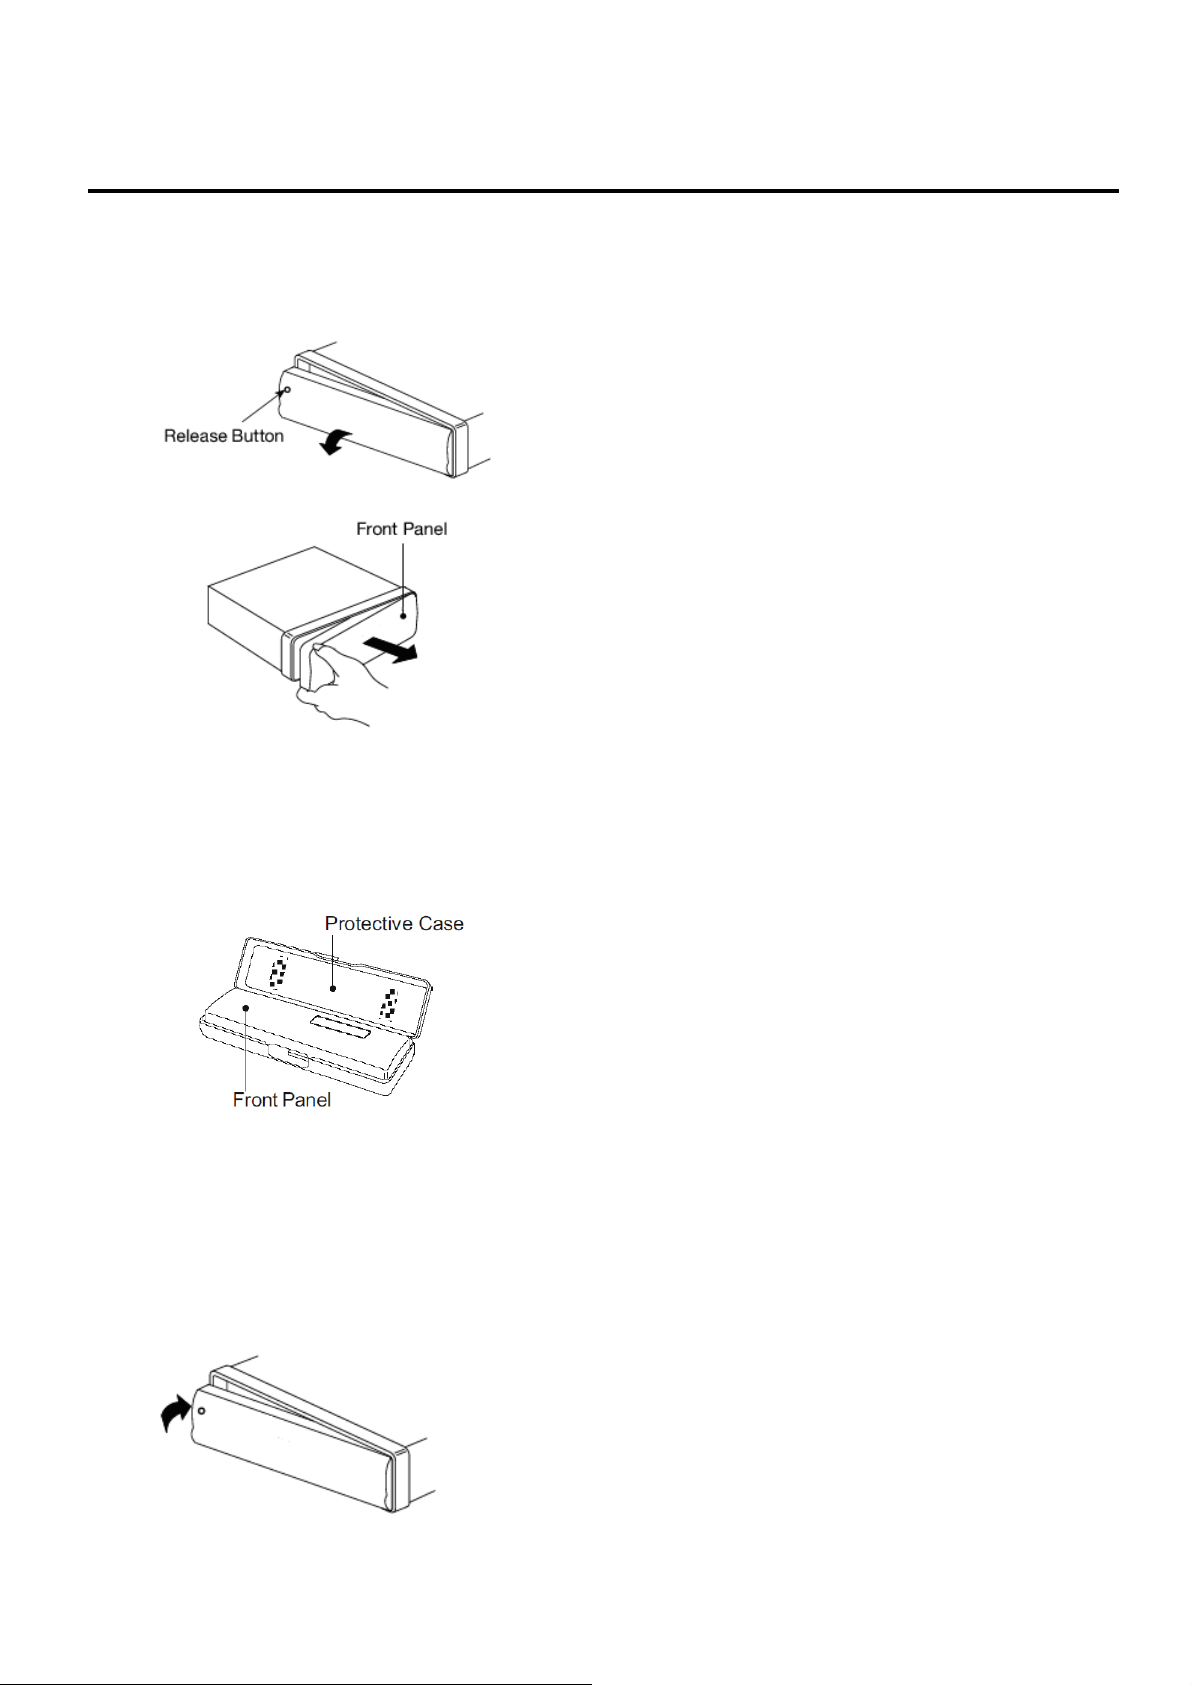
Comment enlev
1. Ap
puyer sur le bouton-poussoir ,
er la façade avant
la façade avant sera ainsi relaché.
on d’éjection
Bout
de façade
La façade avant
2. Remettre la façade avant dans l’étui
fourni tout de suite après l’avoir retiré.
Précautions dans la manipulation du
la façade avant
1. Ne pas faire tomber la façade avant.
2. Ne pas exercer une pression sur
l’afficheur ou sur les touches de contrôle
durant les phases d’enlèvement ou
d’installation du la façade avant.
3. Ne pas toucher les contacts sur la
façade avant ou sur le corps principal
de l’unité. Ceci pourrait causer des
contacts électriques faibles.
4. Faire attention à ce que les poussières et
les substances étranges n’attaquent pas
les contacts; en ce cas là utiliser un
chiffon sec et propre et les enlever.
5. N’exposer la façade avant à des
températures élevées ou à la lumière
directe du soleil en aucun cas.
6. Tenir tout agent volatile loin (par exemple
le benzène, les diluants ou les
insecticides) évitant qu’il ne rentre en
contact avec la surface la façade avant.
7. Ne pas chercher à démonter la façade
avant.
La façade avant
Comment installer la façade avant
Pour installer le panneau de commande,
insérer le panneau dans le boîtier et
vérifiez que le panneau est bien installé.
Dans le cas c
se produit sur l'écran ou certaines touches
ontraire, une anomalie
ne fonctionnent pas correctement.
6
Page 8

NNEXIONS ELECTRIQUES
CO
CONNECTEUR ISO
7
Page 9

FON
CTIONNEMENT
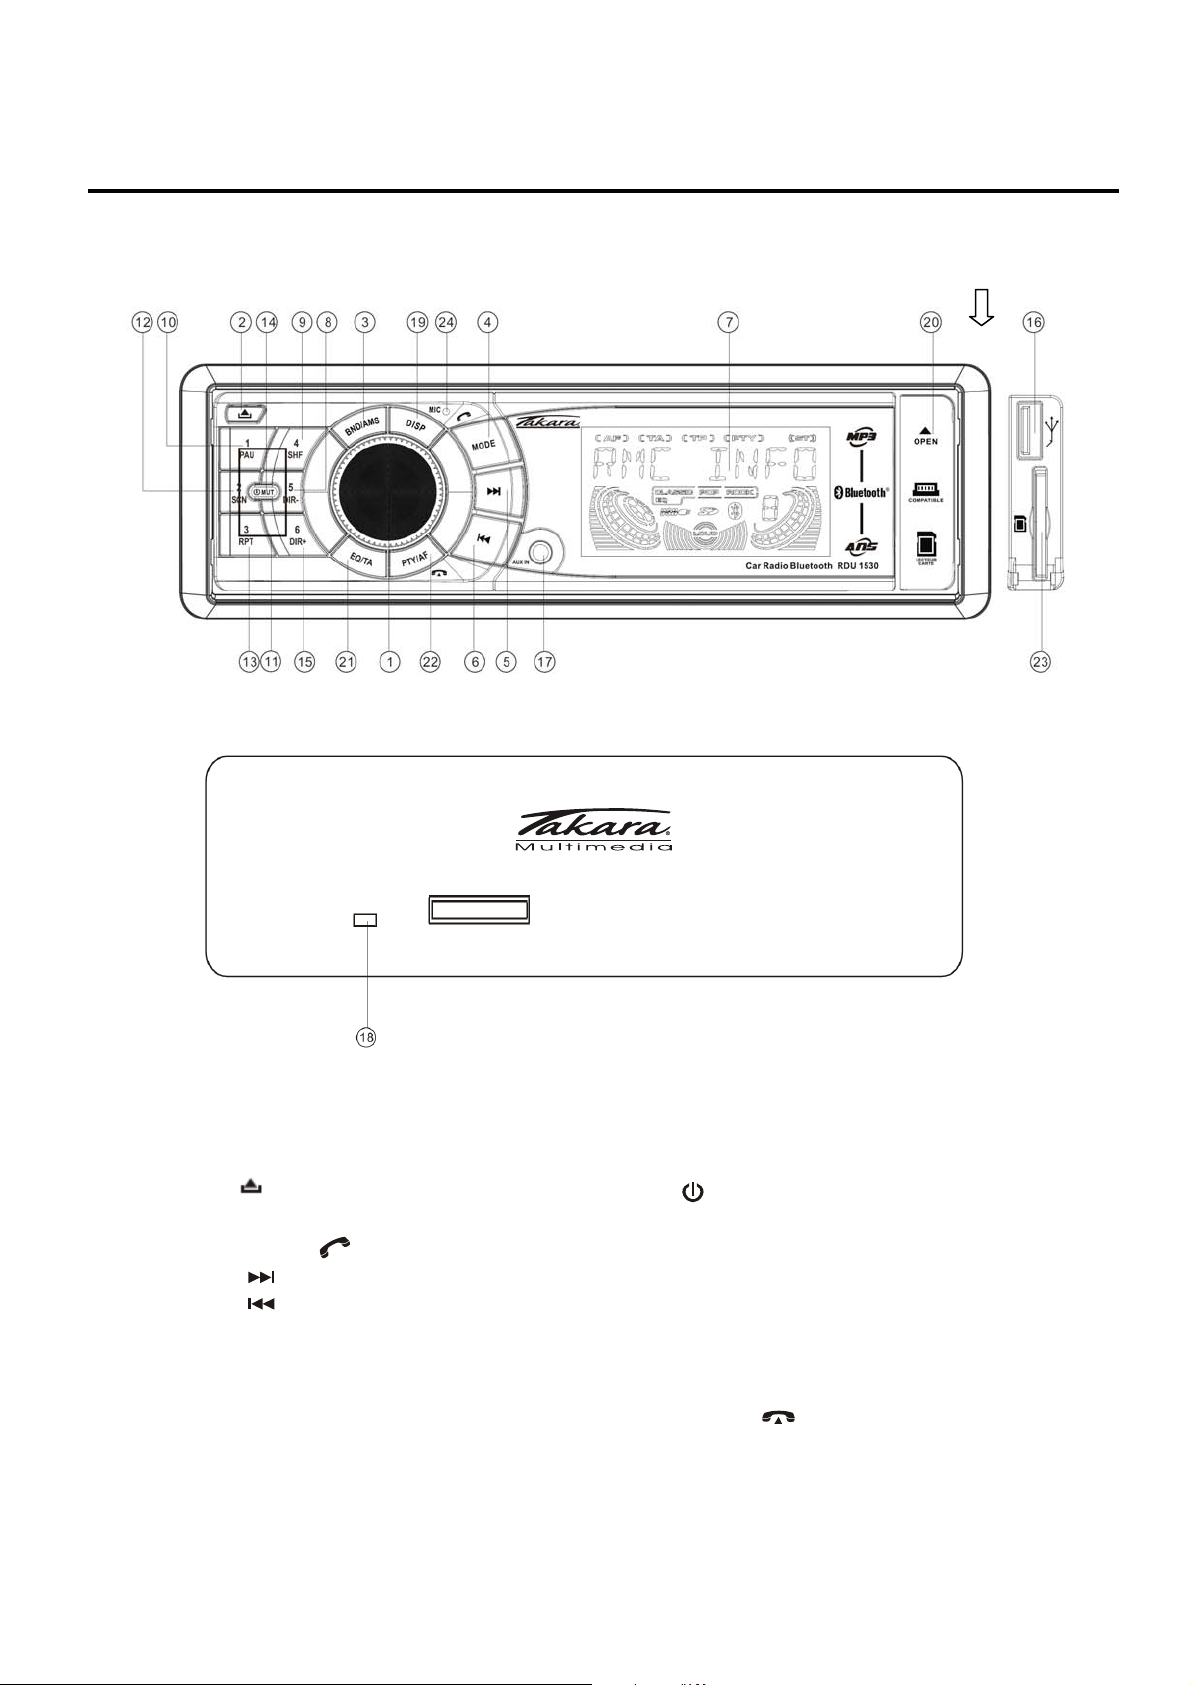
POSITION BOUTONS
ouvrez la couverture
1. bouton volume/
bouton SEL
on d’éjection de façade)
( bout
2.
3. BND/AMS
4. MODE/
5.
6.
7. LCD
8. 5 DIR-
9. 4 SHF
10. 1 P
11.
AU
Touches des Présélections 1 à 6
12. 2 SCN
13. 3 RPT
14.
15. 6 DIR+
16.
Interface Entrée Série Bus
AUX IN
17.
Touche d’annulation (RESET)
18.
19. DISP
20. ESB couverture
21. EQ/TA
22. PTY/AF/
Connexion cartes mémoires
23.
24.
Micro
/MUT
8
Page 10

FON
CTIONNEMENT
Opérat
Mise en fonction/
Appuyer sur le bouton
ions de Base.
arrêt de l»appareil.
pour démarrer
(14)
l’appareil. Quand l’appareil est allumé,
appuyez et
(
14) pour
maintenez le bouton
l’éteindre.
Retirer la façade avant amovible de
l»appareil.
Appuyez sur la touche de retrait de la façade
avant (2) pour détacher celle-ci de l’appareil.
Ajuster la puissance du volume.
Appuyer rapidement
sur le bouton (1)
SEL
pour sélectionner le mode réglage désiré. Le
mode réglage changera dans l’ordre suivant:
VOL BAS TRB BAL FAD
e) (Bass) (Treble) (Balance) (Fader)
(Volum
LOUD
En tournant le bouton volume (1) dans le
sens des aiguilles d'une montre ou dans le
sens inverse des aiguilles d'une montre, vous
pouvez ajuster la qualité de son selon votre
préférence.
LOUD: En tournant le bouton volume (1)
pour sélectionner le mode LOUD ON
(pour activer la fonction d’augmentation
de l
’effet des «basses») ou LOUD OFF.
REGLAGE DE SYSTEME.
Appuyez et maintenez le bouton SEL (1) sur
le panneau avant pour entrer dans le mode
réglage de système. Puis appuyez
rapidement sur le bouton SEL (1) pour
sélectionner l’item que vous voulez changer
et tournez le boulon volume (1) pour changer
le réglage correspondant.
AVOL
1) T
2) BEEP
Cette touche située sur le panneau avant
ON/OFF
permet d’activer/désactiver le son
«Bip»lorsqu’une touche de fonction est
activée.
3) AREA (Région) EUR/USA
Utilisez le bouton volume (1) pour régler
l’écart de fréquence de zone EUR
/USA.
4) P-VOL
Utilisez le bouton de volume (1 ) pour
sélectionner le niveau de volume lorsque
l'appareil est mis en marche.
INFORMA
Appuyez s
TION D’AFFICHAGE.
ur le bouton (19) pour passer
DISP
d’un mode d’affichage à un autre.
Appuyez répétitivement sur le bouton DISP
(19), la fréquence, l’horloge, l’information de
disque ou l’information PTY seront affichées
sur l’écran LCD.
Egalis
Appuyez sur la touche (21) pour activer
eur.
EQ
l’égalisateur et vous permettre de
sélectionner entre les 5 différents modes
proposées dans la séquence et dans l’ordre
suivant:
ėFLA
T(uniforme)ėCLASS(classique)ė POP ė ROCK
FF (retour normal)
O
ė
MUET.
Appuyez le bouton MUT
(14) afin de couper
le son. “MUTE” s’affichera sur
l’affichage. Lorsque MUTE est activé,
appuyez encore sur le bouton MUT
(14)
pour remettre le son.
Utilisez le bouton de volume (1) pour
ajuster la valeur de volume TA.
AFFICHAGE A CRISTAUX LIQUIDES
Affiche la fréquence ou le nom de la station
écoutée (7).
9
Page 11

FON
CTIONNEMENT
Connexion pour app
Un app
connecté à votre appareil par I’entrée
“Aux-In” (17) se trouvant en façade.
Après
appareils, appuyez sur la
our sélectionner le mode
p
La fonction ∫Res
La fonction RESET peut être activée pour
les différentes raisons suivantes:
- Retour au réglage d’origine.
- Lorsque les touches de fonctions ne
- Des symboles erronés sont affichés sur
Appuyez sur le bouton de la fonction
RESET à l’aide d’une pointe bic ou d’une
fine tige méallique pour activer cette
fonction.
Note:
RESET l’appareil ne fonctionne toujours
pas correctement, à l’aide d’un coton tige
très légèrement imbibé d’alcool
isopropylique nettoyez le bouton et
appuyez
Uti
Sélec
En mode radio, appuyez sur la touche
(3) afin de sélectionner la bande des
fréquences que vous souhaitez. Durant
votre sélection les bandes de fréquences
défileront dans l’ordre suivant:
Sélection d»une station.
Appuyez brièvement sur l’une des touches
recherche automatique de station. Appuyez
durant quelques secondes sur l’une de ces
areil audio portable peut être
avoir effectué
sont plus actives.
l’écran.
après avoir appuyé sur le bouton
Si
à nouveau sur le bouton.
lisation de La Radio.
tion de la bande de fréquences.
M1 FM2 FM3 MW
F
(5&6) pour activer la function de
/
areil auxiliaire.
a connexion des
l
touche (4)
auxiliaire.
etª.
MODE
BND
touches pour faire apparaître l’indication
“MANUAL”et passer donc en
recherché manuelle des stations. Si aucune
des deux touches n’est activée durant
plusieurs secondes,l’appareil revient
automatiquement en mode de recherche
automatique.
ise automatique en mémoire
M
Appuyez durant quelques secondes sur
la touche (3),
recherche alors dans toute la bande de
fréquence présélectionnée les 6 stations
dont elle capte le signal de la meilleure
qualité possible (fort et clair)et les
mémorise sous les 6 numéros des
présélections.
Lorsque le stockage de la mémoire
automatique est terminé, il entrera
en mode de numérisation prédéfini
automatiquement.
Mise en mémoire d»une station.
Après avoir trouvé votre station, presser un
des boutons de pré-sélection (1-6) pendant
plusieurs secondes,
enregistrée sur la touche sélectionnée.
U
tilisation Du Système ANS.
Fréquence Alternative
AF est une fonct
valable pour les chaînes FM. L’appareil
cherche la meilleure fréquence pour la chaîne
sélectionnée.
Appuyez et maintenez PTY/AF (22) to
activer/désactiver cette fonction.
AF est affiché: La fonction est activée et les
informations ANS sont reçues.
AF clignote: Pas d’informations ANS reçues.
AF n’est p
désactivée.
ALARM e
autoroutiéres sont reçues. Le volume
augmente à une valeur préréglée.
BND/AMS
ion ANS,
as affiché: La fonction est
st affiché: Les annonces
la radio
a station est alors
l
(AF).
il est seulement
10
Page 12

FON
T
Cert
de chaîne nommée aussi le type
programme. Vous pouvez chercher les
chaînes ayant certains genres.
Appuyez une fois sur PTY/AF (22) pour
Tournez le bouton volume (1) pour
CTIONNEMENT
ype de Programme (PTY)
aines chaînes FM transmettent en plus
sélectionner le groupe PTY.
sélectionner le programme PTY comme
suivants.
Après avoir sélectionné le programme PTY,
appuyez sur / (6&5) à la recherche.
l’app
areil commencera à chercher les
chaînes respectives et s’arrêtera lorsque
une chaîne sera trouvée. Si l’appareil ne
trouve aucune chaîne de genre respectif
PTY, “NO PTY” (PAS DE PTY) sera
affiché. La fonction PTY sera désactivée si
le genre PTY sélectionné n’est plus recu.
Lorsque PTY est activée, appuyez
encore sur PTY (22) pour désactiver la
fonction PTY.
Lect
ure via ESB.
Sur
la face avant de l’appareil se trouve la
connexion ESB (16) Vous pouvez donc
connecter une clé Entrée Série Bus à
l’appareil via cet interface. Lorsque vous
connectez une clé Entrée Série Bus à
l’appareil via cet interface, l’appareil
recherche automatiquement les différents
dossiers MP3 contenu dans cette clé et
débute immédiatement la lecture.
Si l’appareil se trouve dans un autre mode de
sélection de lecture ou en mode radio, vous
pouvez appuyer sur la touche (4) pour
sélectionner le mode ESB.
En lecture MP3 d’une clé ESB les
divers.
ction d»une plage
Séle
En appuyant brièvement sur les
touches / vous passez
immédiatement à la plage
précédente/suivante. Le numéro des
ages sont affichés sur l’écran de
pl
l’appareil. En appuyant de manière continue
MOD
E
Annonce T
Appuyez et maintenez TA (21) pour
activer ou désactiver ce mode. TA
sera affiché avec le mode activé.
En mode
automatiquement, quelque soit le mode,
I’annonce trafic. Le niveau du volume
augmentera à une valeur minimum pour
I’annonce trafic.
Lors d’une émission d’annonce trafic,
appuyez et maintenezTA (21) pour
interro
désactiver.
rafic (TA)
TA, l’appareil diffusera
mpre cette fonction sans la
sur les touches / l’appareil fera une
lecture rapide arrière/avant. La lecture
normale à vitesse normale sera reprise dès
que l’une de ces touches sera relachée.
ise en pause
M
Appuyez sur la touche PAU (10) pour
interrompre momentanément la lecture est
mise en pause.
sur la touche PAU pour reprendre
la lecture.
Appuyez à nouveau
11
Page 13

FON
CTIONNEMENT
B
alayage des lectures de toutes les
plages
Appuyez sur la touche SCN (12) pour
effectuer une lecture durant quelques
secondes du début de chacune des plages.
Appuyez une fois de
cette même touche pour stopper la
fonction et faire la lecture normale de la
plage sélectionnée.
Répétition fonction
Appuyez sur la touche RPT (13) pour faire
relire de manière continue la plage en cours
de lecture.
cette même touche pour annuler la fonction.
Lecture aléatoire de toutes les plages.
Appuyez sur la touche SHF (9) pour activer
la lecture aléatoire (ordre de lecture des
plages différents et déterminé aléatoirement
par l’appareil) de toutes les plages du
disque.
touche pour annuler cette fonction.
Sélection d»un folder (album)
Appuyez sur l’une des touches DIR- (8)
ou DIR+ (15) pour sélectionner par
defilement décroissant ou croissant les
différents albums présents sur le disque.
Si le disque necontient pas d’album il ne
sera pas possible d’utiliser cette fonction
et ces touches seront inactives.
Sélection d»une piste.
Appuyer sur la touche (3),BND/AMS
er le bouton du volume pour choisir
utilis
directement le numéro de piste. Puis
appuyer sur le bouton volume pour
démarrer la lecture.
Information d'affichage
Appuy
afficher les informations au format ID3
( titre dela plage, de l’album, nom du
ez sur la touche (19) pour
Appuyez à nouveau sur
Appuyez à nouveau sur cette même
plus sur
DISP
chanteur et autres diverse informations)
si elles sontdisponibles sur le
disque.(Cette fonction n’est active que
sur
des disques MP3).
Note:
•
L’autoradio
lire des clés ESB avec une capacité de
stockage jusqu’à 32GB. L’utilisation
d’une clé ESB avec une capacité
supérieure peut endommager
l’appareil.
ESB MP3 n’est pas un standard unique,
•
cela implique que différentes marques ou
différents modèles disposent d’un
standard qui parfois leur est propre. Ceci
explique pourquoi notre appareil ne peut
lire tous les supports MP3
• Lorsque vous connectez un clé MP3 et
que celui-ci dispose de piles normales
(piles non rechargeables), il faudra
renouveler les piles de la clé MP3 avant
de la connecter via l’interface à
l’appareil.
Le non respect de cette recommandation
importante peut faire exploser la/les
pile(s).
• Ne déconnectez pas la clé ESB de
l’appareil lorsqu’il est en cours de lecture
via l’interface ESB.
Précautions importantes
Lorsque la clé ESB contient des dossiers
importants, nous vous conseillons de ne pas
la raccorder à l’appareil pour une
lecture.
Une mauvaise opération pourrait, dans les
deux cas, effacer les dossiers contenus
dans l’un ou l’autre des supports. Nous ne
pouvons assumer la responsabilité d’une
perte dedossier.
TAKARA RDU 1530 peut
12
Page 14

FON
Lect
mémoire
L’autoradio
CTIONNEMENT
ure via connexion pour carte
TAKARA RDU 1530 peut lire
des cartes mémoires avec une capacité de
stockage jusqu’à 32GB. L’utilisation d’une
carte mémoire avec une capacité
supérieure peut endommager l’appareil.
sque vous insérez une carte mémoire
Lor
dans cette connexion, l’appareil
recherchera automatiquement les différents
dossiers MP3 contenus dans la
carte mémoire et débutera immédiatement
la lecture.
pérations et manipulations sont les
Les o
mêmes que celles décrites, ci-dessus, dans
les autres modes de lectures. Vous pouvez
également sélectionner le mode carte
enappuyant sur la touche (4) et
MOD
E
sélectionner le mode CARTES MÉMOIRES.
Si la carte contient des dossiers importants,
pour les mêmes raisons évoquées
r
ci-dessus, nous
SUPPORT MP3
ecommandons de ne pas la
l’appareil.
connecter à
DECODING MODE
L’appareil peut lire des fichiers MP3
en décodant les
St
andard
PEG1 Audio
M
Layer 3
(44.1kHz)
modes suivants.
Bit Rate
(kbps)
16~ 320 Kbp
& VBR
s
Supports
Stereo
Mode
’utilisation du système Bluetooth.
L
•
• Préparation à l’utilisation du système
••
Bluetooth.
1. Avant d’utiliser le système Bluetooth,
vérifiez que votre téléphone mobile est
compatible Bluetooth.
2. Les différents modèles de téléphone
mobiles, émettent un signal Bluetooth
quelquefois différents. Afin d’obtenir la
meilleure qualité de conversation il est
recommandé de ne pas éloigner le
téléphone mobile d’une distance
supérieure à 3 mètres de l’autoradio.
Veillez également à ce qu’il n’y aiepas un
obstacle en métal entre les deux appareils
(mobile et radio)
• COUPLAGE
1) Dans n’importe quel mode, appuyez sur
la touche (4) située sur la
MOD
E
face avant de l’appareil.
Sélectionnez l’option Bluetooth sur votre
téléphone mobile. Veuillez consulter le
mode d’emploi de votre téléphone mobile
pour sélectionner cet option.
2) Sélectionnez l’option "HW CARBT"dans
la liste des différents codes Bluetooth de
votre téléphone et entrez ensuite le mot de
passe "0000".
3) L'unité a une fonction Auto Couplage, il
recherche le téléphone portable
Blue-tooth automatiquement.
4) Lorsque la mise en phase des deux
appareils est réussie l’écran de la radio
affichera l’indication
ainsi
que le numéro du modèle de votre
téléphone.
13
Page 15

FON
5) Si la liais
RÉPONDEUR / Rejeter un Appel
Entrant
Quand un appel entrant,
b
prendre l’appel ou sur la touche (22)
pour rejeter cet appel.
Transférer un appel du téléphone mobile
vers l’appareil.
Durant la conversation, vous appuyez
durant quelques secondes sur la touche
MODE
du téléphone mobile
CTIONNEMENT
on a échoué, essayez de
coupler à nouveau dans quelques
secondes. Vous pouvez vous référer à
l'opération sur votre téléphone mobile, de
supprimer le dispositif et refaire la
réparation de nouveau.
appuyez
rièvement sur la touche (4) pour
(4) pour
transférer l’appel
vers l’appareil radio.
Note:
Dans le cas d’un transfert d’appel, la
fonction mute de la radio sera
automatiquement désactivée.
14
Page 16

SPECIFIC
ATIONS
GENERA
Al
imentation requise : DC 12 Volts, Masse négative
Controle des tonnalités
Basses (at 100 Hz) : f10 dB
Treble (at 10 kHz) : f10 dB
Puissance de sortie maximum : 4X45watts
Intensité : 15 Ampere (max.)
LECTEUR ESB/CARTE MéMOIRE
Signal : More than 55 dB
Separation : More than 50 dB
Frequence : 40Hz – 18 kHz
RADIO
Frequences Couvertes 87.5 to 108 MHz
IF 10.7 MHz
Sensibilité (S/N=30dB) 10 dBu
Séparation stéréo >25dB
L
Pour 2 Bandes Europe
FM
MW
Fr
equences couvertes 522 to 1620 kHz
IF 450
Sensibilité (S/N=20dB) 36 dBu
kHz
15
Page 17

Vérificati
A
vant de contrôler les différents points de la présente liste, vérifiez que toutes les
ons à faire en cas de ∫ panne ª
connexionssont correctement effectuées. Si le problème persiste après avoir controlé les
différents pointsde cette liste, consultez votre revendeur ou un service spécialisé en
réparation.
S
ymptômes Causes Solutions
Pas
d’
alimentation
Le contact du véhicule
n’est pas allumé.
Le
fusible a sauté. Remplacez le fusible défectueux.
Si l’appareil est correctement
raccordé au circuit d’alimentation de
la voiture et que le moteur du véhicule
ne tourne pas, placé la clé du contact
sur la position«ACC».
I
l n’y pas de son
ouches des
Les t
contrôles ne
fonctionnent pas
adio ne
La r
fonctionne pas.
Les présélections
radio ne
fonctionnent pas
La puissance volume est
sur minimum.
Les co
nnexions ne sont pas
correctement effectuées.
Le microprocesseur interne
du fait du bruit ne
fonctionne pas
correctement.
ble d’antenne n’est
Le câ
pas raccordé.
Le signal de réception est
trop faible.
Ajustez la puissance volume au niveau
qui vous convient.
Vérifiez les connexions.
ez sur la touche RESET.
Appuy
La face
correctement fixée à sa place.
Connectez le cable d’antenne
fermement.
Sélectionnez une station
manuellement.
avant de l’appareil n’est pas
16
Page 18
RDU 1
Mobile Audio System
530
CAR RADIO BLUETOOTH
17
Page 19

CON
TENTS
Inst
allation .......................................... 19
DIN Front-Mount (Method A) ................ 19
Installing the unit............................... 19
Removing the unit............................. 20
DIN Rear-Mount
Using the detachable front panel...... 20
Wiring Connection ............................. 23
Operation ............................................ 24
Location of keys................................. 24
Basic operation .................................. 25
Switching on/off the unit...................
Faceplate release .............................
Sound adjustment.............................
System setting ..................................
Display information ...........................
Set the clock .....................................
Equalization ......................................
Liquid crystal display.........................
Auxiliary input ...................................
Reset function...................................
Radio operation..................................
Switching to radio mode ...................
Selecting the frequency band ...........
Selecting station ...............................
Automatic memory storing&
(Method B) ................ 21
25
25
25
25
25
25
25
25
25
26
26
26
26
26
9
0
Previewing tracks...............................
Repeating function ............................
Playing tracks in random....................
Selecting directory up/down...............
Selecting tracks by BND/AMS button.
Display information............................
Memory Card operation......................
Supported MP3
Decoding modes.................................
Bluetooth OPERATION
Specification........................................
Trouble shooting.................................
...................
27
27
27
27
27
27
28
28
28
30
31
Program Scanning............................
Station storing...................................
ANS operation ..................................
In Serial B
Selecting tracks ................................
Pausing play .....................................
us (ESB) play operation....
26
26
26
27
27
27
18
Page 20
INST
N
• Choose the mounting location where the
• Before finally installing the unit, connect
• Use only the parts included with the unit to
g Consult with your nearest dealer if
• Install the unit where it does not get in the
g ·Avoid installing the unit where it would be
DIN FRONT/REAR-MOUNT
ALLATION
otes:
unit will not interfere with the normal
driving function of the driver.
the wiring temporarily and make sure it is
all connected up properly and the unit and
the system work properly.
ensure proper installation.
The use of unauthorized parts can cause
malfunctions.
installation requires the drilling of holes or
other modifications of the vehicle.
driver’s way and cannot injure the
passenger if there is a sudden stop, like
an emergency stop.
subject to high temperature, such as
from direct sunlight, or from hot air, from
the heater, or where it would be subject to
dust, dirt or excessive vibration.
This unit can be properly installed either f
rom “Front” (conventional DIN Frontmount)
or “Rear” (DIN Rear-mount installation,
utilizing threaded screw holes at the sides
of the unit chassis). For details, refer to the
following illustrated installation methods
DIN FRONT-MOUNT (Method A)
Installation Opening
This unit can be installed in any dashboard
having an opening as show below:
m
53m
182mm
Installing the unit
Be sure you test all connections first, and
then follow these steps to install the unit.
1. Make sure the ignition is turned off, and
then disconnect the cable from the
vehicle battery’s negative (-) terminal.
2. Disconnect the wire harness and the
antenna.
3. Press the release button on the front
panel and remove the control panel (see
the steps of “using the detachable front
panel”).
4. Lift the top of the outer trim ring then pull
it out to remove it.
5. T
he two supplied keys release tabs inside
the unit’s sleeve so you can remove it.
Insert the keys as far as they will go (with
the notches facing up) into the appropriate
slots at the middle left and right sides of
the unit. Then slide the sleeve off the back
of the unit.
19
Page 21
INST
6. M
7. Reconnect the wire harness and the
ALLATION
ount the sleeve by inserting the sleeve
into the opening of the dashboard and
bend open the tabs located around the
sleeve with a screwdriver. Not all tabs will
be able to make contact, so examine which
ones will be most effective. Bending
open the appropriate tabs behind the
dashboard to secure the sleeve in place.
antenna and be careful not to pinch any
wires or cables.
Note: to install the short threading terminal
of the mounting bolt to the back of
the unit and the other long threading
terminal to the dashboard.
10. Reconnect the cable to the vehicle
battery’s negative (-) terminal.
Then replace the outer trim ring and
install the unit’s front panel. (see the
steps of “using the detachable front
panel”).
8. Slide the unit into the sleeve until it locks
into place.
9. To further secure the unit, use the
supplied metal strap to secure the back of
the unit in place. Use the supplied
hardware (Hex Nut (M5mm) and Spring
Washer) to attach one end of the strap to
the mounting bolt on the back of the unit.
If necessary, bend the metal strap to fit
your vehicle’s mounting area. Then use
the supplied hardware (Tapping Screw
(5x25mm) and Plain Washer) to attach
the other end of metal strap to a solid
metal part of the vehicle under the
dashboard. This strap also helps ensure
proper electrical grounding of the unit.
Removing the unit
1. Make sure the ignition is turned off,
disconnect the cable from the vehicle
then
battery’s negative (-) terminal.
2. Remove the metal strap attached the back
of the unit (if attached).
3. Press the release button to remove the
front panel.
4. Lift the top of the outer trim ring then pull it
out to remove it.
5. Insert both of the supplied keys into the
slots at the middle left and right sides of
the unit, then pull the unit out of the
dashboard.
20
Page 22
INST
DIN RE
ALLATION
AR-MOUNT (Method B)
If your vehicle is a Nissan, Toyota, follow
these mounting instructions.
Use the screw holes marked T (Toyota), N
(Nissan) located on both sides of the unit
to fasten the unit to the factory radio mounting
brackets supplied with your vehicle.
T
o fasten the unit to the factory radio
mounting brackets.
Align the screw holes on the bracket with
the screw holes on the unit, and then
tighten the screws (5x5mm) on each side.
Note: the outer trim ring, sleeve and the
metal strap are not used for method B
installation.
ory Radio
Fact
Mounting Bracket
Screw
S
ide View showing
Screw Holes marked
T, N
Screw
ashboard or Console
D
21
Page 23
USING
THE DETACHABLE FRONT PANEL
To Detach the Front
1. Press the release button on the left-top
of the panel and pull off the front panel.
2. For safekeeping, store the front panel in
the supplied protective case immediately
after being removed.
Panel
Precautions when handling
1. Do not drop the front panel.
2. Do not put pressure on the display or
control buttons when detaching or
reinstalling the front panel.
3. Do not touch the contacts on the front
panel or on the main unit body.
It may result in poor electrical contact.
4. If any dirt or foreign substances adhered
on the contacts, they can be removed
with a clean and dry cloth.
5. Do not expose the front panel to high
temperatures or direct sunlight in
anywhere.
6. Keep away any volatile agents (e.g.
benzene, thinner, or insecticides) from
touching the surface of the front panel.
7. Do not attempt to disassemble the front
panel.
To Install the Front Panel
To install the control panel, insert the panel
into the housing and make sure the panel
is properly installed. Otherwise,
abnormali
keys will not function properly.
ty occurs on the display or some
22
Page 24
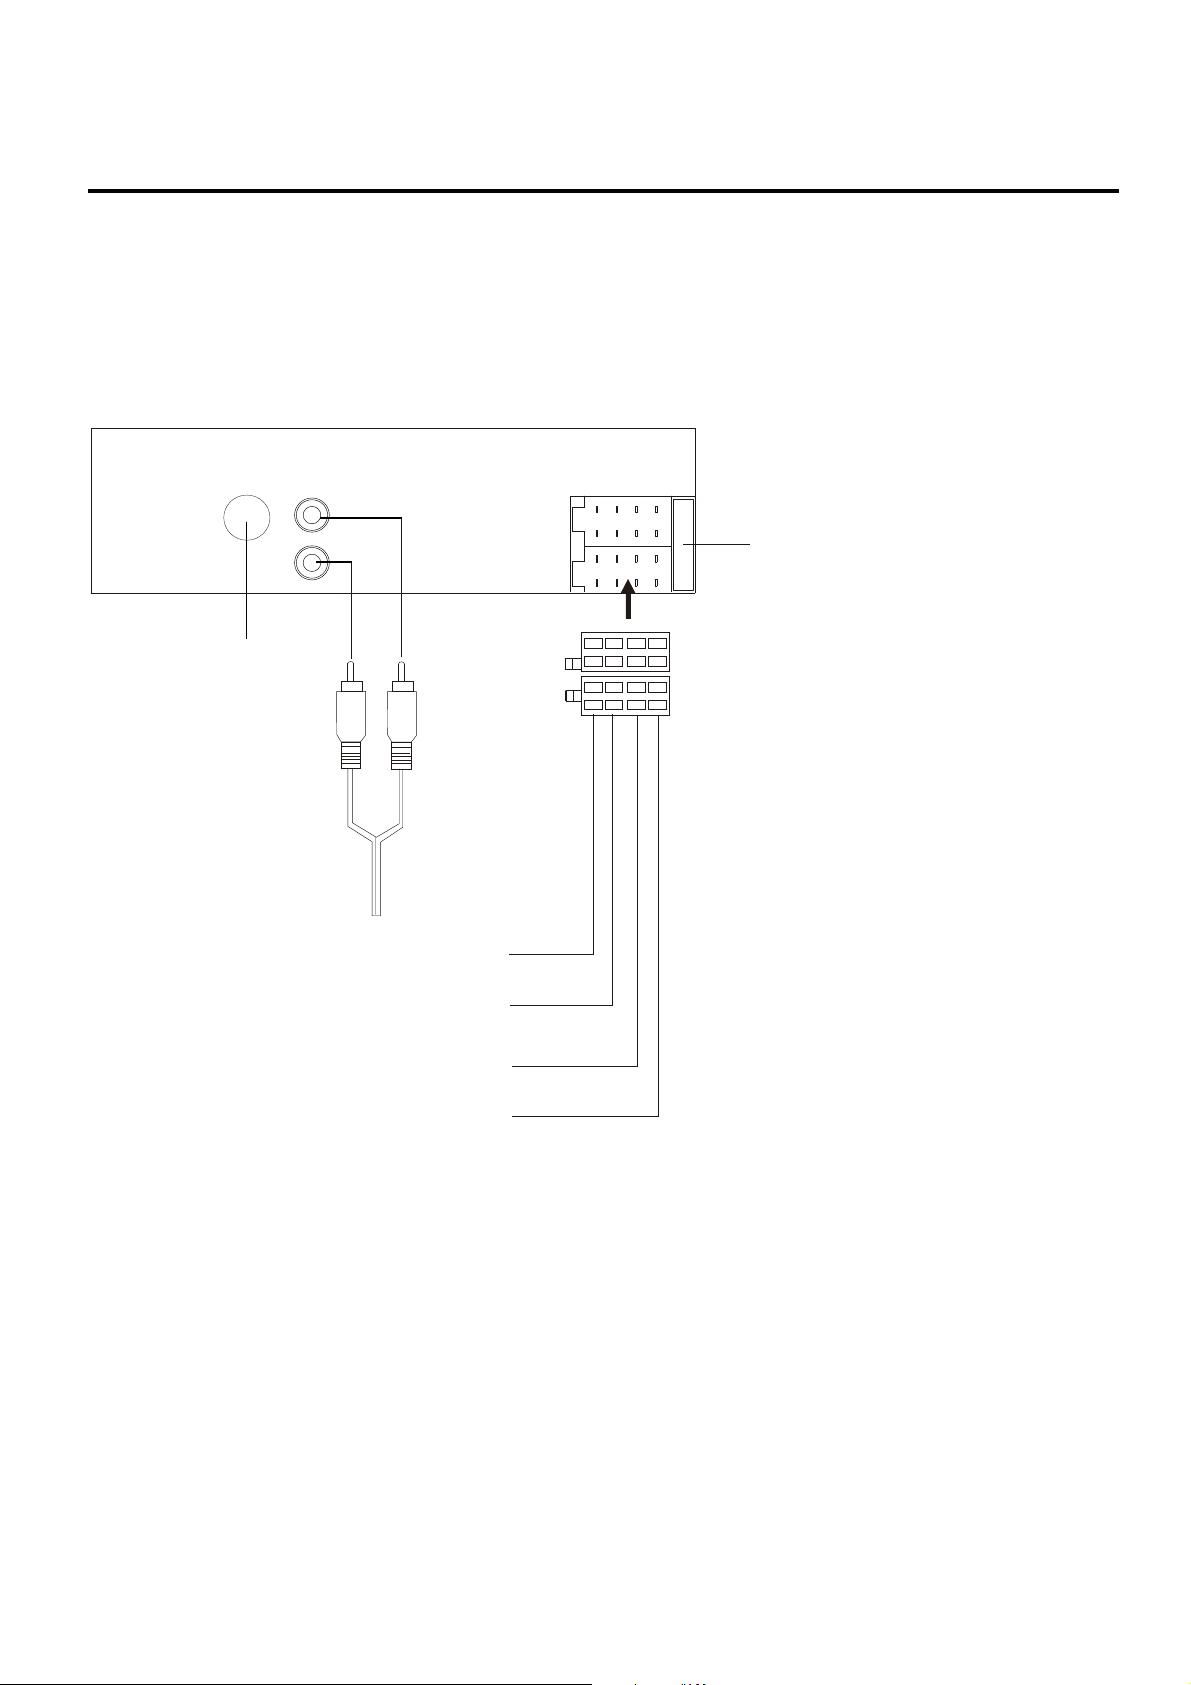
WIRING CONNE
CTION
ISO Connector
RADIO ANTENNA
FUSE(15A)
WHITE: LCH RCA
YELLOW: RCH RCA
ISO CONNECTION
YELLOW: MEMORY +12V
BLACK: GROUND
RED: +12V (TO IGNITION KEY)
BLUE: AUTO ANTENNA OUTPUT
GRAY: FRONT RIGHT SPEAKER (+)
GRAY/BLACK: FRONT RIGHT SPEAKER (-)
VIOLET: REAR RIGHT SPEAKER (+)
VIOLET/BLACK: REAR RIGHT SPEAKER (-)
GREEN: REAR LEFT SPEAKER (+)
GREEN/BLACK: REAR LEFT SPEAKER (-)
WHITE: FRONT LEFT SPEAKER (+)
WHITE/BLACK: FRONT LEFT SPEAKER (-)
(CABLES NOT INCLUDED)
23
Page 25
O
PERATION
LOC
ATION OF KEYS
Open the cover
olume knob (when rotated)
1. V
SEL button (when pressed)
2.
(release button)
3. BND/AMS button
4. MODE/
5. button
6. button
7. Liquid Crystal Display
8. 5 DIR- button
9. 4 SHF button
10. 1 P
11. 1-6 preset buttons
AU button
24
12. 2 SCN button
13. 3 RPT button
14. /MUT button
15. 6 DIR+ button
16. ESB interface
17. AUX IN
18. Reset button
19. DISP button
20. ESB cover
21. EQ/TA button
22. PTY/AF/
23. Memory card interface
24. MIC
Page 26
PERATION
O
B
ASIC OPERATION
SW
ITCHING ON/OFF THE UNIT
Press
but
ton (14) to turn on the unit.
When the unit is on, press and hold button
(14) to turn
the unit off.
FACEPLATE RELEASE
utton (2) to detach the removable
Press
b
faceplate.
SOUND ADJUSTMENT
Press SEL
button (1) shortly to select the
desired adjustment mode. The adjustment
mode will change in the following order:
VOL BAS TRB BAL FAD
(Volum
e) (Bass) (Treble) (Balance) (Fader)
By rot
ating the volume knob (1) clockwise or
LOUD
counter-clockwise, it is possible to adjust the
desired sound quality.
For LOUD item, rot
ate the volume knob (1)
to select LOUD ON (reinforce the bass
output) or LOUD OFF.
SYSTEM SETTING
Press and hold SEL button (1) on the front
p
anel to enter system setting mode. Then
shortly press SEL button (1) to select the item
you want to change and rotate the volume
knob (1) to change the corresponding setting.
1) TAVOL
Use the volume knob (1) to adjust
the TA volume value.
2) BEEP ON/OFF
Use the volume knob (1) to set Beep
sound ON or OFF.
3) AREA
EUR/USA
In radio mode, Use the volume knob
(1) to set the different area frequency
spacing.
4) P-VOL
Use the volume knob (1) to select the
volume level when the unit turns on.
DISPLA
Y INFORMATION
Press DISP button (19) to operate as the
conversion of each display mode.
Repeatedly press the DISP button (19), such
as the frequency, the clock, the disc
information or the PTY information will display
on the LCD.
SET THE CLOCK
Shortly press the DISP button (19) until the
clock is shown on the display. Then hold the
DISP button until the clock flashes. Then
press button (6) to change the minutes
and
button (5) to change the hours.
EQUALIZATION
Press EQ button (21) shortly to turn on
equalization function and to select desired
audio mode. There are several different
modes as below:
→ F
LAT → CLASS → POP → ROCK → OFF
MUTE
Press MUT button (14) shortly to mute
down the sound instantly and "MUTE"
will appear on the display.
When MUTE ON, press the
button (14) again to resume the
MUT
sound.
LIQUID CRYSTAL DISPLAY
Exhibit current frequency and active
functions on the display (7).
AUXILIARY INPUT
The unit can be connected to a portable
audio player through the auxiliary input jack
AUX IN
After finishing the
MODE button (4)
switch
(17) on the front panel.
connection, you can press
on the front panel to
he mode to t
AUX mode.
25
Page 27

PERATION
O
RESET FUNCTION
Reset
button (18) must be activated with
either a ballpoint pen or thin metal object.
The reset button is to be activated for the
following reasons:
-
Initial installation of the unit when all
wiring is completed.
- All the function buttons do not operate.
- Error symbol on the display.
If the unit doesn’t work after pressing the
reset button (18), please use a cotton swab
soaked in isopropyl alcohol to clean the
socket on the front panel.
RADIO OPERA
SWITCHING T
TION
O RADIO MODE
Press MODE button (4) shortly to select
radio mode, the radio mode appears in the
display together with the memory band and
frequency.
SELECTING THE FREQUENCY BAND
At radio mode, press BND/AMS
button (3) shortly to select the desired
band.
The reception band will change in the
following order:
F
M1 FM2 FM3 MW
SELECTING STATION
Press the button (5) and button (6)
shortly to activate automatic seek function.
Press for several seconds until “MANUAL”
appears on the display, the manual tuning
mode is now selected. Then you can shortly
press the button (5) and button (6) to
adjust the frequency manually. If both buttons
have not been pressed for several seconds, it
will return to seek tuning mode.
AUTOMATIC MEMORY STORING
Press BND/AMS button (3) for
several seconds, the radio searches from
the current frequency and checks the
signal strength until one cycle search is
finished. And then 6 strongest stations are
stored into the corresponding preset
number button.
When automatic memory storing is finished,
it will enter into preset scan mode
automatically.
STATION STORING
Press any one of the preset buttons (11) (1 to
6) to select a station, which had been stored
in the memory. Press this button for several
seconds, the current station is stored into the
number button.
ANS (ANNOUNCEMENT NAME STATION)
OPERATION
Alternative Frequencies (AF)
AF is an ANS (announcement name station)
function and is only available f
ches in the background the best
The unit
sear
or FM stations.
frequency for the selected station.
Press and hold
(22) to activate/deactivate
AF
this function. AF is displayed: Function is
activated and ANS information is
received.
AF flashes: No ANS information is
received.
AF is not displayed: Function is
deactivated.
ALARM is displayed: Emergency
announcements are received. The volume
increases to the preset value.
Program T
e FM stations transmit besides the
Som
ype (PTY)
station name also the pro-gram type. You
can search for stations with certain
genres.
Press PTY
(22) once to select the PTY
group.
Rotate the volume knob (1) to select the
PTY program.
26
Page 28

PERATION
O
Af
ter selecting the PTY program, then
press (6) or (5) to search.
The unit s
earches for the respective
stations and stops when a station is
stops when a station is found.
The PTY function is deactivated if
the selected PTY genre is no
longer received.
When PTY ON, press PTY (22) again to
cancel the PTY function.
T raffic Announcement (T A)
Press and hold
deactivate this mode.
button (21) to activate or
TA
TA is displayed
with activated mode.
In TA mode the unit automatically tunes
from any mode into a current traffic
announcement. The volume level increases
to the minimum value for traffic
announcements.
Press and hold TA (21) during a traffic
announcement to interrupt the function
without deactivating it.
ESB PLA
On the front p
Y OPERATION
anel of unit, when you open
the ESB cover (20), you will see an ESB
interface (16), you can connect a ESB driver
through this interface.
When you connect a ESB driver through the
interface, the unit will search the MP3
files and start to play it automatically. In other
modes, you can also press MODE button (4)
to select ESB mode.
SELECTING TRACKS
Press button (6) or button (5) to
move to the previous track or the following
track. Track number shows on display.
Hold
button (6) or button (5) to fast
reverse or fast forward. The play starts
from when you release the button.
PAUSING PLAY
Press PA U button (10) to pause the player.
Press it again to resume play.
PREVIEWING TRACKS
Press SCN button (12) to play first few
seconds of each track.
Press again to stop intro and listen to track.
REPEAT FUNCTION
Press RPT button (13) to continuously
repeat the same track. Press it again to
stop repeat.
PLAYING TRACKS IN RANDOM
Press SHF button (9) to play all tracks
in random order. Press again to cancel
the function.
SELECTING DIRECTORY UP/DOWN
Press DIR- button (8) or DIR+ button (15)
to select directory downward or upward.
If the MP3 file does not contain
any directory, there is no function of
pressing DIR- button (8) or DIR+ button
(15).
SELECTING TRACKS BY BND/AMS
BUTTON
Press button (3),
BND/AMS
it enters into “Searching track
directly” mode.
Use the volume knob (1) to directl
y select
the track number. Then press the volume
knob to start playing the track.
DISPLAY INFORMATION
Press DISP button (19) to show the following
information, such as the clock, ID3 TAG (if
available: song title, directory name, artist
name, other contents…) (FOR MP3 ID3
FUNCTION VERSION ONLY) and other
information.
27
Page 29

PERATION
O
Note˖˖
z
“TAKARA’s auto radio RDU 1530 can
support ESB driver with a capacit
32GB.
Use of ESB driver with higher capacity
may damage the unit.
z The main unit can only support the
standard ESB-memory device.
z ESB MP3 player is not a standard
which means different brand name or
different models have their own
standard. So our product cannot
support all MP3 players.
z When connecting an MP3 player and it
has a normal battery in the player (non
rechargeable battery), you should
remove the battery from the MP3 player
then connect it to the ESB interface.
Otherwise, it may cause battery burst.
z When in ESB play mode, be sure not to
remove the ESB driver from the ESB
interface.
MEMOR
“TAKARA’s
support memory card with a capacity up to
32GB.
Use of memory card with higher capacity
may damage the unit.
On the front of the unit, when you open
the ESB cover, you will see the memory
card interface.
When you insert a memory card i
memory card interface, the unit will search
the MP3 files in the card and
MP3 files
The operation is the same with the ESB
operation described above. If in other mode,
you can also press MODE button (4) to select
memory card mode.
Y CARD OPERATION
auto radio RDU 1530 can
st
automatically.
y up to
n the
art to play
CAUTION
When there are import
device or the memory card, do not connect
it to the main unit to play. Because any wrong
operation may cause file loss. And our
company assumes no responsibility for this.
SUPPORTED MP3
ant files in the ESB
DECODING
MODES
The main unit support
MP3 decoding
S
tandard
MPEG1 Audio
r 3
Laye
(44.1kHz)
LUETOOTH OPERATION
B
• PREPARE FOR BLUETOOTH
•
•
•
OPERATION
(1) When use Bluetoot
the mobile phone supports Bluetooth
function.
(2) For the different kind of mobile phone,
Bluetooth emissive power has some
difference. To get the best conversation
quality, it is commended that the
distance between the mobile phone and
the unit is within 3m. And please don’t
put any metal object or any obstacle
between the path of the mobile phone
and the unit.
•
PAIRING
1) Long pressing MODE button (4) to
enter paring mode. On the mobile
phone, select the Bluetooth set up.
(Please refer to the instruction manual
of your mobile phone on how to
operate Bluetooth.)
modes as below.
Bit Rate
(kbps)
16~ 320 Kbps
& VBR
s the following
Supports
Mode
Stereo
h, please make sure
28
Page 30

PERATION
O
2) “HW CARBT” should appear in the list
on your mobile phone,
“HW CARBT” and then input password
“0000”.
3) The unit has auto pairing function, it will
searching the Bluetooth mobile phone
automatically.
4) When successful paired, the Bluetooth
sign will be displayed on LCD.
5) If pairing failed, try to pair again within
several seconds. You can refer to the
operation about your mobile phone,
delete the device that just searching for
and repair again.
ANSWERING/REJECTING AN
INCOMING CALL
When a call coming, you can press
button (4) to answer the call, or press
button (22) to reject the
TRANSFE
MOBILE PHONE AND THE UNIT
During the talking mode, you can press
and hold MODE button (4) to transfer the
phone call between the mobile phone and
the unit.
Note:
If you transfer the call to mobile phone, the
mute of the present mode will be released
at the same time.
R THE CALL BETWEEN
please select
incoming call.
29
Page 31

SPECIFIC
GENERAL
ATION
Power Supply Requirement
Tone Controls
Bass (at 100 Hz) : f10 dB
Treble (at 10 kHz) : f10 dB
Maximum Output Power : 4X45watts
Current Drain
ESB/MEMORY CARD PLAYER
Signal to Noise Ratio : More than 55 dB
Channel Separation : More than 50 dB
Frequency Response : 40Hz – 18 kHz
RADIO
For 2 Band (Europe)
Frequency Coverage 87.5 to 108 MHz
IF 10.7 MHz
Sensitivity (S/N=30dB) 10 dB
Stereo Separation >25dB
s : DC 12 Volts, Negative Ground
: 15
Ampere (max.) (For High Power Version)
FM
MW
Frequency Coverage 522 to 1620 kHz
IF 450 kHz
Sensitivity (S/N=20dB) 36 dB
30
Page 32

TROUB
LE SHOOTING
Before going through the checklist, check wiring connection. If any of the problems persist
after checklist has been made, consult your nearest service dealer.
Symptom Cause Solution
power.
No
No sound.
The operation
keys do not
work.
The radio does
not Work. The
radio station
automatic
selection does
not work.
The car ignition switch is
not on.
The fuse is blown.
Volume is in minimum Adjust volume to a desired level.
Wiring is
connected.
The built-in microcomputer
is not operating properly
due to noise.
The antenna cable is not
connected.
The signals are too weak. Select a station manually.
not properly
If the power supply is connected to
the car accessory circuits, but the
engine is not moving, switch the
ignition key to “ACC”.
Replace the fuse.
Check wiring connection.
Press the RESET button.
Front panel is not properly fix into its
place.
Insert the antenna cable firmly
.
31
Page 33

RDU 1530
Mobile
Audio System
CAR RADIO BLUETOOTH
32
Page 34

Inho
udsopgave
Inst
allatie........................................
Verwijder schroef voor installatie..........34
DIN voorzijde (methode A) ...................34
Installeren van de unit ..........................34
Verwijderen van de unit........................35
DIN achterzijde (methode B)................36
Gebruik van het afneembare
frontpaneel........................................
Aansluiten van de draden..................38
Overzicht bedieningsknoppen..........39
Basisfuncties......................................
In- en uitschakelen van de unit.............40
Verwijderen afneembaar frontje ...........40
Geluidsvolume wijzigen........................40
Systeem instellen................................ .40
Scherm informatie klok instellen...........40
Equalizer ..........................................
.....34
..37
40
....40
....40 Mute..................................................
afspelen...........................................
Kiezen van een menu........................42
lecteren van nummers ..................43
Se
ID3-informatie weergeven..................43
Geheugen Kaart afspeelfunctie .........43
Ondersteuning MP3 decoderen
mode.....................................................43
Bluetooth Bediening ..........................44
Specificatie.......................................
eel voorkomende problemen...........46
V
..42
...45
Vloeibaar kristal weergave....................40
Aansluiten van externe apparaten........41
Reset functie. ......................................
Radiobediening. .................................41
Frequenties kiezen...............................41
Zenders zoeken....................................41
Automatisch zendergeheugen
enprogrammazoekfunctie.....................41
Zenders opslaan...................................41
ANS (Announcement Name Station)
bediening..........................................
Invoer serien bus afspeelfunctie.......42
Nummers zoeken..............................42
Afspelen pauzeren............................42
Preview van alle nummers................42
Herhalen van een nummer ...............42
Alle nummers in willekeurige volgorde
..41
....41
33
Page 35

allatie
Inst
N.B:
• Kies m.b.t. de plaatsing van het apparaat
een locatie waar de bestuurder bij gebruik
vanhet apparaat tijdens het rijden niet
wordt gehinderd.
• Voordat U het apparaat definitief
installeert dient Uer zorg voor te dragen
dat de bedrading correct is aangesloten
en het apparaat naar behoren werkt.
• Gebruik alleen de meegeleverde
onderdelen om het apparaat te installeren.
Gebruik vanandere onderdelen kan
resulteren in het ontstaanvan defecten.
g Raadpleeg uw dichtstbijzijnde dealer
wanneer ert. b.v. de installatie gaten
moeten worden geboord of uw voertuig
andere aanpassingen behoeft.
• Installeer het apparaat op een plaats waar
het de bestuurder niet in de weg zit en
depassagier niet kan verwonden tijdens
een noodstop.
g Vermijdt installatie op plaatsen waar het
apparaat onderhevig kan zijn aan hoge
temperaturen zoals direct zonlicht of hete
lucht uit de verwarming. Vermijdt
eveneens plaatsen waar het apparaat
onderhevig zou kunnen zijn van stof,
vuiligheid of hevige vibraties.
DINVoorzijde/Achterzijde montage
Dit apparaat kan eenvoudig worden
geïnstalleerd volgens het “Voorzijde” principe
(conventionele installatie m.b.v. een slede) of
“Achterzijde” principe (waarbij gebruik wordt
gemaakt.
Van reeds aanwezige schroefgaten in het
chassis.Voor details m.b.t. de
installatiemethodes,zie de aanwezige
illustraties.
DIN ≈VoorzijdeΔ montage (Methode
A)Installatie Opening
Dit apparaat kan worden geïnstalleerd in
iederdashboard met een opening voorzien
van deafmetingen zoals hier aan de
rechterzijdeomschreven.
53m
m
182mm
Het apparaat installeren
U dient er zorg voor te dragen dat alle
aansluitingen zijn getest voordat U de
volgendestappen gaat ondernemen en het
apparaat installeert.
1. Zorg ervoor dat het contact is
uitgeschakeld en verwijder de “min”
(negatief) kabel vande accu.
2. Verwijder de ISO kabel en ontkoppel de
antenne.
3. Druk de Open toets in op het
paneel/front om deze te verwijderen
Voor
(zie het hoofdstuk “Gebruik van het
verwijderbare voorpaneel/front”).
4. Duw de zijkantvan de buitenring naar
buiten en haal deze vervolgens naar
vorenom te verwijderen.
5. De twee meegeleverde sleutels zorgen
ervoor dat de in de autoradio aanwezige
clipsworden geopend waarna de autoradio
kan worden verwijderd uit de slede. Plaats
desleutels tot deze niet meer verder
kunnen (met de knopjes naar buitengericht)
in dehiervoor bestemde openingen in het
midden van de linker- en de rechterzijde
van hetapparaat. Schuif hierna de slede
naar de achterzijde van de autoradio.
34
Page 36

allatie
Inst
6. M
onteer de slede door deze in de opening
in het dashboard te plaatsen en buig
vervolgens de op de slede aanwezige clips
open m.b.v. een schroevendraaier. Niet alle
clips zullen contact kunnen maken.Bestudeer
dus welke het meest effectief zijn.Dit
openbuigen zorgt ervoor dat de slede in het
dashboard wordt bevestigd.
een metalen gedeelte van het voertuig
achter het dashboard. De stripzorgt
eveneens dat het apparaat op deze wijze
juist geaard is.
N.B.: Installeer op deze wijze het korte
uiteinde van de bout aan de achterzijde
van het apparaat en het lange uiteinde aan
het dashboard.
7. Sluit de ISO verbindingskabel aan en
sluit de antenne weer aan. Zorg ervoor
dat hierbijgeen bedrading of kabels
worden beschadigd.
8. Schuif het apparaat in de slede totdat
deze vast klikt.
9. Om het apparaat aan de achterzijde te
bevestigen gebruikt U de meegeleverde
metalennaapirtsednavedjiznéémoedrevel
egeemedkiurbeG.pirtsde Mounting Bolt
aan de achterzijde van het apparaat te
bevestigen.Indien nodig buigt U de strip
om één en ander passend te maken.
Vervolgens gebruiktU om het andere
uiteinde van de strip tebevestigen aan
10. Bevestig de accukabel wederom aan de
“Min” (negatief) pool van de accu.
Plaatsvervolgens het frontframe terug
en installeer het Voorpaneel (Front) (zie
het hoofdstuk“Gebruik van het
verwijderbare voorpaneel/ front”).
Het apparaat v
1. Zorg ervoor dat het contact uitgeschakeld
is en verwijder de “min” (negatief) kabel
vande accu.
2. Verwijder de metalen strip aan de
achterzijde van het apparaat (indien
gemonteerd).
3. Druk de Open toets in om het
voorpaneel/front te verwijderen.
erwijderen
35
Page 37

allatie
Inst
uw de bovenzijde van de buitenring naar
4. D
boven en trek deze vervolgens naar buiten
om deze te verwijderen.
5. Plaats de meegeleverde sleutels in de
hiervoor bestemde openingen in het
midden vande linker- en de rechterzijde
van het apparaat. Trek vervolgens het
apparaat uit hetdashboard.
DIN ≈AchterzijdeΔ montage (Methode B)
Wanneer uw voertuig behoort tot het merk
Nissan of Toyota dient U de volgende
instructies te volgen m.b.t. de installatie.
Maak gebruik van de gemarkeerde
schroefgaten (T voorToyota, N voor Nissan)
aan weerszijden van het apparaat om deze te
bevestigen aan dedoor de fabrikant van uw
voertuig meegeleverde bevestigingsplaatjes.
Om het apparaat aan de meegeleverde
bevestigingsplaatjes te bevestigen zorgt U
er voor dat de schroefgaten in de
meegeleverde plaatjes gelijk komen te
liggen aan de schroefgaten op het apparaat
waarna U de schroeven aan weerszijden
kunt bevestigen.
N.B.:De buitenring,slede en metalen strip
worden bij bevestiging volgens Methode B
dus niet gebruikt.
36
Page 38

Gebr
uik van het verwijderbare voorpaneel/front
HET VOORP
1. Druk de Release toets in. Het front klapt nu
naar beneden.
Release knop
2. Draag er zorg voor dat het voorpaneel/front
direct na verwijdering wordt opgeborgen in
het hiervoor bestemde beschermingskoker.
ANEEL/FRONT VERWIJDEREN
Voorpaneel/front
Voorzorgsmaatregelen
1. Laat het voorpaneel/front niet vallen.
2. Oefen geen druk uit op het display of de
controletoetsen tijdens het verwijderen
ofinstalleren van het voorpaneel/front.
3. Vermijd contact met de kontakten op het
voorpaneel/front alsmede het apparaat
zelf. Dit kanresulteren in slecht contact.
4. De kontakten kunnen, indien bevuild,
eenvoudig gereinigd worden met een
schone,drogedoek.
5. Stel het voorpaneel/front niet bloot aan
hoge temperaturen of direct zonlicht.
6. Stel het voorpaneel/front niet bloot aan
vluchtige stoffen als benzeen, thinner
eninsectenverdelgers.
7. Laat het voorpaneel/front intact. Probeer
deze niet uit elkaar te halen
Het voorpaneel/front installeren
Om het bedieningspaneel te installeren,
plaatst u het paneel in de behuizing en
zorg ervoor dat het paneel goed is
geïnstalleerd. Anders verschijnt er op het
scherm abnormaliteit
toetsen zullen niet volledig functioneren.
en of sommige
37
Page 39

ansluiten van de bekabeling
A
ISO Connector
RCA UITGANG
WIT: L CH
Zekering (15A)
ANTENNE
ROOD: R CH
38
Page 40

Bedie
ning
OVERZICHT BEDIENI
NGSKNOPPEN
Open de dekking
1. volume knop/
SEL knop
seknop front)
(relea
2.
3. BND/AMS
4. MODE/
5.
6.
7. LCD
8. 5 DIR-
9. 4 SHF
10. 1 P
11.
AU
1-6 voorkeuzeknoppen
12. 2 SCN
13. 3 RPT
14. /MUT
15. 6 DIR+
INVOER SERIEN BUS interface
16.
17. AUX IN
18. resetknop
19. DISP
20. ESB dekking
21. EQ/TA
22. PTY/AF/
GEHEUGEN KAART interface
23.
Microfoon
24.
39
Page 41

Bedie
ning
Basisfuncties
A
an-/uitzetten van de radio
Druk op de
het apparaat. Als het apparaat is
ingeschakeld, druk en houd de
om het apparaat uit te schakelen.
Verwijderen frontje
Houd de
afneembare frontje te verwijderen.
Geluidsvolume instellen
Druk kort op de SEL
selecteren van de gewenste afstelmodus. De
afstelmodus verandert in de volgende
volgorde:
VOL BAS TRB BAL FAD
e) (Bass) (Treble) (Balance) (Fader)
(Volum
Door de volumeknop (1) met de klok mee of
tegen de klok in te draaien, kan de gewenste
geluidskwaliteit afgesteld worden.
LOUD ON:
om he
t volume tijdelijk extra hoog tezetten.
SYSTEEM INSTELLEN
Druk en houd de SEL knop (1) ingedrukt aan
het voorpaneel voor de systeem
instellingsmodus. Druk dan kort op de SEL
knop (1) om het item te selecteren dat u wilt
veranderen en draai de volumeknop (1) om
de dezelfde instelling te veranderen.
1) TAVOL
Gebruik de volume knop (1) om het TA
volume waarde aan te passen .
2) BEEP ON/OFF
Hiermee kunt u de waarschuwingspiep
aan- of uitschakelen die klinkt als u de
knoppenop het display bedient.
3) AREA
EUR/USA
Gebruik de volumeknop (1) om de
EUR/USA
te stellen.
toet
s (14) in te schakelen op
toe
ts (14)
knop i
ngedrukt (2) om het
knop (1) voor het
LOUD
gebiedsfrequentie ruimte in
4) P-VOL
Gebruik de Volumeknop (1 ) om de volume
level te stellen wanneer het apparaat word
aangeschakeld.
SCHERM INFORMA
TIE
Druk op de DISP (19) om te bedienen
volgens de conversie van elke
schermmodus.Druk herhaaldelijk op de DISP
knop (19), zoals de frequentie, de klok, de
diskinformatie of de PTY informatie zal op het
scherm te zien zijn.
KLOK INSTELLEN
Druk kort op de DISP knop (19) totdat de klok
op het scherm te zien is. Houd dan de DISP
klok ingedrukt totdat de klok knippert.
En druk vervolgens op
de minuten te veranderen en de knop
knop (6) om
(5) om de uren te veranderen.
Equalizer
ruk op de EQ knop (21) om de
D
equalizerfunctie in te schakelen en de
gewensteaudioinstelling te kiezen. Er zijn
vijf verschillende mogelijkheden in deze
volgorde:
LAT → CLASS → POP → ROCK → OFF
→ F
MUTE
Druk op de MUT knop (14)
om het geluid
onmiddelijk te dempen en “MUTE” zal op
het scherm verschijnen. W
anneer MUTE
ON te zien is, druk dan nog een keer op
de MUT knop (14) om het geluid weer
af te spelen.
VLOEIBAAR KRIST
AL WEERGAVE
Toont huidige frequentie en actieve functies
op het scherm (7).
40
Page 42

Bedie
A
UX ingang
ning
Op de unit kan een extern audioapparaat
worden aangesloten via de AUX IN
aansluiting (17) op het frontpaneel. Nadat de
aansluiting is voltooid kunt u met de MODE
knop (4) ophet frontpaneel naar de AUX IN
functie wisselen.
Reset functie
De RESET knop (18) dient te worden
bediend met een pen of een dun metalen
voorwerp.De RESET knop kan in de
volgende gevallen gebruikt worden:
- Eerste instelling van het apparaat nadat
alle draden zijn aangesloten
-
Geen van de knoppen op het display
werkt
- Error-symbool op het display
dergeheugen opslaan en oproepen
Zen
Druk de knop (3) meerdere
BND/AMS
seconden achtereen in tot ‘ZOEKENÿ
verschijntop het display. De radio zal
vanuit de huidige frequentie gaan zoeken
en controleert designaalsterkte tot een
zoekronde is voltooid. Daarna worden de
zes zenders met de besteontvangst
onder de gewenste voorkeuze knop
opgeslagen.
Wanneer automatische geheugen opslaan
is voltooid, zal het automatisch in
preset scan-modus overgaan.
Opslaan van zenders
Gezocht een zender Druk op PRESET (11)
1 tot 6 in om een zender te selecteren die is
opgeslagen in hetgeheugen. Houd de knop
meerdere seconden ingedrukt tot een
N.B Als het indrukken van de RESET knop
(18) geen effect heeft, gebruik dan een in
isopropylalcohol gedrenkte katoenen doek
om de socket op het frontpaneel schoon te
maken.
Radi
Selec
obediening
teren van de frequentie
In de radiostand kunt u door het kort
indrukken van de BND/AMSknop (3) de
gewenstefrequentie instellen. De
ontvangstband zal in deze volgorde
veranderen:
F
M1 FM2 FM3 MW
Kiezen van een radiostation
Druk kort op de knop (5&6) om de
/
automatische zoekfunctie in te schakelen.
Druk dezemeerdere seconden achtereen in
tot ‘MANUAL ’ verschijnt op het display:
nu kuntu handmatig naar een zender zoeken.
Als beide knoppen enige tijd niet worden
ingedrukt,wordt weer overgeschakeld op de
zoekfunctie.
Druk en houd (22) om deze functie te
activeren/deactiveren. AF
AF
wordt
weergegeven:
De functie is geactiveerd en ANS informatie
is ontvangen.
AF knippert: Geen ANS informatie
ontvangen
AF niet weergegeven: Functie is
gedeactiveerd.
ALARM is weergegeven: Noodoproep
meldingen worden ontvangen. Het volume
verhoogt naar de voorgeinstelde waarde.
Programmatype (PTY)
Sommige FM st
ations zenden naast de
stationnaam ook het pro-gramma type uit.
U kunt zoeken naar stations met bepaalde
genres:
41
Page 43

Bedie
ning
Druk eenmaal op PTY (22) om de PTY
groep te selecteren.
Draai de volumeknop (1) om het PTY
programma als volgt te selecteren.
Het apparaat zoekt, na het selecteren van het
PTY programma, druk dan
/
om te zoeken. Naar de respectievelijke
stations en stopt wanneer een station is
gevonden.
De
PTY
functie is
gedeactiveerd als het geselecteer
de
PTY genre niet meer wordt ontvangen.
Wanneer PTY aanstaat, druk dan nog
een keer op PTY (22) om de PTY functie
te annuleren.
Verkeersmelding (TA)
Druk en houd TA knop (21) om deze
modus te activeren of te deactiveren. TA
wordt met geactiveerde modus
weergegeven.
In TA modus stemt het apparaat
automatisch van elke modus in aktuele
verkeersmeldingen. Het geluidsniveau
verhoogt naar het minmaal niveau voor
verkeersmeldingen.
Druk en houd (21) tijdens een
TA
verkeersmelding om de functie te
onderbreken zonder het te deactiveren.
INVOER SERI
EN BUS (ESB)
afspeelfunctie
In het frontpaneel van het apparaat zit een
ESB-interface (16). U kunt een
ESB-apparaatop deze interface (16)
aansluiten. Als u een ESB-speler op de
interface aansluit, zal hetapparaat de
MP3-bestanden of in de
doorzoeken en
om deze af te
in een andere
automatischbeginnen
spelen.Als het apparaat
modus staat, kunt u ook
ESB-driver
op de
ESB-functie selecteren.
u
alshierboven
MODE knop
de bestanden op
beschreven.
(4) drukken ende
Vervolgens kunt
dezelfde wijze afspelen
Kiezen van nummers
Druk kort op om naar het vorige
/
of volgende nummer over te schakelen.
Hetbetreffende nummer zal worden
weergegeven op het display.
Houd de knop ingedrukt om
/
voor- of achteruit te spoelen. Het
afspelenzal verdergaan op het moment dat
u deze knop loslaat.
Afspelen pauzeren
Druk op de PAU knop (10) om
weergave te onderbreken.
ruk hem wederom in om het
D
afspelen voort te zetten.
Preview van alle nummers
Druk op de SCN knop (12) om van elk
nummerenkele seconden af te spelen.
Druk deze knop wederom in om de introductie
afte breken en naar het nummer te luisteren.
Herhalen van hetzelfde nummer
Druk op de RPT knop (13) om continu een
bepaald nummer te herhalen.
A
lle nummers in willekeurige volgorde
afspelen
Druk op de SHF knop (9) om alle nummers
in willekeurige volgorde af te spelen.
Kiezen van een menu
Druk op de DIR- knop (8) of DIR+ knop
(15) om een vorige of volgend menu te
kiezen.Als de CD/MP3 schijf geen
menu’s bevat, heeft het indrukken van de
genoemdeknoppen geen effect.
42
Page 44

Bedie
ning
lecteren van nummers
Se
Druk op BND/AMS toets (3)
voor een tijd. Het treedt in "Zoeken track
direct" . Het toestel
zoekt de track geselecteerd door het
volgen door volume knop.
ID3-informatie weergeven
Druk op de toets (19) voor des
DISP
informatie onder ID3 (moeten wel opde
discaanwezig zijn) Deze functie werkt
niet.
N.B.:
•
“TAKARA’s
autoradio RDU 1530 kan een
ESB driver ondersteunen met een
capaciteit op tot 32GB. Het gebruik ESB
driver met hogere capaciteit kan het
apparaat beschadigen.
• ESB MP3-speler is geen standaard,
zodat andere merknamen of andere
modellen huneigen standaaANS
hebben. Zodoende kan ons product niet
MP3-speler ondersteunen
elke
• Als u een MP3-speler aansluit en er een
normale batterij in dit apparaat zit (geen
oplaadbarebatterij) is het aan te bevelen
om de batterij uit het apparaat te halen en
hem daarna opde ESB-interface aan te
sluiten. Anders zou de batterij kapot
kunnen knappen.
•
Als de unit in de ESB-speelfunctie staat,
verwijder dan niet het ESB-apparaat van
deESB-interface.
Waarschuwing
Als er belangrijke bestanden op het
ESB-apparaat staan, sluit hem dan niet op de
unit aanom af te spelen.
Door een
foutieve bediening zouden er namelijk
bestanden verloren kunnen gaan.En hiervoor
kan ons bedrijf niet aansprakelijk worden
gesteld.
GEHEUGEN KAARTEN bediening
T
AKARA's autoradio RDU 1530 kan een
geheugenkaart ondersteunen met een
capaciteit op tot 32GB. Het gebruik van een
geheugenkaart met hogere capaciteit kan het
apparaat beschadigen.
Als u een geheugen Kaart in de geheugen
Kaart interface invoert, zal het apparaat naar
MP3-bestanden of op de
automatisch beginnen om
kaar
t zoeken en
deze af tespelen.
De bediening is identiek aan de
eningswijze van MP3-bestanden zoals
bedi
hierbovenbeschreven.Als het apparaat in
een andere modus staat, kunt u ook op de
MODE knop (4) drukken ende geheugen
Kaart functie selecteren. Als er belangrijke
bestanden op de geheugen Kaart
staan,sluit hem dan niet op de unit aan om
af te spelen.
ONDERSTEUNING MP3
DECODEREN MODE
De main unit ondersteunt MP3
decoder-functies
S
tandaard
M
PEG1 Audio
Layer 3
(44.1kHz)
zoals hieronder.
Bit Rate
(kbps)
16~ 320 Kbp
& VBR
s
Supports
Mode
Stereo
43
Page 45

Bedie
ning
Bluetooth bedizening
•
• Bereid de Bluetooth bediening voor
••
(i) Zorg ervoor dat uw mobiele telefoon de
Bluetooth-functie ondersteunt als u
Bluetoothwilt gebruiken.
(ii) Het overdrachts bereik van Bluetooth is
afhankelijk van het type telefoon. Om de
besteconversatiekwaliteit te verkrijgen is
het aan te bevelen om de afstand
tussen de telefoonen de unit tot
maximaal drie meter te beperken. Zorg
er bovendien voor dat er geenmetalen
voorwerp of ander object tussen de
mobiele telefoon en de unit aanwezig is.
• Bediening
1) Houd de MODE knop (4) op de unit
ingedrukt.
Kies op uw mobiele telefoon de
Bluetooth set up-functie. (Voor de
bediening van Bluetoothverwijzen we u
naar het instructieboekje van uw mobiele
telefoon).
BEANTWOORDEN / AFWIJZING VAN
EEN OPROEP
Wanneer er een oproep komt,
U kunt op de knop (4) drukkenom
het gesprek aan te nemen of op de
knop (22) om het gesprek af te wijzen.
Overzetten van het gesprek tussen
mobiele telefoon en het apparaat
In de praatstand kunt u door de
MODE (4) ingedrukt te
houden het gesprekoverzetten van de
mobiele telefoon naar het apparaat of
andersom.
N.B.
Als u het gesprek overbrengt naar de
mobiele telefoon zal de mute van de
huidige functieworden vrijgegeven op
hetzelfde moment.
) In de lijst op uw telefoon dient “HW CARBT”
2
e verschijnen, kies “HW CARBT” en voer
t
dan hetpaswoord “0000” in.
3) Het apparaat heeft een automatische
koppeling functie, het zoeken naar een
mobiele Bluetooth-telefoon gebeurt
automatisch.
4) Na het succesvol aansluiten verschijnt
p het display. En het
o
typenummervan uw mobiele telefoon zal
op het display worden weergegeven.
5) Als de verbinding is mislukt, probeer
opnieuw te koppelen na enkele seconden.
U kunt verwijzen naar de werking van uw
mobiele telefoon, verwijder het apparaat
waarnaar u zocht en opnieuw zoeken.
44
Page 46

SPECIFIC
ATIE
GENERA
Pow
er Supply Requirements : DC 12 volt, negatieve massa
Tone Controls
Bass (at 100 Hz) : f10 dB
Treble (at 10 kHz) : f10 dB
Maximum Output Power : 4X45watts
Stroomverbruik
ESB/GEHEUGEN KAARTEN PLAYER
Signaal / ruisverhouding : Meer dan 55 dB
Kanaalscheiding : Meer dan 50 dB
Frequentiebereik : 40Hz – 18 kHz
L
: 15
Ampère (max.) (Voor de High Power Version)
RADIO
Voor 2 Bands (Europa)
FM
Frequency Coverage 87.5 to 108 MHz
IF 10.7 MHz
Gevoeligheid
Kanaalscheiding >25dB
Frequency Coverage 522 to 1620 kHz
IF 450 kHz
Gevoeligheid (S/N=20dB) 36 dBu
(S/N=30dB) 10 dBu
MW
45
Page 47

V
eel Voorkomende Problemen
ontroleer voordat u deze checklist doorneemt of het apparaat correct is aangesloten.IAls
C
een probleem blijft bestaan nadat u de checklist heeft doorgenomen, neem dancontact op met
uw dichtstbijzijnde servicedealer.
ymptoom Probleem Oplossing
S
pparaat gaat
A
niet aan.
en geluid.
Ge
De
bedieningsknopp
enwerken niet.
e radio werkt
D
niet.
Hetautomatisch
zoekennaar
radiozenderswer
kt niet.
Het contact van de auto
staat nietaan.
e zekering is doorgebrand. Vervang de zekering.
D
Volume staat op
minimumstand.
e bedrading is niet
D
correctaangesloten.
De ingebouwde
microcomputerwerkt niet
goed.
e antennekabel is
D
nietaangesloten.
De signalen zijn te zwak. Zoek de zender handmatig.
Als de unit is aangesloten op
hetcircuit van elektrische
auto-accessoires, maar de motor
nietdraait, zet dan het contact
op‘ACC’.
Verhoog het volume naar hetgewenste
niveau.
Controleer de bedrading.
Druk op de RESET knop.
Hetfrontpaneel zit niet goed op zijnplek.
Sluit de antennekabel stevig aan.
46
Page 48

RDU 1530
Mobile
Audio System
CAR RADIO BLUETOOTH
47
Page 49

CON
TENUTO
nità
..49
...49
51
52
...55
55
55
Inst
allazione......................................
Togliere viti prima dell' installazione......49
DIN anteriere (Metodo A)......................49
Installare l'unità .................................
Rimuovere l'unità..................................
DIN posteriore (Metodo B)....................51
U
tilizzo del pannello frontale staccabile..
Connesson elettriche......................... 53
Posizione tasti.....................................54
Operazioni di base .............................55
Accensione srenmento dell' l'u
Togliere il frontalino..............................
Regolazione volume.............................55
Impostazione el sistema .....................55
Informazioni sul display........................55
Impostazione dell' orologio.........................55
Equalizzazione.....................................
Ripetizione tracce..............................57
Riproduzione casuale di tutti i brani ...57
Selezione directory up/down ............57
Selezione tracce............. ..................58
Informazioni display...........................58
Lettura schede di memoria................58
Supporto decodifica MP3
Bluetooth OPERAZIONE.....................59
Specifiche tecniche............................
Risoluzione de
i problemi....................61
......................58
60
Muto......................................................55
Display a scristalli liquidi ......................55
Connessione dispositivo ausiliario....... 55
Reset....................................................56
Operazioni Radio...............................56
Selezione della banda di frequenza.....56
Selezione della stazione ......................56
Memorizzazione automatica delle stazioni
e anteprima di ascolto..........................56
Memorizzare una stazione...................56
Operazioni ANS (Announcement Name
Station)...............................................
Utilizzo porta ESB...............................57
Selezione tracce ...............................57
Mettere in pausa la riproduzione.......57
Anteprima di tutti i brani....................57
..56
48
Page 50

INST
Nota
• Scegliere una posizione di montaggio per
• Prima di installare definitivamente l'unità,
• Utilizzare solo le parti in dotazione con
g Consultatevi con il rivenditore più vicino se
• In
g Evitare di installare l'unità in luoghi in cui
INSTALLAZIONE DIN FRONTALE/
POSTERIORE
Questa unità può essere installata
correttamente Frontalmente (Installazione
DIN Frontale/Convenzionale).
ALLAZIONE
:
cui l'unità non interferisca con la normale
funzione di guida del conducente.
collegare i fili temporaneamente e
accertarsi che tutto sia collegato
correttamente e l'unità e il sistema
funzionino correttamente.
l'unità per garantire una corretta
installazione.
L'uso di parti non autorizzate puo
causare malfunzionamenti.
l'installazione richiede la perforazione
o altre modifiche del veicolo.
stallare l'unità in mobo che non interferisca
con i movimenti del conducente, e non
danneggi passeggeri, in caso di arresto
improvviso come una frenata di emergenza.
sarebbe soggetta ad alte temperature,
come ad esempio luce diretta del sole,
aria calda, riscaldamento, o polvere,
sporcizia o
vibrazioni eccessive.
INSTALLAZIONE
Inizio dell' installazione
Questa unità può essere installata in
qualsiasi cruscotto che a'bbia un'apertura
come illustrata qui di seggito:
DIN FRONTALE (Metodo A)
m
53m
182mm
Installare l'unità
Inauzitutto assieurarsi che il motore sia
spento e quindi seguire la procedura
sottoindicata per installare l'unità.
1. Assicurarsi che il motore sia spento, quindi
scollegare il cavo sel polo negativo(-) della
batteria.
2. Scollegare icavi e l'antenna.
3. Premere il pulsante di rilascio
(vedere "utilizzare il frontalino estraibile").
4. Sollevare la parte superiore della cornice di
fissaggio esterna. E tirare
5. Le
due chiavi fornite permettono di sbloccare
le linquette au'interno della griglia e di
poterldtogliere.
Inserire le chiavi (con la parte scolpita
rivolta verso l'alto) nelle speciali fessure
situate al centro del lato destro e sinistro
del l' unita. Quindi, far scorrere la griclia fuori,
dalla parte posteriore del l'unita.
per
del frontalino
rimuoverld.
o "posteriormente (Installazione DIN
Posteriore), utilizzando i fori per viti filettate sui
lati del telaio unità). Per ulteriori informazioni,
consultare le modalita di installazione
illustrate qui di seguito.
49
Page 51

INST
6.
ALLAZIONE
Montare la griglia inserendola nell'.
Aperitura del sruscotto e sollevare le
linguette intorno alia griglia, con l'aiuto
di un cacciauite. Non tutte le linguette
potranno incastrarsi. Decorre capire quall
sono le piu efficaci,tenerle quindi sollevate
per fissare la griglia nel punto previsto.
9. Per fissare l'unità, utilizzare la stanghetta
in metallo fornita per fissare il retro del l'unità
al crusgotto. Usare il materiale in dotazion
(dado esagonale (M5mm) e rondella)
per collegare una
emità della
estr
stanghetta al bullone di montaggio
sulla parte posteriore del veicolo. se
necessario, piegare il metallo della stanghetta
adattare l'area di montaggio del veicolo.
Quindi utilizzare il materiale fornito (vite
(5x25mm) e rondella piatta) per
collegare l'altra estremità della stanghetta di
metallo a una solida parte metallica del
veicolo, sotto il cruscotto. Questa stanghetta
contribuisce inoltrea garantire una
corretta messa a terra dell 'unità.
Nota: pe
r installare la porte terzzionale a filetto
conter, del brullore di monteggeo cilla porte
prederiore dell'unità e l'altro terminale a
Linguette
7. R
icollegare i cavi e l'antenna e fare
attenzione a non schiacciare fili o cavi.
8. Far scorrere l'unità nella griglla fino alla
totale introduzione.
filetto lungo dl cruscotto.
Stringa d melello
Bullone Montaggio
Sedicimale dado
Vite
10. Ricollegare il cavo al polo negativo (-)
della batteria. Quindi sostituire la
cornice esterni di fissaggio installare il
frontalino sull'unità (vedere
"utilizzare il frontalino staccabile").
50
Page 52

INST
R
1. Assi
ALLAZIONE
imuovere l'unità
curarsi che il motoresia spento,
quindi scollegare il cavo dal polo negatino
(-) della batteria.
2. Rimuovere la stangheta in metallo attaccata
al retro dell'unità (se collegata).
3. Pr
emere il tasto di rilascio per rimuovere il
frontalino.
S
4.
ollevare la parte superiore della cornice
esterna di fissaggio etirare verso l'esterno
per rimuoverla.
5. Ins
erire entrambe le chiavi fornite, nelle
fessure al centro del lato destro e sinistro
dell 'unità, poi tirare fuori l'unità dal cruscotto.
montaggio.
Per fissare l'unità alle staffe
di
Di fabbrica allineare i fori per le viti con i
for i sul l'unità, quindi stringere le viti
(5x5mm), su ogni lato.
Nota: La cornice, esterna di fissaggio, la
L
griglia e la stanghetta di metallo mon sono
utilizzate nel metodo B di installazione.
INSTALLAZIONE
(Metodo
B)
DIN POSTERIORE
Se il veicolo è una Nissan, Toyota, seguire
queste istruzioni di montaggio: Utilizzare i fori
per le viti segnate T (Toyota), N (Nissan) che si
trovano su entrambi i lati dell'unità per fissarla
alle, staffe di montaggio
in dotazione con il
veicolo.
Vista laterale che mostra le
viti segnate eruche T,N
Staffa di montaggio
Radio
viti
viti segnati staffe
viti
51
Page 53

TILIZZO DEL FRONTALINO ESTRAIBILE
U
Per st
accare il frontalino
1. Premere il tasto , il
frontalino sarà rilasciato.
t
asto di rilascio
frontalino
2. Mettere il frontalino nella
custodia susitoduio la rimozione.
Custodia protettiva
Precauzioni durante la manipolazione
1. Non far cadere il frontalino
2. N
on esercitare pressione sul display o sui
pulsanti di controllo durante la rimozione o
l'installazione del frontalino.
3. N
on toccare i contatti sul frontalino
sul corpo principale, questo potrebbe
danneggiare i contatti elettrici.
4. Se sporcizia o sostanze estranee
aderiscono ai contatti, possono essere
rimossi con un panno
5. N
on esporre il frontalino a
pulito e asciutto.
temperature elevate o alla luce solare
diretta, in nessun caso.
6.T
enere lontano eventuali agenti volatili
(ad esempio il benzene, diluenti, o
insetticidi) dalla superficie del
frontalino.
7. Non tentare di smontare il frontalino.
frontalino
Per installare il frontalino
Per installare il pannello di controllo,
inserirlo nell`apposito spazio al fine di
evitare funzionamento anomale del
displauy oppure dei pulsanti.
52
Page 54

ONNESSIONI ELETTRICHE
C
Connettore
ISO
BIANCO: CAN S
ANTENNA
JACK LINEOUT
Fusibile(15A)
ROSSO: CAN D
53
Page 55

O
PERAZIONE
POSIZIONE TASTI
Aprire il coperchio
1. volume tasto/
SEL tasto
(t
2.
3. BND/AMS
4. MODE/
5.
6.
7. LCD
8. 5 DIR-
9. 4 SHF
10. 1 P
11.1-6
asto di rilascio)
AU
Pulsa nti di memorizzazione
12. 2 SCN
13. 3 RPT
14. /MUT
15. 6 DIR+
16.
Slot ESB
17.AUX IN
Pulsante di reset
18.
19. DISP
20. ESB coperchio
21. EQ/TA
22. PTY/AF/
23.
Slot Scheda
M
icrofono
24.
54
Page 56

OP
ERAZIONE
OP
ERAZIONI DI BASE
ACCENDERE/SP
Premere
'unità. Quando l'unità è accesa, tenere
l
pulsante (14) per accendere
il
premere
EGNERE L
pulsante (14) per spegneia.
'UNITA'
TOGLIERE IL FRONTALINO
Premere
il pulsante
(
2) per staccare il
frontalino.
REGOLAZIONE SUONO
Premere il pulsante SEL
(1) per selezionare
la modalita’ d`impostazione desiderata. La
modalita’ di regolazione verra’ modificata nel
seguente ordine:
VOL BAS TRB BAL FAD
(Volum
e) (Bass) (Treble) (Balance) (Fader)
LOUD
Ruotando la manopola del volume (1) in
senso orario oppure in senso anti-orario, e’
possibile regolare la qualita’ audio in uscita.
LOUD ON:
passare alla funzione loudness.
Per
IMPOSTAZIONI DEL SISTEMA
Tenere premuto il pulsante SEL (1) sul
frontalino per entrare nella modalita’
d`impostazione del sistema. Premere quindi il
pulsante SEL (1) per selezionare la voce
desiderata e ruotare la manopola (1) per
modificare le impostazioni.
AVOL
1) T
Utilizzare la manopola del volume (1)
per regolarne il valore TA.
2) BEEP ON/OFF
Per attivare il segnale acustico on / off
quando si premono i pulsanti sul pannello
frontalino.
3) AREA
EUR/USA
Utilizzare la manopola (1) per
selezionare la frequenza relativa
all`area EUR/USA.
4) P-VOL
Utilizzare la manopola del volume (1) per
selezionare il livello di volume quando
l`unita` e` accesa.
INFORMAZIONI SUL DISPLA
Y
Premere il pulsante DISP (19) per
passare da una modalità di visuallzzazione
ad un'altra.
Premere ripetutamente il pulsante DISP (19),
la frequenza, l`orologio, le informazioni del
disco oppure PTY saranno visualizzate sullo
schermo LCD.
IMPOST
AZIONE OROLOGIO
Premere il pulsante DISP (19) fino a quando
sul display appare un orologio. Tenere
premuto il pulsante DISP fino a quando
l`orologio lampeggia.
Premere il puls
ante (6) per
modificare i minuti, premere (5) per
modificare le ore.
EQUALIZZATORE
emere EQ
Pr
ulsante (21) per attivare
il p
la funzione di equalizzazione e
selezionare quella desiderata tra:
LAT → CLASS → POP → ROCK → OFF
→ F
MUT
E
Premuto il pulsante MUT (14)
per annullare
il suono istantaneamente mentre sullo
schermo appare la scritta “MUTE”. Verra’
visualizzata la scritta MUTE ON. Premere
il pulsante MUT (14) per ripristinare il
suono.
DISPLAY A CRISTALLI LIQUIDI
Visualizza la frequenza utilizzata e le
funzioni attive (7).
CONNESSIONE DI UN DISPOSITIVO AUSILIARIO
L'
unità può essere collegata ad un lettore
audio portatile tramite il jack AUX IN (17) sul
frontalino. Dopo aver terminato la
connessione, è possibile premere il pulsante
MODE (4) sul frontalino per selezionare
la modalità AUX IN.
55
Page 57

PERAZIONE
O
FUNZI
ONE RESET
RESET
18)
deve essere attivato Il pulsante (
con una penna a sfera o oggetti in
metallo sottile. Il pulsante RESET deve
essere attivato per i seguenti motivi:
Installazione iniziale quando tutti i
collegamenti dei cavi sono stati effettuati.
- Tutti i tasti funzione non funzionano.
mbolo di errore sul display.
No
Si
ta:
se pr
emendo il RESET
pulsante (18),
l'unità non funziona ancora,
utilizzare un tampone di cotone imbevuto di
alcol isopropilico per pulire il pulsante.
OPER
SELEZIONE della band
In modalità radio, premere il pulsante
AZIONI RADIO
a di frequenza
BND/AMS
(3) per selezionare la banda desiderata.
La banda di ricezione cambia nel seguente
ordine:
M1 FM2 FM3 MW
F
SELEZIONE STAZIONE
Premere brevementei pulsanti per attivare
/
la funzione di ricerca automatica. Premere per
alcuni secondi fino a quando
sul display appare "MANUAL", è stato
la selezinato la modalità di sintonizzazione
manuale. Se entrambi i tasti non sono stati
premuti per alcuni secondi, si tornerà in
automatica alla modalità intonizzazionedi s
automatica.
Memorizzazione automatica
delle stazioni
Premere per diversi secondi il tasto
BND/AMS
(3), la radio ricerca in tutte le bande di
frequenza le o stazioni di cui capta il
segnale di migliore qualita (forte e
chiaro...). E le memorizza nel 6 numeri di
preselezione.
Quando la memoria e` terminat
a, l`unita`
entra in modalita` di scansione
pre-impostata in modo automatico.
MEMORIZZ
AZIONE STAZIONI
Ricercare una stazione,
premere il pulsante (1-6) per alcuni secondi,
l'attuale stazione è memorizzata nel
numero del pulsante.
UTILIZZO DEL SISTEMA
ANS (Announcement Name Station)
Frequenze Alternative
AF r
appresenta una funzione ANS
(AF)
ed e’ solamente disponibile
per stazioni FM. L`unita’ ricerca la
frequenza migliore per la stazione
selezionata.
Tenere premere AF
per
(1)
attivare/disattivare questa funzione.
AF viene visualizzata sullo schermo:
dopo che la funzione e’ stata attivata,
le informazioni ANS vengono
ricevute.
AF lampeggia: nessuna informazione ANS
viene ricevuta.
AF non viene visualizzato: la funzione e’
stata disabilitata.
ALARM viene visualizzato: Vengono ricevuti
messaggi di emergenza. Il volume aumenta
a un livello preimpostato.
Tipologia programma (PTY)
Alcune st
azioni FM indicano oltre al nome
della stazione anche il tipo di programma in
modo tale che l`utente possa effettuare la
ricerca anche in base al genere di stazione
desiderata.
56
Page 58

PERAZIONE
O
Premere PTY (22) una volt
a per
selezionare il gruppo PTY.
Ruotare la manopola del volume (1) per
selezionare I programmi PTY come
segue.
Dopo aver selezionate il programma PTY,
prem
ere (6) oppure
(5) per
iniziare la ricerca.
l`unita’ inizia la ricerca delle stazioni
disponibili, quando la stazione viene trovata,
la ricerca si interrompe automaticamente.
La funzione PTY viene
disattivat
genere selezionato PTY non
Quando sullo schermo appare la scritta
a se il
e’ piu’ ricevuto.
PTY ON, premere PTY (22) nuovamente
per disattivare la funzione PTY.
Informazioni sul traffico stradale (TA)
Tenere
premere TA (21) per attivare
o disattivare la modalita’. TA viene
visualizzato quando la modalità è attiva.
In modalita’ TA l`unita’ viene
automaticamente sintonizzata su qualsiasi
trasmissione relativa al traffico stradale. Il
livello del volume aumenta.
OPERA
ZIONI ESB
Sul frontalino dell'unità, vi è una
interfaccia ESB (16). è
possibile collegare un dispositivo ESB
tramite questa interfaccia (16). Quando
si collega una chiave ESB
tramite l'interfaccia, l'unità ricerca i file
MP3 contenuti nel dispositivo
e inizia a riprodurli
Se in altre modalità, è possibile
automaticamente.
premere
MODEil pulsante (4) per selezionare
la Modalità ESB.
SELEZIONE TRA
Premendo si salta al brano
CCE
/
precedente / successivo. Il numero delle
tracoe sarà mostrato sul display.
Premere e tenere premuto per scorrere
/
velocemente le tracce avanti/indietro, la
lettura a velocita normale sarà ripresa quando
i tasti saranno rilasciati.
METTERE IN PAUSA LA
RIPRODUZIONE
Premere il pulsante PAU (10) per mettere in
amente per riprendere
pausa.
Premere
nuov
il la riproduzione.
ANTEPRIMA DI TUTTI I BRANI
Premere il pulsante
SCN (12) per ascoltare
alcuni secondi di ogni brano.
Premere di
nuovo per interrompere
e ascoltare la traccia normalmente.
RIPETIZIONE FUNZIONE
Premere il pulsante RPT (13) per ripetere lo
stesso brano continuativamente.
Premere
nuovamente per arrestare la ripetizione.
RIPRODUZIONE
CASUALE
DI TUTTI I BRANI
Premere il pulsante SHF (9) per riprodurre tutti
i brani in ordine casuale.
Premere
di nuovo per annullare la funzione.
SELEZIONE DIRECTORY UP / DOWN
Premere DIR- (8) o DIR+ il pulsante
(15) per selezionare directory verso l'alto o
verso il basso. Se il MP3 non
contiene alcuna directory,questi tasti
non saranno attivi.
57
Page 59

PERAZIONE
O
EZIONE TRACCE
SEL
Pressatura BND/AMS il pulsante
(3) una volta si entra in
"Ricerca diretta traccia".
Usare la manopola volume per scegliere
direttamente il numero della traccia.
riprimere per fermare la riproduzione.
INFORMAZIONI DISPLAY
Premere il pulsante (19) per mostrare il
DISP
le informazioni formato ID3
(se disponibili: titolo del brano,
nome di directory, il nome artista, altri
contenuti ...) (FUNZIONE ATTIVA SOLO PER
MP3).
Nota:
•
La radio “TAKARA” RDU 1530 supporta
dispositivi ESB con capacita' fino a 32GB.
Utilizz
are dispositivi ESB con capacita’
superiore ai limit indicati puo’ causare
un danno all`unita’.
• ESB non manno uno standard unico i
questo comporta che differenti marche o
modelli hanno uno standard particolare.
Questo spiega perche il nostro apparecchio
può leggere tutti i supporti MP3.
• Quando si collega un lettore MP3 che
dispone di una
male batteria (non
nor
ricaricabile), è necessario sostituire la
batteria dal lettore MP3 quindi collegarlo
all' interfaccia ESB. In caso contrario,
la batteria potrebbe espcodere.
•
Non rimuovere la chiave ESB dall'
interfaccia quando è in riproduzione.
A
TTENZIONE
Quando ci sono dei file importanti nel
dispositivo ESB, non collegara
all'unità stessa raccomandazione.
Un'operazione sbagliata può causare
infatti l
a perdita di file.
la nostra società non si assume alcuna
responsabilità per questo.
OPERAZIONI CARTA MEMORIA
La radio “TAKARA” RDU 1530 supporta
schede di memoria con capacita’ fino a
32GB. Utilizzare schede di memoria con
capacita’ s
uperiore puo’
provocare un danno all`unita’.
Quando si inserisce una carta memoria,
l'unità ricerca file MP3 sulla
a riprodurli
sonole stesse
automaticamente. Le operazioni
stesso descritte sopra.
carta e inizia
Se in altre modalità, è possibile
premere il pulsante MODE (4) per selezionare
la modalità carta memoria. Quando ci sono dei
file importanti nella scheda, non collegara all'
unità principale.
DECODIFICA MODE AUDIO
Li unità può leggerei file audio
decodificando
andard
St
M
PEG1 Audio
Layer 3
(44.1kHz)
le seguenti modalita.
Bit Rate
(kbps)
16~ 320 Kbp
& VBR
s
Supports
Mode
Stereo
58
Page 60

PERAZIONE
O
PERAZIONE BLUETOOTH
O
• PREPARAZIONE PER IL
•
•
•
FUNZIONAMENTO
(i) quando uso la tecnologia Bluetooth, si
prega di fare Assicurarsi che il
telefono cellulare supporta la funzione
Bluetooth.
ii) Per i diversi tipi di telefoni cellulari,
(
Bluetooth potenza di emissione ha
qualche differenza. Per ottenere la
migliore qualità di conversazione, è
elogiato che la distanza tra il cellulare
e l'unità è a 3m. E per favore non
mettere qualsiasi oggetto di metallo o
di qualsiasi ostacolo tra la strada del
telefonino e l'unità.
• ASSOCIAZIONE
1) In ogni modo, tenere premuto MODE
pulsante (4) sul pannello frontale,
Il telefono cellulare, selezionare Bluetooth
istituito. (Si prega di fare riferimento al
manuale di istruzioni del tuo cellulare su
come operare Bluetooth.
RISPONDERE/RIFIUT
CHIAMATA IN ARRIVO
Quando una chiamata e` in arrivo,
Premere
per rispondere
hiamata, oppure premere
c
pulsante (22) per rifiutare la chiamata
in entrata.
Trasferire la chiamata TRA TELEFONO
E 'UNITA
Durante il modo di parlare, è possibile
premere e tenere premuto
MODE pulsante (4) per
trasferire la chiamata tra il telefono
portatile e l'unità.
Nota:
Se si trasferisce la chiamata al telefono
cellulare, disattivare la modalità della
presente verrà rilasciato allo stesso
tempo.
pulsante (4)
ARE UNA
lla
a
2
) "HW CARBT" dovrebbe apparire nella lista sul
tuo cellulare, seleziona "HW CARBT" e poi la
p
assword di ingresso "0000".
3) L`unit
4) Quando successo associati
5) Se la connessione non riesce, riprovare
entro pochi secondi. Fare riferimento al
manuale d`uso del cellulare oppure
cancellare l`unita` di ricerca e riprovare.
a` e` dotata di una funzione di
connessione automatica attivabile
mediante mobile Bluetooth.
Verrà visualizzato sul display
LCD.
59
Page 61

SPECIFIC
AZIONE
GENERA
Re
quisiti di Alimentazione : DC 12 Volt, negativo
Controlli di tonalità
Bass (a 100 Hz) : f10 dB
Treble (a 10 kHz) : f10 dB
Potenza di uscita massima : 4X45watt
Intensità : 15 Ampere (max.) (Per High Power
ESB/CARTA MEMORIA PLAYER
Segnale : Pi
Separazione canali : Più di 50 dB
Risposta in frequenza : 40Hz – 18 kHz
LI
ù di 55 dB
Version)
RADIO
Per 2 bande
(Europe)
FM
Frequenze coperte 87.5 a 108 MHz
IF 10.7 MHz
Sensibilità(S/N=30dB) 10dBu
Separazione stereo >25dB
MW
Frequenze coperte 522 a 1620 kHz
IF 450 kHz
Sensibilità(S/N=20dB) 36 dBu
60
Page 62

RISO
Pri
persiste dopo aver controllato i diversi punti della lista, consultare il
un tecnico speciazizzato.
LUZIONE DEI PROBLEMI
ma di controliare il seguente elenco controllare che tutte le connessioni siano corrette. Se il problema
ù vicino rivenditoreo
pi
Sintomo Causa
L'
N
essuna
accensione
N
essun suono.
tasti non
ionano.
funz
La radio non
funziona. co
asti di I t
memorizzazione
radio non
funzionano.
auto non e accesa.
Il fusibile
Il volume è al minimo Regolare il volume al livello
Il collegamenti del cavi non
sono effettuati
Il microprocessore interno
non funziona correttamente
a causa del rumore.
Il cavo dell'antenna non è
llegata.
Il seg
e troppo debole.
è bruciato. Sostituire il fusibile.
corrett
nale di ricezione
amente.
Soluzione
Se l'apparecchio e collegato
correttamente al circulto di alimentazione
il mot
dell' automa girare la chiave di
di accensione su
Premere il pulsante RESET.Il frontalino
non è correttamente fissato al sue
ore non è in movimento,
"ACC".
desiderato.
Controllare le connessioni
posto.
Inserire il cavo dell'antenna
saldamente.
Selezionare una stazione
manualmente.
61
Page 63

RDU 1530
Mobile
Audio System
CAR RADIO BLUETOOTH
62
Page 64

INH
ALTSVERZEICHNIS
Inst
allierung......................................
Entfernen Sie die Schraube vor der .....64
DIN Front-Mount (Method A)................64
Einbau des Gerätes..............................64
Herausnehmen der Gerätes.................66
DIN Hinter-Teil (Method B) ...................66
Benutzen des abnehmbaren
Bedienfeldes.......................................
Vedrahtete Verbingungen..................68
Platzierung der Tasten.......................69
Grundlegende Bedienung .................70
Ein-/Ausschalten des Geräts............... 70
Entfernen der Frontplatte .................... 70
Einstellen des Tones ............................70
Systemeinstellung................................ 70
Display-information uhreinstellung....... 70
..64
67
Vorschau aller Titel ...........................72
Wiederholen eines Titels...................73
Abspielen in Zufallswiedergabe........73
Direkte HOCH/RUNTER Auswahl ....73
A
USWAHL DER TITEL.....................73
DISPLAY ID3 INFORMATION...........73
Speicher Karten Bedienung .............73
Support MP3 Dekodiermodus
...................................................
Bluetooth BEDIENUNG ......................74
Spezifikation......................................
Fehlersuche........................................
..........74
75
..
.76
Schwankungsrückstellung
Flüssigkristallaneige
Audio Eingang......................................
Reset Funktion .....................................
Bedienung des Radios.......................71
Auswahl der Frequenz .........................71
Auswahl der Sender.............................71
Automatische Speicherung &
Programmsuche...................................71
Speicherfunktion...................................
ANS Funktion.......................................
Eingang Serien Bus Abspielbedienung
...................................................
Titelauswahl......................................72
Unterbrechen des Abspielens/
Pause ..............................................
...................70
....70Stumm..............................................
............................70
71
71
71
71
...........72
.72
63
Page 65

INST
Hin
g Wählen Sie eine Montageposition, in der
g Stellen Sie vor der endgültigen Installation
• Verwenden Sie, um die richtige Installation
g Wenden Sie sich an den nächstgelegenen
• Installieren Sie das Gerät in einer Position,
g Installieren Sie das Gerät nicht an Stellen,
ALLIERUNG
weise:
das Gerät nicht die normalen
Bedienvorgänge des Fahrers beim
Fahren beeinträchtigt
des Gerätes vorübergehend die
elektrischen Anschlüsse her und prüfen
Sie, ob alle richtig verbunden sind sowie
das Gerät und das System richtig
funktionieren.
zu gewährleisten, nur die dem Gerät
beiliegenden Bauteile. Der Einsatz nicht
zugelassener Teile kann zu
Funktionsstörungen führen.
Vertriebshändler, wenn zur Installation
das Herstellen von Bohrungen oder
andere Veränderungen am Fahrzeug
erforderlich sind.
in der es den Fahrer nicht behindert und
der Beifahrer bei einer plötzlichen
Bremsung, wie bei einer Notbremsung,
nicht verletzt wird.
an denen es hohen Temperaturen, wie
durch direkte Sonneneinstrahlungoder
Warmluft des Heizers, bzw.
Staub,Schmutzoder starken
Erschütterungen ausgesetzt ist.
DIN-MONTAGE VON VORDER -/
RÜCKSEITE
Dieses Gerät kann sowohl von “vorn”
(herkömmliche Montage von der
Vorderseite) oder “hinten” (DIN-Installation
zur Montage von der Rückseite unter
Verwendung der Bohrungen für
Gewindeschrauben seitlich des
Gerätegehäuses) richtig installiert werden.
Für weitere Details siehe in den
nachfolgenden Installationshinweisen.
DIN-INSTALLATION VON
DERVORDERSEITE (Methode A)
Installationsöffnung
Dieses Gerät kann in einem beliebigen
Armaturenbrett installiert werden, dass über
eineÖffnung mit den folgenden
Abmessungen verfügt:
m
53m
182mm
nstallation des Geräts
Prüfen Sie zuerst unbedingt alle
Anschlüsse und gehen Sie dann wie folgt
zurInstallation des Gerätes vor.
1. Verg
2. Lösen Sie die Kabelstränge und die
3. Betätigen Sie die Freigabetaste auf der
4. Heben Sie den oberen Teil des äußeren
5. Mit den beiden beiliegenden Schlüsseln
ewissern Sie sich, dass der Motor
ausgeschaltet ist, und lösen Sie danndas
Kabel vom Minuspol (-) der Batterie.
Antenne.
Frontplatte und nehmen Sie dasBedienfeld
ab (siehe unter “Gebrauch der
abnehmbaren Frontplatte”).
Abschlussrahmens an und ziehen Sieihn
nach außen, um ihn zu entfernen.
können die Nasen im Gerätegehäuse gelöst
werden,so dass dieses entfernt werden
kann. Schieben Sie die Schlüssel so weit
wie möglich (sodass die Kerben nach oben
zeigen) in die Schlitze in der Mitte der linken
und rechtenGeräteseite hinein. Schieben
Sie dann das Gehäuse nach hinten vom
Gerät.
64
Page 66

INST
6. M
ALLIERUNG
ontieren Sie das Gehäuse durch
Einschieben in die Öffnung im
Armaturenbrettund biegen Sie die rund um
das Gehäuse angeordneten Nasen mit
einemSchraubendreher auf. Nicht alle Nasen
werden jedoch greifen, prüfen Siedeshalb,
welche davon am zweckdienlichsten sind.
Biegen Sie die geöffnetenNasen hinter das
Armaturenbrett, um das Gehäuse zu
befestigen.
9. Verwenden Sie zu einer weiteren
Befestigung des Gerätes den
beiliegenden Metallbügel, um das Gerät
auf der Rückseite zu befestigen.
Benutzen Sie die beiliegen den Bauteile
(Sechskantmutter (M5mm) und
Federunterlegscheibe) zum Anbringen
des einen Bügelendes an der
Montageschraube auf der Geräterckseite.
Biegen Sie den Metallbügel
gegebenenfalls, so dass er in den
Montagebereich in Ihrem Fahrzeug passt.
Benutzen Sie die beiliegenden Bauteile
(Blechschraube -5 x25 mm und glatte
Unterlegscheibe) zum Anbringen des
anderen Endes des Metallbügels an
einem festen Metallelement des
Fahrzeugs unter dem
Armaturenbrett .Dieser Bügel sorgt auch
für die Gewährleistung einer
angemessenen Erdung des Gerätes.
7.Schließen Sie den Kabelstrang und die
Antenne wieder an und achten Sie darauf,
keine Drähte oder Kabel zu quetschen.
8. Lassen Sie das Gerät in das Gehäuse
gleiten, so dass es einrastet.
Hinweis: Installieren Sie die
Montageschraube mit kurzem Gewinde
auf der Rückseite des Gerätes und die
anderem itlangem Gewinde am
maturenbrett.
Ar
65
Page 67

INST
10. Sc
AusbaudesGeräts
1. Vergewissern Sie sich, dass der
2. Entfernen Sie den auf der Rückseite des
3. Betätigen Sie die Freigabetaste, um die
4. Heben Sie den oberen Teil des äußeren
5. Fügen Sie beide beiliegenden Schlüssel in
ALLIERUNG
hließen Sie das Kabel wieder am
Minuspol (-) der Batterie an. Bringen Sie
dann den äußeren Abschlussrahmen
wieder an und setzen Sie die Frontplatte
des Gerätes ein (siehe unter “Gebrauch
der abnehmbaren Frontplatte”)..
Motorausgeschaltet ist, und lösen Sie dann
das Kabel vom Minuspol (-) der Batterie
Gerätes angebrachten Metallbügel (wenn
vorhanden).
Frontplatte abzunehmen.
Abschlussrahmens an und ziehen Sie ihn
nach außen, um ihn zu entfernen.
die Schlitze in der Mitte auf der linken und
rechten Seite des Gerätes ein und ziehen
Sie das Gerät dann aus dem
Armaturenbrett.
DIN-INSTALLATION VON DER
RÜCKSEITE (Methode B)
Sollte Sie ein Auto von Nissan oder Toyota
besitzen, beachten Sie bitte die
folgendenMontagehinweise.
Verwenden Sie die mit T (für Toyota) oder
N (für Nissan) markierten Bohrungen fürdie
Schrauben, die sich beidseitig des Gerätes
befinden, um dieses an denserienmäßigen
Befestigungsbügeln Ihres Fahrzeugs
anzubringen.
Befestigung des Gerätes an den
serienmäßigen Befestigungsbügeln für das
Radio. Bringen Sie die Bohrungen für die
Schrauben am Bügel mit denen am Gerät
inÜbereinstimmung und ziehen Sie dann
die Schrauben (5x5 mm) auf beiden
Seitenfest
Hinweis: Der äußere Abschlussrahmen,
das Gehäuse und der Metallbügelkommen
bei Installationen nach Methode B nicht
zum Einsatz.
66
Page 68

GEBR
A
bnehmen der Frontplatte
1. Betätigen Sie die Taste , wodurch
2. Bewahren Sie die Frontplatte zur
Sicherheit sofort nach dem Abnehmen in
derbeiliegenden Schutzhülle auf.
AUCH DER ABNEHMBAREN FRONTPLATTE
die Frontplatte nach unten klappt.
F
reigabe Taste
Frontplatte
Vorsichtsmaßnahmen beim Umgang mit
der Frontplatte
1. Lassen Sie die Frontplatte nicht fallen.
2. Üben Sie während des Abnehmens oder
Anbringens der Frontplatte keinen Druck
auf das Display oder auf die
Bedientasten aus.
3. Berühren Sie nicht die Kontakte an der
Frontplatte oder am Hauptgerät. Dadurch
kann es zu schlechten elektrischen
Kontakten kommen.
4. Wenn Schmutz oder Fremdkörper an
den Kontakten haften, können diese mit
einem sauberen und trockenenT
uchentfernt werden.
5. Setzen Sie die Frontplatte keinen hohen
Temperaturen oder direktem Sonnenlicht
aus.
6. Verhindern Sie ein Auftreffen flüchtiger
Stoffe (z.B. Benzen, Verdünnung oder
Insektizide) auf der Oberfläche der
Frontplatte.
7. Versuchen Sie nicht, die Frontplatte zu
zerlegen.
Anbringen der Frontplatte
Um die Bedient
Sie die Tafel in das Gehäuse ein, und
stellen Sie sicher, daß die Tafel richtig
montiert ist. Sonst wird Abnormität auf
dem Display erscheinen oder einige
Tasten werden nicht funktionieren.
afel zu montieren, stecken
67
Page 69

ELEKTRIS
CHE ANSCHLÜSSE
ISO-A
nschlussteil
ANTENNE
Weiß
JACK LINEOUT
Sicherung(15A)
: L CH
ROT: R CH
68
Page 70

FUNK
LOC
TIONSWEISE
ATION OF KEYS
öffnen Sie die Abdeck
ung
1. volume taste/
SEL taste
( Freigabe Taste)
2.
3. BND/AMS
4. MODE/
5.
6.
7. LCD
8. 5 DIR-
9. 4 SHF
10. 1 P
11.1-6 Vorwahl Tasten
AU
12. 2 SCN
13. 3 RPT
14. /MUT
15. 6 DIR+
Eingang Serien Bus Schnittstelle
16.
AUX IN
17.
Reset-Taste
18.
19. DISP
20. ESB Abdeckung
21. EQ/TA
22. PTY/AF/
23. Speicher Karten Schnittstelle
24
. Mic (Mikrophon)
69
Page 71

FUNK
Gr
Ein-
Drücken Sie die Taste
TIONSWEISE
undlegende Bedienung
/Ausschalten des Gerätes
(14) um das Gerät
einzuschalten. Wenn das Gerät eingeschaltet
ist, halten Sie Taste
(
14) ,
um das
Gerät auszuschalten.
4) P-LAUTSTÄRKE
Benutzen Sie den Lautstärke-Knopf (1),
um das Niveau von Lautstärke
auszuwählen, wenn das Gerät
eingeschaltet ist.
Lösen der Frontplatte
2) um das
Drücken Sie diese Taste
(
Frontgerät zu lösen.
Einstellen des Sounds
Drücken Sie die SEL-
Taste (1) kurz um den
gewünschten Einstellmodus auszuwählen.
Der Einstellmodus wird sich in der folgenden
Reihenfolge ändern:
VOL BAS TRB BAL FAD
e) (Bass) (Treble) (Balance) (Fader)
(Volum
LOUD
Durch das Drehen des Lautstärkeknopfs (1)
im Uhrzeigersinn oder gegen den
Uhrzeigersinn ist es möglich, die gewünschte
Tonqualität einzustellen.
LOUD ON:
Um
die Laut-stärkefunktion
einzuschalten.
SYSTEMEINSTELLUNG
Halten Sie die SEL-Taste (1) gedrückt auf
dem Bedienfeld, um in den
Systemeinstellmodus zu gelangen. Dann
drücken Sie die SEL-Taste (1) kurz um den
zu ändernden Punkt auszuwählen, und
drehen Sie den Lautstärkeknopf (1), um die
entsprechende Einstellung zu ändern.
1) TAVOL
Benutzen Sie den Lautstärke-Knopf
(1), um die Lautstärke von TA
einzustellen.
2) BEEP ON/OFF
Um den Beep Ton ein-/auszuschalten
drücken Sie die Taste auf dem Frontteil.
3) AREA EUR/USA
Mit dem Lautstärkeknopf (1) stellen
Sie EUR/USA
-Gebiet
frequenzintervall ein.
DISPLA
Y-INFORMATION
Drücken Sie die DISP-Taste (19), um als
Umwandlung von jedem Anzeigemodus zu
arbeiten. Drücken Sie die DISP-Taste (19)
wiederholt, wird die Frequenz, die Uhr, die
Disk-Information oder die PTY-Information
auf dem LCD-Display erscheinen.
UHREINSTELLUNG
Drücken Sie die DISP-Taste (19) kurz bis die
Uhr auf dem Display erscheint. Dann halten
die Sie DISP-Taste gedrückt bis die Uhr
blinkt.
Dann drüc
ken Sie die Taste (6), um
die Minuten zu ändern, und drücken Sie
die Taste (5), um die Stunden zu
ändern.
wankungsrückstellung
Sch
Drücken Sie die EQ (21) Taste um die
Funktion einzuschalten und den
gewünschten AudioModus einzu-stellen. Es
gibt 5 Modi wie unten angegeben:
→ F
LAT → CLASS → POP → ROCK → OFF
STUMM
Sie die MUT
-Taste (14),
um den Ton
sofort zu dämpfen, und das Zeichen
„MUTE“ wird auf dem Display erscheinen.
Wenn Stumm eingeschaltet ist, drücken
Sie die MUT-Taste (14) erneut, um
den Ton wiederzuherstellen.
FLÜSSIGKRIST
ALLANEIGE
Dies zeigt aktuelle Frequenz und aktive
Funktionen auf dem Display (7).
70
Page 72

FUNK
uxiliary Eingang
A
TIONSWEISE
An das Gerät kann über die AUX IN
Buchse (17) auf dem Frontteil ein tragbarer
AudioPlayer angeschlossen werden
Wenn Sie beide Geräte miteinander
verbunden haben,drücken Sie die MODE (4)
Taste auf dem Frontteil um in den AUX IN
Modus zu wechseln.
RESET FUNKTION
Die Reset (18) Taste muss mit einem
Kugelschreiber oder dünnen Metallteil
Aktiviertwerden. Die Reset Taste soll aus
folgenden Gründen aktiviert werden:
- Erstinstallation des Geräts nachdem alle
Kabel komplett vernetzt sind
- Wenn keine der Tasten mehr funktioniert
- Wenn das Error Symbol auf dem
display erscheint.
H
inweis: wenn Sie die Reset (18) Taste
drücken kann das Gerät in dem Moment
nichtfunktionieren, benutzen Sie bitte etwas
in Isopropyl Alkohol getränkte Watte, um
das untereTeil des Frontteils zu säubern.
R
ADIO BEDIENUNG
uswahl der Frequenz/Band
A
Im Radio Modus drücken Sie Bnd (3) kurz,
um dasgewünschte Band auszuwählen.
Diemöglichen Bänder werden in folgender
Reihenfolge angezeigt:
M1 FM2 FM3 MW
F
Auswahl der Station
Drücken Sie kurz / (5&6) um die
automatische Such-funktion zu aktivieren.
Halten Siedie Taste mehrere Sekunden
gedrückt bis “Manuelles” im Displa
yerscheint; somit haben Sie den manuellen
Suchmodus ausgewählt. Wenn Sie keine
DerTasten für wenige Sekunden drücken,
gelangen Sie automatisch wieder zur
automatischenSuchfunktion.
Automatische Speicherung
Drücken die Taste (3) für einige
Sekunden,
der nächsten
dieSignalstärke,bis
BND/AMS
das Radio sucht von
Frequenz und misst
ein
Suchzyklus beendet ist.
Anschließend sind die 6 stärksten
Programmeunter der dazugehörigen
Tastennummer gespeichert.
enn automatische Memory-Speicherung
W
fertig ist, wird es automatisch in den
voreingestellten Scann-Modus gelangen.
Programmspe
icherung
Drücken Sie eine beliebige Taste von (1-6)
um ein Programm auszuwählen,
welchesschon abgespeichert wurde.
Drücken Sie die Taste einige Sekunden,
n ist das
dan
unter der gewählten
gewählte Programm
Tastennummer
gespeichert.
NS (Announcement Name Station)
A
ENUNG
BEDI
Alternative Frequenzen (AF)
AF ist eine ANS (Announcement name
station)-F
unktion und ist nur vorhanden für
FM-Sender. Das Gerät sucht im
Hintergrund die Bestfrequenz für den
ausgewählten Sender.
Halten Sie die AF-Taste (22), um
diese Funktion zu
aktivieren/deaktivieren. AF ist
angezeigt: Funktion ist aktiviert und
ANS-Information ist empfangen.
AF blinkt: Keine ANS-Information ist
empfangen.
AF ist nicht angezeigt: Funktion is
t
deaktiviert.
71
Page 73

FUNK
TIONSWEISE
ALARM ist angezeigt: Not
durchsagen sind
empfangen. Die Lautstärke steigt auf den
voreingestellten Wert.
Programmtyp (PTY)
Bestimmte FM-Sender senden neben
Sendername auch den Programmtyp. Sie
können nach Sender mit bestimmten
Gattungen suchen.
Drücken Sie die PTY-Taste (22) einmal,
um die PTY-Gruppe auszuwählen.
Drehen Sie den Lautstärkeknopf (1), um
das PTY-Programm auszuwählen wie
folgt.
Nach Auswahl von PTY-Programm drücken
Sie dann die (6)
Taste oder (5)
Taste für Suche.
Sucht das Gerät nach jeweiligem Sender
und stoppt, wenn ein Sender gefunden ist.
Die PTY-Funktion ist deaktiviert,
wenn die ausgewählte PTY-Gattung
nicht mehr empfangen ist.
Wenn PTY eingeschaltet ist, drücken Sie
die PTY-Taste (22) erneut, um die
PTY-Funktion abzubrechen.
EING
ANG SERIEN BUS (ESB) ABSPIEL
BEDIENUNG
n dem Frontteil des Geräts ist eine ESB
Schnittstelle (16). Sie können ein ESB
Laufwerküber diese Schnittstelle (16)
anschließen. Wenn Sie ein ESB Laufwerk
über diese Schnittstelleanschließen, so
sucht
das Gerät automatisch nach MP3,
Dateien und spielt diesedann
automatisch ab.
Wenn Sie sich in einem anderen Modus
befinden, so können Sie die Taste MODE (4)
drückenum den ESB Modus auszuwählen.
Wenn Sie MP3 Dateien
abspielen, so ist die die
wie bei der MP3
Bedienung wieoben
in diesemModus
Bedienung dieselbe
beschrieben.
Titelauswahl
Drücken Sie / (5&6) , so wird der
nächste/ vorherige Titel ausgewählt. Die
Titelnummerwird auf dem Display
angezeigt.
Drücken und halten Sie (5&6), so wird
/
der Titel vor-/zurückgespult. Die
wirdabgespielt, wenn Sie Taste loslassen.
Verkehrsdurchsage (TA)
Halten Sie die TA-Taste (21), um
diesen Modus zu aktivieren oder
deaktivieren. Bei aktiviertem Modus wird
Verkehrsdurchsage angezeigt.
Im Verkehrsdurchsage-Modus wird das
Gerät automatisch von jedem Modus in eine
aktuelle Verkehrsdurchsage eingestellt. Das
Lautstärke-Niveau steigt auf den
Minimum-Wert für Verkehrsdurchsage.
Während einer Verkehrsdurchsage
halten Sie die TA-Taste (21), um die
Funktion zu unterbrechen, ohne daß
sie deaktiviert ist.
Unterbrechen (PAUSE) des Abspielens
Drücken Sie die PAU (10) Taste um den
Abspielvorgang zu unterbrechen.
Drücken
Sie diese Taste erneut um das Abspielen
fortzusetzen.
VORSCHAU ALLER TITEL
Drücken Sie die Taste SCN (12) um vorerst
einige Sekunden von jedem Lied auf
deraktuellen.
Drücken Sie diese
Tasteerneut, die Titel werden in voller
Länge abgespielt.
72
Page 74

FUNK
W
Drücken Sie die RPT (13) Taste um
kontinuierlich den gleichen Titel zu
wiederholen.
P
LAYING ALL TRACKS IN RANDOM
Drücken Sie die SHF
Titel
Reihenfolgewiederzugeben.
um dieseFunktion zu beenden.
Direkte HOCH/RUNTER Auswahl
Drücken Sie DIR- (8) oder DIR+ (15) um
hoch oder runter zu schalten. Wenn Ihre
MP3 kein Verzeichnis hat, so
haben diese Tasten keine Funktion.
AUSWAHL DER TITEL
Drücken Sie Taste (3)
für eine Zeit. Es tritt in "Suchen Spur
direkt".
Das Gerät sucht die Strecke durch
ausgewählte
DISPL
Drücken Sie die Taste (19) um das
ID3 TAG anzuzeigen (Falls verfügbar:
Lied-Titel,Name des Interpreten, oder
andere Informationen/Inhalte…)(NUR
VERFÜGBAR IN DER MP3 ID3
VERSION)
Hinweis:
•
„TAKARAs Autoradio RDU1530 unterstützt
ESB-Treib
32GB. Benutzung von ESB-Treiber mit
höherer Kapazität kann das Gerät
beschädigen.
• ESB MP3 Player sind nicht
stand
verschiedene Herstellerund Modelle
ihren eigenen Standard haben können.
So kann unser Produkt nicht jedenMP3
Player unterstützen.
TIONSWEISE
iederholen eines Titel
(9) Taste, um alle
auf in zufälliger
rücken Sie diese D
BND/AMS
Laut
AY ID3 INFORMATION
er mit einer Kapazität von bis
ardisiert, was bedeutet, dass
taste erneut,
stärkeknopfs (1).
DISP
• Wenn Sie einen MP3 Player
anschließen, der normale (nicht
wiederaufladbare) Batterienin sich hat,
so sollten Sie diese vorab vom MP3
Player entfernen und ihn erst dann
mitder ESB Schnittstelle verbinden.
Andernfalls kann dies zum Platzen der
Batterie führen.
• Wenn Sie sich im ESB Abspielmodus
befinden, darf das ESB-Gerät nicht von
der ESB Schnittstelle entfernt werden.
VORSICHT
Wenn Sie wichtige Dateien in Ihrem ESB
Speichergerät haben, verbinden Sie dieses
nichtmit dem Gerät um diese abzuspielen.
Denn jegliche
kann Dateienverlust
Firma übernimmt
SPEICHER KARTEN Bedienung
TAKARAs Autoradio RDU 1530 unterstützt
Memory-K
32GB. Benutzung von Memory-Karte mit
höherer Kapazität kann das Gerät
beschädigen.
enn Sie eine speicher Karte Karte in die
W
Speicher Karten Schnittstelle einführen, wird
das Gerät nachMP3 Dateien
diese automatisch
abspielen.Die Bedienung ist dieselbe wie bei
den MP3 Bedienung weiter oben beschrieben.
Wenn Siein einem anderen Modus sind,
können Sie die MODE Taste (4) drücken, um
den speicher Karte Modus auszuwählen.
Wenn Sie wichtige Dateien auf der Speicher
Karten Karte haben, verbindenSie die Karte
nicht mit dem Hauptgerät um diese
abzuspielen.
falsche Bedienung
verursachenund unsere
keinerlei Haftung dafür.
arte mit einer Kapazität von bis
such
en und
73
Page 75

FUNK
SU
TIONSWEISE
PPORT MP3 Dekodiermodus
Das wichtigste Gerät unterstützt MP3
Modi wie unten.
St
andard
PEG1 Audio
M
Layer 3
(44.1kHz)
LUETOOTH BEDIENUNG
B
• Vorbereitung für die Bluetooth
•
•
•
Bit Rate
(kbps)
16~ 320 Kbp
& VBR
Unterstütz
t Mode
s
Stereo
Bedienung
(i) Wenn Sie Bluetooth verwenden,
vergewissern Sie sich, dass das
Mobiltelefon dieBluetooth Funktion
unterstützt.
(ii) Bei den verschiedenen Arten der
Mobiltelefone, hat die Bluetooth
Sendestärke gewisseUnterschiede.
Um die beste Sprachqualität zu
bekommen, wird empfohlen, dass
zwischendem Mobiltelefon und dem
Gerät weniger als 3 Meter liegen. Bitte
stellen Sie keineMetallteile oder
andere Geräte in den Weg zwischen
Mobiltelefon und dem Gerät.
• PAAREN
1) In jeglichem Modus, drücken und
halten Sie MODE (4) auf dem
Frontteilgedrückt.
Wählen Sie die Bluetooth Funktion in
ihrem Mobiltelefon. (Bitte informieren
Sie sich indem Handbuch von ihrem
Mobiltelefon, wie Sie die Bluetooth
Funktion bedienen)
2) "HW CARBT" sollte in der Liste in
ihrem Mobiltelefon erscheinen, bitte
wählen Sie "HW CARBT" und geben
Sie das Passwort „0000“ein.
3) Das Gerät hat Funktion von
automatischer Paarung, es wird
automatisch nach dem
Bluetooth-
4) Wenn Sie erfolgreich gepaart haben,
erscheint
Handy suchen.
in der LCD
Anzeige. Unddas Mobiltelefon wird in
der LCD Anzeige angezeigt.
5) Falls Paarung scheitert, versuchen Sie
innerhalb von einigen Sekunden, die
Paarung er
neut zu machen. Sie können
die Bedienungsanleitung über Ihre
Handy nachlesen, und löschen Sie das
Gerät, das nur sucht, und reparieren Sie
es erneut.
·
ANTWORTEN/ABLEHNEN VON EINEM
KOMMENDEN ANRUF
Wenn ein Anruf kommt,
doch Sie können
(4)
drücken um den Anruf anzunehmen,
oder aber (22) drücken, umden
Anruf abzulehnen.
·TRANSEFRIEREN DES ANRUFS
·
·
·
ZWISCHEN DEM MOBILTELEFON UND
DEM GERÄT
Während dem Sprechmodus können
Sie die MODE (4) Taste
drücken und gedrückthalten, um den
Anruf zwischen dem Mobiltelefon und
dem Gerät zu transferieren.
Hinweis:
Wenn Sie den Anruf zum Mobiltelefon
transferieren, so wird der
Stumm-Modus (Mute)in demselben
Moment entfernt.
74
Page 76

SPEZIFIK
A
LLGEMEINE
Pow
er Supply Requirements : DC 12 Volts, Negative Ground
Tone Controls
Bass (bei 100 Hz) : f10 dB
Treble (bei 10 kHz) : f10 dB
Maximale Ausgangsleistung : 4X45watts
ATION
Stromaufnahme
ESB/MEMORY-KARTE PLAYER
Signal to Noise Ratio : Mehr als 55 dB
Kanaltrennung : Mehr als 50 dB
Frequency Response : 40Hz – 18 kHz
RADIO
Frequenzbereich 87.5 to 108 MHz
IF 10.7 MHz
Empfindlichkeit
(S/N=30dB) 10dBu
Stereo-Trennung >25dB
Ampere (max.) (Für High Power-Version)
: 15
Für 2 Bands Europa
FM
MW
Frequenzbereich 522 to 1620 kHz
IF 450 kHz
Empfindlichkeit (S/N=20dB) 36 dBu
75
Page 77

FEHLER
or Sie die Prüfliste durchgehen, prüfen Sie die Verbindungen der Kabel.Wennirgendein
Bev
Problem nach prüfen der Prüfliste besteht, wenden Sie sich bitte an IhrenVerkäufer.
Symptoom Grund Lsöung
BEHEBUNG
Kei
n Strom
nTon
Kei
Die
Bedienungstaste
nfunktionieren
nicht
D
as Radio
funktioniertnicht.
ie automatische
D
Sender-wahl
funktioniert nicht.
Die Zündung des Autos Ist
aus.
D
ie Sicherung ist durch-
gebrannt
Die Lautstärke ist auf
Minimum eingestellt.
ie Kabel sind nicht
D
korrekt verbunden.
Der eingebaute
Mikro-Computer
funktioniert nicht
einwandfrei.
Das Antennekabel ist nicht
verbunden.
Die Signale sind zu
schwach.
Schalten Sie die Zündung ein.
Sicherung ersetzen
Stellen Sie die Lautstärke auf
dieGewünschte Stärke ein.
Überprüfen Sie die Verbindungen der
Kabel.
Drücken Sie die RESET Taste. Das
Frontteil ist nicht einwandfrei anseinem
Platz.
Fügen Sie das Antennenkabel ein.
Wählen Sie manuell einen Sender aus.
76
Page 78

RDU 1530
Mobile
Audio System
CAR RADIO BLUETOOTH
77
Page 79

INDICE
Inst
alatión...........................................
PREVIO
A LA INSTALATIóN
...................................................
............79
79
PARA SACAR LA UNIDAD DEL
SALPICADERO......................................79
MANEJO DEL PANEL FORNTAL
...................................................
............82
CONEXI‡N DE LOS CABLES
...................................................
............83
FUNCIONES GENERALES
...................................................
............84
ENCENDIDO/APAGADO .......................85
APERTURA DEL PANEL FRONTAL ......85
SONIDO AJUSTE...................................85
CONFIGURACIóN DEL SISTEMA
INFORMACIóN DE LA PANTALLA
CONFIGURAR EL RELOJ
.....................85
.........85
.........85
ECUALIZADOR......................................85
FUNCION ENTR
A
VANCE DE CANCI‡N
RETROCESO DE CANCI‡N
PAUSA
ESCANEO DE CANCIONES
REPETICIóN DE UN
REPRODUCCIóN ALEATORIA DE LAS
SALTO A OTRO DIRECTORIO en MP3
B„SQUED
CANCIONES (BND/AMS)
USO DEL
DE MEMORIA
LECTOR DE TARJETAS
En MP3 Pu
modos de decodificación
OPERACIóN de Bluetooth
ESPECIFICA
SOLUCI‡N DE PROBLEMAS
ADA BUS SERIAL (ESB)
...........................87
...................88
....................................................88
..................88
A CANCIóN
A DIRECTA DE
......................88
..............................................89
.....87
..........88
ede soportar los siguientes
..................89
.....................89
CIONES TÉCNICAS
.............91
...................92
..88
..88
SILENCIAR
PANTALLA DE CRISTAL LIQUIDO
ENTRADA AUXILIAR DE AUDIO
REINICIO DEL SISTEMA
RADIO OPERA
............................................85
........86
...........86
.......................86
CIóN
............................86
CAMBIAR A MODO RADIO ( MODE)
...................................................
.......... 86
SELECTOR DE BANDAS( BAND)
...................................................
SINTONIA MANUAL
AUTOMEMORIA (AS/PS)
.............................86
.....................86
..........
ANS (Announcement Name Station)
OPERACIÓN
.............................................................
86
87
78
Page 80

INST
N
• Instale el aparato en un lugar que no
• Antes de instalar definitivamente el
• En la instalación, utilice únicamente los
• En caso de tener que realizar algún tipo
• Instale el aparato en un sitio donde no
• No instale el aparato donde pueda estar
Este aparato puede ser montado tanto de
forma “Frontal” (montaje DIN-Frontal
convencional) o de forma “Trasera”
(montaje DIN-Trasero, utilizando las
roscas situadas el los laterales del chasis
del aparato).
ALATI‡N
otas:
interfiera con la posición del conductor.
aparato conecte los cables de forma
temporal y compruebe que funciona
correctamente.
componentes suministrados con el
aparato. La utilización de otro tipo de
componentes pueden ser causa de un mal
funcionamiento.
de modificación en su vehículo (agujeros,
etc.) para la instalación de este aparato,
consulte antes con su vendedor más
cercano.
pueda causar daños a los ocupantes del
vehículo en caso de una maniobra brusca,
como una frenada de emergencia.
sometido a altas temperaturas, como la
luz directa del sol o la salida de la
calefacción, ni en lugares con mucho
polvo, suciedad o donde esté sometido a
fuertes vibraciones.
INSTALACI‡N DIN FRONTAL
Para poder instalar este aparato hace falta
que el salpicadero tenga una abertura con
las siguientes dimensiones:
53m
m
182mm
1. Compruebe que todas las conexiones
de los cables están correctamente
realizadas (ver el apartado “Conexión
de los cables”).
2. Asegúrese de que el vehículo está
apagado, y a continuación desconecte
el cable del terminal negativo (-) de la
batería.
3. Pulse el botón de liberación (OPEN) del
panel frontal y retírelo (ver el apartado
“Manejo del panel frontal”).
4. Presiones en los laterales del marco
embellecedor (tiene unas pestañas) y
retírelo.
Inserte las dos llaves de extracción
5.
(suministradas con el aparato) hasta el
fondo (con las muescas hacia arriba) en
las ranuras situadas en los laterales del
aparato. Una vez realizado, retire la faja
de montaje fuera de la unidad.
79
Page 81

INST
6. In
7. Conecte los cables y la antena.
8. Deslice hasta el fondo la unidad dentro de
9. Vuelva a conectar el cable del terminal
PARA SACAR LA UNIDAD DEL
SALPICADERO
1. Asegúrese de que el vehículo está
2. Libere la unidad de la tira metálica
3. Desconecte los cables y la antena de la
4. Retire el panel frontal de la unidad (ver el
5. Retire el marco embellecedor (como se
ALATI‡N
troduzca la faja de montaje en la
abertura del salpicadero y doble hacia
fuera las pestañas de la faja de montaje
con un destornillador para fijarla al
salpicadero.
la f aja de montaje.
negativo (-) de la batería. Coloque el marco
embellecedor e instale el panel frontal de la
unidad (ver el apartado “Manejo del panel
frontal)
apagado, y a continuación desconecte
el cable del terminal negativo (-) de la
batería.
trasera (si está atornillada).
parte posterior de la unidad.
apartado “Manejo del panel frontal”).
explicó anteriormente).
• Introduzca hasta el fondo las llaves de
extracción en las ranuras laterales (con
las muescas hacia arriba) y extraiga la
unidad fuera del salpicadero.
INSTALACI‡N DIN TRASERA
1. Compruebe que todas las conexiones
de los cables están correctamente
realizadas (ver el apartado “Conexión
de los cables”).
2. Asegúrese de que el vehículo está
apagado, y a continuación desconecte
el cable del terminal negativo (-) de la
batería.
3. Pulse el botón de liberación (OPEN) del
panel frontal y retírelo (ver el apartado
“Manejo del panel frontal”).
4.
Presiones en los laterales del marco
embellecedor (tiene unas pestañas) y
retírelo.
5. Inserte las dos llaves de extracción
(suministradas con el aparato) hasta el
fondo (con las muescas hacia arriba) en
las ranuras situadas en los laterales del
aparato. Una vez realizado, retire la faja
de montaje fuera de la unidad (ver gráfico
en el apartado anterior).
6. Con un destornillador retire los anclajes
(garras) atornillados en ambos lados de la
unidad (en la parte delantera).
80
Page 82

INST
7.
ALATI‡N
Alinee los orificios de la unidad con los del
vehículo e introduzca en ellos los tornillos
(5x5mm), fijando la unidad al salpicadero.
81
Page 83

ANEJO DEL PANEL FORNTAL
M
To Detach the Front Panel
1. Pulse el botón y el panel frontal se
abrirá para extraerlo.
C
errar panel
anel frontal
P
2. Por seguridad, guarde el panel frontal en
su estuche inmediatamente después de
retirarlo.
Estuche
PRECA
UCIONES EN SU MANEJO
1. No deje caer el panel frontal.
2. No presione la pantalla ni los botones
cuando retire o inserte el panel en la
unidad central.
3. No toque los contactos del panel frontal
ni de la unidad central, ya que puede
llegar a producir fallos en los contactos.
4. Si los contactos se ensucian límpielos
con un trapo limpio y seco.
5. No exponga el panel frontal a altas
temperaturas ni a la acción directa del
sol.
6
antenga alejado el panel frontal de
. M
sustancias
insecticidas,
volátiles, como benceno,
etc.
7. No trate nunca de desmontar el panel
frontal.
P
anel frontal
To Install the Front Panel
Para inst
alar el panel de control, inserte el
panel en la cubierta y asegúrese de que
el panel está instalado correctamente. De
lo contrario, se produce alteración en la
pantalla o algunas teclas no funcionarán
correctamente.
82
Page 84

NEXI‡N DE LOS CABLES
CO
NEXIONES ISO
CO
RCA SALIDA
BIANCO: L CH
Fusible(15A)
ANTENA
ROJO: R CH
83
Page 85

FUNCI
ONES GENERALES
CONTROLES
Y FUNCIONES / DESCRIPCI‡N DEL PANEL FRONTAL
Abra la cubierta
1. volume /
SEL
2.
3. BND/AMS
4. MODE/
5.
6.
7. LCD
8. 5 DIR-
9. 4 SHF
10. 1 P
M
11
.
Botón
Botón
Botón extracción Panel
AU
emorias 1-6
12. 2 SCN
13. 3 RPT
14. /MUT
15. 6 DIR+
ada Bus Serial interface
Entr
16.
17.
AUX IN
18.
Reset
19. DISP
20. ESB cubierta
21. EQ/TA
22. PTY/AF/
S
lot para memorias tarjetas
23.
icrófono
M
24.
84
Page 86

FUNCI
ONES GENERALES
ENCENDID
a encender el aparato pulse
Par
O/APAGADO
botón .
Cuando el aparato está encendido,
Mantenga presionado el botón
para apagarlo.
AP
ERTURA DEL PANEL FRONTAL
(OPEN/CLOSE)
Para abrir el panel frontal pulse el botón
(2
).
SONIDO AJUSTE
Presione el botón SEL (1) p
ara seleccionar el
modo de ajuste deseado. El modo de ajuste
cambiará en el siguiente orden:
VOL BAS TRB BAL FAD
e) (Bass) (Treble) (Balance) (Fader)
(Volum
LOUD
Girando la rueda de volumen (1) en sentido
horario o antihorario, es posible ajustar la
calidad de sonido deseada.
LOUD ON:
ara activar la función de refuerzo de los
P
graves . LOUD
CONFIGURACIÓN DEL SISTEMA
Mantenga presionando el botón SEL (1) en el
panel frontal para entrar en el modo de
configuración del sistema. Luego, presione el
botón SEL (1) para seleccionar el ítem que
desee cambiar y girar el botón de volumen (1)
para cambiar el ajuste correspondiente.
AVOL
1) T
Utilice el botón de volumen (1)
para ajustar el valor del volumen.
2) BEEP ON/OFF
Permite activar o desactivar los tonos de
teclado.
3) AREA
EUR/USA
Utilice el botón de volumen (1) para
configurar el espaciamiento de
frecuencia de área de EUR/USA.
4) P-VOL
Utilice el botón de volumen (1) para
seleccionar el nivel de volumen cuando la
unidad se enciende.
INFORMACIÓN DE LA
PANTALLA
Presione el botón DISP(VISUALIZACIÓN)
(19) para operar como la conversión de cada
modo de visualización. Presione
repetidamente el botón DISP (19), las
informaciones como la frecuencia, el reloj, el
disco o la información PTY se mostrarán en
la pantalla LCD.
CONFIGURAR EL RELOJ
Presione el botón DISP (19) hasta que el reloj
se muestra en la pantalla. Luego, mantenga
presionando el botón DISP hasta que
p
arpadee el reloj.
A continuación, pulse el botón (6)
para cambiar los minutos y el botón (5)
para cambiar las horas.
ECU
ALIZADOR
Esta unidad incorpora un Procesador
Digital de Señales (Digital Signal
Processor), mediante el cual podemos
seleccionar varias curvas de respuesta
preestablecidas.
C
ada una de ellas posee la ecualización
correcta para los siguientes tipos de
música: FLAT (respuesta plana),
CLASS (música clásica), POP
(música pop), ROCK (música rock) y
OFF (EQ desactivado).
LAT → CLASS → POP → ROCK → OFF
→ F
se repetidamente el botón EQ (21)
Pul
para seleccionar la ecualización
deseada.
SILENCIAR
Presione el botón
MUT
(14) p
ara
silenciar el sonido al instante y
"MUTE(SILENCIAR)" aparecerá en la
pantalla. Cuando se enciende MUTE,
presione el botón MUT (14) de nuevo
para reanudar el sonido.
85
Page 87

FUNCI
ONES GENERALES
P
ANTALLA DE CRISTAL LÍQUIDO
Para exhibir la frecuencia actual y activar
las funciones en la pantalla (7).
E
NTRADA AUXILIAR DE AUDIO
a unidad puede ser conectada a un
Est
reproductor externo de audio portátil, para
lo cual usted deberá conectarlo usando un
cable provisto con un “jack” (17) de 3,5mm
estéreo. Para seleccionar esta entrada p,
pulse el botón de MODE y en el Display se
mostrará “AUX IN” indicando que esta
entrada está seleccionada.
EINICIO DEL SISTEMA
R
Aunq
ue no sea una circunstancia normal, el
micro-procesador que controla esta unidad
(semejante al de los ordenadores) puede ser
afectado por cargas electrostáticas,
pr
ovocando un mal funcionamiento del
mismo. Cuando esto se produce hay que
reiniciarlo pulsando el botón de reinicio
(RESET) (18).
Se debe reiniciar el sistema cuando se
produzca alguno de los siguientes sucesos:
- Cuando acabe de instalar la unidad por
primera vez.
- Cuando los botones no respondan.
Cuando aparezca un mensaje de error en
la pantalla.
Nota: Si al pulsar el botón de reinicio la
unidad no funciona, limpie las conexiones
entre el panel frontal y la unidad principal con
un trapo mojado en alcohol isopropílico.
RADIO OPERA
.
MBIAR A MODO RADIO ( MODE)
CA
Pulse el botón MODE para seleccionar el
modo radio.
CIóN
SELECTOR DE BANDAS( BAND)
Pulse brevemente el botón BND (3) para
seleccionar la banda deseada.
Cada pulsación cambiará la banda según la
siguiente secuencia:
M1 FM2 FM3 MW
F
Sintonía manual
Pulse uno de los botones de sintonía y
manténgalo pulsado ligeramente hasta
que aparezca en pantalla el mensaje
“MANUAL”. Pulse de nuevo en la
dirección deseada hasta alcanzar una
frecuencia próxima a la estación buscada.
Ajuste la frecuencia mediante pulsaciones
cortas.
Nota: La unidad retorna automáticamente a
modo de sintonía automática después de
varios segundos de inactividad en el botón
de sintonía, apareciendo el mensaje
“AUTO” en pantalla.
A
UTOMEMORIA (AMS)
Esta unidad puede almacenar de forma
automática hasta 18 emisoras en la
banda FM (6 en FM1, 6 en FM2 y 6 en
FM3) y 6 emisoras en la banda MW (AM).
Para ello sitúese en la banda deseada
(FM o MW). Pulse el botón BND/AMS
(3) durante unos instantes, y la unidad
comenzará a buscar, y posteriormente
almacenar en las posiciones de memoria,
las emisoras más potentes de la
zona.
Nota: Las emisoras que estén previamente
almacenadas el las memorias son eliminadas
al pulsar el botón de auto memoria.
Siempre que desee chequear las estaciones
memorizadas puede pulsar brevemente
AMS y la unidad escaneará las emisoras
en memorias deteniéndose unos segundos
en cada una.
86
Page 88

FUNCI
ONES GENERALES
Cuando el almacenamiento automático de
memoria está terminado, entrará en el
modo de exploración de preconfiguración
automáticamente.
NS (Announcement Name Station)
A
OPERACI‡N
Frecuenci
AF es una función de ANS y
lsólo está disponible p
FM. La unidad busca en el fondo la mejor
frecuencia para la emisora seleccionada.
Mantenga presionado
desactivar esta función. AF se
muestra: La función se activa y se
recibe la información de ANS.
Parpadea AF: No se recibe la información
de ANS.
AF no se muestra: La función está
desactivada.
Alarma se muestra: Los anuncios de
emergencia se reciben. El volumen
aument
Tipo del Programa(PTY)
Algunas es
además del nombre de la estación,
también el tipo del programa. Usted
puede buscar emisoras con ciertos
géneros.
Presione PTY (22) para seleccionar el
grupo de PTY.
Gire el botón de volumen (1) para
seleccionar el programa de PTY como
sigue.
Después de seleccionar el programa de PTY,
a continuac
(5) para la búsqueda.
La unidad busca las respectivas
estaciones y se detiene cuando se
encuentra una estación. Si no se encuentra
la estación con el género de PTY respectiva,
as Alternativas(AF)
ara las estaciones de
AF (22) para activar/
a al valor preestablecido.
taciones de FM transmiten,
ión presione
(6)
o
"NO PTY" se muestra. La función de PTY se
desactiva si el género de PTY seleccionado
ya no se recibe.
Al encenderse el PTY, presione PTY (22)
de nuevo para cancelar la función de
PTY.
Mantenga presionado
TA (21) p
desactivar este modo. TA se reproduce
con el modo activado.
En el modo TA la unidad sintoniza
Anuncio de Tráfico (TA)
Mantenga presionado
TA (21) en un anuncio
de tráfico para interrumpir la función sin
desactivarlo.
automáticamente de cualquier modo a un
anuncio de tráfico actual. El nivel del
volumen aumenta al valor mínimo para los
anuncios de tráfico.
FUNCION ENTR
En el
panel frontal existe un conector ESB
oculto tras una tapa de goma. Tire de la
lengueta de la tapita de goma para dejar
libre el conector. Usted puede conectar un
dispositivo ESB externo para reproducir las
canciones MP3 grabadas en dicho dispositivo.
(Ejemplo: un Pen-Drive o memoria flash)
Cuando lo conecte, la unidad
automáticamente buscará las canciones
MP3 grabadas en dicho dispositivo, el
manejo es el mismo que el explicado para
el apartado de MP3. También puede
seleccionar esta entrada pulsando el botón
de MODE. .
AVANCE DE CANCI‡N
Si pulsa este botón brevemente avanzará
a la canción siguiente que se esté
reproduciendo.
ADA BUS SERIAL (ESB)
ara activar o
87
Page 89

FUNCI
En p
tema actual.
Mantenga pulsado este botón para
avanzar rápidamente a través de la
canción actual.
RETROCESO DE CANCI‡N
Si gira el botón de sintonía brevemente
retrocederá a la canción anterior
que se esté reproduciendo.
En pantalla se mostrará en número de
tema actual.
Mantenga pulsado este botón para
retroceder rápidamente a través de la
canci
PAUSA
Pulse este botón para realizar una
pausa en la reproducción.
Púlselo de nuevo para reanudarla.
En pantalla aparece el mensaje PAUSE.
ESCANEO DE CANCIONES (2
SCN)
Pulse este botón para escuchar los 10
primeros segundos de cada canción.
REPETICIóN DE UNA CANCIóN (3
RPT)
Pulse este botón para repetir de forma
indefinida la reproducción de la canción
seleccionada.
REPRODUCCIóN ALEATORIA DE LAS
CANCIONES (4 SHF)
Pulse este botón para reproducir las
canciones en un orden diferente
al que han sido grabados.
( 15 )DIR- / DIR+ : SALTO A OTRO
DIRECTORIO en MP3
ONES GENERALES
antalla se mostrará en número de
ón actual.
B„SQUEDA DIRECTA DE
CANCIONES (BND/AMS)
El botón (BND/AMS) sirve, en modo MP3,
para realizar la búsqueda de canciones de
modo directo.
Búsqueda por númer
Pulse el botón (AMS) una vez para
activar el modo de búsqueda de pista.
En la pantalla aparece el mensaje
MP3 TX.
Ahora hay que introducir el número de
canción que se desea reproducir. Para
ello se utilizan los botón volumen.
par
a entrar en el mismo o para
reproducir la canción seleccionada.
"Auto radio
apoyar el driver ESB con una capacidad
hasta 32GB. Uso de la tarjeta de driver
ESB con capacidad puede dañar la unidad.
Los reproductores y memorias MP3
externos no poseen todos el mismo
estándar, esto significa que diferentes
marcas o diferentes modelos poseen su
propio estándar de funcionamiento. Esta
unidad no soporta todos los reproductores
MP3 o Pen-Drives existentes en el
mercado. Esta unidad solo reconocerá
archivos bajo el Standard “ESB memory
discs.
Si su reproductor externo MP3 posee una
batería no recargable, retire primero la pila
del dispositivo y luego inserte el mismo a
esta unidad.
RDU 1530 de TAKARA puede
o de canción:
Pulse el botón DIR + para saltar al
próximo directorio del MP3, y pulse el
botón DIR- para saltar al directorio
anterior.
Si no hubiera nada más que un directorio
en el MP3 estos botones no realizan
ninguna función.
88
Page 90

FUNCI
NOT
No extraiga el dispositivo ESB cuando
se enc
otro modo primero, para evitar daños en
archivos grabados en el dispositivo ESB
Precaución en el uso de dispositivos ESB
de almacenamiento externos:
Cuando existan importantes archivos de
datos guardados en su dispositivo ESB,
no lo conecte a esta unidad para evitar
posibles daños a los archivos de datos
no soportados por esta unidad.
Un error en el manejo de la unidad
podría causar pérdida de archivos, y
nuestra compañía no asume la
responsabilidad por un mal uso de estos
tipos de archivos.
USO DEL
ONES GENERALES
A:
uentra en reproducción. Cambie a
LECTOR DE TARJETAS
DE MEMORIA
Auto-radio RDU 1530 de
apoyar la tarjeta de memoria con una
capacidad hasta 32GB. Uso de la tarjeta de
memoria con alta capacidad puede dañar la
unidad.
En el
frente de la unidad se encuentra un
Slot para lectura de tarjetas de memoria
que contengan archivos de música MP3.
TAKARA puede
no la conecte a esta unidad para evitar
posibles daños a los archivos de datos no
soportados por esta unidad, o por un mal
manejo de la misma, ejemplo extraer la
tarjeta durante la lectura antes de cambiar a
otro modo puede dañar archivos.
En MP3 Puede soportar los siguientes
modos de decodificación:
MPEG1 Audio Layer 3(44.1Khz
Bit Rate (Kbps) 16 ~320Kbps · Stereo
BLUETOOTH
Preparación para el manejo del
Bluetooth
(i) Cuando use la función Bluetooth, por
favor confirme que su teléfono móvil
posee función “Bluetooth”.
(ii) A
VINCULACION
1) En cualquier modo, pulse el botón MODE
distancia entre esta unidad y su
teléfono debe ser como máximo de 3
metros. Depende de la potencia de
transmisión Bluetooth de su teléfono.
Evite los cuerpos metálicos entre el
teléfono y esta unidad
durante 3 segundos.
.
.
..
C
uando inserte la tarjeta de
memoria , la unidad automáticamente
buscará las canciones MP3 grabadas en
dicho dispositivo, el manejo es el mismo
que el
Desde el modo de Radio, también puede
seleccionar esta entrada pulsando el
botón de MODE.
Cuando existan importantes archivos de
datos guardados en su tarjeta de memoria,
explicado para el apartado de MP3.
En el teléfono móvil seleccione el modo
de “búsqueda de nuevos Dispositivos”
o “Vincular nuevo dispositivo” o similar
menú. (Consulte el manual de su
teléfono móvil acerca del manejo en
modo Bluetooth).
2) Inicie la búsqueda desde su teléfono de
un nuevo dispositivo, y cuando la
pantalla de su teléfono muestre "HW
CARBT” seleccioneló . Se le pedirá que
introduzca la clave de vinculación,
entonces introduzca la clave “0000”.
89
Page 91

FUNCI
3) La unidad tiene la función de la
asociac
celular Bluetooth de forma automática.
Una vez conseguida la vinculación el
4)
display de esta unidad le mostrará
5) Si el emparejamiento falla, intenta
asociar de nuevo dentro de varios
segundos. Puede referirse a la operación
sobre su celular, borre el dispositivo que
acaba de buscar y repare de nuevo.
ONES GENERALES
ión automática, se busca el
CONTES
LLAMADA ENTRANTE
Cuando una llamada entrante, si
d
esea responder a la llamada pulse el
botón de descolgar o pulse
para rechazar la llamada.
TRANSFERIR LLAMADA ENTRE EL
MOVIL Y LA UNIDAD
Usted puede transferir el sonido durante
una llamada al móvil o a los altavoces
pulsando el botón (4)MODE
y manteniéndolo pulsado
durante dos segundos.
Nota:
Si usted transfiere la llamada al móvil,
el mute será desactivado al mismo
tiempo.
TAR/ RECHAZAR UNA
90
Page 92

ESPECIFIC
ACIONES TÉCNICAS
GENERAL
Al
imentación : DC 12 V Negativo a Masa
Control de tono
• Bajos (a 100 Hz) : ± 10 dB
• Agudos (a 100 kHz) : ± 10 dB
Potencia máxima de salida :4 x 45W
REPRODUCCI‡N ESB/TARJETAS DE MEMORIA
R
elación Señal Ruido : Más de 55 dB
Separación de canales : Más de 45 dB
40 Hz – 18 kHz Respuesta de frecuencia :
RADIO
FM
Rango de frecuencia : 87.5 a 10
Frecuencia intermedia : 10.7 MHz
Sensibilidad útil (S/N=30dB) : 10 dBu
Separación estéreo : >25 dB
8 MHz
MW
Rango de frecuencia : 522 a 1620 KHz
Frecuencia intermedia : 450 kHz
Sensibilidad útil (S/N=20dB) : 36 dBu
91
Page 93

SOLU
CI‡N DE PROBLEMAS
Antes
de leer la siguiente lista, compruebe que las conexiones eléctricas están
correctamente realizadas.
Si después de realizar las comprobaciones que aparecen en esta lista persisten los
problemas, contacte con nuestro servicio técnico.
S‹NT
OMA CAUSA SOLUCI‡N
N
o hay
potencia.
N
o hay sonido.
La llave de contacto del
vehículo está
desconectada.
fusible está fundido. Cambie el fusible y revise
El
El volumen está
desconectado o muy bajo.
Si los cables de alimentación del
vehículo están correctamente
conectada a los circuitos de
accesorios, y el vehículo está
detenido, coloque el interruptor de
encendido en AAC
(ACCESORIOS).
cortocircuitos en instalación de
altavoces o salida antena electrónica.
Conecte el sonido o suba el volumen
del mismo.
otones del
Los b
aparato no
funcionan.
La radio no
funciona.
Las co
nexiones eléctricas
no están bien realizadas.
microprocesador no
El
funciona correctamente.
El cable de la antena no
está conectado.
Compruebe las conexiones eléctricas.
Compruebe que el panel frontal está
correctamente introducido.
Pulse Reset o
Reconecte la corriente.
Introduzca firmemente el cable de la
antena.
92
Page 94

RDU 1530
Mobile
Audio System
CAR RADIO BLUETOOTH
93
Page 95

‹NDICE
Inst
alação.........................................
Retire parafuso antes da instalação.....95
DIN Front-Mount (Método A)................95
Instalar a unidade.................................
Retirar a unidade..................................
DIN Rear-Mount (Método B) ................97
Usando o painel frontal destacável ..98
Cablagem Conexão............................99
Localização das teclas.......................100
Operação básica.................................101
Ligar / desligar a unidade.....................101
Espelho libertação................................101
Som ajustamento .................................101
Som ajustamento .................................101
Configuração do sistema......................101
Informações de exibi
Configuraç
Equalização........................................
ão do relogio........................101
ção
.....................101
....95
95
96
..101
..101Mudo...................................................
Bus de serie jogar operação..............103
Selecionando faixas.......................... 103
Pausando jogando............................ 103
Visualizando todas as faixas............. 103
Repetindo a mesma faixa................. 103
Reproduzir todas as faixas de
amostragem
SEL
ECÇøO DIRECT‡RIO UP / DOWN
ECÇøO TRACKS
SEL
DISPLAY informação id3
Cartão de memoria operação.............104
Apoi
o decodificação modo MP3
...........................
.......................
...................................................
Operação Bluetooth
Espec
Resolução d
ificação......................................
e problemas ...................107
.........................
.......... 104
...................
.......
..104
104
104
105
105
106
..101Monitor de liquido cristalino................
Auxiliares de entrada............................102
Redefinir função ...................................
Rádio operação ..................................102
Selecionando a banda de frequências .102
Seleção estação...................................102
Automático menmory armazenar &
Programa varredura ............................ 102
Estação de armazenamento.................102
ANS (Announcement Name Station)
operação ...........................................
102
.. 102
94
Page 96

I
NSTALAÇøO
N
otas:
• Escolha o local onde montar a unidade
não irá interferir com o normal função de
condução do motorista.
• Antes de finalmente instalar a unidade, ligue
provisoriamente os cabos e certifique-se
que está tudo ligado corretamente e da
unidade, bem como o sistema funcione
adequadamente.
• Utilize somente as peças incluídas com a
unidade para garantir uma instalação
correcta. A utilização de peças não
autorizadas podem cautilize avarias.
• Consulte o seu revendedor mais próximo se
instalação requer a perfuração de furos
ou outras modificações no veículo.
• Instale a unidade onde ela não fica no
caminho do condutor e não podem ferir o
passageiros, se houver uma paragem
súbita, tal como uma emergência.
g Evite instalar a unidade em que poderia ser
sujeita a temperaturas elevadas, tais como
a partir de luz solar direta, ou de ar quente, a
partir do aquecedor, ou em que seria sujeito
a poeira, sujidade ou vibração excessiva.
DIN frontal / posterior-MOUNT
Este aparelho pode ser instalado
correctamente quer f rom "Frente" (DIN
convencional Frontmount) ou "Rear" (DIN
Rear-mount instalação, utilizando roscados
furos nas laterais da unidade chassis). Para
mais informações, consulte os seguintes
DIN Front-MOUNT (Método A)
Instalação Abertura
Esta unidade pode ser instalada em
qualquer painel ter uma abertura como
mostrado abaixo:
53m
m
182mm
Instalar a unidade
Certifique-se de testar todas as conexões
em primeiro lugar, e então siga esses
passos para instalar a unidade.
1. Certifique-se de que a ignição é
desligada, e, em seguida, desligue o cabo
da bateria do veículo negativo (-) terminal.
2. Desligue o fio da antena e arreios.
3. Pressione o botão de liberação do painel
frontal e remova o painel de controle (veja
os passos de "usando o painel frontal
destacável").
4. Levantar o topo do anel exterior
guarnição então puxe-o para removê-lo
5. Os dois guias fornecidas chaves
liberação no interior da unidade da manga,
a que.
par
você possa removê-lo. Inserir as chaves na
medida em que vai (com os entalhes virada
para cima) para a adequada ranhuras no
meio esquerdo e direito lados da unidade.
Em seguida, deslize a manga ao largo das
costas da unidade.
métodos de instalação ilustrados.
95
Page 97

INST
ALLATION
ontar a manga, inserindo a manga na
6. M
abertura do painel e dobre as abas abertas
localizadas ao redor da manga com uma
chave de fenda. Nem todos os guias serão
ser capaz de fazer contato, para analisar
quais serão os mais eficazes. Bending abrir
as abas atrás do painel de instrumentos para
garantir a manga no lugar.
7. Reconecte o cabo e tirar a antena e ter
cuidado para não beliscar qualquer fios ou
cabos.
8. Deslize a unidade para a manga até
encaixar no lugar.
9. Para garantir ainda mais a unidade, use
a cinta metálica oferecidos para garantir
a volta da unidade no local. Utilizar a
fornecer hardware (Hex Nut (M5mm) e
Primavera Arruela) para prender uma
extremidade da cinta para a montagem
parafuso na parte de trás da unidade. Se
necessário, dobre a alça metálica para
caber sua área de montagem do veículo.
Então use a fornecer hardware (Tocar
Aparafuse (5x25mm) e Plain Arruela)
para anexar a outra extremidade de uma
pulseira de metal sólido parte metálica do
veículo sob o painel. Isso também ajuda
a garantir uma correcta estropo
aterramento elétrica da unidade.
Nota: para instalar o terminal de curto
roscagem parafuso de fixação na parte
traseira do a unidade e os outros longas
roscagem terminal ao painel.
10. Reconecte o cabo para a bateria do
veículo de negativo (-) terminal.
Em seguida, substituir o exterior e
aro de instalar a unidade do painel
frontal. (veja os passos de "usando o
painel frontal destacável").
Retirar a unidade
1. Certifique-se de que a ignição é
desligada, então desligar o cabo do veículo
bateria do negativo (-) terminal.
2. R
emova a cinta metálica acompanha a
parte de trás da unidade (se em anexo).
3. Pressione o botão para libertar remover o
painel frontal.
4. Levantar o topo do anel exterior guarnição
então puxe-o para removê-lo.
5. Insira ambas as fornecidas chaves para a
faixas no meio dos lados esquerdo e direito
a unidade e, em seguida, puxe a unidade
para fora do tablier.
96
Page 98

INST
DIN RE
Se o seu veículo é um Nissan, Toyota, siga
estas instruções de montagem. Use os
furos marcados T (Toyota), N (Nissan)
localizados em ambos os lados da unidade
para prender a unidade para a fábrica de
rádio suportes fornecidos com o veículo.
ALLATION
AR-MOUNT (Método B)
To fasten the unit to the factory radio
mounting brackets.
Align the screw holes on the bracket with
the screw holes on the unit, and then
tighten the screws (5x5mm) on each side.
Note: the outer trim ring, sleeve and the
metal strap are not used for method B
installation.
97
Page 99

USING
THE DETACHABLE FRONT PANEL
Para r
etirar o painel frontal
1. Pressione o botão e, em seguida, o
painel frontal será dobrado para baixo.
Bot
ão de libertação
HOIURQWDO
SDLQ
2. Para guarda, guarde o painel frontal na a
proteção fornecida imediatamente caso
depois de ser removido.
SU
RWHFWRUFDVR
Precauções na manipulação
1. Não deixe cair o painel frontal.
2. Não exercer pressão sobre o ecrã ou o
controlo botões quando desmontar ou
reinstalando o painel frontal.
3. Não toque nos contatos do painel
frontal ou na unidade principal organismo.
Pode resultar em mau contato elétrico.
4. Se alguma sujeira ou substâncias
estranhas aderidas sobre os contactos, o
que pode ser removido com um pano
limpo e seco.
5. Não exponha o painel frontal a
temperaturas elevadas ou luz solar direta,
em qualquer lugar.
6. Manter afastado quaisquer agentes
voláteis (por exemplo, benzeno, diluente,
ou inseticidas) de tocar a superfície do
painel frontal.
7. Não tente desmontar o painel frontal.
HOIURQWDO
SDLQ
Para Instalar o Painel Frontal
Para inst
alar o painel de control, insira o
painel dentro da caixa e certifique-se de
que está devidamente instalado. De outra
forma, poderá ocorrer alguma
anormalidade no mostrador ou algumas
teclas poderão não funcionar
devidamente.
98
Page 100

Cabla
gem conexão
Connector ISO
RCA
Saída
BRANCO: L CH
ANTENA
VERMELHO: R CH
Fusível
(15A)
99
 Loading...