


USER'S MANUAL
TCK-3H
CORD KNITTING MACHINE
M-CK02-E
(9811)

IMPORTANT SAFETY INSTRUCTIONS
This User’s Manual contains operational instructions and the explanation on the names of parts
for TAJIMA Cord Knitting Machine TCK-3HII. Please read through this manual and understand
the contents before operating this machine.
In this manual, items which require your special attention on operation and maintenance of the
machine are specified following CAUTION. These items must be strictly observed to
ensure safety during operation.
This manual may contain discrepancies in detailed information when compared with actual
machine due to continued research and improvements. If any question about the machine or
contents of this manual arises, please consult your local TAJIMA distributor.
(BH11)- 1 -

CONTENTS
IMPORTANT SAFETY INSTRUCTIONS ...............................................1
1. NAMES OF PARTS ........................................................................3
2. SPECIFICATIONS ..........................................................................3
3. ACCESSORIES..............................................................................3
4. SAFETY LABELS...........................................................................4
Safety label positions and contents ................................................................. 4
5. PREPARATION BEFORE STARTING OPERATIONS ...................5
6. THREADING PROCEDURE........................................................... 6
7. OPERATIONS.................................................................................7
8. ADJUSTMENT................................................................................8
Needle replacement......................................................................................... 8
Head replacement ........................................................................................... 8
Stitch Adjustment and where to apply lubrication ............................................ 9
9. BEFORE CALLING FOR REPAIR ................................................. 10
10. 3-NEEDLE & 3-NEEDLE EXTRAFINE CORD KNITTING HEADS.... 11
11. TCK-3HII ELECTRICAL DIAGRAM ..............................................12
PARTS LIST
GENERAL VIEW
DRIVE SYSTEM................................................................................. CK-1
DRIVE SYSTEM AND POWER SUPPLY .......................................... CK-2
THREAD STAND................................................................................ CK-3
HEAD ASSY....................................................................................... CK-4
(BH11)- 2 -
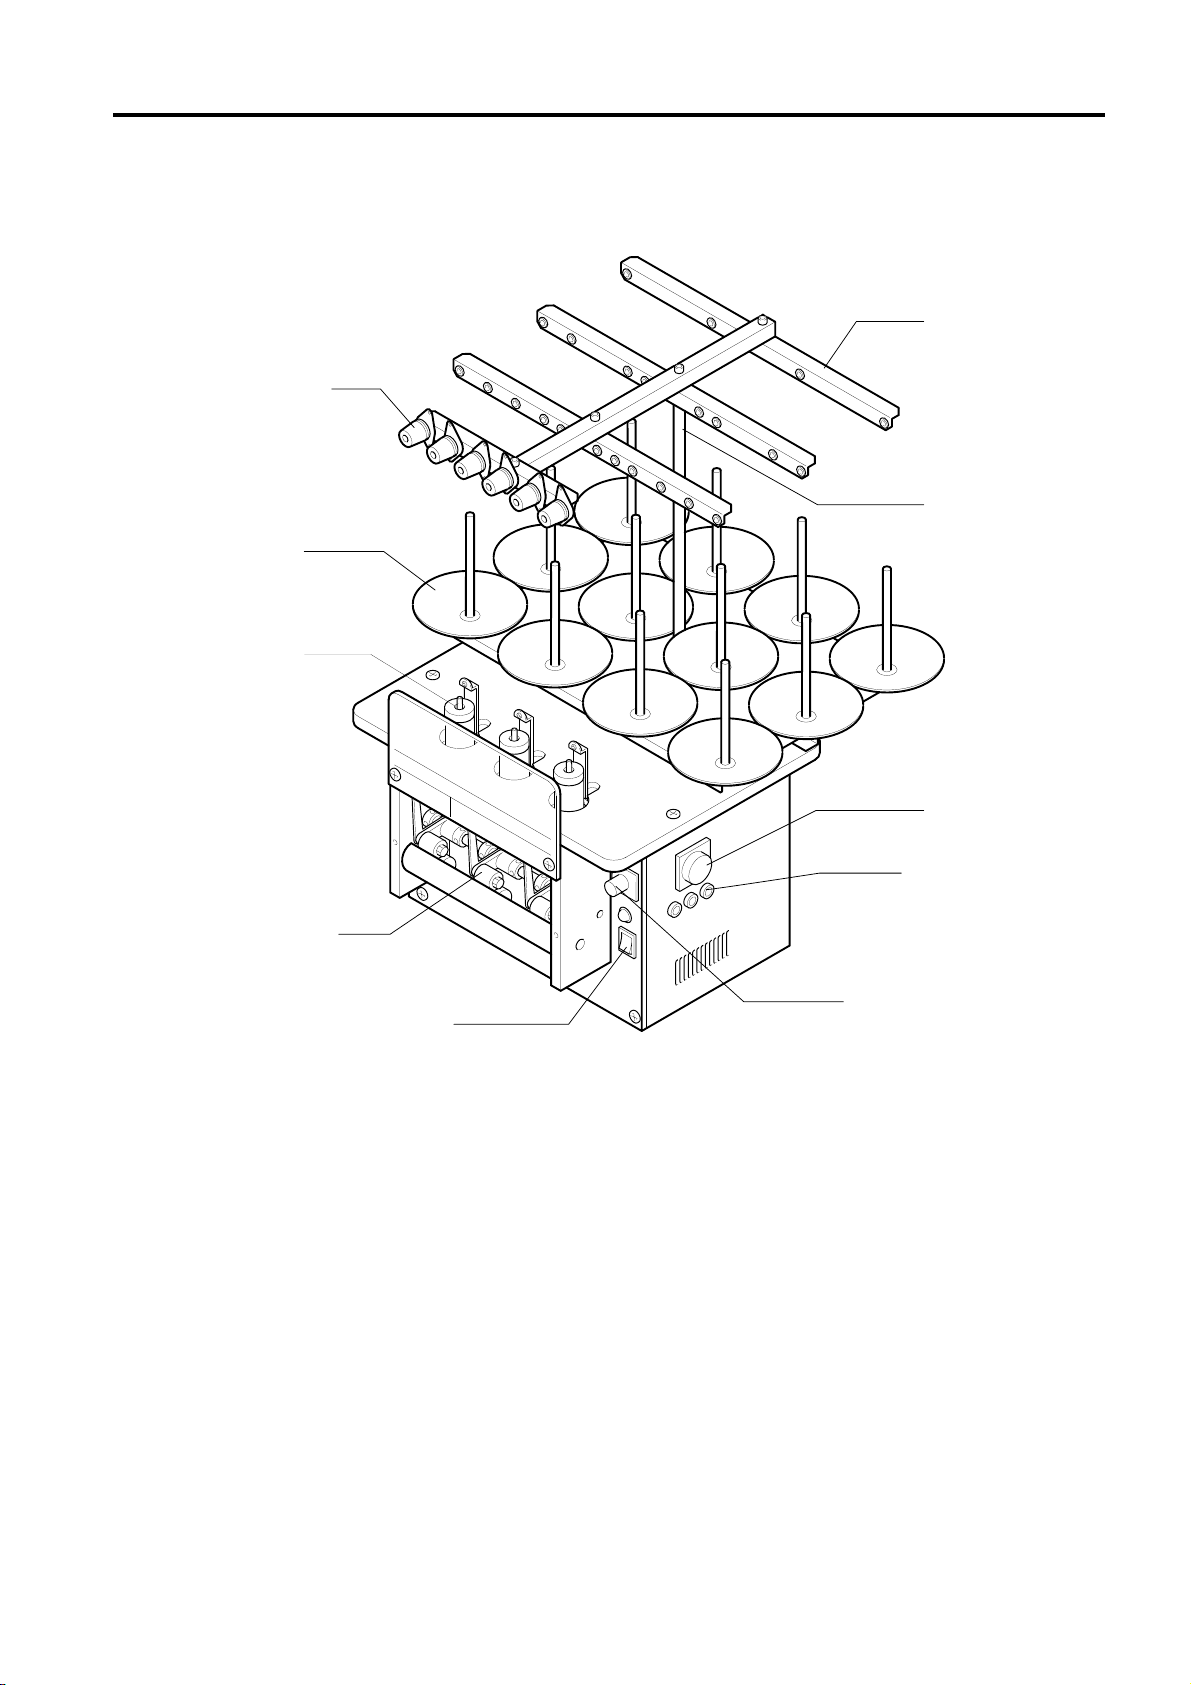
1. NAMES OF PARTS
Thread
tension set
Thread
stand plate
Head ass’y
Thread course
Thread
stand shaft
Driven roller
Power supply switch
2. SPECIFICATIONS
Power supply : 100 VAC, 1-phase 50/60Hz
Power consumption : 90 W
Knitting speed : 1200 mm to 1700 mm per min. (at 60 Hz)
Number of needles : 4-/5-/6-needle type (3-needle type: Optional)
Machine size : 550 mm x 525 mm x 700mm
Machine weight : 26 kg
Timer
Fuse box
Speed controller
3. ACCESSORIES
Knitting needles : 10 pcs.
Drive belt : 1 pc.
(BH11)- 3 -
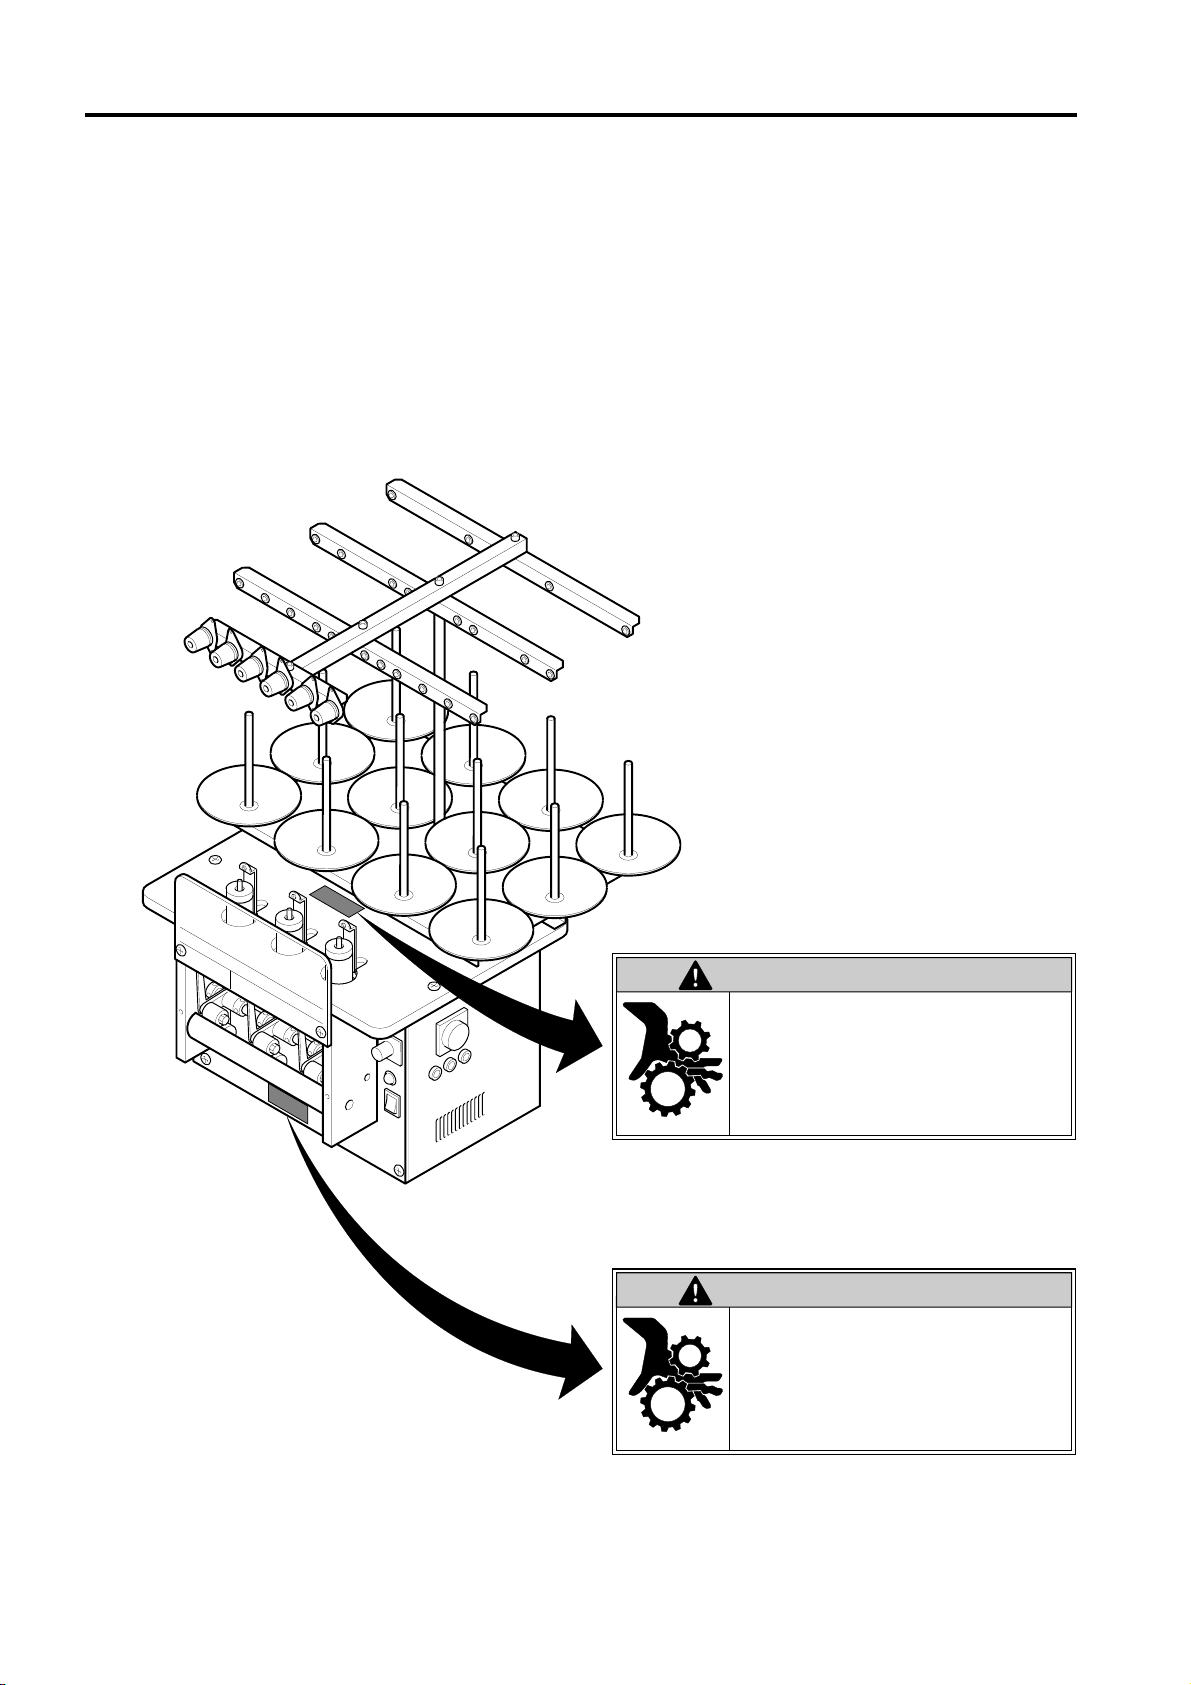
4. SAFETY LABELS
IMPORTANT : The machine has safety labels which instructions for safe operation. Ma-
chine operators must follow these instructions when operating the machine. Do not detach these seals, nor make illegible them by such as
painting.
n Safety label positions and contents
WARNING ATENCION
Moving parts
can cause severe injury.
l Close the safety covers
before starting the machine.
l Do not put hands inside
during operation.
Las partes en movimiento
pueden ocasionar
lesión grave.
l Cierre las cubiertas de seguridad
antes de poner la máquina
en operación.
l No introduzca sus manos
durante la operación.
WARNING ATENCION
Moving parts
can cause severe injury.
Disconnect the main power
before cleaning, lubricating,
or repairing the machine.
Las partes en movimiento
pueden ocasionar
lesión grave.
Desconecte la alimentación
principal antes de limpiar,
lubricar o reparar la máquina.
REMARK: If the safety label is missed or damaged, please contact TAJIMA distributor.
(BH11)- 4 -
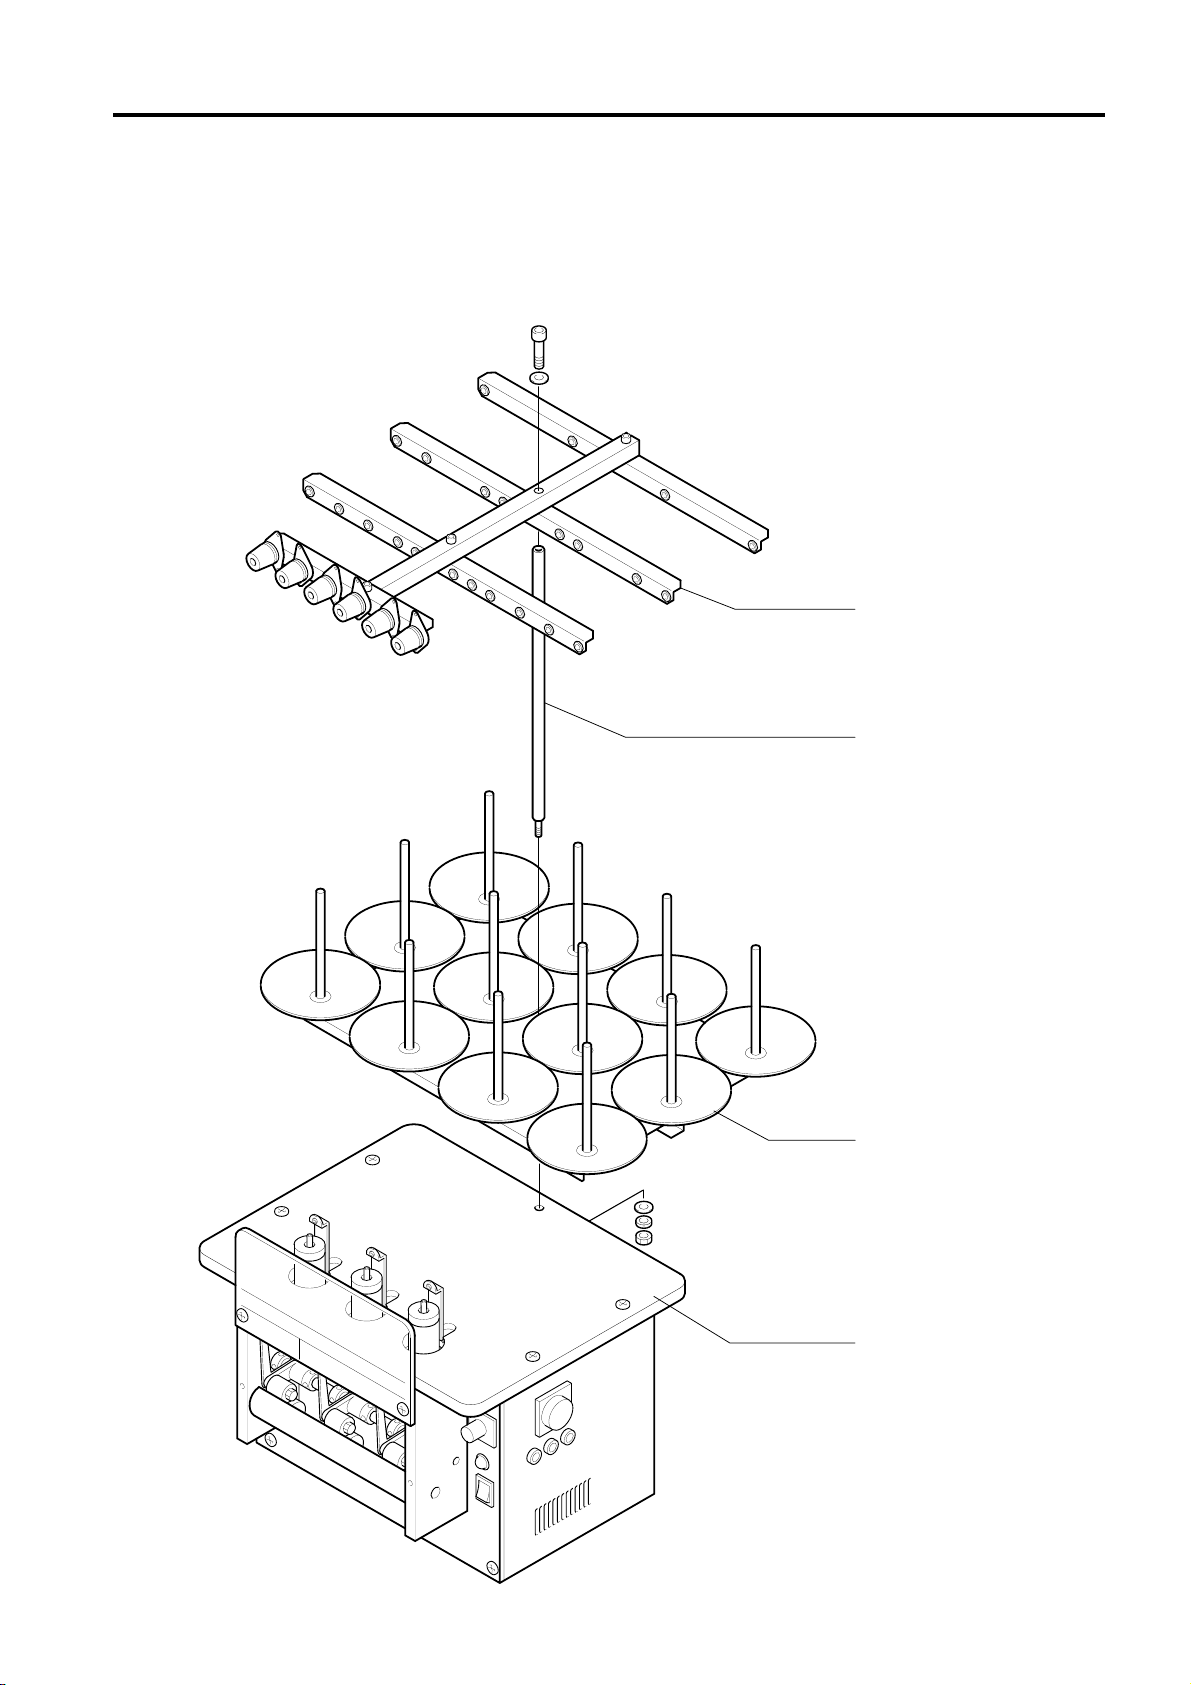
5. PREPARATION BEFORE STARTING OPERATIONS
Assemble the machines as shown in the illustration below, and secure the parts by tightening bolts and / or nuts.
Thread course
Thread stand shaft
Thread stand plate set
Table(machine body)
(BH11)- 5 -
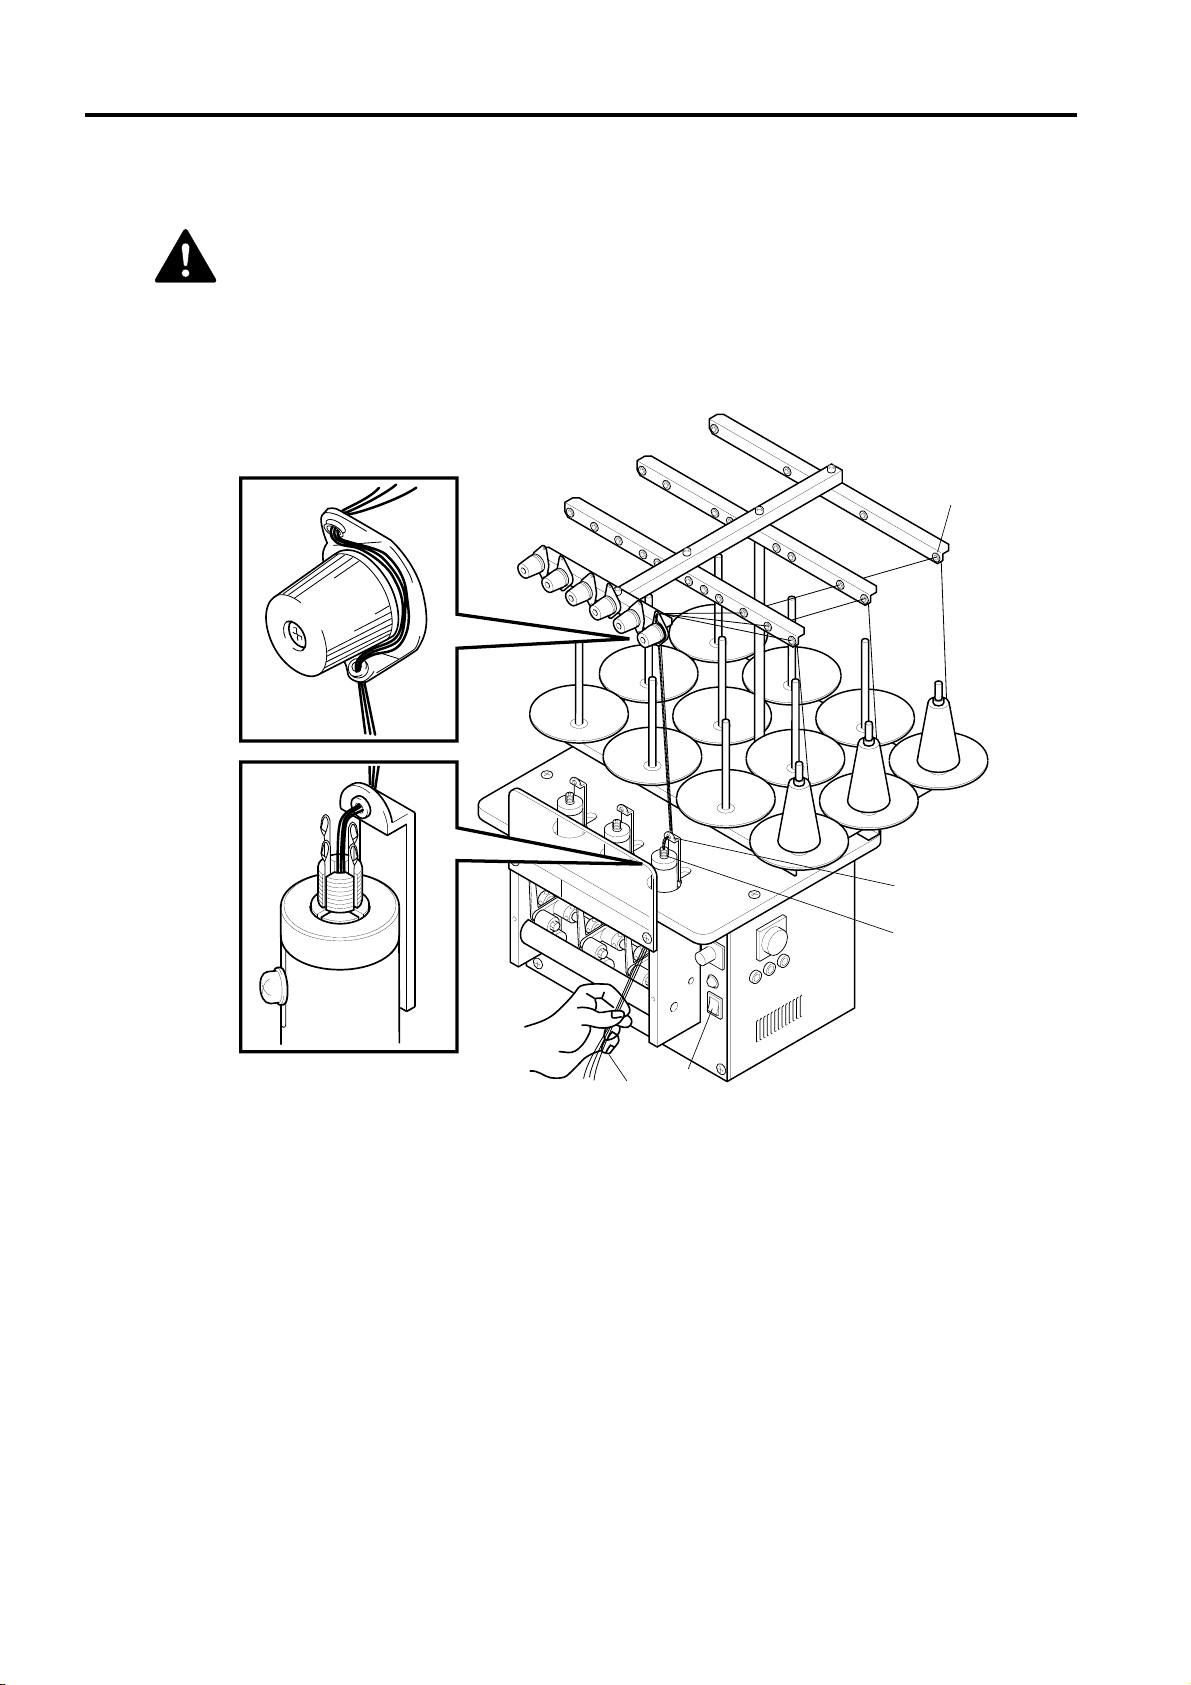
6. THREADING PROCEDURE
CAUTION Danger of being entangled.
You may be injured due to the moving parts. Do not place
your hands or fingers near head ass’y or roller during
machine operation.
(2)
(1)
(3)
(4)
(5)
(6)
Thread through the parts given below following the order until the threads comes out
underneath the table.
1) Thread course
2) Thread tension set
REMARK: Run the thread until it reaches the point above the corresponding head
while paying attention so that the thread will not be crossed.
3) Needle foot thread course
4) Head center
5) Turn the power ON while holding the treads coming out underneath the table.
6) Immediately after turning the power ON, start pulling the thread down at a constant
speed.
(BH11)- 6 -

(9)
(7)
Timer
Speed
controller
(10)
(8)
Power supply
switch
7) the machine starts generating stitches.
8) When the stitches reache the bottom of the roller, turn the power OFF temporarily.
9) Raise the roller and pass the cord underneath the roller.
10) Pull down the cord so that the cord is lightly pressed by the rollers.
NOTE: Repeat the procedures above to run the thread up to the roller for each of the
heads.
7. OPERATIONS
CAUTION Danger of being entangled.
You may be injured due to the moving parts. Do not place
your hands or fingers near head ass’y or roller during
machine operation.
(1) Switch operations
Power supply switch : By turning this switch ON, the pilot lamp lights up and knitting
of cords starts automatically.
Speed controller : Stitches can be adjusted by using this controller dial.
Timer : When knitting this cords, this timer differentiates the timing of
the head ass’y movement and the driven roller movement so
that the cord can be knitted smoothly.
(2) Thread replacement
Turn the power OFF and wait until the machine comes to a complete stop. Then, set
the new thread following the procedures given in “Threading Procedure”.
(BH11)- 7 -

8. ADJUSTMENT
(1) Needle replacement
CAUTION Danger of being entangled.
You may be injured due to the moving parts. Disconnect
the power cable plug from the power source before starting operation so that the machine power does not come
ON accidentally.
Needle
Knurled ring
Head upper cam
(2) Head replacement
CAUTION Danger of being entangled.
1) Loosen the needle foot thread course attaching
screws.
2) Remove the needle foot thread course.
Needle foot
thread course
3) Remove the knurled ring by turning it clockwise.
4) Loosen the head upper cam attaching screw.
5) Pull the head upper cam upward and remove it.
6) Replace the needle and assemble all the unit by
following the steps above in reversed order.
You may be injured due to the moving parts. Disconnect
the power cable plug from the power source before starting operation so that the machine power does not come
ON accidentally.
1) Loosen the table fixing screws and remove the
Head
table.
2) Remove the belt from the head.
Bushing
3) Loosen the nut and remove it.
4) Replace the head and mount the new head to
the head base. (At this moment, check if the bushing is correctly attached on the head.)
Head base
5) Tighten the nut.
Plain washer
Nut
(BH11)- 8 -

(3) Stitch Adjustment and where to apply lubrication.
CAUTION Danger of being entangled.
You may be injured due to the moving parts. Disconnect
the power cable plug from the power source before starting operation so that the machine power does not come
ON accidentally.
(a) Stitch adjustment
1) The position of the head upper cam can be raised up to 3 mm from its bottom
position.
2) Needle stroke can be adjusted by sliding the head upper cam up and down
after loosening the attaching screw.
3) Stitches can be changed for some degree by the adjustments indicated above.
When the head upper cam is slid upward, the stitch becomes shorter. When
the head upper cam is slid downward, the stitch becomes longer and it gives
softer texture to the cord. Adjust so that the point of needle is always positioned lower than the top of center pole "A" at the lowermost point of the
upper cam. If this is neglected, cord may not be knitted correctly. If the head
upper cam is slid beyond the appropriate range, cord may not be knitted
correctly.
4) Stitches can be adjusted by using the speed controller also.
(b) Where to apply lubrication
To be lubricated here
REMARK: Apply lubricating oil to the designated
locations twice a day.
(BH11)- 9 -

9. BEFORE CALLING FOR REPAIR
Carefully read through this Instruction Manual and inspect the machine again before consulting TAJIMA distributors.
Symptoms Remedies
The power does not come ON
even if the power supply
switch is turned ON.
Irregular stitches occur.
l The power cable plug is disconnected from the
outlet.
Connect the power cable plug to the outlet.
l Fuse is blown.
Replace the fuse.
l Drive belt is cut or disengaged.
Replace the belt or engage it.
l Needle is broken.
Replace the needle.
l Threading to the needle is uneven.
Thread correctly.
l Head upper cam is incorrectly positioned.
Adjust the head upper cam position.
l Setting of the speed controller is improper.
Adjust the speed controller.
(BH11)- 10 -

10.
3-NEEDLE & 3-NEEDLE EXTRAFINE CORD KNITTING HEADS
CAUTION Danger of being entangled.
You may be injured due to the moving parts. Disconnect
the power cable plug from the power source before starting operation so that the machine power does not come
ON accidentally.
The standard machine is delivered with the 4-, 5- and 6-Needle heads.
The 3-Needle head is available as an option. There are two kinds of 3-Needle heads. The
heads for extra fine needle have 2 mm diameter nipple in the center pole "A".
<For Standard 3-Needle Knit Cord> <For Extrafine 3-Needle Knit Cord>
REMARK: The use of extrafine 3-Needle head is limited up to 2 heads. When it is used
together with the standard 3-, 4-, 5- and 6-Needle heads, trouble may occur in
knitting. Use the extrafine needle head alone.
(BH11)- 11 -

(BH11)
Blue Blue
21K6RGN-A/2GN75K
(With SW and gear head)
Connect with motor
C2(CH25)
1
4
2
(22)
2.5uF
123 4
Black Blue WhiteYellow
M2
fixing screw
Speed controller
dial(suppiled with
SS21L)
Control pack(SS21L)
(23)
11. TCK-3HII Electrical Diagram
10 2 8 9 4 3 1 11
E
(2)
Connect with box
3
fixing screw
With fuse holder
F220 01-A1
F3
1A
15uF
C1(CH150A)
(21)
With fuse holder
F220 01-A1
F2
5A
MC2
123 4
MC1
Black Blue WhiteYellow
(60W)
Connect with motor
fixing screw
M1
3
6
2
(19)
(3)
(24)
1
TIM
Timer relay
10
H3CR-A-AC
SRE
AC input
(1)
(8)
(9)
S1 R2 S R1 R PE
TB1
Terminal
bese
F110 6P
(4)
(6)
(7)
(5)
(26) (25)
(28)
(27)
SW1
T1OUT IN
SAA1
Surge
JW-L21
RKK
100V:5A
200V:2.5A
absorber
ERZC140K6B1
200V
Transformer
(export spec.)
100V
(125VA)
F1
With fuse
holder
F220 01-A1
(29)
Connect with
transformer fixing screw
(17)
TB2
Terminal
block
MOH64 4P
1
(18)
(20)
SAA2
Surge
absorber
ERZC140K471
(12)
NL
(16)
(14)
2
3
(13)
Neon tube
BN-9CG
(15)
4
(11)
(10)

PARTS LIST

TCK-3H II GENERAL VIEW
CK-3
CK-4
CK-1
CK-2
(BH11)

CK-1
TCK-3H II DRIVE SYSTEM
10
12
2
3
12
8
13
4
7
11
30
3
9
16
17
18
5
21
19
14
20
25
27
28
29
27
25
17
24
38
18
26
35
30
40
29
39
25
27
26
36
6
34
26
25
1
33
32
25
24
31
25
37
23
25
24
22
1
25
19
21
15
(BH11)

TCK-3H II DRIVE SYSTEM
CK-1
Ref.No.
Description Part No. Remark
1 Truss Head Screw
2 Spring Washer
3 Plain Washer
4 Control Pack PB000700BC00
5 Front Panel TK01020A0000
6 Switch PB000500ST00
7 Neon Tube PB000900LP00
8 Speed Control Motor PB000600BC00
9 Hexagon Socket Head Cap Screw
10 Nut
11 Roller-side Drive Pulley TK0109000000
12 Hollow Set Screw
13 Roller Cover TK01160A0000
14 Truss Head Screw
15 Roller Bearing Case R TK01030A0000
16 Hexagon Socket Head Cap Screw
17 Spring Washer
18 Plain Washer
19 Needle Bearing PBHK10120000
20 Roller Bearing Case L TK01040A0000
21 Hollow Set Screw
22 Front Panel Protect Cover TK0117000000
23 Drive-side Roller Shaft TK0105000000
24 10mm Dia.Collar B EF0924000000
25 Hollow Set Screw
26 Drive Roller TK0107000000
27 Hollow Set Screw
28 Roller-side Drive Pulley TK0108000000
29 Hollow Set Screw
30 Belt PBB100S3M252
31 Driven-side Roller Shaft TK0110000000
32 Driven Roller Arm TK01120A0000
33 Roller Feed Spring TK0114000000
34 10mm Dia.Collar TK0106000000
35 Cord Feed Pin TK0115000000
36 Driven Roller TK0111000000
37 Driven Roller Pin TK0113010000
38 Nut
39 Roller Lever TK0127000000
40 Roller Lever Pin TK0128000000
41
42
43
44
45
46
47
48
49
50
M4*8L
M4
M4
6W
M4*45L
M4
M4*6L
M4*6L
M5*12L
M5
M5
M5*8L
M4*5L
M5*10L
M4*4L
M5
Note: As for parts with marks # or *, please follow our instructions on Table of Contents in your parts order. (BH11)

CK-2
TCK-3H II DRIVE SYSTEM AND POWER SUPPLY
34
CK-4
27
39
40
41
28
5
38
32
4
5
B
35
37
36
41
29
30
33
24
29
30
5
24
25
26
28
25
26
A
31
12
37
28
5
14
11
7
13
12
17
7
6
8
10
3
4
5
9
2
B
16
1
A
15
19
18
20
21
22
23
23
(BH11)

TCK-3H II DRIVE SYSTEM AND POWER SUPPLY
CK-2
Ref.No.
Description Part No. Remark
1 Box TK01000A0000
2 Electrical Parts Attaching Base TK01010A0000
3 Truss Head Screw
4 Spring Washer
5 Plain Washer
6 Transformer PB004900TV00
7 Screw with Washer
8 Terminal Base PB000800TB00
9 Control Pack PB000700BC00
10 Screw with Washer
11 Terminal Base PB000700TB00
12 Screw with Washer
13 Condenser
14 Condenser
15 Cord Bushing PB000200BU00
16 Power Supply Cable Plug PB000600PA00
17 Plug Adater PB000400PA00
18 Timer Relay PB000200KH00
19 Adapter PB000400KH00
20 Relay Socket PB000300KH00
21 Fuse Holder PB000200FA00
22 Glass Tube Fuse PA5002100000
23 Glass Tube Fuse PA5002500000
24 Plain Washer
25 Spring Washer
26 Nut
27 Head Base TK01180A0000
28 Hexagon Socket Head Cap Screw
29 Tension Pulley Pin TK0119000000
30 Auxiliary Pulley TK0120000000
31 Head-side Motor Base TK01210A0000
32 Hexagon Socket Head Cap Screw
33 Tension Pulley Base TK01230A0000
34 6mm Wide Belt
35 Induction Motor PB000500BC00
36 Hexagon Socket Head Cap Screw
37 Plain Washer
38 Nut
39 Spring Washer
40 Head-side Drive Pulley TK0122000000
41 Hollow Set Screw
42
43
44
45
46
47
48
49
50
M4*8L
M4
M4
M3*6L
M3*30L
M3*10L
For AC
M5
M5
M5
M4*8L
M4*8L
1150L
60W
M6*20L
M6
M6
M6
M5*6L
Note: As for parts with marks # or *, please follow our instructions on Table of Contents in your parts order. (BH11)

CK-3
TCK-3H II THREAD STAND
18
20
19
22
13
21
12
1
11
1
23
1
2
3
1
2
3
9
24
1
10
16
17
15
14
7
6
1
8
1
2
5
3
4
2
3
1
2
3
(BH11)

TCK-3H II THREAD STAND
CK-3
Ref.No.
Description Part No. Remark
1 Plain Washer
2 Spring Washer
3 Nut
4 Table TK012402000
5 Truss Head Screw
6 Thread Stand Plate TK0125100000
7 Thread Stand Plate Set TK0125S00000
8 Thread Stand Plate Base TK0125200000
9 Thread Stand Shaft TK0126100000
10 Thread Course A TK0126200000
11 Hexagon Socket Head Cap Screw
12 Hexagon Socket Head Cap Screw
13 Tension Base TK0126600000
14 Thread Course B TK0126300000
15 Thread Course C TK0126400000
16 Thread Course D TK0126500000
17 Plastic Thread Guide EF0942A00000
18 Adjusting Screw EF0909000000
19 Thread Course Tension Spring EF0915000000
20 Thread Course Tension Disk EF0913000000
21 Felt Packing EF0904000000
22 Thread Course Tension Stud EF0914000000
23 Thread Course Thread Guide EF0912000000
24 Hexagon Socket Head Cap Screw
25
26
27
28
29
30
31
32
33
34
35
36
37
38
39
40
41
42
43
44
45
46
47
48
49
50
M5
M5
M5
M5*18L
M5*30L
M5*8L
M5*35L
Note: As for parts with marks # or *, please follow our instructions on Table of Contents in your parts order. (BH11)

CK-4
TCK-3H II H E A D A S S Y
3-Needle (Optional)
16
For extrafine
cord
12
13
17
4-Needle
7
4
12
17
13
8
2
3
6
8
9
10
11
1
5
7
4
2
3
6
9
10
11
1
5
17
13
12
14
15
6-Needle5-Needle
7
4
12
17
13
8
2
3
6
8
9
10
11
14
15
7
4
2
3
6
9
10
11
1
5
14
15
1
5
14
15
(BH11)

TCK-3H II HEAD ASSY
CK-4
Ref.No.
Description Part No. Remark
1 Circle Head TK0200000300
1 Circle Head TK0200000400
1 Circle Head TK0200000600
2 Head Upper Cam TK0201000300
2 Head Upper Cam TK0201000400
2 Head Upper Cam TK0201000600
3 Head Lower Cam TK0202000300
3 Head Lower Cam TK0202000400
3 Head Lower Cam TK0202000600
4 Knurled Screw TK0203000300
4 Knurled Screw TK0203000400
4 Knurled Screw TK0203000500
4 Knurled Screw TK0203000600
5 Bushing TK0204000300
5 Bushing TK0204000400
5 Bushing TK0204000500
6 Needle Foot Thread Course TK0205000000
7 Center Pole A TK0206000300
7 Center Pole A TK0206000400
7 Center Pole A TK0206000500
7 Center Pole A TK0206000600
8 Center Pole B TK0207000300
8 Center Pole B TK0207000400
8 Center Pole B TK0207000500
8 Center Pole B TK0207000600
9 Hexagon Socket Head Cap Screw FX0611000000
10 Plain Washer
11 Countersunk Head Screw
12 Plain Washer
13 Pan Head Screw
14 Plain Washer(for 3 Needles)
14 Plain Washer(for 4 Needles)
14 Plain Washer(for 5 or 6 Needles)
15 Nut(for 3 Needles)
15 Nut(for 4 Needles)
15 Nut(for 5 or 6 Needles)
16 2mm Dia.Nipple CE0222000300
17 Cord Knitting Needle TCK000000097
18
19
20
21
22
23
24
25
26
27
28
29
3-Needle(Optional)
4,5-Needle
6-Needle
3-Needle(Optional)
4,5-Needle
6-Needle
3-Needle(Optiona
4,5-Needle
6-Needle
3-Needle(Optional)
4-Needle
5-Needle
6-Needle
3-Needle(Optional)
4-Needle
5,6-Needle
3-Needle(Optional)
4-Needle
5-Needle
6-Needle
3-Needle(Optional)
4-Needle
5-Needle
6-Needle
M4
M5*8L
M5
M5*8L
M8
M10
M12
M8
M10
M12
For 3-Needle Extrafine Cord (OP)
Note: As for parts with marks # or *, please follow our instructions on Table of Contents in your parts order. (BH11)
 Loading...