


T2200P series
Weighing Indicator
User’s guide
UGT2200P-E1.00


T2200P serial weighing indicator user’s manual
Table of Contents
SECTION 1 INTRODUCTION………………………………………………………………1
SECTION 2 SPECIFICATIONS……………………………………………………..……2
SECTION 3 INSTALLATION……………………………………………………………….3
SECTION 4 KEY DESCRIPTIONS………………………………………………………4
SECTION 5 DISPLAYS…………………………………………………………………….5
SECTION 6 OPERATION…………………….……………………………………….…..6
6.1 Zeroing the display………………………………………………………………….6
6.2 Taring……………………………………………………………………………..…….6
6.3 Weighing a sample…….………………………………………………….………….6
6.4 Parts counting…………………………………………………………………………6
6.5 Check-weighing…………………………………………………………………….7
6.6 Accumulated total……………………………………………………………………….8
SECTION 7 PARAMETERS………………………………………………………………9
SECTION 8 RS-232 OUTPUT…………………………………………………………..12
8.1 basic information……………………………………………………………………..12
8. 2 normal print out…………………………………………………….………………….12
8. 3 continuously output protocol…………………..…………………………………….13
SECTION 9 CALIBRATION……………………………………………………..……..14
SECTION 10 ERROR CODE……………………………………………………………15
SECTION 11 TECHNICAL PARAMETES…………………………………………….16


T2200P serial weighing indicator user’s manual
- 1 -
SECTION 1 INTRODUCTION
The T2200P series of weighing indicator provides an accurate, fast and versatile
series of general purpose weighing indicator with counting and check-weighing
functions. There are 2 series of indicator within the range.
All the keypads are sealed, color coded membrane switches and the displays are
large easy to read liquid crystal type displays (LCD). The LCD’s are supplied with a
backlight.
All units include automatic zero tracking, audible alarm for pre-set weights, automatic
tare, and an accumulation facility that allows the individual weights to be stored and
recalled as an accumulated total.

T2200P Weighing Indicator User’s Guide
- 2 -
SECTION 2 SPECIFICATIONS
Model T2200P
Resolution 1/15,000
Interface RS-232 Output Optional
Stabilisation Time 1 Seconds typical
Operating Temperature 0°C - 40°C / 32°F - 104°F
Power supply (external) 110/ 240 Vac, 50/60Hz
Calibration Automatic External
Display 6 digits 24mm LCD display, with LED backlight
indicator Housing ABS Plastic
Zero range 0mV~5mV
Signal input range 0~15mV
ADC Sigma delta
Internal counts 600,000
ADC update Max 60 times /second
Load cell drive voltage Max 5V/150mA
Load cells Up to four 350 ohms cells
Dimensions 280*160*170

T2200P serial weighing indicator user’s manual
- 3 -
SECTION 3 INSTALLATION
The weighing indicator should be sited in a location that will not degrade the
accuracy.
Avoid extremes of temperature. Do not place in direct sunlight or near air conditioning
vents.
Avoid unsuitable tables. The tables or floor must be rigid and not vibrate. Do not
place near vibrating machinery.
Avoid unstable power sources. Do not use near large users of electricity such as
welding equipment or large motors.
Avoid high humidity that might cause condensation. Avoid direct contact with water.
Do not spray or immerse the scales in water.
Keep the weighing indicator clean.
Verify the voltage showing on the label matches the voltage in your area.
Attach the mains cable to the connector on the side of the indicator. The power
switch is located next to he mains inlet.
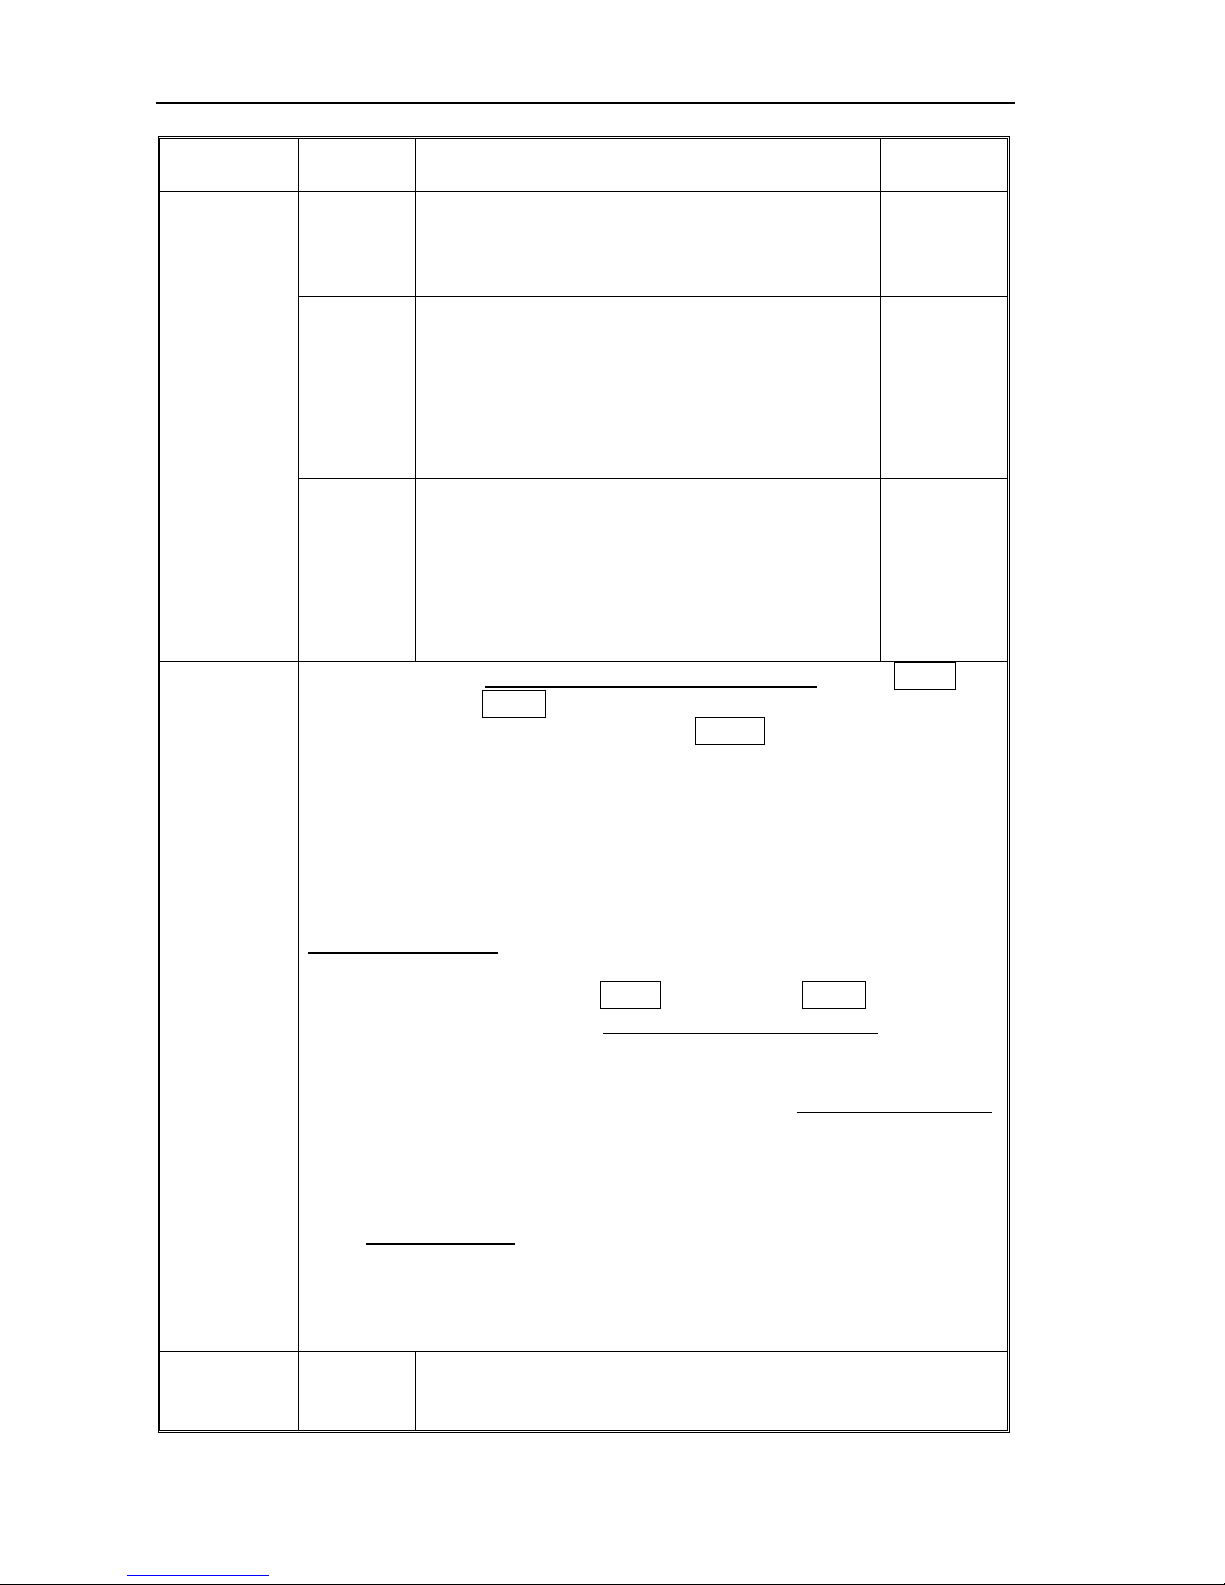
Load cell connect as below( 9 pin D-sub connecter)
+EXC
+SEN
1
+SIG -SIG
2
7
4
5
8
-SE N
-EX C
LOAD C ELL
3

T2200P Weighing Indicator User’s Guide
- 4 -
SECTION 4 KEY DESCRIPTIONS
ZERO or
Set the zero point for all subsequent weighing. The display shows zero.
A secondary function , of "Enter" key when setting parameters or other functions.
TARE or
Tares the scale. Stores the current weight in memory as a tare value, subtracts the
tare value from the weight and shows the results. This is the net weight. Entering a
value using the keypad will store that value as the tare value.
A secondary function ▲, of incrementing the active digit when setting a value for
parameters or other functions.
SHIFT or
Selects the data to be displayed when parts counting and is used for other functions
during setting modes. Will move the active digit to the right when setting values
for some functions.
SMPL or
Select sample quantities when parts counting. Move the active digit left when
setting values for other functions.
FUNC or SET
Used to select the function of the scale. If the scale is weighing it will select parts
counting. Of it is not in weighing mode it will return the user to weighing.
Secondary function ( C ) , is to act as a clear key when setting values for parameters
or other functions.
PRINT or
To print the results to a PC or printer using the optional RS-232 interface. It also
adds the value to the accumulation memory if the accumulation function is not
automatic.
Secondary function (ESC) , is to return to normal operation when the scale is in a
parameter setting mode.
U or UNIT
Change weighing unit.

T2200P serial weighing indicator user’s manual
- 5 -
SECTION 5 DISPLAYS
The LCD display will show a value and a unit to the right of the digits.
In addition there are labels for TARE, GROSS weight, Zero
888888
OK
HI
LO
GROSS
TARE
ZERO
g/pcs
oz %
tkglb
Checkweighing Symbol s
Stability Symbol
Low Battery Symbol
Parts Counti ng Units
Weighing Units

T2200P Weighing Indicator User’s Guide
- 6 -
SECTION 6 OPERATION
6.1 Zeroing The Display
You can press the ZERO key at any time to set the zero point from which all other
weighing and counting is measured, within 4% of power up zero. This will usually
only be necessary when the platform is empty. When the zero point is obtained the
display will show the indicator for zero.
The scale has an automatic rezeroing function to account for minor drifting or
accumulation of material on the platform. However you may need to press the ZERO
key to rezero the scale if small amounts of weight are shown when the platform is
empty.
6.2 Taring
Zero the scale by pressing the ZERO key if necessary. The zero indicator will be on.
Place a container on the platform, a value for its weight will be displayed.
Press the TARE key to tare the scale. The weight that was displayed is stored as the
tare value and that value is subtracted from the display, leaving zero on the display.
The "TARE" indicator will be on. As product is added only the weight of the product
will be shown. The scale could be tared a second time if another type of product was
to be added to the first one. Again only the weight that is added after taring will be
displayed.
When the container is removed a negative value will be shown. If the scale was tared
just before removing the container this value is the gross weight of the container plus
all product that was removed. The zero indicator will also be on because the platform
is back to the same condition it was when the ZERO key was last pressed.
6.3 Weighing a sample
To determine the weight of a sample first tare the empty container then place the
sample in the container. the display will show the weight and the units of weight
currently in use.
6.4 Parts Counting
When the scale is showing weight, pressing the SMPL key will start the parts
counting function.
Before beginning, tare the weight of any container that will be used, leaving the
empty container on the scale. Place the number of samples on the scale. The

T2200P serial weighing indicator user’s manual
- 7 -
number should match the options for parts counting, 10, 20, 50, 100 or 200 pieces.
Press the SMPL key to begin. The scale will show "P 10" asking for a sample
size of 10 parts. Change the sample size by pressing the TARE key, the display will
cycle through the options: 10,20, 50, 100, 200 and back to 10.
Press the ZERO key when the number matches the number of parts used for the
sample. As more weight is added the display will show the number of parts (pcs).
When in counting mode, you can press SHIFT key to show unit weight, total weight
and quantity (pcs)
Press the FUNC key to return to normal weighing.
6.5 Check-Weighing
Check-weighing is a procedure to cause an alarm to sound when the weight on the
scale meets or exceeds values stored in memory. The memory holds values for a
high limit and a low limit. Either limit can be used or both can be used.
See PARAMETERS SECTION for the procedure to be used to set the limits, function
"F0 H-L" is used. After limits have been set the Check-weighing function is
enabled.
When a weight is placed on the scale the arrows will show if the weight is above or
below the limits and the beeper will sound as described below.
BOTH LIMITS SET
The display will show OK and the beeper will sound when the weight is
between the limits.
LOW LIMIT SET,
HIGH LIMIT is set to zero
The display will show OK and the beeper will sound when the weight is
less than the Low Limit. Above the Low Limit the display will show
HIGH and the beeper will be off.
HIGH LIMIT SET,
LOW LIMIT is set to zero
The display will show LOW and the beeper will be off when the weight
is less than the High Limit. Above the High Limit the display will show
OK and the beeper will be on.
BOTH LIMITS SET. LOW IS SET GREATER THAN HIGH
The beeper will never sound and the display will show LOW if the
weight is less that the LOW limit, and HIGH if the weight is greater than
the Low Limit.
NOTE: The weight must be greater than 20 scale divisions for the checkweighing to

T2200P Weighing Indicator User’s Guide
- 8 -
operate.
To disable the Check-Weighing function enter zero into both limits by pressing the
FUNC key when the current limits are shown then pressing ZERO to store the zero
values.
6.6 Accumulated T otal
The scale can be set to accumulate manually by pressing the PRINT key. See the
PARAMETERS Section for details of selecting the method using function "F5 PRT".
The accumulation function is only available when weighing. It is disabled during
parts counting.
.
The weight displayed will be stored in memory when the PRINT key is pressed and
the weight is stable.
The display will show "ACC 1" and then the total in memory for 2 seconds before
returning to normal. If the optional RS-232 interface is installed the weight will be
output to a printer or PC.
Remove the weight, allowing the scale to return to zero and put a second weight on.
Press the PRINT key, the display will show "ACC 2" and then the new total.
Continue until all weights have been added.
To view the totals in memory press PRINT key in zero point (ZERO indicator on), to
clear the memory, just press FUNC key during memory recall display.
When the scales are set to display in other units of weight the accumulation function
is still keeping the weight in kilograms.

T2200P serial weighing indicator user’s manual
- 9 -
SECTION 7 PARAMETERS
The scale has 6 parameters that can be set by the user plus a method of entering the
calibration section.
To set parameters press the FUNC key.
The display will show the first function, "F0 H-L".
Pressing the TARE key will cycle through the other functions.
Pressing ZERO key will allow you to set the function. It may be necessary to either
use T ARE or set a value using the SMPL key and UNITS key to move the active
digit and then using the TARE key to increment a digit, followed by the ZERO key to
enter the value. Use the PRINT key to leave a parameter unchanged.
For example when the display shows “F0 H-L” press the ZERO key to begin.
The display will show “Set Lo”, press the ZERO key to set the low limit, or press the
TARE key to skip to the next parameter, “Set Hi” for setting the high limit.
After pressing the ZERO key to set a limit, use the SMPL key and SHIFT keys to
change the flashing digit, then use the TARE key to increment the flashing digit.
Continue to the next digit and set it as needed.
When all digits have been set press the ZERO key to store the value. The display
will go back to the parameter just set, i.e. “Set Lo”. Advance to another parameter if
needed or press the PRINT key to return to weighing.
FUNCTION MENU SETTINGS TABLE
FUNCTION
SUB-FU
NCTION
DESCRIPTION
DEFAULT
VALUE
SEt Lo
Set a value for the Low limit. 000.000
F0 H-L
SEt HI
Set a value for the High Limit. 000.000
to CLr
Clears the accumulation memory
without printing the results.
to P-C
Prints the accumulation memory
total and then clears the memory.
F1 toL
to Prt
Prints the accumulation Total, does
not clear the memory.
F2 unt
Set weighing unit ON/OFF, you can
select gram (g), pound (lb), ounce,
Hongkong Jin, Taiwanese jin.
Kg, g,
ounce, lb
SEt dA
Set date, The display will show last
date set or 00.01.01. Enter new
date, format yy. mm. dd
F3 tI
SEt tI
Set time, The display will show
current time Enter new time,
format hh. mm .ss
T2200P Weighing Indicator User’s Guide
- 10 -
FUNCTION MENU SETTINGS TABLE
FUNCTION
SUB-FU
NCTION
DESCRIPTION
DEFAULT
VALUE
CLoCK
Set clock off or on,
CLK of / CLK on.
When set clock on, scale will display clock
after standby for 5 minutes.
CLK off
bL
Set the backlight to be on, automatic or off,
EL on / EL Au / EL off
On: always turn on
OFF: always off
AU: automatically turn on/off, when press
any key, add load, backlight will turn on
automatically.
EL Au
F4 off
bEEP
Set the beeper to be Bp 1, Bp 2 ,BP3
during the check-weighing function.
BP 1: not beeper.
BP 2 :If the weighing overstep the rang of
check-weighing, it will tweet.
BP3 :If the weight accord the rang of
check-weighing, it will tweet.
Bp 3
F5 Prt
Set the RS-232 , at first set RS-232 working mode (press TARE key
to change, press ZERO key to sure)
P Prt: print weighing ticket when the PRINT key is pressed,
P Cont: send weighing data continuously, connect to PC ,
ASK: ask and answer mode (bi-direction mode), connect to PC.
Command “R”: send weighing data to PC
Command “T”: do tare operate
Command “Z”: do zero operate
P auto: auto print mode.
Sei re: connect with remote display (also send continuously)
Then set baud rate
After set working mode, display will show b xxx, this is current baud
rate, you select baud rate by TAKE key ad press ZERO to sure.
If you set Sei re, then need set communication protocol, display will
show Con x, con1 is TSCALE standard protocol, con2 and con3 is
other communication protocol, see detail in section 9.
If you set printer (P PRT, P AUTO), then you can set print out format.
Display will shows “PR x”, set the date/time print format, Then display
show “LAB x”, set gross/acc print format, you can see detail below.
These parameter only available in MODE0(normal mode), see detail
in section 12.
Then set printer type,
TY-TP: mini ticket printer
Epm205: EPM205 ticket printer
LP-50: LP-50 label printer
wireless: wireless mode.
Prog Pin
Enter the programming and calibration menus by
entering the correct password. See the calibration
section for details.

T2200P serial weighing indicator user’s manual
- 11 -
Print out format form 1 (for LP-50 printer)
Lab
prt
0 1 2 3
0
GS: 0.888kg
NT: 0.666kg
TW: 0.222kg
GW: 0.888kg
GS: 0.222kg
TOTAL: 0.222kg
NT: 0.222kg
TW: 0.666kg
GW: 0.888kg
TOTAL: 0.222kg
1
DATE: 04/06/06
GS: 0.888kg
DATE: 04/06/06
NT: 0.666kg
TW: 0.222Kg
GW: 0.888kg
DATE: 04/06/06
GS: 0.222kg
TOTAL: 0.444kg
DATE: 04/06/06
NT: 0.222kg
TW: 0.666kg
GW: 0.888kg
TOTAL: 0.444kg
2
TIME: 11/11/11
GS: 0.888kg
TIME: 11/11/11
NT: 0.666kg
TW: 0.222kg
GW: 0.888kg
TIME: 11/11/11
GS: 0.222kg
TOTAL: 0.666kg
TIME: 11/11/11
NT: 0.222kg
TW: 0.666kg
GW: 0.888kg
TOTAL: 0.666kg
3
DATE: 04/06/06
TIME: 11/11/11
GS: 0.888kg
DATE: 04/06/06
TIME: 11/11/11
NT: 0.666kg
TW: 0.222kg
GW: 0.888kg
DATE: 04/06/06
TIME: 11/11/11
GS: 0.222kg
TOTAL: 0.888kg
DATE: 04/06/06
TIME: 11/11/11
NT: 0.222kg
TW: 0.666kg
GW: 0.888kg
TOTAL: 0.888kg
4
NO.: 4
GS: 0.888kg
NO. : 4
NT : 0.666kg
TW: 0.222kg
GW: 0.888kg
NO.: 4
GS: 0.222kg
TOTAL: 1.000kg
No.: 4
NT: 0.222kg
TW: 0.666kg
GW: 0.888kg
TOTAL: 1.000kg
5
DATE: 04/06/06
NO.: 5
GS: 0.888kg
DATE: 04/06/06
NO.: 5
NT: 0.666kg
TW: 0.222kg
GW: 0.888kg
DATE: 04/06/06
NO.: 5
GS: 0.222kg
TOTAL: 1.222kg
DATE: 04/06/06
No.: 5
NT: 0.222kg
TW: 0.666kg
GW: 0.888kg
TOTAL: 1.222kg
6
TIME: 11/11/11
NO.: 6
GS: 0.888kg
TIME: 11/11/11
NO.: 6
NT: 0.666kg
TW: 0.222kg
GW: 0.888kg
TIME: 11/11/11
NO.: 6
GS: 0.222kg
TOTAL: 1.444kg
TIME: 11/11/11
No.: 6
NT: 0.222kg
TW: 0.666kg
GW: 0.888kg
TOTAL: 1.444kg
7
DATE: 04/06/06
TIME: 11/11/11
NO.: 7
GS: 0.888kg
DATE: 04/06/06
TIME: 11/11/11
NO.: 7
NT: 0.666kg
TW: 0.222kg
GW: 0.888kg
DATE: 04/06/06
TIME: 11/11/11
NO.: 7
GS: 0.222kg
TOTAL: 1.666kg
DATE: 04/06/06
TIME: 11/11/11
No.: 7
NT: 0.222kg
TW:: 0.666kg
GW: 0.888kg
TOTAL: 1.666kg
Print out format form 2 (for Tpup label printer, only “PRT” parameter available)
0
2000/00/00 00:00
S/N 1
GW 0.888kg
4
2000/00/00 00:00
S/N 4
GW 0.888kg
1
DATE: 2000/00/00
TIME: 00:00
GW: 0.888kg
5
DATE: 2000/00/00
TIME: 00:00
GW: 0.888kg
2
DATE:
TIME: 00:00
S./NO.: 2
GROSS WT: 0.888kg
6
DATE:
TIME: 00:00
S./NO.: 6
GROSS WT: 0.888kg
3
2000/00/00 00:00
S/N 0003
GW 0.888kg
7
2000/00/00 00:00
S/N 7
GW 0.888kg

T2200P Weighing Indicator User’s Guide
- 12 -
SECTION 8 RS-232 OUTPUT
The T2200P Series of scales can be ordered with an optional RS-232 output.
9. 1 basic information
Specifications:
RS-232 output of weighing data
ASCII code
8 data bits
No Parity
Connector: 25 pin d-subminiature socket
Pin 2: Output
Pin 3: Input, not used at this time
Pin 7: Signal Ground
9. 2 normal print out
Data Format for normal weighing operations, parts counting or recalling of totals from
memory will all be different. Examples follow:
Normal Output
When parts counting the weight, unit weight and count will be printed.
When recalling the Total weight stored in the accumulation memory the output format
is:
Date AND TIME The scale will be set date and time
S/N The number increments every time a new value is stored in memory
GW GW for gross weight, NT for net weight and a unit of weight
<If>
<If> Includes 2 line feeds
*************** A line of stars is shown
<lf> Includes 1 line feed
Date:
Time: 00:00
Total No: 3 Times of the accumulation memory
Total wt.: 0.447KG Weight of the accumulation memory
***************
Date: The scale hasn’t printed
Time: 00:00 The scale will be set time
Gross wt: 0.149KG GW for gross weight, NT for net weight and a unit of weight
Unit wt: 7.4257G The average piece weight computed by the scale
Quantity : 20PCS The number of parts counted
<If>
<If>

T2200P serial weighing indicator user’s manual
- 13 -
-QTY UNIT-
9. 3 continuously output protocol
con1: weighing mode
, -/
k g CR LF
-HEADER1-- - HEADER2- --- W EIGHT DATA --
con1: counting mode
P C S
:
p c s CR LF
HEADER1: ST=STABLE, US=UNSTABLE
HEADER2: NT=NET, GS=GROSS
Con2:
Head
er0
Head
er1
Head
er2
Head
er3
Weig
ht1
Weig
ht2
Weig
ht3
Weig
ht4
Weig
ht5
Weig
ht6
Tare1 Tare2 Tare3 Tare4 Tare5 Tare6
Termina
tor1
Termina
tor2
Header0=02H
Header1 follow decimal point
Decimal point=0, header1=22H
Decimal point=1, header1=23H
Decimal point=2, header1=24H
Decimal point=3, header1=25H
Decimal point=4, header1=26H
Header2 follow weigh status, default value=20H
If in net mode (tare value not 0), header2=header2|01H
If gross weight “-“, header2=header2|02H
If overload or gross weight “-“, header2=header2|04H
If unstable, header2=header2|08H
If weighing unit=kg, header2=header2|10H
Header3 follow weighing unit
If weighing unit=g, header3=21H
If weighing unit=oz, header3=23H
Weight1~weight6: weighing data
Tare1~tare6: tare value
Terminator1: 0DH
Terminator2: 0AH
Con3:
Header0 Header1 Weight1 Weight2 Weight3 Weight4 Weight5 Weight6 Weight
7
Unit1 Unit2 Status
Termina
tor1
Termina
tor2
Header0=01H
Header1 follow weight “+” or “-“
When weight “+”, header1=”+”, when weight “-“, header=”-“
Weight1~weight7: weight data (include decimal point)
Unit1~unit2: weight unit
Status: when stable, status=0, when unstable, status=1
Terminator1: 0DH
Terminator2: 0AH
-WEIGHT UNIT-
TERMINATOR
- QTY -

T2200P Weighing Indicator User’s Guide
- 14 -
SECTION 9 CALIBRATION
The scale can be calibrated using the following procedure. For a more detailed
method of calibrating the scale it will be necessary to enter the secure Programming
Menu. See detail in section 12.
The T2200P weighing indicator can calibrate using either metric or pound weights,
depending on the weighing unit in use before calibration. The display will show
either "kg" or "lb" to identify the weights expected.
PROCEDURE
Turn the power off.
Turn the power back on, during the counting from 9 to 0 press the FUNC key.
The display will show "CAL " for a few seconds. While it is showing "CAL "
press the SMPL, PRINT and TARE keys in sequence to enter the Calibration
section. The display will show "unLoAd".
Remove any weight from the platform. After stable indicator on, press the ZERO
key.
The display will show last calibrate weight value, you can use SMPL, SHIFT, TARE
key input new calibrate weight value (use SMPL, SHIFT key to move active digit, use
TARE key to change value), after you setting, press ZERO key to sure, display will
show "LoAd". Place the calibration weight on the scale. Press the ZERO key.
If the calibration is acceptable the display will show "PASS" and then return to normal.
If an error message is shown try calibration again as a disturbance may have
prevented a successful calibration.
If the problem persist then contact your dealer.
After calibration the scale should be checked to verify the calibration and linearity is
correct. If necessary repeat calibration, especially be certain the scale is stable
before accepting any weight.

T2200P serial weighing indicator user’s manual
- 15 -
SECTION 10 ERROR CODES
ERROR
CODES
DESCRIPTION RESOLUTION
- - - - - Over range Remove weight from the scale.
If the problem persist contact your dealer or
Taiwan scale for assistance.
Err 1
Date Setting Error Enter date using correct format and reasonable
values.
Format: yy:mm:dd
Err 2
Time Setting Error Enter time using correct format and reasonable
values.
Format: hh:mm:ss
Err 4
Zero Setting Error The scale was outside the normal zero setting
range either when it was turned on or when the
ZERO key was pressed.
Remove weight from the scale and try again.
Use the TARE key to set the display to zero value.
If the problem persist contact your dealer for
assistance
Err 5
Keyboard short Keyboard damaged
Err 6
A/D out of range The values from the A/D converter are outside the
normal range. Remove weight from the scale if
overloaded, make sure the pan is attached.
Indicates the load cell or the electronics may be
faulty.
If the problem persist contact your dealer for
assistance.
Err 9
Unstable, can’t
return to zero
When turn on the power, if internal counts is not
stable, display will have “Err 9”, please check the
platform and load cell.
If the problem persist contact your dealer for
assistance.

T2200P Weighing Indicator User’s Guide
- 16 -
SECTION 11 TECHNICAL PARAMETERS
You can press SMPL , PRINT, TARE key to enter setting mode at PROG mode
FUNCTION SUB-FUNCTION DESCRIPTION
AZN 0
This option is used to select the auto zero
maintain
Options : 0.5d, 1d, 2d, 4d
0-AUTO
This option is used to select the auto zero range
when turn the indicator.
Options : 0%, 2%, 5%, 10%, 20%
0-RANGE
This option is used to select the manual zero
range when press the ZERO key.
Options: 2%, 4%, 10%, 20%, 50%, 100%
P1 REF
SPEED
Set the ADC speed
7.5/15/30/60 times/second
DECI
This option is used to select the decimal
Options : 0, 0.0, 0.00, 0.000
INC
This option is used to select the division
Options : 1, 2, 5, 10, 20, 50
CAP
This display will show xxxxxx for setting the
capacity.
P2 CAL
CAL
Calibrate, see detail in SECTION 10
TRI
This display will show xxxxxx for trimming the
load cells .
COUNT
This display will show xxxxxx for indicating the
internal counts.
P3 PRO
RESET
This display will show SURE for recovering the
factory default setting.
MODE 0
This is mode of the natural scale
P4 CHK
MODE 1
This is parameter of the animal scale
If you set MODE 1, then will display some
parameter to set the animal scale
First set the shake range, you can use TARE key
to select 0/5/10/15/20/25/30/35/40/45/50, (0
means disable) reading data shake between the
range you set, the reading will be lock.
Then set the reading lock option
, A 1(lock the min
data), A2(lock the average data), A3(lock the
max data)
Then set the new data increment value
, use
SMPL, SHIFT, TARE key to enter the data, use
ZERO key to sure. After you set these data,
when reading have been locked, if you add
goods again to the platform or release goods
more than this weight, the reading will be update
and lock again.
Then set the delay time: 10/20/30/40.
At last, set lock condition (3/4/5/6/7/8), 3 means if
find continuous 3 times data between the range,
data will be locked.

T2200P serial weighing indicator user’s manual
- 17 -
FUNCTION SUB-FUNCTION DESCRIPTION
MODE 2
This is a subtration scale (print out “-“ weight)
Print format:
GROSS: 0.888KG gross for gross weight
NET: 0.222KG net for net weight
TARE: 0.666KG tare for tare weight
MODE 3
As the mode 2, but print out format different
NW: 0.222KG nw for net weight
GW:0.888KG gw for gross weight

T2200P Weighing Indicator User’s Guide
- 18 -
TAIWAN SCALE is a international supplier with more than 30 years experience in the production
and sale of electronic weighing equipment.
Products are supplied and serviced from our company locations in the CHINA, TAIWAN and
distributed through a world wide dealer network, also we make OEM/ODM products for world
wide customer.
TAIWAN SCALE's products are predominantly designed for the laboratory, medical, business
and industrial markets.
The product range can be summarised as follows:
− Counting scales for general industrial and warehouse applications
− Digital weighing/check-weighing scales
− High performance platform scales with extensive software facilities including parts
counting, percent weighing etc.
− Digital electronic scales for medical use
− Retail price computing scales
− Floor scales
− Truck scale
− Crane scales
− Weighing indicator for platform scales, floor scales and truck scales
− Hand push and pull gauge
− Customize auto weighing systems
TAIWAN SCALE and their distributors offer a full range of technical services such as on site and
workshop repair, preventative maintenance and calibration facilities.
TAIWAN SCALE operates an approved quality management system and is certified to
ISO9001:2000.
Visit our Website at:
www.taiwanscale.com
Taiwan Scale Mfg. Co., Ltd.
282, Sec.3, Hoping W. Rd.
Taipei,
Taiwan
TEL:886-2-23068203
FAX:886-2-23044354
e-mail: tscale@giga.net.tw
W & P Scales Mfg. (Kunshan) Co., Ltd.
No. 99 ShunChang Road
Kunshan Hi-tech industry park
Kunshan, Jiangsu
China
TEL:86-512-57669080
FAX:86-512-57669100
e-mail: sales@taiwanscale.com
©Copyright by Taiwan Scale Mfg. Co., Ltd. All rights reserved. No part of this publication may
be reprinted or translated in any form or by any means without the prior permission of Taiwan
scale.
Taiwan Scale reserves the right to make changes to the technology, features, specifications and
design of the equipment without notice.
All information contained within this publication was to the best of our knowledge timely, complete
and accurate when issued. However, we are not responsible for misimpressions which may
result form the reading of this material.
The latest version of this publication can be found on our Website.
 Loading...