

GWT-NEOS3000AE VER1.0
NEOS3000 SERIES 1 USER MANUAL
A. INTRODUCTION
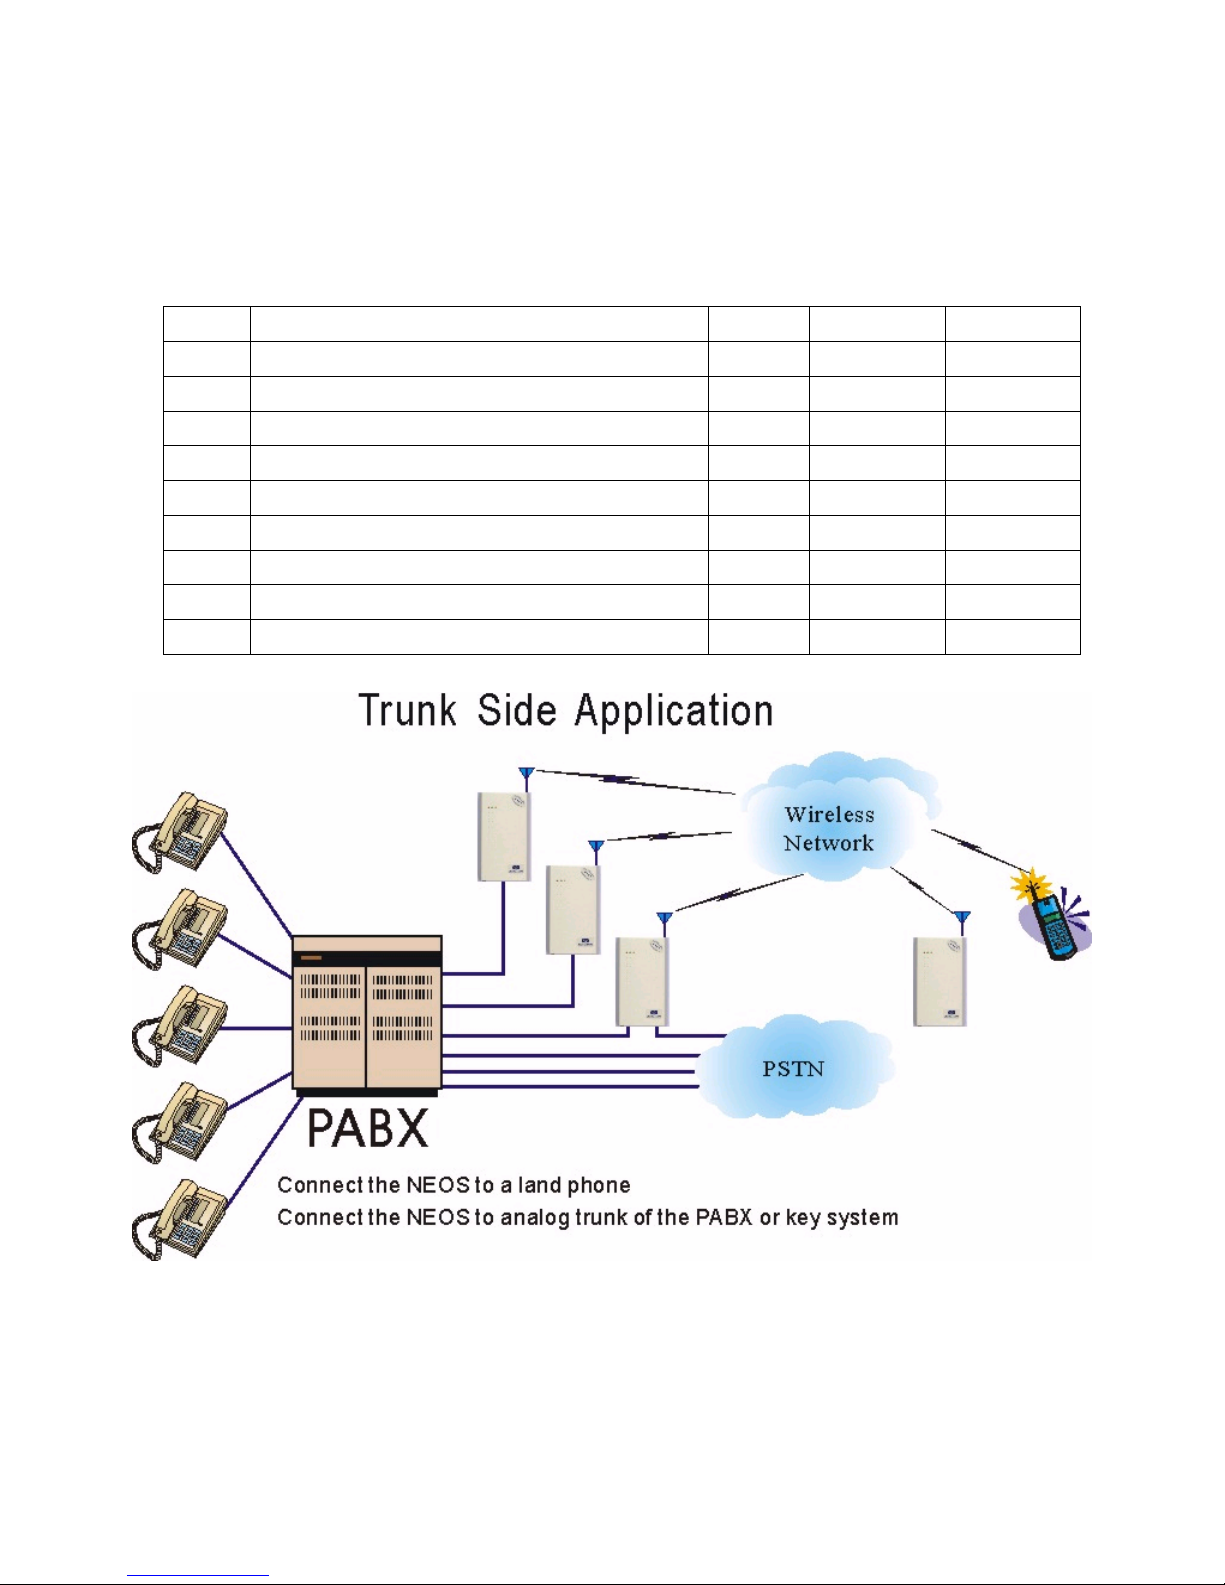
Thank you for choosing the NEOS3000A series product. This innovative product make you connect
to standard telephone equipment with GSM engine into a cellular network for total communications
flexibility. You can connect the NEOS3000A to the land phone or the analog trunk of the PABX or
key system.
B. CHECKING YOUR PARTS
Item Description Qty Included Optional
1 NEOS3000A 1
◎
2 DC12V/1A Switching Adapter 1
◎
3 Phone Cord 1
◎
4 Telephone Box 1
◎
5 Male SMA Antenna 1
◎
6 Operation Manual 1
◎
7 Display 1
◎
8 Data Cable 1
◎
9 SCM50 1
◎
C. SYSTEM ARCHITECTURE
D. INSTALLATION (see diagram below)
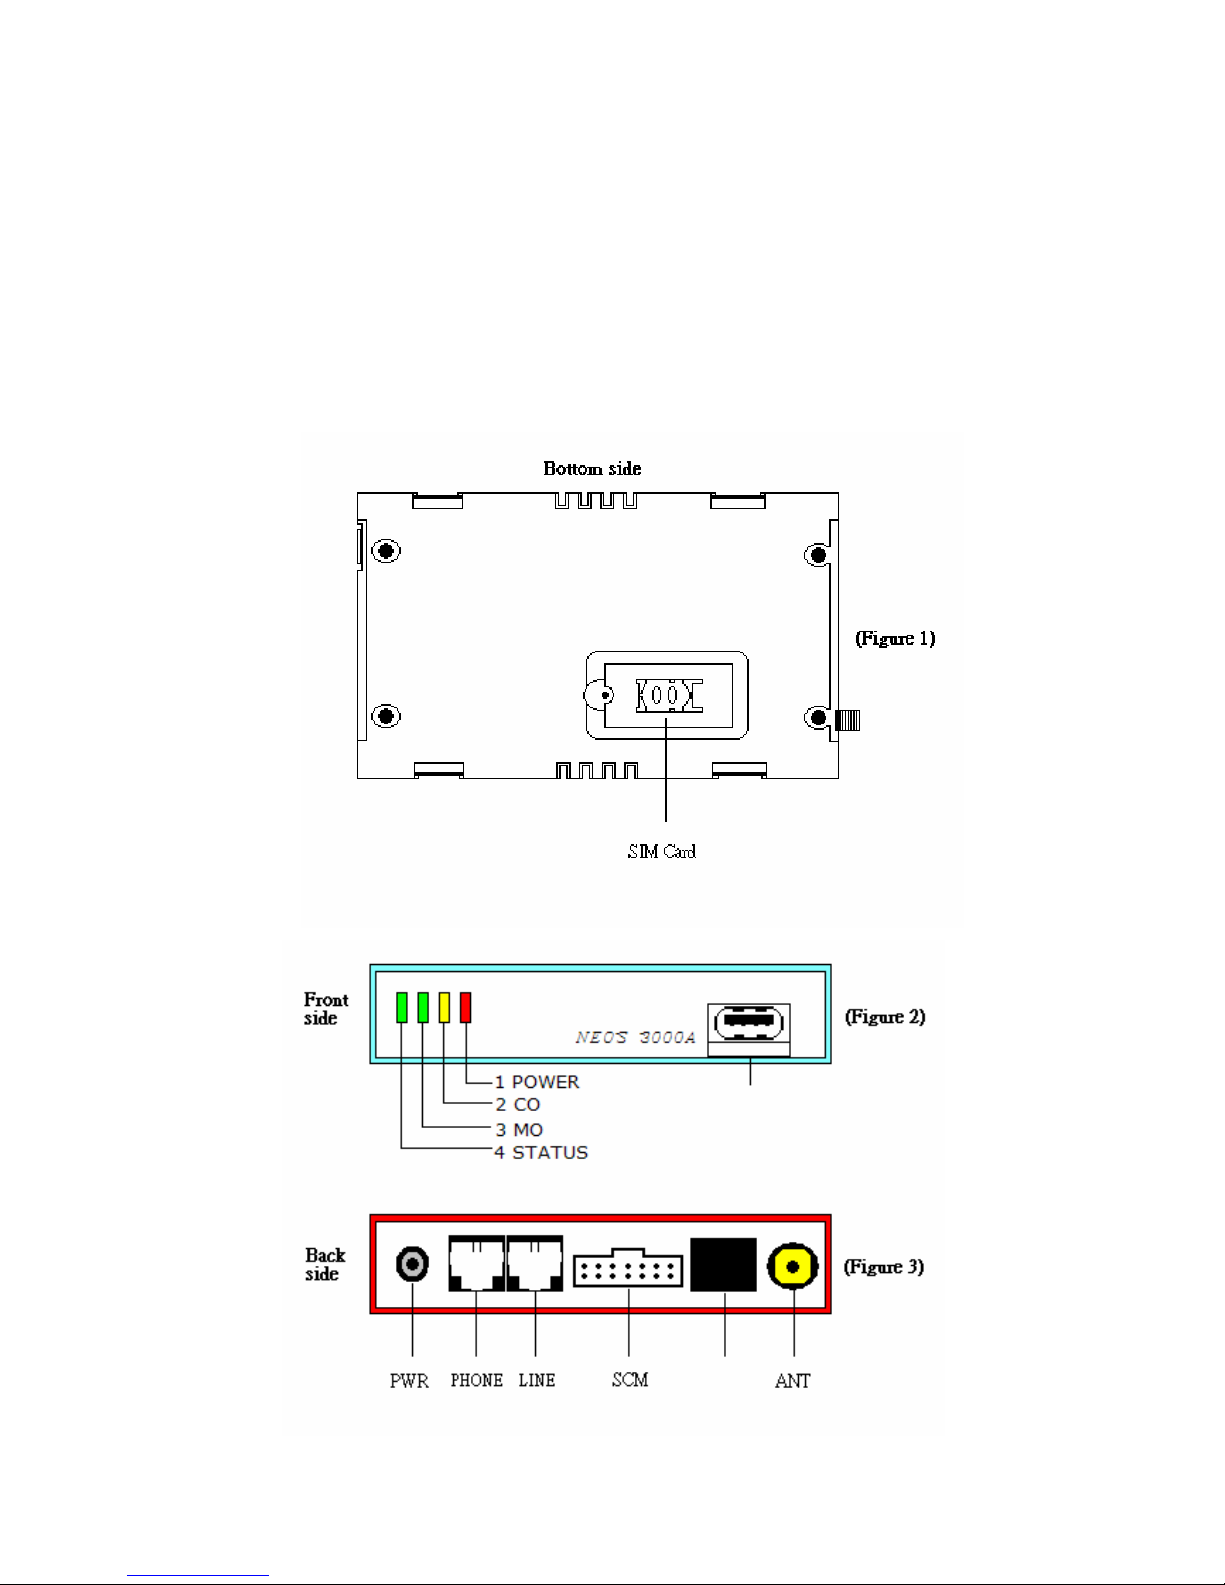
1. SIM Card Installation(figure 1)
1-1. Remove the 12VDC switching adapter
1-2. Gently insert the mini-SIM card in the slot of bottom of NEOS3000A
1-3. Make sure the SIM card is put exactly
1-4. Attach the 12VDC switching adapter
GWT-NEOS3000AE VER1.0
NEOS3000 SERIES 2 USER MANUAL
2. Connect the antenna to the SMA antenna connector on the back of NEOS3000A.
3. Connect The Power and Plug In Your Telephone Equipment(figure 2 and 3)
3-1. Connect the LINE port of NEOS3000A with wall jack of PSTN. (If you don’t have PSTN or
need LCR, you don’t do it.)
3-2. Connect one end of phone cord to the PHONE port of NEOS3000A and the other end to the
analog port of the PABX. (or key system or the land phone)
3-3. Connect the switching adapter to the DC jack of NEOS and AC power.
3-4. All steps are finished, the red led and green led turn on.

GWT-NEOS3000AE VER1.0
NEOS3000 SERIES 3 USER MANUAL
4. LED Status Indicators
Position LED Color LED Activity Description
1 RED Continuous ON or OFF The DC power is ON or OFF
2 YELLOW Continuous ON The PSTN line is idle.
2 YELLOW Flashing(0.05sec ON / 0.05sec OFF) The PSTN line is talking.
3 GREEN Continuous ON The GSM phone is idle.
3 GREEN Flashing(0.05sec ON / 0.05sec OFF) The GSM line is talking.
3 GREEN Flashing(0.25sec ON / 0.25sec OFF) The redial tone of NEOS.
3 GREEN Flashing(0.5sec ON / 0.5sec OFF) The busy tone of NEOS.
4 GREEN Continuous OFF The engine is OFF, in SLEEP, ALARM
4 GREEN Flashing(0.6sec ON / 0.6sec OFF) No SIM card, no PIN entered, network searching
4 GREEN Flashing(0.075sec ON / 3sec OFF) Logged on a network but no call in progress
4 GREEN Continuous ON Connected to remote party
2&3 GREEN and YELLOW Flashing three time in one second Enter the Setup Mode
2&3 GREEN and YELLOW Flashing(0.25sec ON / 1.75sec OFF) Enter the Programming Mode
E. HOW TO USE
1. Pick up your telephone handset.
2. Listen for dial tone. (If there is no tone, you have to check the signal level of GSM engine.)
3. Dial the phone number.
F. PROGRAMMING MODE
1. Pick up the telephone handset and listen for the dial tone. Press the【****#】then enter the
setup mode. You can hear the Du Du Du tone (three times per second).
2. Press the password to enter programming mode, the default value is【1234#】
2-1. When the password is correct, the green LED and yellow LED of NEOS will flash and you
hear short Du tone (one time per second). We call it setup tone.
2-2. When the password is wrong, the green LED and yellow LED of NEOS will flash and you
hear three Du tones then back to the setup mode.
3. In programming mode you can press the function code to program the feature you want. (check
the table of function code)
3-1. If the programming is successful, the green LED and yellow LED of NEOS will flash one
time and you can hear one Du tone. You can program the other function.
3-2. If the programming is fail, the green LED and yellow LED of NEOS will flash three times and
you can hear three Du tones. If you hear setup tone, you can reprogram the function
3-3. You can hang up the handset to cancel this programming when you press wrong code.
3-4. Press【**00#】or hang up the handset over two second if you want to quit the
programming mode.

GWT-NEOS3000AE VER1.0
NEOS3000 SERIES 4 USER MANUAL
G. FUNCTION DESCRIPTION (Reference FUNCTION CODE TABLE)
1. Outgoing Time Control
1-1. NEOS will emit three Du Du Du tones at 25 seconds before the end of the outgoing time
that you program. It reminds you that this call will be finished.
1-2. Press【90X】to set the outgoing time from 1 to 9 minutes. Χ is 1 to 9.
1-3. Press【911】to disable NEOS to finish the call when outgoing time is up. But NEOS will emit
the reminding tone per minute.
1-4. Press【912】to enable NEOS to finish the call when outgoing time is up.
1-5. Press【900】to set that NEOS don’t restrict the outgoing time.
2. Call Restriction ( It is useful when you remove phone cord from line port of NEOS)
2-1. Press【916】to enable the call restriction. You can call when the prefix of phone number
match permissible dialing number or else you can not call and hear Du Du Du tone.
2-2. Press【915】to disable the call restriction. You can call all number when you don’t connect
wall jack to line of NEOS.
Note:If you press【916】to enable the call restriction and the permissible dialing number is
empty, you can not call at all.
3. Permissible Dialing Number
3-1. Press【8XXXXXXXXX#】to add the prefix number. Χ represents digit of number. One prefix
is up to 9 numbers and total is up to 50 sets.
3-2. Press【7XXXXXXXXX#】to delete the prefix number.
3-3. Press【998】to clear all permissible dialing number.
3-4. If you connect wall jack to NEOS, the permissible dialing number will become router
between PSTN and GSM network.
4. Outgoing Tone
4-1. Press【927】to disable the beeping tone when you call via GSM network.
4-2. Press【928】to enable the beeping tone when you call via GSM network.
5. Polarity Reversal
5-1. Polarity reversal of outgoing call description
When the outgoing call is connecting NEOS will reverse the polarity. If anyone hangs up
the phone, then NEOS reverse the polarity back.
5-2. Polarity reversal of incoming call description
When you pick up your handset NEOS reverse the polarity. If anyone hangs up the phone,
then NEOS reverse the polarity back.
5-3. Polarity reversal Option
Press【963】to disable polarity reversal of outgoing.
Press【964】to enable polarity reversal of outgoing.
Press【967】to disable polarity reversal of incoming.
Press【968】to enable polarity reversal of incoming
6. Factory Default Setting
Press【999】to enable the default setting.

GWT-NEOS3000AE VER1.0
NEOS3000 SERIES 5 USER MANUAL
H. INSTALLITION TIPS
1. Make sure that GSM engine logged to a network. Check the receive signal strength and move
the antenna until you achieve the best signal possibly.
2. RF energy from GSM engine may affect the other standard telephone equipment. Don’t place
the NEOS beside equipment too close.
3. When you connect NEOS with PABX, please notice the polarity of PSTN line.
4. Please disable the PIN entered of SIM card. Disable the feature of call waiting, call forwarding
and voice mail.
I. FUNCTION CODE TABLE
Feature Function Code Description
****#
Enter the setup mode.
Setup Mode
**00#
Quit the setup mode and enter normal mode.
0XXXX# Set the password. It is 4 to 8 digits. The default is set 1234#.
913 Disable to press password.
Password
914 Enable to press password. It is default.
900 Disable outgoing time control.
90X Set the outgoing time. X is 1 to 9 minutes.
911
Disable NEOS to break the call when outgoing time is up. And
NEOS will emit the reminding tone per minute.
Outgoing Time
Control
912 Enable NEOS to break the call when outgoing time is up.
915 Disable limiting dial from mobile. It is default.
Call Restriction
916 Enable limiting dial from mobile.
8XXXXXXXXX#
Add the prefix number. It is up to 9 digits.
7XXXXXXXXX#
Delete the prefix number.
Permissible
Dialing Number
998 Delete all permissible dialing number.
927 Disable outgoing tone.
Outgoing Tone
928 Enable outgoing tone.
963 Disable polarity reversal of outgoing call. It is default.
964 Enable polarity reversal of outgoing call.
967 Disable polarity reversal of incoming call. It is default.
Polarity Reversal
968 Enable polarity reversal of incoming call.
Receive Volume 53X X is 0 to 4. Adjust the receive volume of engine. Default is 3.
Transmit Volume 60X# X is 0 to 4. Adjust the transmit volume of engine. Default is 2.
Reset Default 999 Enable the default setting.
Password is 1234#.
Outgoing time is not limited.
Disable limiting dial.915
Factory Default setting
No Permissible Dialing number.

GWT-NEOS3000AE VER1.0
NEOS3000 SERIES 6 USER MANUAL
 Loading...