

Page 1

T2020
Operator's Manual
Page 2

TAIT ELECTRONICS LIMITED SOFTWARE LICENCE AGREEMENT
This legal document is an Agreement between you, (the "Licencee") and Tait Electronics Limited ("Tait"). By
opening this product package and/or using the product you agree to be bound by the terms of this Agreement.
If you do not agree to the terms of this Agreement, do not open the product package and immediately return the
unopened product package to Tait. If you open the product package that will be deemed to be acceptance of the
terms of this licence agreement.
LICENCE
In consideration of the payment of the Licence Fee which forms part of the price you paid for products you
acquired from Tait or its subsidiary or agent (the "products") and our willingness to be bound by the terms of this
agreement, Tait grants to you as Licencee the non-exclusive right to use the copy of a Tait software program
included in the products, (the "Software").
In particular the Licencee may use the program on a single machine and if the software is supplied on a diskette,
the licensee may:
(a) copy the program into any machine readable or printed form for backup purposes in support of your use
of the program on the single machine (Certain programs, however, may include mechanisms to limit or
inhibit copying. They are marked "copy protected"), provided the copyright notice must be reproduced and
included on any such copy of the Software.
(b) Merge it into another program for your use on the single machine. (Any portion of this program merged
into another program will continue to be subject to the terms and conditions of this Agreement.);
The Licencee may not duplicate, modify, reverse compile or reverse assemble the Software in whole or part.
TITLE TO SOFTWARE
This agreement does not constitute a contract of sale in relation to the Software supplied to the Licencee. Not
withstanding the Licencee may own the magnetic or other physical media on which the Software was originally
supplied, or has subsequently been recorded or fixed, it is a fundamental term of this Agreement that at all times
title and ownership of the Software, whether on the original media or otherwise, shall remain vested in Tait or
third parties who have granted licences to Tait.
TERM AND TERMINATION
This Licence shall be effective until terminated in accordance with the provisions of this Agreement. The
Licencee may terminate this Licence at any time by destroying all copies of the Software and associated written
materials. This Licence will be terminated automatically and without notice from Tait in the event that the
Licencee fails to comply with any term or condition of this Agreement. The Licencee agrees to destroy all copies
of the Software and associated written materials in the event of such termination.
LIMITED WARRANTY
The Software is supplied by Tait and accepted by the Licencee "as is" without warranty of any kind either
expressed or implied, including but not being limited to any implied warranties as to merchantability or fitness
for any particular purpose. The entire risk as to the quality and performance of the Software vests in the Licencee.
Should the Software prove to be defective, the Licencee (and not Licensor or any subsidiary or agent of the
Licensor) shall assume the entire cost of all necessary servicing, repair or correction.
Tait does not warrant that the functions contained in the Software will meet the Licencee's requirements or that
Page 3

the operation of the Software will be uninterrupted or error free. However Tait warrants that the diskettes if any
on which the Software is supplied to the Licencee shall be free from defects in material and workmanship under
normal use and service for a period of ninety (90) days from the date of delivery to the Licencee.
EXCLUSION OF LIABILITY
Tait's entire liability and the Licencee's exclusive remedy shall be:
1. The replacement of any diskette not meeting Tait "limited warranty" and which is returned to Tait or an
authorised agent or subsidary of Tait with a copy of the Licencee's purchase receipt; or
2. If a diskette is supplied and if Tait is unable to deliver a replacement diskette which is free from defects
in material or workmanship, the Licencee may terminate this Agreement by returning the Software to Tait.
3. In no circumstances shall Tait be under any liability to the Licencee, or any other person whatsoever, for
any direct or consequential damage arising out of or in connection with any use or inability of using the
Software.
4. Tait warrants the operation of the Software only with the operating system for which it was designed. Use
of the Software with an operating system other than that for which it was designed may not be supported
by Tait, unless otherwise expressly agreed by Tait.
GENERAL
The Licencee confirms that it shall comply with the provisions of law in relation to the Software.
LAW AND JURISDICTION
This Agreement shall be subject to and construed in accordance with New Zealand law and disputes between the
parties concerning the provisions hereof shall be determined by the New Zealand Courts of Law. Provided
however Tait may at its election bring proceedings for breach of the terms hereof or for the enforcement of any
judgement in relation to a breach of the terms hereof in any jurisdiction Tait considers fit for the purpose of
ensuring compliance with the terms hereof or obtaining relief for breach of the terms hereof.
No Dealings
The Licencee may not sublicense, assign or transfer the licence or the program except as expressly provided in
this Agreement. Any attempt otherwise to sublicense, assign or transfer any of the rights, duties or obligations
hereunder is void.
No Other Terms
The Licencee acknowledges that it has read this agreement, understand it and agree to be bound by its terms and
conditions. The Licencee further agrees that this is the complete and exclusive statement of the agreement
between it and Tait in relation to the Software which supersedes any proposal or prior agreement, oral or written
and any other communications between the Licencee and Tait relating to the Software. (LS-589)
Page 4

Contents Page
To Switch On ................................................................... 1
To Select a Channel .............................................................. 2
To Receive ..................................................................... 2
To Transmit .................................................................... 3
Economiser Mode ............................................................... 4
To Scan Channels ............................................................... 5
User Programmable Scan.......................................................... 5
To Make a Call (Selcall Option Fitted) ............................................... 6
To Receive a Call (Selcall Option Fitted) ............................................. 8
Advanced User Operations ........................................................ 9
Repeater Talkaround......................................................... 9
Call Queuing (Selcall Option Fitted) ............................................ 9
To Divert a Received Call (Selcall Option Fitted) ................................ 11
To Send DTMF Tones (DTMF Option Fitted) ................................... 13
Alphanumeric Entry Mode ................................................... 14
To Change the Selcall Status Code (Selcall Option Fitted) .......................... 15
Emergency Operation (Selcall Option Fitted) .................................... 16
To Alter User Options ...................................................... 16
Other Selcall Features ...........................................................17
Warning (Vehicle Installations) ................................................... 18
Appendix A1 Key Functions Explained........................................... 18
Appendix A2 Indicator And Display Functions Explained ............................ 20
Appendix B Installation ...................................................... 23
Composition of the T2000 Series radio kit ....................................... 23
Recommended Installation Tools .............................................. 23
Installation Planning........................................................ 23
To Remove the Radio from its Cradle .......................................... 24
The Cradle Assembly ....................................................... 24
Mounting ................................................................25
Antenna Installation ........................................................ 25
Wiring................................................................... 26
External Wire (Horn/Hush/Emergency)......................................... 27
Remote Front Panel Option ..................................................27
Microphone Clip ........................................................... 28
Installation Checks ......................................................... 28
Troubleshooting ........................................................... 29
Maintenance .............................................................. 29
Despatcher Operation ....................................................... 29
Page 5
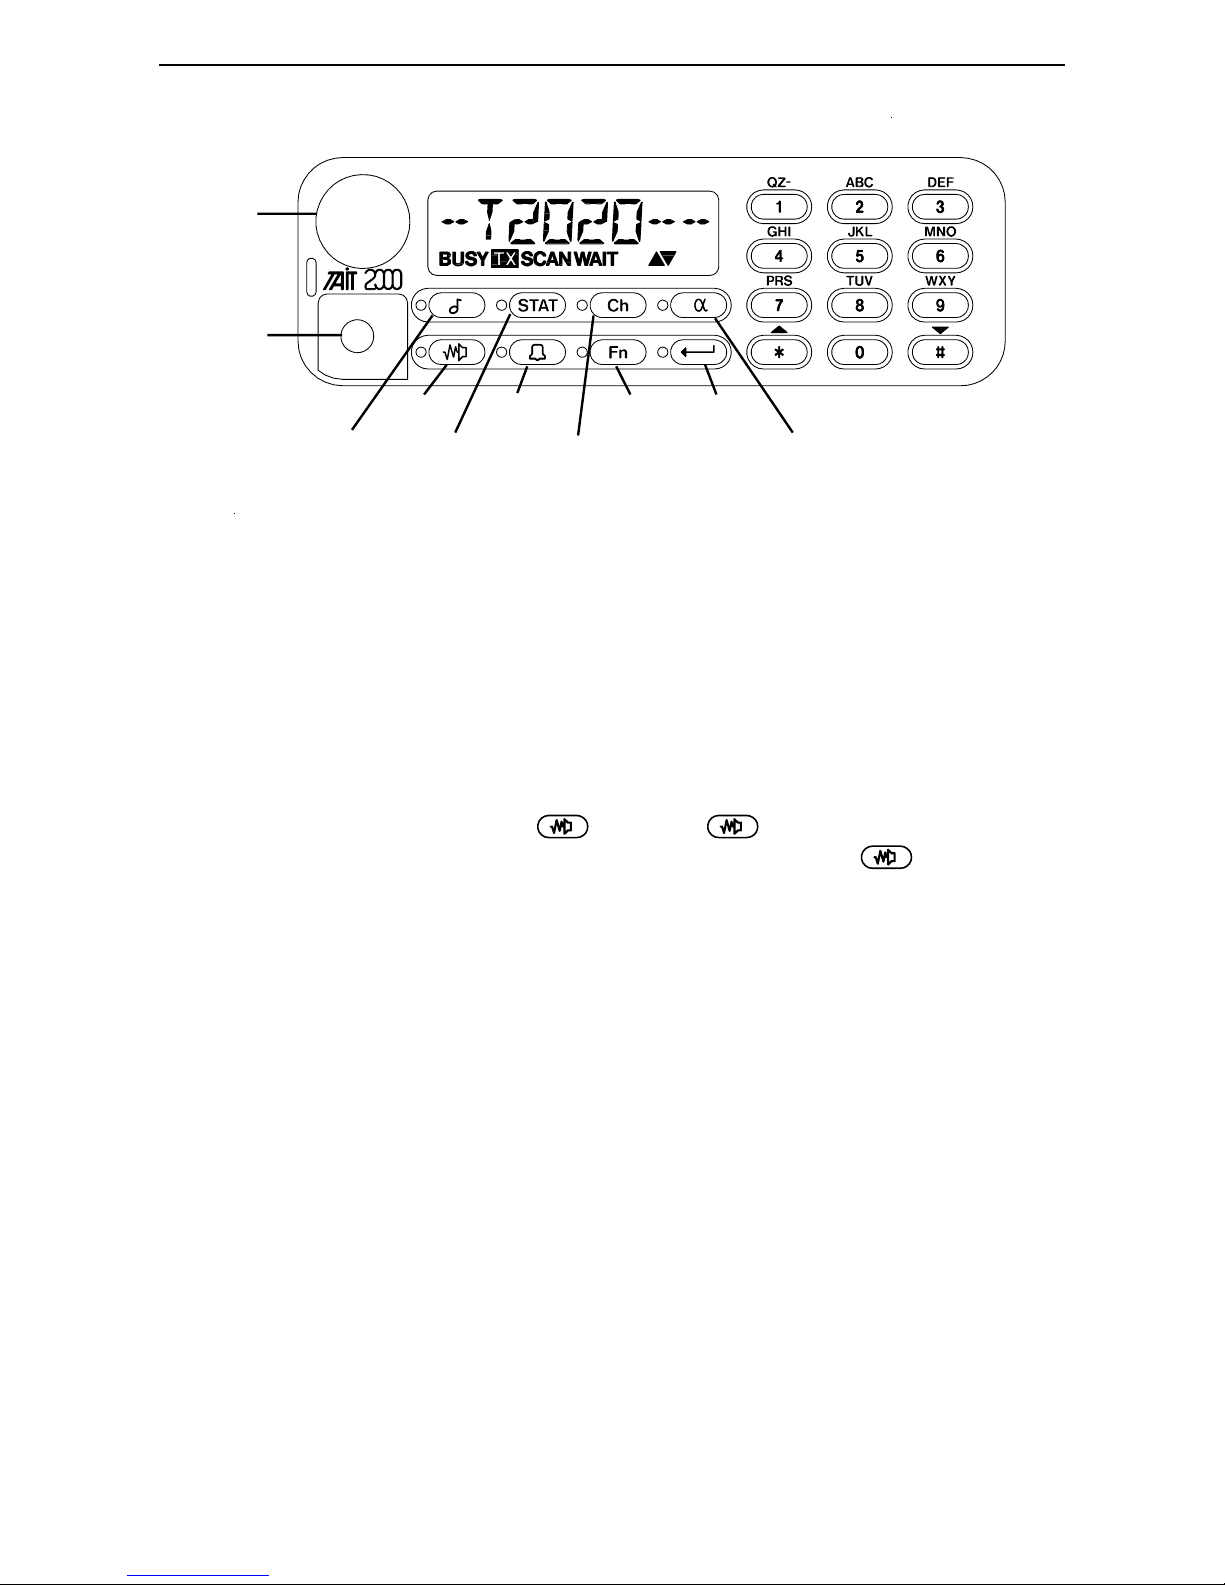
Monitor Auxiliary Function Enter
Call Status Channel Alphanumeric
On/Off
Volume
Microphone
Socket
T2020 Operator's Manual 1
T2020 Front Panel Controls and Indicators
To Switch On
1 Switch the radio on by rotating the volume knob about one-third of a turn clockwise.
You will feel a click as the knob leaves the 'off' position. The display will show a
power-up message and the radio then emits two short tones, beep.beep.
2 After the front panel display shows its power-up message, the radio will restore
itself to the same state it was in when last turned off.
3 Press and hold the monitor key until the ! indicator flashes. Adjust the
volume knob for a comfortable listening level. Depress the key briefly to
return the radio to the quiet state. The radio will emit a short tone, boop. (It may
be programmed to return to this state after a short while anyway.)
4 You will need to finally set the volume level when you receive your first call. The
volume level of the confidence tones (beeps) is also affected by the volume control,
but will not reduce below a preset minimum level.
Page 6

2 T2020 Operator's Manual
To Select a Channel
Each channel has two labels associated with it: its number and its name. Your Tait
dealer will advise you of the channel numbers and names for your radio. (The name or
'alphanumeric label' may also have other information such as a Selcall identity associated
with it - see the section "To Make a Call (Selcall Option Fitted)".)
To select the channel by its channel name:
1 If the indicator beside the ! key is not already illuminated, press the key so that
it lights up. The current channel name will appear in the display with the up and
down arrows ">?" below it.
2 To select the next channel up, press the key on the keypad. Similarly press the
key for the next channel down. By holding either of these keys pressed you
can scroll through the available channels until you reach the channel you want.
To select the channel by its number:
3 Select the channel entry mode as explained in 1 above.
4 Use the alphanumeric keypad to type the channel number, which will appear in the
display. Depending on the length of the number, you may have to finish it by
pressing the key. (You will need to do this if the display does not change
when you type the last digit.) The display will change to the channel name.
To Receive
1 Your radio will remain muted until another user makes a call. Listen for your call-
sign when you hear activity, and if you are called, reply promptly with your callsign (for example "Mobile-9 receiving").
2 The (BUSY) indicator in the display will appear whenever there is any activity on
the channel. Your radio may only unmute the speaker for some of this activity,
depending on which signalling options are fitted. Consult your Tait dealer to see
which signalling options are active on your radio.
3 The key enables you to monitor a channel to listen to other users, regardless
of the muting controls programmed into your radio. There are three types of muting
control which may screen your calls:
Page 7

T2020 Operator's Manual 3
The RF squelch keeps your radio quiet as long as any signals it receives are below a factory-set
1
threshold. This ensures that only signals which will be intelligible will be made audible.
Continuous Tone-Controlled Sub-audible Signalling.
2
Digital Coded Squelch.
3
- the RF squelch requires that any signal made audible exceeds a preset level;
1
- the CTCSS or DCS mute requires that any signal made audible carries a
23
specific (inaudible) tone or code;
- the Selcall mute requires that any signal made audible carries a special
(audible) tone sequence at the beginning of the transmission.
Note that the RF Squelch will always operate in your radio, but the CTCSS (DCS)
or Selcall mutes are optional depending on the way your radio is programmed.
4 The key may be programmed to override one or more of the mutes. The most
common configuration is as follows:
- a brief press (less than one second) overrides any Selcall or CTCSS/DCS
signalling mute. (If hookswitch monitoring is programmed, lifting the
microphone off hook will have the same effect.)
- a long press (more than one second) additionally overrides the RF squelch.
If you are not sure how your T2020 has been programmed, consult your Tait dealer.
5 The radio is equipped with an automatic RF squelch. Occasionally, you may find
the message you are receiving is still intelligible, but is being cut off periodically by
the RF squelch. In this case, you can force the radio to leave the RF squelch open
continuously by giving the key a long press until the radio sounds two short
tones, beep.beep, and the ! indicator flashes.
6 Your radio may be fitted with the ability to hush (mute) another device such as a car
stereo, to enable you to hear a call better. Consult your Tait dealer to see if this
facility is active on your radio.
To Transmit
1 If the BUSY indicator is on, the channel is busy and you must wait until it is free
before proceeding. If you attempt to transmit anyway, the "WAIT" indicator may
appear in the display, and your attempt will be deferred. The radio will sound an
Page 8

4 T2020 Operator's Manual
Some options do not allow channel monitoring in this way, but simply prevent you from
1
transmitting if the channel is busy. Consult your Tait dealer to see if this applies to your radio.
alerting tone, beep . beep . beep, as soon as the channel becomes free.
2 Lift the microphone off its hook and listen to check that no-one else is using the
channel. Depending upon the options fitted to your radio, you may also have to
press the key briefly . If you attempt to transmit while the channel is in use,
1
you will hear a warning tone, boop, from the speaker and the "WAIT" indicator will
appear in the display. When the channel becomes free again, the radio will sound
an alerting tone, beep . beep . beep.
3 Hold the microphone about 5cm from your mouth and squeeze the Press-To-Talk
(PTT) switch on the side of the microphone. Speak clearly into the microphone,
identifying yourself and the person you wish to contact by your call signs (for
example - "Mobile-9 to Base"). Release the PTT switch when you have finished
talking.
4 The radio is fitted with a timer to limit the maximum length of transmissions. The
radio will sound a warning, beep .. beep .. beep, before it stops transmitting.
5 Your radio may be fitted with the ability to hush (mute) another device such as a car
stereo so that your speech is clearly audible to other users when you transmit a call.
Consult your Tait dealer to see if this facility is active on your radio.
Economiser Mode
1 The T2020 incorporates an economiser mode which turns off some internal circuitry
and dims the back-lighting for the front panel to conserve battery power. This will
occur after a pre-determined period of inactivity.
2 Operating any of the front panel controls or the PTT switch restores the radio to full
activity immediately.
3 If the radio receives a call for you, it will also restore itself to full activity
immediately.
Page 9

T2020 Operator's Manual 5
To Scan Channels
1 Ensure the microphone is placed on its hook. (Your radio may be programmed to
scan while the microphone is off-hook. Consult your Tait dealer for more
information on this feature.)
2 Channels to be scanned are assembled into groups. Each group is assigned a
channel number and programmed into your radio. Consult your Tait dealer to find
out the number, label and channel contents of each of your scan groups. To start
scan operation, select the appropriate scan group in the same way as selecting an
ordinary channel. The "SCAN" indicator will appear in the display.
3 The radio will now repeatedly scan through all programmed channels searching for
activity. When activity is detected on any channel, scanning will halt and the
display will show the active channel's name. (If signalling options are active in the
radio, only activity with valid signalling tones will halt the scanning.) The radio
will pause and unmute on that channel as long as the traffic remains, and the
"SCAN" indicator will flash. It will resume scanning, after a short delay, once the
traffic disappears.
4 If you wish to reply to a message or make a call when the radio is in scan mode, you
may lift the microphone off its hook at any time to suspend scanning. If the radio
has halted scanning to monitor the traffic on a channel, it will remain on that
channel when you lift the microphone off-hook. If the radio has found no traffic
(i.e. has not halted), it will revert to the preprogrammed home-channel.
5 You may change channel if you wish, but this will cancel the scan mode.
Otherwise, converse in the normal manner and, when finished, place the microphone
back on its hook to restart the scan.
6 Scan mode is cancelled by selecting any of the non-scanning channels. The
"SCAN" indicator will disappear from the display.
User Programmable Scan
A user programmable scan group must be defined during programming.
1 To edit the user programmable scan group, press the key. Scroll the items
through the display by pressing the and keys until PROG GRP is
displayed and press the key. The name of the group that is to be edited will be
Page 10

6 T2020 Operator's Manual
displayed and the top row of LED's will be lit.
2 Press the key for a second time to start the editing. All the available channels
can now be displayed by pressing the and keys. The "SCAN" indicator
will indicate those channels that are included in the user programmable scan group
and a flashing "SCAN" indicator will indicate the home channel.
3 Any channel can be added or deleted from the scan group by selecting the required
channel and then pressing the key.
Note: A scan group must contain 2 to 16 channels.
4 The home channel is defined by selecting a channel and then holding the key
for longer than 1 second. The "SCAN" indicator will now be flashing.
Note: You can only delete a normal channel from the scan group. If the home
channel is to be deleted from the scan group, you first have to define another
channel as home channel and then delete the original home channel.
5 Once the group editing is complete, press the key to return to the function
menu. An inactivity timer will also return the radio to the normal operating mode
if no operator activity has been detected for the last 10 seconds.
To Make a Call (Selcall Option Fitted)
Selcall is enabled on a per channel basis. Hence if you try to make a call on a channel that
does not have Selcall enabled, an invalid key press tone will sound. Ensure you are aware
of the channels which have Selcall enabled.
1 If the radio is scanning, you may have to lift the microphone off its hook or select
a single channel in place of the scan group. Check that the radio is on the correct
channel and that the channel is clear before attempting to make the call.
2 Your radio may have been preprogrammed with the ability to make a 'one touch' call
to one other user; usually your base or despatcher - check with your Tait dealer. To
call this user, press the key for about one second. You will notice that the
"TX" indicator appears in the display briefly and your radio will sound a short beep
as the call is transmitted.
3 Your radio may be programmed with the ability to call other users with Selcall on
your channel. Press the key briefly to activate the Selcall mode. Enter the call
code for the other user on your keypad. Each digit will appear in the display as you
Page 11

T2020 Operator's Manual 7
enter it. When you have entered all of the digits, press the or key to send
the call.
For example:
You wish to call another user on the current channel (REGION 2) with the number
37515. The sequence of keystrokes, and the corresponding display characters, " ",
would look like this:
REGION2 (the current channel)
... 12345 (the last number called)
... 3 (first digit of the new number)
... 37 (2nd digit of the new number)
... 375 (3rd digit of the new number)
... 3751 (4th digit of the new number)
... 37515 (5th digit of the new number)
or ... TX (call placed)
4 After the call is sent you may hear an acknowledging tone, beep, or series of tones
from the other user's radio indicating that your call has been received. If you hear
no tone, their radio may not be capable of generating the acknowledging tone, it
may be off or they may be out of range of your call. Your T2020 may be
programmed to display the status of the called unit as follows:
- if no acknowledge sequence was detected after a period of time, the display
will show "-NO ACK-";
- if an acknowledge sequence was detected but no status information was
decoded, the display will show "NO STAT";
- if an acknowledge sequence was detected and the decoded status number can
be identified, the status description will be displayed, e.g. "AT LUNCH";
- if an acknowledge sequence was detected and the decoded status number
cannot be identified, the status number will be displayed, e.g. "STAT 09".
If any front panel activity is detected before any of the above messages is displayed,
the acknowledge sequence is no longer expected and messages will therefore no
longer be displayed.
5 When the other user replies, you should take your microphone off its hook and press
the PTT switch on the side of the microphone when you wish to speak.
Page 12

8 T2020 Operator's Manual
6 If you wish to call a group of other users, you may do so by dialling the digits
common to all members of the group and then using the # character, which will
substitute for all the remaining digits. (Note that this facility may not be
programmed into your radio.)
For example:
You wish to call a group of users on the current channel (REGION2) with numbers
which all begin with 37 and have three more digits. After you have selected channel
REGION 2 (see the previous section, To Select a Channel), the sequence of
keystrokes and the corresponding display characters would look like this:
REGION2 (the current channel)
... 12345 (the last number called)
... 3 (1st digit of the new number)
... 37 (2nd digit of the new number)
... 37GGG (group wild card character)
or ... TX (call placed to all 37??? users)
When the group call has been sent, there will be no acknowledging tone from any
of the other users. You should wait a few seconds after the TX indicator in the
display disappears and then broadcast your message. You should phrase your
message in such a way that it requires no acknowledgement, since the other users
cannot all reply at once.
To Receive a Call (Selcall Option Fitted)
1 When your radio receives an incoming call, the ! indicator beside the key
will flash and a ringing tone, burr,burr ...burr,burr, will sound from the speaker.
(Your T2020 may be programmed to display the caller's identity when you receive
a call. Consult your Tait dealer for more information on this feature.)
2 To answer the call, you should lift the microphone off its hook and converse with
the caller. As soon as you operate the PTT switch, the ringing tone will cease.
3 If you do not answer the call within a short time, the ringing tone will stop. The
radio may then switch on another alerting device (the horn in your car, for example)
to attract your attention. (Consult your Tait dealer to see if this option is fitted.)
The external device will also sound for a predetermined time before stopping.
Page 13

T2020 Operator's Manual 9
4 Your T2020 may be programmed to queue incoming calls. If this feature is enabled,
the caller's identity will be put on the queue after the ringing stops. All other call
indicators will be cleared when the received call has been queued. (Refer to the
section on Call Queuing for more information.)
5 If the call was not queued and you are still unable to answer the call, the radio will
indicate that a call was received in your absence by leaving the red !!!! indicator
flashing.
6 If you do not wish to answer a call, the ringing may be cancelled at any time by
pressing any of the front panel keys. (The function associated with the key you
press will not be invoked.) Note that if the caller's identity was displayed and the
call was still not answered, pressing the key will clear the call and initiate an
'immediate call back' to the caller.
7 If you are one of the recipients of a group call, your radio will only sound a single
sequence of the ringing tone, burr,burr. The caller will then broadcast his message
to all members of your group.
Advanced User Operations
Repeater Talkaround
Repeater talkaround is a programable option that allows the T2020 to transmit and
receive in simplex on the repeater receive frequency of the current channel. This feature
can be used to talk to other participants on a repeater channel without the use of the actual
repeater, for example when you are out of reach of the repeater.
1 Press the key for longer than 1 second.
2The ! should now be flashing which indicates that the T2020 is now in the
repeater talk around mode.
Call Queuing (Selcall Option Fitted)
This feature will enable the storing of up to 10 caller identities. Consult your Tait dealer
to find out if this feature has been enabled for your radio.
Page 14

10 T2020 Operator's Manual
1 Accessing The Call Queue
The call queue can be accessed through the Function Menu Entry mode. This is the
same mode as that used to alter the user options.
- To enter this mode, press the key. The last item viewed previously will
appear in the display. Scroll the items through the display by pressing the
and keys.
- Once in this mode, scroll through the item list and select "CALL QUE".
- Pressing the key when "CALL QUE" is being displayed will let you
access the Call Queue, but only if the queue is not empty.
- In Call Queue Entry mode, the display will show the current entry number and
the total number of entries in the list. An example of the display would be "CL
01/02" which indicates that the current entry is entry number one, with a total
of two entries in the queue. The and arrow keys can be used to
scroll through the list of entries and the key can be used to delete the
entry from the queue.
- Pressing the key will then show the caller identity of this entry. Again,
the and arrow keys can be used to scroll through the list of entries
and the key can be used to delete the entry from the queue.
- Pressing the key again when the caller identity of the entry is being
displayed will initiate the call back and automatically remove that entry from
the queue. Note that the call back sequence is based on the caller identity.
2 Exiting The Call Queue
Pressing any mode key while in the Call Queue will initialise the respective mode
and therefore will take the radio out of the Call Queue Entry mode. This includes
the key.
When deleting entries and making call backs, if the call queue becomes empty, the
radio will automatically exit from the Call Queue Entry mode and go back into the
Function Menu Entry mode.
Page 15

T2020 Operator's Manual 11
3 Queuing Calls
The caller identity and the channel of the received call will be put on the Call Queue
when:
- the internal alert (ringing) of the received call stops;
- another call is received before the previous one is queued.
Note that after the incoming call has been queued, it is automatically
cleared/answered and the radio will resume what it was doing prior to receiving the
call. This includes the resumption of scanning, if the radio was scanning prior to
receiving the call.
4 Queue Not Empty
Whenever the queue is not empty, the Function Menu Entry mode will automatically
be the default mode, with the "CALL QUE" function as the current selected item,
regardless of what has been programmed for the default mode. This will mean that
the radio will always revert to the Function Menu Entry mode after a period of no
user activity if there was something in the call queue. In addition to that, the red
(FCN) indicator will flash whenever the radio is in the Function Menu Entry mode.
5 Queue Full
Whenever the queue is full, the radio will continue receiving calls but will not
resume what it was doing prior to receiving the call. This means that the radio will
not resume scanning if it was scanning prior to receiving the call. This will allow
calls to be received only on the held channel. For every other call that is received,
the information on the previous call will be overwritten.
To Divert a Received Call (Selcall Option Fitted)
This feature will enable the radio to be put into "Call Diversion Mode", where any valid
incoming Selcall sequences will cause the radio to transmit another user defined Selcall
or DTMF sequence on the programmed "Call Diversion Channel". The sequence
(number) to be transmitted and the call type (Selcall or DTMF) can be set from the front
panel when putting the radio into "Call Diversion Mode".
Page 16

12 T2020 Operator's Manual
1 Activating Call Diversion Mode
The Call Diversion "switch" can be accessed through the Function Menu Entry
mode. This is the same mode used to alter the user options.
- To enter this mode, press the key. The last item viewed previously will
appear in the display. Scroll the items through the display by pressing the
and keys.
- Once in Function Menu Entry mode, scroll through the function list and select
"DIVERT".
- Pressing the key while "DIVERT" is being displayed will initiate the call
diversion set-up process.
- On entry into the set-up procedure, the display will flash the last selected
diversion call type: this may be Selcall or DTMF. Use the and
arrow keys to toggle between the two options. Note that if the DTMF option
has not been fitted on the radio, the DTMF call type will not be an option.
- Pressing the key will confirm the call type selected and display the last
selected sequence if it was still valid. If the last selected sequence was no
longer valid, the displayed sequence will be the default sequence.
- If another sequence is required, the numeric keypad can be used to enter the
new diversion sequence. Note that the correct sequence length must be entered
(consult your Tait dealer for more information on this). Pressing the key
will confirm the diversion sequence and put the radio into Call Diversion
mode.
2 Exiting Call Diversion Set-up/Mode
At any stage of the call diversion set-up process, any mode key-presses will
initialise the respective mode and therefore take the radio out of the Call Diversion
Set-up/Mode. This includes the key.
3 Receiving A Call During Call Diversion
When a standard incoming call is received by the radio in Call Diversion mode, the
programmed auto-acknowledge sequence will be transmitted as for a normal call,
but the programmed Diversion Status will be transmitted instead of the normal
acknowledge status to inform the caller that the call has been diverted.
Page 17

T2020 Operator's Manual 13
The radio will then proceed to switch to the programmed call diversion channel and
transmit the sequence that has been set up for the call diversion without indicating
that an incoming call has been received (no ringing).
After executing the diversion transmission, the radio will revert to the channel it was
on prior to the call diversion.
4 Making A Call To A Radio In Diversion Mode
Your T2020 radio can be programmed to respond to a diversion status report when
making a call. When it detects the diversion status in the acknowledge from the
radio it has called, it will display "-DIVERT-" to indicate that the call has been
diverted. It then proceeds to switch to the programmed diversion channel.
To Send DTMF Tones (DTMF Option Fitted)
The keypad on the T2020 may also send Dual Tone Multi-Frequency tones (consult your
Tait dealer to see if this option is fitted to your radio). This gives you the ability to dial
telephone numbers if your radio network has an interconnection to the Public Switched
Telephone Network (PSTN) or to send tones as control codes to remote devices.
1 To enter the DTMF mode, observe which of the function indicators below the
display is currently illuminated (i.e. ! , ! , ! , ! or !!!! ) and
push that key to de-activate the function. This leaves the radio in the DTMF dial
mode, with the last number dialled in the display.
2 Pressing will redial the number in the display.
3 Dialling a new number may be done digit by digit or as a complete number, as
follows:
- To transmit the tone with each key-press (i.e. 'live'), press the PTT switch on
the microphone as you dial. (Your radio may be programmed so that you need
only press the number key.) The TX indicator appears in the display as you
dial.
- To set up a complete sequence of digits, push each number key in turn without
pressing the PTT switch (although your radio may be programmed to transmit
the tones 'live' anyway). Each number appears in the display, and when the
sequence is complete it may be transmitted by pushing the key. (Even
if the digits have been transmitted 'live' they will be retransmitted as a group.)
Page 18

14 T2020 Operator's Manual
In this mode the time of transmission of each digit is set by the radio and is
usually shorter and more efficient than sending them 'live'.
4 Pressing any of the keys on the keypad causes the corresponding DTMF tone to
sound, but this does not indicate whether or not the tone has actually been
transmitted. Watch your radio's display to see if the TX indicator appears (without
the PTT switch pressed).
5 To access special DTMF tones A to D, your radio may be programmed to use the
PTT switch as a shift key to alter the function of some of the keypad keys as
follows:
- PTT + gives DTMF tone A
- PTT + gives DTMF tone B
- PTT + gives DTMF tone C
- PTT + gives DTMF tone D
Alphanumeric Entry Mode
The T2020 contains a number of memory locations which are able to be accessed with
an alphanumeric entry or label from the keypad. The alphanumeric label may be the
same as a channel name or it may be a quite separate word, person's name or acronym
which helps you find the appropriate memory location. Each location may contain
information which selects a channel, makes a Selcall or DTMF call or selects a new
Selcall status code.
To select a memory location by its alphanumeric label:
1 Press to enter the alphanumeric entry mode. Now type the label associated
with the location (and function) you want, using the keypad keys as either numbers
or letters (e.g. the key may be used as a '2', an 'A', a 'B' or a 'C'). A star "*"
will appear in the display as you type each character until you have entered enough
for the radio to recognise the label. When it does, it will display the label in full.
2 Pressing will cause any instructions (channel selection, send call and so on)
contained in the memory location to be carried out.
3 If you then press the key, the display will change from the label to the channel
name. (The radio may be programmed to return to the channel name display after
a short while anyway.)
Page 19

T2020 Operator's Manual 15
For example:
You wish to call your BASE which monitors a channel called REGION2 and has the
Selcall code, 24624. The sequence of keystrokes, and the corresponding display
characters, " ", might look like this:
... "MARLEY6" (the last label entered)
[AB
C] ... "*" (unable to determine new label)
[A
BC] ... "**" (unable to determine new label)
[PRS
] ... "BASE" (new label identified)
... "24624" (channel REGION2 selected and Selcall code
transmitted)
... "REGION2" (channel for BAS
E displayed)
To Change the Selcall Status Code (Selcall Option Fitted)
If your radio is fitted with Selcall, you may also be able to choose from a number of
activity codes which will be sent with each call you make to indicate your present status.
Each code's description and number (0 to 99) is set when the radio is programmed.
Typical descriptions might be "AT LUNCH", "ENROUTE" and so on.
1 To enter the status mode press the key. How they are displayed by your radio
depends on which status display function is active (see the later section, To Alter
User Options).
2 If 'normal display' (STAT NRM) is active, the complete eight character word for the
currently selected status will be displayed. You may now scroll through the choices
by pressing the keys until you find one appropriate for your present
activity. Alternatively, if you know it, you may type the number for your new status
on the keypad. The new status description will appear in the display (you may have
to press first).
3 If 'fixed display' (STAT FIX) is active, your own status is displayed as a code at the
right of the display (along with the channel name which is truncated to six
characters). You may now scroll through the codes by pressing the and
keys. Again, if you know it, you may enter the number for your new status on the
keypad. The new status code will appear in the display (you may have to press
first).
4 The status code is sent when your radio acknowledges another user's call to you.
Page 20

16 T2020 Operator's Manual
Emergency Operation (Selcall Option Fitted)
To utilise the emergency capability of the T2020, the radio must be fitted with Selcall
selective tone calling and be connected to a hidden emergency switch. (The key on
the front panel may also be programmed to initiate the emergency state.)
1 To send an emergency call, operate the hidden switch. This will cause no change
in the front panel indications of the T2020, but the radio will send a Selcall
emergency code to a preprogrammed party (usually your base or despatcher) every
few seconds until it receives an acknowledging Selcall code.
Note: The emergency cycling option is controlled at the time of programming. If
emergency cycling is disabled then the emergency sequence is sent only once
and no Tx/Rx cycling occurs.
2 The radio will then adopt a transmit/receive cycle which allows the base or
despatcher to monitor activity in the vicinity of the radio.
3 The radio may be removed from this mode either by receiving a reset code from the
base or despatcher during one of its receive periods, or by turning the radio off and
back on without the emergency switch operated.
To Alter User Options
Whilst most of the features available on the T2020 radio are able to be customised with
the Tait programming software, some may be directly accessible to you, to alter according
to your own requirements. Consult your Tait dealer to see whether this facility is
available on your radio.
1 To enter the options mode, press the key. The last item viewed previously will
appear in the display. Scrolling the items through the display may be done by
pressing the keys.
2 To select whether your radio sounds key-press confidence tones (beeps), scroll the
display to find either the "BEEP ON" or "BEEP OFF" message. To change from
one to the other, press . To change back, press again.
3 To alter the loudness of the confidence tones (beeps), scroll the display to find either
the "BEEP HI" or "BEEP LOW" message. To change from one to the other, press
. To change back, press again.
4 To select whether your Selcall status is displayed as a full word or a single digit,
Page 21

T2020 Operator's Manual 17
scroll the display to find either the "STAT NRM" or "STAT FIX" message. To
change from one to the other, press . To change back, press again.
5 To adjust the display's normal backlighting level between full and dimmed, scroll
the display to find either the "LITE FUL" or "LITE DIM" message. To change from
one to the other, press . To change back, press again.
6 To adjust the display's economy mode backlighting level between dimmed and off,
scroll the display to find either the "ELIT DIM" or "ELIT OFF" message. To
change from one to the other, press . To change back press again.
7 To select whether the radio is able to mute an external device such as a car stereo
when you transmit or receive a call, scroll the display to find either the "HUSH ON"
or "HUSH OFF" message. To change from one to the other, press . To change
back, press again. (This function also requires the radio to be equipped with
the necessary hardware interface.)
8 To select whether the radio sounds a vehicle horn (or similar device) when a
received call is unanswered, scroll the display to find either the "HORN ON" or
"HORN OFF" message. To change from one to the other, press . To change
back, press again. (This function also requires the radio to be equipped with
the necessary hardware interface.)
9 The cloning function, call queue and call diversion set-up modes are also accessed
from this mode. For more information on this contact your Tait dealer.
10 To exit the options mode, press any of the other function keys. The radio may also
be programmed to return to one of the other modes after a short while anyway.
Other Selcall Features
Your T2020 radio may be programmed with other Selcall functions. Consult your Tait
dealer for more information on these functions:
- quiet status interrogation (QSI)
- automatic numbering identification (ANI)
- deferred calling
- stun.
Page 22

18 T2020 Operator's Manual
Warning (Vehicle Installations)
Do not allow any part of your body to come within 20cm of the antenna for more than a
few minutes while the radio is transmitting, unless there is an intervening metal screen.
Do not touch the antenna while the radio is transmitting.
Appendix A1 Key Functions Explained
If 'confidence tones' have been enabled during programming, pressing any of the keys
causes a short tone, beep, to be sounded. If they have been suppressed, the key-press will
be silent.
'Call' takes your radio into the Selcall mode in order to make calls to other
users. A short press invokes the dialling mode. A long press accesses a
memory location which may contain the identity (call number) of another user
(or group of users) and will initiate a call to them. The "TX" indicator appears
in the display briefly and your radio will sound a short beep as the call is
transmitted.
'Status' is also associated with Selcall and gives you access to a number of
activity choices from which you can select one to indicate your own present
status. The description corresponding to each code (0-99) is set when the radio
is programmed. Typical descriptions might be "AT LUNCH", "ENROUTE"
and so on. For more information see the section 'To Change the Selcall Status
Code'.
'Channel' takes your radio into the channel selection mode. Here you may
select a channel or scan group using the keys, a number or a label
associated with the channel name.
A long press invokes or cancels the 'Repeater Talkaround' mode.
Page 23

T2020 Operator's Manual 19
'Alphanumeric' sets your radio in a mode where it accepts key-presses on the
number keys as being a letter or a number character. (Each number key
represents three letters.) The radio cannot tell which of the four characters you
intend, so it waits until you give it sufficient characters so that the label or
acronym becomes completely distinguishable from all other similar labels
before it displays the complete word.
'Monitor' gives you access to the signalling mute and RF squelch control of
your receiver. With it you may monitor only transmissions intended for you,
all transmissions or very weak signals.
'Auxiliary' is provided to control an auxiliary hardware option such as an
external alerting device. Alternatively, it may be programmed to act as a
memory from which a particular channel configuration or a calling sequence
may be recalled at the touch of a single key.
'Function' takes your radio into the user options mode (if it is available on your
radio). This allows you to customise the operation of your radio to suit your
particular requirements, and to access some other optional radio operational
modes.
'Enter' is used to tell your radio that you have completed a series of key-presses
and that the radio should now go and act on the information you have given it.
It is used for channel entry, Selcall calls, DTMF dialling, alphanumeric entry
and user option selection.
to
The number keys are used for entering numbers into the radio when the
indicator beside the key is not illuminated. They are used for entry of
channel and scan group numbers, Selcall numbers and DTMF tones.
[ABC] to [QZ-]
The number keys also act as letter entry keys when the indicator beside the
key is illuminated. The radio cannot tell at first which of the four
characters you intend it to read when you press the key. You must continue
Page 24

20 T2020 Operator's Manual
keying the label or acronym into it, until it has enough characters to be able to
distinguish the word from all similar words it has in its memories.
For example:
Suppose your radio has two channel labels programmed into it: BASE and
BASIL. To call up the BASE channel, you key in [AB
C]; [ABC]; [PRS]. The
radio cannot yet distinguish whether you want BASE or BASIL so it places
"***" in the display. But when you key in the fourth letter, [DE
F], the radio
knows you do not want BASIL (or you would have keyed in [GHI
]) and so it
is able to acknowledge the entry properly and displays "BASE".
Note that in choosing labels or acronyms, you should avoid words which are
indistinguishable to the radio, e.g. BASE and CAPE. Both use the same key
sequence, [ABC]; [ABC]; [PRS]; [DEF]. You will only be able to find them
separately with the or keys.
or
or
When the ">?" indicator appears in the display, these keys act as up / down
scrolling keys to enable you to search through a list of choices. They are used
in conjunction with the , , and keys.
When the ">?" indicator is not visible in the display, these keys act as dialling
keys for Selcall and DTMF dialling. In Selcall dialling mode the key
may be used in place of the key, and the key may be used as a 'wild
card' digit to make group calls.
Appendix A2 Indicator And Display Functions
Explained
!!!! 'Call' indicates that your radio has received a Selcall call. If it is intended
specifically for you alone, your radio will also sound a ringing tone, burr,burr
...burr,burr. If the call is a group call intended for several users at once, your
radio will sound only one sequence of this ringing tone, burr,burr. If the 'Call'
indicator is flashing, your radio received a call which you were unable to
answer. It will only indicate who the call was from if that option is fitted.
Page 25

T2020 Operator's Manual 21
! 'Status' indicates that your radio is ready for you to select a status code relating
to your current activity. You may use the keys to choose a status
code or description.
! 'Channel' indicates that your radio is ready for you to enter information to
enable it to select a new channel. You may use the keys to choose
from a list, the key to enter a label, or the number keys.
A flashing ! indicates that the current channel is in the 'Repeater
Talkaround' mode.
! 'Alphanumeric' indicates that your radio is ready for you to enter some
information from the keypad as letter or number characters, such as a channel
label.
! When the radio is operating normally, this indicator will be off. If it is on
continuously, the signalling mute (if active) is open. This may be because the
microphone is off hook or the key has been pressed. If the indicator is
continually flashing, the has been pressed for long enough to open the RF
squelch.
! 'Aux' indicates the state of the auxiliary options switch. Depending upon the
configuration of the auxiliary options switch, the ! indicator may be
either on continuously or off continuously, or may only come on whilst the
key is held pressed.
! 'Function' indicates that your radio is ready for you to change its user
programmable options. The display will show the last option viewed
previously. You may use the keys to choose a new option and the
key to change it.
! 'Enter' comes on when the key is pressed.
F All indicators off. If your radio is able to transmit DTMF tones, it is possible
only in this mode.
Page 26
22 T2020 Operator's Manual
"BUSY" 'BUSY' indicates that the channel you are currently listening to has traffic on
it. If the signalling mute on your radio is closed (see function), you may
not hear the traffic until you lift your microphone off-hook.
"TX" 'TX' indicates that your radio is sending a transmission. It should come on
each time you press the PTT switch on the side of the microphone. It should
also come on briefly when your radio makes a Selcall or DTMF call (see the
relevant sections on making these types of calls). If it does not, and the
(WAIT) indication is not present, your radio may be malfunctioning and you
should consult your Tait dealer.
"SCAN" 'SCAN' indicates that your radio is sampling each of a group of channels for
any activity. When it finds some, it will pause on that channel for as long as
the channel carries traffic and then resume scanning.
"WAIT" 'WAIT' indicates that, although you have just attempted to transmit, the
channel you are using is busy and the attempt has been deferred. You should
wait for the radio to give you an alerting signal, beep . beep . beep, as soon as
the channel becomes free.
">?"'>?' indicates that you are now able to use the keys (which
would otherwise carry the * and # characters) to scroll through a list of
choices related to the function ( or ) which is
currently active. Having found an appropriate choice with the
keys, you may select it by pushing .
Page 27

T2020 Operator's Manual 23
 Loading...