

Page 1

Contents
Safety warningsSafety warnings
Safety warnings
Safety warningsSafety warnings
Getting starGetting star
Getting star
Getting starGetting star
Installing the antenna ............................................................ 6
Installing and removing the battery pack .............................. 6
Installing and removing the belt clip ..................................... 7
Radio contrRadio contr
Radio contr
Radio contrRadio contr
On/off/volume control ......................................................... 8
16-way selector ...................................................................... 8
Side panel keys ..................................................................... 10
Keypad ................................................................................. 10
Radio indicators ................................................................... 10
Confidence tones ................................................................. 12
Programmable function key settings .................................... 13
Keypad functions ................................................................. 14
Summary of radio indicators ................................................15
Basic operBasic oper
Basic oper
Basic operBasic oper
Turning the radio on and off and controlling volume ...........18
Operating modes ..................................................................18
Battery indicator .................................................................. 19
Transmitting and receiving ...................................................19
TT
rr
unking operunking oper
T
r
unking oper
TT
rr
unking operunking oper
Types of calls ....................................................................... 22
Trunking call setup .............................................................. 22
Call time limit ...................................................................... 23
Receiving calls ..................................................................... 24
......................................................................................................................................
...................................................................
......................................................................................................................................
tedted
........................................................................................................................................
ted
....................................................................
tedted
........................................................................................................................................
ols and indicaols and indica
ols and indica
ols and indicaols and indica
aa
tiontion
..................................................................................................................................
a
tion
.................................................................
aa
tiontion
..................................................................................................................................
Transmit timer............................................................. 20
aa
tiontion
a
tion
aa
tiontion
Callers identity display ................................................ 25
Group calls .................................................................. 26
torstors
........................................................................................
tors
............................................
torstors
........................................................................................
....................................................................................................................
..........................................................
....................................................................................................................
44
4
44
66
6
66
88
8
88
11
88
1
8
11
88
22
11
2
1
22
11
Tait Electronics Ltd has made every effort to ensure the
accuracy of the information in this manual. However, Tait
Electronics Ltd reserves the right to update the radio
and/or this manual without notice.
1 1
1
1 1
Page 2

Status calls ................................................................... 26
Making calls ........................................................................ 27
Call setup ..................................................................... 27
Calls not connected ...................................................... 28
Dialling options ................................................................... 29
Radio-to-radio calls...................................................... 29
Group calls .................................................................. 29
Priority calls ................................................................. 30
Emergency call ............................................................. 30
Preset calls .................................................................... 31
Status calls .................................................................... 31
Despatcher callback requests ....................................... 32
Interfleet (out-of-fleet) calls ......................................... 33
PSTN and PABX calls................................................... 33
Re-establishing a call ........................................................... 34
Last number redial ...................................................... 34
Callback ....................................................................... 34
Call queuing ................................................................. 34
Selecting another trunking network .................................... 37
Conventional operConventional oper
Conventional oper
Conventional operConventional oper
Subaudible signalling .......................................................... 38
Monitor ............................................................................... 39
Receiving calls ..................................................................... 39
Making calls ........................................................................ 39
Exiting conventional mode .................................................. 40
DTMF oDTMF o
verver
DTMF o
ver
DTMF oDTMF o
verver
Example: Accessing telebanking .......................................... 42
Example: Calling an automated attendant .......................... 43
Other feaOther fea
Other fea
Other feaOther fea
turtur
tur
turtur
Backlighting ........................................................................ 44
Night use ............................................................................. 44
Do not disturb ..................................................................... 44
Dynamic power control ....................................................... 45
aa
tiontion
........................................................................................................
a
tion
....................................................
aa
tiontion
........................................................................................................
diallingdialling
......................................................................................................................
dialling
...........................................................
diallingdialling
......................................................................................................................
eses
......................................................................................................................................
es
...................................................................
eses
......................................................................................................................................
3838
38
3838
44
4
44
4444
44
4444
11
1
11
2 2
2
2 2
Page 3

Handset operation ............................................................... 45
Volume override .......................................................... 45
Keypad lock ......................................................................... 46
Low power transmit ............................................................ 46
Clear .................................................................................... 46
Charging the baCharging the ba
Charging the ba
Charging the baCharging the ba
Charging the battery using the fast charger ......................... 47
Fast charger indicators ........................................................ 48
Charging the battery using the trickle charger .................... 48
Preserving battery life ......................................................... 49
Conditioning the battery with the fast charger .................... 49
Conditioning/analysing the battery with the fast charger ... 50
Disposing of used nickel-cadmium batteries ....................... 50
Basic maintenanceBasic maintenance
Basic maintenance
Basic maintenanceBasic maintenance
General care ......................................................................... 51
Troubleshooting ...................................................................51
AA
ccessoriesccessories
A
ccessories
AA
ccessoriesccessories
Fitting an accessory ............................................................. 52
SpecificaSpecifica
Specifica
SpecificaSpecifica
SoftwarSoftwar
Softwar
SoftwarSoftwar
ttertter
yy
..................................................................................................................
tter
y
.........................................................
ttertter
yy
..................................................................................................................
........................................................................................................................
............................................................
........................................................................................................................
................................................................................................................................................
........................................................................
................................................................................................................................................
tionstions
........................................................................................................................................
tions
....................................................................
tionstions
........................................................................................................................................
e Licence Agre Licence Agr
e Licence Agr
e Licence Agre Licence Agr
eementeement
........................................................................................
eement
............................................
eementeement
........................................................................................
4747
47
4747
55
5
55
5252
52
5252
5353
53
5353
5454
54
5454
11
1
11
3 3
3
3 3
Page 4

Safety warnings
n
Do not hold the radio with its antenna
close to or touching any part of your
body, especially your face and eyes, when
transmitting.
n
Switch the radio off at petrol filling
stations.
n
Switch the radio off in the vicinity of
explosive devices, such as at a quarry that
uses blasting techniques.
n
Use of a handheld microphone or radio
while driving is not permitted in some
countries. Check the vehicle regulations
in the area where you are driving.
n
Use only Tait Orca battery chargers to
charge your radio battery.
n
If using the radio with an earphone or
headset, avoid using unnecessarily high
volume levels.
n
Frequency band 406 to 406.1 MHz is
reserved for use by distress beacons.
Transmissions should not be made within this
frequency band.
n
Do not immerse your Tait Orca radio in water.
4 4
4
4 4
Page 5
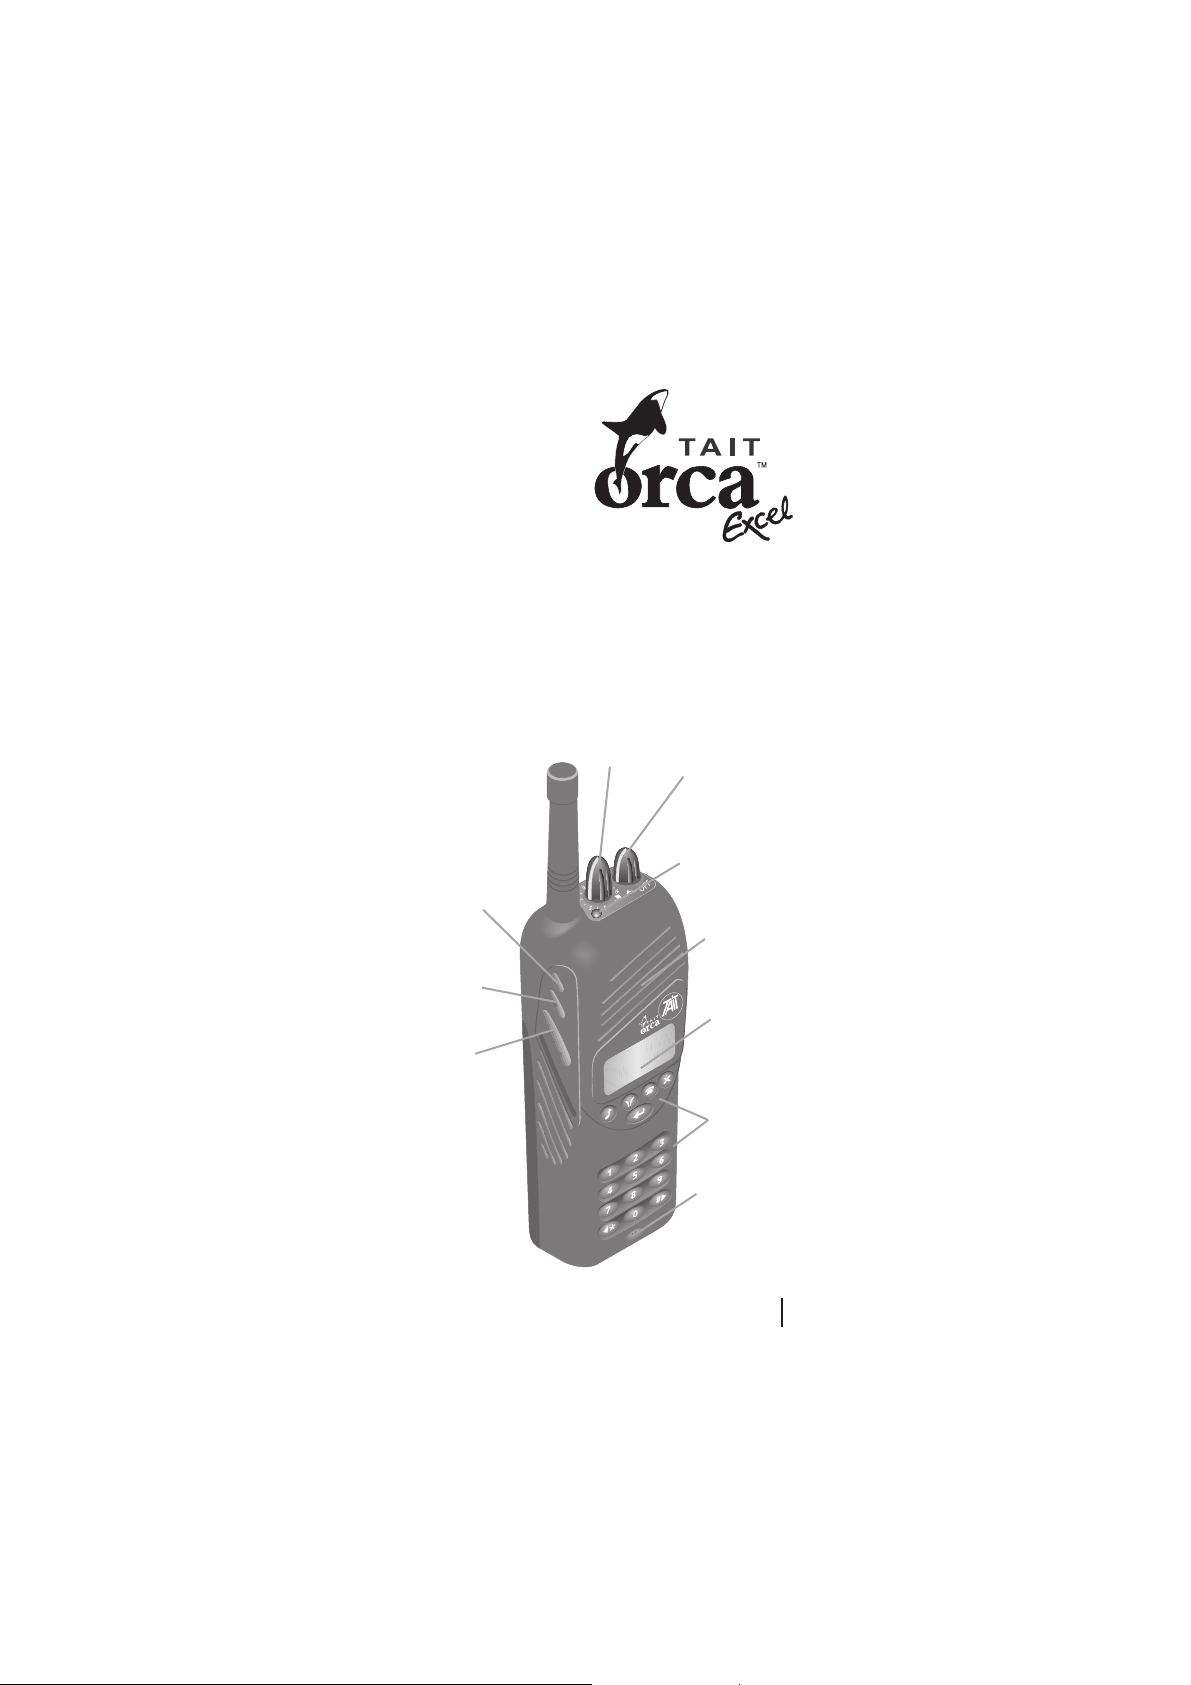
Congratulations on
your purchase of the
Tait Orca handportable
two-way radio.
Compact, rugged and
reliable, your Tait Orca radio
offers the latest state-of-the-art technology and
is preprogrammed to suit your communication needs. If you
are unsure which of the features described in this manual
are available on your radio, consult your system manager or
the person who programmed your radio.
The custom features programmed for your radio may be
listed on the custom settings page on the inside back cover
of this manual.
16-way
selector
Function key 1
On/off/volume
control
LED indicator
Speaker
Function key 2
PTT (press-totalk) key
Display
Keypad
Microphone
5 5
5
5 5
Page 6

Getting started
When you receive your Tait Orca handportable radio, make
sure all items you ordered are included. Typically, you
should receive the following:
n
Tait Orca handportable radio unit
n
Battery pack
n
Antenna
n
Belt clip
n
Charger
n
Plug pack
n
Users Manual
If any parts are damaged or missing, report this to your
local Tait dealer immediately.
Installing the antenna
Before using the radio, connect the antenna as
illustrated. The antenna screws easily into the
socket at the top of the radio.
Installing and removing the
battery pack
Before the radio is first used, the battery
pack must be fully charged, and putting
the battery through a condition/analyse
cycle to charge it will maximise the
batterys initial capacity.
If using the fast charger or multi-charger
to charge the battery, the battery will charge within two
hours. If using the trickle charger, the battery will charge
within 16 hours. The trickle charger is not recommended
for NiMH battery packs.
WARNING! The battery pack must be fully charged before you
first use the radio, and it is highly recommended that the
battery be put through a condition/analyse cycle before first
use. See pages 47 to 50 for charging instructions.
6 6
6
6 6
Page 7

For information on charging and conditioning the battery,
see pages 47 to 50.
To fit the battery pack to the radio, insert the bottom edge
of the battery pack into the two slots at the back of the
radio. Push the battery pack towards the radio. It should
snap into place.
To remove the pack, push the battery catch down and from
the sides, pull the battery away from the radio.
Installing and removing the belt clip
Slide the belt clip into the two slots on the top of the
battery. Push down until the clip snaps into place.
Battery clip
Belt clip
Slots
Battery
The belt clip has been designed to avoid accidental removal.
However, it can be replaced if required.
To remove the belt clip, insert the end of a flat-bladed object
(e.g. a butter knife) under the edge of the release tab
without forcing it. Gently lift the release tab up, then slide
the belt clip away from the battery.
Should the small battery clip come loose while removing the
belt clip, it can easily be refitted by sliding it into the slot at
the top of the battery until it snaps into place.
Release
tab
7 7
7
7 7
Page 8

Radio controls and indicators
Your Tait Orca handportable controls and indicators
include the on/off/volume control, the 16-way selector, side
panel keys, keypad, and various radio indicators.
Many of the keys can have functions assigned to both short
and long presses. A short keypress is defined as less than
one second. You may need to experiment to become familiar
with how long short and long keypresses are.
On/off/volume control
Rotating the on/off/volume control clockwise turns on the
radio and increases volume. Rotating the control counterclockwise decreases volume and turns off the radio. This
also controls the volume level of indicators and confidence
tones.
To preserve battery life, it is recommended that you turn off
the radio when it is not in use.
16-way selector
Each position on the 16-way selector can be preprogrammed for:
n
Trunking mode preset calls: Change to the assigned
position and press the PTT to initiate a trunked call.
n
Conventional channels: Change to the assigned position
to automatically switch the radio into conventional
mode.
n
Changing network: Change to the assigned position and
press the PTT to change to a different trunking
network.
What preset calls, networks and conventional channels are
available for your radio may be listed on the custom settings
page on the inside back cover of this manual.
The label displayed for each position on the 16-way selector
can describe what option is available.
8 8
8
8 8
Page 9

Function keys
preprogrammed
functions (see
page 13)
Function
key 1
Function
key 2
PTT key
(Press-To-Talk)
press to
transmit,
release to
receive,
press to receive an
incoming trunking
call
Keypad
Despatcher
Queue/Status
DTMF
Clear/Monitor
Enter
/ Scroll keys
LED indicator
(see pages 15 to 17)
Speaker
Display*
(see pages 10
to 12)
Microphone
*Throughout this user’s manual, messages that appear in the display are
shown in ALLCAPS.
9 9
9
9 9
Page 10

Side panel keys
The side panel keys include:
n
function keys 1 and 2 for access to preprogrammed
functions; and
n
PTT (press-to-talk) key for making the radio transmit
each time you talk.
The options that can be preprogrammed for the function
keys are described on page 13.
Keypad
Keys 0 to 9 are used for dialling numbers and entering data.
The left arrow/star ( / ) and hash/right arrow ( / ) keys
can be used for scrolling.
Other key functions are as outlined on page 14.
Radio indicators
In combination, the radios display window, LED indicator
and audible indicators provide you with information on the
state of your radio.
The tables on pages 15 to 17 show the meanings of different
combinations of radio indicators. A summary of these
indicators is also provided on the inside back cover of this
manual.
Throughout this users manual, messages that appear in the
display are shown in ALLCAPS.
A typical display is shown below.
10 10
10
10 10
Page 11

The bottom line of the display shows a series of symbols
that give additional information on the state of the radio.
The meaning of these symbols is as follows.
Steady: The battery is low.
Flashing: Recharge the battery.
Steady: The battery is charged.
Steady: The radio is in DTMF dialling mode.
Steady: Monitor or squelch override is active.
Steady: Scrolling is permitted.
Flashing: The radio is transmitting at medium or high power.
Steady: Low power transmit mode is active.
Flashing: The radio is transmitting at low power.
Steady: Handset mode is active.
Steady: The radio currently has access to a trunking network.
Flashing: The radio does not currently have access to a trunking
network. It may be attempting to find a site it is authorised to use, or
it may be out of range of a network signal.
The bars on the display ( ) indicate the received signal
strength (RSSI), which will be displayed whenever the radio
is idle in trunking mode. If signal strength is low, calls you
make may not get through.
The message QUIET ON indicates that the radio is currently
in do not disturb mode, and BARTS is the label of a string
associated with the position on the 16-way selector.
11
11 11
11 11
Page 12

If a function such as do not disturb were not active, the
message BARTS would be displayed at double-height, as
shown below.
Confidence tones
There are two sets of confidence tones available for your
radio: the Tait tone set and the MPT tone set. When
describing radio indicators, this manual describes only the
Tait tone set, which is the default.
If your radio has been preprogrammed with confidence
tones, a tone will be sounded each time you press a keypad
key or side panel key. For the Tait tone set, a short mediumpitched tone indicates that the keypress is valid, and a long,
low-pitched tone indicates that the keypress is invalid. If the
keypress is not valid, you should check to ensure the entry
you are attempting to make is allowed for your radio.
12 12
12
12 12
Page 13

Programmable function key settings
Unless stated otherwise, functions operate in both trunking
and conventional modes. Some functions are not permitted
in some countries.
Functions marked * are described more fully in the Other
features section (pages 44 to 46).
When programmed Pressing the assigned function key
for
Audible indicators Turns audible indicators on and off.
Backlighting* Turns backlighting on. Backlighting will turn off
after a preprogrammed time.
Clear* Trunking mode only. Clears the last request to the
trunking system.
Do not disturb* Trunking mode only. Turns the do not disturb
function on and off.
Dynamic power control* Turns dynamic power control on and off.
Handset mode* Turns handset mode on and off.
Keypad lock* Locks the keypad so the keys cannot be activated
accidentally. Pressing the clear/monitor key (
turns off keypad lock.
Low power transmit* Changes the transmit power from mid or high to
low. Pressing the key again returns the transmit
power to the preprogrammed level.
Monitor* Conventional mode only. Turns monitor on
and off.
Night use* Turns night operation mode on and off.
Preset calls Sends a trunking preset call, changes to another
trunking network or to a conventional channel. If
the radio is in conventional mode when a trunking
preset call is selected, the call will proceed. Once
the call is complete and has been cleared down,
the radio will return to conventional mode if a
conventional channel is selected on the 16-way
selector.
Volume control* Controls volume in handset mode.
)
13 13
13
13 13
Page 14

Keypad functions
Key Key name Function
despatcher Short press: Send a callback request to your
despatcher (trunking mode only).
queue Short press: Access the call queue (trunked
DTMF Shor t press: Enter DTMF overdialling mode*.
clear/monitor Short press: Clear the current entry.
enter End an entry or make a selection.
/ left/star Left arrow: Arrow key when scrolling.
/ hash/right Hash: For terminating and confirming string
*If this feature was preprogrammed.
**The radio may be programmed so that monitor cannot be activated.
However, a short press will always turn off monitor, if it is active.
mode only).
Long press: Display received status call.
Long press: Turn monitor on and off**
(conventional mode only).
Star: For call string and DTMF overdialling.
entries (in trunking mode) and for DTMF
overdialling.
Right arrow: Arrow key when scrolling.
14 14
14
14 14
Page 15

Summary of radio indicators
LED:
steady red steady green steady amber
flashing red flashing green flashing amber
Sound:
pitch:
duration:
Display messages are shown in ALLCAPS, e.g. QUEUED
Display Sound Meaning
+
Trunking mode Basic operation
WAIT
(continued on next page)
high medium low
short long ... sound repeats
+ flashing The radio is transmitting.
+ flashing The radio is transmitting at low power.
medium + Low power transmit is active.
slow + Handset mode is active.
A function has been turned on.
A function has been turned off.
x 3 The transmit timer is about to expire.
In 10 seconds, the radio will stop
transmitting. Release the PTT key
before transmitting again.
The radio has stopped transmitting
1.5 sec because the transmit timer has
expired. Release the PTT key before
transmitting again.
slow + The radio has access to a network and
is ready to make or accept calls.
medium The radio does not currently have
flashing access to a network. It is attempting to
find a site it is authorised to use, or is
out of range of a network signal.
x 5 The current operation has been
cancelled at your request.
The system is setting up an incoming
every call. Give a brief press of the PTT to
1.5 sec accept the call.
15 15
15
15 15
Page 16

Display Sound Meaning
+ GO or A traffic channel has been allocated for
+ GO The radio is operating on a traffic
fast A call has been received but not
+ caller’s ID warble ... answered. You can return the call by
ENGAGED
QUEUED
SYS BUSY
Trunking mode (cont’d)
NOT HOME
UNAVAIL
UNOBTAIN
ACCEPTED
a call you have made or received. You
can proceed with the conversation.
channel.
giving a brief press of the PTT.
x 3 Your call time is almost up. In 10
seconds, you will be disconnected and
the network will clear down the call.
... The system cannot contact the party
you are attempting to call because they
are busy. Try again later. If you are
repeatedly unable to make the call,
contact your fleet manager.
The network has queued the call you
are attempting to make. Your call will
be connected as soon as possible.
The network is busy and is unable to
handle your call request. Try again
later.
The party you are calling has their
radio switched off, in do not disturb
mode or is out of range. Try your call
later.
Your radio is not permitted to make the
type of call you requested.
The call you are attempting to make is
not valid for your radio. Consult your
fleet manager.
Your status call, despatcher callback
request or network service request has
been accepted.
16 16
16
16 16
Page 17
Display Sound Meaning
+ CHAN Your radio is now operating in
Conventional mode
medium + Monitor is active.
slow + The battery is low. Recharge or replace
flashing every 5 the battery as soon as possible.
Warnings
conventional mode.
The channel is busy.
You cannot transmit because the
channel is busy. Wait until it is free to
transmit or use a channel that is clear.
seconds
The battery is too low to operate the
radio. Turn off the radio and recharge
or replace the battery.
The temperature is too high. You
should stop transmitting and allow
the radio to cool down.
17 17
17
17 17
Page 18

Basic operation
This section describes the basic operation of your radio,
including turning the radio on and off, adjusting volume,
selecting channels, and transmitting and receiving.
Turning the radio on and off and controlling
volume
Rotating the on/off/volume control clockwise turns on the
radio and increases volume. Rotating the control counterclockwise decreases volume and turns off the radio.
To preserve battery life, it is recommended that you turn off
the radio when it is not in use.
When you turn on the radio, you may need to enter a
personal identification number (PIN) before you can use the
radio. If you get the message ENTER CODE, enter your
assigned PIN, which will be up to five characters long, then
press the enter key ( ). If you do not know your PIN,
consult your system manager or the person who programmed your radio.
The radio will then display the radios identity, then a
message such as TAIT ORCA RADIO. The radio will then
give two short, medium-pitched beeps, which indicate that
the power-up sequence is now complete. How you now use
the radio depends on what operating mode it is in.
Operating modes
There are two main modes of operation available on your
radio: trunked and conventional.
n
In trunking mode, you make calls through the trunking
network. You can call other radios in your fleet and,
depending on how your network is configured, private
automatic branch exchange (PABX) extensions and
public switched telephone network (PSTN) numbers.
See pages 21 to 37 for more information on operating
in trunking mode.
18 18
18
18 18
Page 19

n
In conventional mode, your radio communicates
directly with other radios over standard channels or via
a repeater. If your radio is in conventional mode, the
message CHAN will appear in the upper lefthand
corner.
See pages 38 to 40 for more information on operating
in conventional mode.
Battery indicator
The battery indicator in the lower lefthand corner of the
display shows how charged the battery is. When the battery
is low, the low battery symbol ( ) will flash, the radio
will emit a low-pitched beep every five seconds and the LED
indicator will slowly flash red. When the battery gets too
low, the radio will emit a long, low-pitched beep and stop
operating. You should turn off the radio immediately.
See pages 47 to 50 for recharging instructions.
To preserve battery life, it is recommended that you turn off
the radio when it is not in use.
Transmitting and receiving
Making and receiving calls in trunking mode is described on
pages 24 to 36. Making and receiving calls in conventional
mode is described on page 39.
Once a call is established, proceed with the conversation by
pressing the PTT (press-to-talk) key to transmit, and
speaking clearly into the radio. While you are transmitting,
the LED will glow red and the transmitting symbol ( ) will
flash. If you are transmitting at low power, the low power
symbol ( ) will flash.
Release the PTT key to hear the other party.
19 19
19
19 19
Page 20

Transmit timer
Your radio is programmed with a transmit timer, which
limits the amount of time you can transmit continuously
using the PTT key.
If the radio gives three short medium-pitched beeps, the
transmit timer is about to expire. Ten seconds later, the
radio will automatically stop transmitting. You will have to
release the PTT key before you can transmit again.
20 20
20
20 20
Page 21

Trunking operation
When your radio is operating in trunking mode, all calls are
made to a trunking system via a control channel. The
trunking system manages a pool of traffic channels.
A typical display upon entry into trunked mode is shown
below.
The trunking service icon ( ) indicates whether the radio
currently has access to the network. If it is on continuously,
your radio is ready to make and accept calls; if it is flashing,
your radio does not currently have access to a network. It
may be attempting to find a site it is authorised to use, or it
may be out of range of a network signal.
BARTS is the label of the string associated with the position
on the 16-way selector. The string will be actioned if you
press the PTT key, the enter key ( ) or the hash key ( ).
The labels that are displayed and the strings associated with
them are dependent upon how your radio is programmed.
Calls can be made from one radio to another, from a radio
to a PABX or PSTN number, or from a PABX or PSTN
number to a radio. The setup of a radio-to-radio call is
described on page 22.
The features and calls available on your radio in trunked
mode depend on how the network is configured. If your
radio does not operate as described in this manual, consult
your network operator.
21 21
21
21 21
Page 22

Types of calls
The types of calls available for your radio depends on how
your radio was programmed. Your network operator can tell
you what calls are available for your radio, or they may be
listed on the custom settings page on the inside back cover
of this manual.
Trunking call setup
For a trunking call between two radios, the calling radio
sends a message to the control channel giving the identity of
the called radio and the type of call.
The control channel then sets up the call by:
n
contacting the other radio; and
n
directing both radios to switch to a traffic channel.
The conversation is carried out on the traffic channel.
When the conversation is finished or when the time
permitted for the call is up (see Call time limit on page
23), the traffic channel will clear down the call and will be
available for other calls. The network (or your radio) may
also clear down the call if neither caller transmits for some
time or moves out of range.
22 22
22
22 22
Page 23

Call time limit
The length of your call may be limited by the network or by
your radio.
Your radio may be programmed to display the call duration
while it is in progress. If so, call duration will be displayed as
either:
n
time remaining for the call; or
n
time already used for the call.
In the display below:
Time remaining for the call is 9 minutes and 54 seconds.
The call time limit will always be displayed at double-height.
When the radio gives three short medium-pitched beeps,
your call time is almost up. Ten seconds later, you will be
disconnected and the network will clear down the call. You
will hear five short, low-pitched beeps.
The network will also clear down the call if there is no
activity on the traffic channel for a network-specific period
of time or if one of the callers move out of range.
23 23
23
23 23
Page 24

Receiving calls
When you receive a call, the radio will display the callers
identity (see page 25) and respond in one of two ways,
depending upon the system configuration and how the
radio is programmed.
n
The radio will give a medium-pitched warble and
automatically accept the call. The LED will glow green
to indicate that the radio has switched to a traffic
channel. The display will read GO. Press the PTT to
proceed with the call.
This is known as on-air call setup.
n
The radio will give a long high-pitched tone every 1.5
seconds. Accept the call by giving a brief press of the
PTT. The display will read WAIT until a traffic channel
has been allocated. The radio will then give two short
medium-pitched beeps, the LED will glow green and the
display will read GO to indicate that the radio has
switched to a traffic channel. Proceed with the call.
This is known as full off-air call setup, or FOACSU.
In either case, if you do not wish to accept the call, give a
short press of the clear key ( ) or change to another
position on the 16-way selector.
When you have finished your conversation, either:
n
give a short press of the clear key ( ); or
n
change to another position on the 16-way selector.
This will indicate to the network that you have finished the
call, and it can then clear down the traffic channel for other
calls. The radio will give five short, low-pitched beeps and
the radio will return to the idle state.
24 24
24
24 24
Page 25

Caller’s identity display
When you receive a call, the callers identity will be
displayed in one of the following ways.
n
If the callers identity is a label such as CAR9, the caller
is one of your preset numbers with a label preprogrammed into your radio.
n
If the callers identity is a number such as 208, the
caller is either one of the preset numbers preprogrammed into your radio that does not have a label, or
is in the same fleet as your radio but is not preprogrammed as a preset call for your radio.
n
If the callers identity is O FLEET, the caller is not in the
same fleet as your radio and is not preprogrammed.
n
If the callers identity is PHONE, the caller is calling
from the PSTN (public switched telephone network).
n
If the callers identity is PABX, the caller is calling from
the PABX (private automatic branch exchange).
The message displayed may include:
n
a G for a group call; and
n
an E for an emergency call.
For more information on group and emergency calls, see
below.
For example, the display above indicates that the call
received is a group call from car 9.
25 25
25
25 25
Page 26

Group calls
Your fleet may be set up up with users allocated to several
groups, which may sometimes be changed by the network.
The call you receive may be a group call. If so, the caller will
broadcast a message to all members of your group and there
is usually no need to reply.
The call will automatically be cleared down when the caller
is finished. However, you can leave the call at any time by
giving a short press of the clear key ( ) or changing to
another position on the 16-way selector.
Status calls
A status call is a message from another caller telling you
their current activity.
If you receive a status call, the call will automatically be
queued, since a response is not expected.
See Call queuing on pages 34 to 36 for information on call
queuing and viewing your status message.
26 26
26
26 26
Page 27

Making calls
There are three ways to establish a call.
n
Enter the number of the required party using the
keypad and press the enter key ( ) or the hash key ( ).
For more information on what you can dial, see
Dialling options starting on page 29.
n
Each position on the 16-way selector can have a preset
call assigned to it. Change to the position the call you
wish to make is assigned to and briefly press the PTT.
n
The radio can also have two function key preset calls,
which are assigned to one of the function key positions.
Press the assigned function key to send the call.
The control channel will then set up the call.
Call setup
While the control channel is setting up the call, the radio
will display the message WAIT. Once the called party has
answered, you will hear either:
n
a medium-pitched warble; or
n
two short medium-pitched beeps.
Depending upon how the trunking system and radio are
configured, you may also hear a telephone-like ringing tone.
The display will read GO and the LED will glow green to
indicate that the radio has switched to a traffic channel. You
can proceed with the call.
When you have finished your conversation, either:
n
give a short press of the clear key ( ); or
n
change to another position on the 16-way selector.
This will indicate to the network that you have finished the
call, and it can then clear down the traffic channel for other
calls. The radio will give five short, low-pitched beeps and
will revert to the idle state.
27 27
27
27 27
Page 28

Calls not connected
If your call is not connected, your radio will respond with
one of the following messages.
n
If the display reads ENGAGED and the radio gives a
series of long, low-pitched beeps, the party you are
calling is already busy. Try your call again later.
n
If the display reads QUEUED and the radio gives a long,
low-pitched beep, the party you are calling has queued
your call. Wait for the other party to call you back, or
try your call again later.
n
If the display reads SYS BUSY and the radio gives a
long, low-pitched beep, the system is too busy to handle
your call. Try your call again later.
n
If the display reads NOT HOME and the radio gives a
long, low-pitched beep, the party you are calling has
their radio switched off, in do not disturb mode or is
out of range. Try your call again later.
n
If the display reads WAIT and the radio gives a series of
long, medium-pitched beeps, the system is not able to
connect your call straight away but will queue it and
connect it as soon as possible.
n
If the display reads UNAVAIL and the radio gives a long,
low-pitched beep, your radio is not permitted to make
the type of call you requested.
n
If the display reads UNOBTAIN and the radio gives a
long, low-pitched beep, the number you called is not
supported.
28 28
28
28 28
Page 29

Dialling options
How you dial calls depends on how your radio was
preprogrammed and how the trunking network is
configured. Check with your network operator if you are not
sure what calls you can dial.
The dialling sequences described are the most common
setups.
While dialling, you can cancel call setup by giving a short
press of the clear key ( ), changing to another position on
the 16-way selector or dialling the sequence . Note that
the option is not available when your radio has been
preprogrammed for DTMF overdialling.
To send the string you have dialled, press the enter key ( )
or the hash key ( ).
Radio-to-radio calls
To call a radio in your own fleet:
n
dial a number from 20 to 89 or 200 to 899, then
n
press the enter key ( ) or the hash key ( ).
Group calls
Your fleet may be setup up with users allocated to several
groups. Your radio can subscribe to up to eight groups for
each network you are operating on.
To call a group in your own fleet:
n
dial a number from 90 to 98 or 900 to 998, then
n
press the enter key ( ) or the hash key ( ).
You can also modify the properties of the group call you are
making using the following codes:
n
code 1 sends a conference call to the group;
n
code 11 sends a broadcast call to the group;
n
code 8 1 sends a priority conference call to the group;
and
29 29
29
29 29
Page 30

n
code 9 1 sends an emergency conference call to the
group.
To dial group calls using these codes:
n
dial code number, then
n
press the enter key ( ) or the hash key ( ),
where code is one of the codes described above and number
is the number of the group you wish to call.
For example, to send a conference call to group 92, dial
1 92 , and to send a priority conference call to group
92, dial 8 1 92 .
Priority calls
If you wish your call to take priority over other calls being
made on the trunking network, dial:
n
8 number, then
n
press the enter key ( ) or the hash key ( ),
where number is the number of the radio unit or group you
are calling.
Emergency call
When you send an emergency call, the radio sends a
message to alert the party you are calling, usually a
despatcher, that you are in distress. You may still need to
inform them of your location and any other relevant
information.
On most networks, emergency calls pre-empt other types of
calls, and so if all traffic channels are busy, an existing call
will be cleared down so the emergency call can proceed.
To dial an emergency call:
n
dial 999, then press the enter key ( ) or the hash key
( ); or
n
dial *9, then press the enter key ( ) or the hash key
( ).
30 30
30
30 30
Page 31

Dialling one of these sequences will send an emergency call
to the prime emergency address that was preprogrammed
for your radio.
If you wish to send an emergency call to another address,
dial 9 number, then press the enter key ( ) or the hash
key ( ), where number is the radio unit number you wish to
send the emergency message to.
One of the preset calls on your radio may be an emergency
call. If so, it will be assigned to a function key setting. Press
the assigned function key to make the emergency call.
Preset calls
Your radio can be preprogrammed with up to 20 preset
calls.
To make a preset call:
n
dial 0 nn, then
n
press the enter key ( ) or the hash key ( ),
where nn is the preset call number in two-digit format.
For example, to send preset call 17, dial 017, then press the
enter key ( ) or the hash key ( ). To send preset call 0, dial
000, then press the enter key ( ) or the hash key ( ).
Preset calls numbered 1 to 16 can also be made by switching
to the corresponding position on the 16-way selector and
pressing the PTT.
Status calls
Status calls send the called party a brief message such as
enroute, at lunch or at home without setting up a
voice conversation.
To make a status call:
n
dial 0 ss number, then
n
press the enter key ( ) or the hash key ( ),
where ss is the two-digit status number and number is the
number of the party you wish to call. If you wish to send the
31 31
31
31 31
Page 32

status call to your despatcher, simply dial:
n
0 ss, then
n
press the enter key ( ) or the hash key ( ).
One or more of the preset calls on your radio may be status
calls. To make preset status calls, dial the call as you would
a normal preset call.
The network will return a message confirming that your
status call has been received. When this message is received,
the display will read ACCEPTED and the radio will give a
two-second-long high-pitched beep.
Despatcher callback requests
If your fleet has a despatcher, you can send a message to the
despatcher requesting they call you back.
There are two ways to send a despatcher callback request.
n
Dial 0, then press the enter key ( ) or the hash key
( ).
n
Give a short press of the despatcher key ( ).
The network will return a message confirming that your
despatcher call has been received. When this message is
received, the display will read ACCEPTED and the radio
will give a two-second-long high-pitched beep.
To send a callback request to another despatcher:
n
dial 0 number, then
n
press the enter key ( ) or the hash key ( ),
where number is the other despatchers radio unit number.
If you wish to cancel a callback request you have made:
n
dial 0, then press the enter key ( ) or the hash key ( )
if you made the request to your own despatcher; or
n
dial 0 number, then press the enter key ( ) or the
hash key ( ), where number is the other despatchers
radio unit number.
32 32
32
32 32
Page 33

Interfleet (out-of-fleet) calls
Consult your network operator on how to dial interfleet
calls.
PSTN and PABX calls
For calls to the public switched telephone network (PSTN)
or to a private automatic branch exchange (PABX), you may
need to first dial a code. If you are unsure whether your
system requires a code or what the code is, consult your fleet
manager.
To make a call to a PSTN number, dial code number, where
code is the code specified by your fleet manager, and number
is the PSTN number you wish to call. For example, to make
a call to PSTN number (03) 584 1212 when code is 0, dial
0035841212, then press the enter key ( ) or the hash key
( ).
To make a call to a PABX extension, dial code number, where
code is the code specified by your fleet manager and number
is the PABX extension you wish to call. For example, to
make a call to PABX extension 8909 when code is 3, dial
38909, then press the enter key ( ) or the hash key ( ).
Be sure to press the PTT key when you are speaking.
33 33
33
33 33
Page 34

Re-establishing a call
When a call has been ended and no other function is active,
your radio may be preprogrammed to display the identity of
the last party you were talking to. If so, you can easily reestablish the call using last number redial, callback or call
queuing. The last number redial function is used for
outgoing calls, and callback and call queuing are for
incoming calls.
Last number redial
If you initiated the call, the called partys identity is stored
and displayed. Redial the number by pressing the enter key
( ).
Callback
If you received the call, the callers identity may be
displayed, together with the message CALLBACK. If so, you
can call them back by pressing the enter key ( ).
If you do not wish to return the call, give a short press of the
clear key ( ). The callers identity will be deleted, and the
identity of the last party you called will be displayed. If you
wish to redial this call, press the enter key ( ).
If you have missed a call from another radio, the callers
identity will be displayed, the LED will rapidly flash amber
and the radio will periodically give a medium-pitched
warble. You can call back the person who called you by
pressing the enter key ( ).
Callback does not operate for PABX and PSTN calls.
Call queuing
If you are unable to answer your incoming calls immediately, your radio may be preprogrammed to store up to 20
calls so you can call back later.
All unanswered calls will normally be queued whether call
queuing is on or off.
If you wish to queue all your incoming calls, give a short
press of the queue key ( ). The message QUE will appear in
34 34
34
34 34
Page 35

the display, and while call queuing is on, all radio messages
will be displayed in the second row of the display.
You can also activate call queuing by dialling the string 48,
then pressing the enter key ( ) or the hash key ( ).
When call queuing is on, incoming calls will automatically
be added to the call queue and displayed, together with how
many calls are in the call queue. The call displayed will be
the most recent call.
For example, the display above shows that BARTS is the
first of two calls.
To return the call, press the enter key ( ). If you do not
wish to return the call, you can either:
n
delete the call by giving a short press of the clear
key ( ); or
n
use the scroll keys ( / ) to scroll through the list of
queued calls until you find the call you wish to return.
If the message reads SCL rather than CL, the call displayed
is a status call. Give a long press of the queue key ( ) to
read the status message, and give a short press of the clear
key ( ) to clear the message. If there are other calls in the
call queue, the radio will return to the call queue. If the
status call was the only call in the call queue, the radio will
revert to the state it was in before receiving the status call.
When you return a call and the call is established successfully, the call will be deleted from the queue. If the call is not
established successfully, the call will remain in the call
35 35
35
35 35
Page 36

queue. When all calls in the call queue are called back
successfully or deleted from the queue, the radio will revert
to normal operation until another call is received an
queued.
Incoming calls will be queued as long as call queuing is
active. To cancel call queuing, give a short press of the queue
key ( ). You can also cancel call queuing by dialling the
string 48, then pressing the enter key ( ) or the hash key
( ).
36 36
36
36 36
Page 37

Selecting another trunking network
Your radio may be programmed to operate on up to four
trunking networks. See your network operator if you are not
sure if your radio has this capability.
To change to a new network:
n
change to the assigned position on the 16-way selector
and press the PTT; or
n
dial a preset number that has another network assigned
to it; or
n
dial 70 n, then press the PTT, the enter key ( ) or the
hash key ( ), where n is the number of the network,
which will be from 1 to 4.
When the new network has been selected, the radio will give
two short medium-pitched beeps and will display the new
networks name.
37 37
37
37 37
Page 38

Conventional operation
Your radio may be preprogrammed with up to 10 conventional channels.
If programmed, select a conventional channel by:
n
changing to the assigned position on the 16-way
selector; or
n
key in the desired number (101 to 110) and press the
enter key ( ) or the hash key ( ).
In conventional mode, you communicate directly with other
radios or via a repeater rather than through the trunking
system. A typical display upon entry into conventional
mode is shown below.
CHAN indicates that the radio is in conventional mode, and
CONV109 is the name of the current channel.
Subaudible signalling
Your radio may be also be programmed with subaudible
signalling that segregates your group from others using the
same channels. If so, you will only hear traffic from radios
within your own group and so will have some degree of
privacy.
38 38
38
38 38
Page 39

Monitor
The monitor facility allows you to override the subaudible
signalling so you hear all conversations on a channel,
including those outside your group.
Monitor can be turned on and off by a short press of the
monitor/clear key ( ), or it may be assigned to a function
key.
While monitor is active, the monitor symbol ( ) will
appear in the display.
Receiving calls
Your radio will remain quiet until there is activity on the
currently selected channel. When you hear your own call
sign, respond promptly by pressing the PTT key and
replying. You can then proceed with your call (see Transmitting and receiving on page 19).
Making calls
To make a call, make sure the channel is free. If the channel
is busy, you will not normally be able to transmit; if so, the
radio will sound a low-pitched warning beep if you try to
transmit. You may not be able to hear the activity, but the
LED will glow green.
When the channel is free, press the PTT and speak clearly
into the radio. Identify yourself and the party you are calling
using the call signs you have been assigned. While you are
transmitting, the LED will glow red and the transmitting
symbol ( ) will flash. If you are transmitting at low power,
the low power symbol ( ) will flash. Release the PTT key
when you have finished talking.
39 39
39
39 39
Page 40

Exiting conventional mode
To exit conventional mode, either:
n
select a position on the 16-way selector that does not
denote a conventional channel;
n
enter two or three numbers that do no correspond to a
conventional channel, then press the PTT, the enter key
( ) or the hash key ( ); or
n
if the 16-way selector is on a position that is not a
conventional channel, give a short press of the clear key
( ).
The radio will then return to operating on the trunking
network it was operating on before entry into conventional
mode.
40 40
40
40 40
Page 41

DTMF overdialling
DTMF (dual tone multiple frequency) is the tone-based
system used in the worlds telephone networks. If your
system has access to the public switched telephone network
or other networks that make use of DTMF tones, your radio
can make a call to a telephone or send control codes to a
remote device.
If you simply wish to call a PABX or PSTN number, follow
the instructions for making such calls on page 33. If,
however, once you have set up such a call you wish to send
control codes (e.g. telebanking), use DTMF overdialling.
You can only use DTMF overdialling in trunked mode.
If you wish to dial tones A to D, your radio may be programmed so that you can use the PTT key as a shift key in
conjunction with the numeric keys as follows:
n
PTT + = A
n
PTT + = B
n
PTT + = C
n
PTT + = D
So pressing the PTT key, holding it, then pressing the
key enters tone A in the DTMF string.
You can also send a pause by pressing the PTT, holding it,
and then pressing the key. A hyphen will be entered in
the display to indicate a pause.
To use DTMF overdialling while the radio is operating on a
trunking network, first set up a call to the device you want
to send control codes to, which is usually a PABX extension
or PSTN number.
Once the call is connected:
n
Give a short press of the DTMF key ( ). The message
DTMF and the DTMF overdialling symbol ( ) will
appear in the display.
41 41
41
41 41
Page 42

n
Begin dialling the control codes required.
When you are finished entering control codes, give a short
press of the DTMF key ( ) to exit DTMF overdialling
mode.
When you are finished with your call, clear down the call by
either:
n
press the clear key ( ); or
n
change to another position on the 16-way selector.
The call will then be cleared down.
Example: Accessing telebanking
In this example, the code the trunking system requires for
making a PSTN call is 0 and the telephone banking systems
phone number is 5487777.
To access telebanking:
n
Dial 05487777 (the code plus the PSTN number).
n
Press the enter key ( ).
n
When the trunking system has set up the call (the
display reads GO), and the telebanking system has
answered, give a short press of the DTMF key ( ) to
enter DTMF overdialling mode.
n
Start entering the control codes required by the
telebanking system.
So if your telebanking system requires you to enter your
user code (e.g. 12345678), followed by the hash key, you
would dial 12345678 and wait for the telebanking
systems response.
When you are finished entering control codes, give a short
press of the DTMF key ( ) to exit DTMF overdialling
mode.
If you are then finished with the call, clear down the call as
described above.
42 42
42
42 42
Page 43

Example: Calling an automated attendant
An automated attendant is an automated answering service
that requests the caller to dial the extension number they
wish to call. If an organisations PABX extensions cannot be
dialled directly by outside callers, an automated attendant
can transfer external phone calls to those extensions.
In this example, the code the trunking system requires for
making a PSTN call is 0, the automated attendants phone
number is 5487777, and the extension the caller wishes to
call is 8866.
To call extension 8866:
n
Dial 05487777 (the code plus the PSTN number).
n
Press the enter key ( ).
n
When the trunking system has set up the call (the
display reads GO), and the automated attendant has
answered, give a short press of the DTMF key ( ) to
enter DTMF overdialling mode.
n
Enter 8866.
When your call is connected, proceed with the conversation
as you would for a normal PSTN or PABX call. You can then
give a short press of the DTMF key ( ) to exit DTMF
overdialling mode as control codes are no longer required.
When you are finished with the call, clear down the call as
described on page 42.
43 43
43
43 43
Page 44

Other features
Note that some features are not permitted in some
countries.
Backlighting
Control of backlighting can be assigned to a function key. If
programmed, pressing the assigned function key turns
backlighting on. Backlighting will remain on for only a few
seconds.
Backlighting can also be activated by turning on the night
use feature.
Night use
When the radio is programmed for night use, backlighting
will be turned on whenever a key is pressed or when a call is
received. Backlighting will remain on for only a few seconds
unless further activity is detected.
If assigned to a function key, pressing the key toggles night
use on and off.
Do not disturb
Do not disturb only works in trunking mode.
Do not disturb allows you to ignore incoming calls while
still making outgoing calls as usual.
To activate do not disturb, dial the string 49, then press
the enter key ( ) or the hash key ( ). To cancel do not
disturb, dial the string 49, then press the enter key ( ) or
the hash key ( ).
The radio will give a short medium-pitched beep when do
not disturb is turned on, and a short low-pitched beep when
it is turned off. While do not disturb is active, the message
QUIET ON will appear in the upper righthand corner of the
display, and any strings you dial will appear in the lower
righthand corner.
44 44
44
44 44
Page 45

Do not disturb can also be assigned to a function key. If so,
pressing the key toggles do not disturb on and off.
Dynamic power control
Dynamic power control optimises the radios power use by
reducing the transmit power in high signal strength areas.
If assigned to a function key, pressing the key toggles
dynamic power control on and off.
Handset operation
The radio can be operated as a normal radio where you hold
the radio with the microphone about 15 cm away from your
mouth. It can also be operated like a telephone handset in
noisy environments or when privacy is required. However,
ensure that while using the radio in handset mode, you do
not hold the speaker pressed against your ear and the
antenna does not touch your body.
Press the assigned function key to activate handset mode.
The handset symbol ( ) will appear in the display.
Handset mode will automatically turn off after a preprogrammed period of inactivity. You can also turn off handset
mode by pressing the function key.
Volume override
Your radio may be preprogrammed so that the function
keys are used as volume up and down keys while in handset
mode.
45 45
45
45 45
Page 46

Keypad lock
The keypad lock prevents accidental operation by locking
the keypad so that only a certain set of keys can be used.
What keys are locked depends on how your radio was
programmed, but the clear key ( ) can never be locked.
If assigned to a function key, pressing the key activates the
keypad lock. Deactivate keypad lock by pressing the clear
key ( ).
The normal function of the clear key ( ) will be locked out
while keypad lock is active.
Low power transmit
If you are using your radio in conditions where signal
strength is high, you can extend battery life by transmitting
at low power.
If assigned to a function key, pressing the key changes the
transmit level from mid or high to low. Pressing the key
again returns the transmit power to the preprogrammed
level.
When low power transmit mode is active, the low power
transmit mode symbol ( ) will appear in the display. When
you transmit, the symbol will flash.
The low power transmit mode symbol ( ) will also flash
when you transmit on a channel preprogrammed for low
power.
Clear
One of the function key settings can be programmed to clear
the last request to the trunking system. For example, if you
have just pressed the PTT to set up a call, pressing the
assigned function key will cancel the call.
The function key will only act as a clear key in trunking
mode.
46 46
46
46 46
Page 47

Charging the battery
The battery will last about eight hours under normal usage,
although this depends on the time spent transmitting and
the type of battery used.
Battery state is indicated in the radios display. When the
battery is low, the low battery symbol ( ) will flash, the
radio will emit a low-pitched beep every five seconds and
the LED will slowly flash red. Recharge or replace the
battery as soon as possible. When the battery gets too low,
the radio will emit a long low-pitched beep and stop
operating. Turn off the radio immediately.
Your radio comes
Indicator
Discharge
button
charger does not have a discharge button, but is otherwise
identical in appearance to the fast charger. The multicharger is made up of six fast chargers and can be used on a
desktop or mounted on a wall. Instructions for using the
fast charger also apply to the multi-charger.
The battery can be recharged attached to the radio or as a
separate unit.
with a choice of
three chargers: a
desktop fast
charger (left), a
desktop trickle
charger or a multi-
charger. The trickle
Charging the battery using the fast charger
The fast charger will charge the battery when the radio is
on, but the battery will charge faster if the radio is turned
off.
WARNING! The battery pack must be fully charged before first
use, and it is highly recommended that the battery be put
through a condition/analyse cycle before first use.
47 47
47
47 47
Page 48

Insert the battery/radio into the charger. The indicator will
glow amber for three seconds, then red. If the indicator does
not glow red, make sure the battery/radio is seated properly
and the charger is properly plugged in. If the battery is too
hot or too cold, the indicator will remain amber until the
battery temperature is within the safe range for recharging
(5ºC to 40ºC).
Charge times are:
n
up to 1 1/2 hours for the 1100 mAh NiCd battery;
n
up to 2 hours for the 1500 mAh NiCd battery; and
n
up to 2 1/2 hours for the NiMH battery.
Once the battery is charged, the indicator will change from
red to green. Leaving the battery in the charger once it is
charged does not damage the battery.
Fast charger indicators
Indicator Meaning
steady red battery charging
steady green battery charged
steady amber charge suspended until battery
flashing red battery not seated properly in the charger,
flashing green battery being discharged
flashing amber battery below optimum capacity
temperature is within correct range
contacts dirty or battery faulty
Charging the battery using the trickle charger
The trickle charger is not recommended for NiMH battery
packs as they can take up to 24 hours to charge and the
overall lifetime of your battery may be reduced. Use a fast
charger instead.
To charge the battery pack using the trickle charger, make
sure the radio is turned off. Insert the battery/radio into the
48 48
48
48 48
Page 49

charger. Make sure the indicator on the charger glows red. If
the indicator does not glow red, make sure the battery/
radio is seated properly and the charger is properly plugged
in. The indicator will remain red until the radio is removed
from the charger.
The battery will be charged in about 16 hours. Leave the
battery in the charger until you next need to use the radio;
however, leaving the battery in the charger for longer than
24 hours is not recommended.
Preserving battery life
n
Condition your battery weekly using the Tait Orca fast
charger.
n
Avoid storing the battery for extended periods without
first fully recharging it. For best results, store the
battery detached from the radio.
n
Avoid repeatedly recharging the battery when it has
only had a small amount of use.
n
Turn the radio off when it is unattended for long
periods.
n
Use only a Tait-recommended charger.
n
Maintain an ambient temperature of between 5ºC and
40ºC during recharging. Optimum battery performance
will be obtained between 15ºC and 25ºC.
n
Do not allow the battery pack contacts to become shortcircuited.
Conditioning the battery with the fast charger
For best performance, the battery should be conditioned
weekly using the fast charger. Conditioning the battery
takes about eight hours, depending on how much use it has
had.
To condition the battery, turn off the radio. Insert the
battery/radio into the fast charger then press the discharge
button until the indicator flashes green. The indicator will
49 49
49
49 49
Page 50

flash green while the battery is being discharged. Once the
battery is discharged, it will charge normally.
Conditioning/analysing the battery with the
fast charger
Conditioning/analysing the battery with the fast charger
will put the battery through a number of conditioning
cycles and will check the batterys capacity on the last cycle.
To condition/analyse the battery, turn off the radio. Press
and hold the discharge button while inserting the battery/
radio. Continue holding the discharge button; the indicator
will glow amber for three seconds, and then will flash green.
When the indicator flashes green, release the discharge
button.
The condition/analyse cycle will take approximately 16
hours.
Once charged, the chargers indicator will glow green if the
battery is in good condition. The indicator will flash amber
if the battery is below its optimum capacity; consult your
Tait dealer.
Disposing of used nickel-cadmium batteries
NiCd batteries contain a small amount of the metal
cadmium, which can produce potentially toxic waste if not
disposed of properly. When no longer in use, contact your
Tait dealer for recycling details.
50 50
50
50 50
Page 51

Basic maintenance
Your Tait Orca handportable requires no regular maintenance other than ensuring that the battery has sufficient
charge and that no damage has occurred to the antenna or
the battery pack.
General care
n
Wipe the battery contacts, accessory connector contacts
and radio display with a dry lint-free cloth to remove
any dirt, oil or grease.
n
Use a cloth dampened with clean water to clean the
radios case and display lens, but do not immerse the
radio in fluids.
n
Do not allow the radio to come into contact with
detergents, alcohol, aerosol sprays or petroleum-based
products as they may permanently damage the case.
n
Avoid high temperatures. If the radio overheats, it will
cease to function. You will hear two short high-pitched
beeps.
Troubleshooting
If you are experiencing difficulty operating your Tait Orca
handportable, review basic operation and check the
following items:
n
Is the battery firmly attached to the back of your radio?
n
Is the battery sufficiently charged?
n
Is the battery charger working properly?
n
Is the antenna damaged?
If all appears to be in order but your radio still fails to
operate properly, consult your local Tait dealer for
assistance.
51 51
51
51 51
Page 52

Accessories
Tait offers a large range of accessories to increase communication efficiency with your Tait Orca handportable. Most of
the accessories available are listed below, and you can
contact your nearest Tait dealer for a more detailed list.
n
Antennas
n
Audio accessories
Lapel speaker microphones
n
Carrying accessories
Belt clip
Heavy duty carry case
Heavy duty holster
n
Batteries
1100 mAh NiCd battery pack
1500 mAh NiCd battery pack
1850 mAh NiMH battery pack
n
Battery chargers
Desktop fast charger
Desktop trickle charger
Multi-charger
Fitting an accessory
To fit some accessories to the radio, you will need to remove
the rear accessory cover. Remove the battery, then insert the
end of a key underneath the bottom edge of the accessory
cover. Lift to remove the cover.
When attaching or removing an accessory, ensure that the
lever is in the upright position. Once the accessory is in
position, rotate the lever 90 degrees counterclockwise to
lock it in place.
52 52
52
52 52
Page 53

Specifications
Size L x W x HSize L x W x H
Size L x W x H 44 mm x 62 mm x 153 mm
Size L x W x HSize L x W x H
(including 1(including 1
(including 1
(including 1(including 1
NiCd baNiCd ba
NiCd ba
NiCd baNiCd ba
TT
ypical weightypical weight
T
ypical weight 520g
TT
ypical weightypical weight
(including 1(including 1
(including 1
(including 1(including 1
NiCd baNiCd ba
NiCd ba
NiCd baNiCd ba
BaBa
ttertter
Ba
tter
BaBa
ttertter
TT
rr
ansmitter poansmitter po
T
r
ansmitter po
TT
rr
ansmitter poansmitter po
RR
eceive sensitivityeceive sensitivity
R
eceive sensitivity better than -117 dBm
RR
eceive sensitivityeceive sensitivity
AA
udio poudio po
A
udio po
AA
udio poudio po
Antenna connectorAntenna connector
Antenna connector SMA
Antenna connectorAntenna connector
For full details of the technical specifications of the radio,
refer to the Service Manual or to your nearest Tait dealer.
11
00 mAh00 mAh
1
00 mAh
11
00 mAh00 mAh
ttertter
y)y)
tter
y)
ttertter
y)y)
11
00 mAh00 mAh
1
00 mAh
11
00 mAh00 mAh
ttertter
y)y)
tter
y)
ttertter
y)y)
y vy v
oltageoltage
y v
oltage 7.5 V nominal
y vy v
oltageoltage
werwer
wer 136-174 MHz: 5 W
werwer
174-530 MHz: 4 W
werwer
wer >0.5 W into 16 ohms
werwer
53 53
53
53 53
Page 54

Tait Electronics Ltd
Software Licence Agreement
This legal document is an Agreement between you (the “Licencee”)
and Tait Electronics Limited (“Tait”). By opening this product package
and/or using the product you agree to be bound by the terms of this
Agreement. If you do not agree to the terms of this Agreement, do not
open the product package and immediately return the unopened product package to Tait. If you open the product package, that will be deemed
to be acceptance of the terms of this licence agreement.
Licence
In consideration of the payment of the Licence Fee, which forms part of
the price you paid for products you acquired from Tait or its subsidiary
or agent (the “products”) and our willingness to be bound by the terms
of this agreement, Tait grants to you as Licencee the non-exclusive right
to use the copy of a Tait sof tware program included in the products (the
“Software”).
In particular, the Licencee may use the program on a single machine
and if the software is supplied on a diskette, the licensee may:
(a) Copy the program into any machine readable or printed form for
backup purposes in support of your use of the program on the
single machine (certain programs, however, may include mechanisms to limit or inhibit copying; they are marked “copy protected”),
provided the copyright notice must be reproduced and included
on any such copy of the Software.
(b) Merge it into another program for your use on the single machine.
(Any portion of this program merged into another program will
continue to be subject to the terms and conditions of this Agreement.)
The Licencee may not duplicate, modify, reverse compile or reverse
assemble the Software in whole or part.
Title to software
This agreement does not constitute a contract of sale in relation to the
Software supplied to the Licencee. Not withstanding the Licencee may
own the magnetic or other physical media on which the Software was
originally supplied, or has subsequently been recorded or fixed, it is a
fundamental term of this Agreement that at all times title and ownership of the Software, whether on the original media or otherwise, shall
remain vested in Tait or third parties who have granted licences to Tait.
54 54
54
54 54
Page 55

Term and termination
This Licence shall be effective until terminated in accordance with the
provisions of this Agreement. The Licencee may terminate this Licence
at any time by destroying all copies of the Software and associated
written materials. This Licence will be terminated automatically and
without notice from Tait in the event that the Licencee fails to comply
with any term or condition of this Agreement. The Licencee agrees to
destroy all copies of the Software and associated written materials in
the event of such termination.
Limited warranty
The Software is supplied by Tait and accepted by the Licencee “as is”
without warranty of any kind either expressed or implied, including but
not being limited to any implied warranties as to merchantability or
fitness for any particular purpose. The entire risk as to the quality and
performance of the Software vests in the Licencee. Should the Software prove to be defective, the Licencee (and not Licensor or any subsidiary or agent of the Licensor) shall assume the entire cost of all
necessary servicing, repair or correction. Tait does not warrant that the
functions contained in the Software will meet the Licencee’s requirements or that the operation of the Software will be uninterrupted or
error free. However Tait warrants that the diskettes if any on which the
Software is supplied to the Licencee shall be free from defects in material and workmanship under normal use and service for a period of
ninety (90) days from the date of delivery to the Licencee.
Exclusion of liability
Tait’s entire liability and the Licencee’s exclusive remedy shall be:
1. The replacement of any diskette not meeting Tait “limited warranty” and which is returned to Tait or an authorised agent or
subsidiary of Tait with a copy of the Licencee’s purchase receipt; or
2. If a diskette is supplied and if Tait is unable to deliver a replacement diskette that is free from defects in material or workmanship,
the Licencee may terminate this Agreement by returning the Software to Tait.
3. In no circumstances shall Tait be under any liability to the Licencee,
or any other person whatsoever, for any direct or consequential
damage arising out of or in connection with any use or inability of
using the Software.
4. Tait warrants the operation of the Software only with the operating
system for which it was designed. Use of the Software with an
operating system other than that for which it was designed may
not be supported by Tait, unless otherwise expressly agreed by
Tait.
55 55
55
55 55
Page 56

General
The Licencee confirms that it shall comply with the provisions of law in
relation to the Software.
Law and jurisdiction
This Agreement shall be subject to and construed in accordance with
New Zealand law and disputes between the parties concerning the provisions hereof shall be determined by the New Zealand Courts of Law.
Provided however Tait may at its election bring proceedings for breach
of the terms hereof or for the enforcement of any judgement in relation
to a breach of the terms hereof in any jurisdiction Tait considers fit for
the purpose of ensuring compliance with the terms hereof or obtaining
relief for breach of the terms hereof.
No dealings
The Licencee may not sublicense, assign or transfer the licence or the
program except as expressly provided in this Agreement. Any attempt
otherwise to sublicense, assign or transfer any of the rights, duties or
obligations hereunder is void.
No other terms
The Licencee acknowledges that it has read this agreement, understand it and agree to be bound by its terms and conditions. The Licencee
further agrees that this is the complete and exclusive statement of the
agreement between it and Tait in relation to the Software which supersedes any proposal or prior agreement, oral or written and any other
communications between the Licencee and Tait relating to the Software
(LS-589).
56 56
56
56 56
 Loading...