

Page 1

11 FT X 11 FT
STEEL BUTTERFLY GAZEBO
MODEL #TPGAZ2002
Page 2

TABLE OF CONTENTS
2
Package Contents - Rafters, Beams and Canopy ....................................... 3
Package Contents - Posts and ............................................................. 4
Hardware Contents ...................................................................................... 5
Preassembly Instructions - Rafters .............................................................. 6
Preassembly Instructions - Posts ................................................................. 7
Assembly Instructions................................................................................... 8
Safety Information ...................................................................................... 11
Care and Maintenance ................................................................................11
One-Year Limited Warranty ........................................................................11
Page 3

PACKAGE CONTENTS - RAFTERS BEAMS AND CANOPY
3
C
B
G
B
C
B
D
E
C
D
C
B
PART DESCRIPTION
B
C
D
Lintel
Angle head
Top support bar
QUANTITY
8
4
4
PART DESCRIPTION QUANTITY
E
G
Center connector
Fabric
1
1
Page 4

PACKAGE CONTENTS - POSTS AND BRACES
F
F
F
A
A
A
F
A
PART DESCRIPTION QUANTITY
A
F
Post
Ball
4
4
Page 5
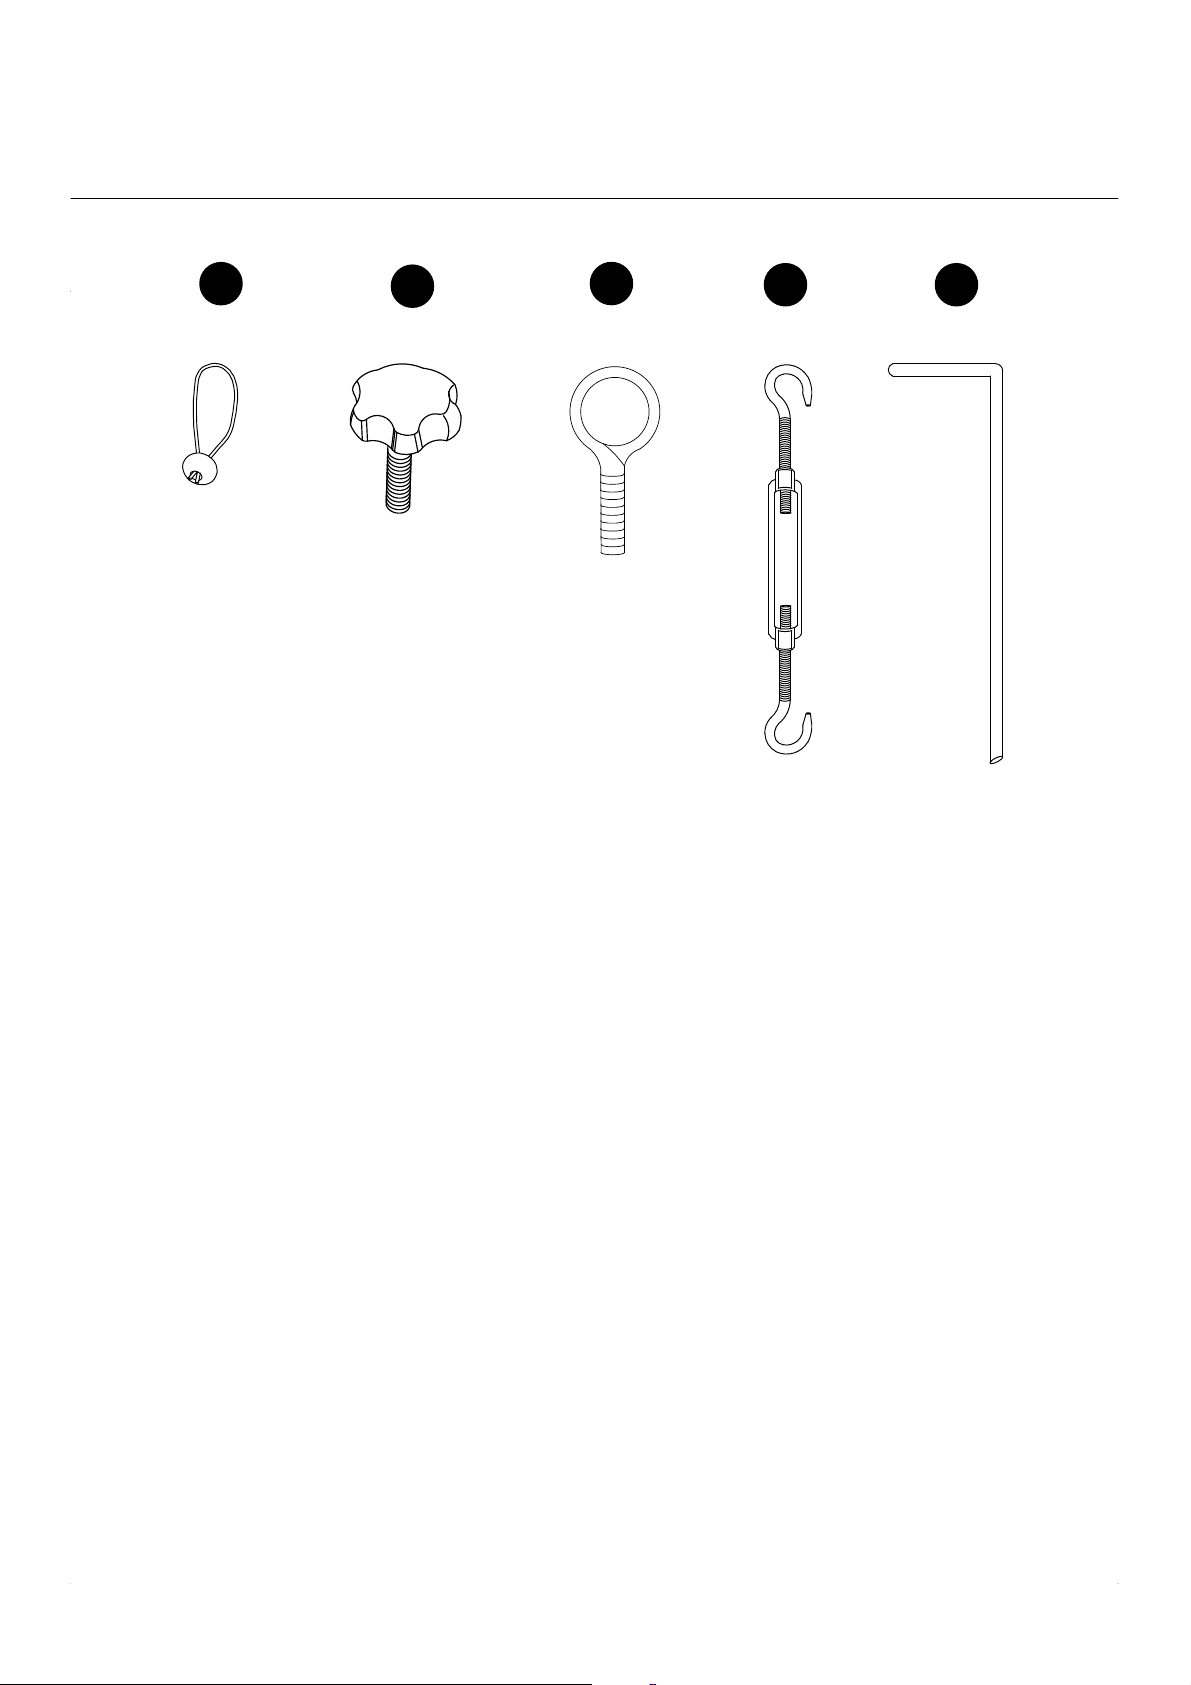
HARDWARE CONTENTS
5
H
Elastic Button
Qty.32
I
Handle Screw
Qty.8
J
Ring Screw
Qty.4
K
Coupling Hook
Qty.4
L
Stake
Qty. 12
Page 6
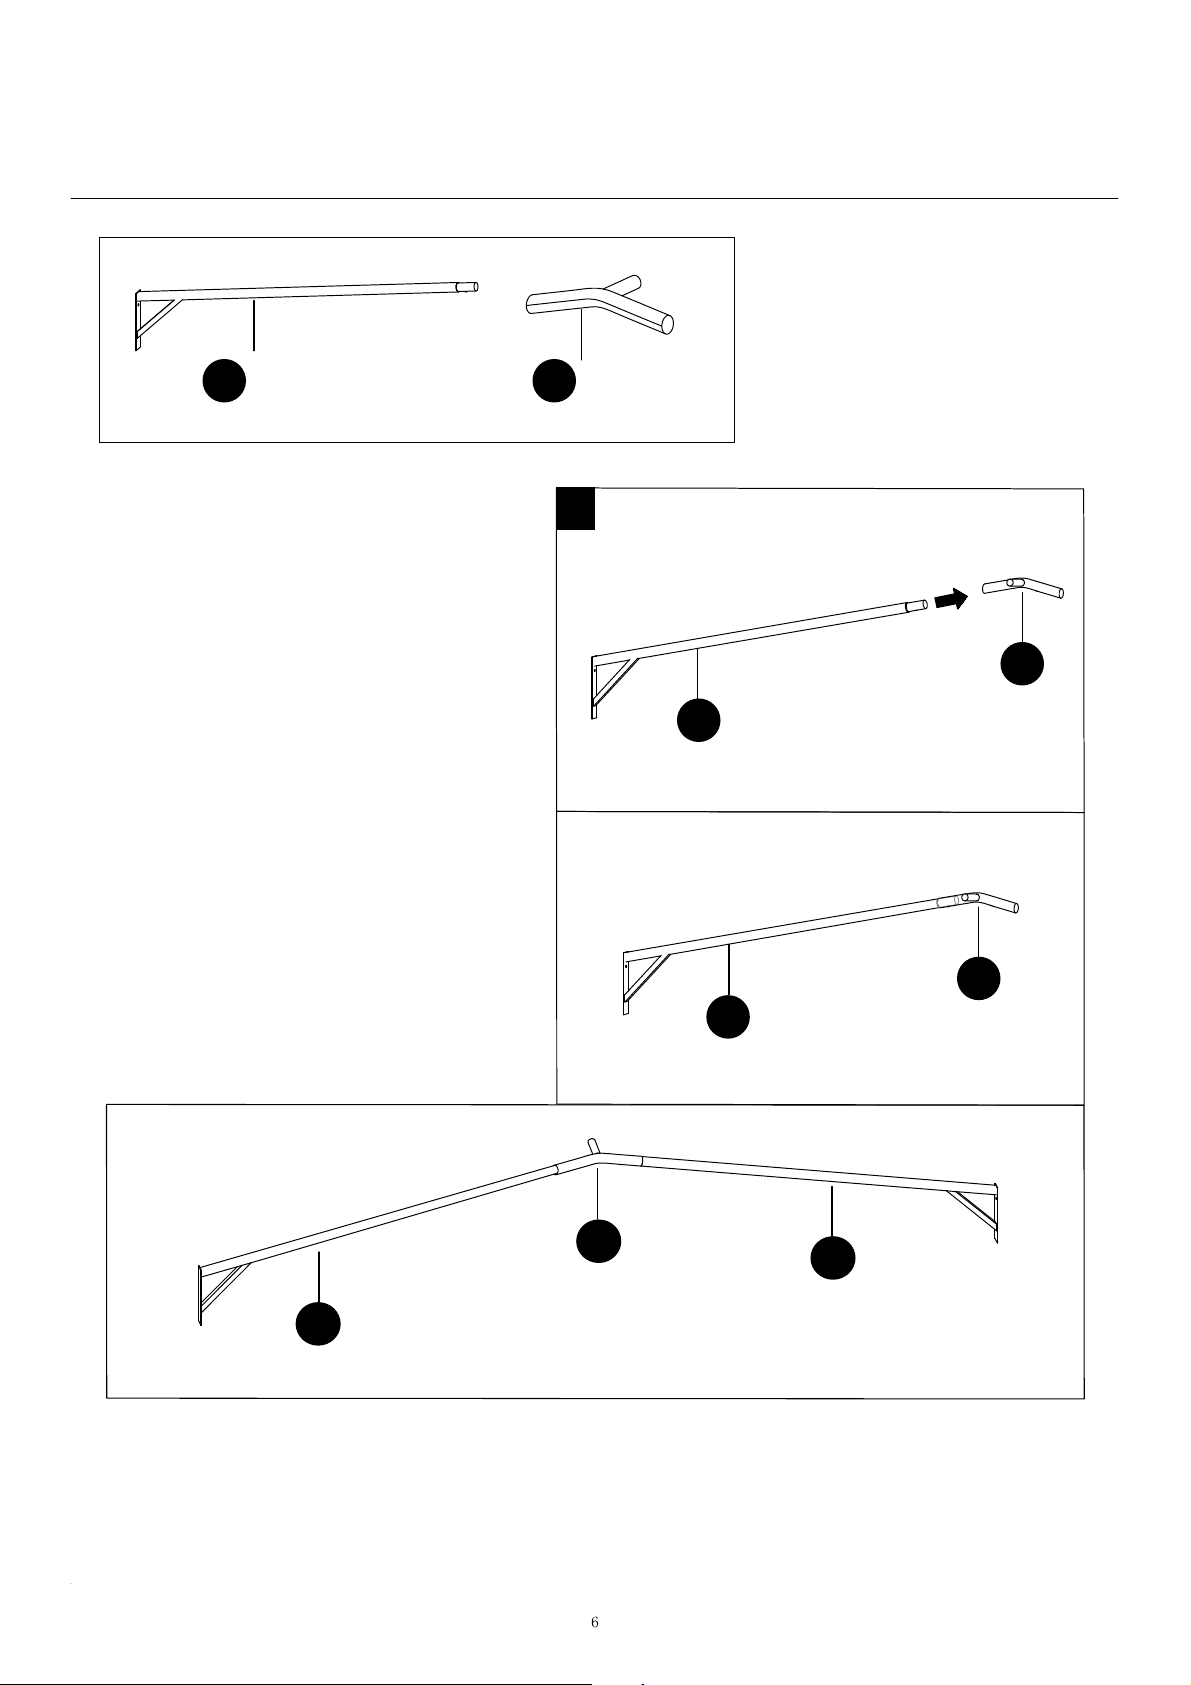
PREASSEMBL Y INSTRUCTIONS - RAFTERS
B
x8
1.Put the lintel (B) together,
insert one lintel (B) into angle
head (C), take another lintel
(B) and insert it into the other
end of the lintel. Connect the
rest of lintel (B) with angle
head (C) in the same way
.
C
x4
1
C
B
B
C
B
C
B
Page 7
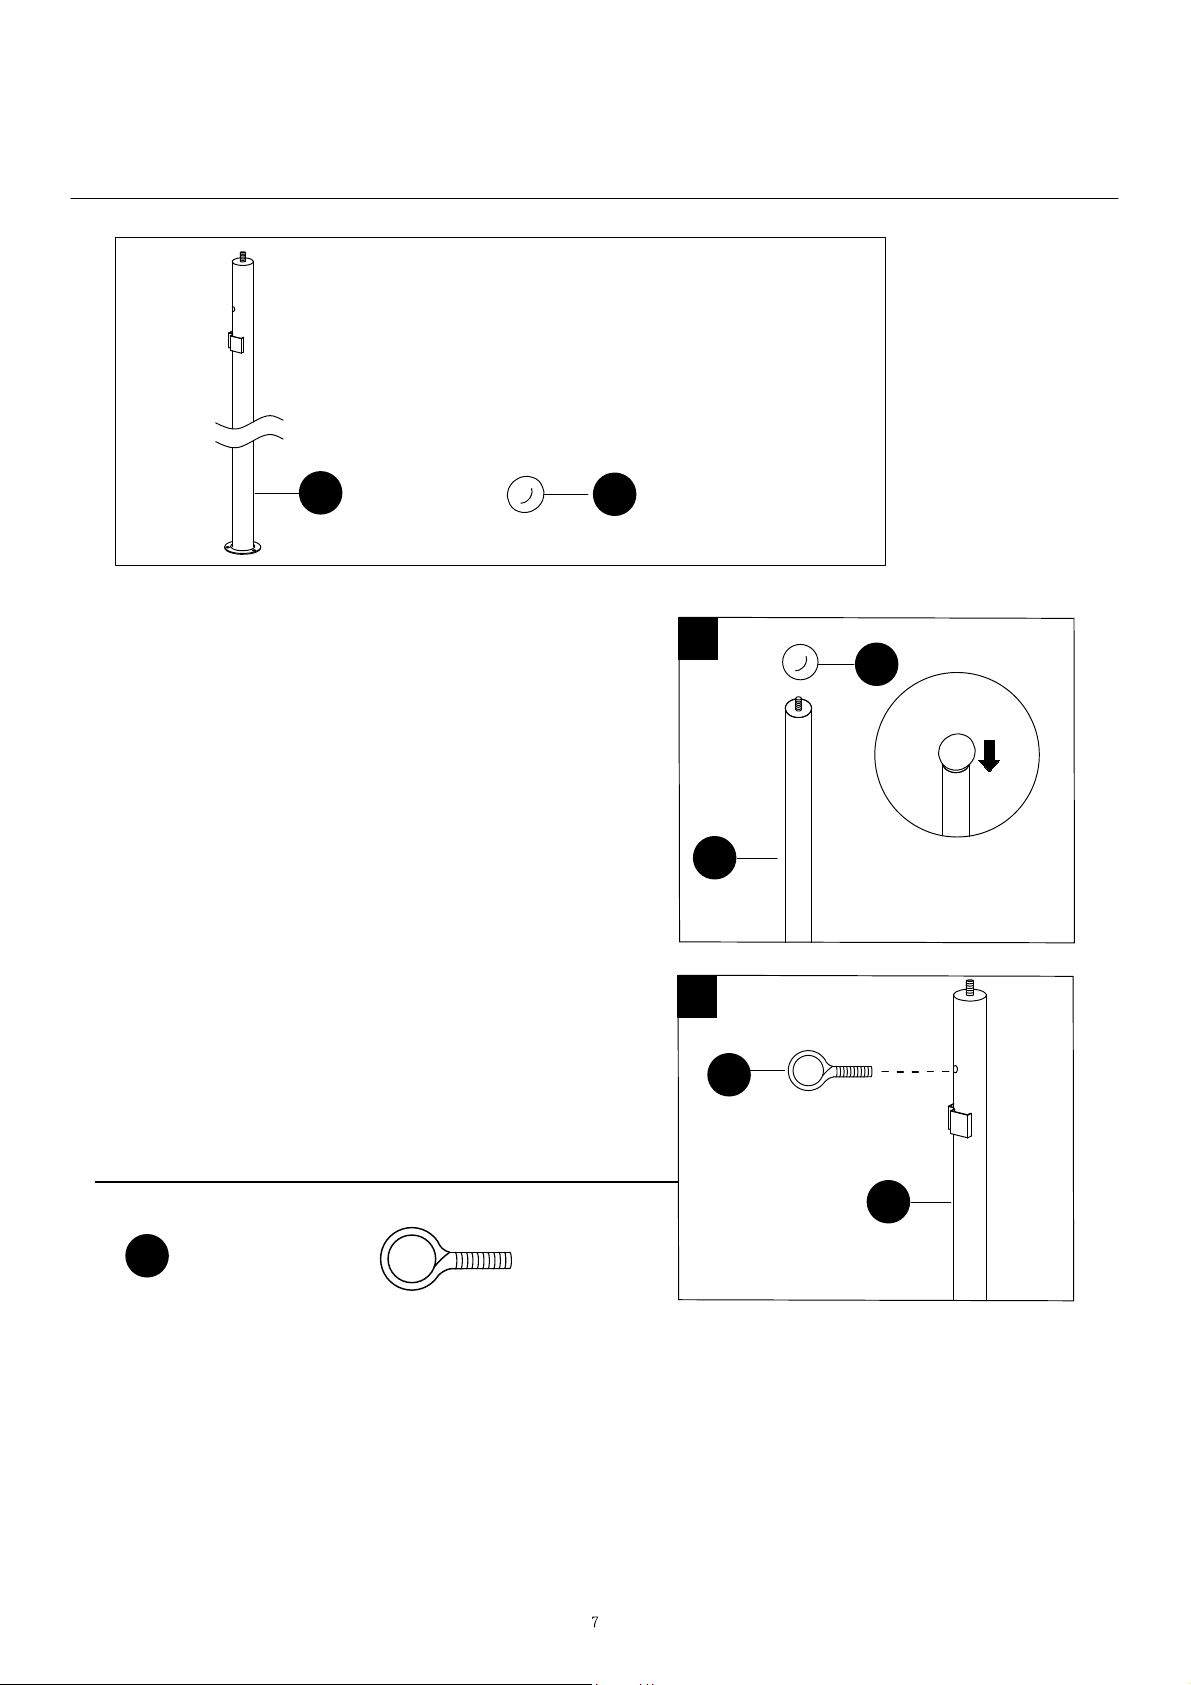
PREASSEMBLY INSTRUCTIONS- POSTS
A
x4
x4
F
2.Connect the little ball (H) to the
top of the post (A) directly.
3.Fasten the ring screw (J) onto
the post (A) directly
Hardware Used
.
2
F
A
3
J
A
J
Ring Screw
x4
Page 8
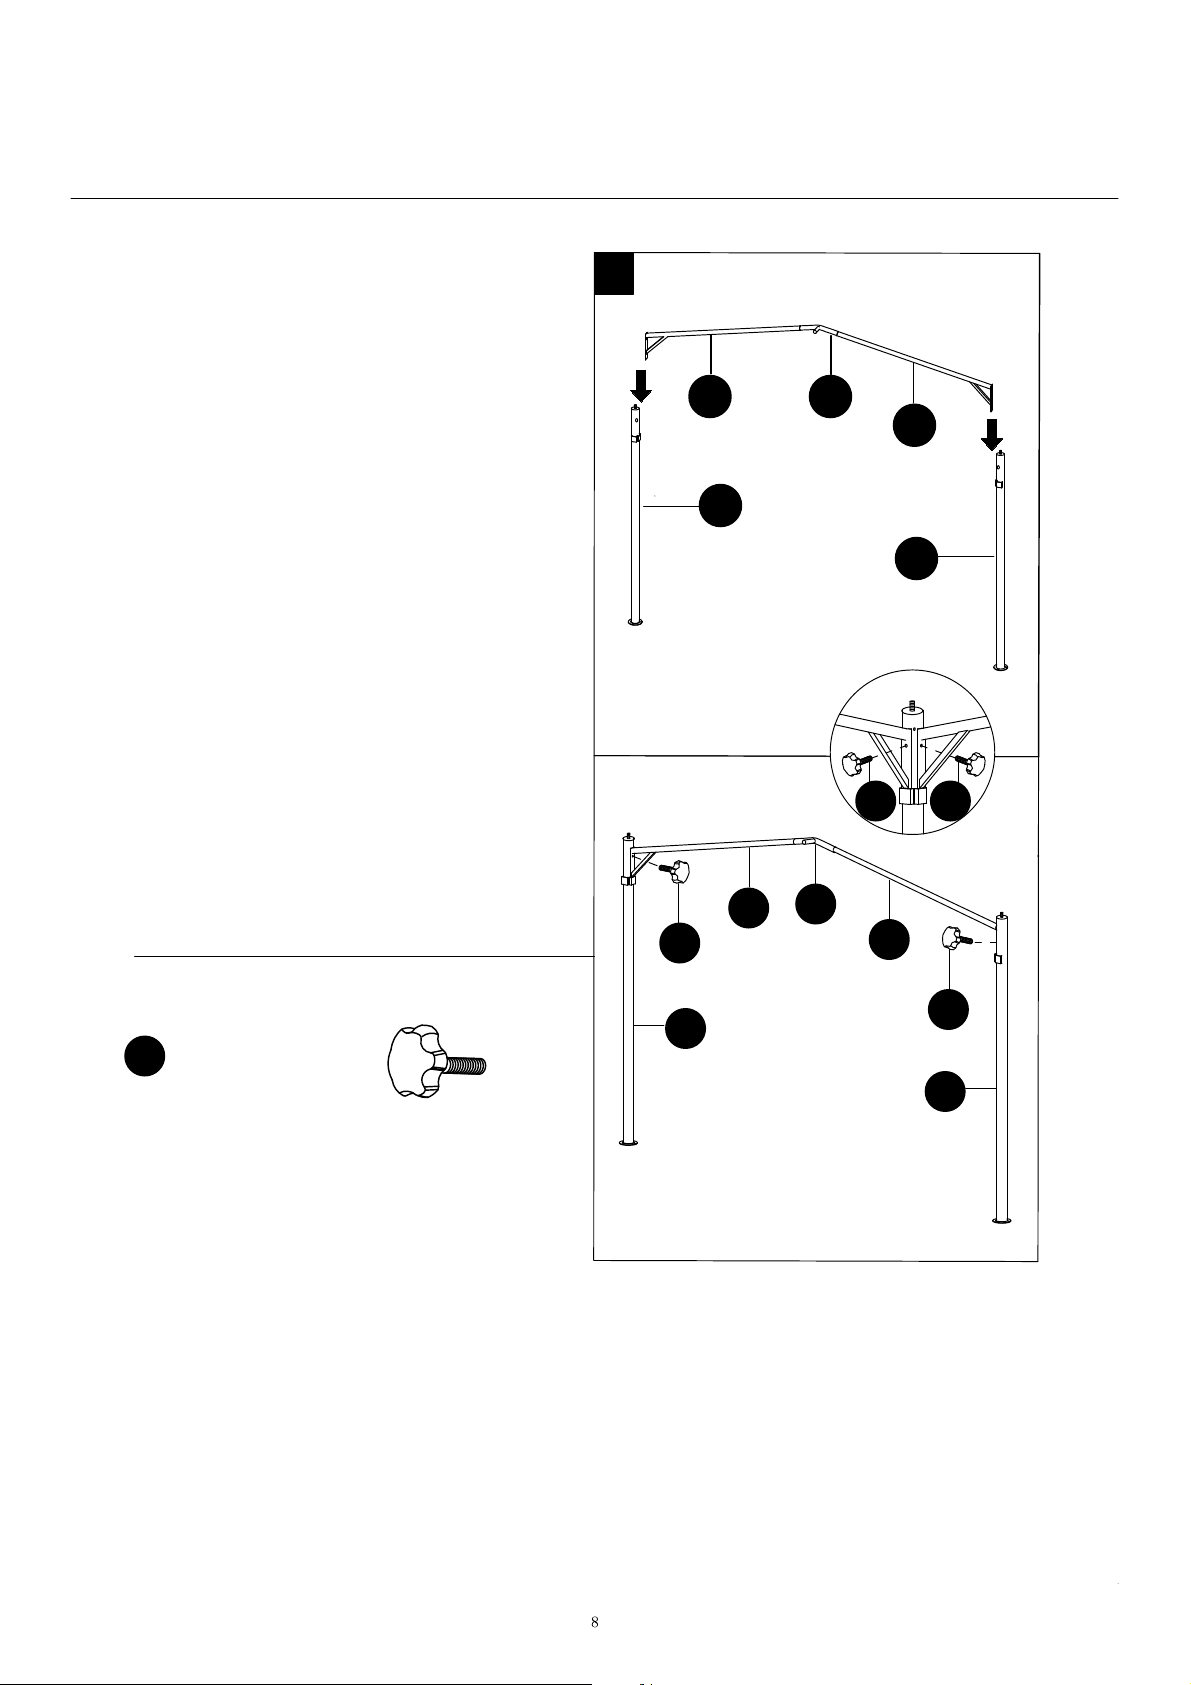
ASSEMBLY INSTRUCTIONS
4.Insert the connected lintel into
the post (A), and fix it with the
handle screw (I).
4
B
A
C
B
A
I
I
I
Hardware Used
I
Handle Screw
x8
I
A
B
C
B
I
A
Page 9
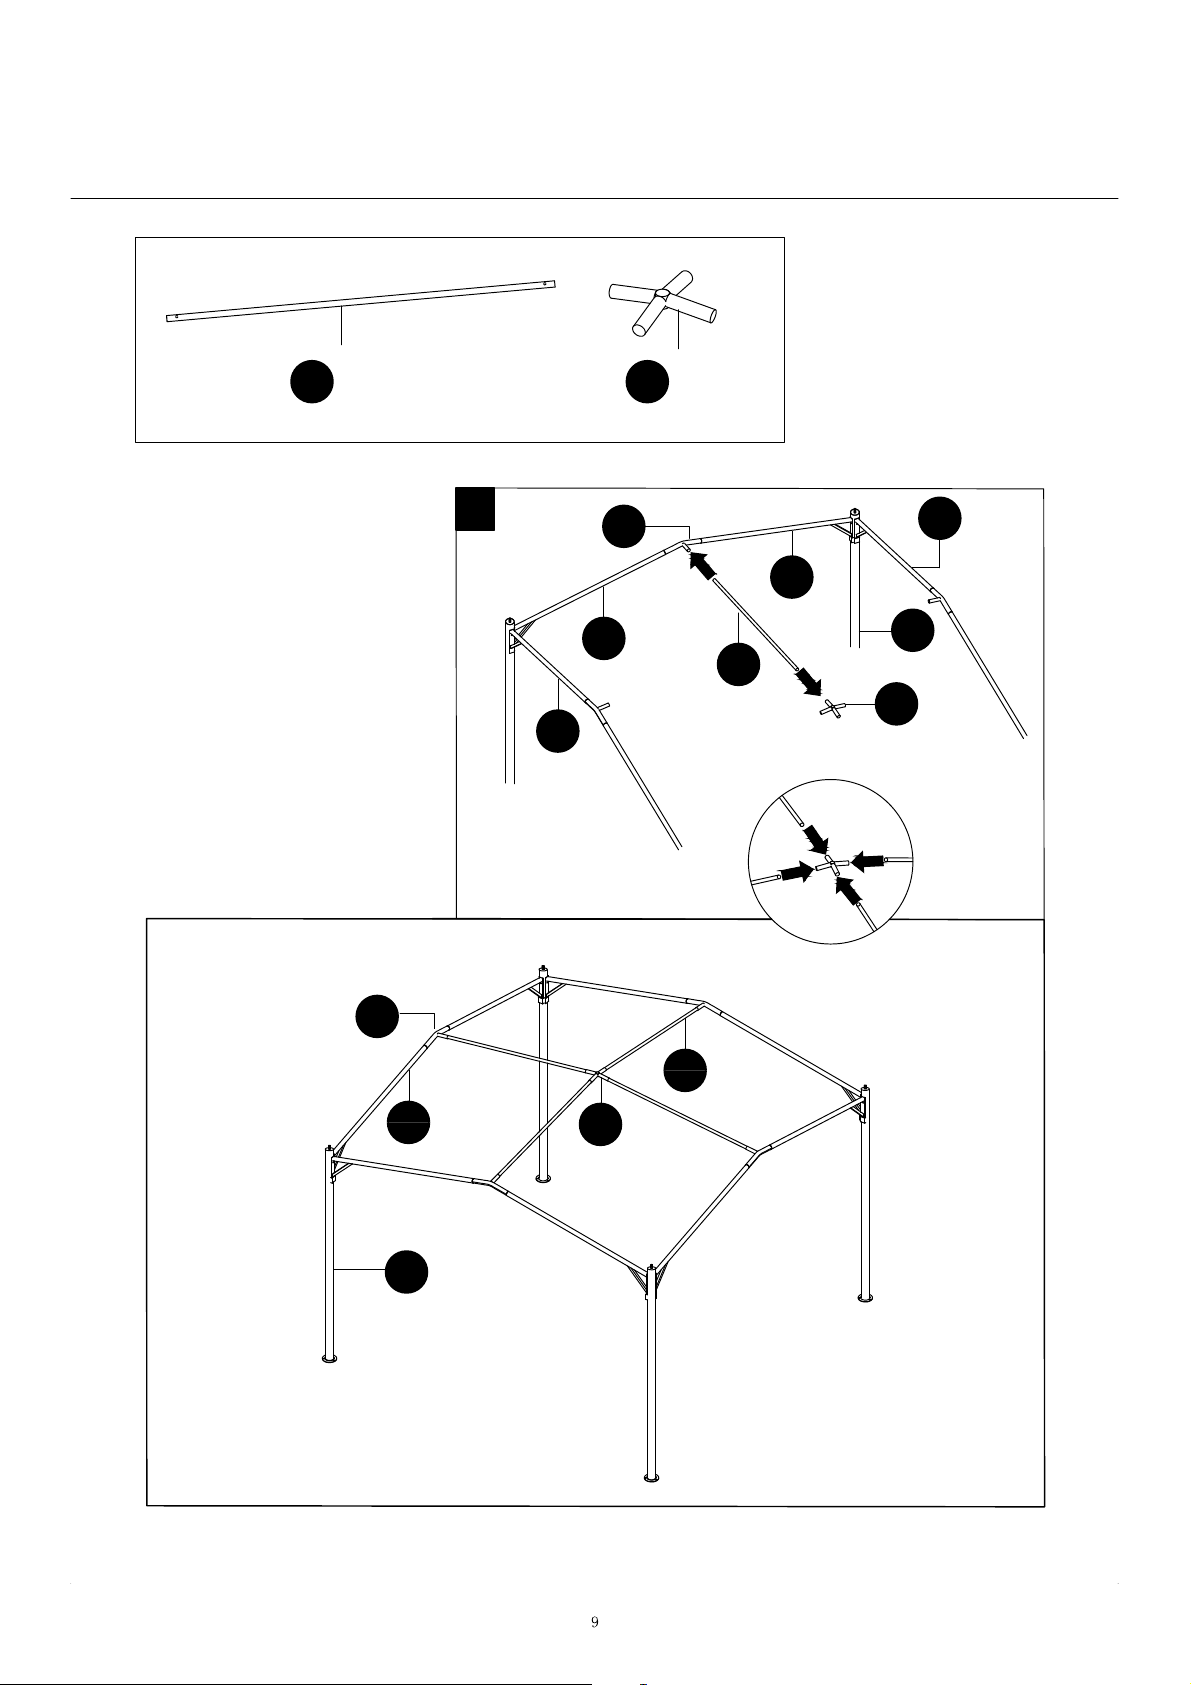
ASSEMBLY INSTRUCTIONS
D
x4
E
x1
5.Insert the end of one
top support bar (D)
into central connector
(E), insert the other
end into angle head
(C), in the same way,
insert the another three
top support bars (D) into
three more angle
heads (C).
C
5
B
B
C
B
B
A
D
E
D
A
B
E
Page 10
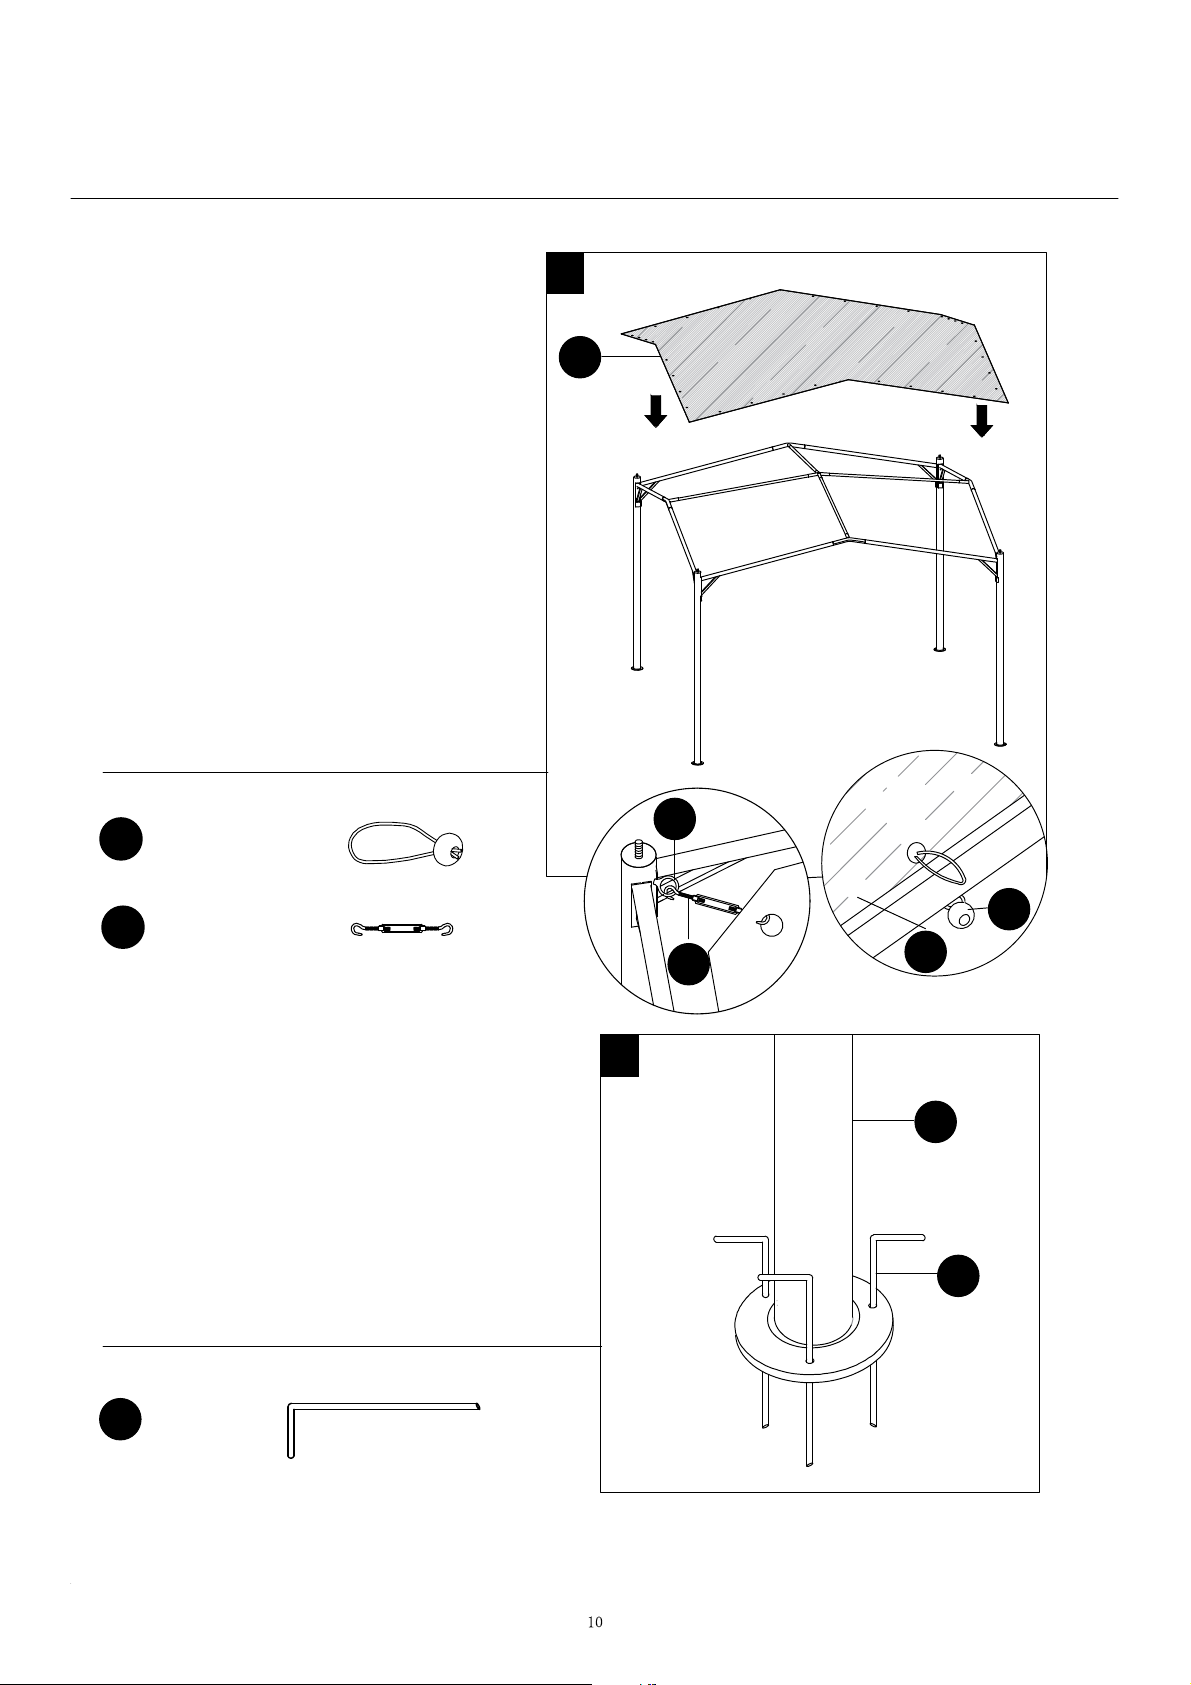
ASSEMBLY INSTRUCTIONS
6.Put the fabric (G) on the top
of gazebo and fix it on the
lintel (B) with the elastic
button (H) through top covered
fold, then with one end of the
coupling hook (K) through the
corner of the fabric (G), connect
the other end to the ring screw.
Hardware Used
Elastic Button
H
6
G
J
x32
Coupling Hook
K
7.Insert the stake (L) into the
ground through the base plate to
secure the gazebo.
Hardware Used
L
Stake
x4
x12
7
K
H
G
A
L
Page 11

SAFETY INFORMATION
11
Please read and understand this entire manual before attempting to assemble,
operate or install the product.
WARNING
• Assemble the item on a soft, non-abrasive surface, such as carpeting, to avoid
damage.
• This item is heavy. Use care when handling.
• Use four adults to ensure safe assembly.
CAUTION
DO NOT
leave out during high winds, heavy rains or snow. Remove the canopy
CARE AND MAINTENANCE
Wash with mild soap. Rinse with water and let air dry.
CAUTION
DO NOT leave out during high winds, heavy rains or snow. Remove the canopy
ONE-YEAR LIMITED WARRANTY
This warranty is extended to the original purchaser and applies to defects in materials
and workmanship of your patio furniture provided your furniture is maintained with
care and used only for personal, residential purposes.
Frames are warranted to be free from defects in material or workmanship for a period
of one (1) year.
Exclusions: Items used for commercial, contract or other non-residential purposes;
display models; items purchased "as is;" or items damaged due to acts of nature,
vandalism, misuse or improper as-sembly are not covered. Discoloration or fading of
the finish or fabrics as a result of exposure to the elements, chemicals or spills is not
covered. Tabletop breakage, corrosion or rusting of hardware and damage to frames
or welds caused by improper assembly, misuse or natural causes are not covered.
Warranty is to the original purchaser and is non-transferable. Any replacement of
warranted items will be in the original style and color or a s吓ilar style and color if the
original is unavailable or has been discontinued. As some states do not allow
exclusions or limitations on an implied warranty, the above exclusions and limitations
may not apply. This warranty gives you specific rights, and you may also have other
rights which vary from state to state.
If you come across any issue, please contact Below email for after sale service,
We will provide support at any time. E-mail: [email protected]
 Loading...