


L1
Lactate Monitoring System
Owner’s Manual
Owner’s Manual

Dear L1 System Owner:
Thank you for purchasing the L1 Lactate Monitoring System. This
manual provides important information to help you to use the system
properly. Before using this product, please read the following
contents thoroughly and carefully.
If you have other questions regarding this product, please contact the
local customer service or place of purchase.
Intended Use
This system is intended for use outside the body (in vitro diagnostic
use) by people with suspecting of having lactic acidosis at home and
by healthcare professionals in clinical settings as an aid to monitoring
the effectiveness of acid-base control. It is intended to be used for
the quantitative measurement of lactate in fresh capillary whole
blood samples from the fingertips. It should not be used for diagnosis
or screening of diseases.
Version 2.0 2018/05
311-4261100-008

IMPORTANT SAFETY PRECAUTIONS
READ BEFORE USE
1. Use this device ONLY for the intended use described in this manual.
2. Do NOT use accessories which are not specified by the
manufacturer.
3. Do NOT use the device if it is not working properly or if it is damaged.
4. This device does NOT serve as a cure for any symptoms or diseases.
The data measured is for reference only. Always consult your doctor
to have the results interpreted.
5. Before using this device to test lactate, read all instructions
thoroughly and practice the test. Carry out all the quality control
checks as directed.
6. Keep the device and testing equipment away from young children.
Small items such as the battery cover, batteries, test strips, lancets
and vial caps are choking hazards.
7. Use of this instrument in a dry environment, especially if synthetic
materials are present (synthetic clothing, carpets etc.) may cause
damaging static discharges that may cause erroneous results.
8. Do NOT use this instrument in close proximity to sources of strong
electromagnetic radiation, as these may interfere with the accurate
operation.
9. Proper maintenance and periodically control solution test are
essential to the longevity of your device. If you are concerned about
your accuracy of measurement, please contact the local customer
service or place of purchase for help.
KEEP THESE INSTRUCTIONS IN A SAFE PLACE

TABLE OF CONTENTS
BEFORE YOU BEGIN ............................................................................ 1
Important Information.................................................................... 1
Meter Overview ............................................................................. 2
Display Indicators ......................................................................... 3
Test Strip ....................................................................................... 4
SETTING THE METER ........................................................................... 4
THE TWO MEASURING MODES ........................................................... 6
BEFORE TESTING ................................................................................. 6
Calibration ..................................................................................... 6
How to Code Your Meter............................................................... 7
Checking the Code Number ......................................................... 7
QUALITY CONTROL TESTING ............................................................. 8
When Should the Control Solution Test be Performed? ............... 8
Performing a Control Solution Test ............................................... 8
TESTING WITH BLOOD SAMPLE ....................................................... 10
Preparing the Lancing Device for Blood Testing ......................... 10
Preparing the Puncture Site ....................................................... 10
Performing a Lactate Test ............................................................ 11
METER MEMORY ................................................................................. 13
Reviewing Test Results ............................................................... 13
DOWNLOADING RESULTS ONTO A COMPUTER ............................. 14
MAINTENANCE .................................................................................... 15
Battery ........................................................................................ 15

Charging the Battery ................................................................... 15
Caring for Your Meter.................................................................. 16
Caring for Your Test Strips .......................................................... 16
Cleaning Your Lancing Device .................................................... 17
Important Control Solution Information ....................................... 18
SYSTEM TROUBLESHOOTING .......................................................... 19
Result Readings ......................................................................... 19
Error Messages .......................................................................... 19
Troubleshooting .......................................................................... 21
DETAILED INFORMATION ................................................................... 22
SYMBOL INFORMATION ..................................................................... 22
SPECIFICATIONS ................................................................................. 23


BEFORE YOU BEGIN
Important Information
Severe dehydration and excessive water loss may cause readings
which are lower than actual values. If you believe you are suffering
from severe dehydration, consult a healthcare professional
immediately.
If your test results are lower or higher than usual, and you do not
have any symptoms of illness, first repeat the test. If you have
symptoms or continue to get results which are higher or lower than
usual, follow the treatment advice of your healthcare professional.
Use only fresh whole blood samples to test your lactate. Using
other substances will lead to incorrect results.
If you are experiencing symptoms that are inconsistent with your
lactate test results and you have followed all the instructions given
in this owner’s manual, contact your healthcare professional
We do not recommend using this product on severely hypotensive
individuals or patients in shock. Please consult the healthcare
professional before use.
1
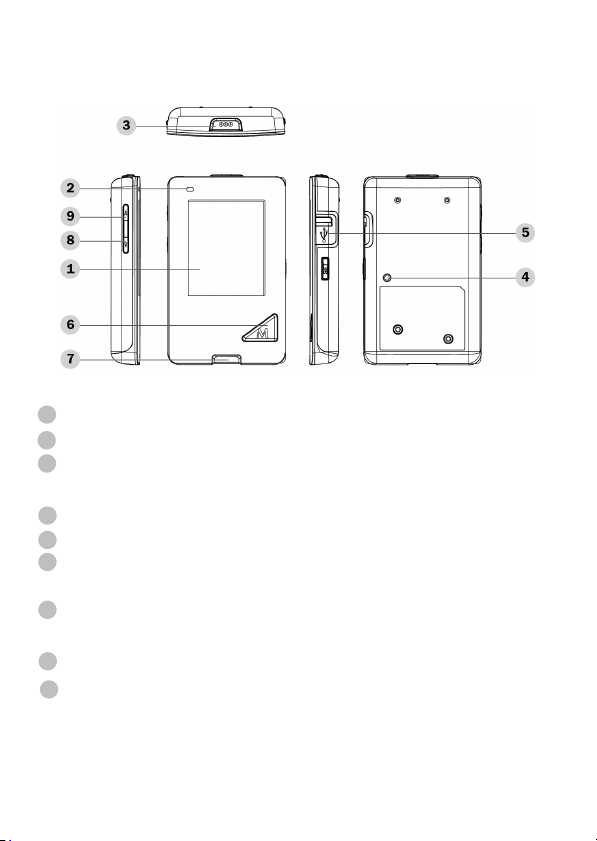
Meter Overview
1
Display Screen
2
Charger Indicator
3
Test Strip Ejector
Eject the used strip by pushing up this button.
4
Reset Button
5
Data Port
6
M Button (M)
Enter the meter memory
7
Test Strip Slot
Insert test strip here to turn the meter on for testing
8
Down Button (▼)
Up Button (▲)
9
2

Display Indicators
The screen displays several indicators to help you use this meter.
Press M to turn on the meter. Press ▲ or ▼ to select from the modes
below:
Indicator Meaning/ You can do this
Lactate Measuring Mode:
Perform your lactate tests.
Memory Recall Mode:
Review your lactate test results in the meter
memory.
Setting Mode:
Set up your meter.
System Power Off:
Turn off the meter.
3

Test Strip
Test results might be wrong if the contact bar is not fully inserted into the test
slot.
NOTE:
The L1 monitor should only be used with L1 Test Strips. Using other test
strips with this meter can produce inaccurate results.
1
Absorbent Hole Confirmation Window
3
Test Strip Handle Contact Bars
ATTE NTI ON :
The front side of test strip should face up when
inserting test strip.
2
4
SETTING THE METER
Before using your meter for the first time or if you change the meter
battery, you should check and update these settings.
Entering the Setting Mode (a)
Start with the meter off (no test strip inserted). Press M to turn on the
meter. Press ▲ or ▼ to select Setting mode and press M.
1. Setting the date format
Press ▲ or ▼ to select the desired date format --month/day/year or day/month/year. Press M.
2. Setting the date
The sequence of the date setting is: YEAR → MONTH → DAY.
Press ▲ or ▼ until the correct year / month / day appears. Press
M. The meter displays the full date and “Date is set” message.
4

3. Setting the time format
Press ▲
Press M.
4. Setting the time
The sequence of the time setting is: HOUR → MINUTE.
Press ▲ or ▼until the correct hour / minute appears. Press M.
The meter displays the complete time and “Time is set” message.
5. Deleting the memory
To delete all the results, press ▲ or ▼ to switch to ”yes” and
press M. The meter displays “Memory cleared” which indicates
that all data stored is deleted.
NOTE:
These parameters can ONLY be changed in the setting mode.
If the meter is idle for 3 minutes during the setting mode, it will switch off
automatically.
or ▼ to select the desired time format --- 12h or 24h.
Congratulations! You have completed all settings!
5

THE TWO MEASURING MODES
The meter provides you with two modes for measuring, General and
QC. You can switch between each mode by:
Modes Use when
General testing with the blood sample
QC testing with the control solution
You can switch between each mode by: In the measuring mode, after
a test strip is inserted, press ▲ or ▼ to select a suitable measuring
mode when the meter displays the list. Press M and proceed with a
lactate testing.
BEFORE TESTING
Calibration
You must calibrate the meter every time you begin to use a new box
of lactate test strips by setting the meter with the correct code. Test
results may be inaccurate if the code number displayed on the
monitor does not match the number printed on your test strip vial or
individual foil packet.
6

How to Code Your Meter
1. Insert the code chip when the monitor is off. Wait until the number
appears on the display. (b)
NOTE:
Make sure the number on display, code chip, and test strip vial (or individual
foil package) are the same.
2. Remove the code chip, the display will show “OFF”. This tells you
that the meter has been updated and is ready for measurement.
Checking the Code Number
You need to make sure that the code number displayed on the meter
matches the number on the test strip vial or box of foil package
before you proceed (b). If it matches, you can proceed with your test.
If the codes do not match, please stop testing and contact Customer
Service for help.
NOTICE:
The code number on the display from picture (b) is only for your
reference, it may not be an actual code for this meter.
WARNING :
It is important to make sure that the LCD displayed code is the same as the
code on the test strip vial or box of foil package before testing. Failure to do
so will get inaccurate results.
If the LCD displayed code is not the same as the code on the test strip vial
or box of foil package, and the code number cannot be updated, please
contact Customer Service for assistance.
7

QUALITY CONTROL TESTING
When Should the Control Solution Test be
Performed?
if it is mandatory following the local regulations in your country,
if you suspect the meter or test strips are not working properly,
if your lactate test results are not consistent with how you feel, or if
you think the results are not accurate,
to practice the testing process, or
if you have dropped or think you may have damaged the meter.
Test strips (e), control solutions (f), lancing device (g) or sterile
lancets may not be included in the kit (please check the contents on
your product box). They can be purchased separately. Please make
sure you have those items needed for a lactate test beforehand.
Performing a Control Solution Test
To perform a control solution test, you will need: (d), (e) and (f).
When the meter is off, you can enter the measuring mode by
two ways:
1. Insert the test strip to turn on the meter
Insert the test strip into the meter. Wait for the meter to display
the initiating animation. Or,
Press M to turn on the meter
Select the measuring mode. Press M to enter. Insert a test strip
when the meter displays test strip inserting animation. Wait for
the meter to display the initiating animation.
8

2. Select Q.C. and press M to perform this test in the control
solution measuring mode.
Warning:
When doing the control solution test, you have to mark it so that the test
results will NOT mix with the lactate TEST RESULTS stored in the memory.
Failure to do so will mix up the lactate test results with the control solution
test results in memory.
3. Apply control solution (h)
Shake the control solution vial thoroughly before use. Squeeze
out the first drop and wipe it off, then squeeze out another drop
and place it on the tip of the vial cap. Hold the meter to move the
absorbent hole of the test strip to touch the drop. Once the
confirmation window fills completely, the meter will begin
counting down.
NOTE:
To avoid contaminating the control solution, do not directly apply control
solution onto a strip.
4. Read and compare the result
After counting down to 0, the control solution test result will
appear on the display. Compare this result with the range printed
on the test strip box or test strip vial and it should fall within this
range. If not, please read the instructions again and repeat the
control solution test.
NOTE:
The control solution range printed on the test strip box is for control solution
use only. It is not a recommended range for your lactate level.
See the MAINTENANCE section for important information about your
control solutions.
9

TESTING WITH BLOOD SAMPLE
Warning:
To reduce the chance of infection:
Never share a lancet or the lancing device.
Always use a new, sterile lancet. Lancets are for single use only.
Avoid getting hand lotion, oils, dirt, or debris in or on the lancets and the
lancing device.
Preparing the Lancing Device for Blood Testing
Please follow the instructions in the lancing device insert for
collecting a blood sample.
Preparing the Puncture Site
Stimulating blood perfusion by rubbing the puncture site before blood
extraction has a significant influence on the lactate value obtained.
Blood from a site that has not been rubbed exhibits a measurably
different lactate concentration than blood from the finger. When the
puncture site was rubbed prior to blood extraction, the difference was
significantly reduced.
Please follow the suggestions below before obtaining a drop of
blood:
Wash and dry your hands before starting.
Select the puncture site either at fingertips.
Rub the puncture site for about 20 seconds before penetration.
Clean the puncture site using cotton moistened with 70% alcohol
and let it air dry.
Fingertip testing (i)
Press the lancing device’s tip firmly against the lower side of your
fingertip. Press the release button to prick your finger, then a click
indicates that the puncture is complete.
10

NOTE:
Alcohol swabs with 70% alcohol can be purchased in pharmacy.
Choose a different spot each time you test. Repeated punctures at the same
spot may cause soreness and calluses.
Performing a Lactate Test
To perform a lactate test, you will need: (d), (f) and (g).
1. Insert a test strip to turn on the meter
The meter displays the initiating animation.
2. Select general mode by pressing ▲ or ▼.
Press M to perform this test.
3. Obtaining a blood sample (j)
Use the pre-set lancing device to puncture the desired site. The
size of the drop should be at least as 0.8 microliter (μL) of volume.
Gently squeeze the punctured area to obtain another drop of
blood. Be careful NOT to smear the blood sample.
4. Apply the sample (k)
Gently apply the drop of blood to the absorbent hole of the test
strip at a tilted angle. Confirmation window should be completely
filled if enough blood sample has been applied. Do NOT remove
your finger until you hear a beep sound.
NOTE:
Do not press the punctured site against the test strip or try to smear the
blood.
If you do not apply a blood sample to the test strip within 3 minutes, the
meter will automatically turn off. You must remove and reinsert the test strip
to start a new test.
The confirmation window should be filled with blood before the meter begins
to count down. NEVER try to add more blood to the test strip after the drop
of blood has moved away. Discard the used test strip and retest with a
new one.
If you have trouble filling the confirmation window, please contact your
health care professional or the local customer service for assistance.
11

5. Read Your Result
The result of your lactate test will appear after the meter counts
down to 0. The lactate result will be stored in the memory
automatically.
6. Eject the used test strip (l)
Eject the test strip by pushing the eject button on the top. The
meter will switch itself off automatically.
Always follow the instructions in the lancing device insert when
removing the lancet.
WARNING :
The used lancet and test strip may be biohazardous. Please discard them
carefully according to your local regulations.
12

METER MEMORY
The meter stores the 450 most recent test results along with
respective dates and times in its memory. To enter the meter memory,
start with the meter switched on.
Reviewing Test Results
1. Select the records mode by pressing ▲ or ▼.
Press M to enter. The first reading you see is the last lactate
result along with test number, date, time and the measuring
mode.
2. Press ▲ or ▼ to recall the test results stored in the meter each
time you press. Press M again and the meter returns to the main
page of record mode.
NOTE:
Any time you wish to exit the memory, press M to exit or leave it without any
action for 3 minutes. The meter will switch off automatically.
13

DOWNLOADING RESULTS ONTO A
COMPUTER
Data Transmission via Cable
You can use the meter with a USB cable and the Health Care
Software System to view test results on your personal computer. To
learn more about the Health Care Software System or to obtain a
USB cable separately, please contact the local customer services or
place of purchase for assistance.
1. Obtaining the required cable and installing the software
To download the Health Care Software System, please visit the
TaiDoc’s website: www.taidoc.com
2. Connecting to a personal computer
Connect the cable to a USB port on your computer. With the
meter switched off, connect the other end of the USB cable to the
meter data port. “PC link” will appear on the meter display,
indicating that the meter is in communication mode.
3. Data transmission
To transmit data, follow the instructions provided with the
software. Results will be transmitted with date and time. Remove
the cable and the meter will automatically switch off.
WARNING :
While the meter is connecting to the PC, it will be unable to perform a lactate
test.
14

MAINTENANCE
Battery
Your meter comes with a built-in rechargeable 3.7V Li-polymer
battery.
Low Battery Signal
When the meter displays “Battery empty” message:
The power is not enough to do a test. Please charge the battery
immediately.
Charging the Battery
To charge the battery (m), make sure the meter is turned off.
1. Connect the USB adapter to the side of the meter.
2. Plug the USB adapter to a wall outlet or connect the other end of
USB cable to the USB port on your personal computer.
3. The recharge symbol shows when battery is recharging. After the
battery is fully charged, remove the USB cable and then the
meter will automatically turn off.
NOTE:
Recharging the battery does not affect the test results stored in the memory.
The USB cable is for meter recharging and data transmission with a
computer. If you wish to recharge through wall outlet, please obtain a USB
adapter.
Generally, the expected battery life can last for at least 50 measurements
with 3 minutes in each measurement, or at least for 4 months of standby
until the meter runs out of power.
Properly dispose of the batteries according to your local environmental
regulations.
15

Caring for Your Meter
Cleaning
1. To clean the meter exterior, wipe it with a cloth moistened with
tap water or an alcohol swab with 70% alcohol, then dry the
device with a soft dry cloth. Do NOT rinse with water.
2. Do NOT use organic solvents to clean the meter.
Meter Storage
Storage conditions: -20
o
C to 60oC (-4oF to 140oF), below 95%
relative humidity.
Always store or transport the meter in its original storage case.
Avoid dropping and heavy impact.
Avoid direct sunlight and high humidity.
Meter Disposal
The used meter should be treated as contaminated that may carry a
risk of infection during measurement. The batteries in this used
meter should be removed and the meter should be disposed in
accordance with local regulations.
The meter falls outside the scope of the European Directive
2002/96/EC-Directive on waste electrical and electronic equipment
(WEEE).
Caring for Your Test Strips
Storage conditions: 2
relative humidity. Do NOT freeze.
Store your test strips in their original vial only. Do not transfer to
another container.
Store test strip packages in a cool dry place. Keep away from direct
sunlight and heat.
oC
to 30oC (35.6oF to 86oF) and below 85%
16

After removing a test strip from the vial, immediately close the vial
cap tightly.
Touch the test strip with clean and dry hands. Use each test strip
immediately after removing it from the vial or the foil package.
Do not use test strips beyond the expiration date. This may cause
inaccurate results.
Do not bend, cut, or alter a test strip in any way.
Keep the strip vial or single foil package away from children since
the cap and the test strip may be a choking hazard. If swallowed,
promptly see a doctor for help.
For further information, please refer to the test strip package insert.
Cleaning Your Lancing Device
Cleaning Procedures
1. Take out one alcohol swab with 70% alcohol from the package and
squeeze out any excess liquid in order to prevent damage to the
meter.
2. Wipe all lancing device's exterior surface and release button.
3. Remove the alcohol swab. Allow the lancing device surface to dry
completely.
4. Discard the used alcohol swabs and never reuse them. Users
should wash hands thoroughly with soap and water after handling
the lancing device.
The lancing device should be cleaned after each use.
17

Important Control Solution Information
Use only our control solutions with your meter.
Do not use the control solution beyond the expiration date or 3
months after first opening. Write the opening date on the control
solution vial and discard the remaining solution after 3 months.
It is recommended that the control solution test be done at room
temperature 20°C to 25°C (68°F to 77°F). Make sure your control
solution, meter, and test strips are at this specified temperature
range before testing.
Shake the vial before use, discard the first drop of control solution,
and wipe off the dispenser tip to ensure a pure sample and an
accurate result.
Store the control solution tightly closed at temperatures between
2°C to 30°C (35.6°F to 86°F). Do NOT freeze.
18

SYSTEM TROUBLESHOOTING
If you follow the recommended action but the problem persists,
please call your local customer service.
Result Readings
MESSAGE WHAT IT MEANS
Reading below
detection range
Reading above
detection range
Error Messages
MESSAGE WHAT IT MEANS WHAT TO DO
Error 01
Error 23
Error 24
Error 25
Error 26
Error 28
< 0.3 mmol/L
> 22 mmol/L
Appears when the battery
cannot provide enough
power for a test.
Appears when there is a
system error
Appears when a used test
strip is inserted.
Appears when ambient
temperature is above or
below system operation
range.
Appears when inserting
the wrong code chip
Charge the battery immediately.
Repeat the test with a new test strip.
If the meter still does not work,
please contact the customer service
for assistance.
Repeat with a new test strip.
System operation range is 10°C to
40°C (50°F to 104°F). Repeat the
test after the meter and test strip are
in the above temperature range.
Check the code chip and insert the
correct code chip.
19

Error 29
Error 30
Problem with the test strip Repeat the test with a new test strip.
Error 41 Meter error
Appears when removing
Error 40
Error 45
Error 46
Notice 01
Notice 03
the strip during a
measurement
Appears when there is
insufficient blood volume.
Appears when HCT value
exceeds the
measurement range
Measuring result is above
the limited range.
Measuring result is below
the limited range!!
Measuring record is
empty.
Contact the local customer service
for help.
Repeat the test with a new test strip.
If this error persists, please the
customer service for assistance.
Review the instructions and repeat
test with a new strip.
If the problem persists, please
contact the local customer service for
help.
Repeat the test with a new test strip.
Notice 02
20

Troubleshooting
1. If the meter does not display a message after inserting a test
strip:
POSSIBLE CAUSE WHAT TO DO
Batteries exhausted. Recharge the battery.
Test strip inserted upside down or
incompletely.
Defective meter or test strips. Please contact customer services.
2. If the test does not start after applying the sample:
POSSIBLE CAUSE WHAT TO DO
Insufficient blood sample.
Defective test strip. Repeat the test with a new test strip.
Sample applied after automatic
switch-off (3 minutes after last user
action).
Defective meter. Please contact customer services.
3. If the control solution testing result is out of range:
POSSIBLE CAUSE WHAT TO DO
Error in performing the test. Read instructions thoroughly and
Control solution vial was poorly
shaken.
Expired or contaminated control
solution.
Control solution that is too warm
or too cold.
Defective test strip. Repeat the test with a new test strip.
Meter malfunction. Please contact customer services.
Improper working of meter and
test strip.
Insert the test strip with contact bars
end first and facing up.
Repeat the test using a new test strip
with larger volume of blood sample.
Repeat the test with a new test strip.
Apply sample only when flashing ” ”
appears on the display.
repeat the test again.
Shake the control solution vigorously
and repeat the test again.
Check the expiry date of the control
solution.
Control solution, meter, and test strips
should be at room temperature 20°C
to 25°C (68°F to 77°F) before testing.
Please contact customer services.
21

DETAILED INFORMATION
The meter provides you with plasma equivalent results.
Desirable range:
Lactate 0.7 - 2.5 mmol/L
Source: Burtis, Carl A. and Ashwood, Edward R., ed. 1994. Tietz Textbook of Clinical
Chemistry. Philadelphia, PA: W. B. Saunders Co.
Please consult your doctor to determine a target range that
works best for you.
SYMBOL INFORMATION
SYMBOL REFERENT SYMBOL REFERENT
In vitro diagnostic
medical device
Consult instructions
for use
Temperature limitation
Use by
Batch code Manufacturer
Serial number
Caution, consult
accompanying
documents
Humidity Limitation
Collection for
electrical and
electronic equipment
CE mark
Authorized
representative in the
European
22

SPECIFICATIONS
Model No.: L1
Dimension & Weight: 96 (L) x 61 (W) x 26 (H) mm, 67.2 g
Power Source: One 3.7V Li-polymer battery
Display: LCD
Memory: 450 measurement results with respective date and time
External Output: Mini USB cable
Auto sample loading detection
Auto electrode insertion detection
Auto reaction time count-down
Auto switch-off after 3 minutes without action
Temperature Warning
Operating Condition: 10°C to 40°C (50°F to 104°F), below 85%
R.H. (non-condensing)
Meter Storage/Transportation Conditions: -20°C to 60°C (-4°F to
140°F), below 95% R.H.
Strip Storage/Transportation Conditions: 2
o
86
F), below 85% R.H.
Measurement Units: fixed mmol/L
Measurement Range: 0.3 to 22 mmol/L
Expected service life: 5 years
This device has been tested to meet the electrical and safety requirements of:
IEC/EN 61010-1, IEC/EN 61010-2-101, EN 61326-1, IEC/EN 61326-2-6.
23
oC
to 30oC (35.6oF to

TaiDoc Technology Corporation
B1-7F, No.127, Wugong 2nd Rd.,
Wugu Dist., 24888 New Taipei City, Taiwan
www.taidoc.com
MedNet GmbH
Borkstraβe 10, 48163 Mϋnster, Germany
For self-testing
 Loading...