

Page 1
MANUAL
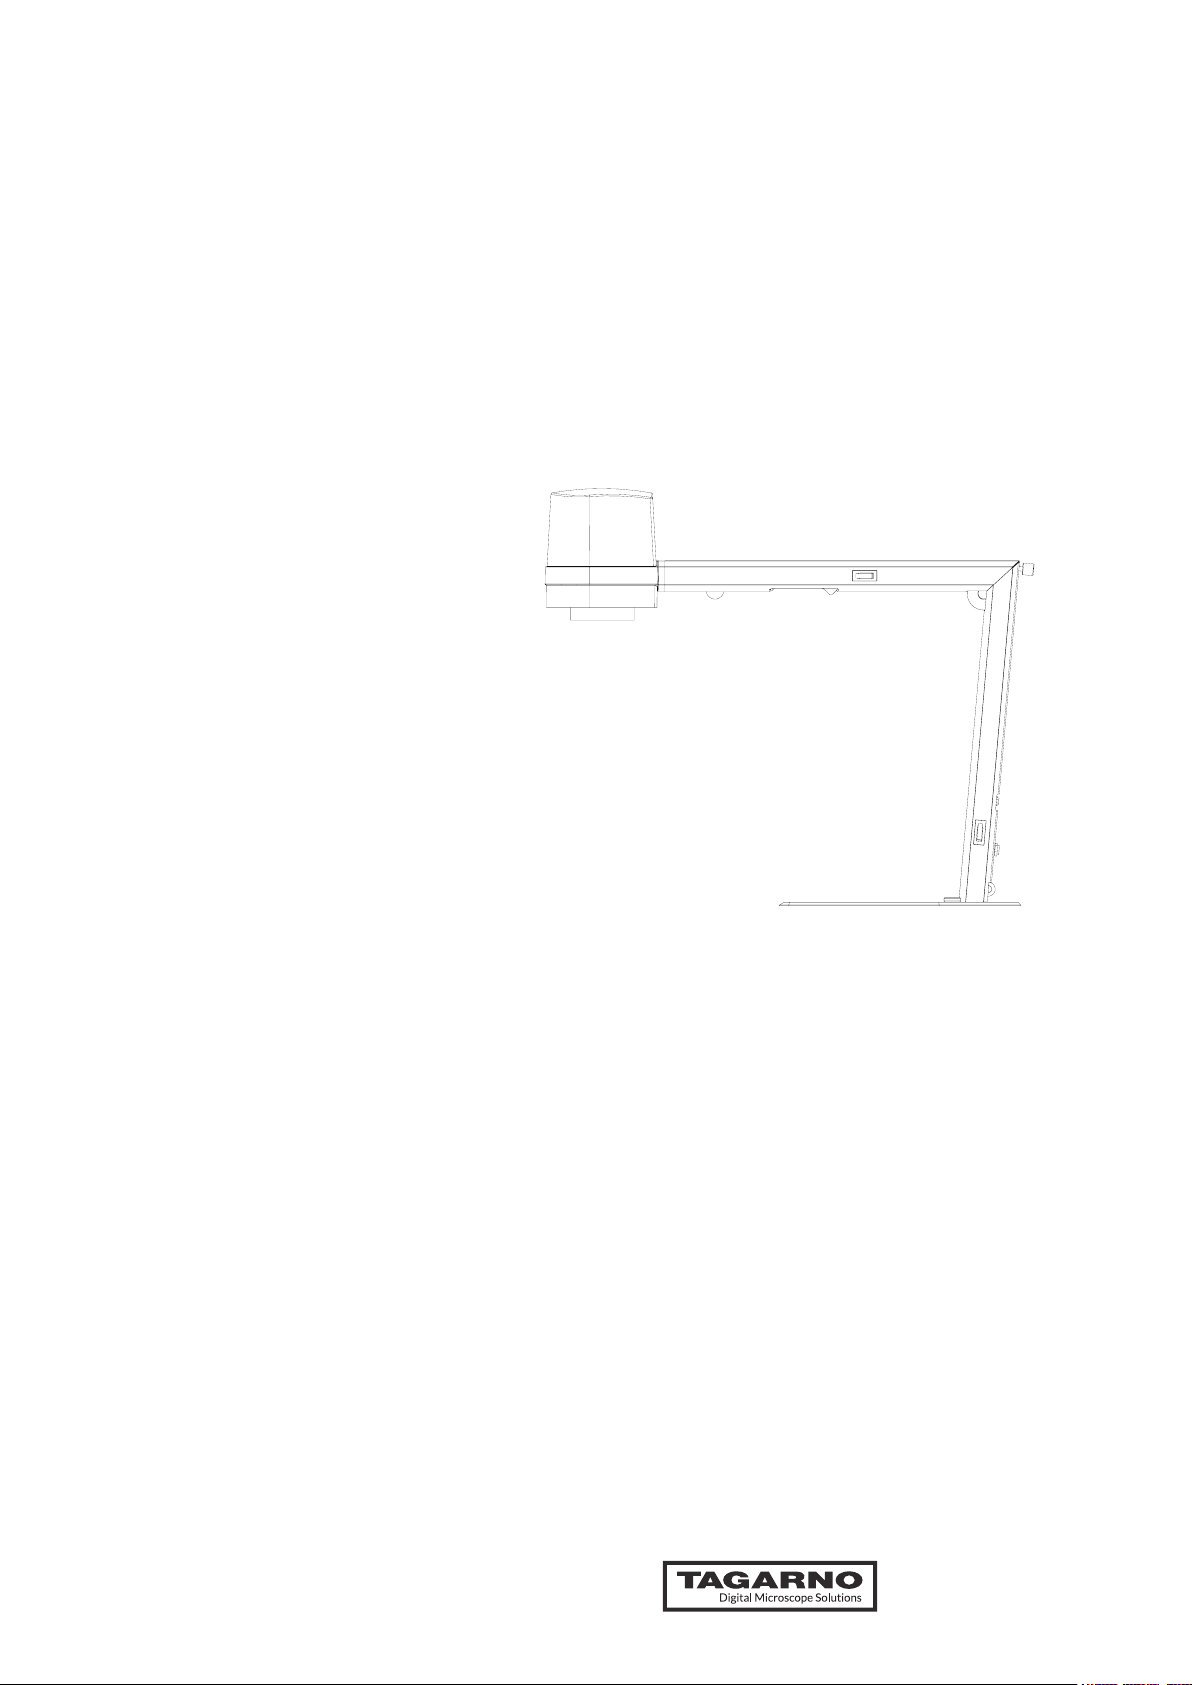
TAGARNO FHD ZIP
VERSION: 1.6 | FIRMWARE 5.8 | 2019-12-02
CONTENTS
1. INTENDED USE 2
2. WARNINGS 2
3. TIPS 2
4. YOU HAVE RECEIVED 3
5. ASSEMBLING 4
6. CONNECTING 5
7. OPERATION 6
8. TECHNICAL SPECIFICATIONS 9
9. SYSTEM REQUIREMENTS 11
10. MAINTENANCE 12
11. WARRANTY 12
12. ERGONOMICAL RECOMMENDATIONS 12
13. DECLARATION OF CONFORMITY 13
14. COMPLIANCE STATEMENTS 14
Go to tagarno.com/productmanuals to nd manuals and tutorial videos.
1
Page 2
INTENDED USE
1. INTENDED USE
The product is a digital magnifying system consisting of a camera unit, PCBs, mechanical
parts and a power supply. The product is intended for marketing worldwide and is designed for
manual visual inspection.
WARNINGS
2. WARNINGS
Read all safety information before you use the product.
Please pay attention when you see a warning label on the product.
This product is for indoor use only.
You must not discard this electrical/electronic product in domestic household waste.
Please dispose at your local recycling centre.
1. Read the manual before you use the product
2. Use the product only as specied, or the protection supplied by the product can
be compromised
3. Do not position the equipment so that it is difcult to operate the disconnecting
device (appliance inlet of external power supply, equipment input connector)
4. If fluids are spilled on the product, turn the system off immediately by pulling the power
supply out of the electrical outlet
5. In case of re close to the microscope, please turn off and disconnect the system
6. Avoid subjecting the lens to sharp or hard objects
7. Please do not connect the microscope, if visible damages appear
8. Do not dismantle any parts of the microscope, except where noted in the manual
9. Never disassemble or clean internal optical surfaces
10. Use only the power supply provided from TAGARNO
11. Always turn off the system before unplugging, when possible
12. Do not touch the light source. It gets hot when using the product
13. Do not look directly into the light source
CAUTION, HOT SURFACE: The inside of the camera head might be hot.
To reduce the risk of injury from a hot component, allow surface to cool before
changing the close-up lens.
WARNING: This is a Class A product. In a domestic environment, this product may
cause radio interference, in which case the user may be required to take appropriate
measures.
3. TIPS
1. Avoid touching the lens glass
2
Page 3
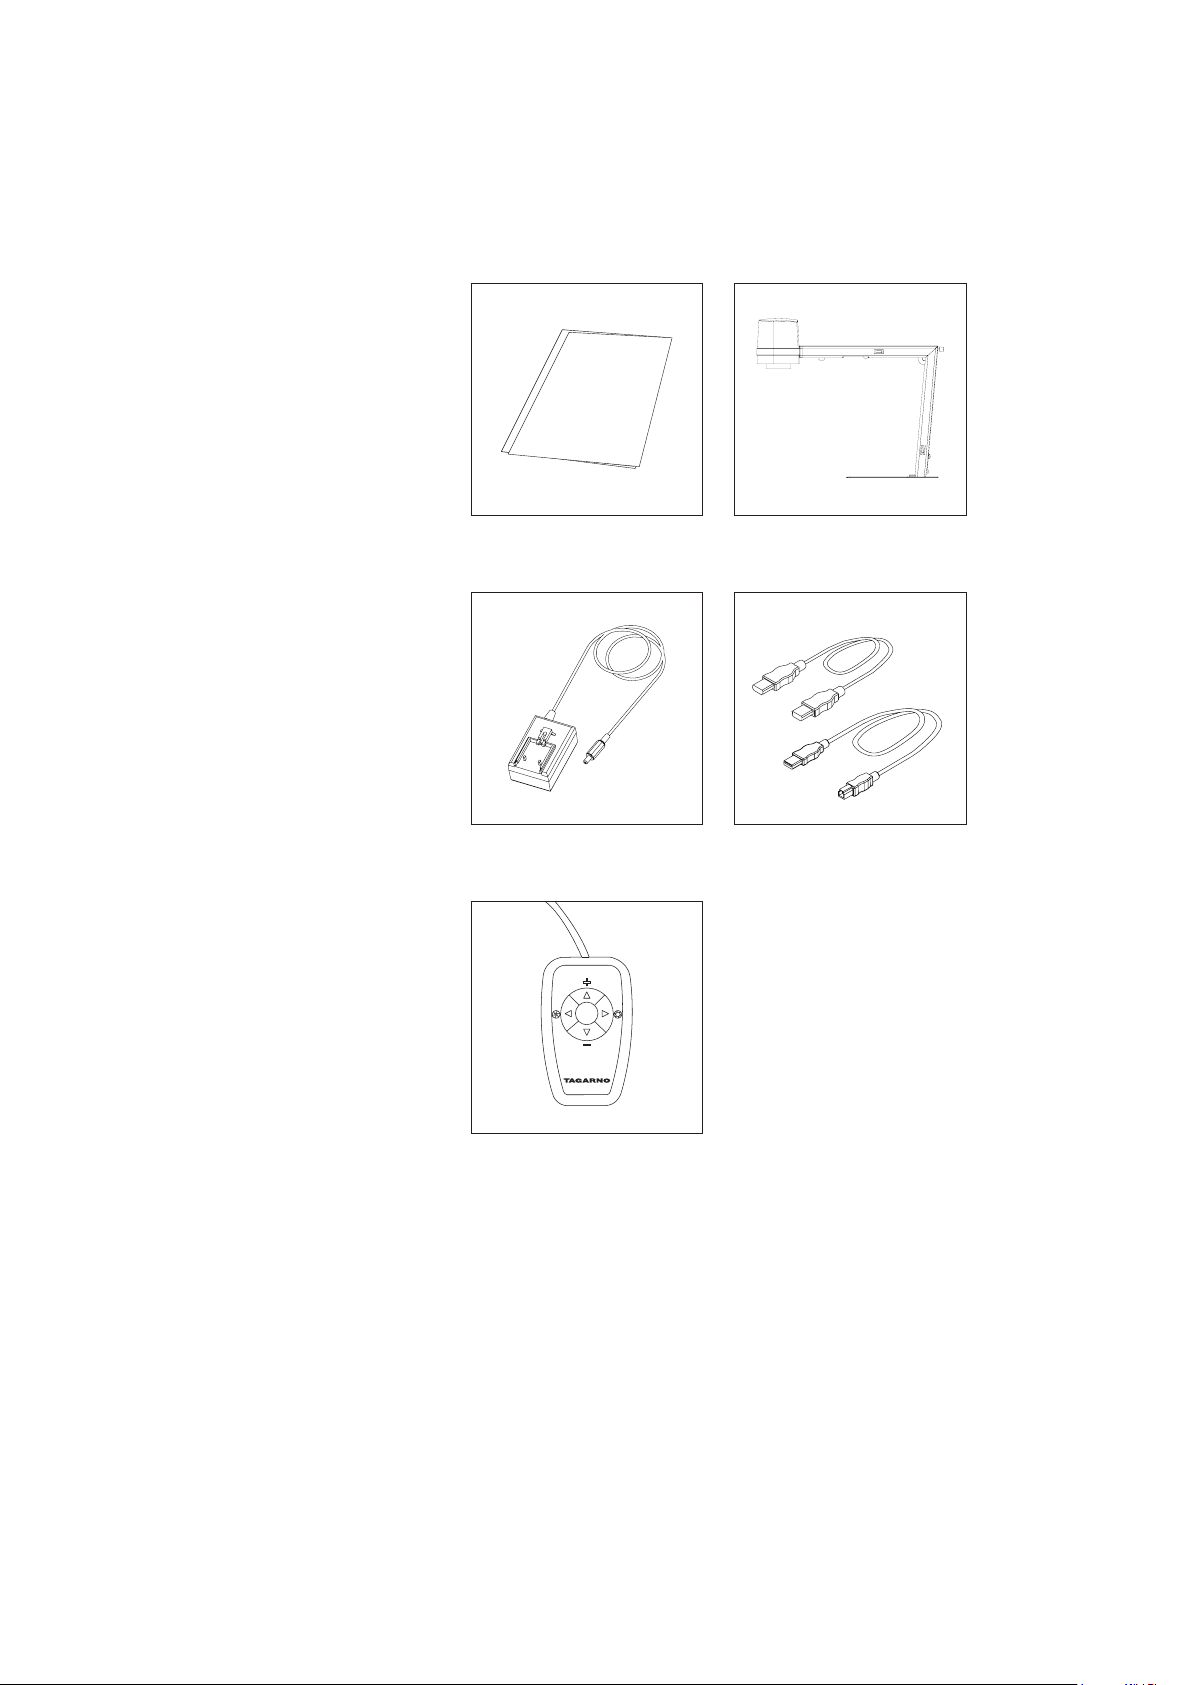
4. YOU HAVE RECEIVED
Manual
Power supply Mini HDMI-HDMI Cable
Microscope
Micro USB 3.0 Cable
XKEY Control box
3
Page 4
5. ASSEMBLING
TIP!
Find the “How to Install” tutorial video here:
www.tagarno.com/installzip
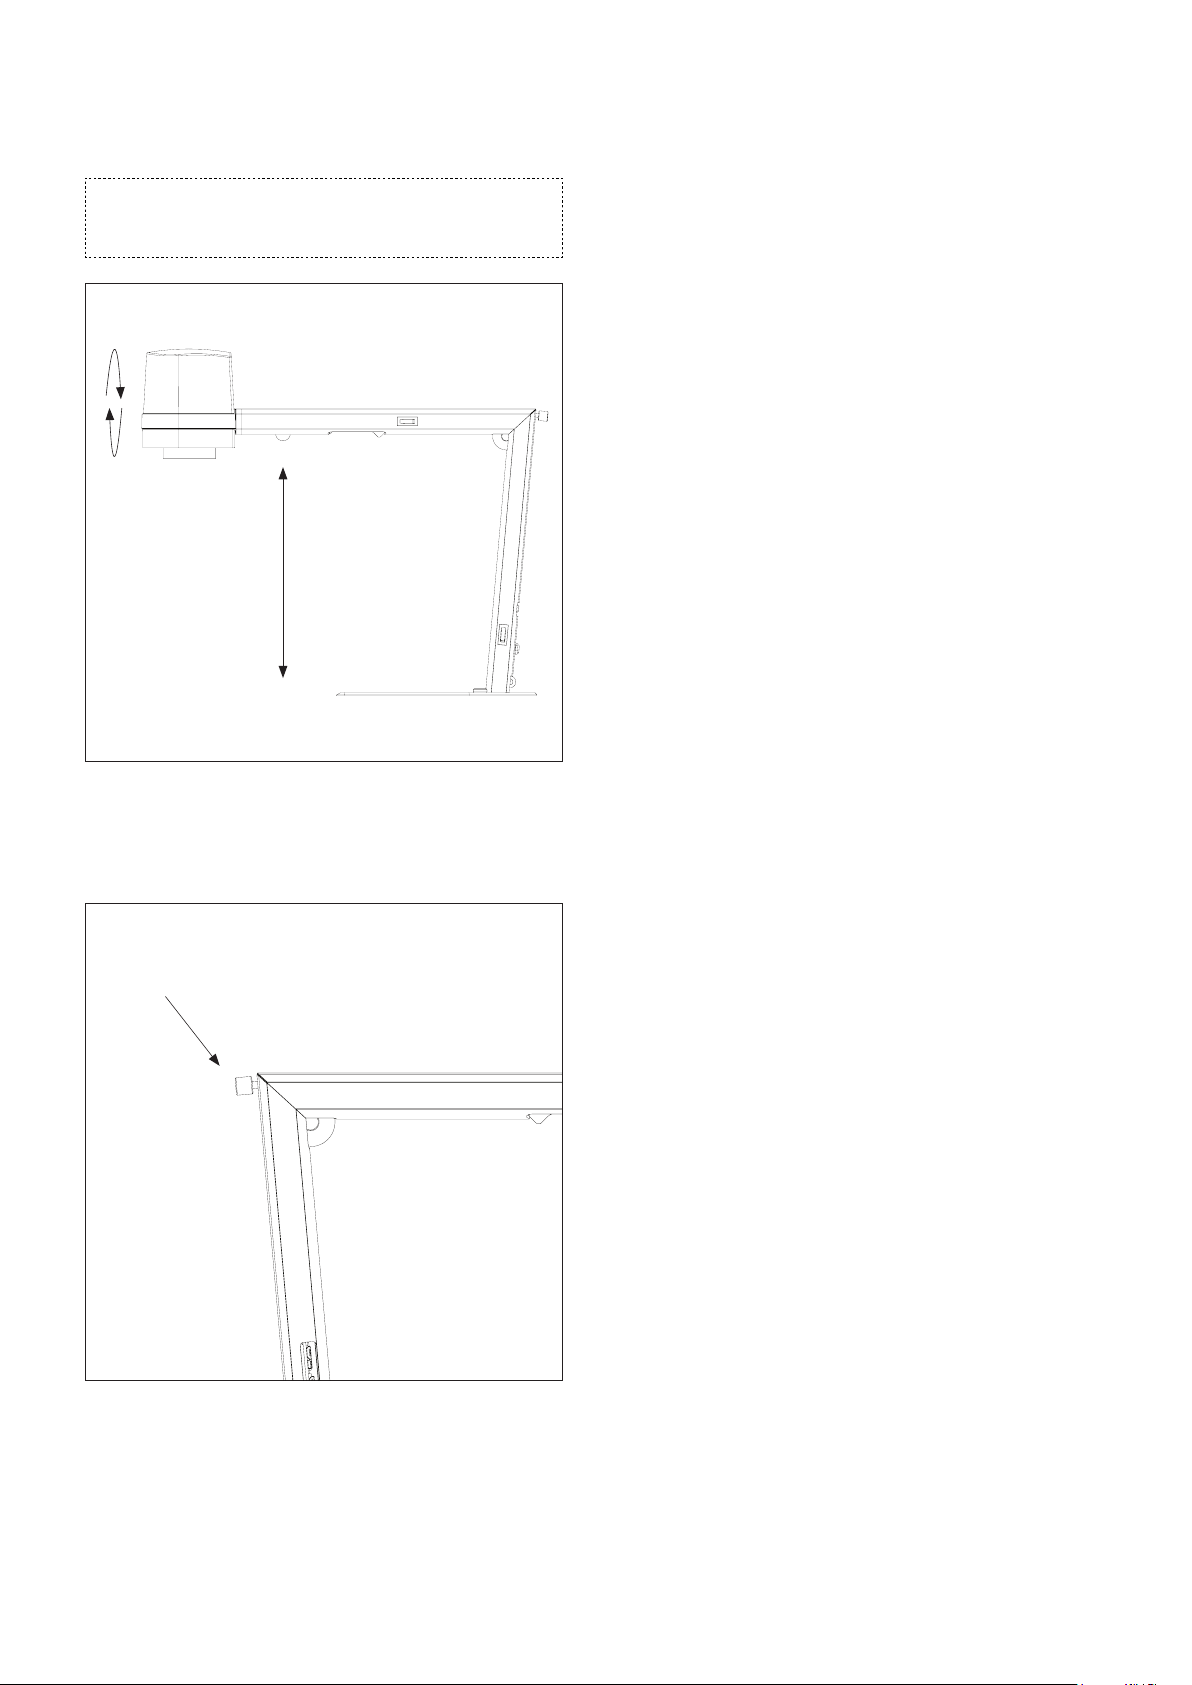
Unfold the device and rotate the camera head 90 degrees so the
lens points downwards.
Lock the device by fastening the screw.
4
Page 5
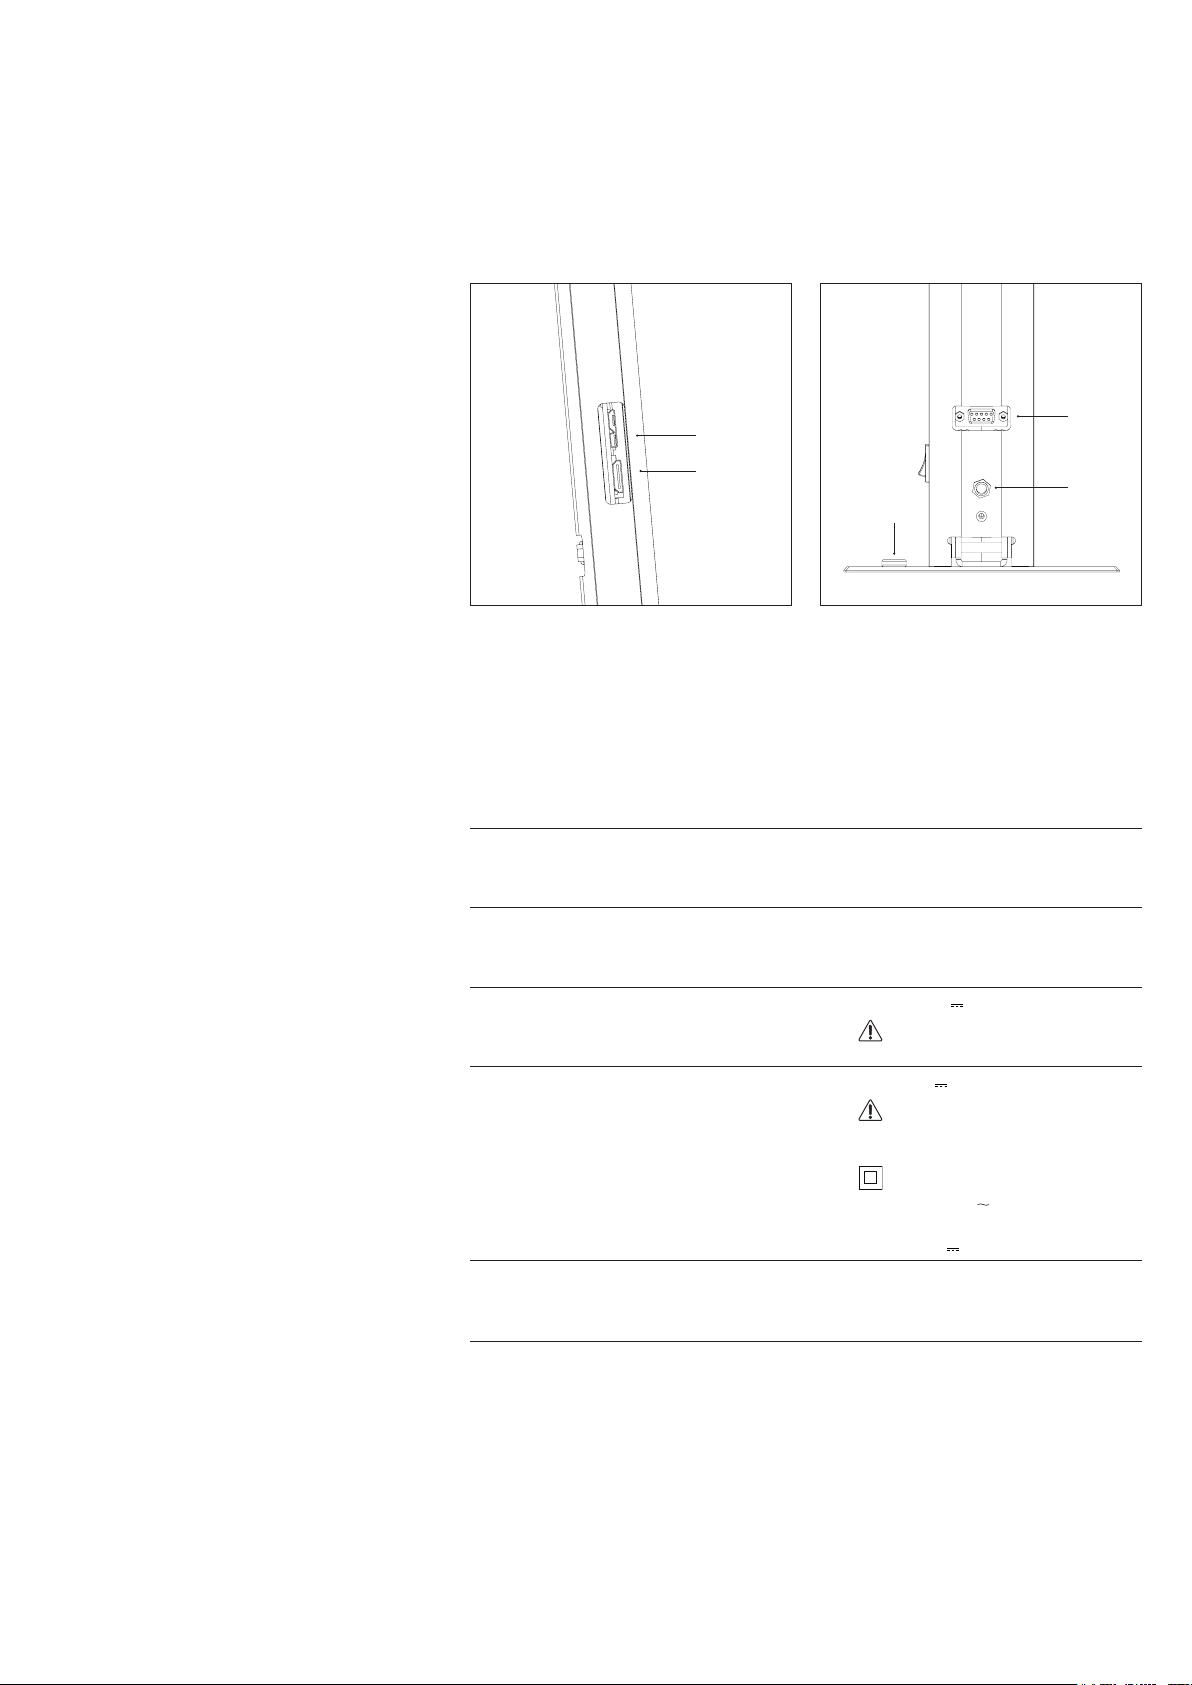
6. CONNECTING
2.
1.
5.
Connect HDMI cable (1) and USB 3.0 cable (2).
WARNING! Do not connect the mini HDMI
cable to a PC. Please do not use force when
inserting the cable plugs
Connector Description Type Connect to Specication
1 Output Mini
HDMI
Type C
2 USB 3.0
output
Micro
USB 3.0
Type B
Connect the control box (3), power supply (4)
and ESD - Electro Static Discharge (5).
Monitor HDMI out 720p50, 720p60, 1080p25,
1080p30, 1080p50, 1080p60
Computer USB 3.0 Device, Self-powered
3.
4.
3 Control box D-SUB
9-Pin
Female
4 Power
supply (DC)
5 ESD Snap
DC Jack Power
Socket,
10mm.
Control
box
socket
ESD
Grounding
point
Output: 3.3V
Use only control boxes supplied
by TAGARNO
Input: 12V
Use only the power supply
provided by TAGARNO:
Brand/Model: Mean Well/GEM18I12
Protection Class II
Input: 100-240V 0.45-0.2A, 50/60Hz
Overvoltage category ll
Output: 12V 1.5A Max
ESD Grounding point
330µA
1.0A
5
Page 6
7. OPERATION
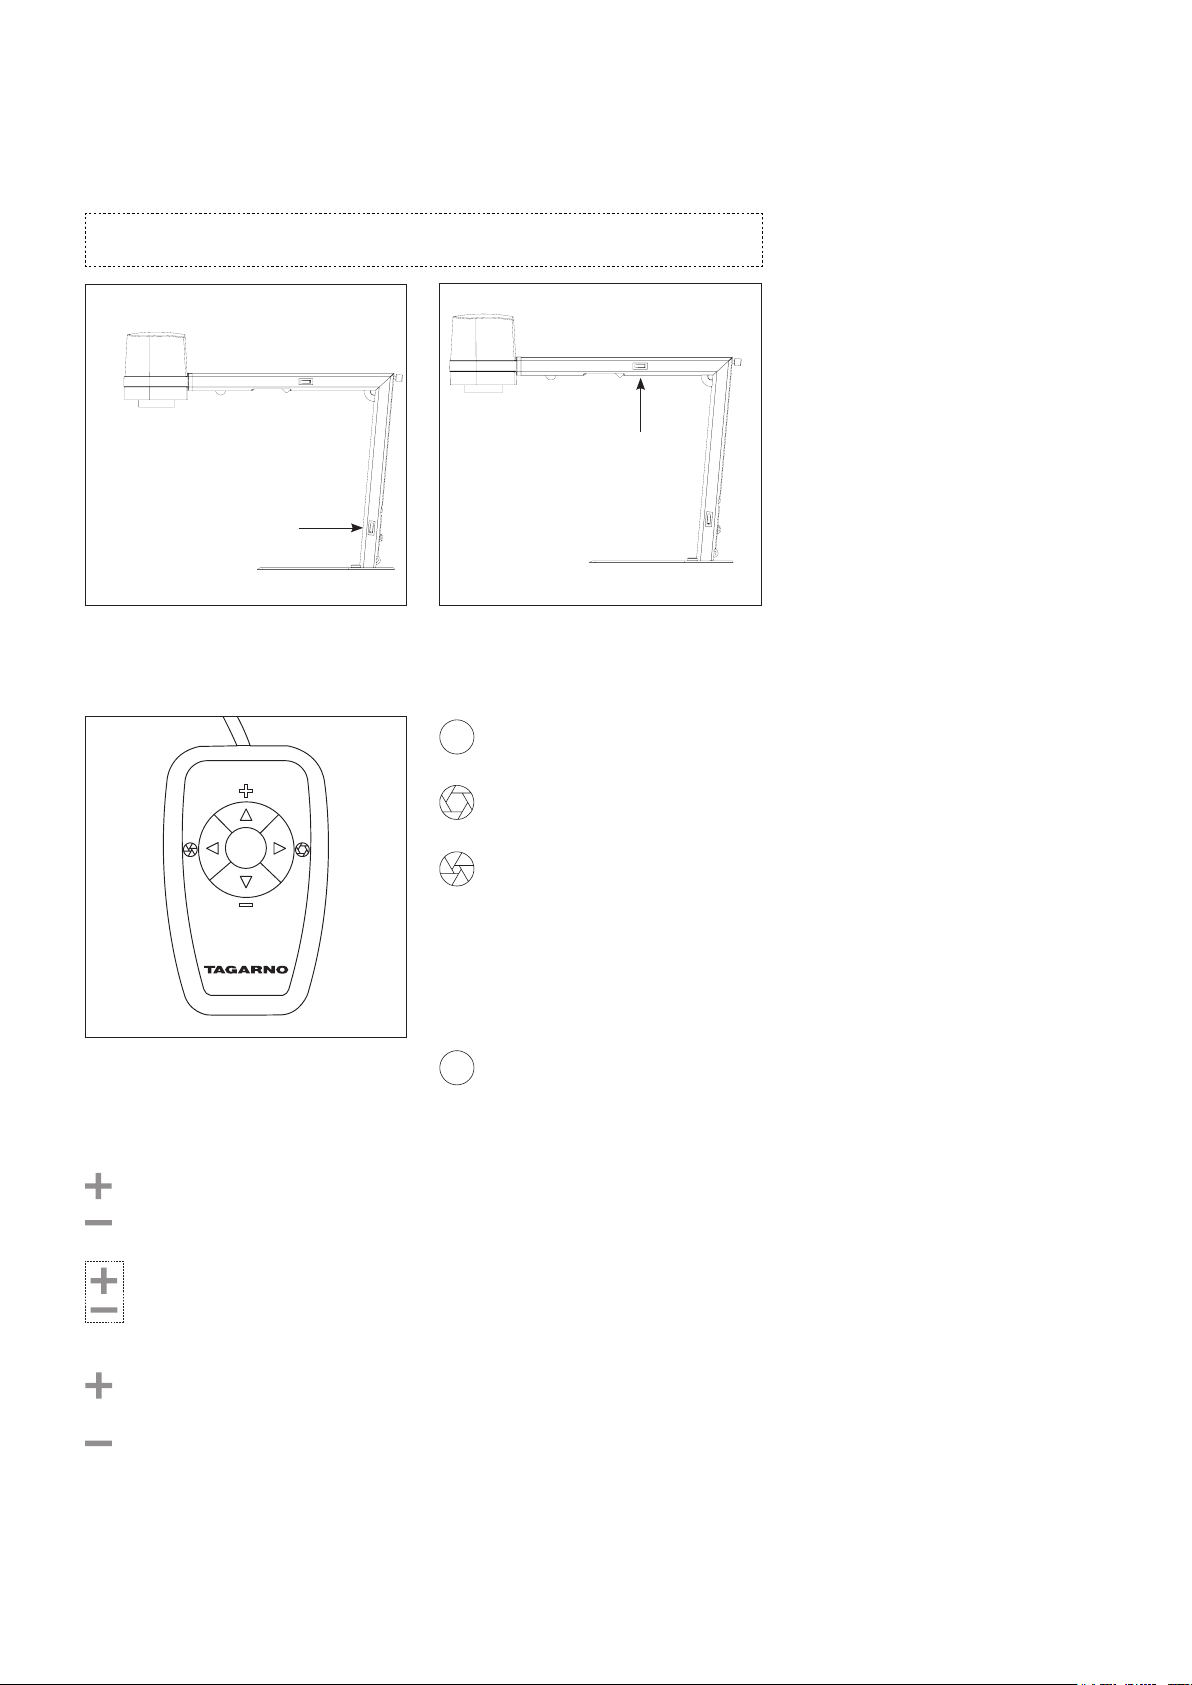
OPERATION | CONTROL BOX (1/3)
TIP!
Find the "How to Use" tutorial video here: www.tagarno.com/usezip
Power on/off
Multi function buttons. Do only connect
equipment distributed by TAGARNO
Zoom in
Zoom out
Push both plus and minus to switch
from auto focus to manual focus.
You can now adjust the focus
manually by using plus/minus
If you wish to focus on something
close
If you wish to focus on something
farther away
Light on/off
Short push switches between Iris,
Gain and Preset mode.
Increase Iris/Gain or switch between
zoom preset 1, 2 or 3.
Decrease Iris/Gain or switch between
zoom preset 1, 2 or 3.
To change and save a zoom preset,
use zoom buttons to select a zoom
level and simultaneously press
left/right buttons. OSD will show
STORED: PRE(X)
Hold down for 3 seconds to use
auto exposure mode
RESET TO FACTORY SETTINGS
Follow this procedure to change back to factory
setting 1080P60.
1. Turn the microscope off
2. Press and hold the center button down
while turning the power on
3. Keep holding the center button down for
25 seconds
4. Release the center button and turn the
power off
5. Turn the power back on and the
microscope is set to factory setting
1080P60
6
Page 7
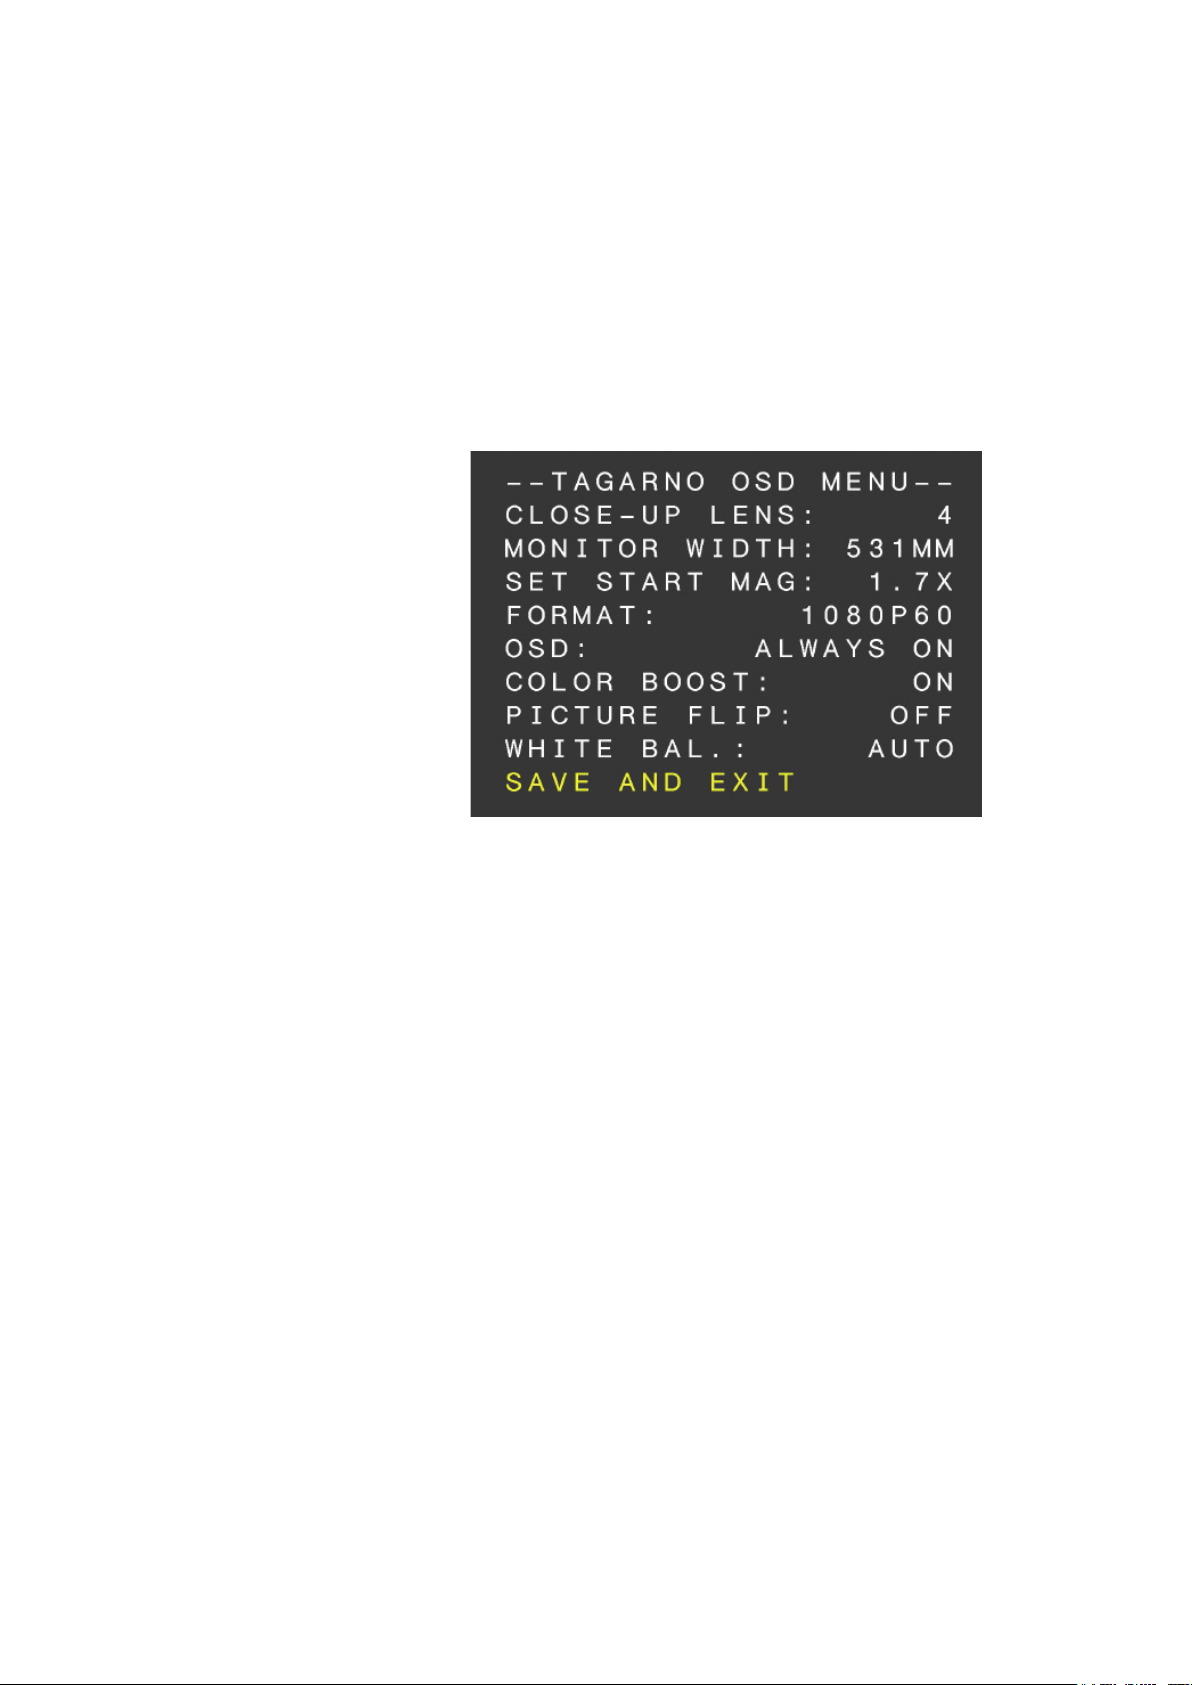
OPERATION | ON SCREEN DISPLAY (OSD) (2/3)
When turning on your FULL HD system, you are informed of the given units, serial number
(SN), version and resolution.
1. Open the OSD menu
To open the TAGARNO On Screen Display Menu, press and hold down the center button for
approximately 5 seconds.
2. Choose lens
Set the current close-up lens by using the left/right arrows on the XKEY Control box. The
choice is naturally between LENS +3, +4, +5 or +10. LENS +4 is factory default. Continue
using the down arrow.
3. Choose monitor width
Press the center button to set up the width of the monitor. You need to measure the
horizontal width of the monitor panel on your monitor. Select one digit at a time by using the
left/right arrows and adjust the digits with the up/down arrows. Switch between millimeters
and inches via the up/down buttons. Monitor 24” FHD is factory default. To store modied
settings, press the center button.
4. Set start magnication
Select the magnication level you wish to use as start up level. Press the center button and
select one digit at a time in the bottom of the page by using the left/right arrows and adjust
the digits with the up/down arrows. By pressing the center button one more time, you have
selected the values chosen. Press the down arrow to choose format.
5. Choose format
You have the option to switch between different video formats, 1080p 60fps being the
highest quality. Select the required format by pressing the center button, and use arrow keys
left/right to select between 6 different formats.
7
Page 8

OPERATION | ON SCREEN DISPLAY (OSD) (3/3)
6. Select OSD presets
You need to choose between respectively ALWAYS ON, OFF or TIMEOUT using the left/right
arrows in order to have the OSD Menu displayed continuously, never or for 3 seconds at the
time. Continue by pressing the down arrow.
7. Color boost
The OSD menu gives you the possibility to choose between two color settings; Color boost
on or off, by using the left/right arrows. Which setting chosen, is a matter of individual
preferences and the object projected on screen. Continue by pressing the down arrow.
8. Picture ip
In the menu you have the possibility to rotate the screen image 180 degrees, or choose the
standard view by using the left/right arrows. Choose between the two views by pressing the
left/right buttons. Continue by pressing the down arrow.
9. White balance
Choose between these settings: AUTO and POWER UP by using the left/right arrows. In AUTO
mode the white balance is continuously adjusted to achieve the best color reproduction. In
POWER UP mode the white balance calibration is performed only once when the system is
turned on. In this mode it’s important that a white sheet of paper is visible in the eld of view
when the microscope is switched on. Continue by pressing the down arrow.
10. Save presets
To save your presets and exit the menu, press the center button and thereby return to the
image displayed on the monitor, using your recently saved presets.
If you have changed the various formats, your FULL HD system needs to be restarted.
This will be indicated in the bottom if needed.
8
Page 9
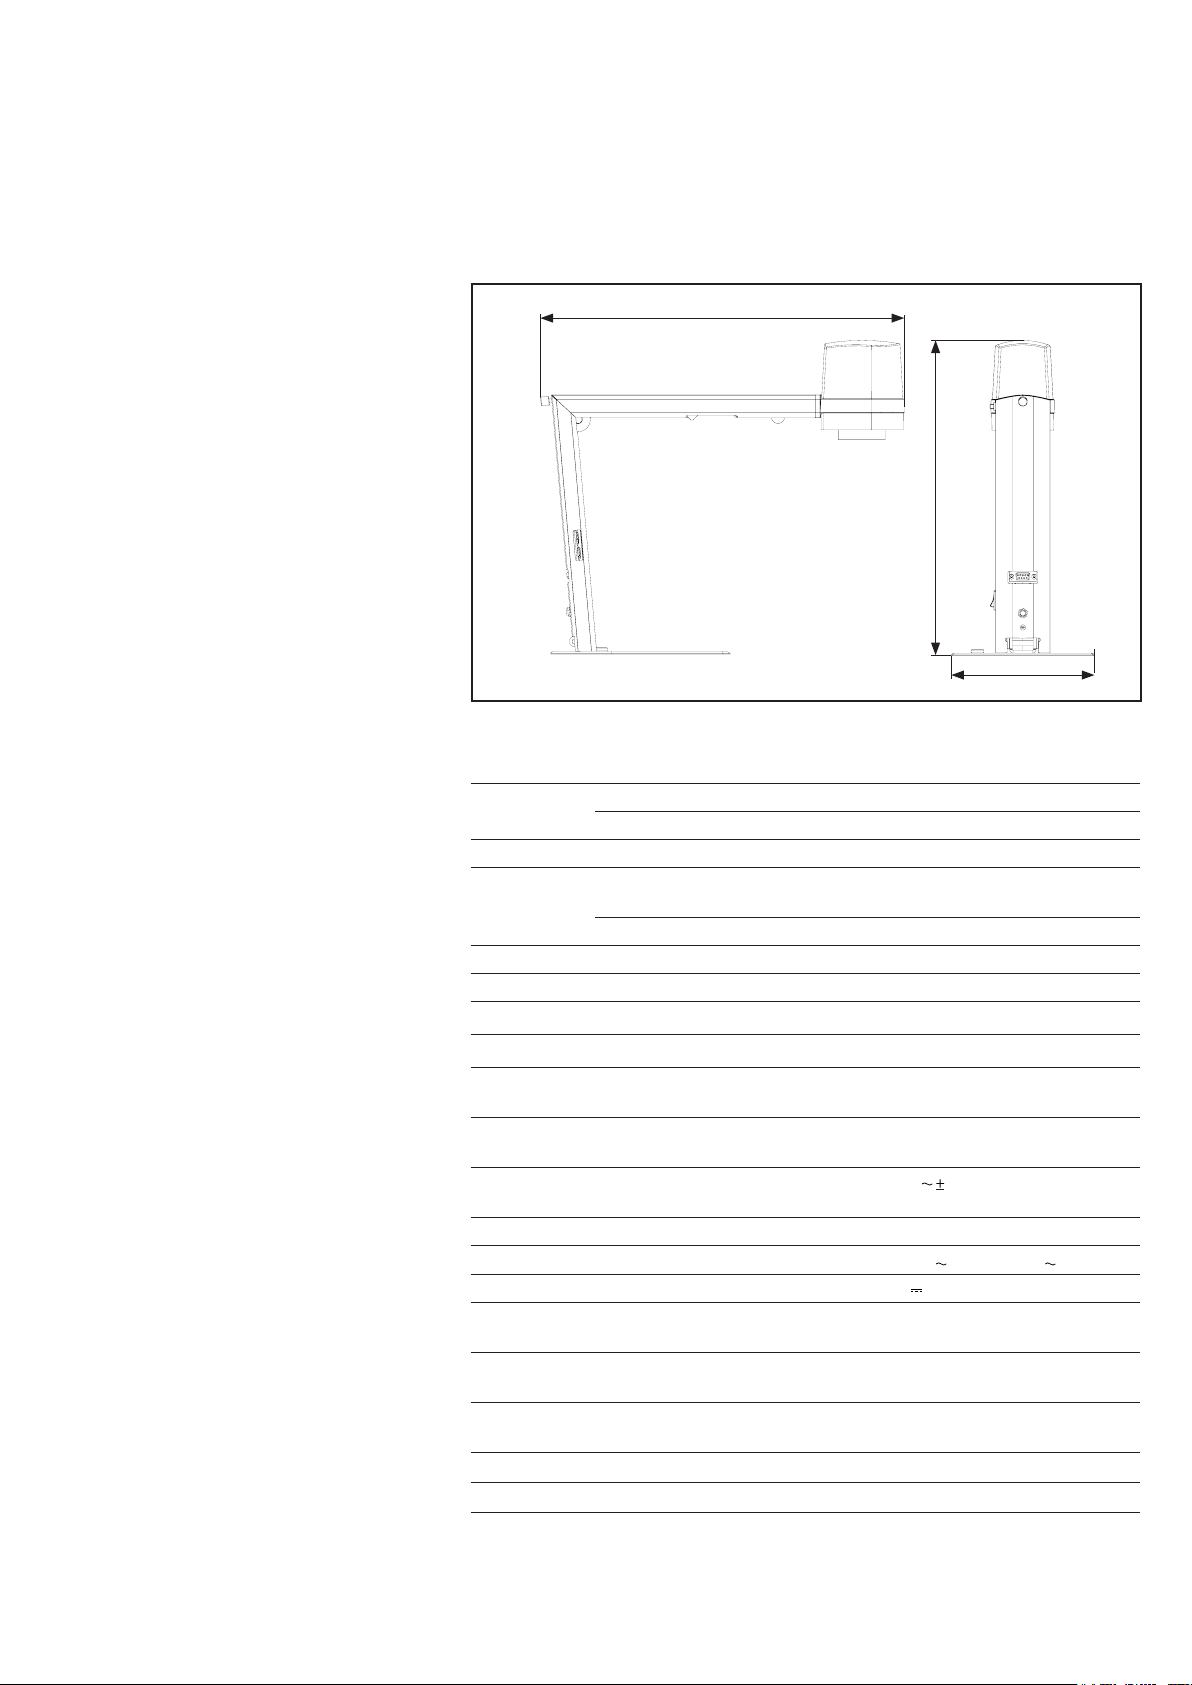
8. TECHNICAL SPECIFICATIONS
TECHNICAL SPECIFICATIONS (1/2)
D
H
W
Dimensions H: 350mm/13.78”
W: 155mm/6.10”
D: 386mm/15.20”
Weight 2.0 kg/4.4lbs
Camera
resolution
Camera zoom 30x optical
Autofocus Yes
Work height 245mm/9.65”
Work depth 280mm/11.02”
Auto Monitor
Detect
Plug
connection
Power
requirements
Environmental
conditions
ESD
FHD 1080p, 1920x1080p at 59,94/50/29,97/25Hz
HD 720p, 1280x720p at 59,94/50Hz
Yes
Mini-HDMI & Micro-USB 3.0
Line voltage 100 - 240V
Line frequency 50/60Hz
AC current consumption (typ.) 130mA/100V
DC current consumption (typ.) 1.0A/12V
Temperature Storage -5 to 60oC / 23 to 140oF
Humidity range Storage 20 to 90% RH non-condensing
Altitude 0 to 2000m / 0 to 6500ft
Pollution degree 2
ESD Grounding Point
10%
55mA/240V
Operation 5 to 40oC / 41 to 104oF
Operation 30 to 80% RH non-condensing
above sea level
9
Page 10

TECHNICAL SPECIFICATIONS (2/2)
FEATURES
Auto & Manual Focus Color boost
Iris, Gain & Preset mode Flip picture
OSD menu Image capture, PC (with third-party software)
Choose lens
Choose monitor width
Set start magnication
Choose format
Select OSD presets
LENS
Dimensions 58 mm/2.3”
Included lens +4
LENS Lens to object distance Magnication on 24" monitor
+4 250mm/9.84” 1.7x - 53x
FIELD OF VIEW - MINIMUM & MAXIMUM
MINIMUM
Lens X-Direction Y-Direction
+4 290 mm / 11.42’’ 163.10 mm / 6.42’’
MAXIMUM
X-Direction Y-Direction
10.50 mm / 0.41‘‘ 5.91 mm / 0.02’’
RECOMMENDED MONITOR FORMAT
Panel format 16:9 (Widescreen)
How to link HDMI input
Response time 2 ms
Signal format FHD 1920x1080
ACCESSORIES
FHD monitors per request Cleaning kit
Light Kits: Ultra Violet, Coaxial, Ringlight and
Backlight
Foot switch
Tables: XY-Table, Height adjustable and
Circular Titling Table
10
Page 11
9. SYSTEM REQUIREMENTS
FULL HD 1080P @ 59,94/50HZ
OS Desktop Laptop
Windows 7, 8 or 10 (with DirectX 11)
Memory 8GB
CPU Intel® Core™ i5 or i7 @2.4GHz,
(3rd or 4th generation named
3xxx or 4xxx)
Hard Disc Space 1GB required (SSD type recommended)
Connections USB 3.0 xHCI host controller (Intel chipset recommended)
Integrated Graphics Intel® HD Graphics 4000 Intel® HD Graphics 4400
Dedicated graphics card AMD Radeon™, HD 7xxx
Series with 2GB RAM
Monitor resolution 1920x1080 (recommended)
CPU: Intel® Core™ i5 or i7
@2.4GHz (4th generation
named 4xxx)
nVidia GeForce GT 740M
with 2GB RAM
FULL HD 1080P @ 29,97/25HZ AND HD 720P @ 59,94/50/30/25HZ
OS Desktop Laptop
Windows 7, 8 or 10 (with DirectX 11)
Memory 4GB
CPU Intel® Core™ [email protected] or
[email protected], (3rd generation
named 3xxx)
Intel® Core™ i3 @ 3.2GHz,
(3rd generation named 3xxx)
Hard Disc Space 1GB required (SSD type recommended)
Connections USB 3.0 xHCI host controller (Intel chipset recommended)
Integrated Graphics Intel® HD Graphics
Dedicated graphics card AMD Radeon™, 1GB ram nVidia GeForce GT 1GB RAM
Monitor resolution 1920x1080 (recommended)
SOFTWARE RECOMMENDED
Windows 7 Youcam 7
Windows 8 Windows 8 Camera App
Windows 10 Windows 10 Camera App
11
Page 12

10. MAINTENANCE
MAINTENANCE
• Store and use the product in a dry, clean and ventilated room.
• Do not place the product in direct sunlight, next to a radiator/heater or some place where
the system may be subjected to liquids.
• All plugs are designed to be used in one way only. Therefore, you should never use force
when you connect the system.
• Remember to disconnect all elements if you intend to move the product.
• If you move the product from a cold to a hot room, you must wait at least an hour before you
turn it on, to avoid short circuits due to condensation.
• Remove the cables by pulling the plug itself - never by pulling the cable.
• If the product needs repair, never do it yourself, contact your distributor.
• When cleaning the product, please turn off the system and wait untill the system has
cooled off.
• Clean the product with a damp cloth. Never use strong cleaning agents or chemicals
- these may damage the microscope.
• Clean the lens regularly with isopropyl alcohol and a microber cloth or with the TAGARNO
cleaning kit.
11. WARRANTY
WARRANTY
Warranty terms for the product shall be as follows:
TAGARNO warrants that the product will correspond with the specication at the time of
delivery and will be free from defects in material and workmanship for a period of 24 months
(2 years) from date of invoice from Supplier.
This warranty covers:
a. The replacement of defective parts.
b. All labour costs to exchange defective parts in product.
c. Complete functions test of product before return to end user’s site.
d. Return transport costs of product from TAGARNO to end user’s site.
The warranty only applies if the product is packed, shipped, stored, handled and maintained
correctly.
Failures due to improper packing and transport are not covered.
Failures due to drops and sudden blows are not covered.
Failures due to storage and handling in extreme high or low temperatures are not covered.
Failures due to storage or handling in extreme high humidity are not covered.
ERGONOMIC RECOMMENDATIONS
12. ERGONOMICAL RECOMMENDATIONS
Please be careful when carrying the product from one place to another.
Please do not lift the microscope by grabbing the camera arm.
All TAGARNO products are marked with a product label:
Values marked with X varies from product to product and are replaced by specic numbers and letters.
12
Page 13
PRODUCT
MODEL
ART Inspection camera unit
TAGARNO FHD ZIP | Type no.: 600600
MANUFACTURER
NAME TAGARNO A/S
ADRESS Sandøvej 4
ZIPCODE/CITY 8700 Horsens
COUNTRY Denmark
PHONE +45 76251111
DESCRIPTION
TAGARNO A/S hereby declares that the product listed above, consisting of a camera unit
and a 12V power supply, is in compliance with the following European directives:
2006/25/EU Articial Optical Radiation
2014/30/EU Electromagnetic Compatibility
2014/35/EU Low Voltage Directive
By conforming to the following harmonized standards:
IEC 62471:2008
EN 61326-1:2013
IEC 61010-1:2010
Risk Group Exempt
Class A / Industrial Electromagnetic Environment
IECEE CB Scheme Ref. Certif. No. NO103722
THE DECLARATION IS ISSUED BY
MANUFACTURER TAGARNO A/S
TAGARNO A/S
Sandøvej 4
8700 Horsens
Denmark
+45 76251111
www.tagarno.com
13
Page 14

14. COMPLIANCE STATEMENTS
INDUSTRY CANADA COMPLIANCE STATEMENT
CAN ICES-3 (B)/NMB-3(B)
This Class B digital apparatus meets the requirements of the Canadian InterferenceCausing Equipment Regulations.
Cet appareil numérique de la Classe B respecte toutes les exigences du Règlement sur
le Matériel Brouilleur du Canada.
FCC COMPLIANCE STATEMENT (UNITED STATES)
Federal Communications Commission (FCC) Statement
This equipment has been tested and found to comply with the limits for a Class B digital
device, pursuant to part 15 of the FCC Rules.
These limits are designed to provide reasonable protection against harmful interference
in a residential installation.
This equipment generates, uses, and can radiate radio frequency energy and, if not
installed and used in accordance with the instructions, may cause harmful interference
to radio communications. However, there is no guarantee that interference will not occur
in a particular installation.
If this equipment does cause harmful interference to radio or television reception, which
can be determined by turning the equipment off and on, the user is encouraged to try to
correct the interference by one or more of the following measures:
• Reorient or relocate the receiving antenna.
• Increase the separation between the equipment and receiver.
• Connect the equipment into an outlet on a circuit different from that to which the
receiver is connected.
• Consult the dealer or an experienced radio/TV technician for help.
14
 Loading...