

Page 1
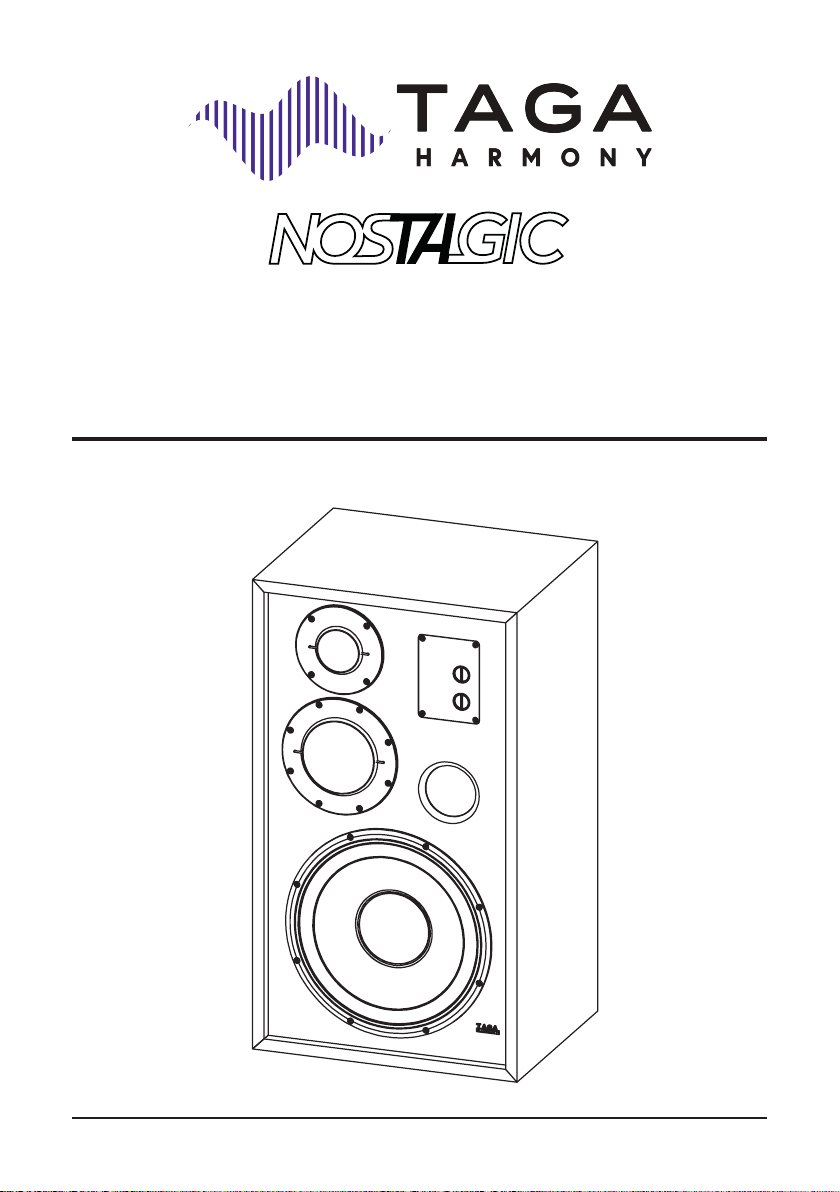
NOSTALGIC
TH-15, TH-12, TH-10, TH-8
HI-FI MONITOR SPEAKERS
Edition 05-2024
Instruction Manual
Page 2

Page 3

Introduction
Congratulations for purchasing TAGA Harmony speakers!
This meticulously crafted speaker is a celebration of the golden age of audio, seamlessly blending
timeless design with cutting-edge acoustic technology.
The NOSTALGIC speaker pays homage to the iconic designs of yesteryear, featuring a vintageinspired cabinet that evokes a sense of nostalgia and sophistication.
The exquisite craftsmanship is evident in every detail, from the beutifully nished enclosure to the
vintage-style grille cloth.
This loudspeaker is not just a piece of audio equipment; it is a work of art that enhances any
room’s aesthetic.
KEY FEATURES
• Vintage-Inspired Design: the timeless look of the loudspeaker adds a touch of elegance to any
space.
• Quality Craftsmanship: each loudspeaker is handcrafted with attention to detail, ensuring
durability and longevity. The 2nd generation of Taga Low Interference Enclosures (TLIE-I), which
walls and internal bracing is made of high-quality, high-density, thick MDF boards to increase
stiffness and limit any unwanted resonances.
• Reference-Performance Audio:
Reference-Performance Tweeter (RPT) designed to deliver the crispest and most detailed
high-frequency response. Crafted with precision and utilizing advanced materials, this tweeter
ensures that every nuance of the music is faithfully reproduced. Audiophiles can expect a
delicate balance between clarity and warmth, making every listening experience a sonic
masterpiece.
Key Features of the Reference-Performance Tweeter:
Precision Diaphragm Material: the tweeter utilizes state-of-the-art diaphragm materials (Titanium-
Magnesium alloy with Polyester surround and 25 mm Aluminium voice coil with CCA wires) to
reproduce high frequencies with unparalleled accuracy.
Optimized Magnet Structure: oversized (85 x 15 mm), advanced magnet design enhances
efciency, ensuring a swift and precise response to audio signals.
Resonance Control Technology: minimizes distortion and enhances purity of sound through
innovative resonance control mechanisms. Flat dome design reduces distortion at higher power
outputs.
Reference-Performance Midrange Driver (RPM) is engineered to be the heart of the
loudspeaker. It reproduces the critical midrange frequencies with exceptional clarity and
articulation, ensuring that vocals and instruments are rendered with lifelike accuracy. This driver
strikes a perfect balance, making it an essential component for audiophiles who demand the
utmost in sonic excellence.
Key Features of the Reference-Performance Midrange Driver:
Optimal Dome Material: carefully selected dome material (Aluminum) and stiff yet exible
Polyester surround ensure a smooth and natural midrange response, capturing the true essence
of recorded sound.
Voice Coil and Magnetic Structure Technology: advanced voice coil (50 mm Aluminium voice coil
with CCA wires) and magnet structure design (135 x 20 mm) enhances efciency and minimizes
distortion, providing a true-to-life reproduction of midrange frequencies.
2
Page 4

Introduction
Reference-Performance Bass Driver (RPB) is engineered with passion and precision to
reproduce low frequencies with exceptional clarity and depth.
Key Features of the Reference-Performance Bass Driver:
Advanced Cone Material: crafted from high-quality materials (Paper-Polyester cone with U type
rubber surround), the woofer cone provides a perfect balance between stiffness and exibility for
articulate bass response.
Powerful Magnet Structure: the woofer features a robust motor structure (based on oversized
magnet and bulged T-Yoke) that ensures optimal control and accuracy, even at high volumes.
Optimized Suspension System: a precisely tuned suspension system ensures controlled cone
movement, reducing distortion and enhancing overall bass performance.
Heat Dissipation Technology: the driver is equipped with effective heat dissipation mechanisms
(Kapton voice coil with OFC wires, oversized top plate) to handle high power levels, ensuring
long-term reliability.
Reference-Performance Crossover is designed to seamlessly blend audio frequencies,
ensuring a smooth and accurate transition between drivers.
This crossover is poised to deliver an audio experience characterized by clarity, balance, and
precision.
Key Features of the Reference-Performance Crossover:
Few-Element Design: the crossover utylizes silver-clad 4N (99.99%) single crystal copper wires
and incorporates just a few elements to divide and route audio signals to the appropriate drivers,
ensuring each frequency range is handled by the most suitable component.
Premium Capacitors and Inductors: crafted with high-quality Polyester capacitors and upgraded
inductors, the crossover minimizes signal distortion, allowing for the faithful reproduction of audio
signals.
Low-Resistance Circuitry: the low-resistance circuit design minimizes signal loss, preserving the
integrity of the audio signal and maximizing efciency.
• Tweeter and Midrange Frequency Level Adjustment
Users can adjust the level of both the tweeter and midrange drivers relative to the bass driver,
selecting one of three settings: -3dB, 0dB, 3dB, enabling to achieve the desired tonal balance for
unique listening preferences.
• Premium Speaker Binding Posts
They ensure optimal conductivity and resistance to corrosion for long-lasting, pristine audio
quality.
• Front Bassreex Port
It is strategically positioned on the front of the speaker enclosure. This design choice maximizes
placement exibility while maintaining optimal low-frequency performance.
• Dedicated Speaker Stands (only NOSTALGIC TH-15, NOSTALGIC TH-12)
The NOSTALGIC TH-15 and NOSTALGIC TH-12 are provided with dedicated speaker stands,
which are very heavy and ultra-rigid, providing almost perfect isolatation of speakers from the
oor, increasing the transparency of sound and providing better denition and the basis for the
bass. The stand is tilted backwards at 5 degrees to time-align all the drivers and to further limit
unwanted resonances and turbulences.
3
Page 5

Introduction
CABINET CARE
Great care and craftsmanship has gone into the construction and nish of the cabinet.
Periodically use a soft, dry cloth to remove dust or ngerprints. Do not use strong chemical
cleaners, paper towels or other abrasive materials as it may damage the nish.
IMPORTANT REMARKS
An exclamation mark in a triangle is intended to alert the user to the presence
of important operating and maintenance (servicing) instructions in the literature
accompanying the appliance.
Please read this instruction manual carefully before installation and keep it for future reference.
• If not clearly specied otherwise in the product specications (available on the
www.tagaharmony.com website), these speakers are intended for indoor use only.
• Please do not dismantle any parts of the speakers as this may void your warranty – servicing
should be done only by a qualied TAGA Harmony repair center.
• During connecting the speakers make sure to power off your amplier(receiver) or other
source.
• Make sure that all connections are done according to this manual and a manual provided with
your amplier(receiver).
• Make sure that your amplier(receiver) has suitable output power and a working impedance
compatible with the speakers. Using an unsuitable amplier(receiver) may damage the
speakers and/or amplier(receiver) and may void your warranty.
The speakers may be damaged by too powerful amplier(receiver) [too high output power] as
well as by an underpowered amplier(receiver) [distortions of sound].
• Do not use high volume levels for a long time – this may damage the speakers and void your
warranty.
• When switching on and off your amplier(receiver), turn down the volume to avoid strong
electrical impact to be delivered to the speakers.
• Avoid positioning the speakers too near to a traditional TV set – these speakers are not
magnetically shielded.
• Position the speakers in ventilated and dry atmosphere and do not expose them to sun or
other heat sources.
• Position the speakers and stands on a stable and hard surface.
• Never drag the speakers / stands to move them, as this can damage the speakers / stands.
Always lift the speakers / stands and carry them to a new location.
• When the speakers are not operating, cover them with protective grills.
• The speakers (especially mounted on stands) have a high center of gravity and may become
unstable and fall over during earthquakes, when rocked or improperly positioned.
As safety precautions to avoid tip-over of speakers and stands we recommend to anchor them
to the wall or other permanent construction.
Note! Wall anchoring devices have to be purchased separately and are not delivered with
your speaker.
Specications and the latest instruction manual edition
Full technical specications and the latest edition of the instruction manual are available on
www.TagaHarmony.com
4
Page 6
Contents
Unpacking the speakers and stands 5
Placement 7
Hooking up the wires 9
Final adjustments 11
Unpacking the speakers and stands
PACKAGING WARNING
The packaging may contain elements such as plastic, that should be kept away from small
children.
The thin foil or small elements can stick to the nose and mouth, or may be swallowed and
prevent breathing.
If you notice any damages in transportation, report it immediately to your dealer.
Keep the speaker carton for future use.
The NOSTALGIC TH-15 and NOSTALGIC TH-12 speakers are sold with dedicated speaker stands.
Note! The NOSTALGIC TH-10 and NOSTALGIC TH-8 are sold without speaker stands.
Each speaker and stand is packed in separate packaging.
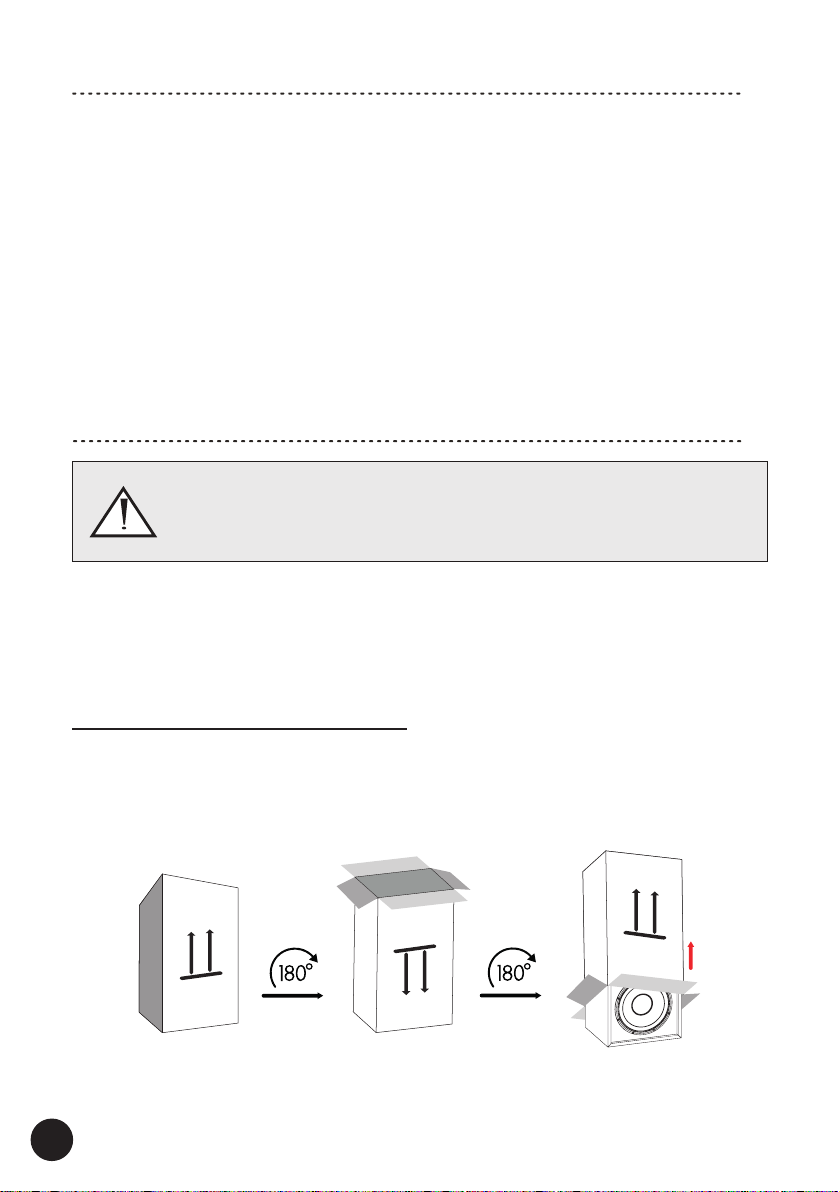
Speakers - open packaging from the bottom
1. Place the carton with the speaker on the oor in the upside down position and open it from the
bottom, remove the protective bag.
2. Carefully turn the carton with the speaker upside down.
3. When the speaker is securely placed on the oor, remove the carton and internal packaging -
your speaker is ready for placement in the room or on the stand.
5
Page 7
Unpacking the speakers and stands
Install protective rubber pads on the bottom of the speaker
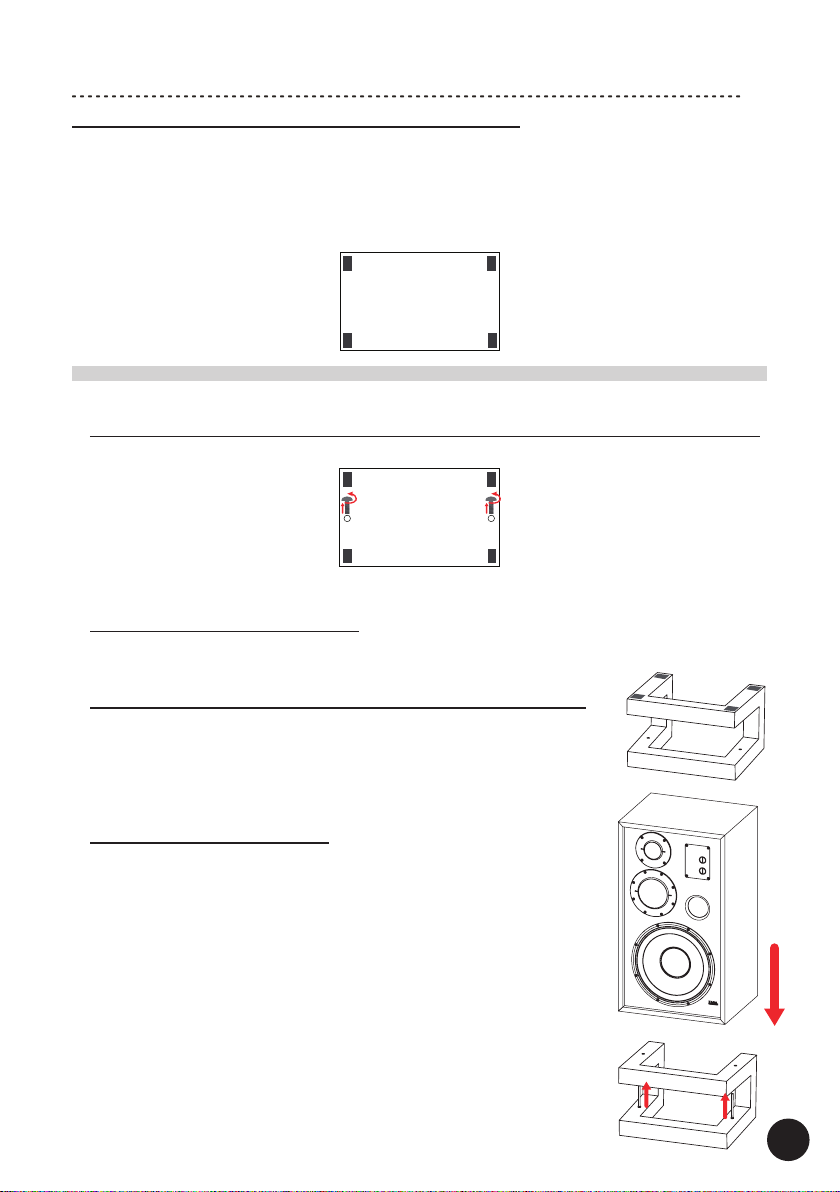
To protect the speaker and the surface it will be put on, we recommend installing 4 pieces of
supplied self-adhesive protective rubber pads on the bottom of the speaker cabinet as shown in
the gure.
Note for NOSTALGIC TH-15 and NOSTALGIC TH-12!
Both models differ in size, which should be considered when planning the placement of the pads
to t the speaker stand - the pads should be located within the outline of the upper frame of the
speaker stand.
NOSTALGIC TH-15, NOSTALGIC TH-12 - SPEAKER STAND
Note! Installation tools are not provided with this product.
1. Remove the bolts securing the mounting threaded sockets on the bottom of the speaker
Remove 2 bolts as shown in the gure.
Sockets placement may vary on the model.
2. Speaker stands - open from the top
Place the carton with the stands on the oor open it from the top, take out the stands and
remove the protective bag.
3. Install protective rubber pads on the bottom of the speaker stand
Place each speaker stand with its bottom facing up - the frame in this
part has no holes.
To protect the oor, we recommend installing 4 pieces (the set includes
8 pieces) of supplied self-adhesive protective rubber pads on the bottom
of the frame of each speaker stand as shown in the gure.
BOTTOM
4. Attach the speaker to the stand
Turn the speaker stand around to its normal position - the frame in this
parts has 2 installation holes.
Each stand is provided with 2 pieces (the set includes 4 pieces) of bolts
to use with the mounting threaded sockets located on the bottom of each
speaker.
To avoid the speaker tipping off the stand, we recommend to attaching
the speaker to the stand using the provided bolts.
Place the speaker on the stand in the position that the speaker sockets
will be aligned with the installation holes on the stand and screw in the
bolts as shown in the gure.
TOP
6
Page 8
Placement
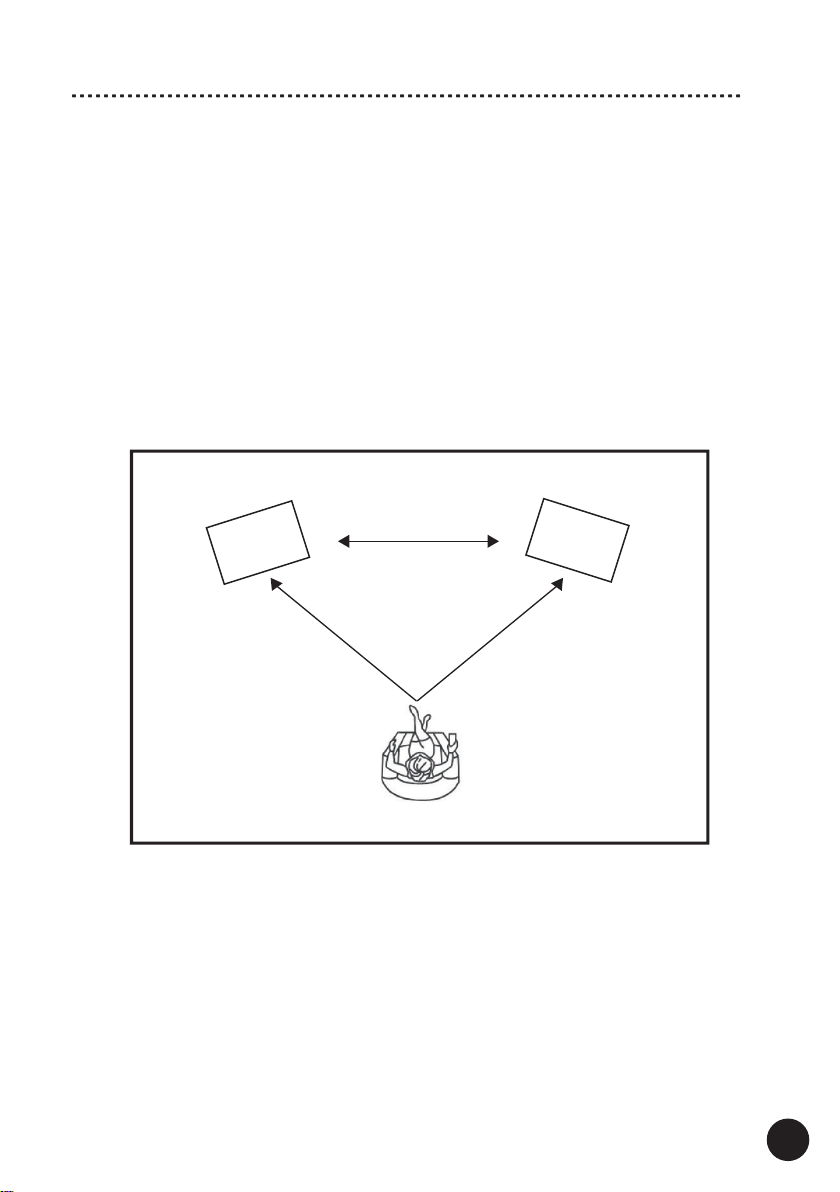
Before deciding where to place the speakers, search for the best location in your room, keep in
mind the following rules and base on the gure on this page as a guide:
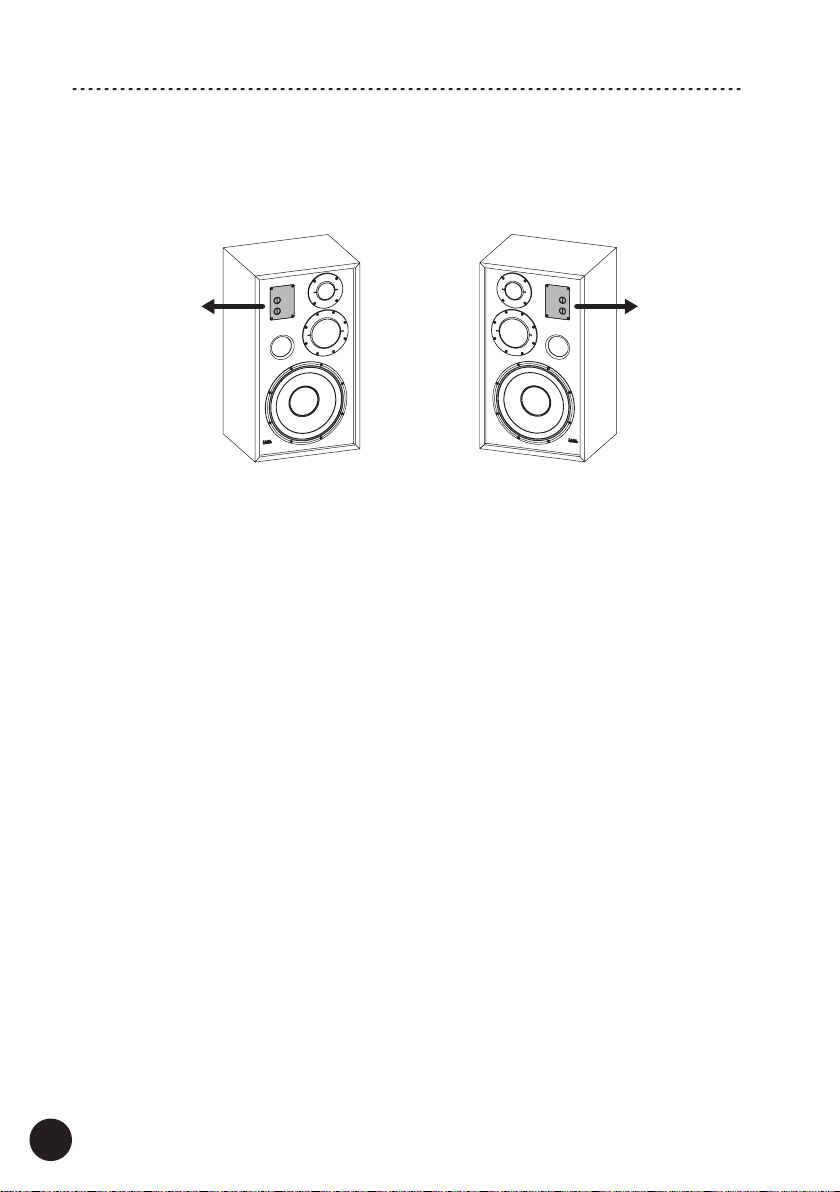
Note! Each speaker is intended for different channel.
When positioning the speaker, we recommend that the Level Adjustment Panel located on the
speaker front, faces outwards (not towards the second speaker) as shown in the below gure.
7
Page 9
Placement
• For the best results, place the speakers 150 -250 cm (5 – 8 feet) apart from each other and
this distance should be around ¾ of the distance from your listening position to the front line of
speakers.
• Keep the tweeters approximately at the ear level while seated.
• Twisting the speakers a little inward towards the listening position may give a more spacious
and realistic soundstage.
• Placing the speakers near a corner or back wall will tend to increase their bass output, but may
result in “boomy” or “muddy” sound.
• Placing the speakers further into the room will tend to decrease their bass output, but may
result in improved articulation and clarity.
• Place the speakers at least 60 cm (2 feet) away from corners and other surfaces which may
interfere or reect sound (like tall furniture).
• We suggest to experiment with speakers placement to achieve the best bass level and stereo
imaging in your room.
See the below example of speakers placement in Stereo systems
Left
Speaker
3/4 x
xx
Listening Position
Listening Position
Right
Speaker
8
Page 10
Hooking up Speaker Cables
Each speaker connector (binding post) can accommodate up to 10 AWG bare speaker cable.
It is recommended to leave about 150 cm (5 feet) of extra cable at the speaker end to facilitate
positioning and installation of the speaker.
Speaker connectors accept most popular types of plugs (banana plugs, spades plugs etc.).
Do not use staples, nails or other metal objects to secure the speaker cables.
You will get the best sound quality and least amount of hum by keeping the speaker cables away
from other electrical wires and cables.
Note! Consult your local TAGA Harmony dealer for further information about speaker cables and
connection options.
Connecting speaker cables
During connecting the speakers make sure to power off your amplier(receiver) or
other source.
Polarity
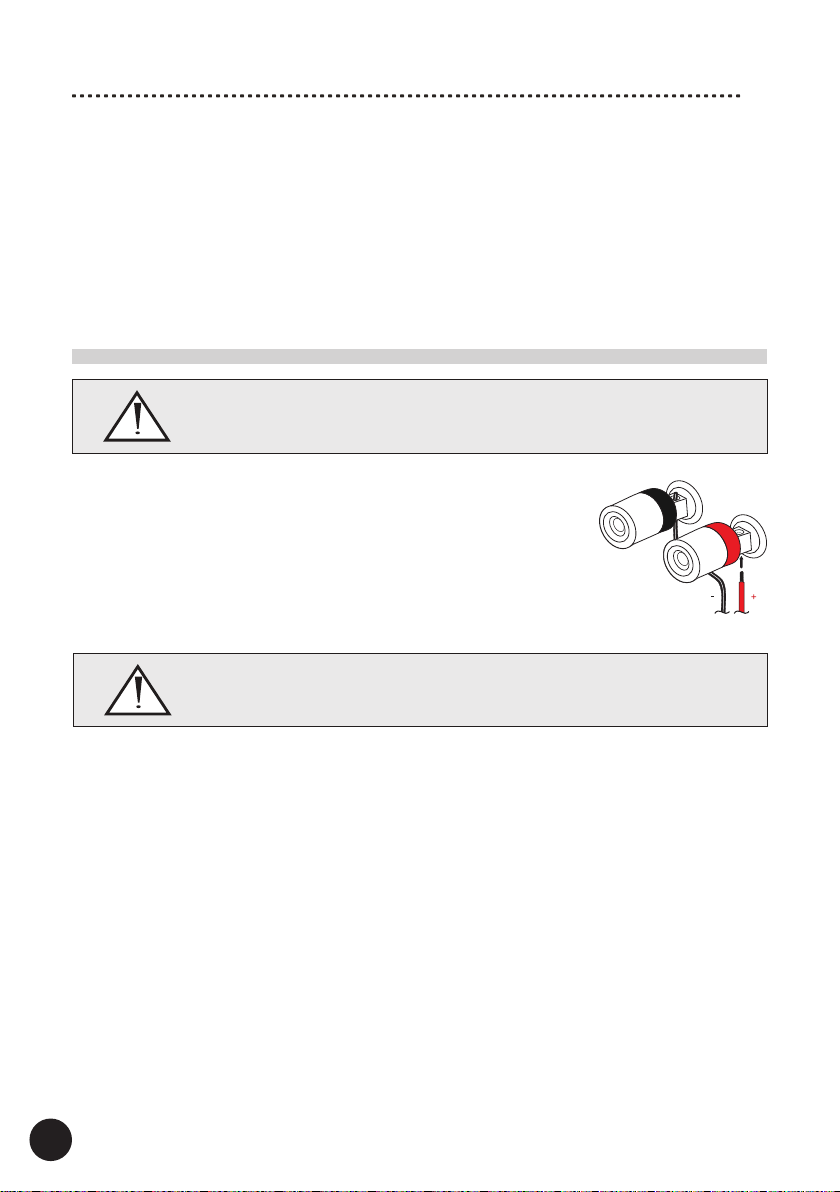
The speakers utilize color coded connectors.
The RED coded connector is + , the BLACK coded is connector is –
(some connectors may have additional + and – marking).
Pay attention to connecting the polarity of the speaker correctly with the
amplier speaker output connectors (connect RED + with RED + and
BLACK – with BLACK -).
Please refer to your amplier(receiver) instruction manual for more
information.
Make sure to avoid short-circuit of RED(+) and BLACK(-) speaker connectors – this
may damage the speakers and/or amplier(receiver) and may void your warranty.
BLACK -
RED +
Speaker Cable
9
Page 11
Hooking up Speaker Cables
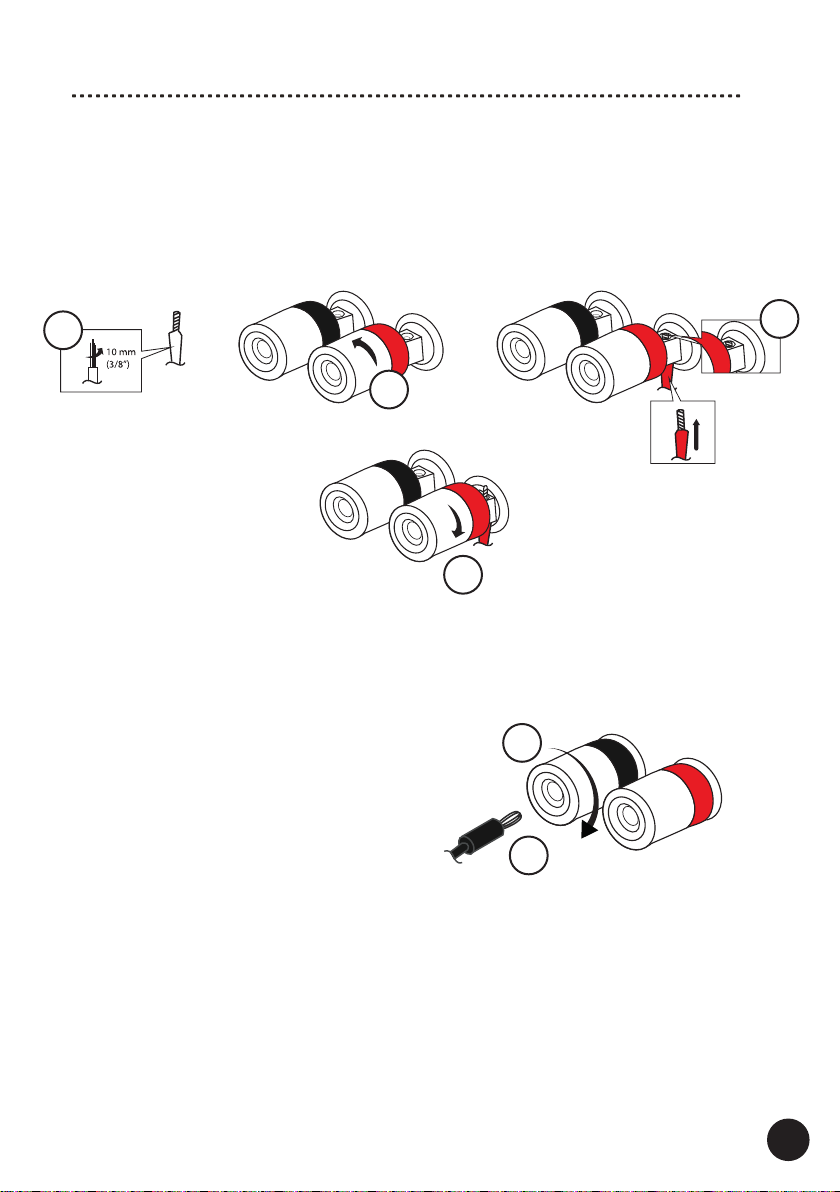
Connecting bare speaker cables (without plugs)
Speaker cables have 2 conductors. Each conductor should be connected to a separate speaker
connector - mind the polarity while connecting.
For each conductor:
1. Remove approximately 10 mm (3/8”) of insulation from the end of the conductor.
Twist the bare wires rmly together.
2. Loosen the speaker connector.
3. Insert the bare wires of the conductor into the gap of the speaker connector.
4. Tighten the speaker connector.
1
2
4
Connecting via banana plug
Mind the polarity while connecting.
BLACK -
RED +
3
Note! An insert hole for the banana plug in some speaker connectors maybe secured with a
plastic plug - make sure to remove this plastic plug before inserting the banana plug.
1. Tighten the speaker connector.
2. Insert the banana plug into the end of
the corresponding connector.
1
Banana plug
BLACK -
2
RED +
10
Page 12
Final adjustments
After you have your speakers positioned in the room, correctly connected and your audio system
properly set up, you can start doing nal adjustments.
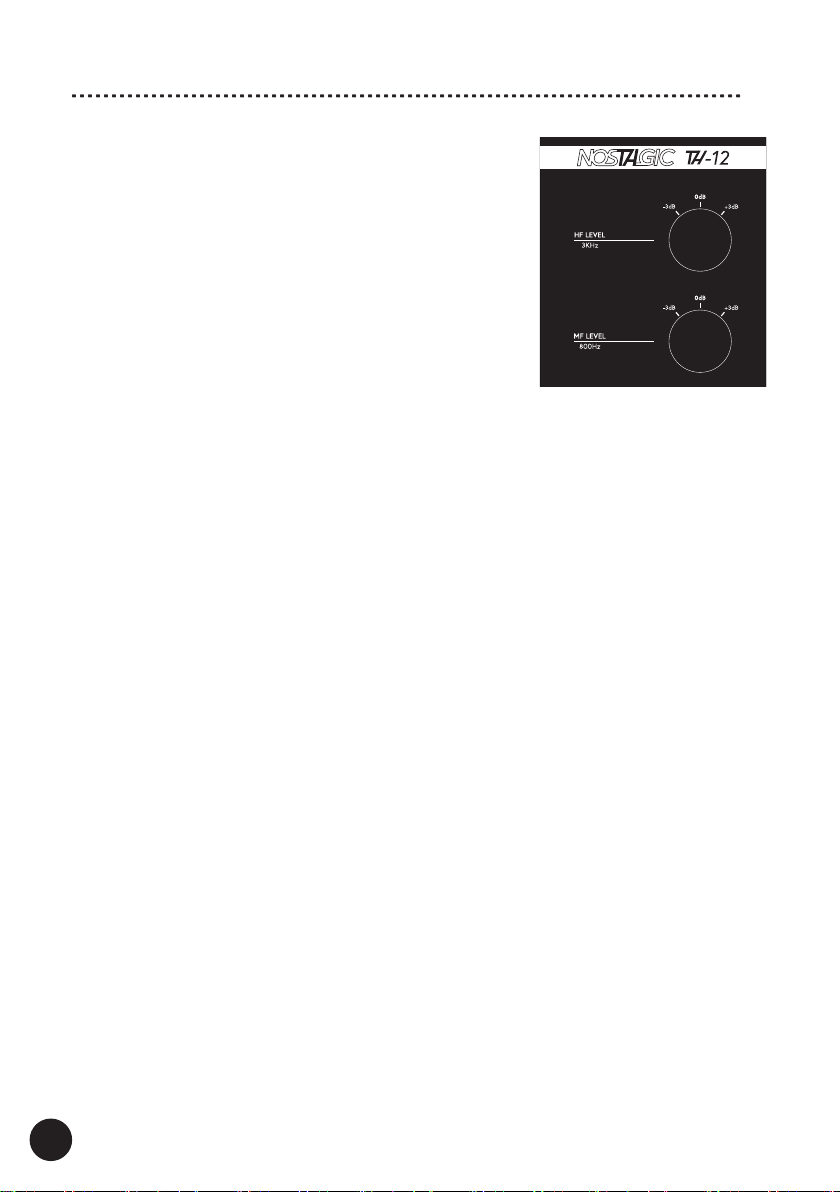
Tweeter and Midrange Frequency Level Adjustment
For each speaker, you can adjust the level of both the tweeter
(3kHz) and midrange (800Hz) drivers relative to the bass driver,
selecting one of three settings: -3dB, 0dB, 3dB, enabling to
achieve the desired tonal balance for unique listening
preferences.
0dB : the default position, the level is not changed.
-3dB : the level is lowered by 3dB.
+3dB : the level is increased by 3dB.
Note! We recommend to test different settings one more time
after the break-in period is over.
/NOSTALGIC TH-12 control panel shown/
Break-In
TAGA Harmony speakers sound great immediately after they are taken out of the carton.
Start listening to music at moderate volume levels to break in the speakers.
The speakers will sound even better after approximately 3-50 hours of play.
Sound
Start playing your favorite music. You should hear balanced audio reproduction across the entire
frequency spectrum. If otherwise then check all wiring connections or consult your local TAGA
Harmony dealer. In stereo systems the amount of bass and the stereo-image quality will be
affected by a number of different factors, including your room’s size and shape, and the position of
the speakers in the room. Listen to a variety of music selections and note the bass level. If there is
too much bass, move the speakers away from the nearby walls. If there is not enough bass move
the speakers closer to the nearby walls. For a better stereo image – experiment with positioning
speakers relative to each other and relative to your listening position.
11
Page 13
We strongly advise to contact a professional installer or dealer in order to install
TAGA Harmony products.
We recommend using high quality TAGA Harmony cables and other installation
accessories.
EU declaration of conformity
As its manufacturer, hereby we declare that the product is in compliance with the
Your product is marked with the symbol shown on the left.
following EU directives and regulations:
CE: 2014/30/EU (EMC) & 2015/863/EU (RoHS)
The full text of the EU declaration of conformity is available from the
manufacturer.
Disposal of the product
www.TagaHarmony.com
Disposal of old electrical & electronic equipment
(applicable in the European Union and other countries with separate
This symbol on the product or on its literature and packaging indicates that this
product shall not be treated as household waste. Instead it shall be handed over
to the appropriate collection point for the recycling of electrical and electronic
equipment. By ensuring that this product is disposed of correctly, you will help
to prevent potential negative consequences for the environment and human
health, which could be caused by inappropriate waste handling of this product.
The recycling of materials will help to conserve natural resources. For more
detailed information about recycling of this product, please contact your local
government ofce, your household waste disposal service or the shop where
POLPAK POLAND Sp. z o.o.
AL.JEROZOLIMSKIE 331A
05-816 REGUŁY k/WARSZAWY, POLAND
Email: [email protected]
collection systems)
you purchased the product.
TAGA EUROPE
Page 14

Notes
Page 15

Notes
Page 16

Notes
 Loading...