

TAG illico User Manual

Route de Lavérune
Montée du Terral
34430 Saint Jean de Védas
FRANCE
Tel : +33 (0)4 67 27 43 05
Fax : +33 (0)4 67 27 85 64
contact@tag-fr.com
www.tag-fr.com
Techniques Audio Groupe
USER’S MANUAL

2
ILLICO User’s Manual
ILLICO User’s Manual
3
SUMMARY
SUMMARY
INTRODUCTION
INTRODUCTION Page 3
ADVICE FOR A GOOD USE
ADVICE FOR A GOOD USE Page 3
BASIC EQUIPMENT
BASIC EQUIPMENT Page 4
- MIXABLE INPUTS Page 4
-
TONE ADJUSTMENTS Page 4
-
LINE OUTPUT, SPEAK OUTPUT Page 4
- BATTERY Page 5
-
CONTROL LEDS Page 5
-
POWER SUPPLY INPUT Page 5
OPTIONS
OPTIONS Page 6
- WIRELESS RECEIVERS Page 6
- HANDHELD MIC/TRANSMITTERS Pages 7-8
- BELT TRANSMITTERS Pages 9-11
- CHARGERS AND TRIPOD STAND Page 11
- PLAYERS Pages 12 - 21
TECHNICAL DATA OF
TECHNICAL DATA OF
ILLICO
ILLICO Page 22
NOTES
NOTES Pages 23-24
INTRODUCTION
INTRODUCTION
Thank you for choosing ILLICO. To ensure the best performance and get the maximum life out of
the equipment, we recommend that you read this manual carefully.
ILLICO is a 70-watt battery powered PA system which delivers premium performance and excellent return on investment. Offering up to six hours continuous use Illico is always ready to work
and in addition very easy to install. The mixer features 1 MIC/Line input and a 3-bands EQ. It is
possible to choose between a VHF or UHF non diversity or UHF true diversity wireless module.
Furthermore, the front panel design allows integrating 1 CD/Digital player or Digital recorder. The
optional passive annex cabinet SP-265 makes it possible to multiply the acoustic power.
ADVICE FOR A GOOD USE
ADVICE FOR A GOOD USE
The exclamation point inside an equilateral triangle indicates the existence of internal
components whose substitution may effect safety. Also indicates important operating
instructions.
The lightning and arrowhead symbol warns about the presence of uninsulated dangerours voltage. To reduce the risk of electric shock, do not remove the cover. Refer servicing to qualified personnel.
3 Charge the sound system before use.
3 Do not use the sound system in a humid or dusty place, or near any heat sources such as radia-
tors, heat registers, neither under the sun or at very low temperatures.
3 Place the sound system in a ventilated place.
3 Be careful when moving this unit in order not to damage the electronics.
3 Carry the sound system with caution.
3 Do not forget to decrease the volume switch before turning off the sound system.
3 Handle the control switches carefully.
3 Clean the sound system regularly.
3 Keep the carton in case of return.Transport will be safe and without any risk of damage.

4
ILLICO User’s Manual
BATTERY
ILLICO is equipped with a lead 9Ah / 12V lead battery making lots of loadings and unloadings
possible. When connected on AC main the sound system can work without time limit, while charging. Minimum autonomy: 3 hours, maximum: 6 hours.
It is a battery drawer allowing quick and easy replacement if necessary. To do so, unlock the two
screws and disconnect the two power threads while respecting the polarity.
CONTROL LEDS
3 GREEN LED "ON":
- The equipment is ready to work
- The battery is loaded
3 RED LED "UNLOADED BATTERY":
- Battery has reached its time limit. Estimated working time left: from 5 and 20 minutes depending on working options
- If you have to use the equipment longer than the estimated time connect on AC main. No
working time limit, the battery is loading simultaneously.
3ORANGE LED "CHARGER":
- ILLICO under power, switch “ ON ”
- The internal automatic charger will increase battery tension up to its highest level +/- 13 V.
POWER SUPPLY INPUT
12 Volts power supply input. Allows working on AC main and battery loading of ILLICO.
It is recommended to use the provided cable for recharge.
NEVER STOCK THE EQUIPMENT WITHOUT HAVING RELOADED IT. It is recommended to switch of the equipment while loading to ensure a full battery recharge.
LL
CAUTION: BATTERY LOADING
ILLICO User’s Manual
5
BASIC EQUIPMENT
BASIC EQUIPMENT
2 MIC OR/AND LINE MIXABLE INPUTS
ILLICO is equipped with 1 balanced MIC control input on Jack 6,35 and 1
RCA Line control input.. The input selection is automatic. If both inputs are
connected, you can use them simultaneously
TONE ADJUSTMENTS
The ILLICO is equipped with 3 highly performing tone adjustments.
1 bass frequency tone control on 100 Hz with +/- 12 dB efficiency.
1 treble frequency tone control on 10000 Hz with +/- 12 dB efficiency.
1 voice adjustment especially designed for use in medium frequency which allows for a
sharp increase of voice presence on the mic inputs.
LINE OUTPUT
The ILLICO is equipped with 1 RCA line output enabling connection to another ILLICO
or to any other sound system. You just have to connect the ILLICO Line out to the Line In
of the selected equipment.
SPEAK OUTPUT
ILLICO is equipped with an amplified jack output (diameter: 6,35) for potential use with
another passive speaker, ref: SP-265, signal cable: CH15.
NEVER CONNECT a 4 OHMS SPEAKER: THIS COULD DAMAGE THE ILLICO’S AMPLIFIER.
Jack cabling: you MUST use mono jack, + on the TIP, - on the RING.
To avoid the larsen effect when you switch on mics, do not turn the gain if you are not
far from ILLICO. ADVICE : We strongly recommend that you switch off the mic,
adjust the volume of the ILLICO to the desired volume, then be a few meters away
before switching on the mic again.
LL
CAUTION : MIC Adjustment
ILLICO User’s Manual
7
6
ILLICO User’s Manual
OPTIONS ILLICO
OPTIONS ILLICO
WIRELESS SYSTEM VHF OR UHF
The cabinet can be equipped with one wireless system. It can be chosen between a VHF single frequency receiver (non diversity), a UHF 16 frequency receiver (non diversity) and a UHF 16 frequency receiver (true diversity).
Technical caracteristics of receiver R-300M
VHF receiver, Non Diversity
3 Volume button:
Seperate volume control for the wireless system.
3 Switch on the handheld microphone/beltpack transmitter:
The LED is lightning when the VHF link between transmitter and receiver is ok.
Technical caracteristics of receiver SDR-500M
UHF receiver, True Diversity, with Pilotone.
3 Volume button:
Seperate volume control for the wireless system.
3 Switch on the handheld microphone/beltpack transmitter:
The LED is lightning when the UHF link between transmitter and receiver is
ok. Channel can be changed with the switch located near the volume control.
RECEIVER SDR-6216M
Technical caracteristics of receiver SDR-6216M
UHF receiver, True Diversity, with Pilotone.
3 Switch on the receiver:
The switch on the right is power switch and
volume control
3 Switch on the handheld microphone/beltpack transmitter:
The LEDS A and B are lightning when the UHF link between transmitter and receiver is ok.
Channel can be changed with the switch on the left side.
On/Off + Volume
Selection of the channel
LED A et B
VHF OR UHF HANDHELD MICROPHONE TRANSMITTER
Corresponding to the wireless system the Microphone has to be a VHF or UHF Microphone
Transmitter.
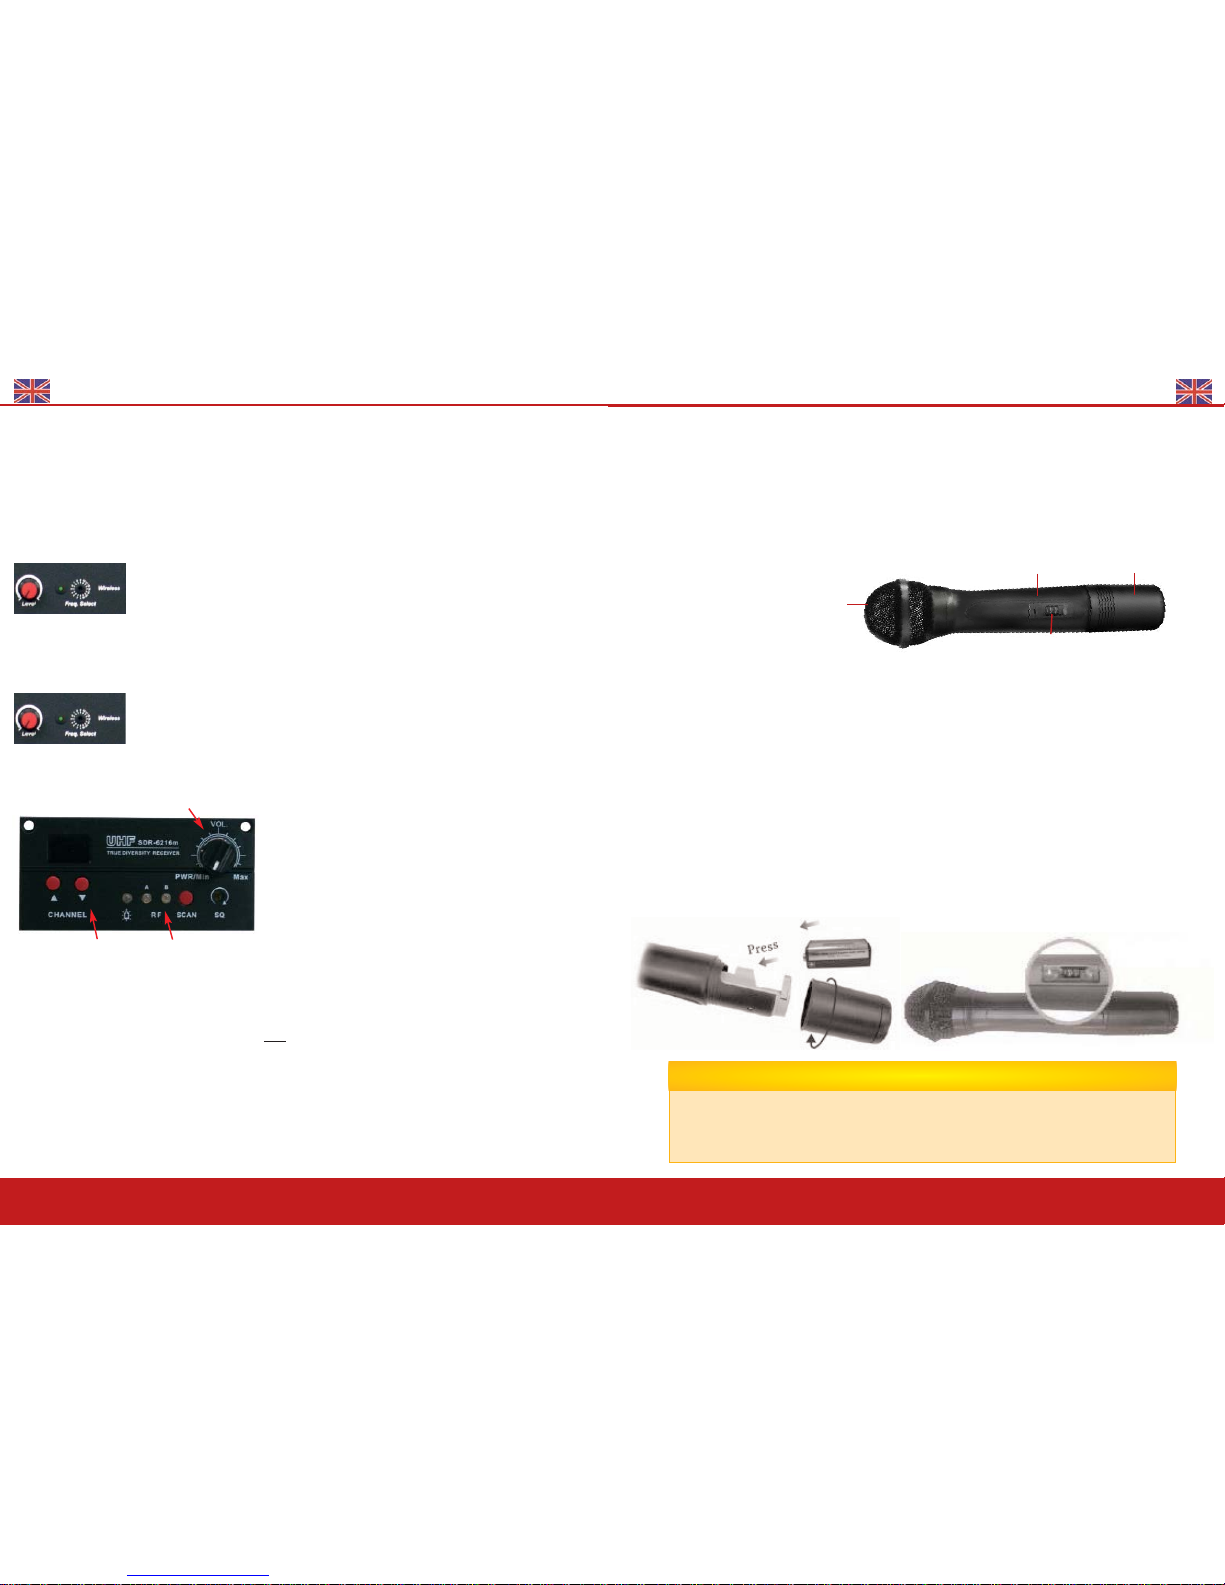
HANDHELD MICROPHONE TRANSMITTER Q-1002 (VHF)
The microphone is equipped with 1 frequency
1. Microphone capsule
2. Battery status - LED indicator
3. Battery compartment
4.Power switch (ON/OFF)
Battery Installation
Q-1002 uses 1 piece of 9V battery. To install new or replace the old battery, First unscrew the
battery cap from the battery compartment, then insert the new battery according to its correct
polarity as indicated. For longer operation hour, Alkaline battery is recommended!
After putting the battery cover back to the housing , slide the switch to "ON" position as shown
below.
As soon as the power is on, the battery-status indicator will give flash, indicating a normal operation. If there is no flash, it indicates either power supply is not available or battery is
installed wrongly.
After switching on, the therefore signal indicator LED(s) of matching receiver will light up, indicating the microphone signal transmission is in normal operation.
Switch off the power when the microphone is not in use, meanwhile, remove the battery out of
microphone if it is not to be used for an extended period.
slide to “ON”
position
For longer operation hour, Alkaline battery is recommended! Wrong batteries can
damage the microphone functions. Check battery status. Many batteries are known
to have leakage problem of conductive and corrosive liquid. Remove the batteries if
you do not plan to use the microphone for a few days.
LL
CAUTION: BATTERY
2
1
3
4
 Loading...