

Page 1

Yakuza OLED Series
Droid & Cyborg 07 Board
1. Features
2. Installation
3. Board Operation
4. OLED Diagrams
5. Menu System
6. Settings
7. Recommendations
FEATURES
• Fully functional in the MacDev Droid and Cyborg 07
• Yakuza Series OLED graphical display system shows eye status, battery li f e, curre nt fi re mode and max
rate of fire, game timer, and menu system
• Includes super thin Stinger grip panels with a window for the OLED display
• Advanced microcontroller running at 16 Mhz
• Fully legal in the NPPL, PSP, and Millennium tournament series
• Anti-breech bounce software to reduce chopping when a loader is running out of paintballs
• RF socket and wiring harness included to support Magna, Pulse, and other RF transmitters
• Multiple modes of fire: unlimited semi-automatic, adjustable semi-automatic, PSP ramping, PSP 3-round
burst, NXL full-automatic, Millennium, custom ramping, auto-response, 3-round burst, and full-automatic
• Tadao trigger logic asynchronously monitors the trigger switch, using an interrupt based scan at 4 million
times per second for the quickest response time and fastest semi-automatic
• Tadao dynamic eye logic watches for the bolt to return every shot, cycling the marker as fast as possible
• Rate of fire adjustable from 10 to 30 bps, plus unlimited rate of fire, and a 0.5 ms fine-tuning setting
• Adjustable ABS programming eliminates first shot drop-off
• AMB (anti-mechanical bounce) and CPF (cycle percentage filter) algorithms help to prevent mechanical
and switch bounce without missing real trigger pulls
• G-mode setting allows 3 different breakout options for every fire mode
• More than 1 billion unique ways to adjust settings
• Extremely easy to use graphical and text based menu system, which allows changes to nearly any variable,
including debounce, dwell, loader delay, AMB, anti-bolt stick, fire mode, max rate of fire, fine rate of fire
adjustment, eye mode, CPF, g-mode breakout, ramp start, ramp percentage, screen settings, settings
profiles, and more
• All settings are stored in non-volatile memory so they are not lost when the battery is disconnected
• Power-efficient software and hardware lengthen battery life
• One-touch startup enables the marker to fire almost instantly
• Uses spring battery contacts so there’s no wiring harness to break or wear out
• 80 gram trigger microswitch
Lifetime warranty against manufacturing defects
•
• Free Yakuza software updates
INSTALLATION
Installation of the Yakuza board must be carefully done to avoid damaging the electronics or wiring harnesses. Your
Yakuza board replaces the trigger switch harness completely, since it is mounted on the board. Additionally, the
power switch harness must also be removed, since the Yakuza board uses spring battery contacts.
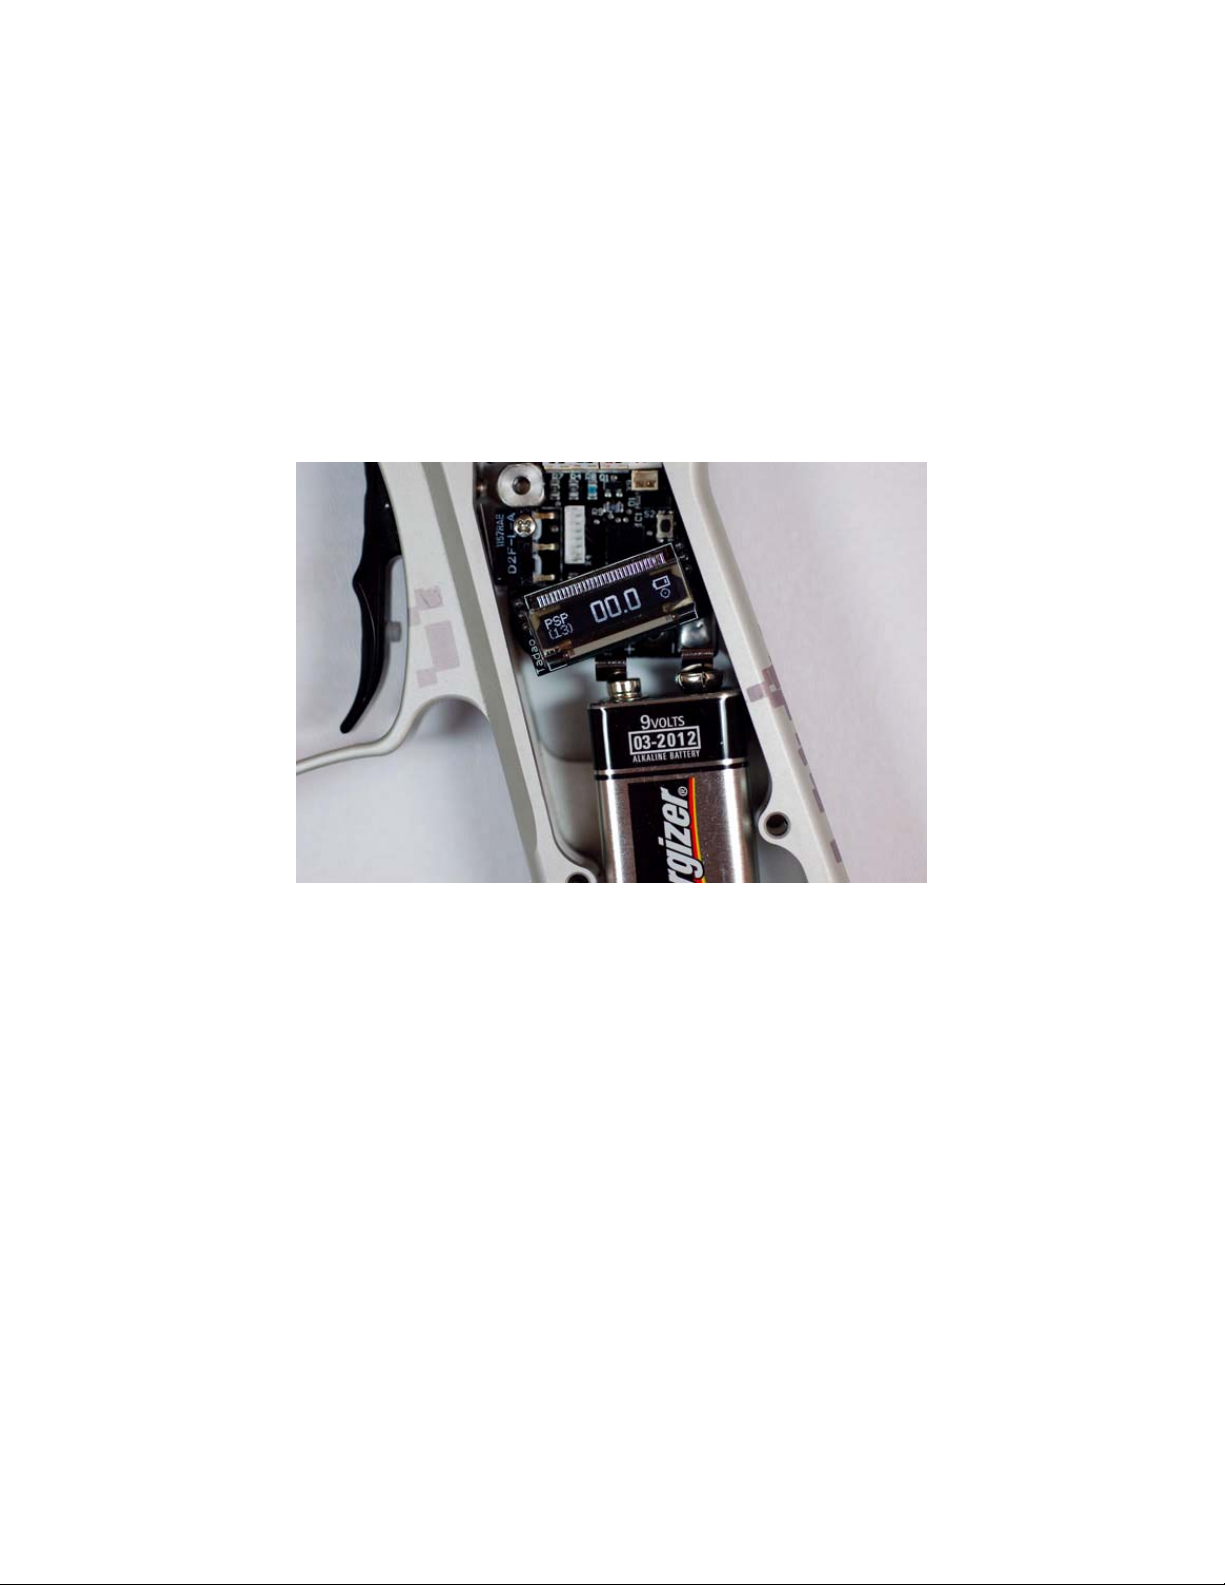
1. Remove the grip panels from both sides of the grip frame, exposing the battery and circuit board.
2. Remove the battery and unplug the eye, trigger switch, solenoid, and power harnesses.
3. Remove the mounting screw.
4. Gently pull the stock board out of the frame.
5. Remove the front and rear frame screws and gently pull the frame away f rom the gun body, making sure
not to pinch or yank the eye wiring.
Page 2
6. Remove the original power switch by unscrewing the two mounting screws. Install the new power switch
included with your Yakuza board.
7. Gently place the grip frame back on the gun body, making sure to route the eye harness and new power
switch harness carefully.
8. Remove the OLED module from the Yakuza board. It has two connectors, one on each side. Make sure to
grasp the entire OLED circuit board, and gently pull it away from the main board. This will facilitate
installation into the frame.
9. Insert the Yakuza main board into the grip frame, securing it with the original board mounting screw, plus
the included longer trigger switch screw.
10. The sockets are all labeled on the backside of the Yakuza board. Plug in the emitter, receiver, solenoid, and
new power harness into their appropriate sockets.
11. Plug the OLED board back into the main board. Make sure to line the connectors up properly and press
down until it is flush with the side of the grip frame.
12. Replace the battery. The positive terminal is towards the front of the frame, as shown by the + and – marks
on the surface of the board.
13. Replace the grip panels.
Completed installation of board and battery:
BOARD OPERATION
Turn on the board by sliding the power switch to the on position. The OLED display will show the boot screen,
followed by the main screen with the current fire mode, rate of fire, battery, and eye status visible.
Turn off the board by sliding the power switch to the off position. The OLED display will turn off to indicate the
board has shut down.
The eye system is toggled on and off by pulling and holding the trigger for 3 seconds. The OLED display will
reflect the eye status by changing the eye indicator.
If used, the eye system cycles the marker as fast as possible. During each shot the eyes watch for the bolt to return,
ending the current firing cycle and starting another as quickly as the pneumatics allow. If the eye system is
continually blocked (e.g., putting your finger in front of the eyes) and is unable to see the bolt return after every
shot, the max rate of fire will be reduced to about 8 balls per second to prevent further chopping, and the OLED
display will display an eye malfunction. Firing the marker with paint and air will utilize the eye system correctly,
maximizing the rate of fire.
The programming menu system is activated by holding down the trigger while pressing turning the board on . The
OLED display will show “Menu system initiated….” Further details regarding the menu system can be found
below.
If selected in the menu system, the game timer will replace the current rate of fire indicator on the OLED display.
The game timer will start to count down on the first trigger pull after the board is turned on.
Page 3

OLED DIAGRAMS
The OLED display built into the Yakuza series board shows the user a multitude of information via text and icons.
The software is written with performance in mind, and will not update the screen until the user stops shooting for
just a fraction of a second. This ensures that screen updates do not interfere with the timings of the marker.
Main screen showing rate of fire: Main screen showing game timer (when enabled):
The battery indicator shows battery life by displaying bars within the icon. The more bars, the higher the battery
level. A low battery (1 bar) is reached at approximately 7.5 volts, but if quality alkaline batteries are used, the
remaining power should be adequate for at least 1 more case of paint.
The eye indicator is displayed as a circular icon, showing the eye status. If the eye system has a malfunction from
not seeing the bolt return, it will show a circle with an X.
Empty breech: Eyes blocked:
Eye malfunction, bolt not seen returning: Eyes off:
MENU SYSTEM
The Yakuza menu system allows the user to quickly and easily change a multitude of settings. The text based menu
is much faster and easier to understand than LED based programming modes.
Tournament lock: The tournament lock can be toggled on and off by pressing the small switch located beside the
battery on the surface of the board while the board is on. Each press will disable or enable the tournament lock, and
display the lock status on the OLED screen.
Programming mode: To boot into programming mode the tournament lock must be off. The user can then hold
down the trigger while turning on the board to boot into programming mode. After the menu boot message, the
displayed setting will be the last one that was modified. If this is the first time the board has been booted into the
menu system, it will show the fire mode.
Scroll through the settings by pulling and releasing the trigger. The menu will wrap around to the beginning when
the last setting is reached.
To change a specific setting the user must pull and hold the trigger. The OLED screen will reflect this by displaying
“hold” on the top line. Once the trigger has been held long enough, the screen will display “set” in front of the
current value. The setting can be modified at this point by pulling and releasing the trigger quickly, which will
advance the current value. Once you reach its maximum or last value, it will loop back to the lowest value. After
the desired value is displayed, you can save the setting by pulling and holding the trigger. “Hold” will be displayed
on the top line of the display until the trigger has been pulled long enough. Once saved, the “set” designation next
to the value will disappear.
Example to change the maximum rate of fire from 15 to 20:
1. Boot into programming mode by holding the trigger while pressing the power switch.
2. The first setting is fire mode:
3. Pull and release the trigger 1 time to advance to the next setting, which is the maximum rate of fire:
4. Pull and hold the trigger until the “Hold” designation disappears. The OLED screen will display the “set”
designation next to the current value for maximum rate of fire:
Page 4

5. Pull and release the trigger 5 times to increment the value from 15 to 20:
6. Pull and hold the trigger until the “Hold” designation disappears. The OLED screen will remove the “set”
designation from view and save the setting:
7. Cycle through additional settings using the trigger, or exit programming mode by turning the board off.
SETTINGS
Fire mode (default semi-automatic unlimited)
1. Semi-automatic unlimited
2. Semi-automatic adjustable
3. PSP ramping – 123 shots semi, on 4
4. PSP burst – 123 shots semi, on 4
5. NXL full-automatic – 123 shots semi, on 4
6. Millennium ramping – 123 shots semi, on 4
th
shot ramps at 5 pulls per second, resets after 1 second
th
shot fires 3-round burst, resets after 1 second
th
shot fires full-automatic, resets after 1 second
th
shot ramps at 6 pulls per second, ignores ramp start
setting if less than 6 pulls per second, resets after 1 second
7. Custom ramping – user adjustable ramping, select custom ramp start and ramp percentage
8. Auto response – fires on each pull and release
9. Burst – 3-round burst
10. Full-automatic – 1 shot semi, on 2
nd
shot fires full-automatic, resets after 1 second
Maximum rate of fire (default 13 bps, range 10-30 and infinity)
The semi-automatic unlimited fire mode ignores this value, making it easy to switch back and forth between NPPL
and PSP gun rules without modifying more than one setting. Adjustable from 10 to 30, with an unlimited option
designated by the infinity symbol.
Fine rate of fire timing (default 0.0, range -2.5 to +2.5)
Allows fine adjustment of the maximum rate of fire in 0.5 millisecond increments, from -2.5 to +2.5 milliseconds.
Game timer (default off, range 1-20)
Enables and sets the game timer, which replaces the rate of fire indicator on the OLED display when turned on.
The game timer is adjustable from 1 to 20 minutes, and automatically adds the 10-second countdown prior to game
start. The game timer will begin counting down on the first trigger pull after the board is turned on.
Debounce (default 10 ms , range 1-25)
The amount of time the trigger must be released for the microcontroller to allow the next trigger pull. The Yakuza
series uses an asynchronous interrupt-based scan at 4 million times per second that is run independently from code
execution. This ensures that every trigger pull is registered. Higher values reduce bounce. Lower values cause
more bounce.
Anti-mechanical bounce (default 1, range 1-4)
Helps eliminate mechanical bounce which can cause a loosely held paintball marker to go full-auto when the trigger
is pulled slowly.
Cycle percentage filter (default 2, range 1-10)
Secondary debounce filter which adjusts how far into the firing cycle additional buffered shots are allowed. A
setting of 1 turns this filter off, while settings 2 through 10 set the percentage of the cycle that must pass before shots
may be buffered. Higher settings will reduce bounce.
Dwell (default 12 ms, range 2-30)
The amount of time the solenoid is energized during each firing cycle. Low dwell times can lead to inconsistency
and drop-off. High dwell times can cause bad air efficiency. The recommended dwell setting for the Droid is 12
ms. The Cyborg can normally use much lower dwell times, so it is recommended to reduce this to 6-8 ms for that
particular marker.
Anti-bolt stick (default off, range 1-10)
Bolt stick can occur when the o-rings in the bolt settle or stick, causing the next shot to have lower velocity. If the
marker is left sitting for more than 20 seconds, ABS adds extra dwell to ensure the next shot has proper velocity.
The default is off.
Page 5

BIP delay (default 1, range 1-10)
A slight delay that allows each paintball to settle in the breech before firing. Lower settings potentially lead to
higher achievable rates of fire.
Bolt delay (default 5, range 1-15)
A delay time that gives the bolt enough time to block the eyes on the forward stroke. Too low of a bolt delay will
cause blank or skipped shots. Too high of a setting can limit the maximum rate of fire.
Eye mode (default forced)
1. Forced with force shot – marker only fires when a paintball is present, unless a force shot is initiated by
holding down the trigger for ½ second.
2. Delayed – the eyes will watch for a paintball for up to 500 ms after each pull, then fire. This is useful for
sound activated loaders and was the stock setting on original Intimidators.
Ramping start (default 5, range 4-14)
Adjusts how fast a user must pull for the ramping fire modes to start adding additional shots. Used with the PSP
ramping, Millennium ramping, and custom ramping fire modes.
Ramping percent (default 500%, range 10%-500%)
Adjusts how much the software helps the user. A 50% ramp will add 50% of the user’s pulling rate to the current
rate of fire (e.g., if you pull 8 times per second, it will add an additional 50%, meaning the gun will fire 12 times per
second).
G-mode or “breakout mode” (default off)
This breakout setting provides unlimited full-auto, which then falls back to the user-selected fire mode, on the 1
nd
2
, or 3rd shot after turning the board on. Breakout modes are illegal for use in all tournament series and most
st
,
recreational paintball fields. Tadao Technologies LLC takes no responsibility if a player chooses to use
breakout modes.
Rate of fire/Timer size (default big)
Allows the user to pick the text size for the current rate of fire or game timer display on the OLED screen. The
available options are “normal” and “big.”
Rate of fire display mode (default maximum)
1. Maximum – displays the highest achieved rate of fire based on the shortest time between any 2 shots.
2. Average – displays the average rate of fire of the last 5 shots.
Brightness (default 5, range 1-5)
Allows adjustment of the OLED display brightness. Lower settings are less bright, with a setting of 1 useful for
night play and scenario games.
Boot screen (default on): Enables or disables the boot screen at startup, which can reduce start time before being
able to fire.
Save profile
Allows the user to save his current settings in one of 3 profiles which are not deleted by a settings reset.
Load profile
Allows the user to load any previously saved settings profiles.
Reset
Allows the user to perform a settings reset, which returns all settings to their default values. Saved profiles will not
be reset.
Version
Displays the current software version running on the Yakuza series board.
Page 6

RECOMMENDATIONS
Settings
The Yakuza series ship with default settings which are tuned for a wide range of trigger adjustments and general
usage. Certain tournament series allow alternate fire modes with specific characteristics, so the following is a list of
settings that will give you a baseline. Ultimately, every marker is unique and may require different settings for
optimal performance.
NPPL: Use the default settings, possibly only changing debounce, AMB, and CPF to suit your personal trigger
adjustments.
PSP: Use the PSP ramping or PSP burst fire modes, with maximum rate of fire set to the required cap for the league
(for 2007 this was 15 bps). Make sure debounce is near default values.
NXL: Use the NXL full-automatic or PSP fire modes. See PSP for maximum rate of fire recommendations.
Millennium: For 2008 the Millennium series modified their rules slightly. It is now a 12 bps cap with a 6 pulls per
second activation, and requires the 1-2-3 semi-auto shots like PSP mode before ramping can begin.
Use the specific Millennium mode. The ramp start will automatically be set to 6 pulls per second as required by the
Millennium series unless a higher value is selected. Maximum rate of fire must be manually set to 12 bps.
Many European tournaments besides the Millennium series utilize semi-automatic, but capped at 15 bps. Select the
capped semi-automatic fire mode for these events.
Care and cleaning
Your Yakuza series board includes a conformal coating to help protect against damage caused by moisture such as
broken paint or rain. Under normal conditions the board should continue to operate, even with small amounts of
moisture present. However, paint is slightly corrosive and can destroy the conformal coatin g over time. In the event
that you get broken paint or water on the electronics, unplug the battery and use rubbing alcohol and a blast of
compressed air to clean the board off. The compressed air will ensure that everything is cleaned out from beneath
the components and connectors.
Batteries
Tadao Technologies recommends the use of quality alkaline batteries such as those made by Duracell and Energizer.
Photo lithium 9 volt batteries are also adequate. Batteries labeled as “heavy duty” or “super heavy duty” are not true
alkaline and will cause inconsistent operation, or may not properly power the electronics. Rechargeable batteries are
also not recommended because they typically do not provide enough current.
Trigger adjustment and switch life
The trigger switch used on the Yakuza series boards is a high quality tactile lever switch made by Omron. It has a
life expectancy of several million actuations. The life of a trigger switch on a paintball marker can be substantially
shortened by using too short of a trigger pull. It is imperative to have at least a tiny amount of travel before and after
the actuation point. It is also extremely important to use some kind of trigger return force, such as a spring or
magnet. Excessive bounce may occur if a spring or magnet is not used, or if the actuation point is too close to the
beginning or end of the trigger pull.
Additional information at www.tadaotechnologies.com
 Loading...