

Page 1
FASTENING TOOLS FOR THE PROFESSIONAL
OPERATOR’S MANUAL
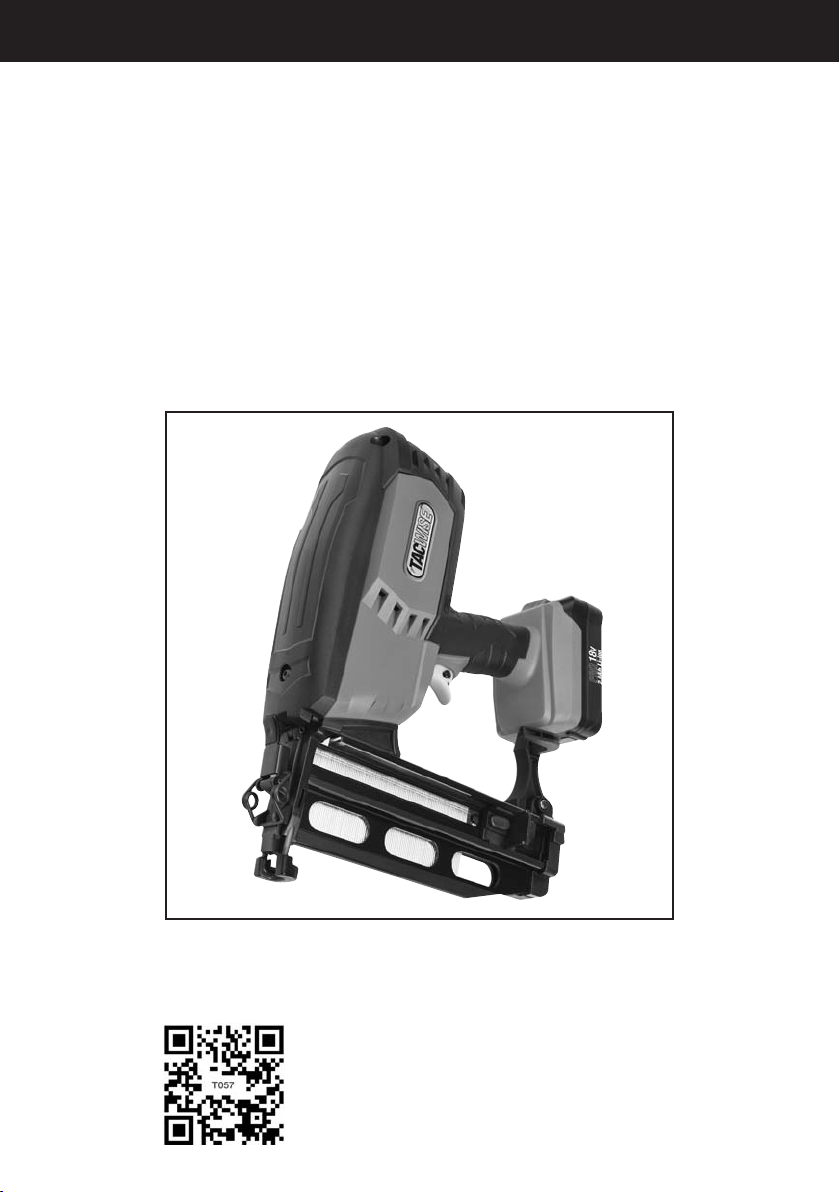
Ranger 2
18V 16G Finish Nailer
Page 2
32
TM
FASTENING TOOLS FOR THE PROFESSIONAL
Register your Tacwise product online NOW
to receive a 3 year extended guarantee at
www.tacwise.com/warranty-registration
or simply scan the QR code to take you directly
to the registration web page
If this product is not functioning
correctly or you are not 100% satisfied
please contact Tacwise first by email:
or telephone
0844 725 9600
UK customers only
before returning to the store where
you purchased it. We are here to
help and may save you a trip
Scan this QR code to take
you to the Tacwise website
www.tacwise.com
This does not affect your statutory rights
Note: This product has two main, easily changeable service parts
(Bungee Cords and Driver Blade Assembly) provided the procedure
is carefully followed (see “Changing Service Parts”).
Page 3
54
TM
FASTENING TOOLS FOR THE PROFESSIONAL
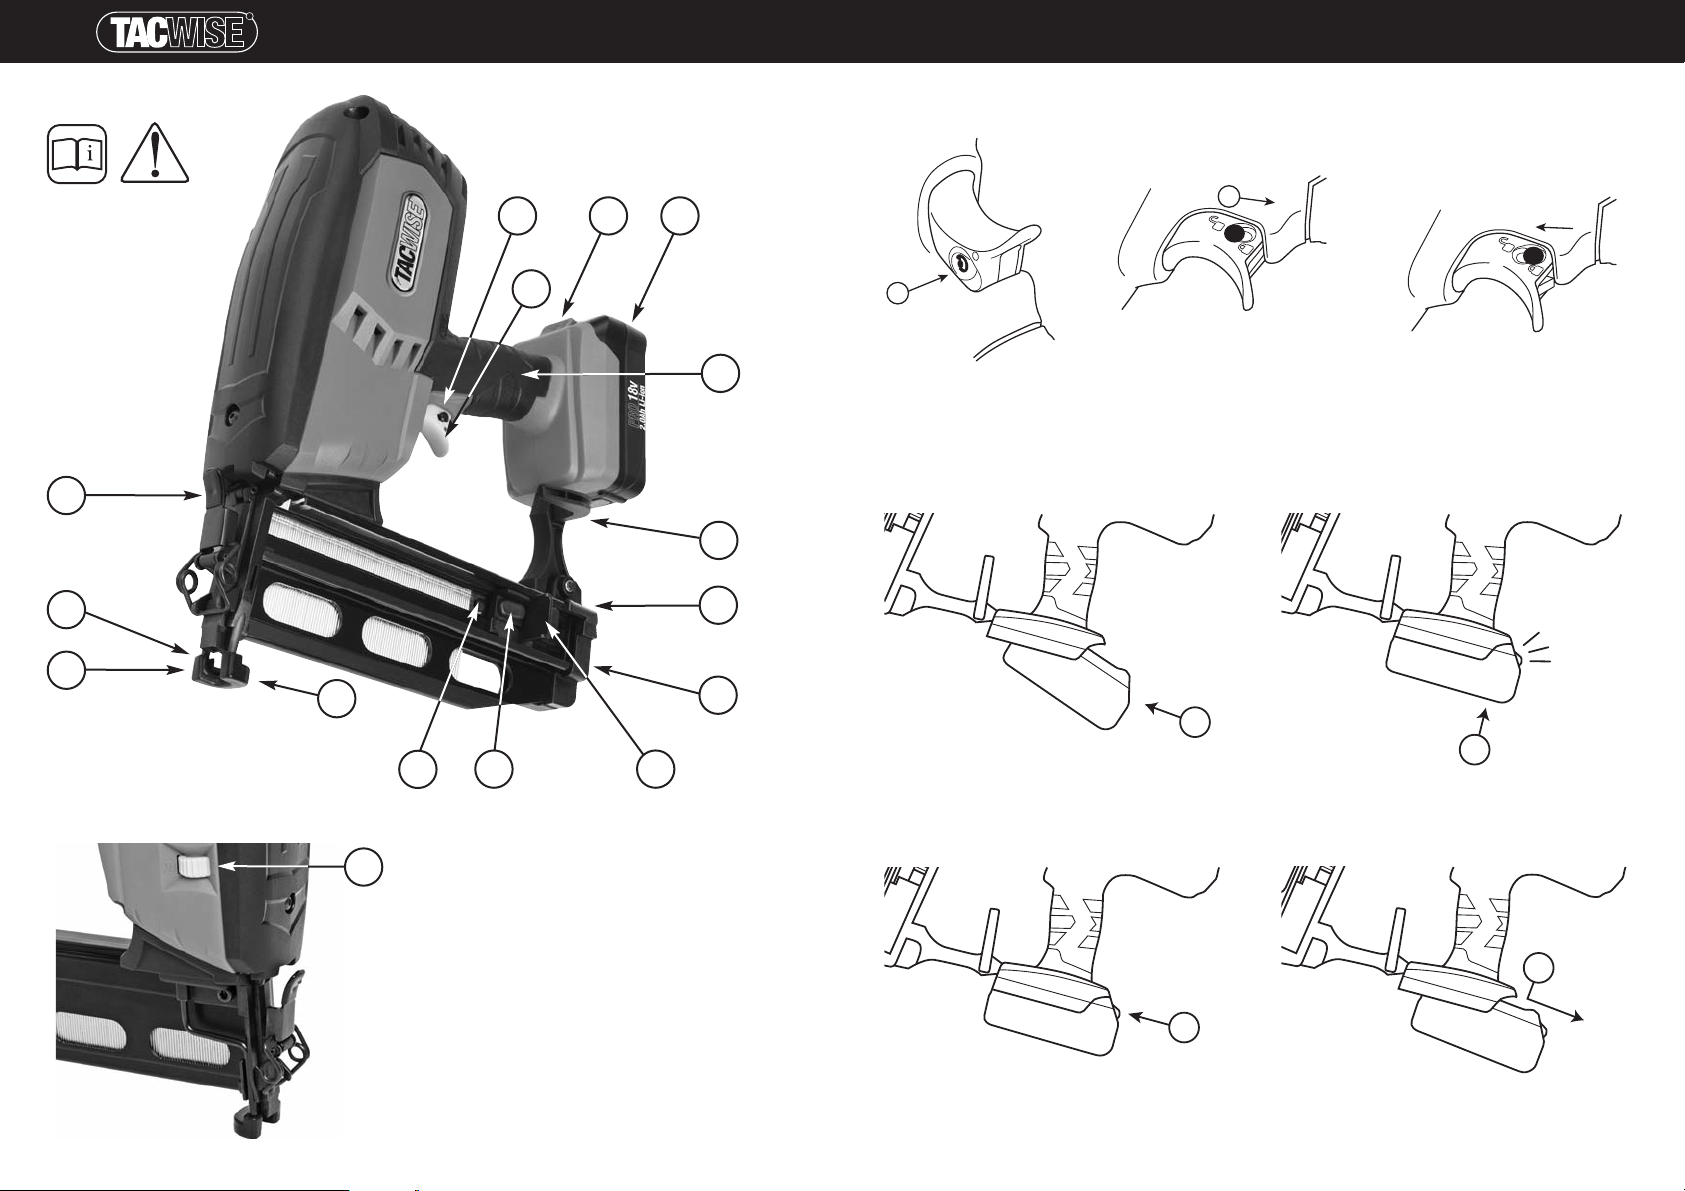
FIG. A
FIG. C - LOADING BATTERY
1
FIG. B - LOCKING/UNLOCKING ACTUATION SYSTEM
1
2
2
FIG. D - REMOVING BATTERY
1
2
4
5
6
7
8
9
15
1
3
2
10
11
12
13
14
16
Page 4
76
TM
FASTENING TOOLS FOR THE PROFESSIONAL
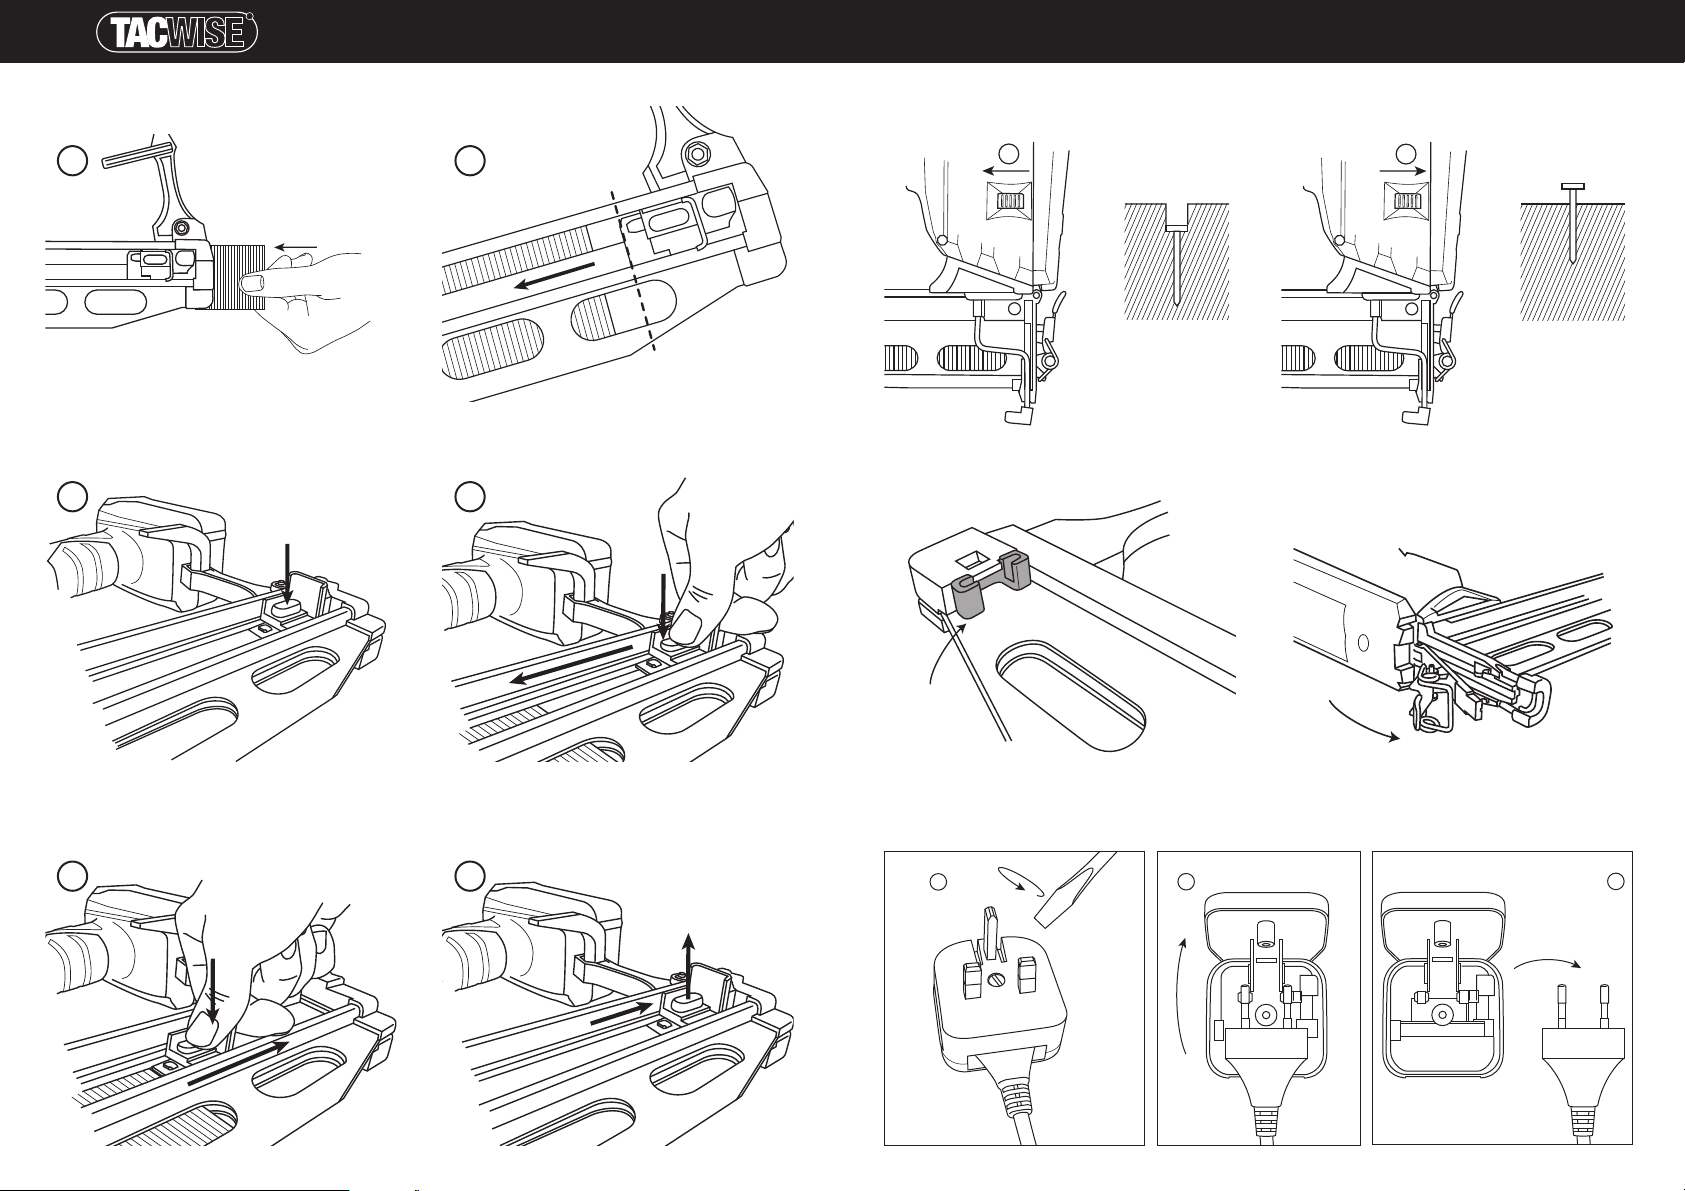
FIG. G - DEPTH CONTROL
1
2
FIG. H - SPARE NON-MARKING
NOSE/TIP PROTECTOR
FIG. I - CLEARING JAMS
FIG. E - LOADING THE TOOL WITH NAILS
FIG. F - UNLOADING THE TOOL FIG. J - CONVERTING THE BATTERY CHARGER PLUG FROM UK TO EURO
1
2
3
1 2
1 2
3 4
Page 5
98
TM
FASTENING TOOLS FOR THE PROFESSIONAL
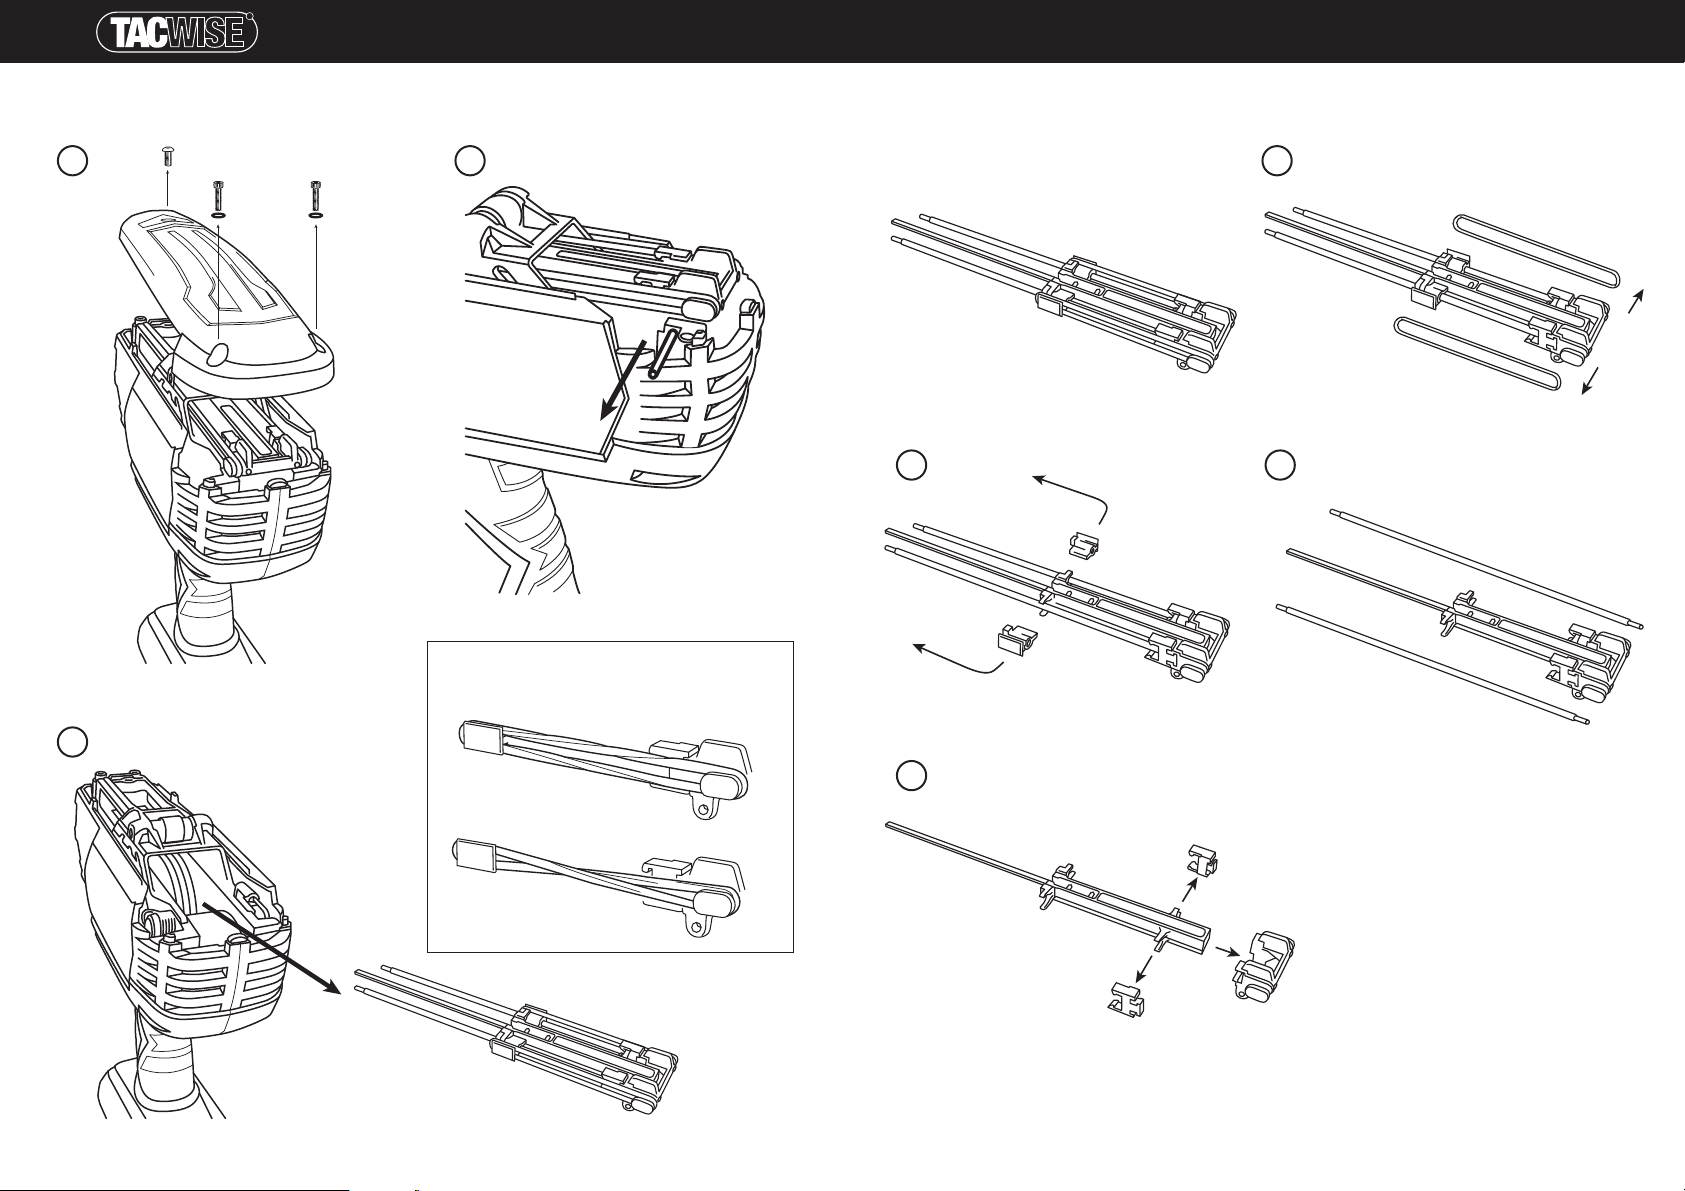
FIG. K - CHANGING THE SERVICE PARTS - REMOVING DRIVER BLADE ASSEMBLY/
REPLACING BUNGEE CORDS (RE-ORDER CODE: 1292)
NOTE: Do not twist or cross bungee
cords when replacing
1 2
3
FIG. K - CHANGING THE SERVICE PARTS - REPLACING OLD DRIVER BLADE WITH NEW
(RE-ORDER CODE: 1303)
4
5 6
7
Page 6
1110
TM
Ranger 2
18V 16G Finish Nailer
Congratulations!
On the purchase of your Tacwise power tool. Your tool will perform
to your satisfaction for a long time if handled in accordance with our
Safety and Operating instructions.
Save this manual for future reference
Package Contents
1 x Finish nailer 2 x Lithium-Ion batteries
1 x Battery charger 1 x Charging cable with plug
1 x Pack of fastenings 4 x Bungee cords
Technical Data
* The declared vibration emission level represents the main
applications of the tool. However if the tool is used for different
applications, with different accessories or poorly maintained, the
vibration emission may differ. This may significantly increase
exposure level over the total working period.
CE – Declaration of Conformity
18V 16G Finish Nailer
Tacwise declares that these power tools have been designed in
compliance with the Regulations and Standards of the European
Directives.
Quality Department, Tacwise Group Plc – UK
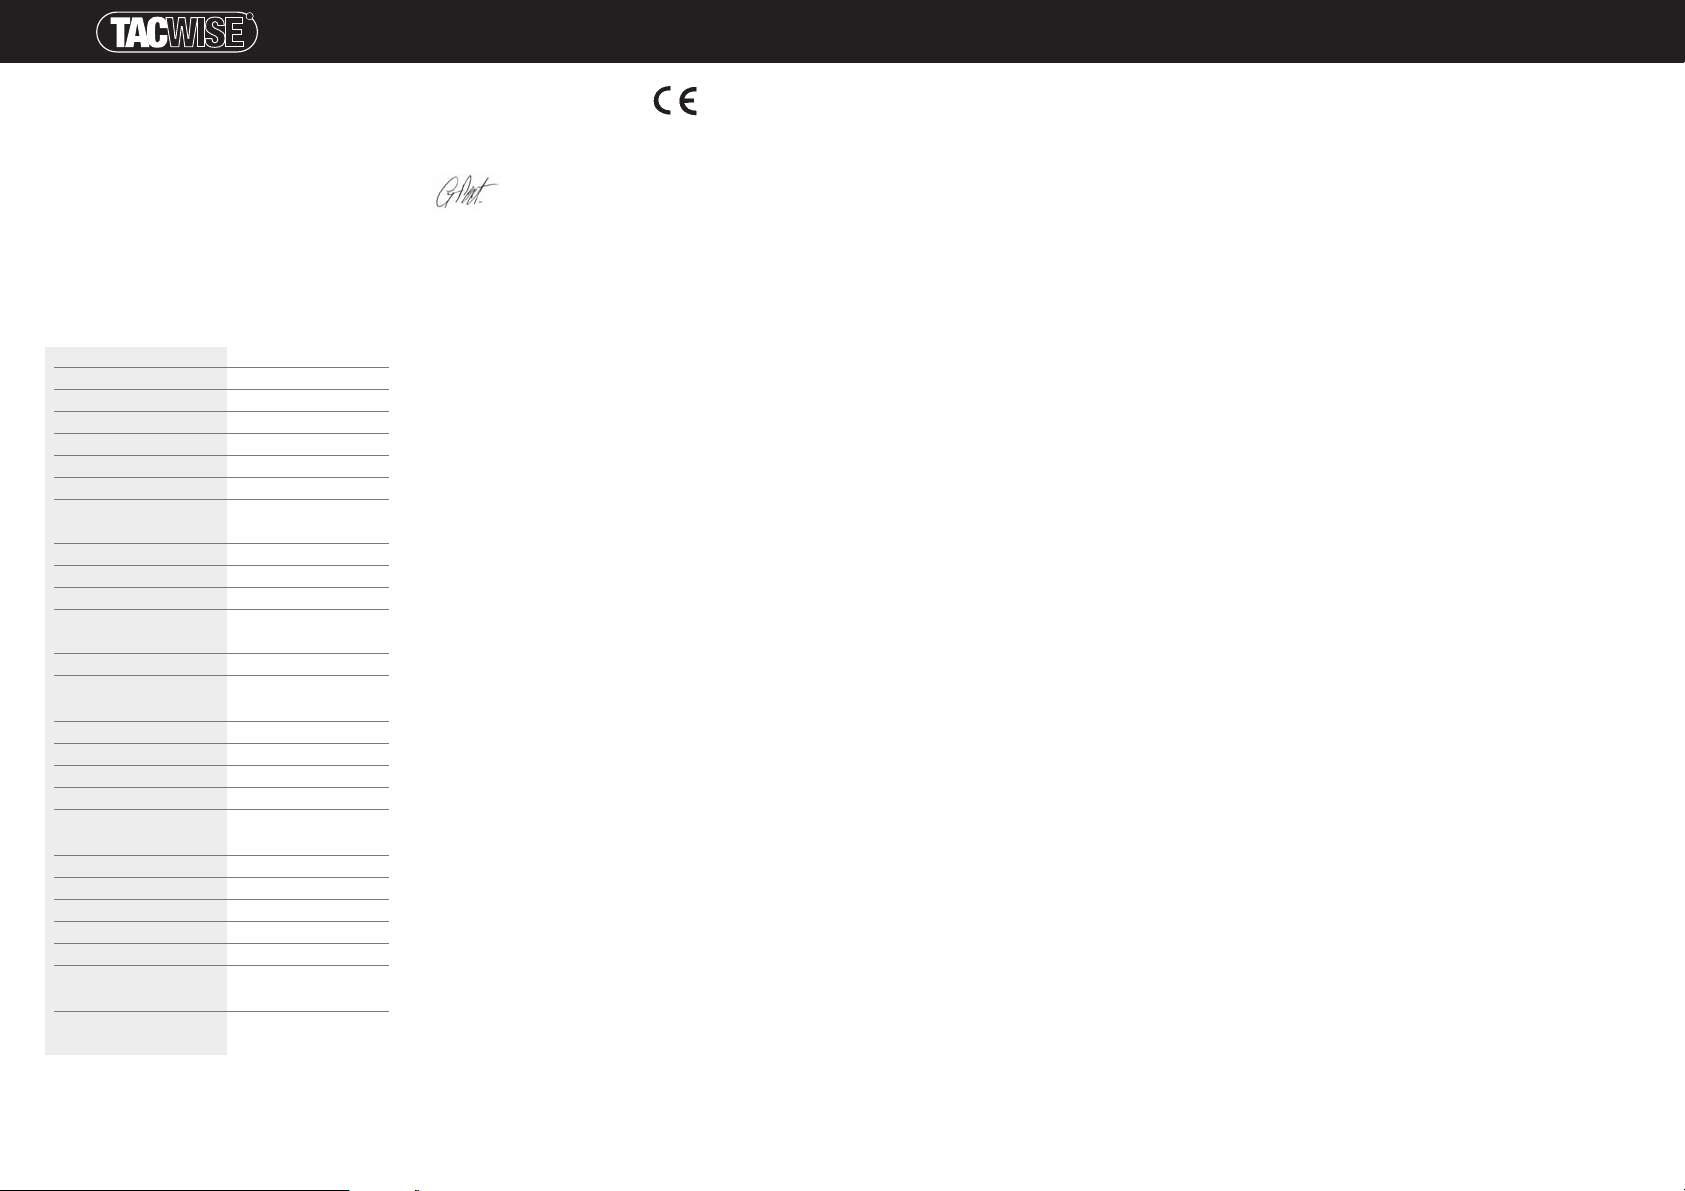
WARNING! Before use carefully read and understand
all instructions.
Failure to do so could result in electric shock, fire and/or serious
personal injury. The term “power tool” in all of the warnings listed
below refers to your battery-operated (cordless) power tool.
Unpacking
This product has been supplied completely assembled.
• Carefully remove the tool and accessories from the box.
• Make sure that all items listed in the packing list are included.
• Inspect the tool carefully to make sure no breakage or damage
occurred during transit.
• If any parts are damaged or missing, please email
[email protected] for assistance. Do not operate this tool until
the missing or damaged parts are replaced. Failure to do so could
result in a personal injury. Whilst every effort has been made to
ensure accuracy of information contained within this manual, the
Tacwise policy is one of continuous improvement to our products
and as such we reserve the right to change the product
specification without prior notice.
General Safety Instructions
Important. Tacwise recommends that this power tool should not be
modified or used for any application other than that for which it was
designed. Any such alteration or modification is misuse and could result
in a hazardous condition leading to a personal injury. If you are unsure of
its relative applications do not hesitate to contact us and we will advise
you.
Know Your Power Tool
Read and understand the manual and labels affixed to the power tool.
Learn its application and limitations as well as the specific potential
hazards particular to this power tool. For any queries relating to safety
matters on this power tool, please email: [email protected].
Work Area
• Keep your work area clean and well lit. Cluttered benches and
dark areas invite accidents.
• Keep children and pets away. All visitors should be kept a safe
distance from work area.
• Avoid dangerous environments. Do not use power tools in damp or
wet locations, or expose them to rain. Provide adequate space
surrounding the work area. Do not use in environments with a
potentially explosive atmosphere, such as in the presence of
flammable liquids, gases or dust; power tools will create sparks
which may ignite the dust or fumes.
• Secure work. Use clamps or a vice to hold work. This frees both
hands to operate the power tool.
Personal Safety
• Stay alert. Always watch what you are doing and use common
sense. Do not operate a power tool when you are tired or under the
influence of medication, alcohol or drugs.
Tool 16G Finish Nailer
Model no. 1245
Single unit packaging Case
Input voltage 18VDC2000mAh
A-weighted sound pressure level 88.1dB (A)
A-weighted sound power level 101.1dB (A)
Vibration emission level* 2.720m/s
2
Fasteners: Type 16G 1.6mm Diameter 90°
finish nails
Fasteners: Length 32mm – 64mm
Max. firing speed 1 nail per second
Magazine capacity 110 nails
Continuous operating duration 800 nails
with 2.0Ah battery
Weight 3.22kgs
Battery 1253
Battery type Li-Ion
Voltage V
DC
18V
Capacity Ah 2.0
Weight 0.44kgs
Charger 1254
Mains voltage/input VAC 230V
Battery type Li-Ion
Approx. charging time 60mins
Weight 0.43kgs
Fitted plug UK/Euro
Fuses in Charger
UK & Ireland 230V tools
13 Amperes
• Wear proper clothing. Do not wear loose clothing or jewellery that
can catch in moving parts. Non-slip footwear is recommended.
Contain long hair. Roll long sleeves above the elbow.
• Avoid accidental starting. Make sure the actuation system is
locked before connecting to power source/picking up or carrying the
power tool.
• Do not over reach or use on unstable surfaces. Keep proper
footing and balance at all times.
• Use safety equipment. Dust mask, non-skid safety shoes, hard hat,
or hearing protection must be used for appropriate conditions. Wear
CE approved safety goggles at all times. Normal spectacles only have
impact resistant lenses; they are NOT safety glasses.
Electrical Safety
• Disconnect power to the tool. When not in use, before servicing or
when changing accessories such as nails etc.
• Do not expose power tools to rain or wet conditions.
• Power tool plugs must match the outlet. Do not use any adapter
plugs with earthed (grounded) power tools. Unmodified plugs and
matching outlets will reduce risk of electric shock.
• Protect yourself from electric shock. When working with power
tools, avoid contact with any earthed or grounded surfaces such as
pipes, radiators, hobs and refrigerators.
• Do not abuse the cord. Never carry the charger by the power cable
or pull it with force from the socket. Keep the power cable away from
heat, oil, sharp edges or moving parts. Damaged or entangled cords
may create a fire or increase the risk of electric shock.
Power Tool Use and Care
• Do not force the power tool. Use the correct power tool for your
application. It will do the job better and safer at the rate for which it
was designed.
• Disconnect the tool from the power source before making any
adjustments, changing accessories or storing the power tool.
Such preventive safety measures reduce the risk of starting the
power tool accidentally.
• Do not alter or misuse the power tool. Use of the power tool for
operations different from those intended could result in a hazardous
situation.
• DO NOT fire if the nails are jammed. This will cause damage to the
driver blade and could invite accidents.
• Keep fingers off the trigger until ready to drive nail.
• DO NOT use on hard surfaces such as rock, concrete, masonry,
bricks or steel. Personal injury or damage to the power tool could
result.
• Secure work. Use clamps or other practical ways to secure and
support the work piece to a stable platform. Holding the work by
hand or against your body is unstable and may lead to loss of control.
• Stored power tools. When not in use, all power tools should be
stored in a dry, locked cupboard and out of the reach of children and
other untrained persons.
• Check for damaged parts. Check for misalignment or binding of
moving parts, breakage of parts and any other condition that may
affect the power tools operation. If damaged, immediately
discontinue use and ensure the power tool is repaired before use.
Poorly maintained power tools can result in accidents.
• Maintain power tools with care. Keep power tools clean for the
best and safest performance. All cables must be checked at regular
intervals and replaced if damaged.
• Recommended accessories. Use only accessories that are
recommended by the manufacturer for your model. Accessories that
may be suitable for one tool may create a risk of injury when used on
another tool.
• Keep the power tool and its handle dry, clean and free from oil
and grease. Always use a clean cloth when cleaning. Never use
brake fluids, gasoline, petroleum-based products, or any strong
solvents to clean your power tool. Following this rule will reduce the
risk of loss of control and deterioration of the power tool housing.
• Beware of hidden danger. Always make sure there is no danger of
hitting any hidden power cables, water or gas pipes.
Battery Tool Use and Care
• Only use the battery recharger specified by the manufacturer.
Use of the wrong battery pack with the charger may create the risk
of a fire.
• Use battery packs specified for the correct tool only. Use of the
wrong battery pack with the tool may create the risk of injury or fire.
• Keep away from other metal objects such as keys, coins, nails,
screws, paper clips etc., when battery pack is not in use. Small
metal objects like those listed above could make a connection across
the terminals. Shorting the battery terminals together and may cause
a fire.
• Liquid may leak from the battery under abusive conditions.
Avoid contact. If skin should accidentally come into contact with
liquid, flush with water. If liquid should come into contact with eyes
seek additional medical help. Liquid ejected from damaged battery
may cause irritation or burns.
Specific Safety Instructions
• Always assume that the tool is loaded with fasteners. Handling
the tool without care could result in an unexpected firing of fasteners
and lead to personal injury.
• Use only the nails specified in the manual. Use of accessories that
are not designed for this tool could result in personal injury and/or
damage to the power tool.
• Do not touch any parts of the power tool magazine or nose
during operation. Hold only by the handle or housing of the tool.
• Do not activate the power tool unless it is in contact with the
work piece. Serious injury can result if you depress the safety lock
pin on nose/contact trip with your fingers, or by improper operation.
• Fastening thin items. Special caution must be taken for possible
penetration through thin items, as this could cause possible harm to
anyone or anything behind the work piece or immediate area.
• Never use the tool as a hammer.The sudden impact could shift
inner components of the power tool, resulting in a fastener discharge
and injury.
• When fastening has been completed always disconnect from the
power source (battery) prior to unloading the magazine.
• Do not disassemble or lock any of the fastener driving parts.
•
Prior to each operation. Check that the safety and triggering
mechanism is functioning properly and that all nuts and bolts are tight.
• Never point any power tool at yourself or at any other person.
While working, hold the tool in such a way that no injuries can be
caused to the head or to the body in the event of possible recoil.
• Never actuate the power tool into free space or the air. Fasteners
can penetrate thin work pieces or slip off corners and edges of the
work piece, potentially putting people at risk.
• Do not drive fasteners on top of other fasteners.
• Disconnect the tool from the battery if a fastener jams in the
tool. While removing a jammed fastener, the tool may be activated by
accident if battery is connected.
• Take care while removing a jammed fastener. The mechanism
may be under compression and a jammed fastener may be
discharged while attempting to free it.
• Do not use this tool to fasten electric cables. This tool is not
designed for the installation of electric cabling and may damage
electric cables which could lead to injury by electric shock or fire
hazards.
FASTENING TOOLS FOR THE PROFESSIONAL
Page 7
1312
TM
FASTENING TOOLS FOR THE PROFESSIONAL
• Use appropriate detectors to determine if any utility lines are
hidden within the work area or call your local utility company
for assistance. Should electric lines be damaged this could lead to
fire and electric shock. Damaged gas lines could lead to explosions.
Penetrating a water line can cause property damage.
• When using the power tool hold it in such a manner that your
head and/or body cannot be injured by the tool suddenly kicking
back due to a malfunction of the battery or from objects in the
work area.
• Do not attempt to open the battery pack. There is a danger of
short-circuiting.
• Protect the battery against heat (continuous intense sunlight),
fire, water and moisture. There is a danger of explosion.
• A damaged battery or one that is subject to improper use can
emit vapours. Ventilate the area and seek medical help if needed.
The vapours can irritate the respiratory system.
• Only use the battery in conjunction with your Tacwise power
tool. This will protect it against overloading.
• Use only original Tacwise batteries with the voltage listed on the
nameplate of the power tool. There may be a danger of injury as
well as property damage through exploding batteries that are
imitations, reconditioned or other brands.
• The electric motor has been designed for one voltage only.
Always check that the battery pack voltage corresponds to the
voltage on the rating plate. Also make sure that the voltage of your
charger corresponds to that of your mains.
Model and Serial No.
The model number of this tool will be found on a label located on the
tools magazine channel and the serial number is inside the body of the
tool that houses the battery. Please record the model number and serial
number in the space provided below. Please always give the following
information when contacting us:
MODEL NUMBER .........................................................
SERIAL NUMBER .........................................................
Explanation of Label on Power Tool
Read instruction manual before use
Wear CE approved safety goggles at all times
Contains chemicals that explode
Wear CE approved ear defenders at all times
Conforms with EC directives
Dispose of electrical equipment and batteries in accordance
with environmental legislations
Explanation of Labels on Charger and Battery Pack
Service Parts
These tools contain two main service parts (Bungee Cords and the Driver
Blade Assembly). These parts are easily replaced by following the
instructions on page 14 of this manual. For additional information please
follow the QR code below or visit our website.
Service
Any servicing over and above the replacement of the “Service Parts”,
requires specialist tools and knowledge and should be performed only
by a qualified Tacwise Service Engineer or appointed Service Agent. We
strongly recommend that the main housing of the tool is not opened, as
such action may result in injury and may compromise the tool warranty.
Li-ion
Features (Fig. A)
Your 18V 16G Finish Nailer has been designed for driving fasteners
into wooden work pieces.
1. Nose piece
2. Working contact element
3. Quick release nose gate
4. Depth adjustment dial
5. Trigger actuation system
6. Trigger
7. Battery release button
8. Battery pack
9. Handle
10. Storage for rubber nose protector
11. Belt hook
12. Magazine
13. Magazine slider
14. Release button for loading
15. Rubber nose for surface protection
16. Magazine spring
Locking and Unlocking the Actuation System (Fig. B)
Lock the actuation system and remove the battery before making any
adjustments, changing accessories, or placing the power tool aside.
This safety measure prevents accidental starting of the power tool.
NOTE: To use the actuation system, push and hold the switch pin on
the trigger 1 whilst moving the pin head 2 on the opposite side to
either the ‘lock’ or ‘unlock’ position as required.
Battery Charging
Use only the battery charger that comes with the product. Only the
battery charger that is matched to the lithium ion battery should be
used in your machine.
NOTE: The battery is supplied partially charged. To ensure full
capacity of the battery, completely charge the battery in the battery
charger before using your power tool for the first time. The lithium ion
battery can be charged at any time without reducing its service life.
Interrupting the charging procedure does not damage the battery.
The “Electronic Cell Protection (ECP)” protects the lithium ion battery
against deep discharging. When the battery is discharged, the power
tool is switched off by a protective circuit: Fasteners can no longer
be shot.
WARNING! After the automatic shut-off of the power tool, do not
continue to press the trigger. The battery could become damaged.
The battery is equipped with a NTC temperature control which allows
charging only within a temperature range of between 0°C and 40°C. A
long battery service life is achieved in this manner. Observe the notes
for “battery disposal”.
LED Functions of Battery Charger
• Green LED flashing = charger connected
• Red LED on = charging/battery low
• Green LED on = charged
• Red LED flashing = charger too hot
• Green and Red LED on = fault with charger (contact your Tacwise
Service Engineer or appointed Service Agent).
Loading/Removing the Battery (Fig. C & D)
To load, slide battery down into battery housing until it clicks. The
battery (8) has two locking levels, which are designed to prevent the
battery from falling out in case of vibrations from intensive use. Press
battery release button (7) and pull the battery up and out completely,
toward the rear.
Loading the Tool with Nails (Fig. E)
• Before loading the magazine see “Locking and Unlocking the
Actuation System”.
• Clean the magazine slider (13) as required and make sure that the
magazine (12) is not dirty/soiled.
NOTE: A lock function of the magazine slider prevents the power tool
from being started with an empty magazine. The working contact
element cannot be pressed in and blank firing is thus prevented.
• Insert a fitting nail strip in the T-slot at the end of the magazine (12).
• Push the nail strip in the magazine toward the front until the last nail
is positioned in front of the magazine spring (16).
• Press the release button (14) on the magazine slider (13).
• While pressing the release button (14) carefully guide the magazine
slider (13) toward the nail strip until the slider makes contact with
the nails. Gently releasing the slider will push the nail strip to the
front of the magazine.
NOTE: The magazine slider must slide back with only low force
(finger-pressure). Do not let the magazine slider snap back without
guiding it. Otherwise, the magazine slider could become damaged, and
there is danger of your fingers being caught or pinched.
NOTE: We strongly recommend that you only use approved/
genuine Tacwise nails.
Unloading the Tool (Fig. F)
• Hold down the release button (14) and pull the magazine slider (13)
to the rear of the magazine release the button and allow the slider
it to lock into position.
• Hold tool upside down, and the nails will drop out of the magazine
NOTE: Do not let the magazine slider snap back without guiding it.
Otherwise, the magazine slider could become damaged, and there is
danger of your fingers being caught or pinched.
Spare Non-Marking Nose/Tip Protector (Fig. H)
This tool is supplied with a removable rubber nose protector (15), which
prevents the tool from marking the surface of the work piece. This tool
is designed to be used both with and without the rubber nose protector
according to the application.
The nose protector can be removed and replaced.
• Before removing or replacing the nose protector see “Locking and
Unlocking the Actuation System”.
• Pull the nose protector from the working contact element.
• To replace, push the new nose protector back over the working
contact element.
NOTE: A spare nose protector is located at the side/rear of the
magazine (10). To order additional nose protectors, please quote
code: 1264.
Nailing
• Use genuine Tacwise fasteners of the type specified for the tool.
• Choose the appropriate material or fastener length.
• Before firing see “Locking and Unlocking the Actuation System”.
• Firmly position the rubber nose protector (15) against the workpiece
until the working contact element (2) is fully depressed.
• Briefly press trigger (6) and release again. A nail is discharged.
• Allow the power tool to bounce back from the workpiece.
• You must release the trigger and working contact element after each
nail to reset the tool. The tool will not fire another nail until the
trigger and working contact element are released.
WARNING: If the trigger (6) and the working contact element (2)
are pressed and held longer than 1 second after firing a nail, it is
possible that further nails are fired due to a kickback-effect.
Read instruction manual before use
Do not charge damaged battery packs
Do not incinerate the battery pack
Conforms with EC directives
Recyclable
Dispose of electrical equipment in accordance with
environmental legislation
Dispose of batteries in accordance with environmental
legislation
Always observe the safety instructions and
applicable regulations
Electrical safety; make sure the voltage of your charger
corresponds to that of your mains
Use indoors only
Do not expose to rain or water
Charge at temperatures between 0°C and 40°C only
Donates the risk of electric shock if not used properly
Page 8
1514
TM
FASTENING TOOLS FOR THE PROFESSIONAL
NOTES:
• When the power tool is used under cold ambient conditions, the
first nails will be driven in slower than usual. Once the power tool
has warmed up during working, normal operating speed will be
regained.
• Do not fire a nail onto an already driven-in one. This could cause
the nail to deform, the nails could become jammed or the power
tool could move uncontrolled.
• Avoid blank shots in order to reduce the wear on the driving blade.
Adjusting the Depth (Fig. G)
The driving depth of the nails can be set with the depth adjustment
dial (4).
• Nails are not driven in deep enough: To increase the driving
depth, turn depth adjustment dial to the left 1.
or
• Nails are driven in too deeply: To reduce the driving depth, turn
the depth adjustment dial to the right 2.
• Test the new driving depth on a test workpiece. Repeat steps
above as required.
Clearing Jams (Fig. I)
NOTE: You must remove jammed nail before using the tool any
further. If you try to fire a nail while the tool is jammed, you could
cause damage to the mechanism.
• Lock the actuation system and remove the battery (8).
• Tilt the tool and remove any unused nails in channel, this should clear
the jammed fastener.
• If this does not work, release the nose gate.
• Remove the jammed nail. Use a pair of pliers if required.
• Close the nail gate
• Refill the magazine
NOTE: If nails become jammed in the nose piece frequently, have the
tool serviced by a Tacwise Engineer or appointed service agent.
Converting the Plug From UK to Euro (Fig. J)
• Unscrew UK plug casing 1.
• Flip open casing to reveal Euro 2-pin plug 2.
• Remove Euro plug from UK casing 3.
Changing the Service Parts (Fig. K)
• Before changing the service parts, see “Locking and Unlocking the
Actuation System”.
• You must also remove any fasteners within the tool before making
any adjustments, see “Unloading the Tool”.
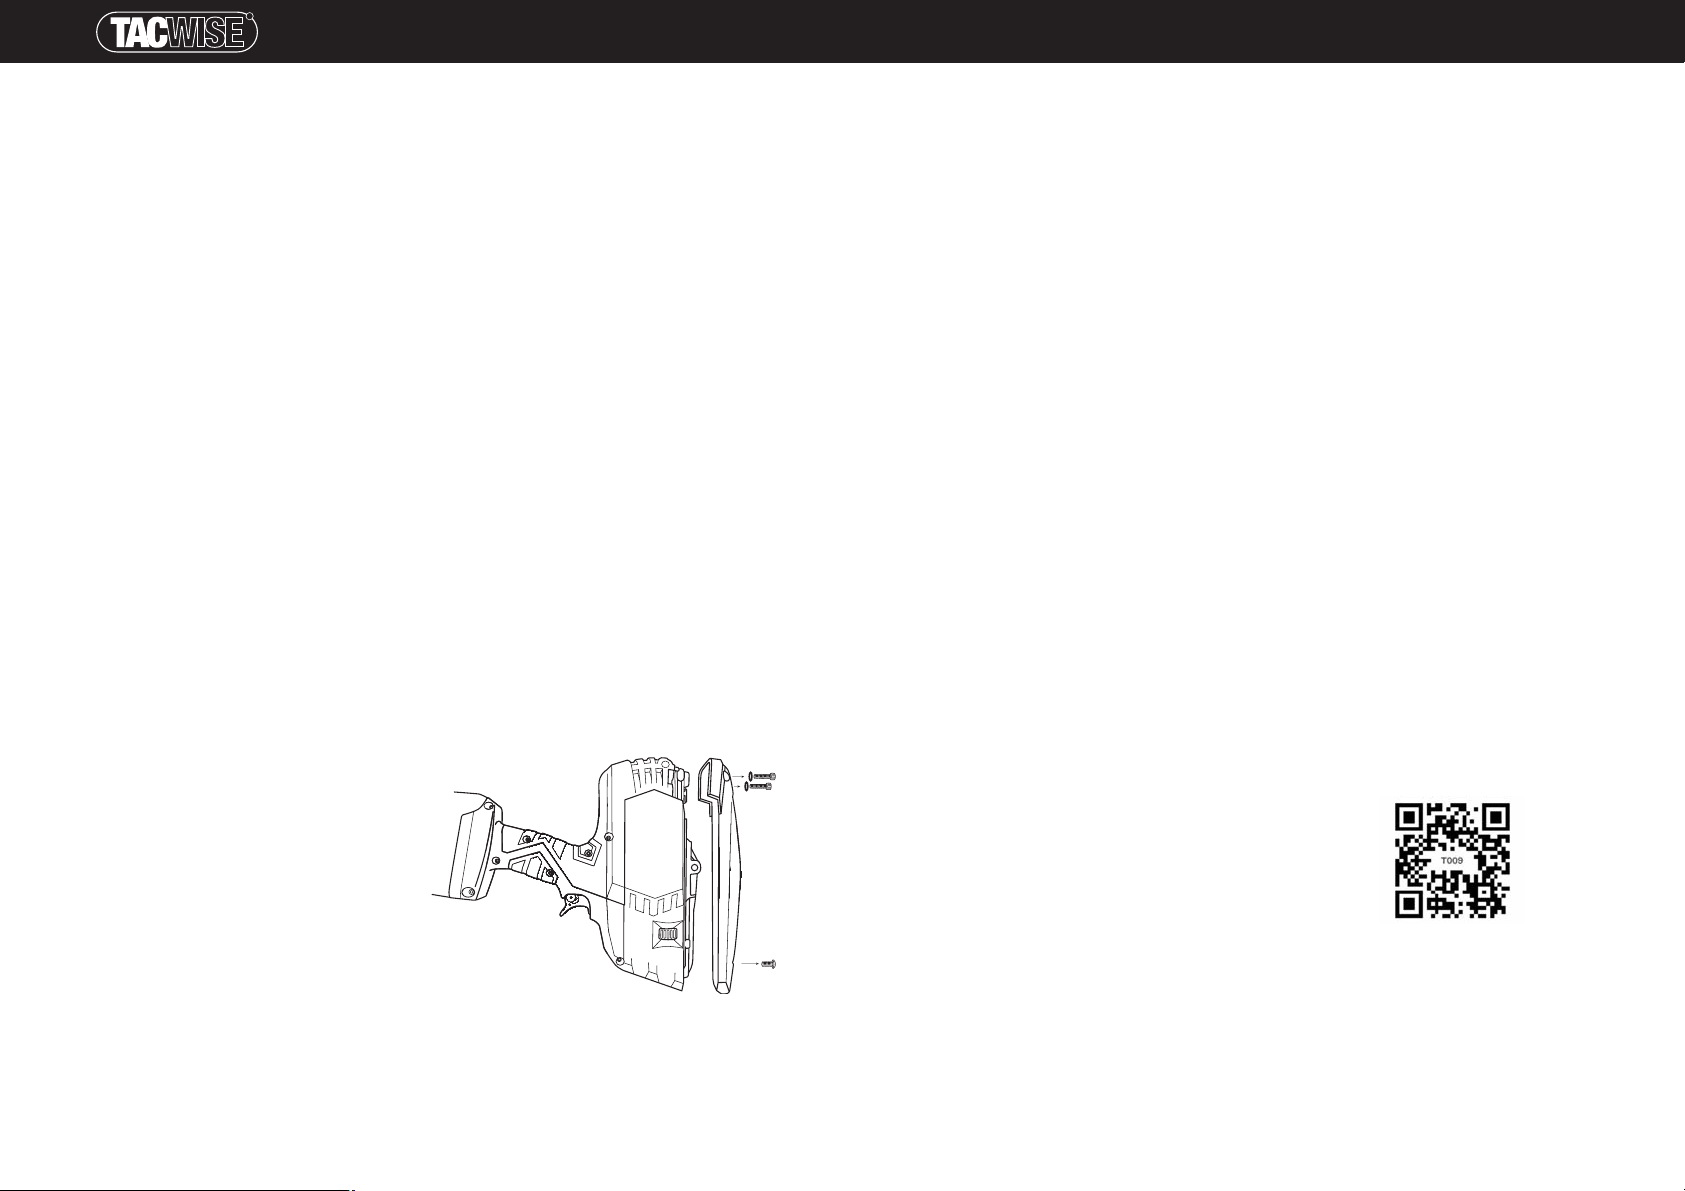
Bungee Cords (Re-order code: 1292)
• Using a 3mm allen key unscrew the pan head bolt and two hex
bolts on the front (black) housing cover.
NOTE: take care when removing the hex bolts, so as not to lose
the washers.
• Lift off the housing cover 1.
• Remove the locating pin - pliers may be required to access
the pin 2.
• Slide out the driver blade assembly 3.
• Remove the cords from the driver blade assembly. Remove any
snapped bungee cords that may be located in the housing.
• Replace old/snapped bungee cords with new cords.
NOTE: It is recommended that you always replace both bungee
cords at the same time. Always discard old/used cords.
IMPORTANT: When fitting new bungee cords always ensure that the
cords are not twisted and that they lay flat within the grooves of the
driver blade assembly. If twisted, the operating life of the cord will be
reduced and the tool may not fire properly.
• With the new bungee cords in place slide the driver blade
assembly back into the housing. The driver blade should fit into
the central slot first followed by the two guiding rods, these need
to slide into their corresponding holes in the chassis.
• Re-fit the locating pin, ensuring that it is pushed right through the
driver blade assembly and is located centrally in the chassis.
• Re-fit housing cover and bolts.
NOTE: If the housing cover doesn’t slot into place easily DO NOT
force it. Remove cover, adjust locating pin (this will be the only reason
the cover cannot fit back on). Re-fit cover. Ensure all bolts are
screwed tight before firing the tool.
Driver Blade Assembly (Re-order code: 1303)
• Follow steps 1 to 3 for changing the Bungee Cords.
• Remove and discard the bungee cords 4. Unclip and slide off the
two plastic retainers holding the steel guiding rods 5. Pull out the
two steel guiding rods 6 and carefully remove the plastic assembly
parts 7.
• Discard old driver blade.
• Fit plastic assembly parts, steel guiding rods, and new bungee
cords to the new driver blade.
IMPORTANT: When fitting new bungee cords always ensure that
the cords are not twisted and lay flat within the grooves of the driver
blade assembly. If twisted, the operating life of the cords will be
greatly reduced and the tool may not fire properly.
• Slide the new driver blade assembly back into the housing.
NOTE: If the housing cover doesn’t slot into place easily DO NOT
force it. Remove cover, adjust locating pin (this will be the only reason
the cover cannot fit back on. Re-fit cover. Ensure all bolts are screwed
tight before firing the tool.
WARNING: You must never attempt to open the tool housing. This
needs a special wrench and must only be conducted by a Tacwise
Service Engineer or appointed Service Agent. You will also invalidate
your guarantee.
Maintenance
Your Tacwise Power Tool has been designed to operate over a long
period of time with a minimum of maintenance. Continuous satisfactory
operating depends upon proper tool care and regular cleaning.
If the machine should fail despite the care taken in manufacturing and
testing procedures, repair should be carried out by a Tacwise Service
Engineer or appointed Service Agent. In all correspondence and
spare parts order, please always include the serial number given on
this machine.
✗
Cleaning
• Remove battery and lock the actuation system before cleaning the
housing with a soft cloth.
• Keep the ventilation slots clear and regularly clean.
• Clean the magazine (12). Remove any debris that may accumulate
in the magazine during operation.
Lubrication
This tool requires no lubrication. Do not lubricate the tool, as it will
damage the internal parts.
Product Advice & Technical Support
What to do if you have a problem with your Tacwise power tool?
Email [email protected].
Transport
The contained lithium-ion batteries are subject to the Dangerous
Goods Legislation requirements. The user can transport the batteries
by road without further requirements.
When being transported by third parties (e.g. air transport or
forwarding agency), special requirements on packaging and labelling
must be observed. For preparation of the item being shipped,
consulting an expert for hazardous material is required. Dispatch
batteries only when the housing is undamaged. Tape or mask off
open contacts and pack up the battery in such a manner that it
cannot move around in the packaging. Please also observe possibly
more detailed national regulations.
Tacwise Recycling Service - serving the customer and the
environment.
Unwanted Tools
Recycle unwanted materials instead of disposing them as waste. All
tools and packaging should be sorted, taken to the local recycling centre
and disposed of in an environmentally safe way. Alternatively, please
email [email protected] for details on how to dispose of your
Tacwise power tool free of charge in an environmentally friendly manner.
Battery Disposal
Follow your Local Authority procedures for the disposal of Lithium-Ion
battery packs.
Guarantee
All Tacwise power tools are carefully checked, tested and are subject
to the stringent controls of Quality Assurance. Tacwise therefore offers
the following guarantee for Tacwise power tools. Your warranty claim
based on your sales contract with the retailer, including your statutory
rights, shall not be affected by this guarantee.
One-Year Standard Guarantee
Ranger 2: This product has two common service parts (Bungee Cords
and Driver Blade Assembly) which are not covered by your
one-year standard guarantee, but are easily changed provided the
procedure is carefully followed (see “Changing Service Parts”).
This tool is supplied with two spare sets of bungee cords.
Over and above these two common service parts there are additional
service parts inside the main tool housing which will need to be
changed by a Tacwise Service Engineer. Please do not attempt to
change these additional service parts yourself as you will invalidate
your guarantee.
Should your Tacwise power tool become defective due to faulty
materials or workmanship within 12 months from the date of
purchase, we guarantee to replace all defective parts free of charge
or at our discretion, replace the tool free of charge. Please note, proof
of purchase must be produced (e.g. an original receipt). The
guarantee period starts from the time the tool is purchased from new.
The date on your original sales receipt is the guarantee start date.
This guarantee does not cover:
• Tools that have received unauthorised changes or additions.
• Defects caused by using accessories, components or spare parts
other than approved/genuine Tacwise accessories or parts.
• Component parts that are subject to natural wear and tear caused
by use in accordance with our operating instructions.
• Defects to the tool caused by improper use, abnormal
environmental conditions or inappropriate operating conditions,
non-compliance with our operating instructions or insufficient
servicing or maintenance.
Additional exclusions:
• Battery packs, chargers and supplied accessories are not included
in the extended guarantee.
Defects covered by the guarantee, that are acknowledged by Tacwise
as being covered by the guarantee, shall be corrected either by
means of repair of the faulty tool free of charge or by replacement
with a tool in perfect working order (this may be a later model).
Retained tools for which a replacement has been provided shall
become the property of Tacwise Plc.
Claims other than the right to correction of faults in the tool named in
these guarantee conditions are not covered by our guarantee.
Services provided under guarantee do not lengthen or renew the
guarantee period of the tool. The above guarantees apply to tools that
are bought and used in Europe.
Register your power tool online within 4 weeks of purchase
to receive an extended guarantee up to 3 years!
For details of your nearest Tacwise Service Engineer or appointed
service agent, please email [email protected], or to register your
warranty visit www.tacwise.com/warranty-registration
Scan the QR Code above for answers to frequently asked
questions about our tool range.
 Loading...