

Page 1

0
July 23, 2013
TACTICAL POLICING | 55/148 CHESTERVILLE RD, MOORABBIN, VIC 3193, AUSTRALIA
CITE User Manual V 1.1
Page 2

1
July 23, 2013
Contents
Introduction ............................................................................................................................................ 3
CITE HD - Wearable High Definition Streaming Video. ....................................................................... 3
Cite Overview .......................................................................................................................................... 4
Top of Cite Unit ................................................................................................................................... 4
Bottom of Cite Unit ............................................................................................................................. 4
Front of Cite Unit ................................................................................................................................ 5
Rear of Cite Unit .................................................................................................................................. 5
Lens Module ........................................................................................................................................ 6
Getting Started ........................................................................................................................................ 7
Kit Contents ......................................................................................................................................... 7
Batteries .............................................................................................................................................. 7
Hot Swap System ............................................................................................................................ 7
Cables .................................................................................................................................................. 9
Power ................................................................................................................................................ 10
LED Lights ...................................................................................................................................... 10
Sleep Mode ................................................................................................................................... 11
Lens Module .......................................................................................................................................... 11
LCD Display ............................................................................................................................................ 13
Cite Functions ....................................................................................................................................... 14
Set Up ................................................................................................................................................ 15
Security ............................................................................................................................................. 16
Recording Video ................................................................................................................................ 17
Manual Activation ......................................................................................................................... 17
Remote Activation ........................................................................................................................ 18
G-Sensor Activation ...................................................................................................................... 18
External Trigger ............................................................................................................................. 18
Viewing Recorded Video ................................................................................................................... 19
Using the Remote Control................................................................................................................. 20
Pairing the Remote with the Cite Unit .......................................................................................... 20
Activate/Deactivate Recording ..................................................................................................... 20
Checking Battery Health ............................................................................................................... 21
Lock Out Button ................................................................................................................................ 22
Mode Functions .................................................................................................................................... 22
Tactical Mode .................................................................................................................................... 22
Page 3

2
July 23, 2013
Pre-record Mode ............................................................................................................................... 22
Streaming Video Mode ..................................................................................................................... 23
GPS .................................................................................................................................................... 23
Mounting Options ................................................................................................................................. 24
Data Storage.......................................................................................................................................... 24
Inserting Micro SD Card .................................................................................................................... 24
Removing Micro SD Card .................................................................................................................. 24
Using a Micro SD Adapter ................................................................................................................. 24
Log File .................................................................................................................................................. 25
Time & Date Settings ............................................................................................................................ 25
Time Zones ............................................................................................................................................ 25
Firmware Upgrade ................................................................................................................................ 26
Page 4

3
July 23, 2013
Introduction
CITE HD - Wearable High Definition Streaming Video.
CITE HD is a compact, modular, rugged and secure digital video recording system utilising a 1080P
HD video camera core. The modular design allows for the lens to be mounted separately or attached
to the main body. This allows CITE to adapt to a wide range of mounting scenarios ranging from
head, shoulder chest, vehicle or K9 configuration to name a few.
The Broadcast quality highly detailed 1080P video captured by the CITE camera is augmented by the
integrated GPS and compass system. This overlays the Time / Date / Latitude / Longitude / Speed /
Heading and direction that the camera is pointed over each frame, The video is searchable by these
elements as well as other criteria such as rapid acceleration or depressing an event button to allow
the operator to notate an occurrence allowing for easy indexing and later location of specific events.
Using the remote trigger system the camera can optionally be activated by a wrist mounted
transmitter, rapid acceleration or when the vehicle lights / siren are activated. When combined with
the pre-record feature this ensures that vehicle based incidents will be captured in their entirety
without the need for a vehicle mounted camera system and officer mounted microphones. If the
CITE unit is permanently mounted in a vehicles then power and remote triggers functions can be
hardwired to the vehicle.
A dual hot swap battery system allows for changing of batteries without interrupting the operation
of the equipment. A variety of battery configurations are available starting at 4 hours of continuous
recording. The addition of the option streaming video module allows real time video to be sent to a
vehicle, station or remotely located recording equipment.
An integrated 2.5” LCD screen allows the operator to ensure correct alignment of the lens module
prior to use. In addition it also allows for infield replay of any recorded event. A tactical button
ensures that during night time or covert operations no noise or light is emitted from the unit. The
Cite system supports a removable IR filter and an optional IR illuminator for use in complete
darkness
Specifications:
1080P HD video resolution at 25 / 30 fps
Dual independent battery system allowing for uninterrupted battery exchange
Integrated GPS
Integrated 3 axis digital compass
Up to 32 GB micro SD storage card capacity
4GB isolated internal log file storage
Pre-record function
External Ports: HDMI, Power, USB, External Audio In, External trigger
Wrist mounted remote control displays GPS coordinates and device status
8 MP geocoded still image camera mode
Operates fully submerged in up to 3 meters of water (greater depths available upon request)
Stereo audio recording
Removable IR filter for improved low light performance
Optional IR illuminator module for operation in complete darkness
Optional Wi-Fi video streaming module
Page 5
4
July 23, 2013
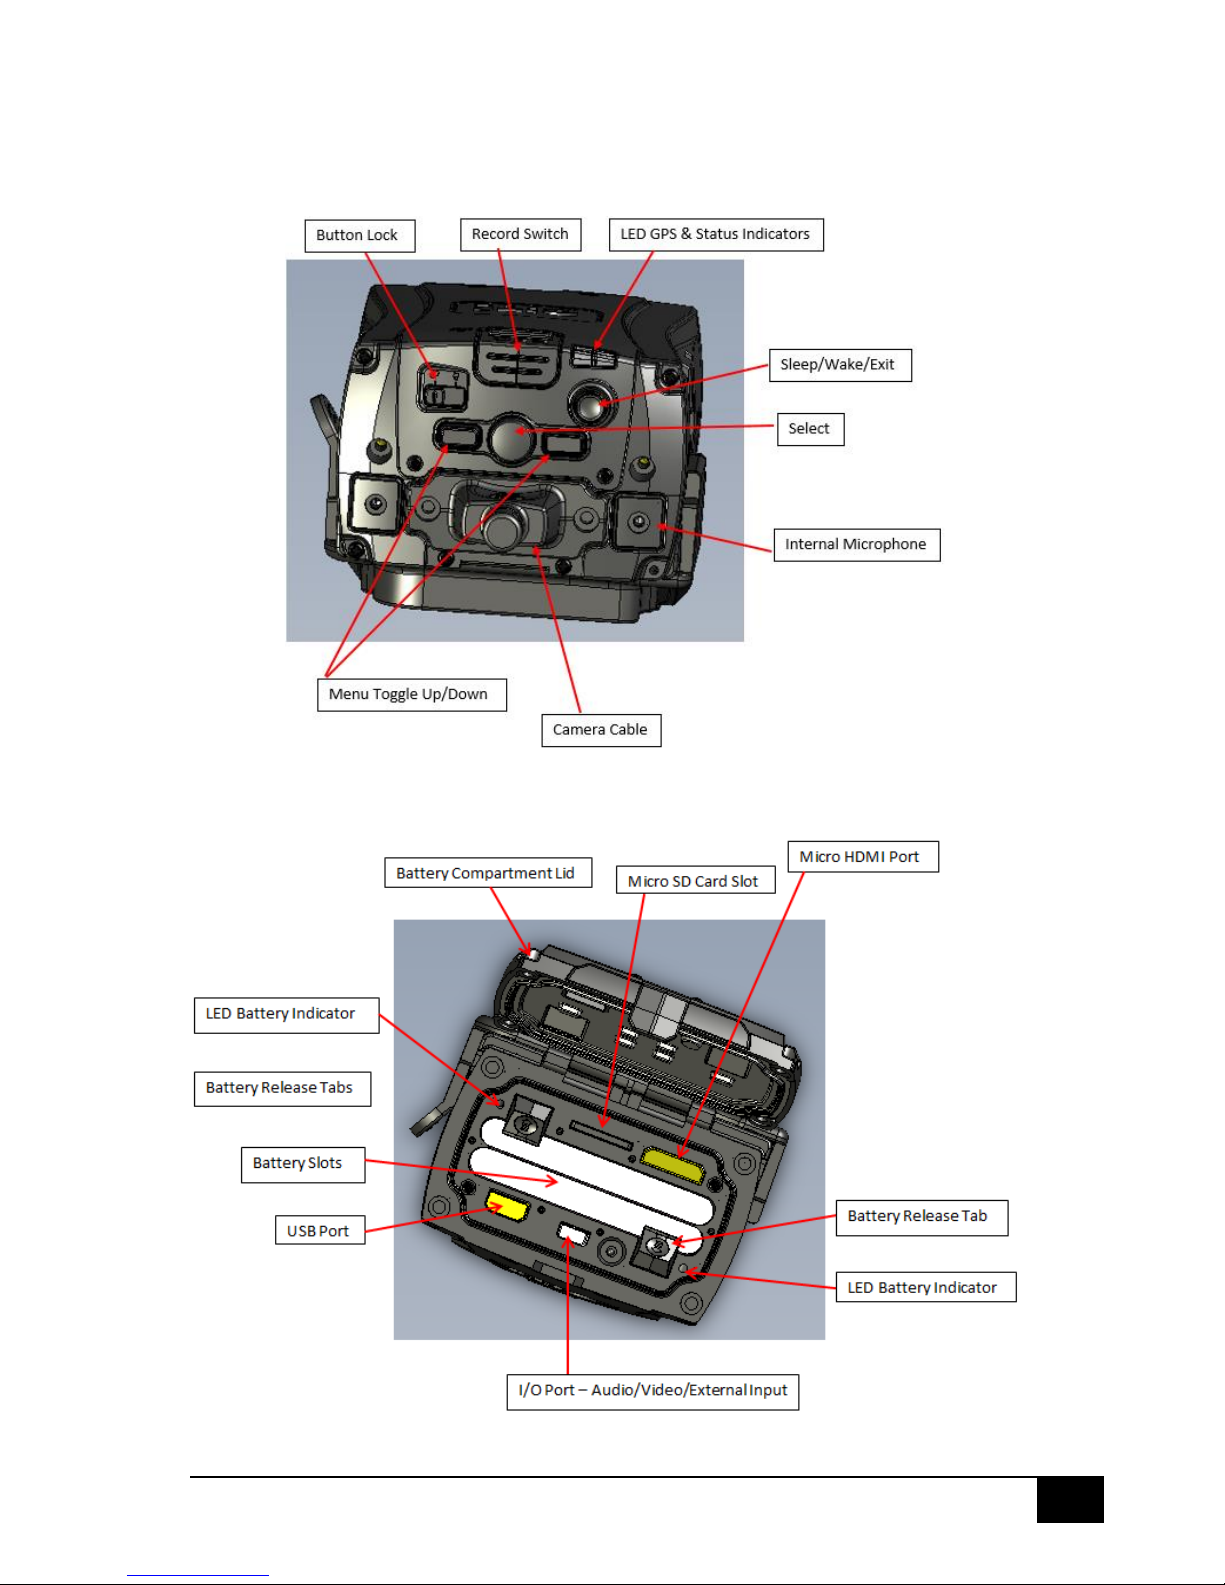
Cite Overview
Top of Cite Unit
Bottom of Cite Unit
Page 6
5
July 23, 2013
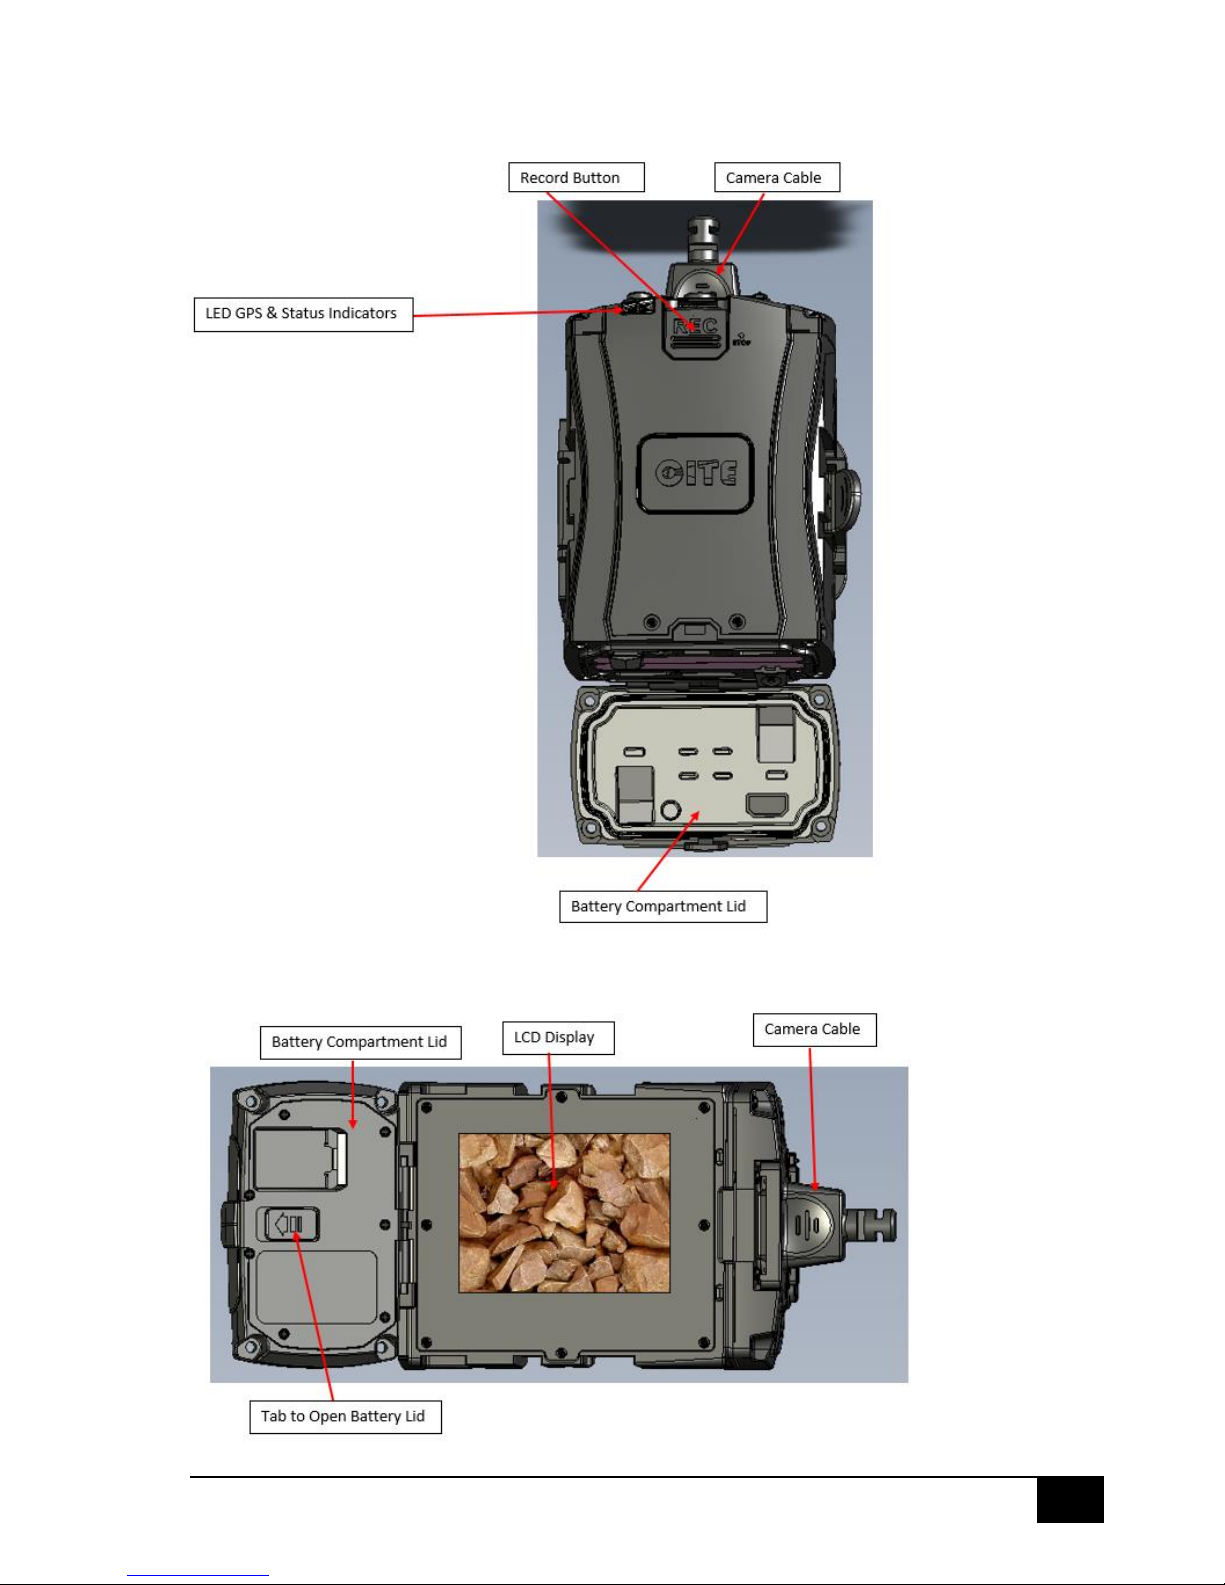
Front of Cite Unit
Rear of Cite Unit
Page 7
6
July 23, 2013
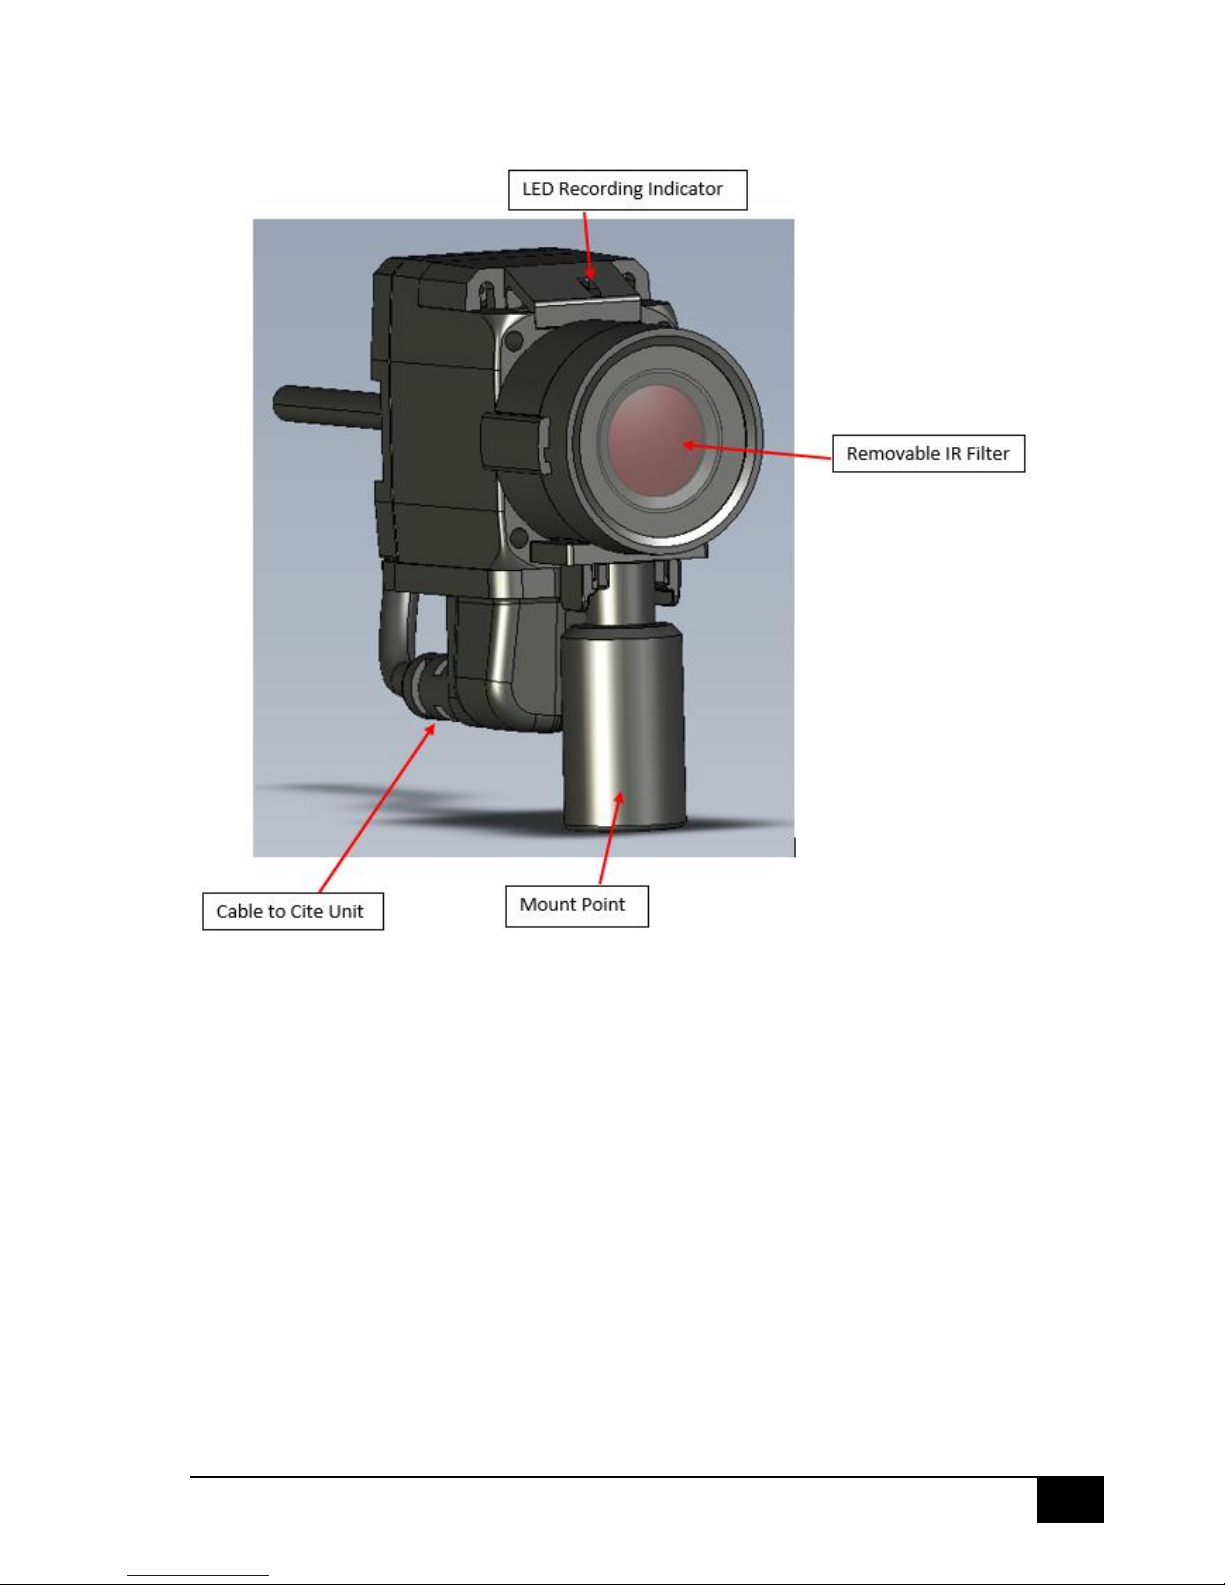
Lens Module
Page 8
7
July 23, 2013
Getting Started
Kit Contents
Each Cite kit contains the following contents:
1 x Cite Unit
1 x Lens Unit
1 x IR Filter (Daytime use)
1 x Clear Filter (Nigh time Use)
1 x Remote Control Unit
1 x USB Cable
1 x Short Cable
1 x Long Cable
1 x Belt Clip
1 x Sunglasses Mount
1 x Collar Clip
1 x Adhesive Helmet Mount
1 x Suction Cup Mount
1 x Car Charger
2 x Rechargeable Li-ion 4.2v Batteries
Optional - 1 x 32 GB Class 10 SD card
Batteries
The Cite unit uses two Li-ion 4.2v batteries. They are located at the base of the unit.
The Cite unit will use the battery with the lowest charge first. When this battery reaches 3.2v, the
unit will automatically switch to the second battery. When the second battery reaches 3.2v and the
first battery has not been replaced, the Cite unit will automatically draw power from both batteries
until all charge has been drained from the batteries.
Hot Swap System
A dual hot swap battery system allows for changing of batteries without interrupting the operation
of the equipment. For the hot swap system to work, the unit must be operating off a single battery,
not both.
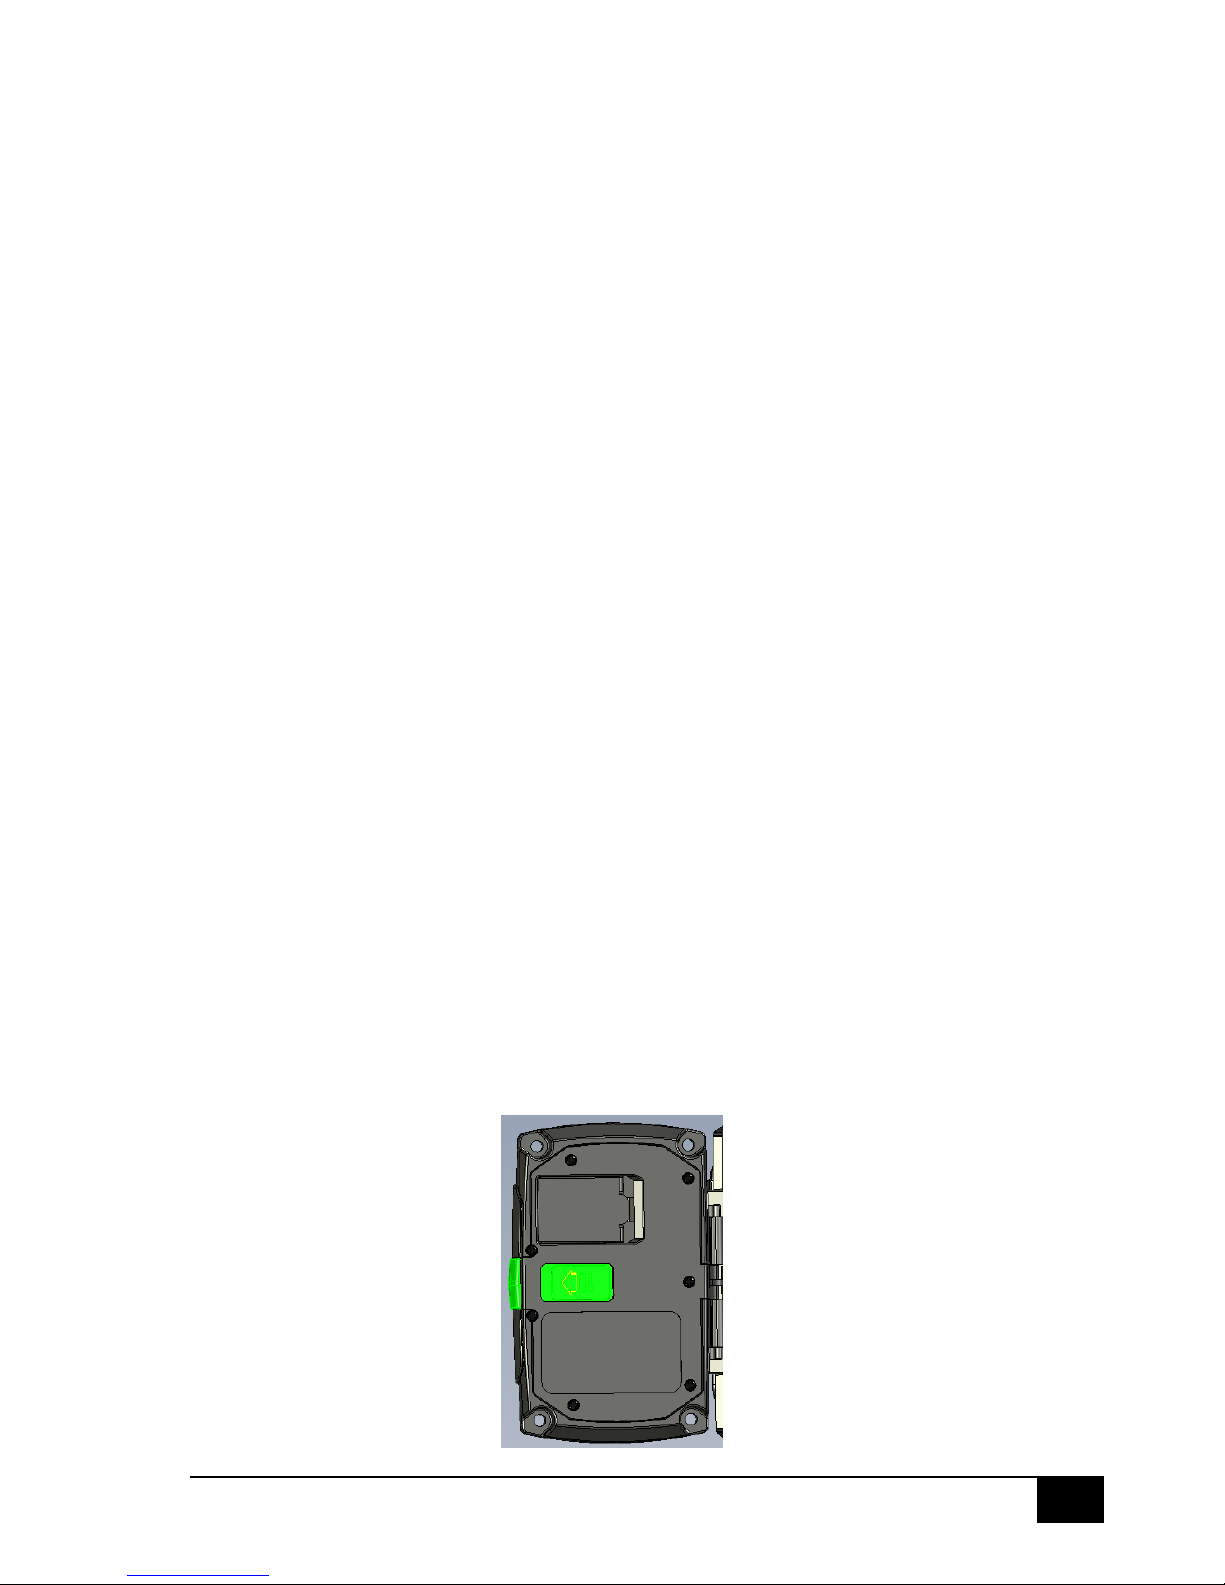
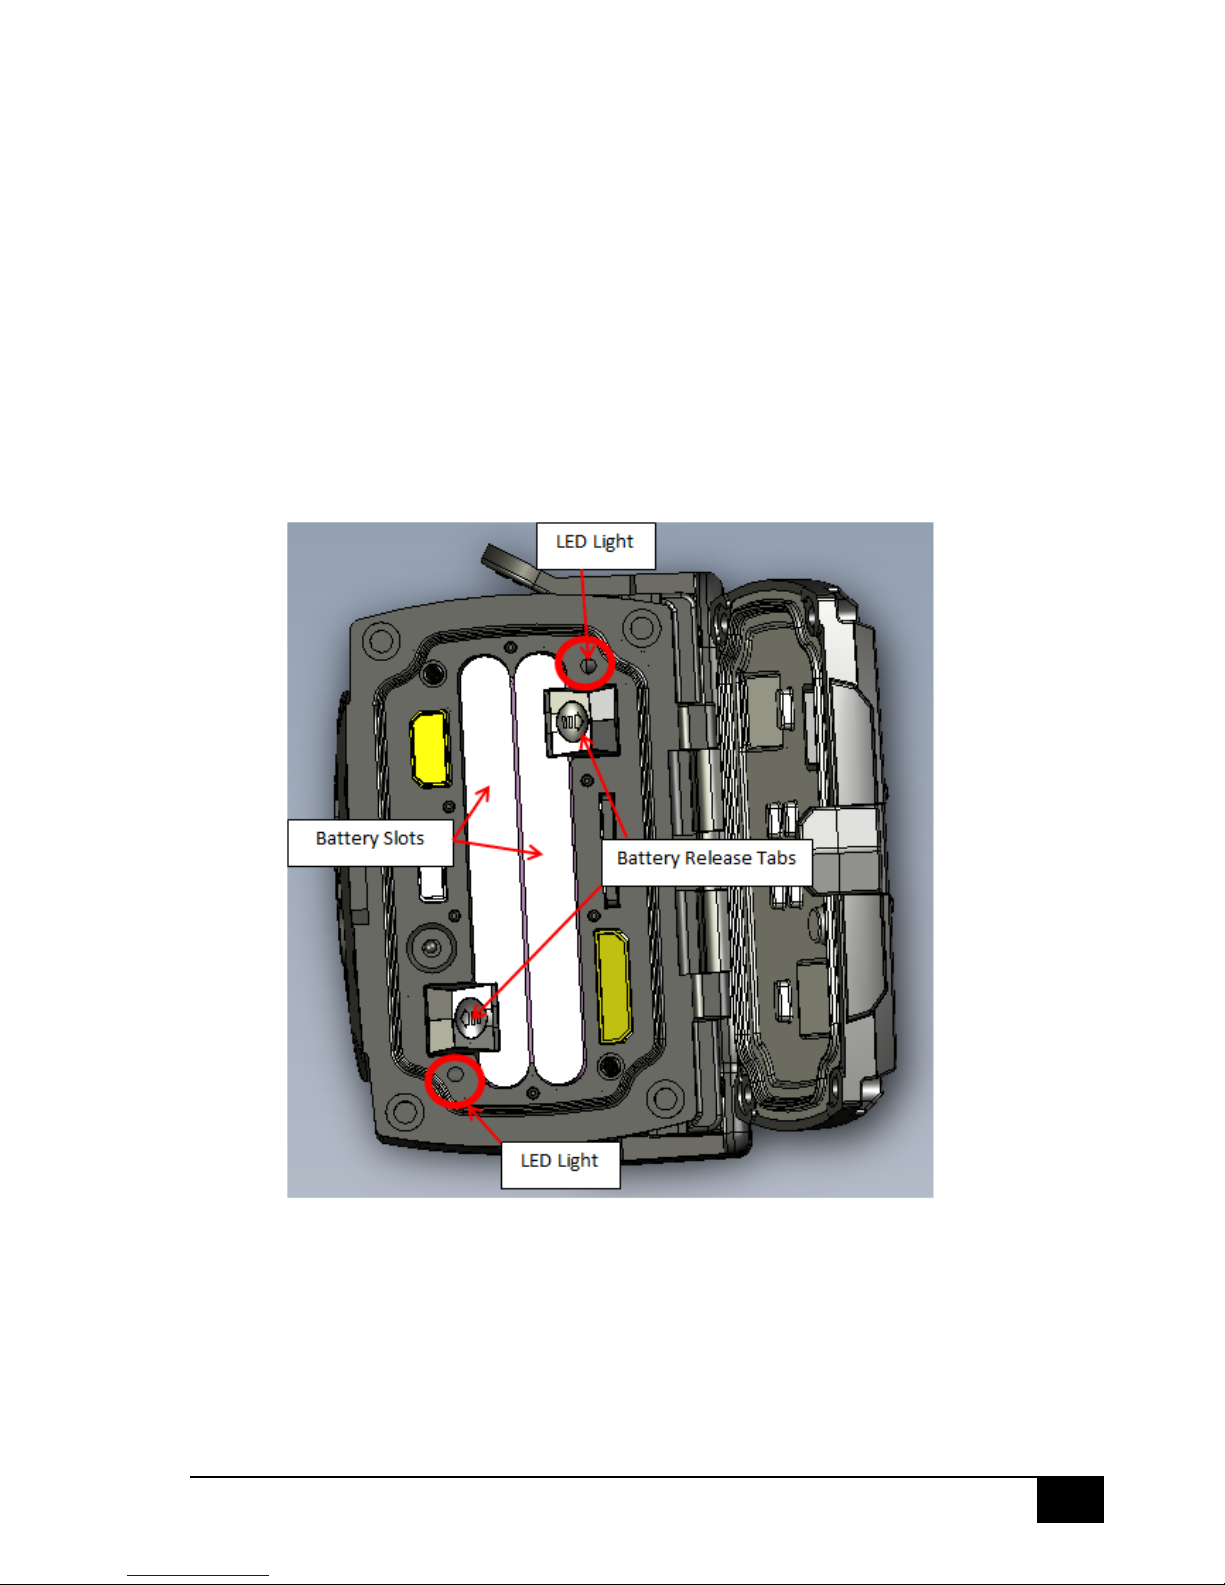
To access the battery compartment at the base of the Cite unit, slide the tab highlighted in the
image below.
Page 9
8
July 23, 2013
The flashing red LED light indicates the battery with the lowest charge. To remove the battery from
the Cite unit, slide the battery release tab. Each battery is spring loaded and will slide forward for
easier removal once the tab has been released.
Replace with a fully charged battery. Ensure the battery is inserted correctly. The battery contact
points inside each battery slot are located at the opposite end of the battery release tab.
If both red LED lights are flashing, both batteries are low and the Cite system is drawing charge from
both batteries. If either battery is removed from the Cite unit when both red LED lights are flashing,
all operation of the equipment will cease. Connect the Cite unit to an external power source via a
USB cable before changing the unit batteries to avoid loss of unit operation.
Page 10
9
July 23, 2013
Cables
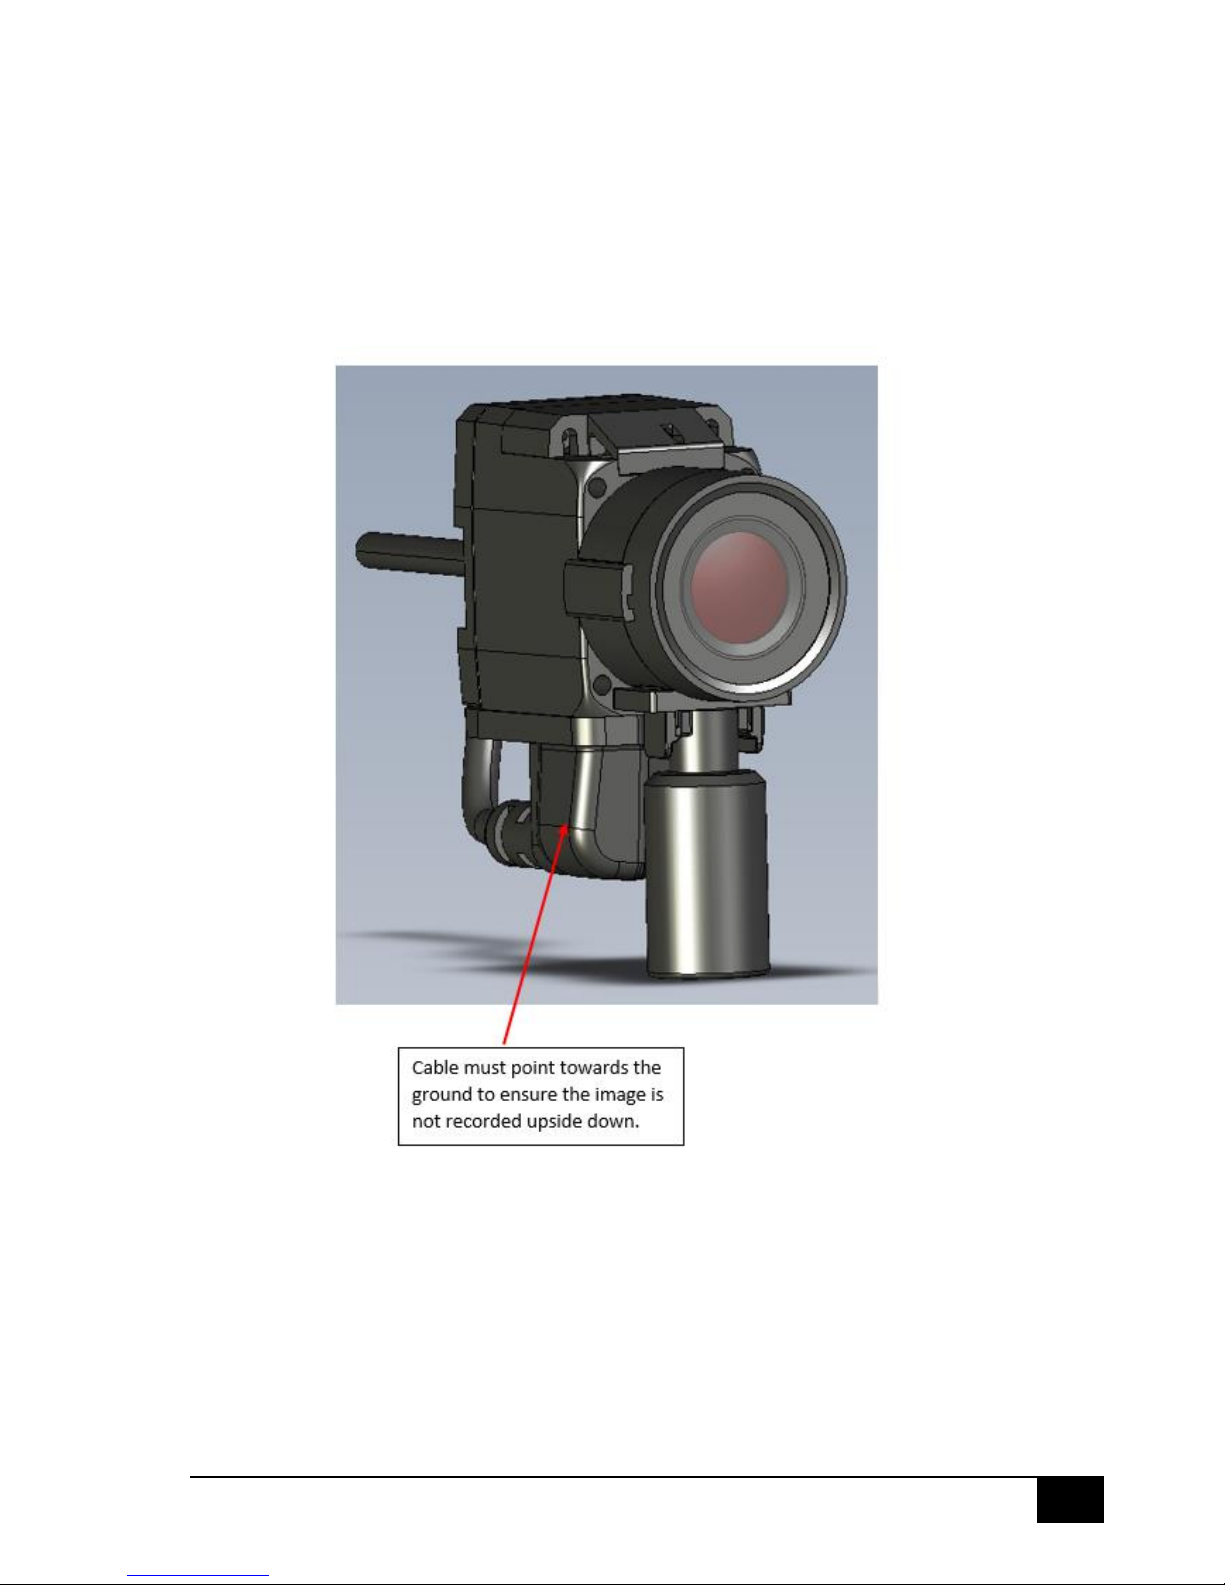
The cable used to connect the lens module to the Cite unit can either be screwed into place or left
unscrewed. When left unscrewed, the cable connecting the lens module to the Cite unit can be
released quickly, however the unit waterproof rating will not apply. When the cable is screwed into
place at both ends, the unit is waterproof to a depth of 3 metres.
It is important to note that when the cable is connected to the lens unit, the base of the cable must
be pointing towards the ground, otherwise the recorded image will be upside down.
Cable lengths can be ordered to any size.
Page 11
10
July 23, 2013
Power
LED Lights
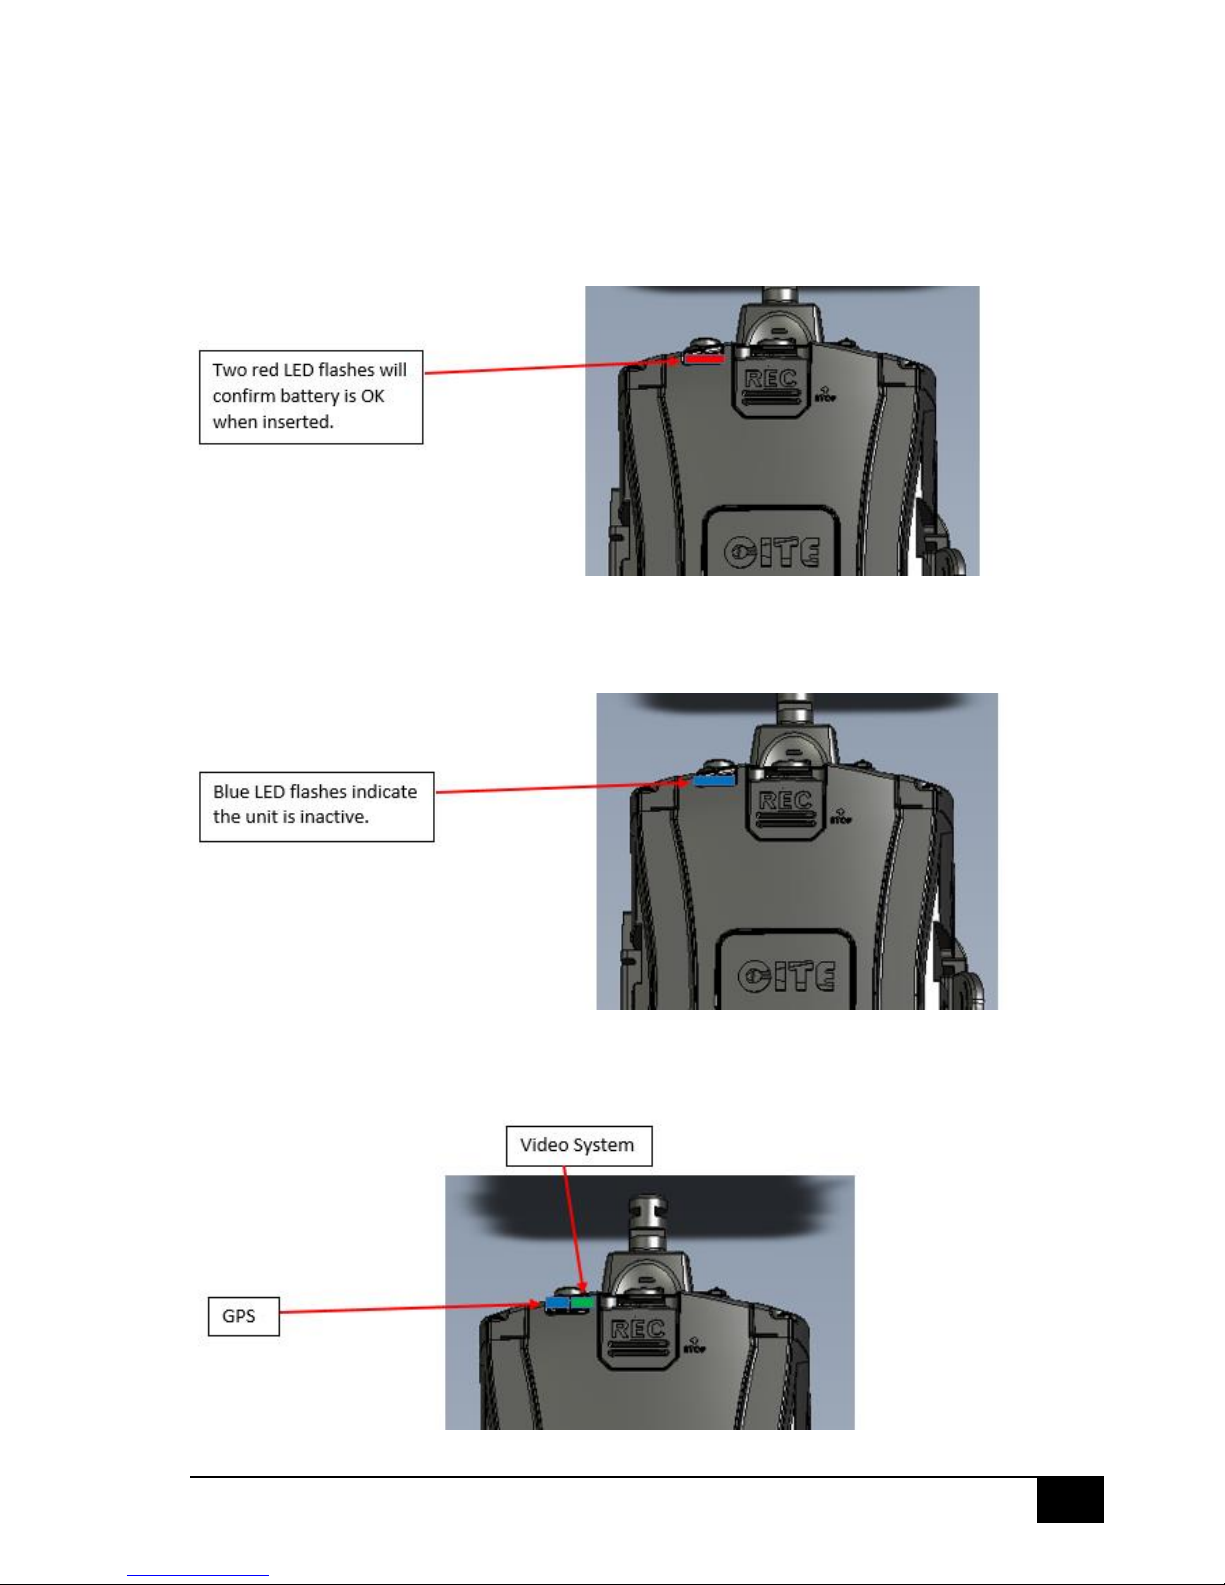
After inserting a battery into the Cite unit, two red LED flashes will confirm if the inserted battery is
OK. If the two red LED flashes do not appear, there may be a fault with the battery and a
replacement should be inserted.
These LED lights also provide information about the status of the Cite unit.
When the LED lights are flashing BLUE, there is no unit activity.
There are two LED lights, when looking at the unit front on, the left LED light represents GPS
functionality and the right LED light represents the video system.
Page 12
11
July 23, 2013
These LED lights can flash one of three colours; blue, green or red.
Blue LED light - There is no activity, e.g. there is no GPS signal and/or the Video system is not
recording.
Green LED light- The system is active, e.g. there is a GPS signal and/or the Video system is recording.
Red LED Light- There is an error.
It is possible to have multiple colours flashing. For example the GPS LED may be flashing blue due to
no GPS signal being available, however the video system LED may be flashing green due to the
recording system being activated.
Sleep Mode
To assist conserve battery life, an option is available to place the Cite unit into sleep mode when not
in use.
To activate sleep mode, depress and hold the ‘Sleep/Wake/Exit’ button until two audible beeps are
heard.
To deactivate sleep mode, depress the ‘Sleep/Wake/Exit’ button once.
NB: when in sleep mode, the unit will commence recording as soon as the record function is
activated. When the recording is deactivated, the unit will automatically return to sleep mode. The
prerecord function will not work whilst the Cite unit is in sleep mode.
Lens Module
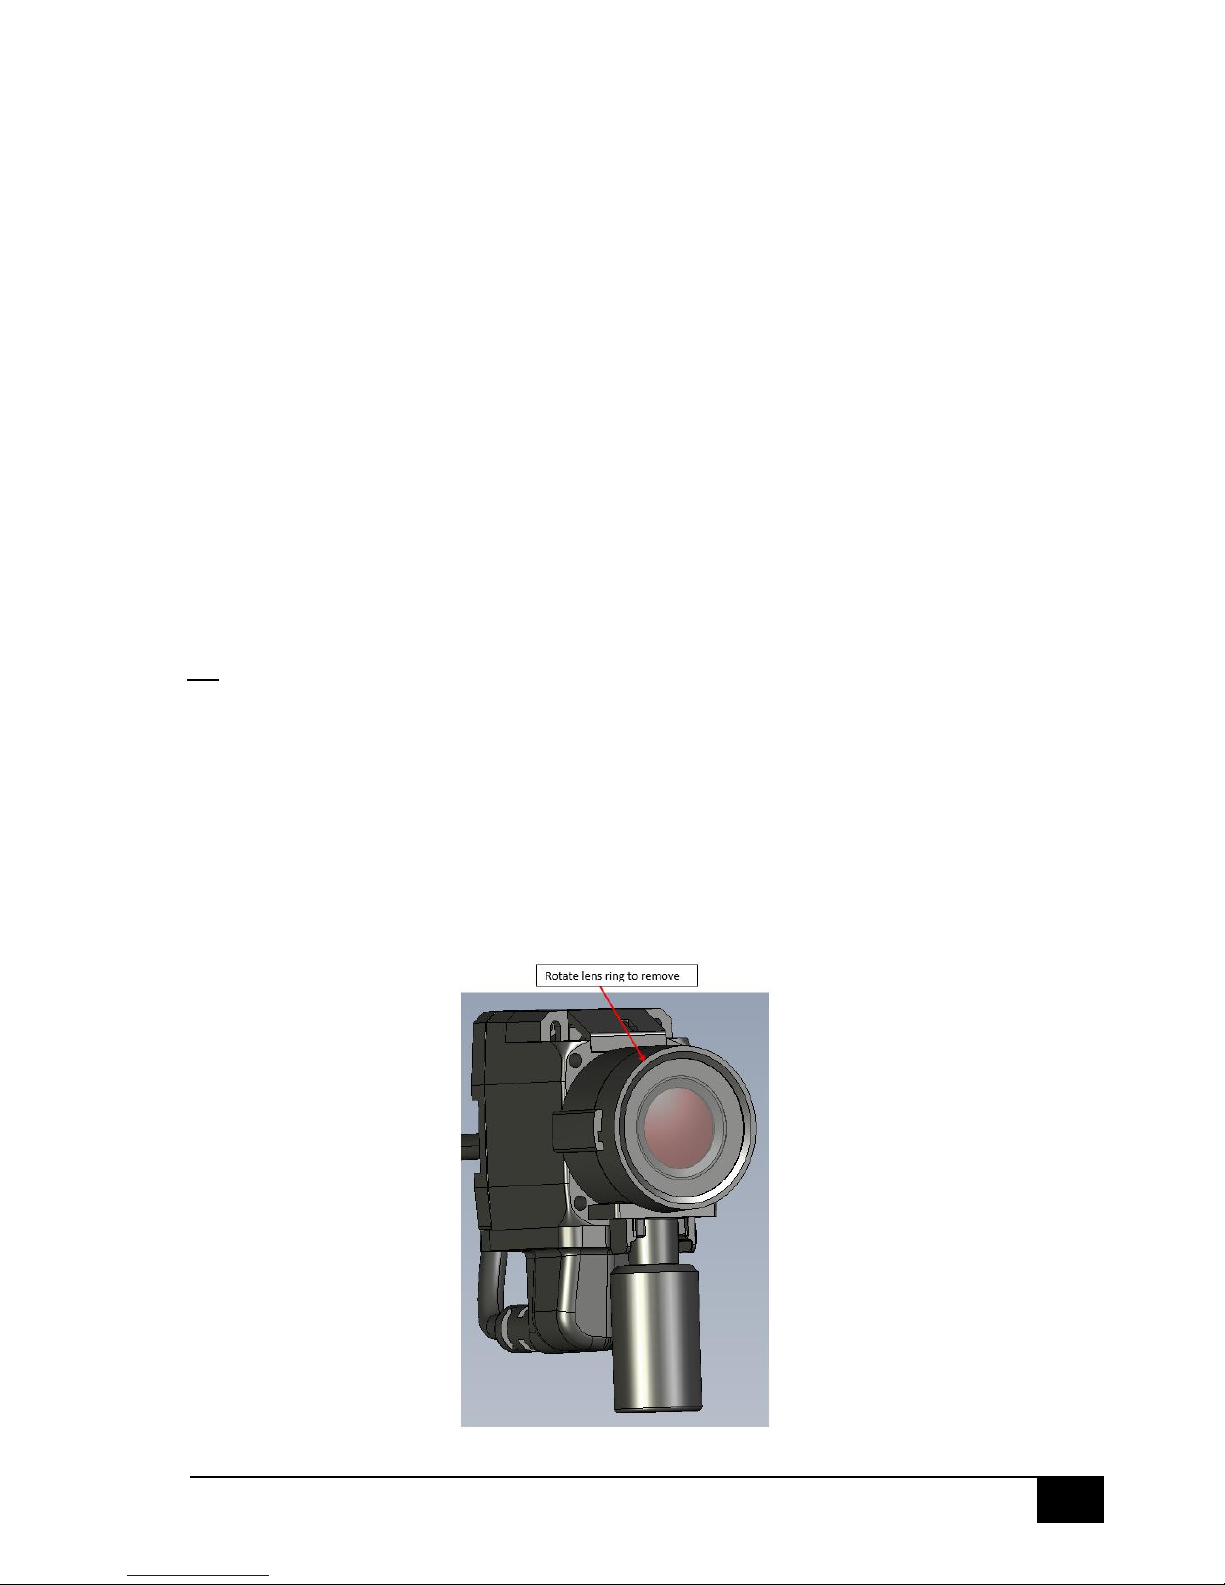
The Cite system supports a removable IR filter and an optional IR illuminator for use in complete
darkness. To change the IR unit, rotate the lens ring anti clockwise, remove and replace with desired
IR unit by reattaching the lens ring and turning it clockwise.
Page 13
12
July 23, 2013
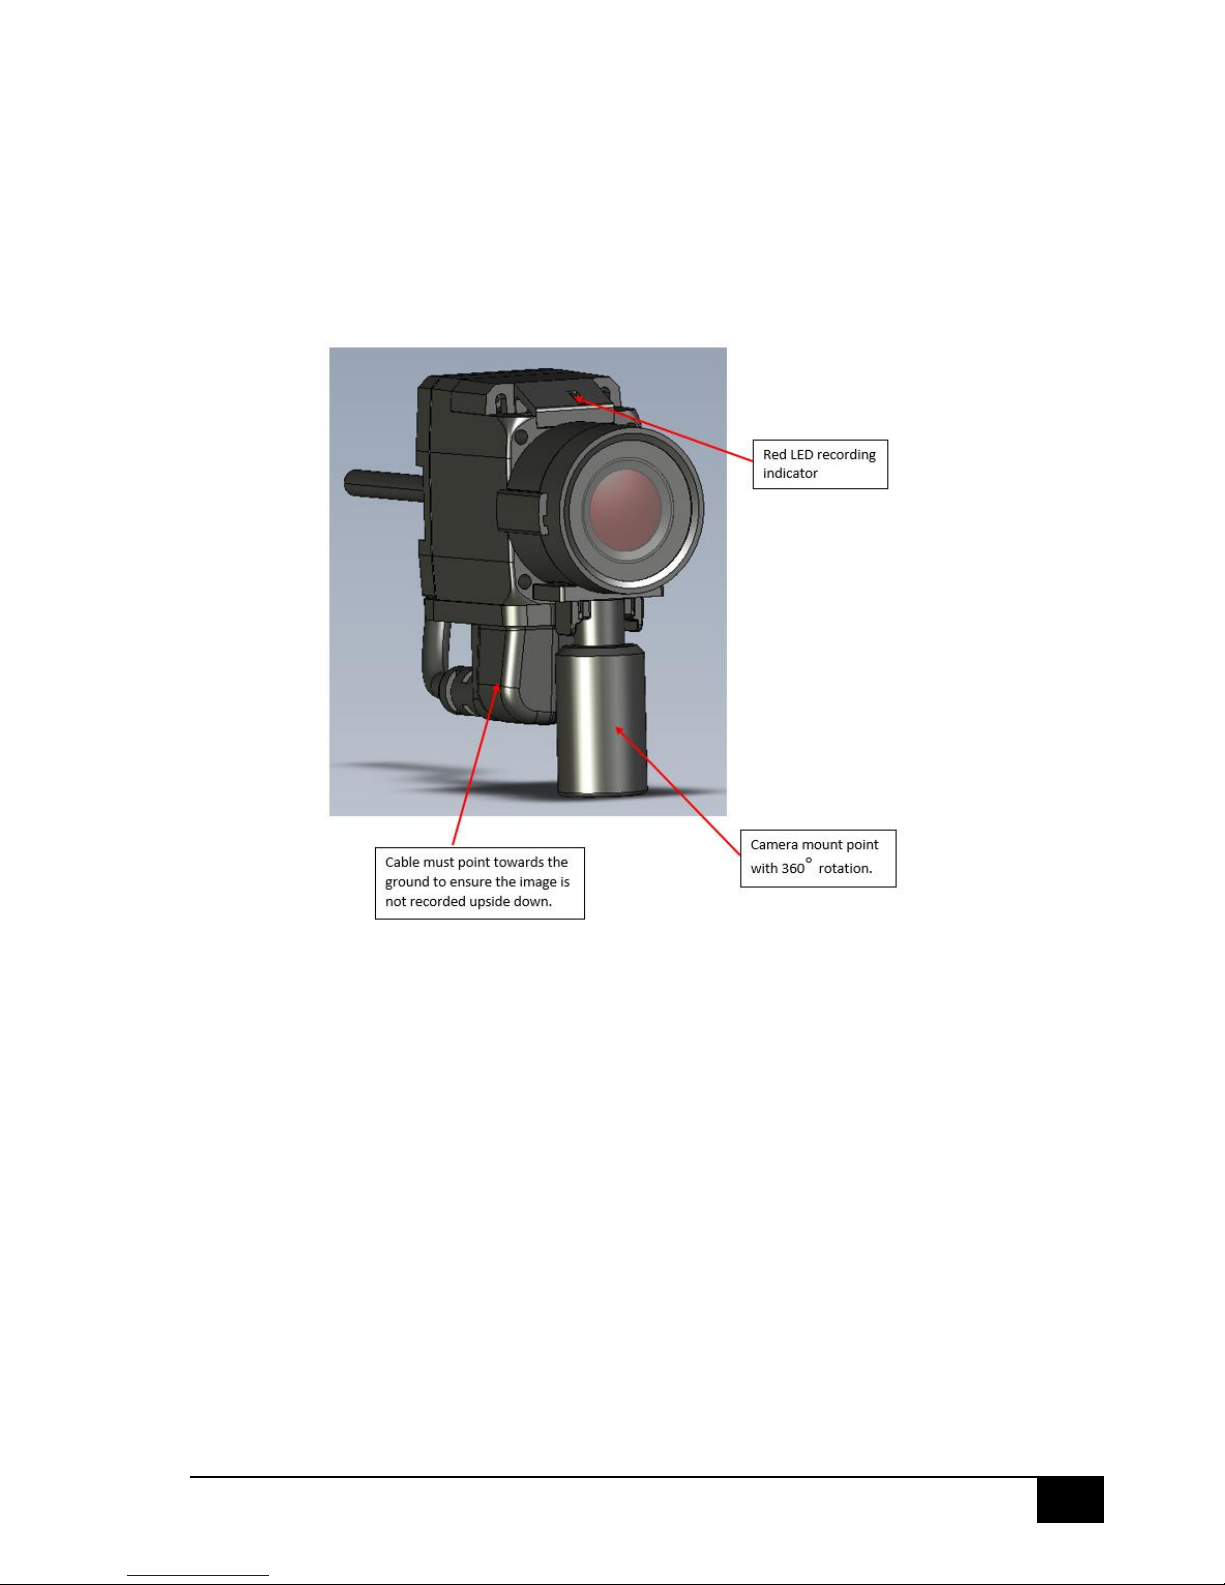
The lens module also has a rotating mounting support located at the base of the lens ring to allow a
mount to be placed at any angle. It is important to ensure that the video cable from the lens module
to the Cite unit is always pointing towards the ground to guarantee the recorded image is not
displayed upside down.
The unit also displays a flashing red LED light when it is recording.
NB: The red LED recording light will not flash when the Cite unit is in Tactical Mode.
Page 14
13
July 23, 2013
LCD Display
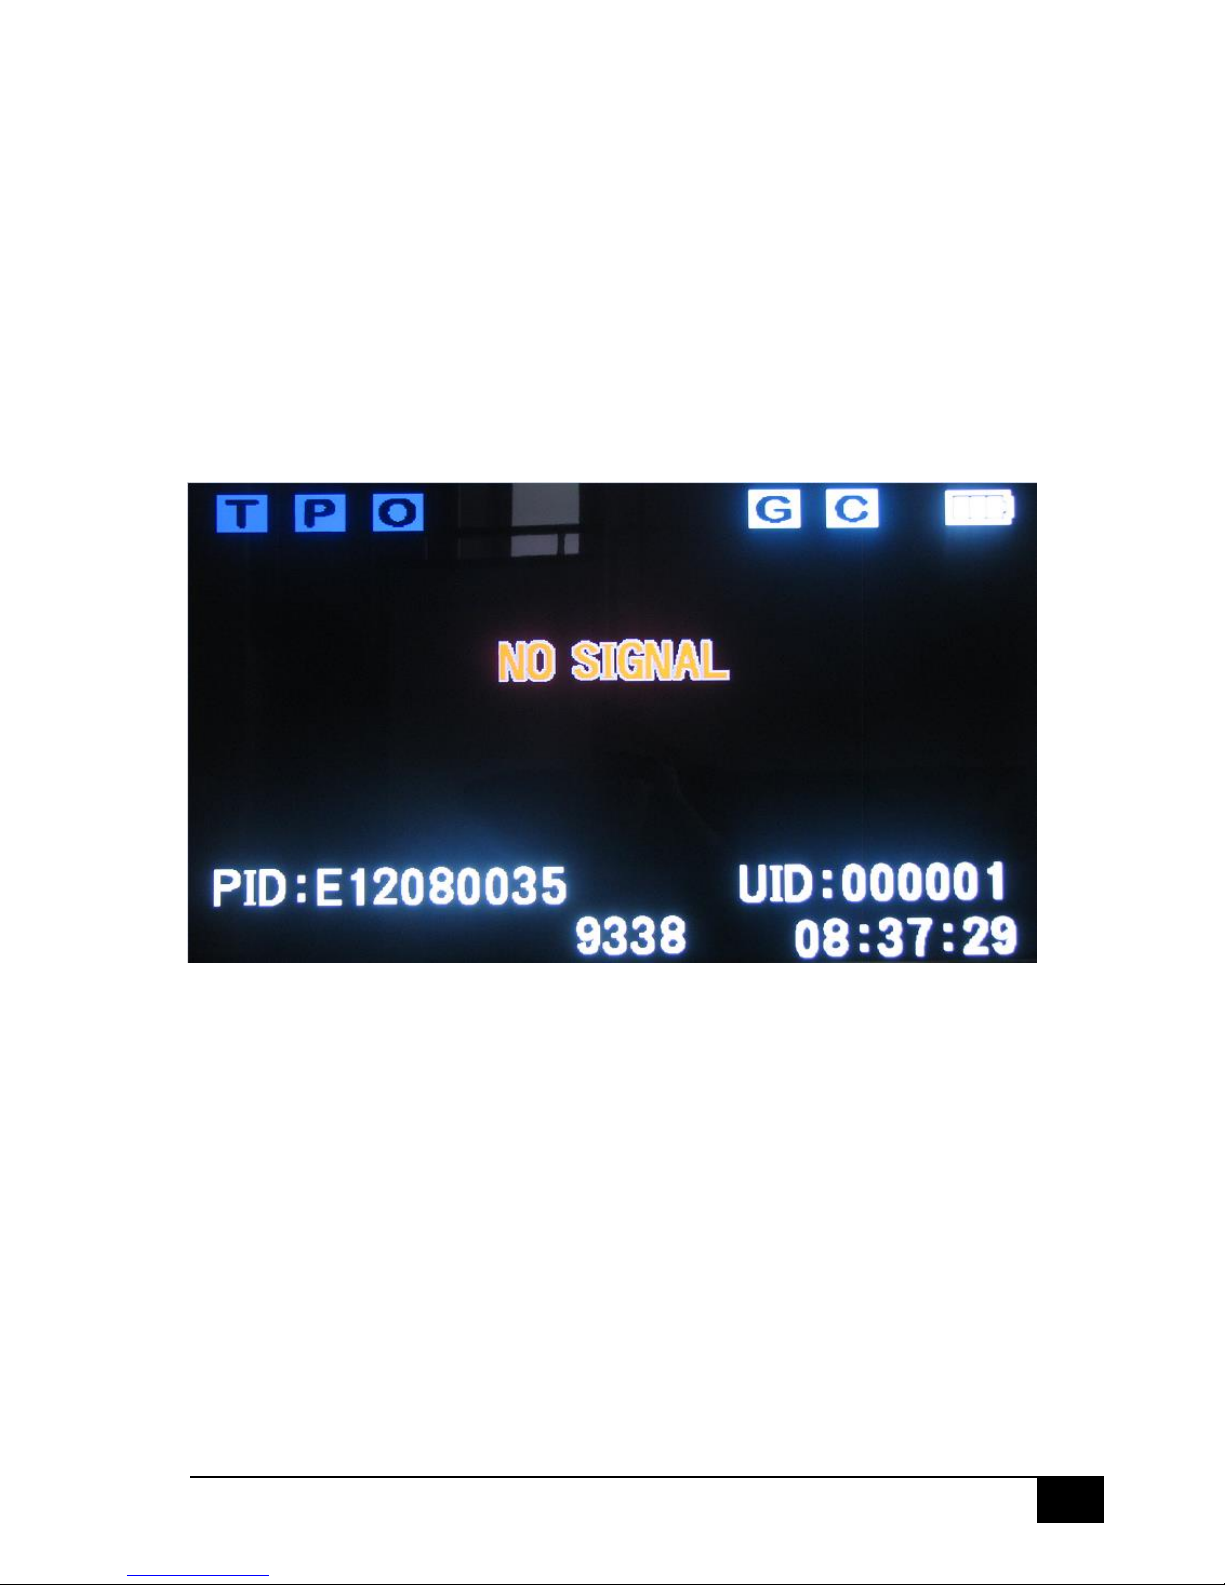
To activate the LCD display, press the ‘Sleep/Wake/Exit’ button once.
A range of information is displayed to the user on the LCD screen.
Located at the top left hand corner are three boxes containing the letters T, P & O. Each letter
represents a different function.
T = Tactical Mode – when the box is dark blue, the mode is active, light blue the mode is inactive.
P = Pre-record Mode – when the box is dark blue, the mode is active, light blue the mode is inactive.
O = Video Streaming Mode – when the box is dark blue, the mode is active, light blue the mode is
inactive.
The progressive record time is displayed at the middle top of the screen.
Located at the top right hand corner of the screen are the letters ‘G’ and ‘C’.
G = GPS - when the box is dark blue, the mode is active, light blue the mode is inactive.
C = Compass - when the box is dark blue, the mode is active, light blue the mode is inactive.
The battery icon displays the amount of battery charge that is left.
The device ID is located at the bottom left hand corner of the screen.
The user ID is located at the bottom right hand corner of the screen.
Page 15
14
July 23, 2013
Cite Functions
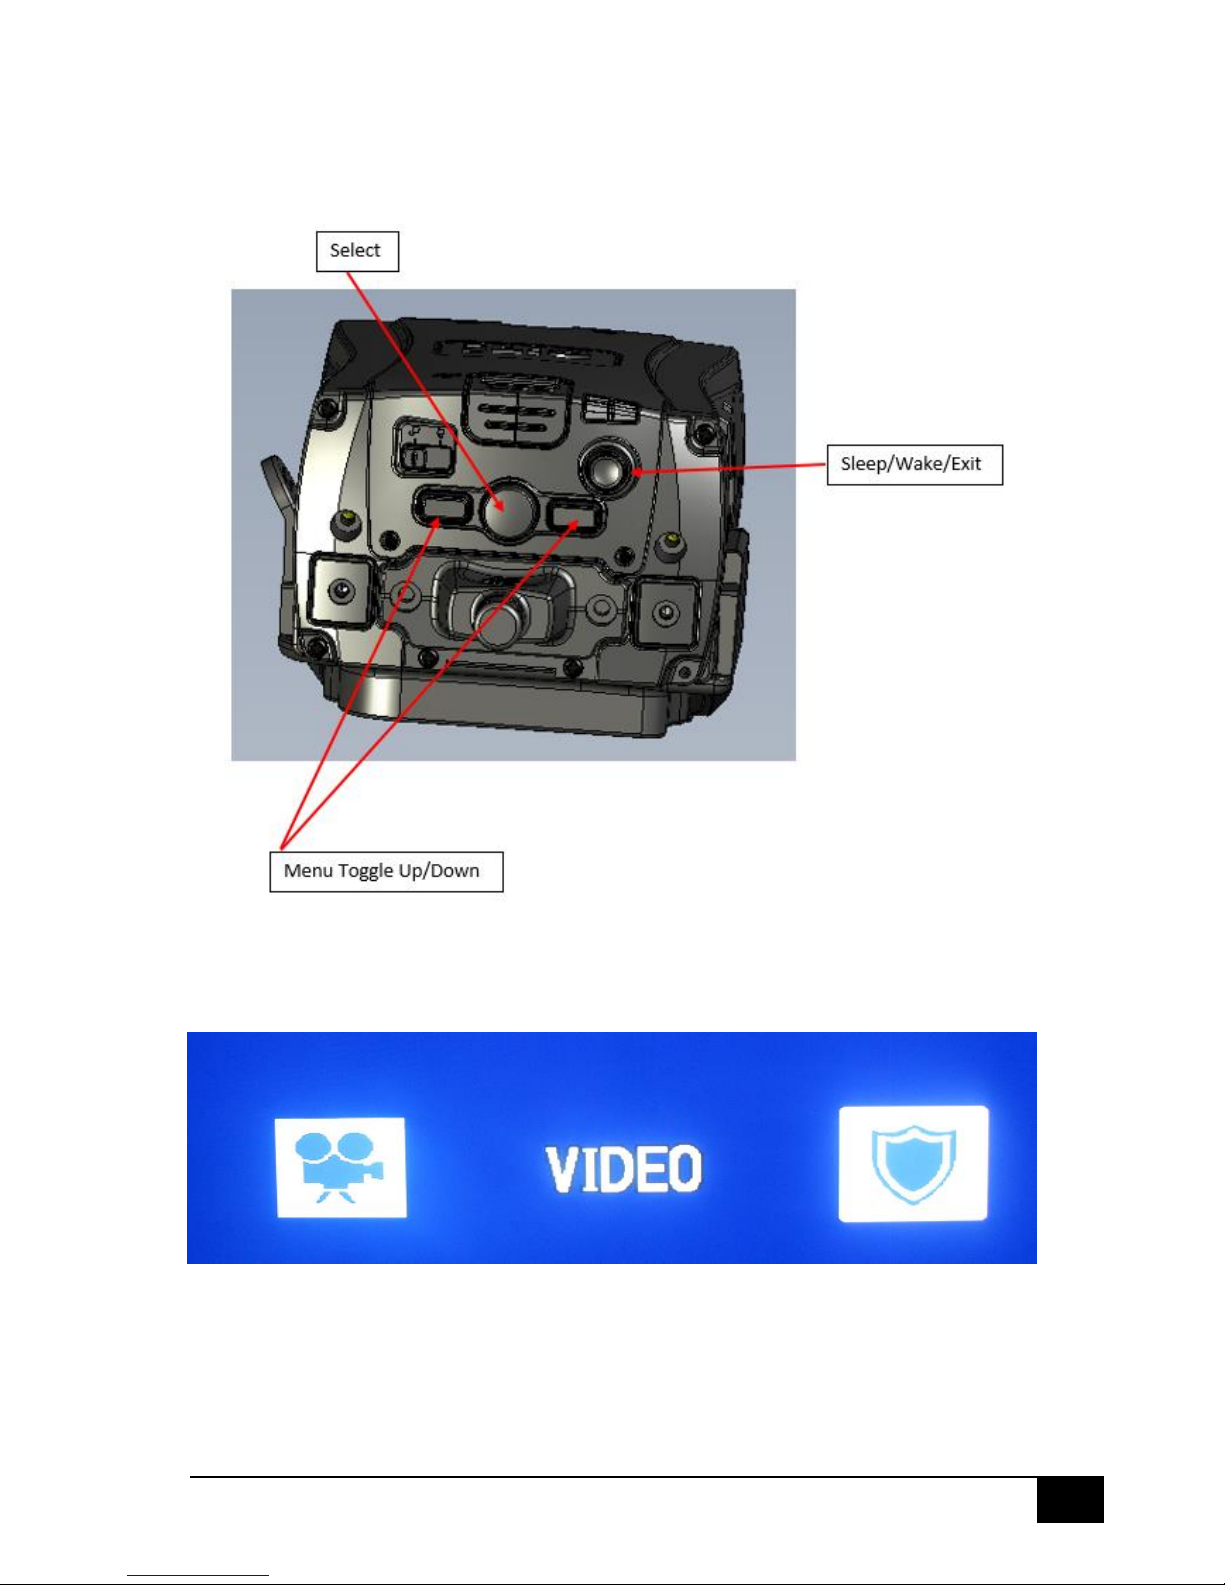
To access the security and set up menus depress the ‘Sleep/Wake/Exit’ button once. The LCD screen
will activate.
Next, depress the ‘Select’ button. Two icons will appear on the screen, a security icon and a set up
icon. Use the toggle buttons to navigate between the two icons. Highlight the required icon, then
depress the ‘Select’ button.
Page 16
15
July 23, 2013
Set Up
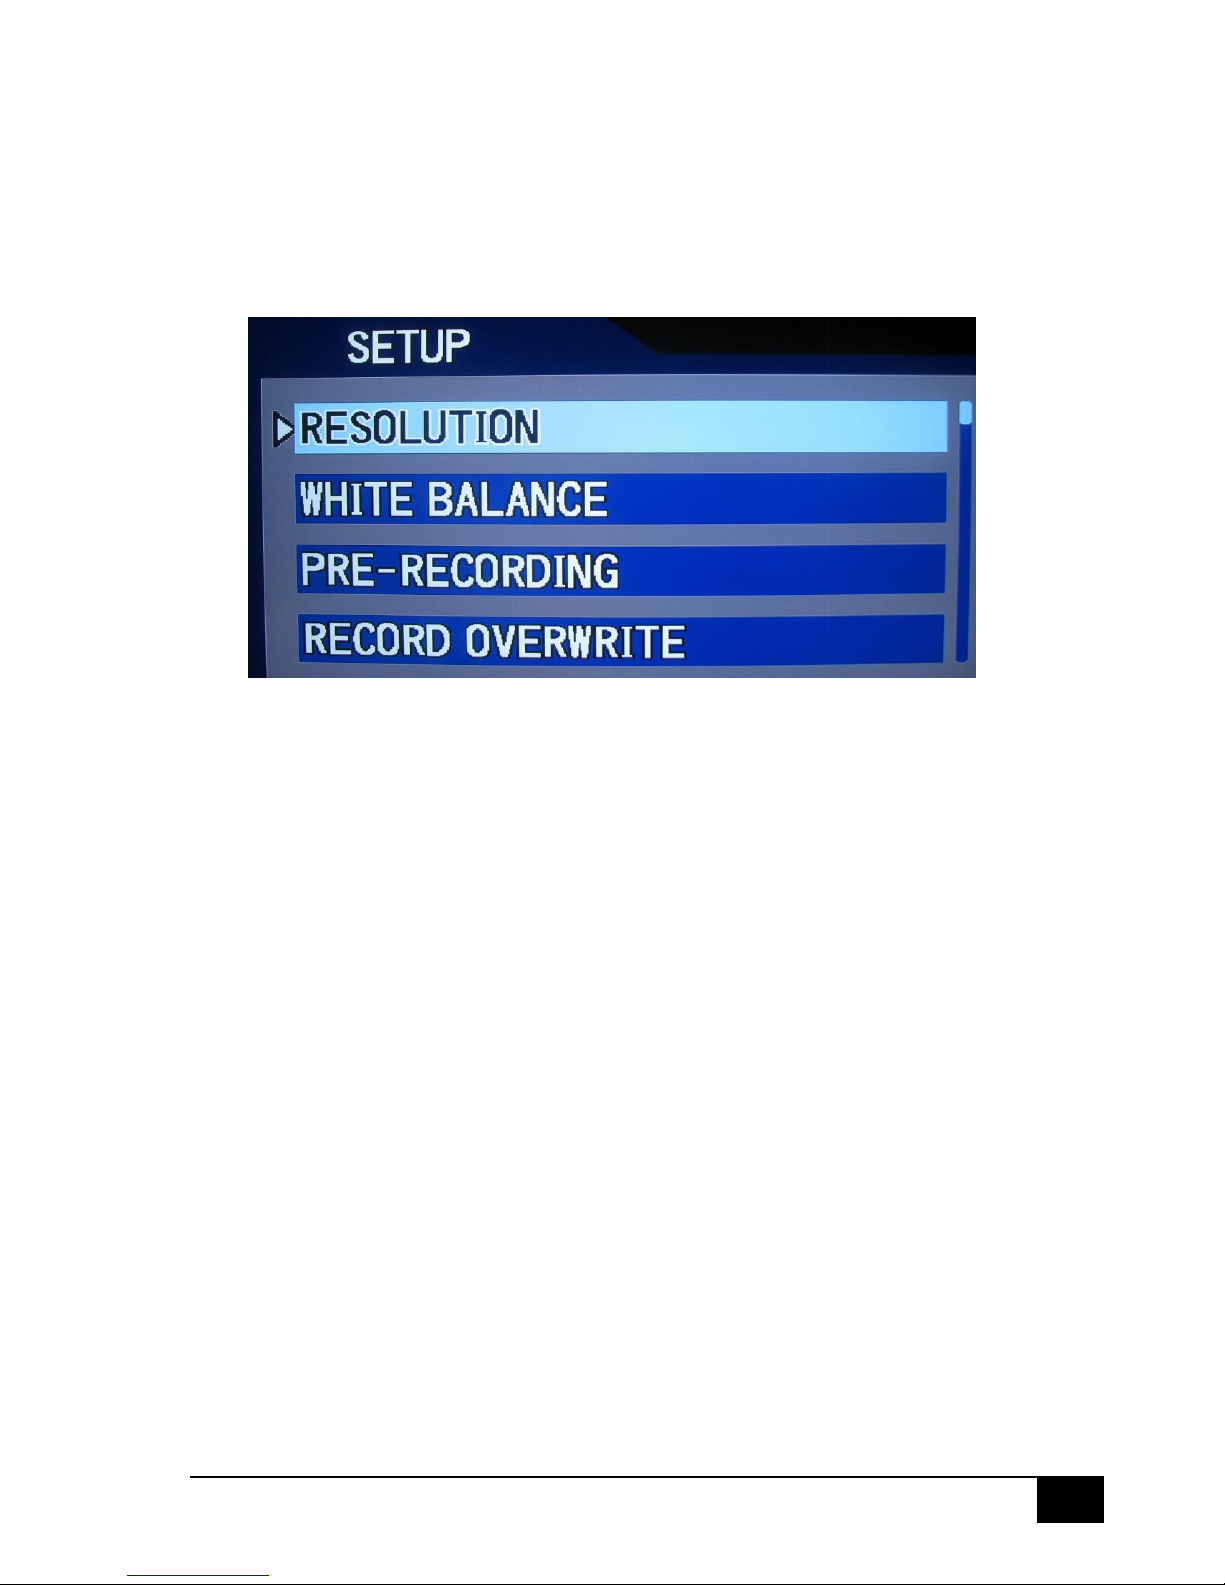
This menu will allow access to the functions listed below.
Use the toggle buttons to navigate between each menu item. Use the ‘Select’ button to access a
highlighted menu. Within each menu use the toggle buttons to select the desired option and then
press the ‘Select’ button to activate. When complete, use the ‘Sleep/Wake/Exit’ button to exit the
menu.
Resolution – Choose the desired image quality, 1080P30, 720P60, 720P30.
White Balance – Set the white balance to automatic or to a pre-determined setting.
Pre-Recording – This turns the pre-record function on/off.
Record Overwrite – If this function is turned on, when the data storage card becomes full, the
system will start to overwrite the oldest files.
Split Mode – To assist ensure data integrity, a new file can be created at pre-determined time
intervals, from 5 – 30 minutes.
Tactics Mode – When tactics mode is activated, all sounds and LED light indicators are turned off.
External Mic – The external microphone is located in the lens unit. This microphone can be activated
or deactivated.
Internal Mic – The internal microphone is located in the Cite unit. This microphone can be activated
or deactivated.
LCD Auto Turn Off – Set the pre-determined time period to turn off the LCD display. Default setting is
30 seconds.
LCD Screen – Turns the LCD screen on/off.
Firmware Version – List the current version of the firmware operating on the Cite unit.
Page 17
16
July 23, 2013
Security
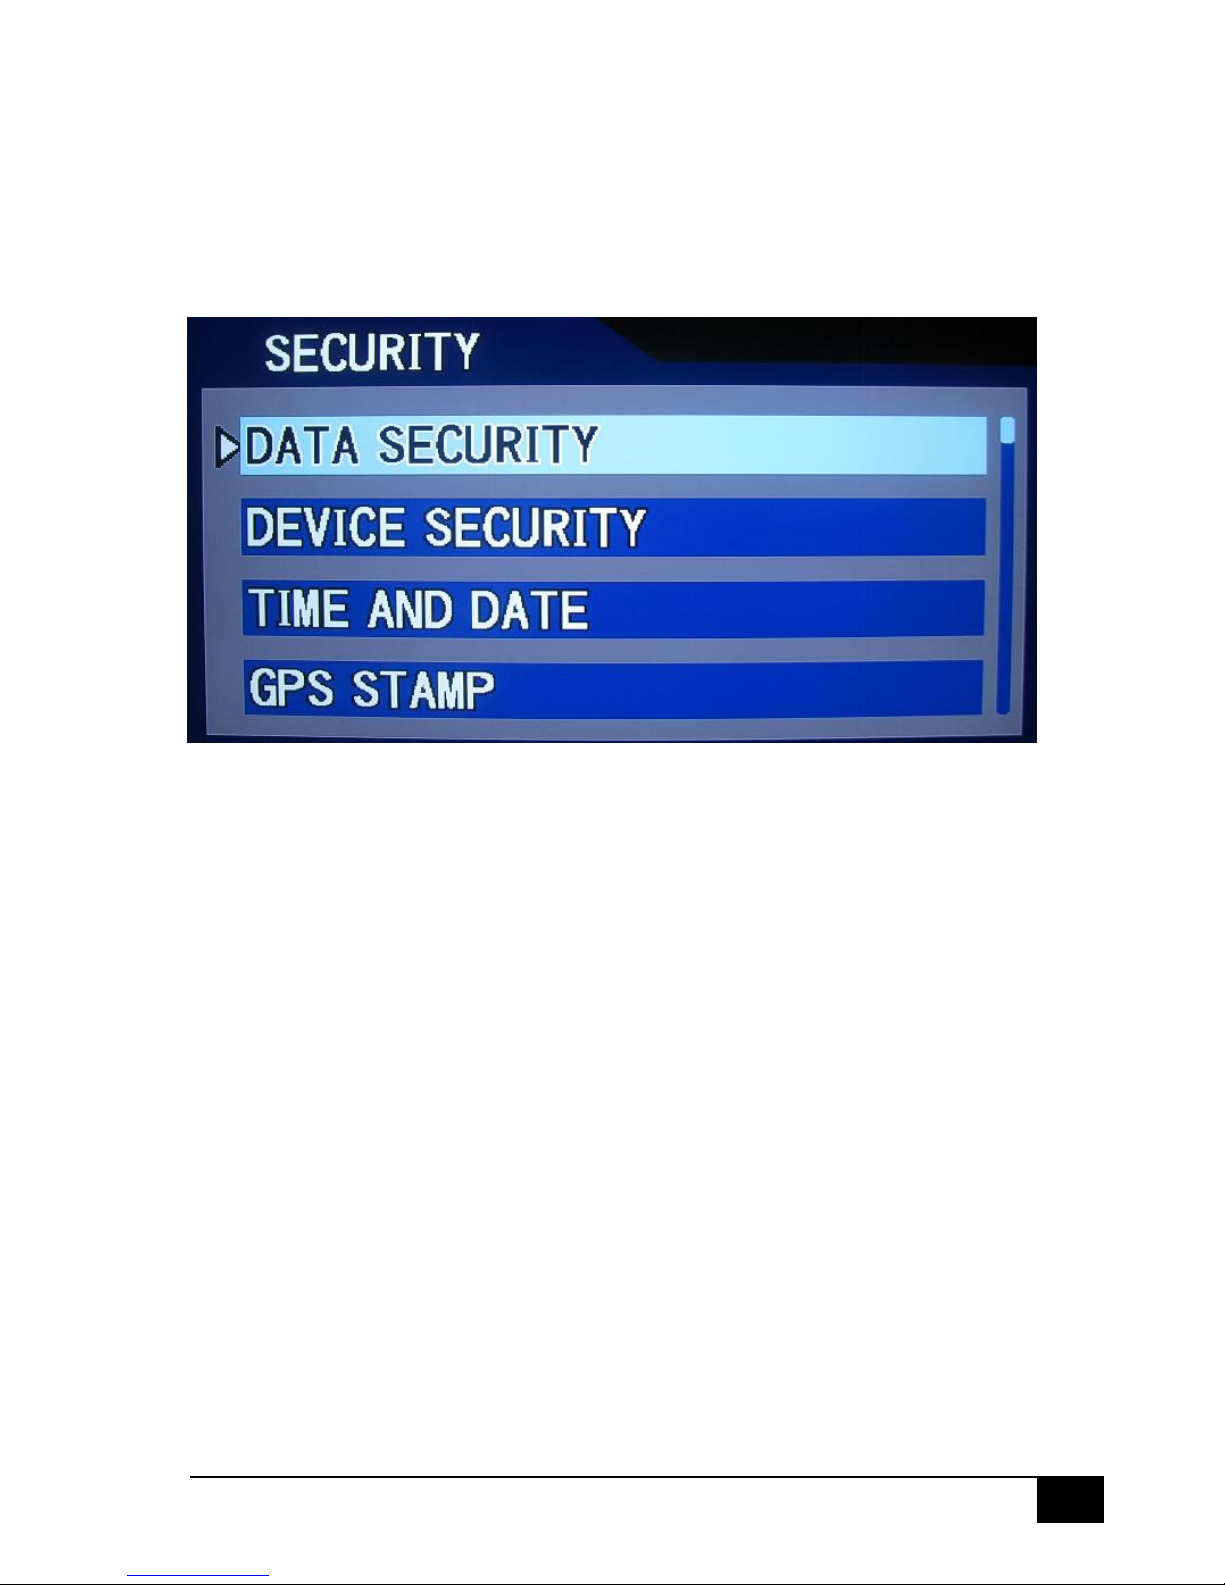
This menu will allow access to the functions listed below.
Use the toggle buttons to navigate between each menu item. Use the ‘Select’ button to access a
highlighted menu. Within each menu use the toggle buttons to select the desired option and then
press the ‘Select’ button to activate. When complete, use the ‘Sleep/Wake/Exit’ button to exit the
menu.
Data Security – Activates/Deactivates the data security function.
Device Security – Activates/Deactivates the device security.
Time and Date – Set automatically using computer tome clock/GPS.
GPS Stamp – Includes GPS coordinates onto the recorded footage.
Language – Select the desired language to be used.
Format – Format the SD card. Warning – all data on the SD card will be lost.
Default Setting – Changes all Cite unit settings back to the factory default settings.
Recording by Gsensor – Any acceleration automatically activates the record function of the Cite unit.
Time Zones – Choose the correct time zone.
Change Password – Change Cite unit password.
NB: all changes made to the Cite unit are recorded in a secure log.
Page 18
17
July 23, 2013
Recording Video
The record function of the Cite unit can be activated in four ways:
1. Manual activation, using the record button on the unit itself.
2. Remote activation.
3. Gsensor activation.
4. External trigger – e.g. activation of lights/sirens.
Manual Activation
To activate the record function manually from the Cite unit, depress the record button. The Cite unit
will commence recording even if it is in sleep mode.
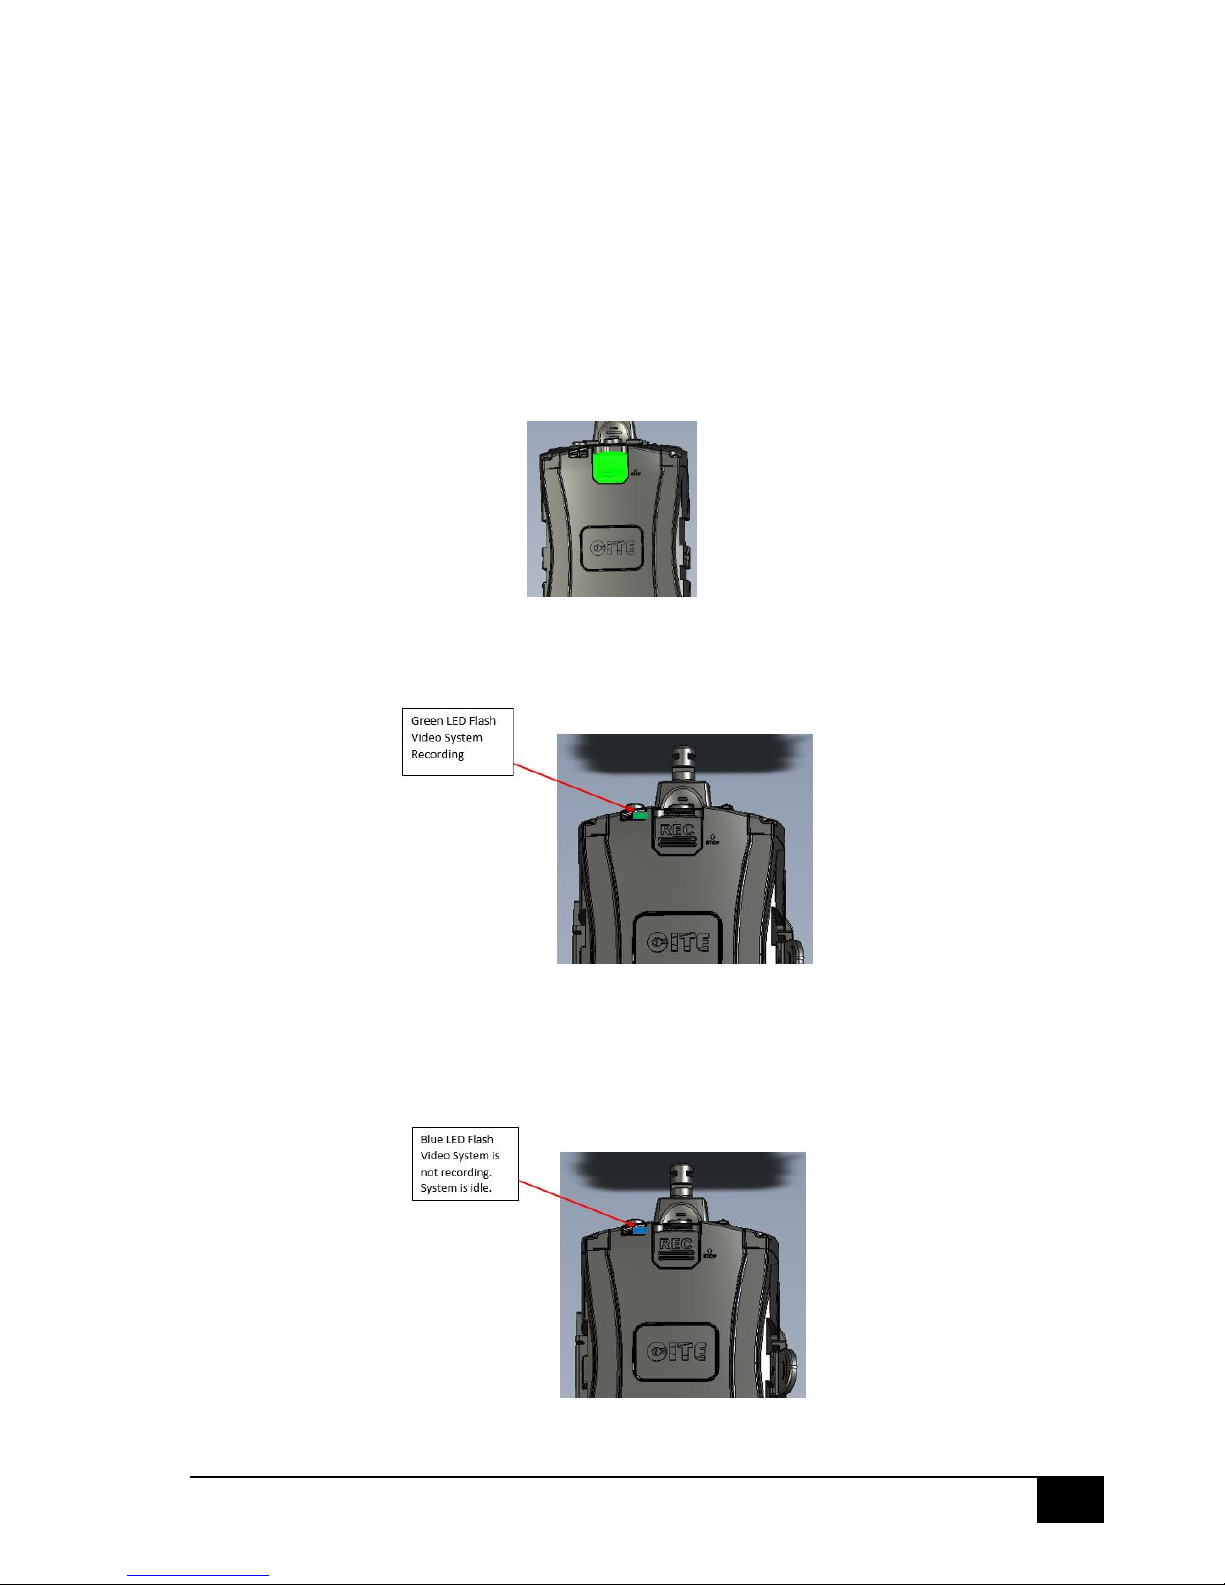
Once the recording has commenced, the right LED light at the top of the Cite unit will start to flash
green.
To stop recording, slide the record button in an upwards direction. When the Cite unit has stopped
recording, the right LED light at the top of the unit will start to flash blue. If the Cite unit was in sleep
mode prior to the recording be activated, the unit will return to sleep mode automatically once the
recording has stopped. In sleep mode the right LED light will not flash.
NB: If tactical mode has been activated, the LED lights will not flash.
Page 19
18
July 23, 2013
Remote Activation
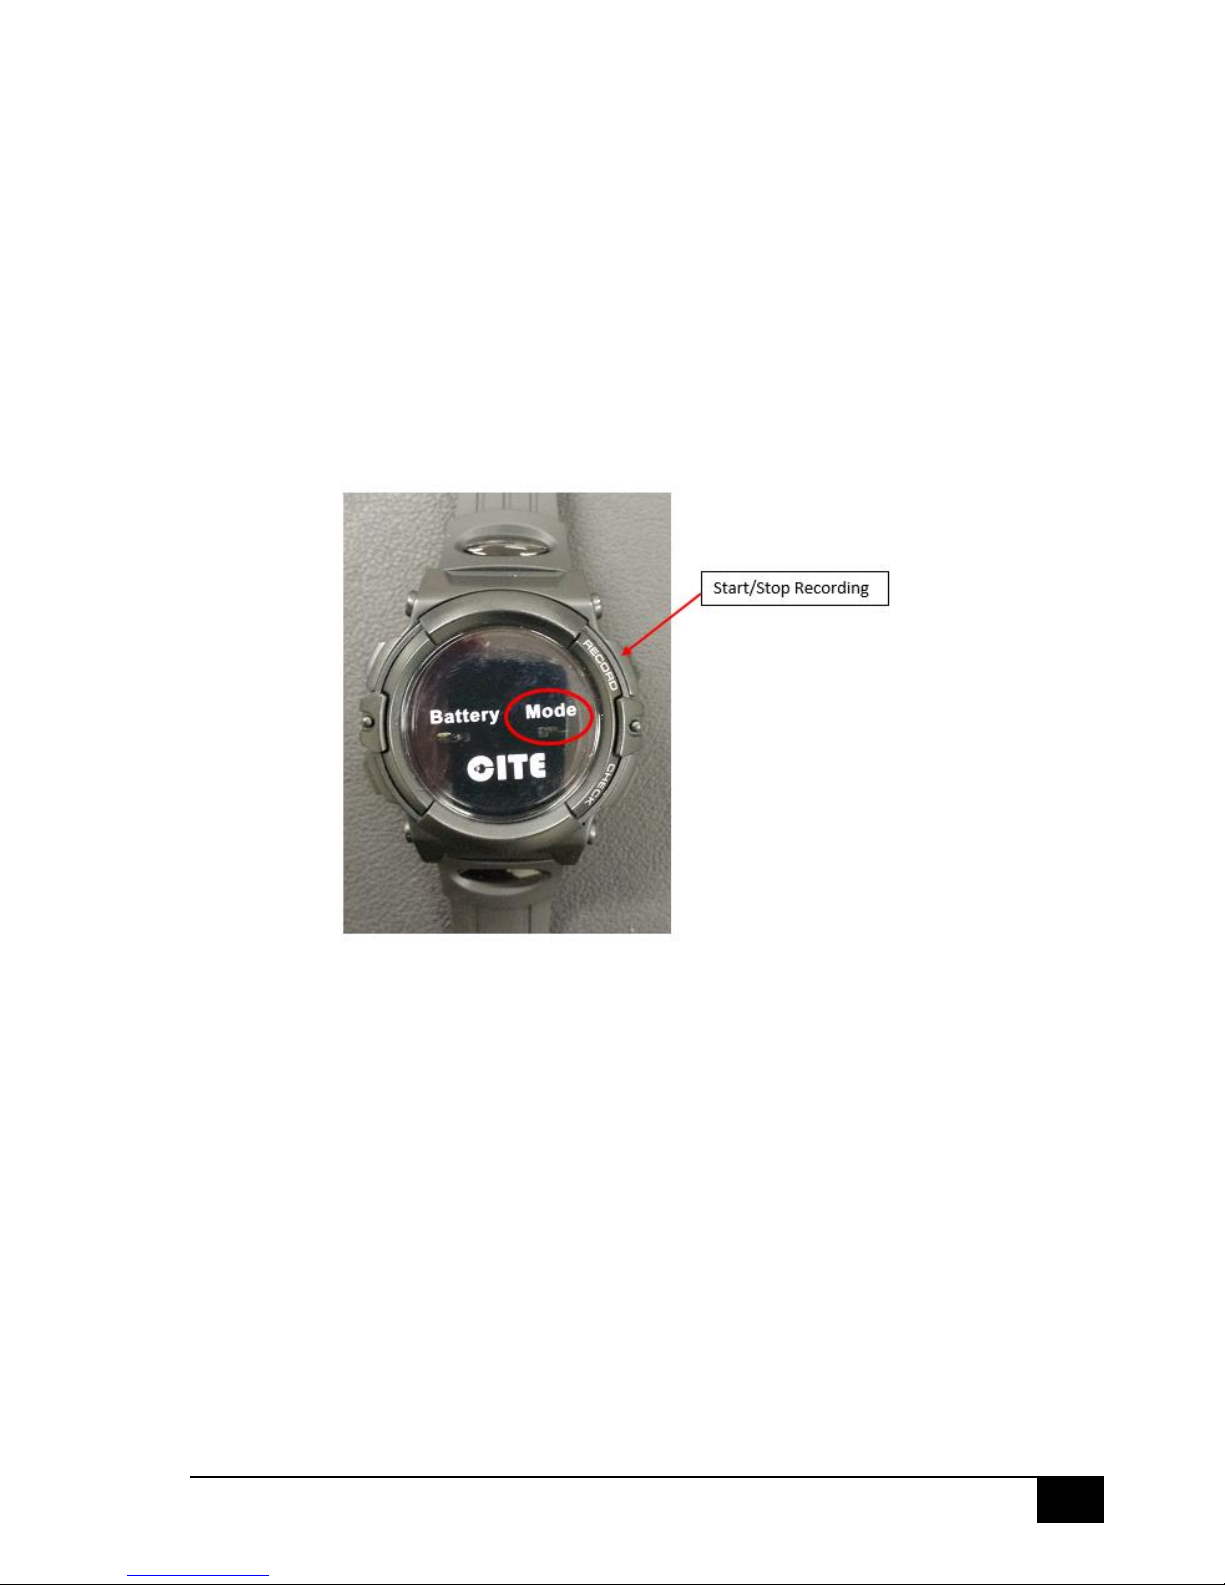
The Cite remote device is similar to a wrist watch. The user can use the remote to activate and
deactivate the recording system.
To activate or de-activate the recording system, press the start button located at the top right hand
corner of the remote.
A LED will flash on the face of the remote under the word ‘Mode’ each time the button is pressed.
Green Flash – System is recording
Blue Flash – System is idle, no longer recording
Red Flash – an error has occurred.
The corresponding LED lights will also flash on the Cite unit as outlined in ‘Manual Activation’ above.
NB: If tactical mode has been activated, the LED lights will not flash.
G-Sensor Activation
If the G-Sensor mode has been turned on under the ‘Settings’ menu, any rapid acceleration, e.g.
walking to running, will automatically start the recording system.
External Trigger
If the Cite unit has been hardwired into a vehicle, an external trigger can be used to activate the
recording system. When the lights/sirens of a vehicle are activated, the Cite unit will automatically
start recording.
Page 20
19
July 23, 2013
Viewing Recorded Video
Recorded video can be viewed directly on the Cite LCD screen, or by using a mini HDMI cable, the
video can be viewed directly on another output source such as a TV or monitor.
To view a recorded video, press the ‘Sleep/Wake/Exit’ button to activate the LCD display.
Looking at the Cite unit from a top down view, press the right toggle button.
This will display all recorded video. Use the toggle button to navigate through the list. Highlight the
video to be viewed, then press the ‘Select’ button to load the file, press the ‘Select’ button again to
play the file.
To stop the video and return to the screen displaying all recorded files, press the ‘Sleep/Wake/Exit’
button.
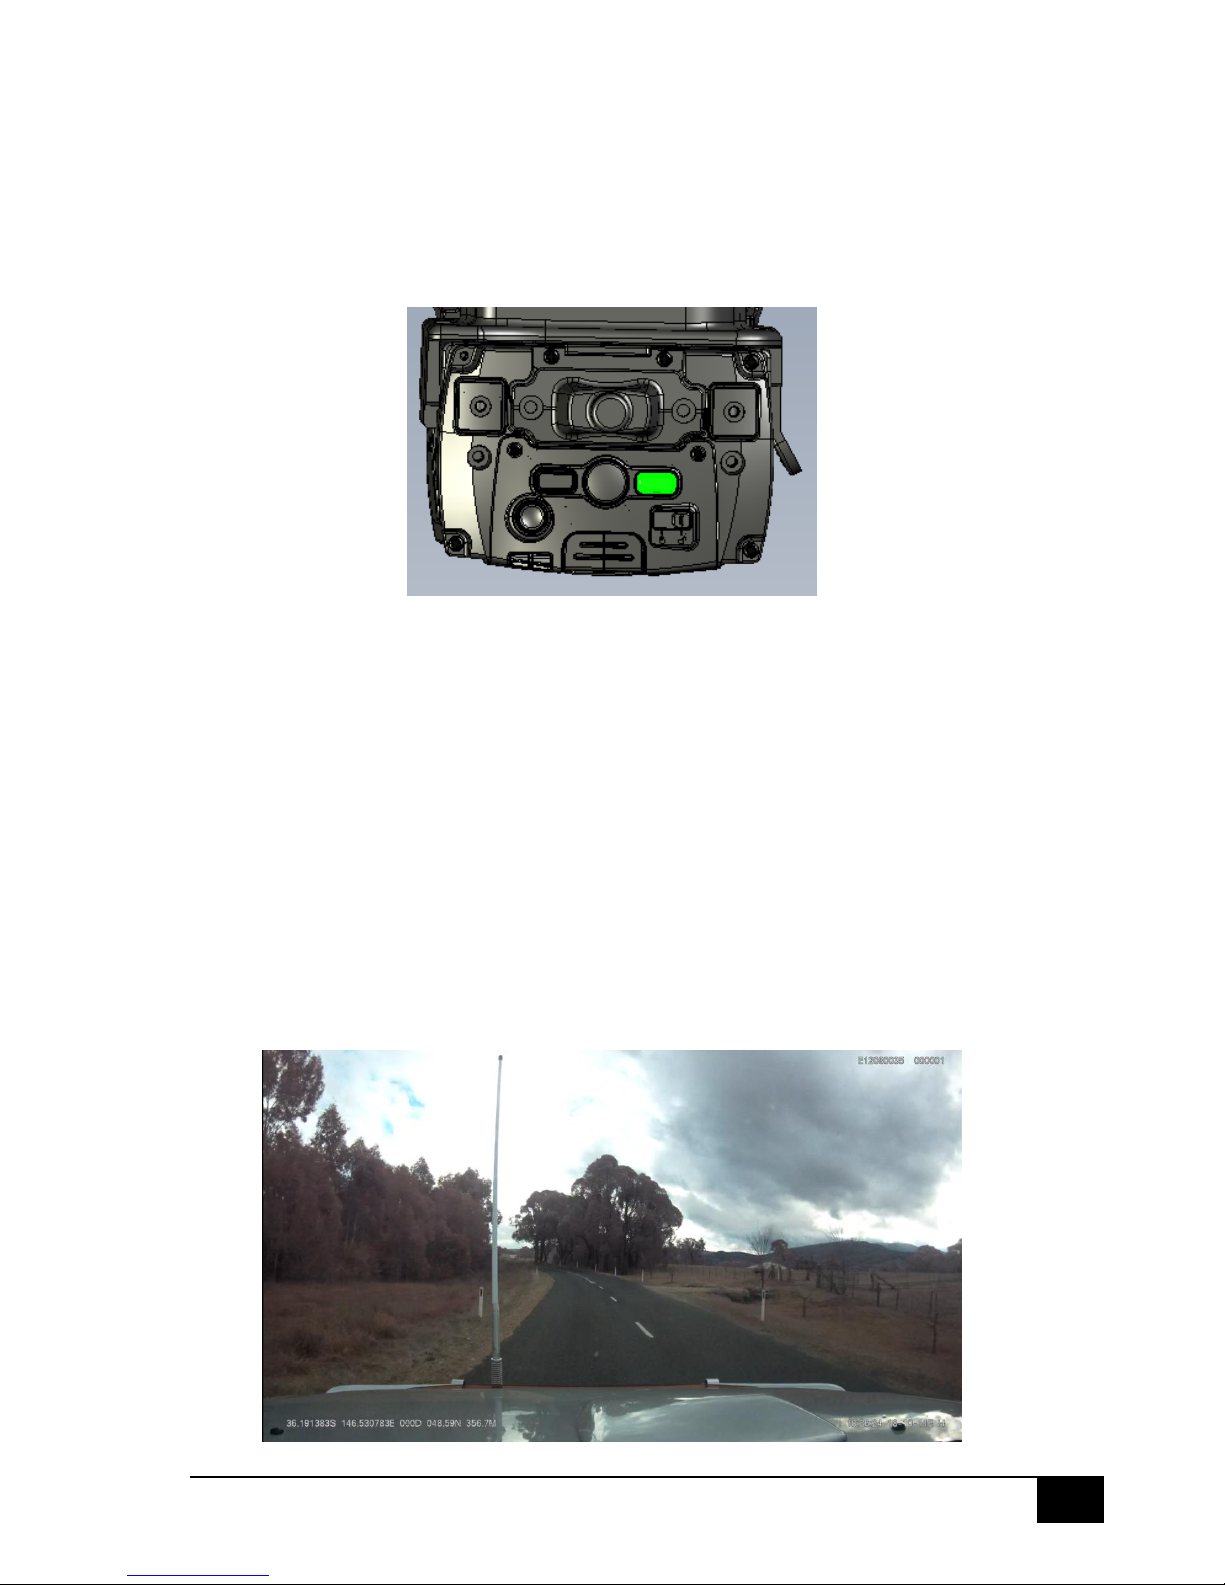
When viewing the video, the GPS and compass overlays detailing the Latitude / Longitude / Speed /
Compass Heading and direction, are shown at the bottom left hand corner of the screen.
The date Time / Date / Time Zone are displayed at the bottom right hand corner of the screen.
Progressive elapsed video time is shown at the top left hand corner of the screen.
To pause the video, press the ‘Select’ button. Pressing the ‘Select’ button again will resume the play
function.
Page 21
20
July 23, 2013
Using the Remote Control
The Cite remote device is similar to a wrist watch. The user can use the remote to activate and
deactivate the recording system and to check battery health.
The remote control uses an RF trigger and can operate the Cite unit within a 15 metre radius.
Pairing the Remote with the Cite Unit
Each remote control device must be paired with a Cite unit. Ensure no other active Cite units are
within a 15 metre radius when undertaking the pairing process or they will also be paired to the
remote.
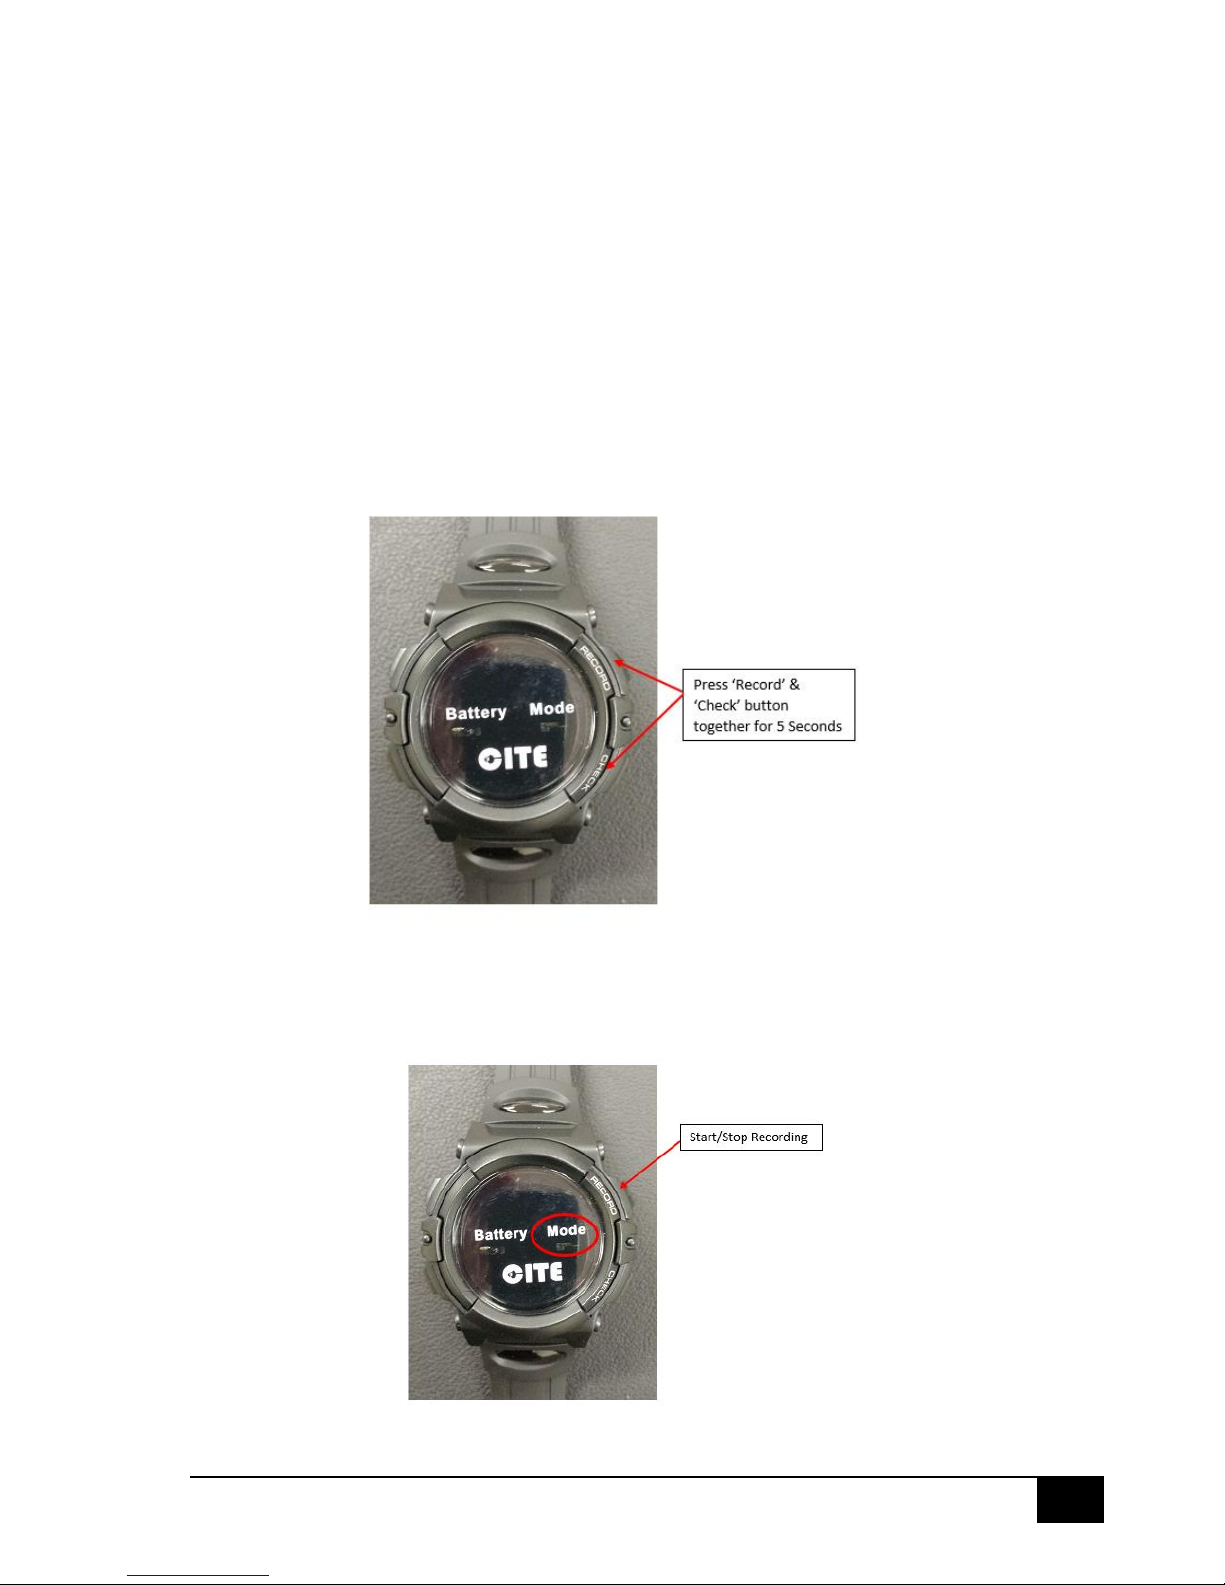
To pair a remote control, turn on the Cite unit so that the LCD display is active. Press the ‘Record’
and ‘Check’ buttons on the remote together for 5 seconds. A long beep will sound from the Cite unit
to confirm both devices have been paired.
Activate/Deactivate Recording
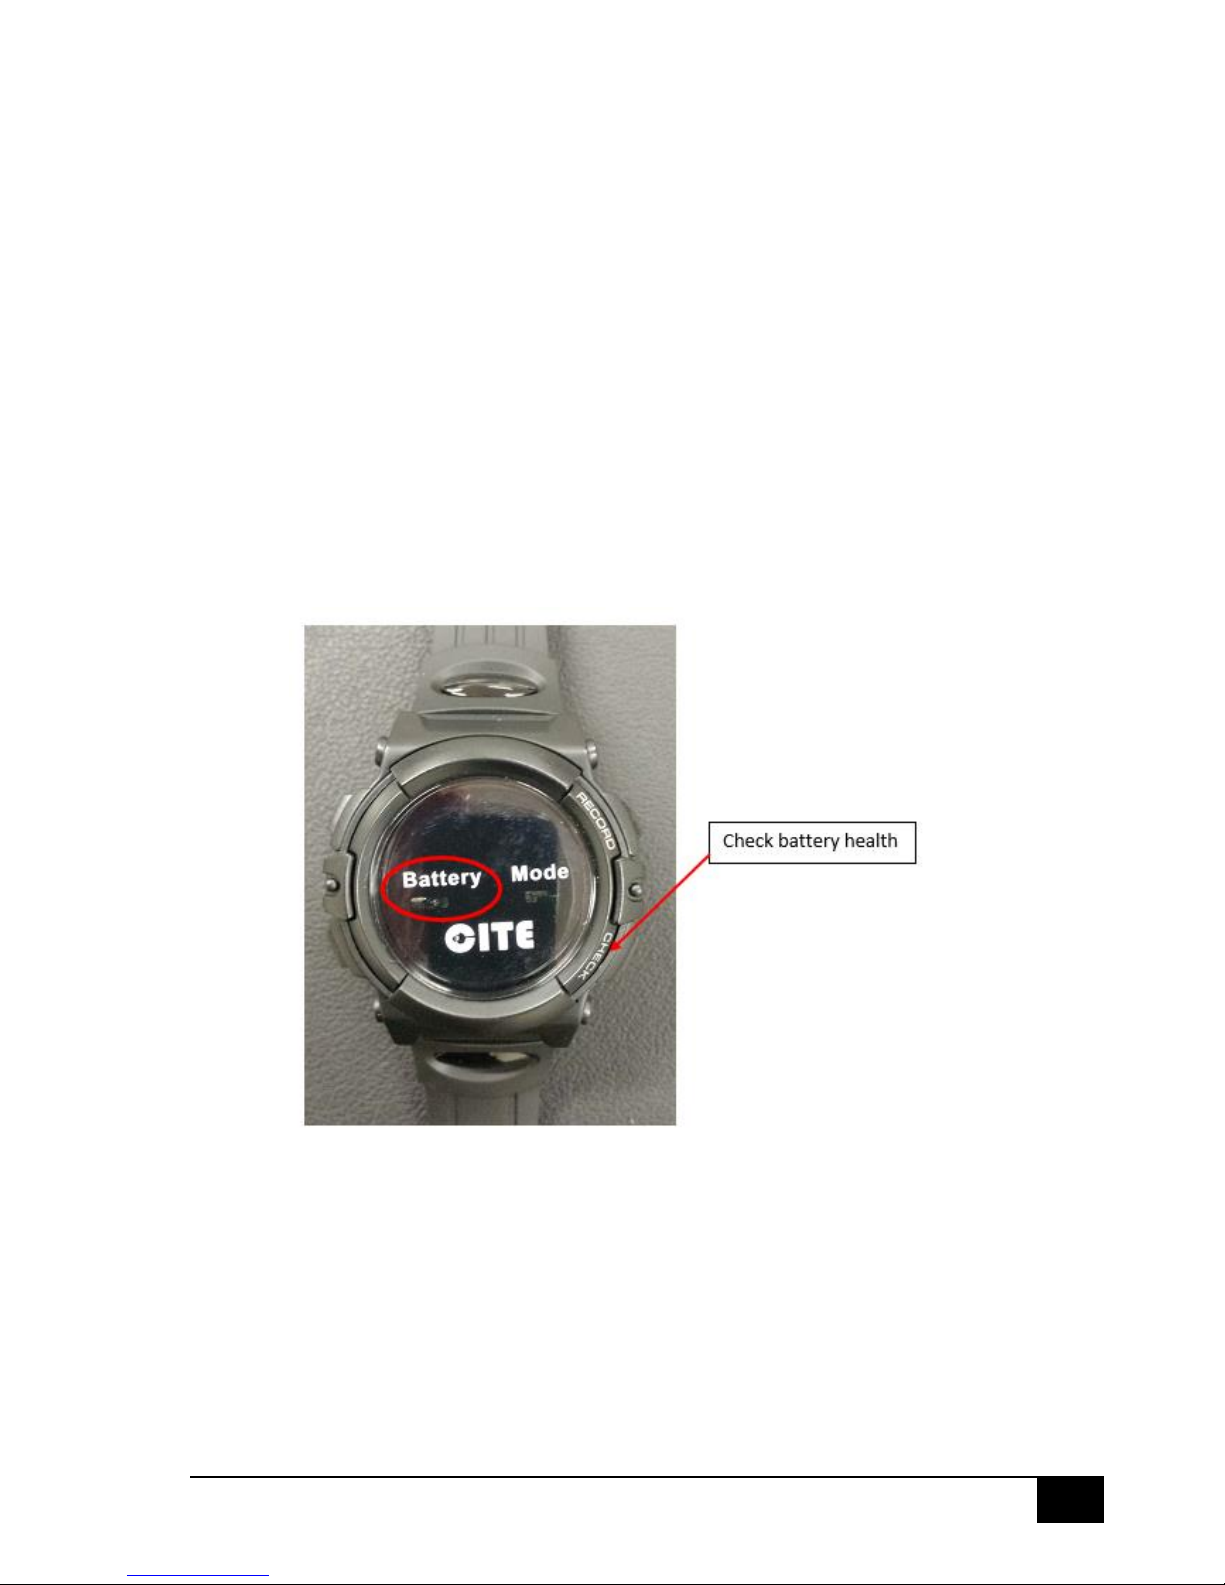
To activate or de-activate the recording system, press the ‘Record’ button located at the top right
hand corner of the remote.
Page 22
21
July 23, 2013
A LED will flash on the face of the remote under the word ‘Mode’ each time the button is pressed.
Green Flash – System is recording
Blue Flash – System is idle, no longer recording
Red Flash – an error has occurred.
The corresponding LED lights will also flash on the Cite unit as outlined in ‘Manual Activation’ above.
NB: If tactical mode has been activated, the LED lights will not flash.
Checking Battery Health
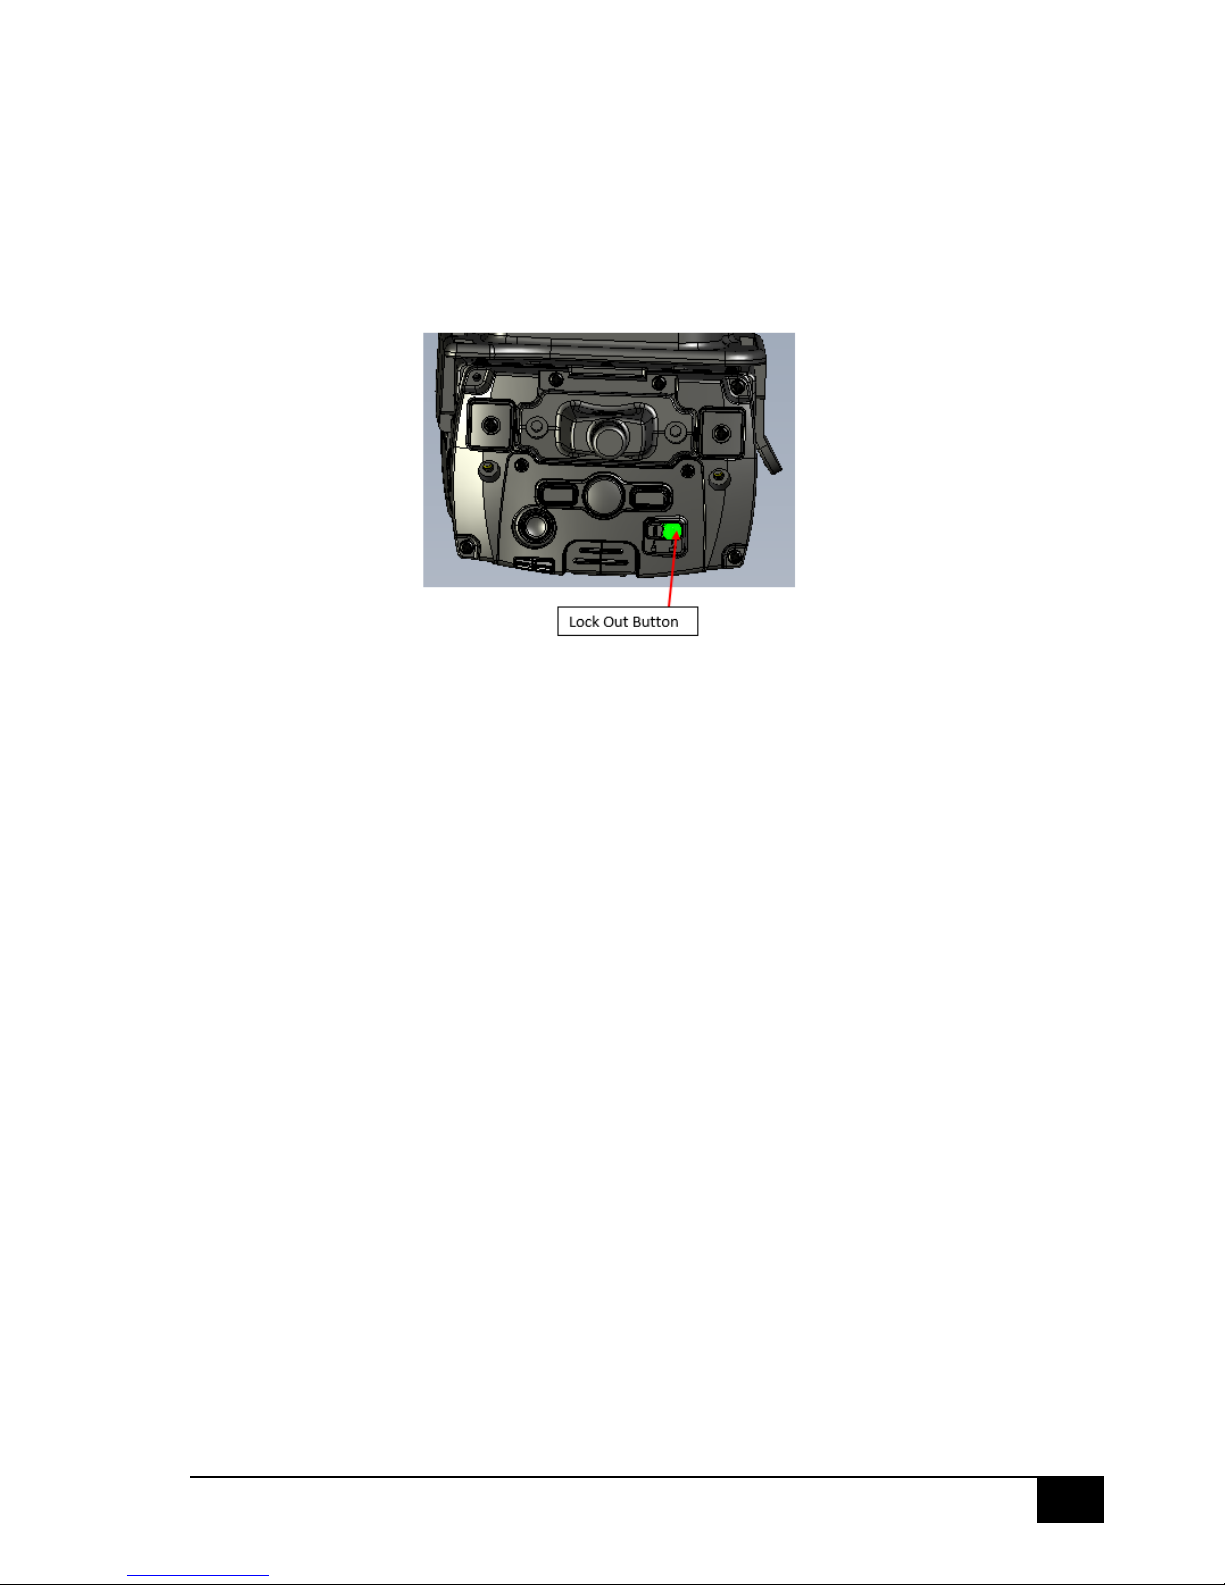
The remote control can also be used to check the health of the batteries in the Cite unit.
On the remote press the ‘Check’ button.
A LED will flash on the face of the remote under the word ‘Battery’.
Green Flash – 100% charge
Blue Flash – 50% charge
Red Flash – batteries are running very low
Page 23
22
July 23, 2013
Lock Out Button
When activated this feature locks all buttons located on the Cite unit to avoid accidental
activation/deactivation.
The lock out button is located on top of the Cite unit, just below the right toggle button. Slide the
button across to the closed padlock symbol to activate, or slide the button across to the unlocked
padlock symbol to deactivate.
NB: When the Cite unit has the lock out button activated, activating the record button on the Cite
unit will still force the unit to start recording. In addition activating the record function from the
remote control will also force the unit to start recording.
Mode Functions
Tactical Mode
When activated, tactical mode turns off all lights and sounds generated by the Cite unit.
If the Cite unit is in sleep mode, activate it by pressing the ‘Sleep/Wake/Exit’ button.
To activate Tactical Mode, press the left toggle button once. The unit will vibrate to acknowledge
Tactical Mode is now active. Also note that the ‘T’ icon located at the top left hand corner of the
screen will turn dark blue, indicating tactical mode is active.
To turn off Tactical Mode, press the left toggle button once, a beep will sound indicating that
Tactical Mode is now inactive. The ‘T’ icon located at the top left hand corner of the screen will
change colour to light blue, indicating that Tactical Mode is inactive.
Pre-record Mode
The pre-record feature ensures all incidents are captured in their entirety. When the pre-record
feature is operating, the Cite system continually records in a 30 second loop. This ensures that the
first 30 seconds of any incident, prior to the record function being activated, has also been captured
by the Cite system.
Pre-record mode is turned on/off from the settings menu – refer to ‘Set Up’ in this manual.
Page 24
23
July 23, 2013
The ‘P’ icon located at the top left corner of the LCD screen represents the pre-record mode. When
the ‘P’ icon is dark blue, the pre-record function is active. When the ‘P’ icon is light blue, the pre-
record function is inactive.
NB: Pre-record mode is inactive when the Cite unit is in sleep mode.
Streaming Video Mode
The addition of the streaming video module allows real time video to be sent to a vehicle, station or
remotely located recording equipment.
This mode is activated from the setting menu – refer to ‘Set Up’ in this manual.
The ‘O’ icon located at the top left corner of the LCD screen represents the streaming video mode.
When the ‘O’ icon is dark blue, the streaming video mode is active. When the ‘O’ icon is light blue,
the streaming video mode is inactive.
GPS
The integrated GPS and compass system overlays the Time / Date / Latitude / Longitude / Speed /
Heading and direction that the camera is pointed over each frame. The video is searchable by these
elements.
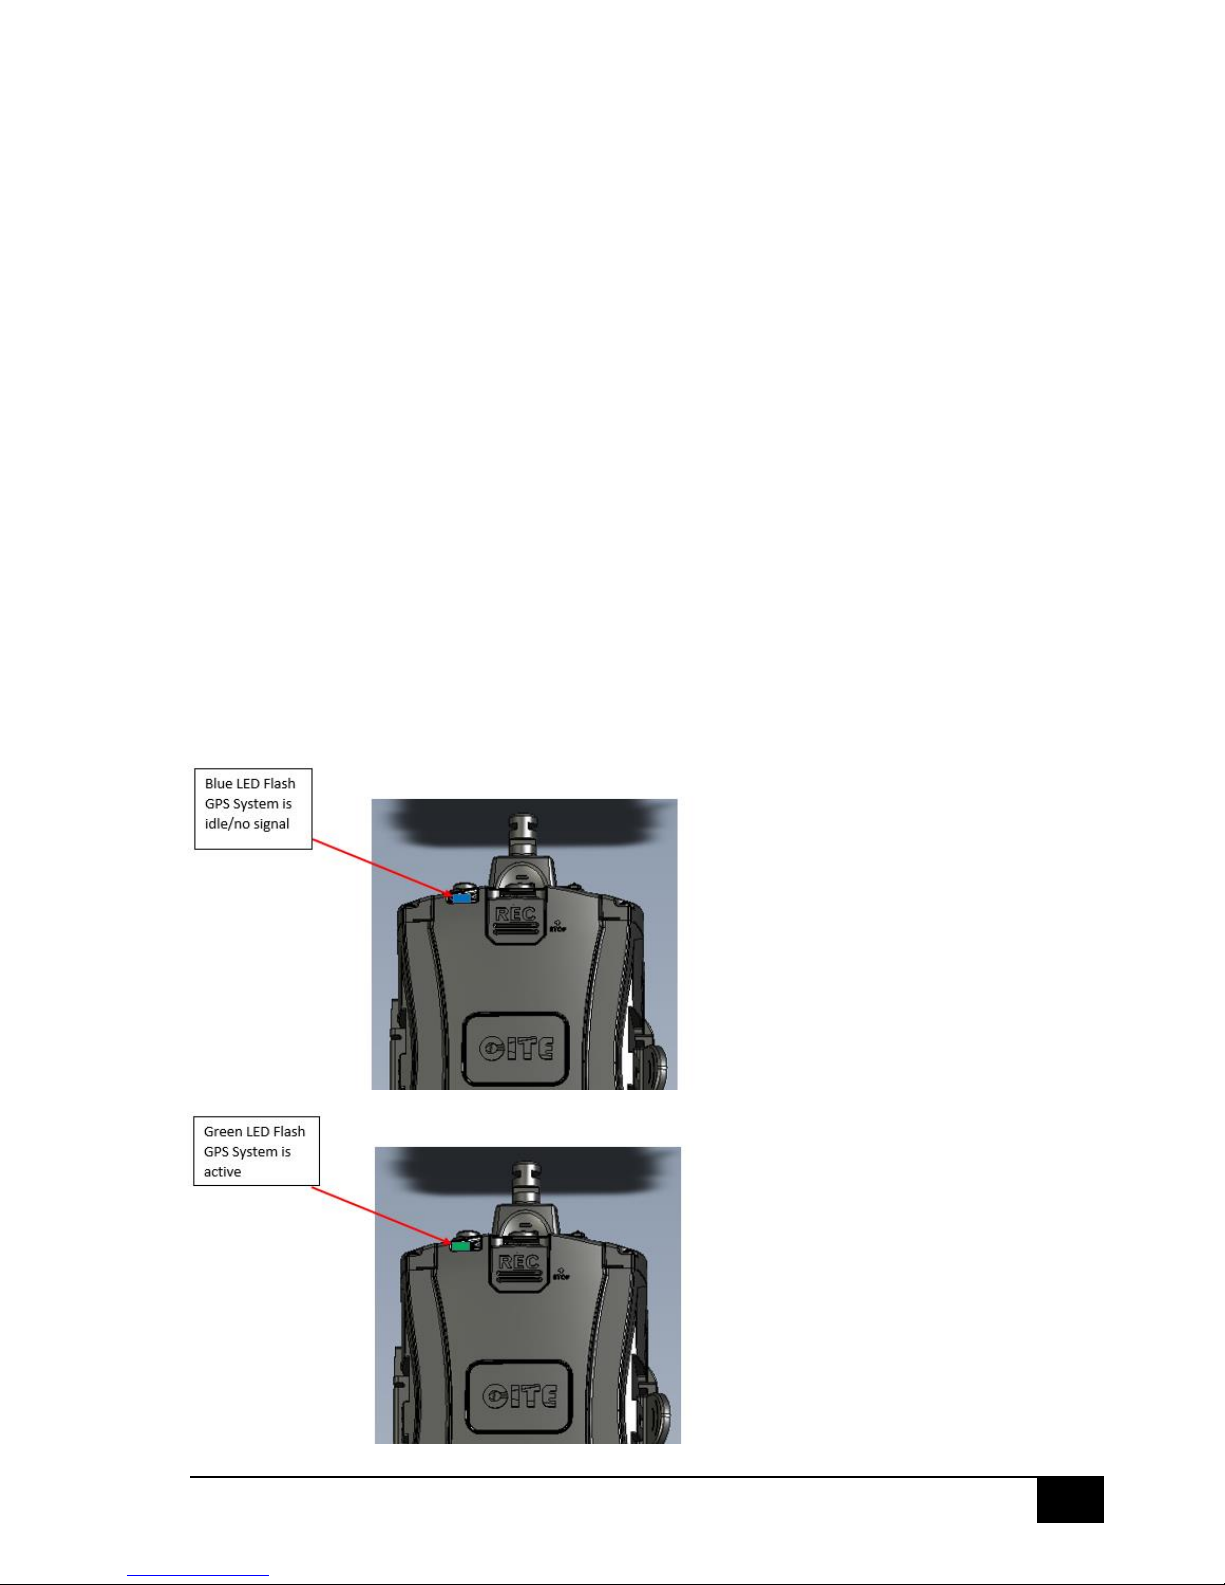
The left LED light located at the front of the Cite unit represents the GPS system. When the light is
flashing blue, the system is inactive or a GPS signal is not available. When the LED light is flashing
green, the GPS system is active. A red LED flash indicates that there is an error.
Page 25
24
July 23, 2013
Mounting Options
The Cite unit can be mounted using any number of generic or custom made mounts.
If the Cite unit is permanently mounted in a vehicle, then power and remote triggers functions can
also be hardwired to the vehicle.
Data Storage
It is recommended that a micro SD card with a maximum storage of 32GB, class 10 is used with the
Cite system. As a minimum a 32GB micro SD card, class 4 can be used. The higher the class of the SD
card, the faster the read/write capability of the unit.
A 32GB SD card will hold 8 hours and 50 minutes of recorded footage.
It is also highly recommended that a tamper proof sticker is used over the micro SD card slot.
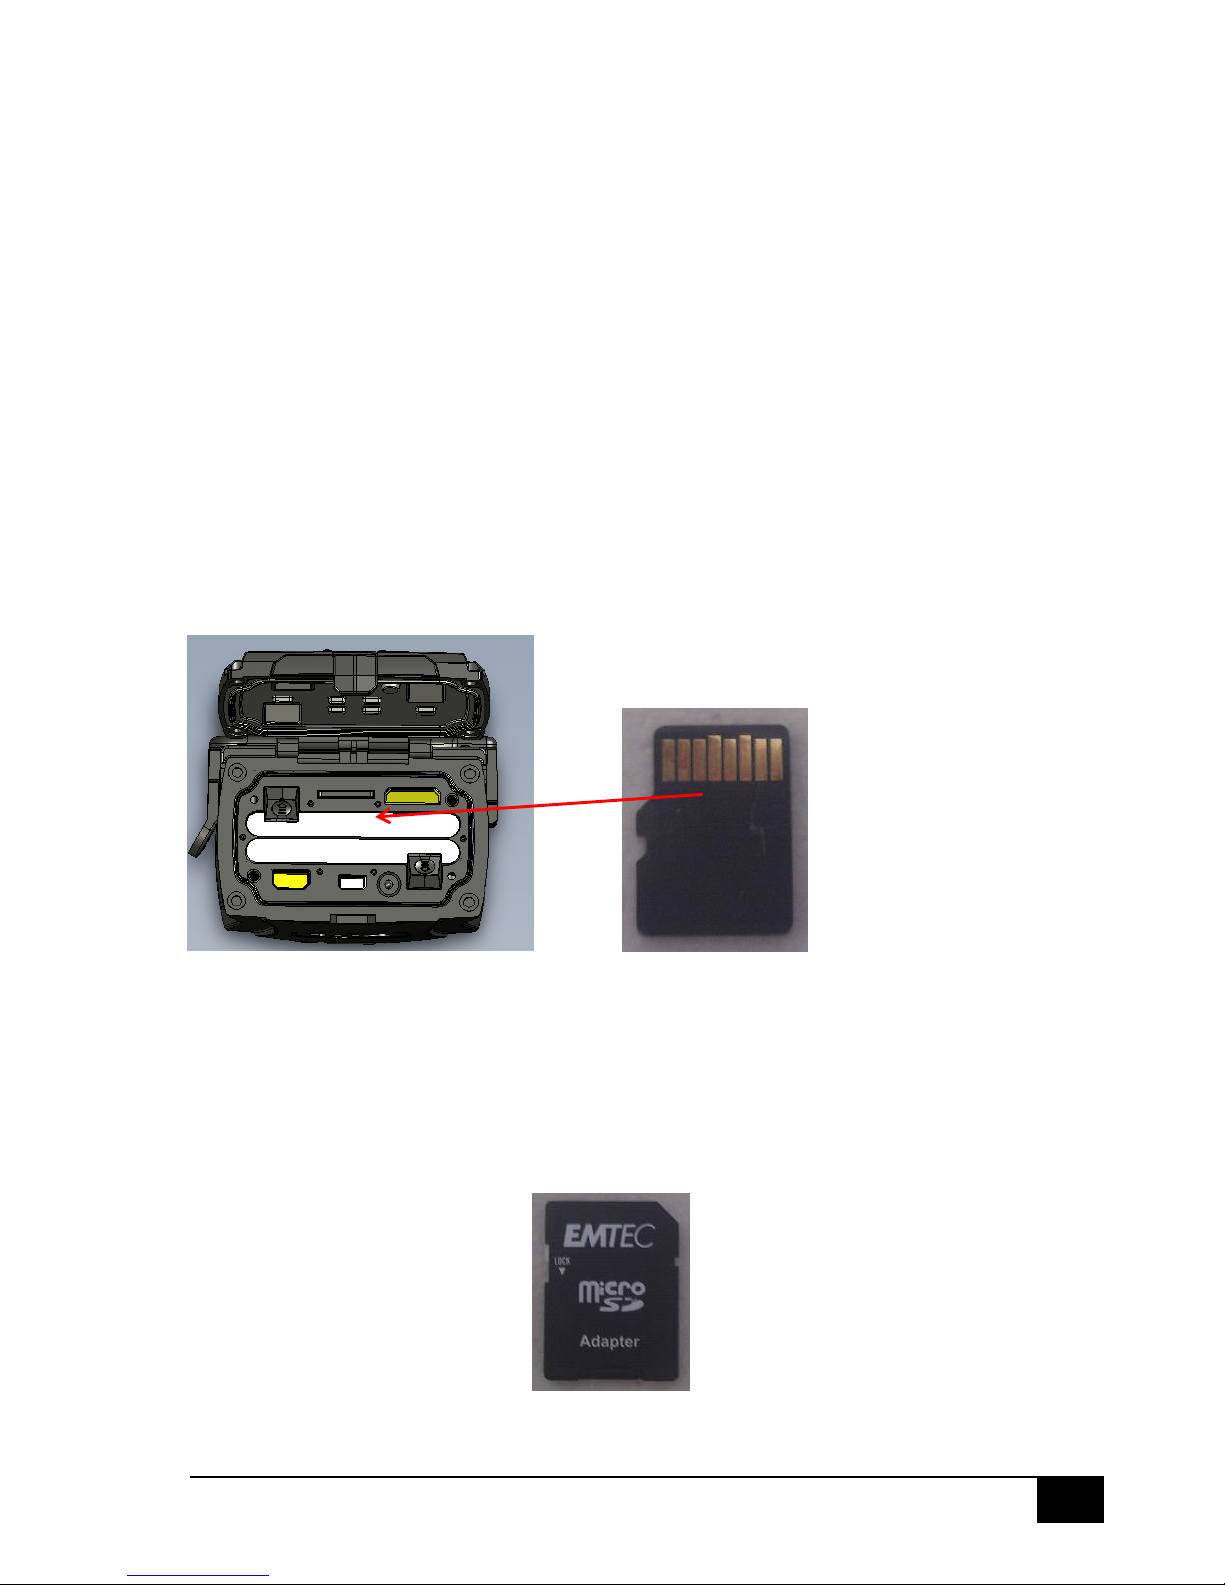
Inserting Micro SD Card
Insert the micro SD card into the micro SD card slot with the contact points facing upwards. Push the
card into the slot unit a click is heard.
Removing Micro SD Card
To remove the micro SD card, push firmly on the card until a click is heard; the SD card will pop out
and can now be removed from the unit.
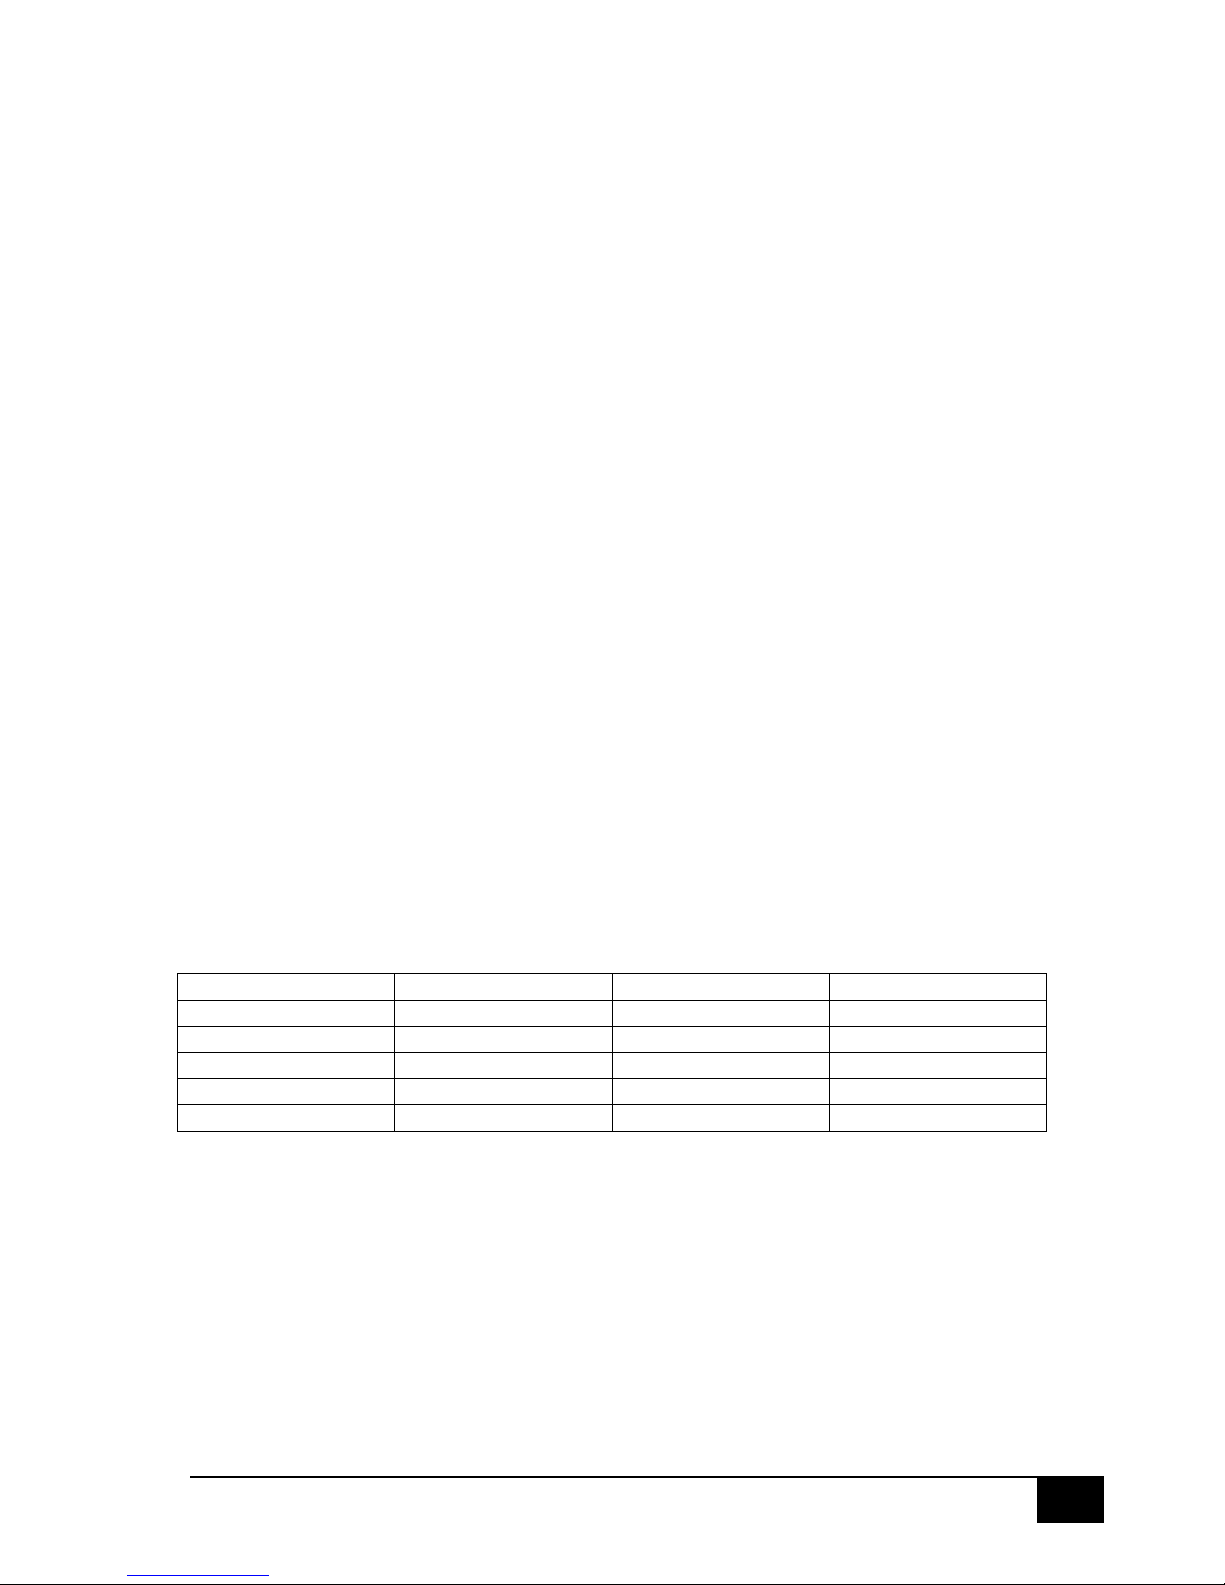
Using a Micro SD Adapter
A micro SD adapter will need to be used to view the data contained on the micro SD card, if the
device being used does not have a micro SD card slot.
Page 26
25
July 23, 2013
Log File
The Cite system uses a log file that automatically records all interactions with the Cite unit. For
example the log will record, when menu settings have been changed, opening of the battery
compartment door, removal of the SD from the unit, when the unit was activated/deactivated,
change of user, activation/deactivation of tactical mode.
Time & Date Settings
The time and date setting of the Cite unit is automatically controlled through the Integrity software.
When a Cite unit is connected to a computer running Integrity, the date and time of the unit will
automatically be set using the computer’s internal time clock.
When the Cite unit has GPS signal, the date and time clock will be updated using the GPS
information. The GPS time/date takes precedence over time/date obtained from a computers time
clock. I there is any variance, the GPS data will be used. All changes are recorded in the systems
internal log.
Time Zones
All time zones are overlayed onto the recorded video, together with time and date. It is important
that the correct time zone is chosen as this will determine the time and date displayed on the
recorded video
The time zone can be changed in the settings menu on the Cite unit – refer Cite Functions – Set up in
this manual.
Each time zone is represented by a letter of the alphabet and is displayed at the bottom right hand
corner of the recorded video when played back. For example if the time zone is UTC (0), the
alphabet character displayed will b ‘Z’.
All other time zone characters are listed below.
UTC (+1) = A
UTC (+7) = G
UTC (-1) = N
UTC (-7) = T
UTC (+2) = B
UTC (+8) = H
UTC (-2) = O
UTC (-8) = U
UTC (+3) = C
UTC (=9) = I
UTC (-3) = P
UTC (-9) = V
UTC (+4) = D
UTC (+10) = K
UTC (-4) = Q
UTC (-10) = W
UTC (+5) = E
UTC (+11) = L
UTC (-5) = R
UTC (-11) = X
UTC (+6) = F
UTC (+12 )= M
UTC (-6) = S
UTC (-12) = Y
Page 27

26
July 23, 2013
Firmware Upgrade
To upgrade the firmware on the Cite unit, remove all batteries from the Cite unit.
Launch the firmware upgrade application; locate the upgrade firmware binary file.
Using the specialised USB cable, connect the Cite unit to the PC. The ‘Upgrade Firmware’ button will
turn grey in appearance. Using the left mouse button, select the ‘Upgrade Firmware’ button.
Once the firmware has been upgrade, the Cite unit must be re-paired with the remote. The factory
default settings will also be applied to the Cite unit.
Page 28

27
July 23, 2013
INDEX
Activate/Deactivate Recording ............................................................................................................. 20
Batteries .................................................................................................................................................. 7
Bottom of Cite Unit ................................................................................................................................. 4
Cables ...................................................................................................................................................... 9
Change Password .................................................................................................................................. 16
Checking Battery Health ....................................................................................................................... 21
Cite Functions ....................................................................................................................................... 14
Cite Overview .......................................................................................................................................... 4
Compass ................................................................................................................................................ 13
Data Security ......................................................................................................................................... 16
Data Storage.......................................................................................................................................... 24
Default Setting ...................................................................................................................................... 16
Device Security ...................................................................................................................................... 16
External Mic .......................................................................................................................................... 15
External Trigger ..................................................................................................................................... 18
Firmware Upgrade ................................................................................................................................ 26
Firmware Version .................................................................................................................................. 15
Format ................................................................................................................................................... 16
Front of Cite Unit .................................................................................................................................... 5
Getting Started ........................................................................................................................................ 7
GPS .................................................................................................................................................. 13, 23
GPS Stamp ............................................................................................................................................. 16
Gsensor ................................................................................................................................................. 16
Hot Swap System .................................................................................................................................... 7
Inserting Micro SD Card ........................................................................................................................ 24
Internal Mic ........................................................................................................................................... 15
Introduction ............................................................................................................................................ 3
Kit Contents ............................................................................................................................................. 7
Language ............................................................................................................................................... 16
LCD Auto Turn Off ................................................................................................................................. 15
LCD display ............................................................................................................................................ 15
LCD Display ............................................................................................................................................ 13
LCD Screen ............................................................................................................................................ 15
LED Lights .............................................................................................................................................. 10
Lens Module ...................................................................................................................................... 6, 11
Lock Out Button .................................................................................................................................... 22
Log File .................................................................................................................................................. 25
Manual Activation ................................................................................................................................. 17
Micro SD Adapter .................................................................................................................................. 24
Micro SD Card ....................................................................................................................................... 24
Mode Functions .................................................................................................................................... 22
Mounting Options ................................................................................................................................. 24
Pairing the Remote with the Cite Unit .................................................................................................. 20
Power .................................................................................................................................................... 10
Pre-record Mode ............................................................................................................................. 13, 22
Pre-Recording ....................................................................................................................................... 15
Page 29

28
July 23, 2013
Rear of Cite Unit ...................................................................................................................................... 5
Record Overwrite .................................................................................................................................. 15
Recording by Gsensor ........................................................................................................................... 16
Recording Video .................................................................................................................................... 17
Remote Activation ................................................................................................................................ 18
Removing Micro SD Card ...................................................................................................................... 24
Resolution ............................................................................................................................................. 15
Security ................................................................................................................................................. 16
Set Up .................................................................................................................................................... 15
Sleep Mode ........................................................................................................................................... 11
Specifications: ......................................................................................................................................... 3
Split Mode ............................................................................................................................................. 15
Streaming Video Mode ......................................................................................................................... 23
Tactical Mode .................................................................................................................................. 13, 22
Tactics Mode ......................................................................................................................................... 15
Time & Date Settings ............................................................................................................................ 25
Time and Date ....................................................................................................................................... 16
Time Zones ...................................................................................................................................... 16, 25
Top of Cite Unit ....................................................................................................................................... 4
Using a Micro SD Adapter ..................................................................................................................... 24
Using the Remote Control..................................................................................................................... 20
Video Streaming Mode ......................................................................................................................... 13
Viewing Recorded Video ....................................................................................................................... 19
White Balance ....................................................................................................................................... 15
 Loading...