

Page 1
Instruction Sheet
Constant
Room Temperature
Outdoor
Temperature
Drop
Heat
Loss
Increase
SUPERSEDES : 102-106, dated June 1, 2000
Plant ID# 9300-1059
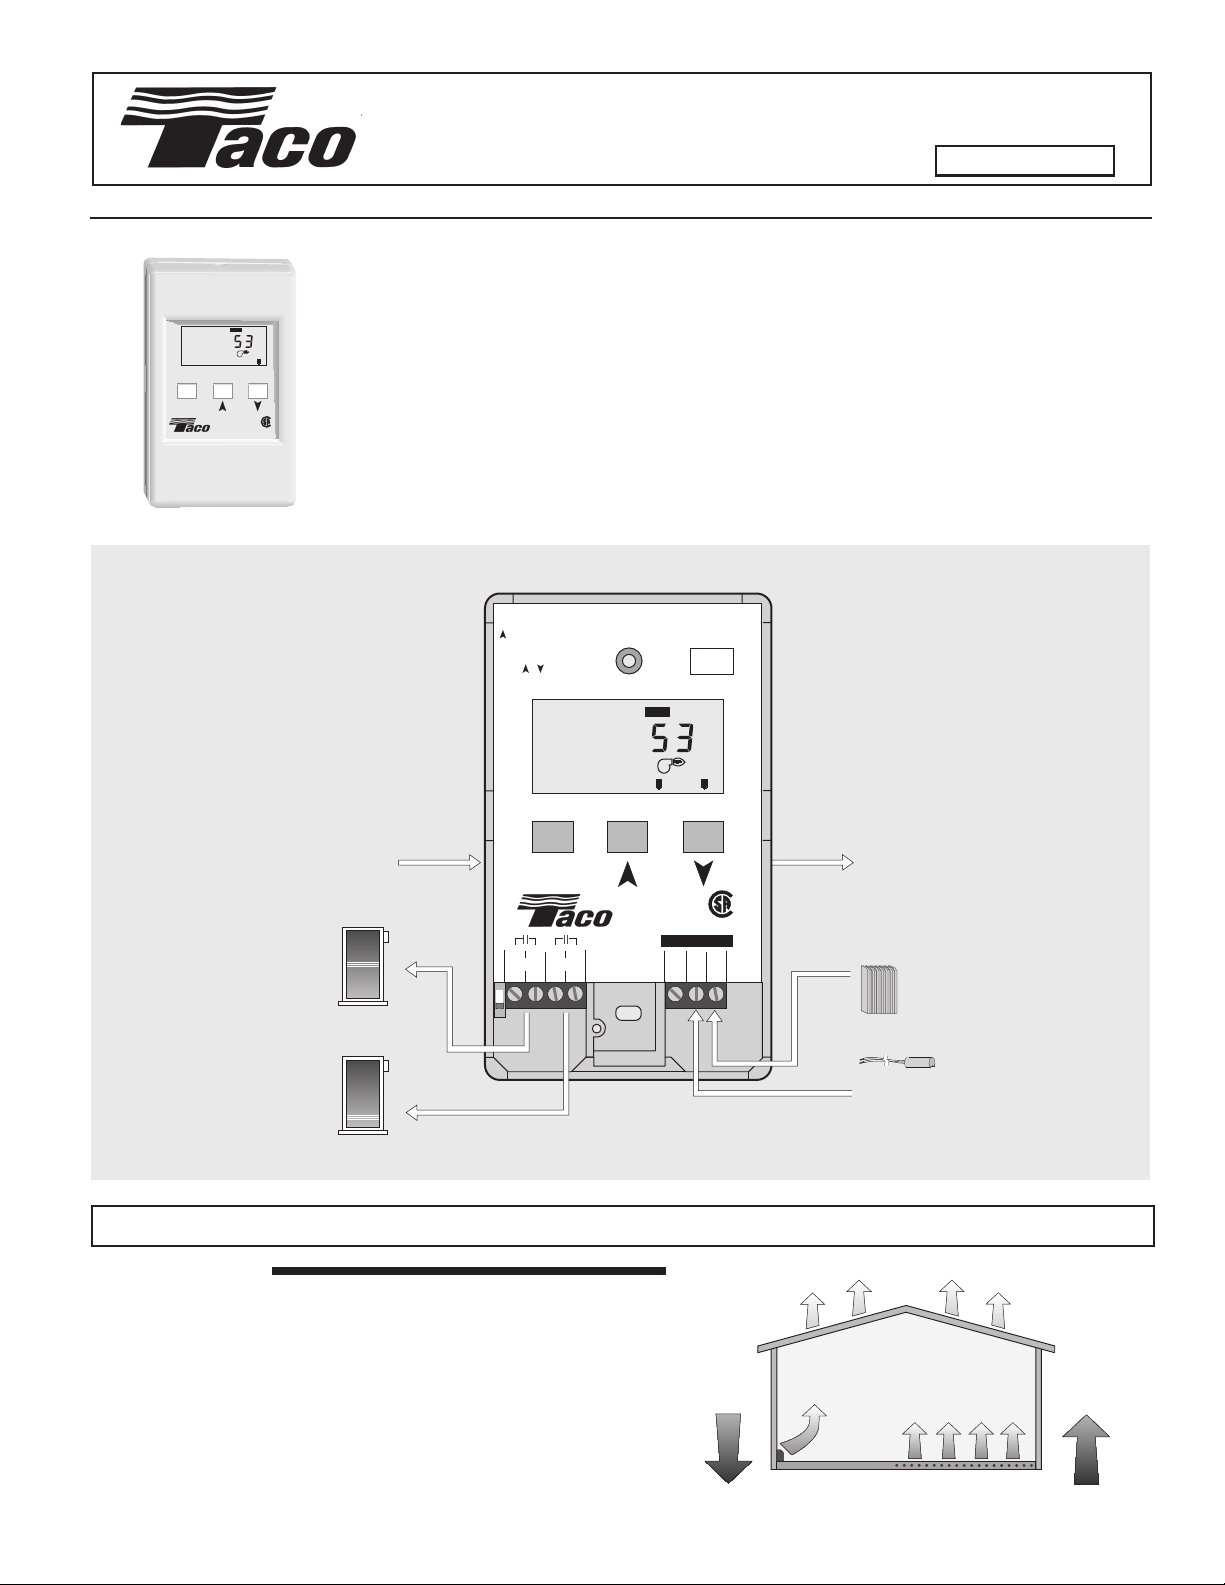
The PC702-1 is a microprocessor-based control designed to regulate the supply water temperature
from a two stage boiler system based on the outdoor temperature or DHW requirements. A wiring
harness is provided to be easily connected to the Taco Expandable (-EXP) Controls.
OUTDR
VIEW
°F
Interstage
1 2
DHW
Boiler
Delay
Demand
Demand
®
CUS
PC702
158033
Start
Item
The PC702-1 includes functions such as automatic reset ratio calculation, Warm Weather Shut Down
(WWSD), Minimum Boiler setting, adjustable interstage delay setting, optional boiler rotation, and an
optional automatic boiler differential. The control has a digital, liquid crystal display (LCD) that normally displays the Boiler Supply temperature, but can display other temperatures and settings.
Control Strategy . . . . . . . . . . . . pg. 1 Control Adjustments . . . . pg. 6
Sequence of Operation . . . . . . . pg. 2 Troubleshooting . . . . . . . pg. 7
Installation . . . . . . . . . . . . . . . . . pg. 4 Error Messages. . . . . . . . . . . pg. 8
Settings . . . . . . . . . . . . . . . . . . . pg. 5 Technical Data . . . . . . . . . . . pg. 8
PC702–1 Two Stage Boiler
Reset & DHW Control
102-106
EFFECTIVE: March 1, 2004
DHW
Demand
Output
Boiler
Output
Boiler
Press & Hold:
Item,
to view settings
, to test
Press & Release:
Item +
+
to adjust menu
OUTDR
Start
Item
1
2
Rotation On / Off
Stage
1 1
Power : 24 V ±10% 50/60 Hz 3 VA
Relays: 120 V (ac) 5 A 1/6 hp pilot 240 VA
Demand: 20 to 260 V (ac) 2 VA
Delay
Interstage
PC702-1
Signal wiring
3
4
must be rated
Stage
at least 300V
2 2
VIEW
DHW
Demand
Do not apply power
5
Com
Jul 00
31000265
°F
1 2
Boiler
Demand
CUS
67
Sup
158033
Out
®
Made in
Canada
H1192A
To Taco
Zone
Control
Input
OutdoorSensor
Included
Input
Boiler Sensor
Included
Control Strategy
OUTDOOR RESET
In order to properly control a hot water heating system, the heat supplied
to the building must equal the heat lost by the building.
• The heat supplied to a building is proportional to the temperature of the
supply water and the surface area of the heating element. A small surface
area such as baseboard radiators requires a higher water temperature
than a larger surface area such as radiant floors.
• The heat lost from a building is dependent on the outdoor temperature,
as well as other factors. As the outdoor temperature drops, the building
heat loss increases.
Page 2
Reset Ratio
Supply Water Temperature
Time
Differential = 10°F (5°C)
165°F(74°C)
B
o
i
l
e
r
o
f
f
B
o
i
l
e
r
o
n
155°F (68°C)
160°F (71°C)
B
o
i
l
e
r
o
f
f
B
o
i
l
e
r
o
n
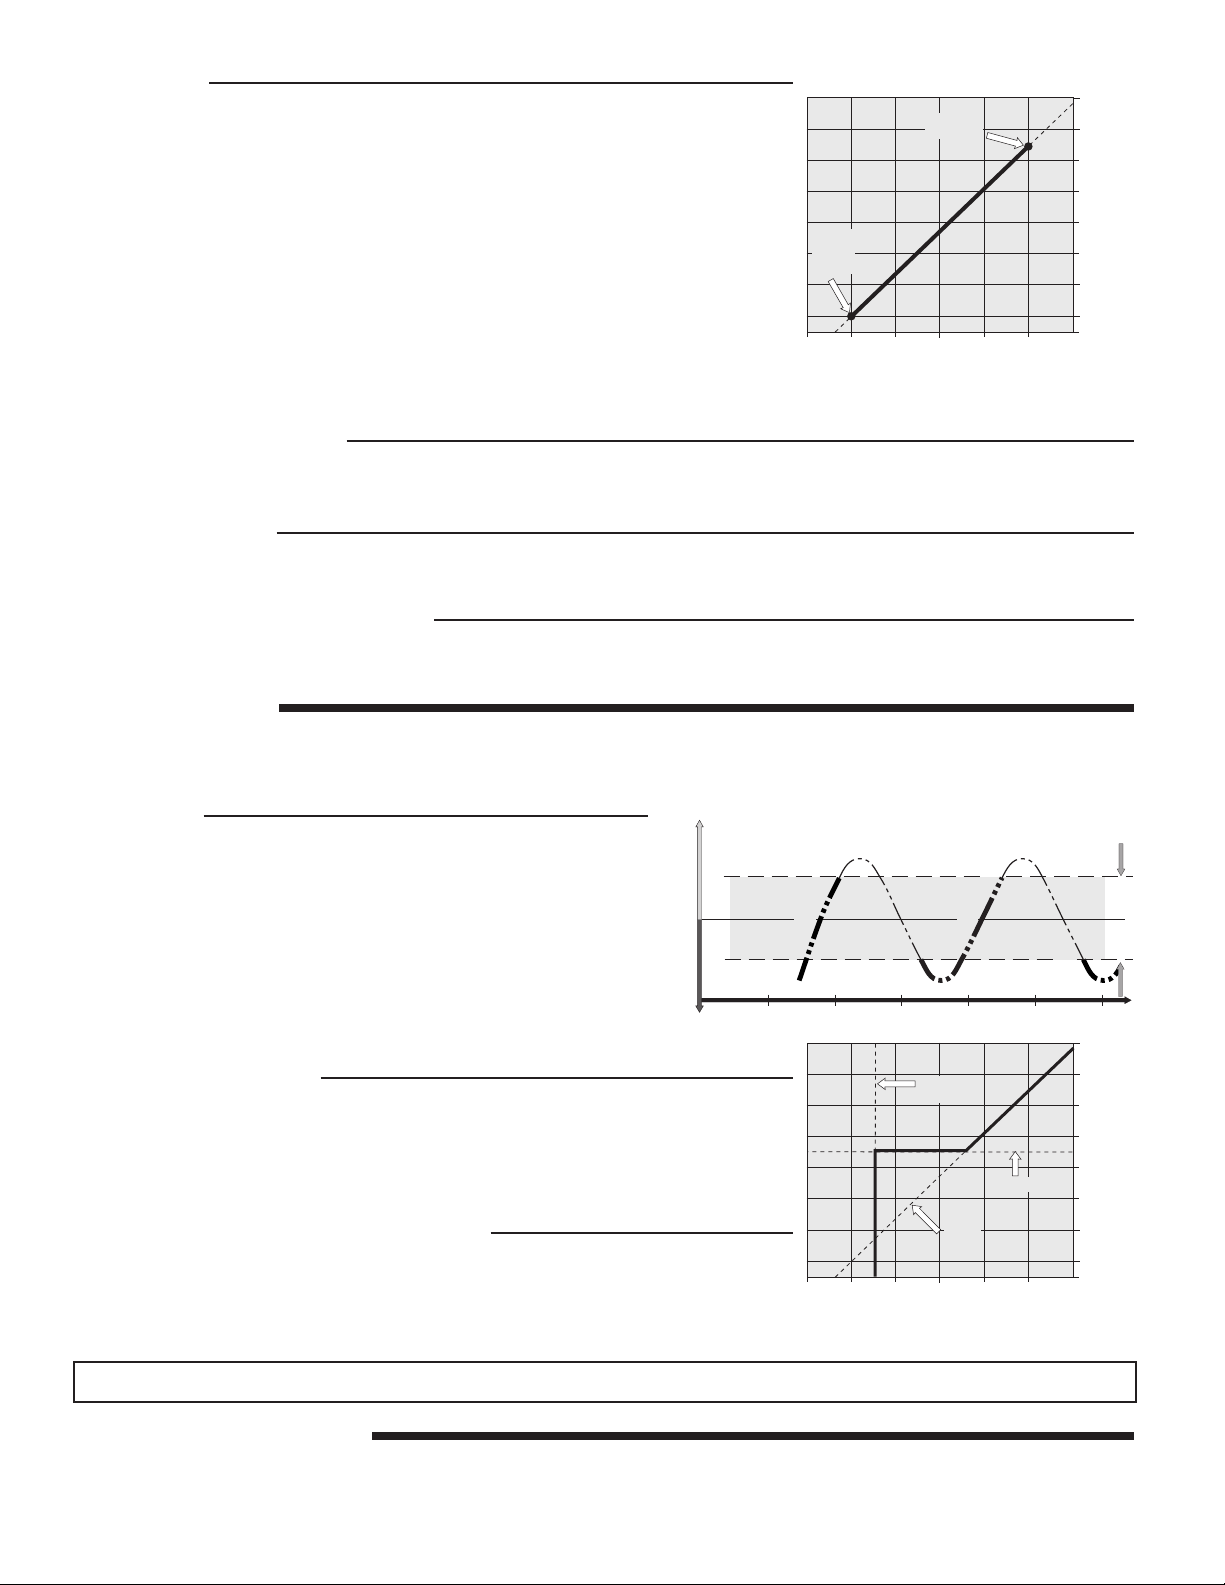
Operation of a hot water heating system can generally be improved by modulating the
supply water temperature as the outdoor temperature changes. Using this approach, the
heat lost from the building is matched by the heat input to the building. The PC702-1 Boiler
Reset Control utilizes a reset ratio to set the relationship between outdoor temperature
and supply water temperature. The reset ratio determines the amount the supply water
temperature is raised for every 1° drop in outdoor air temperature, and it is determined
from the starting point and the system design conditions. In order for the control to
automatically determine the reset ratio, a starting point and design conditions must be
established. These two points are set by the following 4 adjustments:
• Boiler starting temperature
• Outdoor starting temperature
• Boiler design supply water temperature
• Outdoor Design Temperature
See Settings - Step Four for a complete description of each setting.
Reset
Starting
90
(32)
Ratio
Point
70
(21)
Design
Conditions
50
(10)30(-1)10(-12)
Outdoor air temperature
-10
(-23)
210
(99)
190
(88)
170
(77)
150
(65)
130
(54)
11 0
(43)
Supply water temperature
90
(32)
70
(21)
°
F
°C)
(
Reset Ratio Starting Point
The first point used to establish the reset ratio calculation is the starting point. It is a combination of an adjustable boiler starting water
temperature setting and an adjustable outdoor starting temperature setting.
Design Conditions
The second point to establish the reset ratio calculation is the design conditions. This point represents the required water temperature
during the coldest day of the year.
Warm Weather Shut Down (WWSD)
When the outdoor air temperature is warmer than the Warm Weather Shut Down setting, no additional heat is required in the building;
therefore, the heating system can be shut down. This setting has no effect on the reset ratio calculation.
BOILER OPERATION
The supply water temperature from the boiler(s) can be controlled by cycling the boiler(s) on and off. Modulation of the operating
temperature in hot water heating systems not only provides more comfort but also offers significant energy savings. The cooler the
boiler(s) runs, the more efficient it is due to less heat losses up the flue and reduced boiler jacket losses.
Differential
An on / off boiler must be operated with a differential in order to prevent
short cycling. When the supply water temperature drops below the
bottom rail of the differential, the boiler is turned on. The boiler is then
kept on until the supply water temperature rises above the top rail of
the differential. If the differential is too wide, there can be large supply
water temperature swings; however, if the differential is too narrow, the
boiler short cycles and operates inefficiently. This control can automatically calculate the boiler differential in order to achieve an appropriate balance between temperature swings and boiler efficiency. This
also permits the control to adapt to changing loads and conditions.
Minimum Boiler Supply
Most boilers require a minimum supply water temperature in order to prevent corrosion
from flue gas condensation. The control should therefore only modulate the boiler supply
water temperature down to the boiler manufacturer’s minimum recommended operating
temperature. Some boilers are designed to condense and should be operated at low
water temperatures as much as possible for maximum efficiency.
Domestic Hot Water (DHW) Boiler Supply
Most indirect DHW tanks require a relatively high supply water temperature in order to
produce adequate amounts of DHW. The control should therefore override the reset ratio
when there is a demand for DHW and raise the system supply temperature to a
temperature that is suitable for DHW generation.
70
90
(21)
(32)
WWSD
Temperature
Reset
Ratio
50
(10)30(-1)10(-12)
Outdoor air temperature
Minimum
-10
(-23)
°F
°C)
(
210
(99)
190
(88)
170
(77)
150
(65)
130
(54)
11 0
(43)
Supply water temperature
90
(32)
70
(21)
Sequence of Operation
POWERING UP THE CONTROL
After the PC702-1 is powered up, all the LCD segments are turned on for 2 seconds, followed by a software version number. The control
then displays the outdoor temperature.
2 of 8
Page 3
BOILER DEMAND
X
X
END
ZC
Zone 1 Zone 2 Zone 3 Zone 4
ZR
Zone 4Zone 3Zone 2Zone 1
The PC702-1 obtains a boiler demand through the Taco Zone Control when
a zone calls for heat. When the PC702-1 receives a boiler demand, the
Boiler Demand
pointer is displayed in the LCD.
DHW DEMAND
The PC702-1 obtains a DHW demand when a voltage between 24 and 240
V(ac) is applied across the two DHW demand wires (black wires) that come
out of the back of the control. When the PC702-1 receives a DHW demand,
DHW Demand
the
pointer is displayed in the LCD.
OUTDR
VIEW
°
F
1 2
Start
Interstage
DHW
Boiler
Delay
Demand
Demand
Item
®
CUS
PC702
158033
SWITCH
WARM WEATHER SHUT DOWN (WWSD)
When the outdoor temperature rises above the WWSD setting, the PC702-1 displays the WWSD segment in the LCD and turns off the
boiler(s). If the PC702-1 receives a boiler demand from the Taco Zone Control while in a WWSD, the boiler(s) remain off. If the
PC702-1 receives a DHW demand while in a WWSD, the boiler(s) are fired to satisfy the DHW demand.
BOILER OPERATION
The boiler(s) operates around a differential that is either manually set or automatically controlled by the PC702-1. The control includes
a minimum on and off time for the heat source(s), in order to minimize short cycling. The automatic boiler differential increases system
efficiency by adjusting to changing loads.
POWER
INPUT120 VOLT CIRCULATORS
Boiler Demand
While the PC702-1 has a boiler demand, the system supply water temperature is controlled by turning the boiler(s) on and off. The
PC702-1 calculates the target supply water temperature based on the outdoor temperature, the reset ratio settings, and the boiler
minimum setting.
DHW Demand
While the PC702-1 has a DHW demand, the system supply water temperature is controlled by turning the boiler(s) on and off. The
PC702-1 targets a supply water temperature of at least 180°F (83°C).
Maximum Boiler Supply
The PC702-1 does not allow the boiler target temperature to exceed the boiler design
temperature setting plus 10°F (6°C) to a maximum of 225°F (107°C). When operating at
Temperature
Maximum
WWSD
the maximum, the control displays the MAX segment in the LCD when either that boiler
supply or boiler target temperature are being viewed.
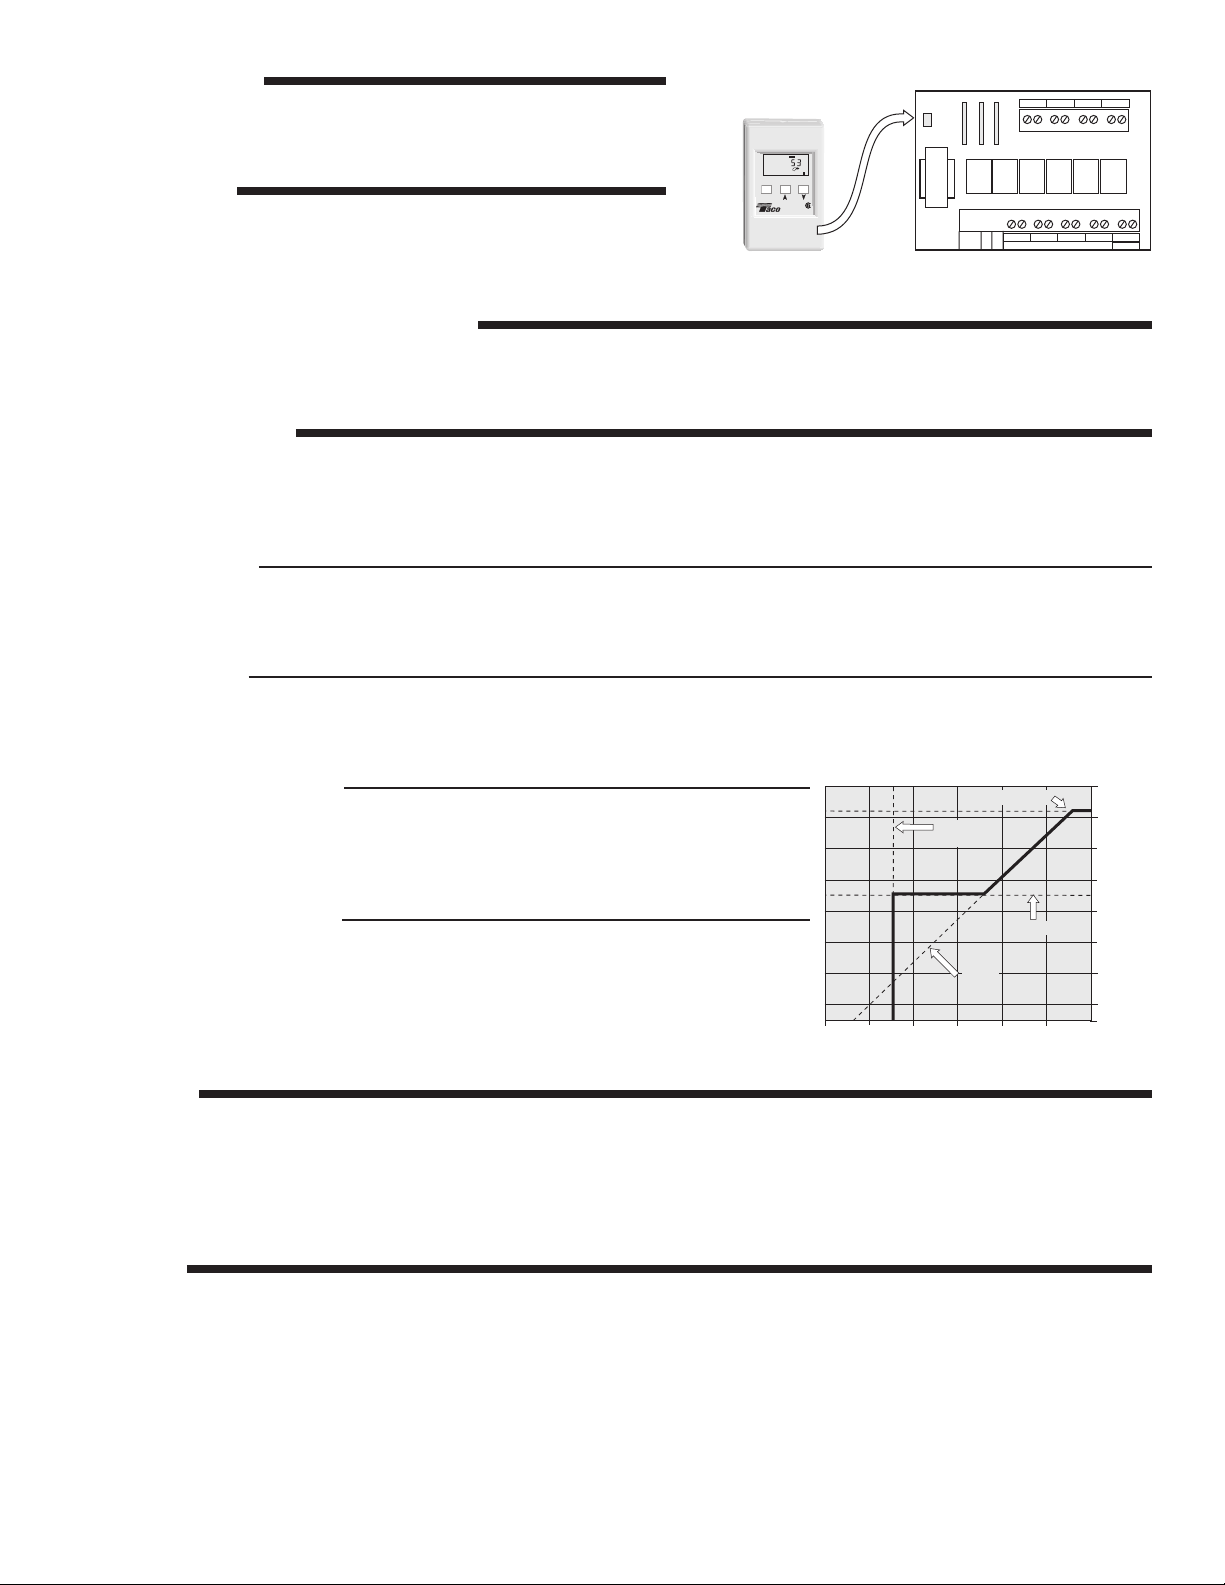
Minimum Boiler Supply
Minimum
The PC702-1 has a minimum boiler setting which selects a minimum boiler target
temperature in order to prevent corrosion from flue gas condensation. During mild
outdoor conditions, the boiler(s) cycles around the minimum boiler setting. This pro-
Reset
Ratio
grammed function has an OFF setting for condensing and electric boilers. When
operating at the minimum setting, the control displays the MIN segment in the LCD when
either that boiler supply or boiler target temperature are being viewed.
90
(32)
50
70
(10)30(-1)10(-12)
(21)
Outdoor air temperature
-10
(-23)
°
F
°C)
(
ROTATION
The PC702-1 has an optional boiler rotation function that is selected using the DIP switch located next to terminal 1 in the wiring
chamber. The PC702-1’s boiler rotation function is fixed at 48 hours. The firing order of the boilers changes whenever one stage
accumulates 48 hours more running time than the other stage. After each rotation, the stage with the least running hours is the first to
fire, and the stage with the most running hours is the last to fire. This function ensures that both stages receive equal amounts of use.
When the
NOTE: If the boiler used is a lo-hi fire boiler, set the
Rotation On / Off
DIP switch is set to the
Off
position, Stage 1 is always the first stage to fire.
Rotation On / Off
DIP switch to the
Off
position.
210
(99)
190
(88)
170
(77)
150
(65)
130
(54)
11 0
(43)
Supply water temperature
90
(32)
70
(21)
STAGING
The PC702-1 controls up to two stages in order to supply the required target temperature. After the first stage is turned on in the firing
sequence, the control waits a minimum amount of time before turning on the next stage. This minimum amount of time is set using the
interstage delay setting. After the interstage delay has expired, the PC702-1 examines the current supply water temperature to
determine when the next stage is to fire. The control uses Proportional, Integral and Derivative (PID) logic.
Proportional - compares the actual supply temperature to the boiler target temperature. The colder the supply water temperature, the
sooner the next stage is turned on.
Integral - compares the actual supply temperature to the boiler target temperature over a period of time.
Derivative - determines how fast or slow the supply water temperature is changing. If the supply temperature is increasing slowly, the
next stage is turned on sooner. If the supply temperature is increasing quickly, the next stage is turned on later, if at all.
3 of 8
Page 4

INTERSTAGE DELAY
The PC702-1 has an adjustable interstage delay setting. This setting sets the minimum time delay between the firing of the first stage
and the firing of the second stage.
Each stage has a minimum on time, and a minimum off time of 30 seconds.
Installation
Caution
Improper installation and operation of this control could result in damage to the equipment and possibly even personal injury.
It is your responsibility to ensure that this control is safely installed according to all applicable codes and standards. This
electronic control is not intended for use as a primary limit control. Other controls that are intended and certified as safety
limits must be part of the control circuit.
STEP ONE
Check the contents of this package. If any of the contents listed are missing or damaged, please contact your sales representative for
assistance.
Type PC702-1 includes: • PC702-1 Boiler Reset Control • One Outdoor Sensor
• One Strap on Sensor • Instruction Sheet
Replacement sensors are available from Taco, Inc. Strap on Sensor – 9300-2044RP Outdoor Sensor – 9300-2052RP
Note
: Carefully read the details of the Sequence of Operation section in this brochure to ensure that you have chosen the proper control
for your application.
STEP TWO
Installing the Control
• Grasp the front cover by the fingertip grips on the top and bottom of the
enclosure and pull the front cover off. Remove the wiring cover screw.
• The enclosure is mounted onto a 2” x 4” electrical box near the Taco
Zone Control.
• The mounting holes in the enclosure accept #6 screws.
• Wiring to the control enters the wiring chamber through the back or
bottom of the enclosure.
• To reassemble the enclosure, first replace the wiring chamber cover and
then push the front cover onto the enclosure until it snaps into place.
Installing the Outdoor Sensor
Note
The temperature sensor (thermistor) is built into the enclosure.
• Take the sensor cover off by sliding it upward relative to the sensor base.
• Use one round or pan head screw to attach the base of the sensor to the wall.
• The sensor is wall mounted and the wiring enters through the bottom of the enclosure. The hole for the
cable entry must face downward in order to prevent water from entering and filling the enclosure.
• The sensor should be mounted on a wall which best represents the heat load on the building (i.e. a
northern wall for most buildings and a southern facing wall for buildings with large south facing glass
areas). The sensor should not be installed near heat sources such as ventilation or window openings.
• The sensor should be installed at an elevation above the ground that will prevent accidental damage
or tampering.
• Install the Outdoor Sensor and run the wiring back to the control mounting location.
Installing the Boiler Sensor
Note
This sensor is designed to mount on a pipe or in a temperature
immersion well.
• The sensor can be strapped directly to the pipe using the cable tie
provided. Insulation should be placed around the sensor to reduce the
effect of air currents on the sensor measurement.
• The Boiler Sensor should be placed downstream of a pump or after an
elbow or similar fitting. This is especially important if large diameter pipes
are used because the thermal stratification within the pipe can result in
erroneous sensor readings. Proper sensor location requires that the fluid
is thoroughly mixed within the pipe before it reaches the sensor.
4 of 8
Hole for
mounting screw
Cable Entry
Page 5

STEP THREE
Wiring to the Zone Control
Connect the PC702-1 cable to the Add-On interface on the Taco Zone Control. Ensure the
to
Reset
.
Wiring the Sensors
Do not apply power to these terminals as this will damage the control.
Outdoor Sensor
Connect the two wires from the Outdoor Sensor to the terminals
7). The Outdoor Sensor measures the outdoor air temperature.
Com — Out
(5 and
Boiler Sensor
Connect the two wires from the Boiler Sensor to the terminals
The Boiler Sensor measures the supply water temperature going from the boiler to the
system.
Wiring the Boilers
The Stage 1 and Stage 2 terminals (1 & 2 and 3 & 4) are isolated outputs in the PC702-1.
There is no power available on these terminals from the control. These terminals are to
be used as a switch to either make or break the boiler circuit. When the PC702-1 requires
the boiler(s) to fire, it closes the contact between terminals 1 and 2 and/or 3 and 4.
DHW Demand
To generate a DHW demand, a voltage between 24 and 240 V(ac) must be applied across
the two DHW demand wires (black wires) coming from the back of the control. This can
be achieved by wiring these two wires in parallel to the DHW (priority) zone on the Taco
Zone Control.
Com — Sup
(5 and 6).
Mode
switch on the Zone Control is set
6
7
Sup5Out
Com
5
6
7
Out
Sup
Com
Zone 3 Zone 4
Refer servicing to qualified
personnel. Opening voids
P
O
T
S
warranty.
Zone 3
Zone 2
Zone 4
POWER
INPUT120 VOLT CIRCULATORS
To DHW
Pump
Settings
Before adjusting the settings, read through the sequence of operation to ensure that you understand how the control operates. The
following page describes how to program these settings into the control once it has been powered up.
STEP FOUR
Boiler Starting Temperature (BOIL Start)
The
BOIL Start
setting is the starting supply water temperature of the reset ratio, and can be adjusted from 35 to 150°F (2 to 66°C).
This setting is typically set to the desired building temperature. In applications where fan coils are used, the
be set higher to prevent cold drafts during mild outdoor conditions. If the building feels cool during mild outdoor conditions, the BOIL
Start setting should be increased.
Outdoor Starting Temperature (OUTDR Start)
The OUTDR Start setting is the outdoor temperature at which the starting temperature is supplied. The adjustment range is from 35
to 85 °F (2 to 29°C). This setting is typically set to the desired building temperature.
Boiler Design Temperature (BOIL DSGN)
The BOIL DSGN setting is the water temperature required to satisfy the building heat loss during the coldest outdoor temperature.
This adjustment is typically dependent on the type of heating terminal used. The following are suggested settings for different terminal
units:
• Inslab Radiant ..................... 100 to 140°F (38 to 60°C) • Radiant Baseboard ................. 130 to 160°F (54 to 71°C)
• Staple-up Radiant .......... 130 to 160°F (54 to 71°C) • Convective Baseboard ....... 160 to 190°F (71 to 88°C)
• Radiators ............................ 140 to 160°F (60 to 71°C) • Fan Coil .............................. 180 to 200°F (82 to 93°C)
BOIL Start
may need to
Outdoor Design Temperature (OUTDR DSGN)
The OUTDR DSGN setting is the outdoor temperature used in the heat loss calculation. It is set to the typical coldest outdoor
temperature.
Boiler Minimum Supply Temperature (BOIL MIN)
Most boilers require a minimum operating temperature to prevent corrosion from flue gas condensation. The
Minimum Boiler
setting
should be programmed to the lowest supply water temperature at which the boiler can operate without causing the boiler flue gases
5 of 8
Page 6

to condense. Consult the boiler manufacturer for recommended minimum boiler supply temperatures. Some typical settings are as
follows:
• Steel fire tube boiler ….......... 140 to 160°F (60 to 71°C) • Condensing boiler ................. Off
• Cast iron boiler ….................. 135 to 160°F (57 to 71°C) • Electric boiler ........................ Off
• Copper tube boiler …............. 125 to 150°F (52 to 66°C)
Differential (DIFF)
The differential adjustment sets how far the actual boiler supply water temperature may deviate from the desired temperature before
the boiler is turned on or off, and it is determined by the flow rate through the system pump relative to the heat output by the boiler.
The differential can be adjusted to Ad (Auto differential) or from 2 to 42°F (1 to 23°C). The following formula can be used to calculate
the desired differential:
Differential = Example: = 10°F (6°C)
When the adjustment is set to
Btu/hr input 100,000 Btu/hr
System US GPM x 500 20 US GPM x 500
Ad (Auto Differential
), the differential is continuously calculated by the control, and varies as the heating
load changes.
Interstage Delay
The interstage delay setting is used to set the minimum time delay between the first stage firing and the second stage firing, and is
adjustable from 30 seconds to 4 minutes.
Warm Weather Shut Down (WWSD)
The WWSD can be adjusted from 35 to 100°F (2 to 38°C). The boiler will be shut down when the outdoor temperature is warmer than
this setting. If the WWSD is set to OFF, the control continues to provide a minimum boiler temperature even during warm outdoor
temperatures.
Control Adjustments
Boiler Start: ______________________________________ Boiler Minimum: _______________________________
Outdoor Start: ____________________________________ Differential: __________________________________
Boiler Design: ____________________________________ Interstage Delay: ______________________________
Outdoor Design: __________________________________ WWSD: ______________________________________
ADJUST MENU
To enter the adjustment mode, Press and Hold simultaneously, the
BOIL Start
Use the and
buttons to set the
desired boiler starting
tempeature.
OUTDR Start
Press and release
the Item button. Use
and buttons
the
to set the desired
outdoor starting
tempeature.
BOIL DSGN
Press and release
the Item button. Use
the
and buttons
to set the boiler
design tempeature.
BOIL
Start Interstage
Delay
OUTDR
Start Interstage
Delay
DSGN
BOIL
Start Interstage
Delay
DHW
Demand
DHW
Demand
DHW
Demand
ADJUST
ADJUST
ADJUST
OUTDR DSGN
Press and release
°F
the Item button. Use
the
to set the outdoor
design tempeature.
Boiler
Demand
BOIL MIN
Press and release
°F
the Item button. Use
the
to set the boiler
minimum
Boiler
tempeature.
Demand
DIFF
°F
Press and release
the Item button. Use
the
to set the boiler
differential
Boiler
tempeature.
Demand
OUTDR
and buttons
BOIL
and buttons
and buttons
The control automatically goes back to viewing when the buttons are left alone for 20 seconds
All settings will be saved even during power down of the control
Item
, and Buttons. The ADJUST element will turn on.
DSGN
Start Interstage
Delay
MIN
Start Interstage
Delay
Start Interstage
Delay
DIFF
DHW
Demand
DHW
Demand
DHW
Demand
ADJUST
Demand
ADJUST
Demand
ADJUST
Demand
Interstage Delay
Press and release
°F
the Item button. Use
the
to set the desired
interstage delay time.
Boiler
WWSD
Press and release
°F
the Item button. Use
the
to set the desired
WWSD tempeature.
Boiler
Units
Press and release
the Item button. Use
the
to select between °F
and °C
Boiler
and buttons
and buttons
and buttons
Start Interstage
Delay
WWSD
Start Interstage
Delay
Start Interstage
Delay
DHW
Demand
DHW
Demand
DHW
Demand
ADJUST
min
Boiler
Demand
ADJUST
°F
Boiler
Demand
ADJUST
°F
Boiler
Demand
6 of 8
Page 7

POWER UP
VIEW MENU
On power up, the
control displays all
segments for 2
seconds and the
control version
number.
The control then
automatically goes
to operating mode,
and displays the
outdoor
temperature.
OUTDR
DSGN
BOIL
TARGET
MAXMIN
WWSD
Start Interstage
Delay
OUTDR
Start Interstage
Delay
DIFF
ADJUST
DHW
Demand
VIEW VIEW
DHW
Demand
Outdoor
°F
Temperature
°C
The OUTDR element
1 2
is turned on. The
outdoor temperature
is displayed
Boiler
Demand
Boiler
°F
Temperature
Press and release
1 2
the Item button. The
boiler supply
temperature is
Boiler
displayed.
Demand
OUTDR
Start Interstage
Delay
BOIL
Start Interstage
Delay
VIEWVIEW
DHW
Demand
DHW
Demand
°F
Boiler
Demand
°F
1 2
Boiler
Demand
Boiler Target
BOIL
Temperature
Press and release
the Item button. The
boiler target
temperature is
displayed.
To view all control settings, the
may be pressed and held while in the View
Menu. The control will then scroll through all
the adjustable items.
TARGET
Start Interstage
Delay
Item
VIEW
DHW
Demand
button
Troubleshooting
STEP FIVE
As in any troubleshooting procedure, it is important to isolate a problem as much as possible before proceeding. The error messages
greatly simplify troubleshooting of the PC702-1. When the control displays an error message, identify the fault from the look-up table
on page 8 and follow standard testing procedures to confirm the problem. If you suspect a wiring fault, return to step three and carefully
check all external wiring and wiring connections.
Sensor and Internal Faults
• If an outdoor sensor fault occurs, the PC702-1 will assume a fixed outdoor temperature of 32°F (0°C) and will target the appropriate
supply water temperature. An error message is displayed.
• If a supply sensor fault occurs, the PC702-1 turns the boiler off and displays an error message.
• If an EEPROM fault occurs, the PC702-1 turns the boilers off until
all the settings are checked.
°F
1 2
Boiler
Demand
Adjustment of Settings
• If the outdoor temperature is cold and the rooms are cold, increase the BOIL DSGN setting by 5°F (3°C) per day.
• If the outdoor temperature is near the WWSD temperature and the rooms are cold, increase the BOILStart setting.
• If the boiler is cycling too often, increase the Differential setting or set control to Ad (Auto Differential). If the second stage is coming
on too soon, increase the Interstage Delay setting.
Testing the Sensors
A good quality test meter capable of measuring up to 5,000 kΩ (1 kΩ = 1000 Ω) is required
to measure the sensor resistance. In addition to this, the actual temperature must be
measured with either a good quality digital thermometer, or, if a thermometer is not
available, a second sensor can be placed alongside the one to be tested and the readings
compared.
First measure the temperature using the thermometer and then measure the resistance
Ω
Ω
of the sensor at the control. The wires from the sensor must not be connected to the
control while the test is performed. Using the chart below, estimate the temperature
measured by the sensor. The sensor and thermometer readings should be close. If the
test meter reads a very high resistance, there may be a broken wire, a poor wiring
connection or a defective sensor. If the resistance is very low, the wiring may be shorted,
there may be moisture in the sensor or the sensor may be defective. To test for a defective
sensor, measure the resistance directly at the sensor location.
Do not apply voltage to a sensor at any time as damage to the sensor may result.
Temperature Resistance Temperature Resistance Temperature Resistance Temperature Resistance
°F °C Ω °F °C Ω °F °C Ω °F °C Ω
-30
-20
-10
0
10
20
-34
-29
-23
-18
-12
-7
234,196
165,180
118,018
85,362
62,465
46,218
30
40
50
60
70
80
-1
4
10
16
21
27
34,558
26,099
19,900
15,311
11,883
9,299
90
100
110
120
130
140
32
38
43
49
54
60
7,334
5,828
4,665
3,760
3,050
2,490
150
160
170
180
190
200
66
71
77
82
88
93
2,045
1,689
1,403
1,172
983
829
7 of 8
Page 8

STEP SIX
• Install the wiring cover over the wiring chamber and secure it with the screw provided.
• Place the front cover on the control and snap it into place.
• It is important to explain the operation of this control within the system to the end user, and to anyone else who may be operating
the system.
Error Messages
Whenever a fault is detected, an error message will be displayed to indicate the location of the problem.
EEPROM
Read Error
Outdoor
Sensor Open
OUTDR
Circuit
Outdoor
Sensor Short
Circuit
OUTDR
Boiler
Sensor Short
Circuit
BOIL
Technical Data
PC702-1 Two Stage Boiler Reset & DHW Control
Control — Microprocessor PI control; This is not a safety (limit) control.
Packaged weight — 1.5 lb. (670 g)
Dimensions — 4-3/4” H x 2-7/8” W x 7/8” D (120 x 74 x 22 mm)
Approvals — CSA NRTL /C; Meets ICES & FCC regulations for EMI/RFI.
Ambient conditions — Indoor use only, 32 to 105°F (0 to 40°C), < 90% RH non-
Power supply — Class 2, 24 V ±10% 50/60 Hz 3 VA (Powered by Taco -Exp
Relays — 24 V (ac) 5 A 1/6 hp, pilot duty 240 VA
DHW Demand — 20 t o 260 V (ac) 2 VA
Sensors — NTC thermistor, 10 kΩ @ 77°F (25°C ±0.2°C) ß=3892
included: Outdoor Sensor M 2036 and Universal Sensor 071.
Boiler Start
Outdoor Start
Boiler Design
Outdoor Design
Boiler Minimum
Differential
Interstage Delay
WWSD
Units
— 35 to 150°F (2 to 66°C) 70°F (21°C)
— O f f, 80 to 180°F (Off, 27 to 82°C) 140°F (60°C)
— Auto, 2 to 42°F (Auto, 1 to 24°C) Auto
— 0:30 to 4:00 minutes 2:00 min.
— 35 to 100°F, Off (2 to 38°C, Off) 70°F (21°C)
— °F, °C °F
condensing.
Control)
Factory
—
35 to 85°F (2 to 29°C) 70°F (21°C)
—
70 to 220°F (21 to 104°C) 190°F (88°C)
—
-60 to 32°F (-51 to 0°C) 10°F (-12°C)
Boiler
BOIL
Sensor Open
Circuit
Refer to the troubleshooting section
for operation details.
Press & Hold:
Item,
, to test
Press & Release:
Item +
Rotation On / Off
to view settings
+ to adjust menu
1
Stage
1 1
OUTDR
Item
2
Start
Delay
Signal wiring
3
4
must be rated
Stage
at least 300V
2 2
Power: 24 V ±10% 50/60 Hz 3 VA
Relays: 120 V (ac) 5 A 1/6 hp pilot 240 VA
Demand: 20 to 260 V (ac) 2 VA
Jul 00
31000265
VIEW
°F
1 2
Boiler
DHW
Interstage
Demand
Demand
CUS
PC702-1
158033
Do not apply power
5 67
Com
Out
Sup
®
Made in
Canada
H1192A
The installer must ensure that this control and its wiring are isolated and/or shielded from strong sources of electromagnetic noise.
Conversely, this Class B digital apparatus complies with Part 15 of the FCC Rules and meets all requirements of the Canadian
Interference-Causing Equipment Regulations. However, if this control does cause harmful interference to radio or television reception,
which can be determined by turning the control off and on, the user is encouraged to try to correct the interference by reorienting or
relocating the receiving antenna, relocating the receiver with respect to this control, and/or connecting the control to a different circuit
from that to which the receiver is connected.
Do It Once. Do It Right.™
TACO, INC., 1160 Cranston Street, Cranston, RI 02920 Telephone: (401) 942-8000 FAX: (401) 942-2360.
TACO (Canada), Ltd., 6180 Ordan Drive, Mississauga, Ontario L5T 2B3. Telephone: 905/564-9436.
Visit our web site at: http://www.taco-hvac.com
8 of 8
Copyright 2004 TACO, Inc.
Portions Copyright 2000
tekmar Control Systems Ltd.
tekmar Control Systems Inc.
 Loading...