

Page 1
102-352
C
ITY WATER
S
UPPLY
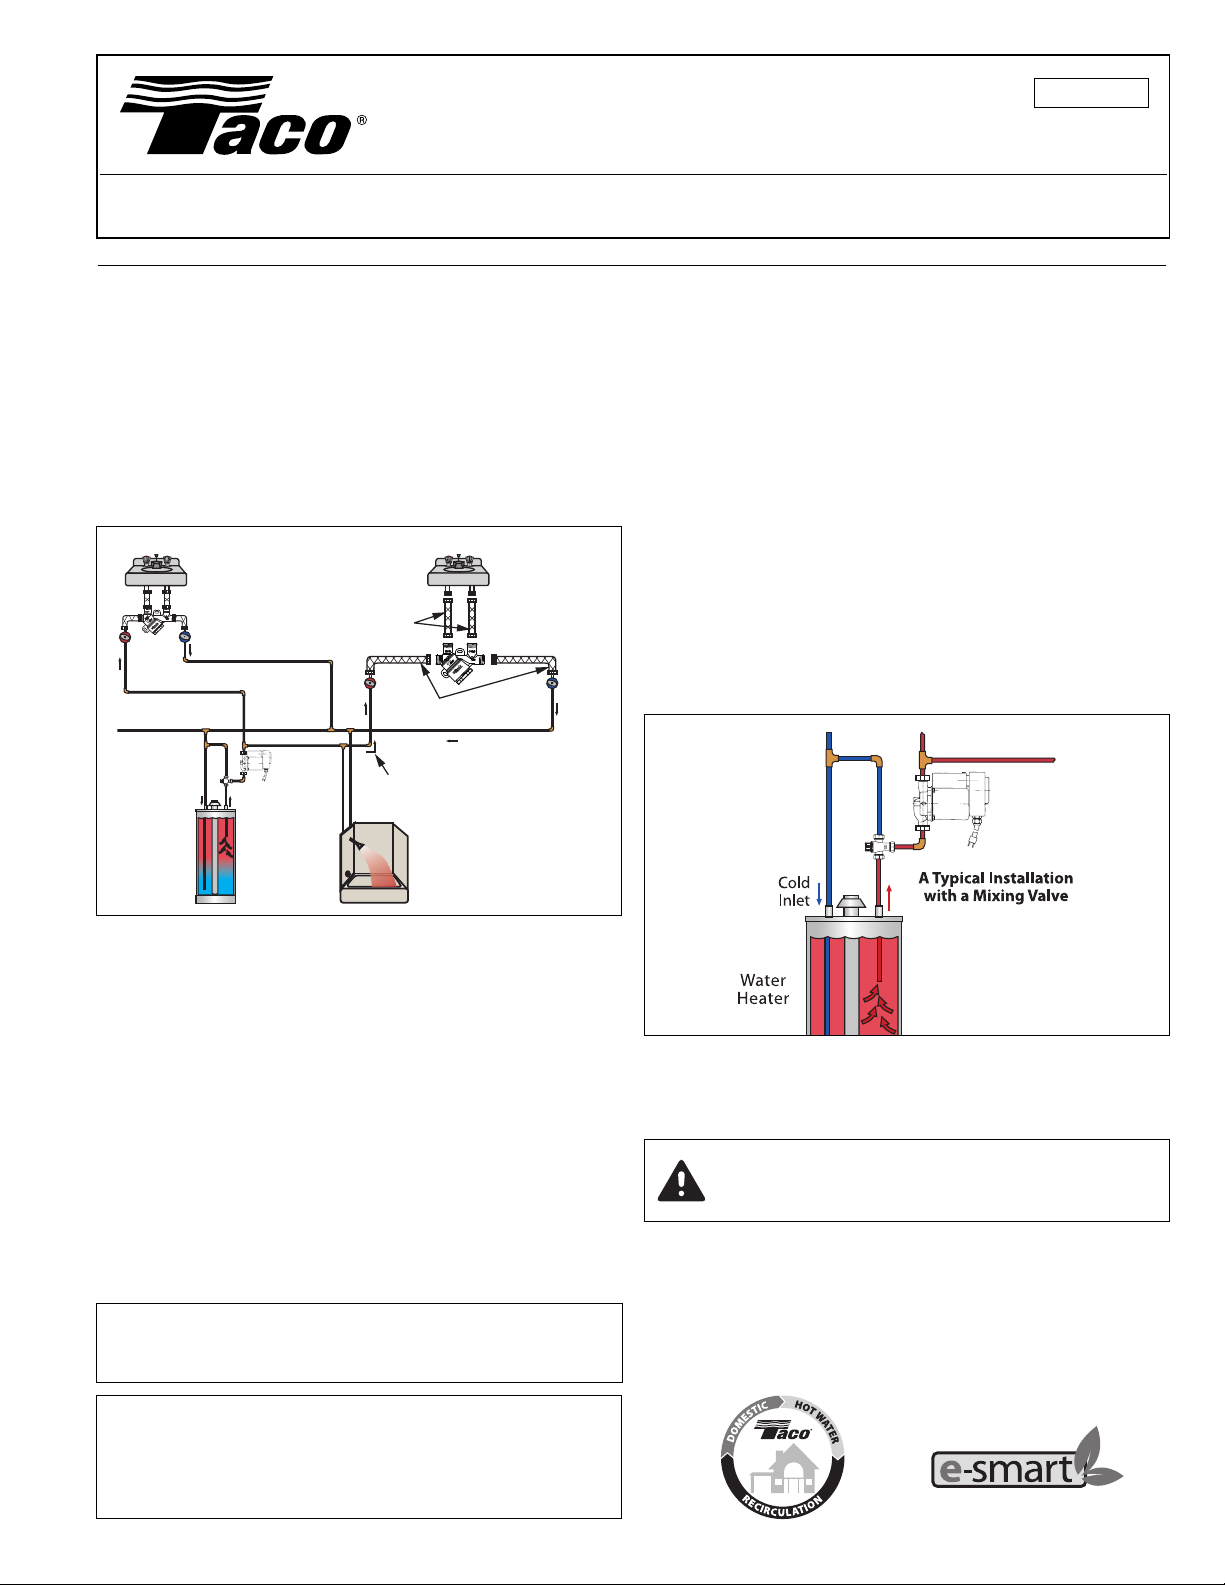
Cold
A
dditional Hot-Link®
Valve Locations
Hot
Cold
Inlet
Water
Heater
HOT WATER LIN E
A Typical
Installation
with a
Mixing Valve
Hot-Link®
Circulator
COLD WATER LI NE
C
oldHot
The Best Location
i
s furthest xture
from Hot Water Heater
S
hut-O
Valve
Shut-O
V
alve
1/2"
1
/2"
Use (2) existing 3/8" x 1/2"
female to female ex lines
(2) new 1/2" x 1/2"
Taco® supplied ex lines
(female to female)
Hot-Link® includes (2)
plastic wall anchors
and screws
Hot-Link®
Circulator
Instruction Sheet
Hot-Link®System for Domestic Hot Water Recirculation
SUPERSEDES: June 1, 2013 EFFECTIVE: June 1, 2014
Plant ID# 001-3917
Application:
The Taco Hot-Link®System for Domestic Hot Water recirculation ensures instant hot water comfort at showers and
faucets. By supplying fresh hot water to the fixtures while
returning the “cooled” hot water back to the water heater
through the cold line, it also saves thousands of gallons of
wasted water per year. The average family can achieve
yearly savings of up to 12,000 gallons of water normally
wasted down the drain while waiting for hot water.
1. Follow all local plumbing and electrical codes when
installing the Hot-Link System.
2. Shut off cold water supply valve to water heater.
3. Open a hot water faucet in the house to drain the hot
water line.
4. Open water heater drain valve located at the bottom of
tank to drain remaining hot water from the lines. It is
not necessary to drain the entire tank.
5. Disconnect hot water supply line at water heater outlet
nipple.
6. Install one
3
⁄4" tailpiece of the union adapter provided
to the water heater outlet. Apply pipe dope or Teflon
tape to all male threads as required.
7. Install the other 3⁄4" union tailpiece to the pump inlet
connection. Be sure flow arrow located on the pump
casing is in the proper direction. See diagram.
High Quality Features:
The Hot-Link System includes a high performance
Stainless Steel 00 circulator with a pre-wired power cord
and programmable 24 hour timer. This circulator is suitable
for most residential homes with hot supply lines up to 150
feet in length.
The unique Hot-Link Valve is the key to the system. Made
of durable high temperature polymer, it creates an easy-toinstall return loop through the cold line from the furthest
fixture back to the water heater. An integral thermal sensor
disc closes when hot water reaches the valve. An internal
flow check prevents cold water from backing into the hot
line. Stainless steel braided flex hoses complete the installation.
Installing the Hot-Link System Circulator:
WARNING: To avoid electrical shock, disconnect the
WARNING: 1. Circulator must be installed on and support-
power supply to the circulator and the main
electrical unit.
ed by the circulation piping.
2. The addition of unions on both the suction
and discharge side of the circulator is
recommended.
8. Install the stainless steel Hot-Link circulator by connecting the union halves. Circulator motor must be in
the horizontal position.
CAUTION: Do not run circulator dry.
Permanent damage may result and will void
warranty.
9. Reconnect the hot water supply line to circulator outlet.
10. Open supply valve to water heater. Let water run until all
air is purged from lines. Check for any leaks. If leaks are
detected, close supply valve and tighten all connections.
11. Shut off open hot water faucet.
A Taco resource – saving product
Page 2
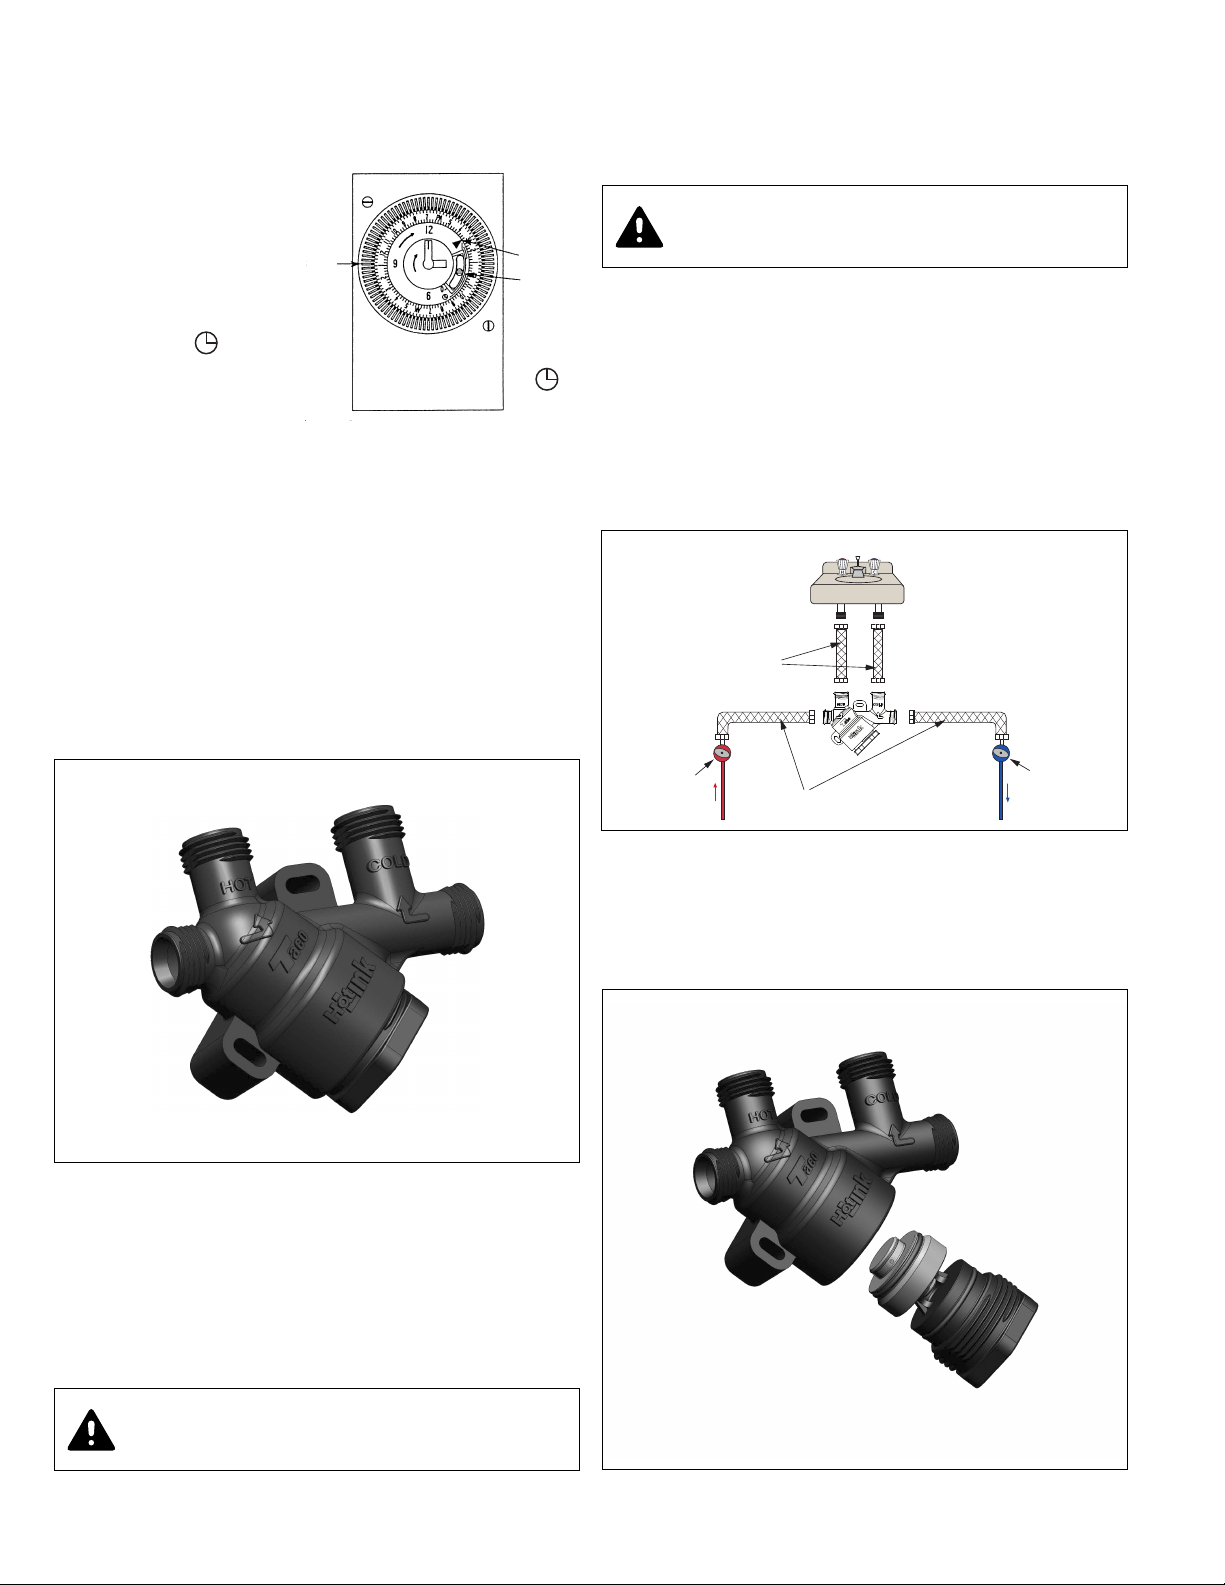
Setting the Circulator Timer:
Hot
Shut-O
Valve
Shut-O
Valve
1/2” Male
(2) New 1/2”x1/2”
Taco® supplied ex lines
(female x female)
Use (2) existing female
x female ex lines
1/2” Male
Hot-Link® includes (2)
plastic wall anchors
& screws
Cold
1/2”
3/8” Male
3/8” Male
1/2”
HOT COLD
. Set timer to exact time of day by turning the clock face
1
clockwise. Be sure to align the time arrow with the cor-
ect AM/PM settings in outer ring.
r
Analog Timer Manual
Switch Settings
1. Up = On, Constant
circulation I
2. Middle = Automatic
operation
3. Down = Off O
TRIPPERS
PROGRAM
Analog Timer Diagram
A
MANUAL
WITCH
S
A
SETTING
2. Plug power cord into nearest 115V power outlet. Set
timer manual switch to ON to test for pump operation.
Run pump in manual mode for 5 minutes to purge air
from pump. See clock face diagram.
3. To set the desired ON/OFF operation times, push the
trippers away from the clock face at the corresponding
hour/minute for ON times. Push trippers toward clock
face for OFF times. Each tripper represents 15 minutes.
4. After all ON/OFF times are set, move timer manual
switch to middle AUTO position for automatic operation.
IME
T
RROW
IN
UTO
4. Disconnect the hot and cold flex hoses from the
1
⁄2"
faucet connections beneath the sink and reconnect
them to the respective hot and cold inlet ports on the
Hot-Link Valve. Locate the flow arrows on the side of
the valve to verify flow direction.
AUTION: Use caution when attaching flex
C
hoses to the Hot-Link Valve to prevent crossthreading or stripping of the threads.
5. Install the 1⁄2" x 1⁄2" flex hoses provided. Connect one
hose to the hot outlet of the valve and the hot water
connection on the faucet (left side). Connect the second flex hose to the cold outlet of the valve and the
cold water connection on the faucet (right side).
6. When all connections are made, open angle stop
valves and check for leaks.
7. Attach the Hot-Link Valve to the wall using anchor
screws provided.
Installing the Hot-Link Valve:
1. Select the hot water faucet furthest from the water
heater. If your plumbing system branches in two different directions, another Hot-Link Valve may need to be
installed at the end of each run.
2. Shut off the hot and cold angle stop valves below the
sink.
3. Open the hot and cold faucets to purge water from the
lines.
CAUTION: Do not use pipe dope or teflon
tape on the valve body threads.
Note: The Hot-Link Valve can be disassembled for service
and cleaning. Repeat steps number 2 and 3. Unthread the
valve stem from the body and clean internal screen of
debris. Reattach valve stem securely to prevent leaks.
Open angle stop valves and check for leaks.
Page 3
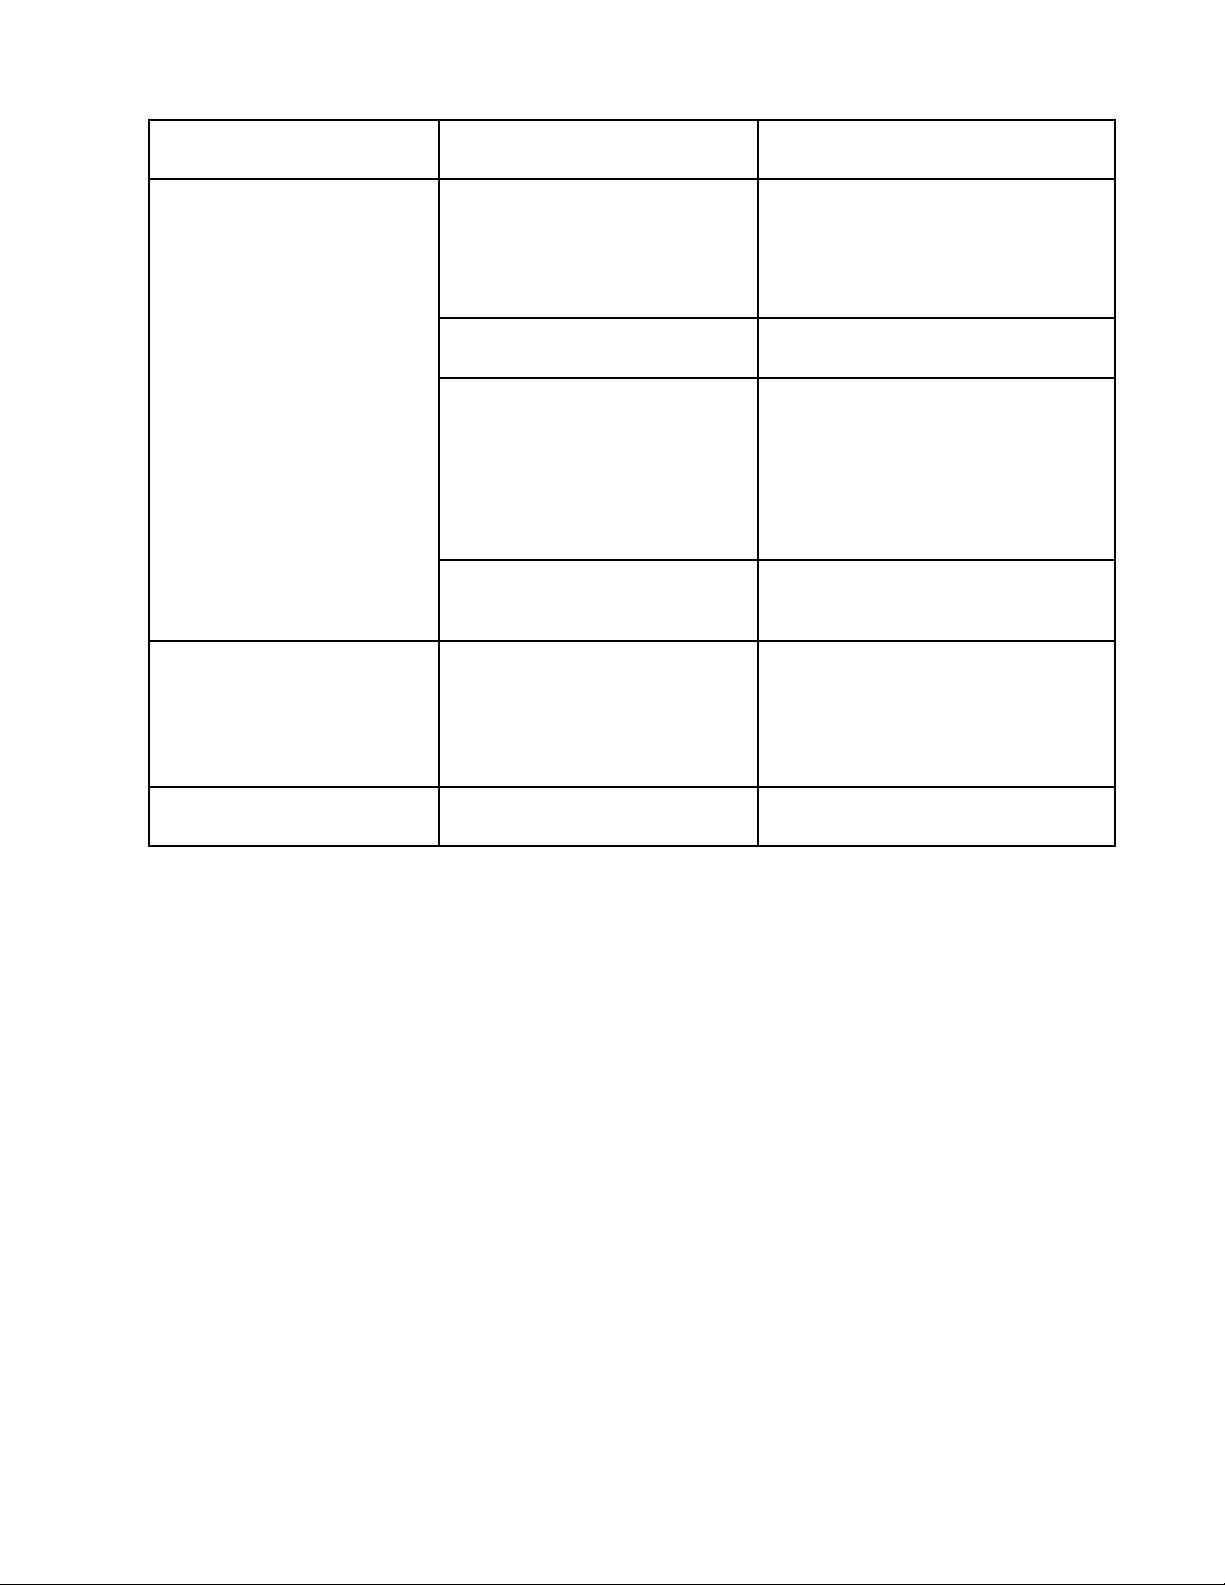
Hot-Link Trouble Shooting
SYMPTOM POSSIBLE CAUSE SERVICE TIP
• Close angle stop valves beneath sink.
• Open hot and cold faucets to drain
Clogged filter screen.
line of pressure.
• Remove valve stem, thoroughly clean
screen, replace, open angle stop
valves and check operation.
No Hot Water
Abundance of Hot Water in
Cold Line
Note: It is normal for some
warm water to be in cold line
during recirculation cycle.
Water is too Hot
Pump installed incorrectly.
Pump not running.
Hoses connected incorrectly.
If unable to flush the hot water
from the cold line by running the
cold faucet, it may indicate that the
valve is damaged.
Hot-Link system has improved
delivery of hot water.
• Check to see if flow arrow on pump
casing is in correct direction.
• Check circuit breaker.
Check power supply outlet.
•
• Check to see if timer is set to correct
time of day.
• Check trippers. Are they set to correct
AM/PM time?
• Check timer switch. Set to AUTO
(middle) position.
• Check to see if flex hoses are connected to proper Hot/Cold ports on
valve.
• Replace valve.
• Install mixing valve on water heater outlet. See piping schematic on page 1.
Page 4
LIMITED WARRANTY STATEMENT
Taco, Inc. will repair or replace without charge
(at the company’s option) any Taco 00 Series
circulator or circulator part which is proven
defective under normal use within three (3) years
from the date of manufacture.
In order to obtain service under this warranty, it
is the responsibility of the purchaser to promptly
notify the local Taco stocking distributor or Taco
in writing and promptly deliver the subject product
or part, delivery prepaid, to the stocking distributor. For assistance on warranty returns, the
purchaser may either contact the local Taco
stocking distributor or Taco. If the subject product or part contains no defect as covered in this
warranty, the purchaser will be billed for parts
and labor charges in effect at time of factory
examination and repair.
Any Taco product or part not installed or operated
in conformity with Taco instructions or which
has been subject to misuse, misapplication, the
TACO, INC., 1160 Cranston Street, Cranston, RI 02920 Telephone: (401) 942-8000 FAX: (401) 942-2360.
TACO (Canadá), Ltd., 8450 Lawson Road, Unit #3, Milton, Ontario L9T 0J8. Telephone: 905/564-9422. FAX: 905/564-9436.
Visit our web site at: http://www.taco-hvac.com
addition of petroleum-based fluids or certain
chemical additives to the systems, or other
abuse, will not be covered by this warranty.
If in doubt as to whether a particular substance
is suitable for use with a Taco product or part, or
for any application restrictions, consult the
applicable Taco instruction sheets or contact
Taco at (401-942-8000).
Taco reserves the right to provide replacement
products and parts which are substantially similar
in design and functionally equivalent to the
defective product or part. Taco reserves the right
to make changes in details of design, construction, or arrangement of materials of its products
without notification.
TACO OFFERS THIS WARRANTY IN LIEU OF
ALL OTHER EXPRESS WARRANTIES. ANY
WARRANTY IMPLIED BY LAW INCLUDING
WARRANTIES OF MERCHANTABILITY OR
FITNESS IS IN EFFECT ONLY FOR THE DURA-
TION OF THE EXPRESS WARRANTY SET
FORTH IN THE FIRST PARAGRAPH ABOVE.
THE ABOVE WARRANTIES ARE IN LIEU OF
ALL OTHER WARRANTIES, EXPRESS OR
STATUTORY, OR ANY OTHER WARRANTY
OBLIGATION ON THE PART OF TACO.
TACO WILL NOT BE LIABLE FOR ANY SPECIAL, INCIDENTAL, INDIRECT OR CONSEQUENTIAL DAMAGES RESULTING FROM THE
USE OF ITS PRODUCTS OR ANY INCIDENTAL
COSTS OF REMOVING OR REPLACING
DEFECTIVE PRODUCTS.
This warranty gives the purchaser specific
rights, and the purchaser may have other rights
which vary from state to state. Some states do
not allow limitations on how long an implied
warranty lasts or on the exclusion of incidental
or consequential damages, so these limitations
or exclusions may not apply to you.
Printed in USA
Copyright 2014
TACO, Inc.
 Loading...