

TabletKiosk Sahara NetSlate a510 Quick Start Manual
Quick Start Guide
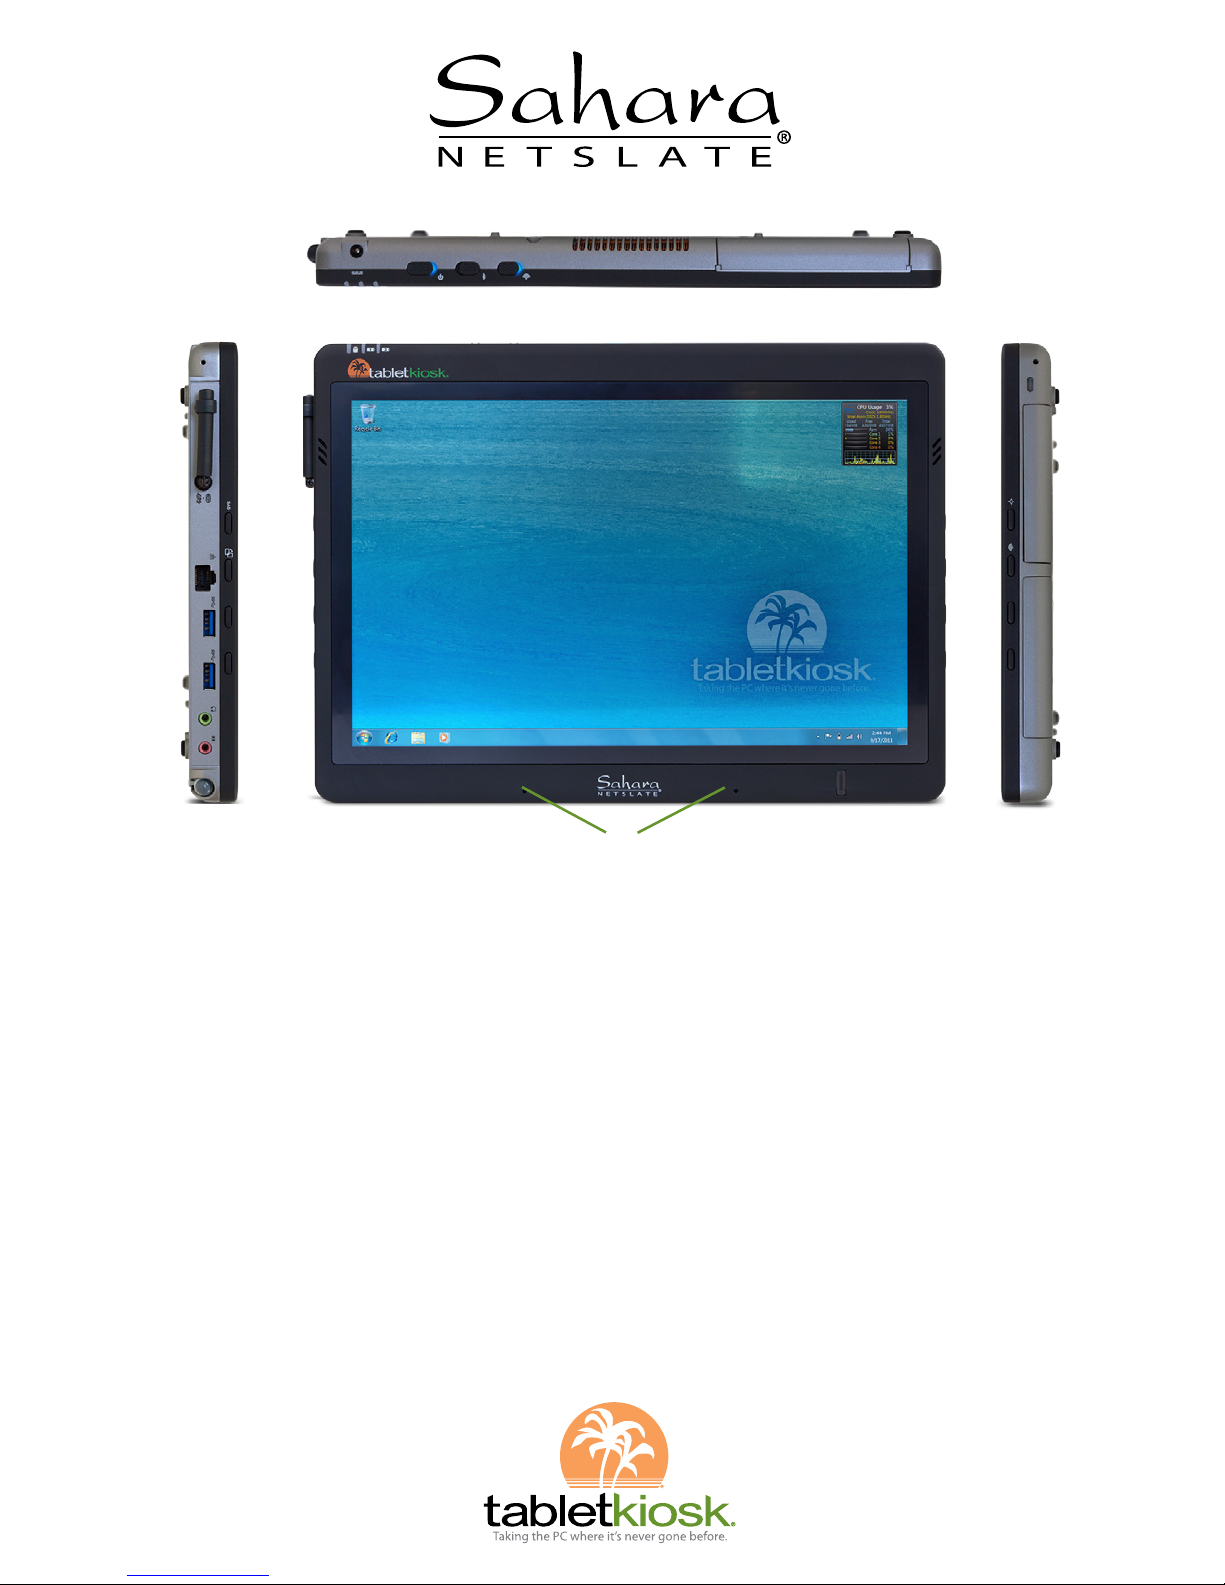
Sahara NetSlate® a510 Tablet PC
Left Side
1. Carry Strap Attachment
2. 3G+GPS Antenna Port
(with antenna attached)
3. Ethernet Port (RJ45)
4-5. USB 3.0 Ports
6. Headphone Jack
7. Audio In Jack
8. Stylus Pen Garage
9. SAS Button
10. Screen Rotation Lock
11-12. Volume or Brightness
Control Buttons (user
assignable in BIOS)
Top Side
13. DC In (Power In)
14. HDD Access LED
15. Battery Status LEDs
16. Power Switch
17. Bluetooth Switch
18. WiFi Switch
19. Modular Expansion
Port with cover
Front
20. Audio Speaker
2. 3G+GPS Antenna
21. Microphone Array
22. Fingerprint Reader
Right Side
1. Carry Strap Attachment
23. Kensington Lock Port
24. Battery 1
25. Touch Screen ON/OFF
26. Wireless Mode Toggle
27-28. Programmable Buttons
29. Battery 2
Left Side
Right Side
Top Side
!
@
#
$
%
^
&
*
CL
@
CL
CQ
CR
CS
CT
BPBQ BR BS BT BU
CM CN
BO
(
BL
BM
BN
!
CO
CP
CU
Congratulations on your purchase of a TabletKiosk Sahara NetSlate® a510 Tablet PC. This guide
is aimed at getting you up and running with your new Tablet PC as quickly as possible.
For more information on setting up and using your Sahara NetSlate a510, please consult the
digital User’s Guide located on your desktop or visit our website at www.tabletkiosk.com.
What’s in the Box
Your Sahara NetSlate should come securely packaged in its shipping container along with the
items listed below. Contact your dealer immediately if you find that anything is missing or
damaged. Note, however, that contents may be changed without notice.
1. AC Adapter with Power Cord
2. Cleaning Cloth
3. Neoprene Slip Case
4. Simple Stand
5. Windows Getting Started Guide
6. This Quick Start Guide
7. Standard Lithium-Ion Battery Pack(s)
8. Stylus Pen (may not be included with certain configurations)
Setting Up Your Sahara NetSlate
The following steps will help you power up and get running with your new Sahara NetSlate a510
Tablet PC as quickly and effortlessly as possible. These steps might change slightly over time
with newer revisions of the installed operating system, or when your tablet is purchased from a
systems integrator or solutions provider.
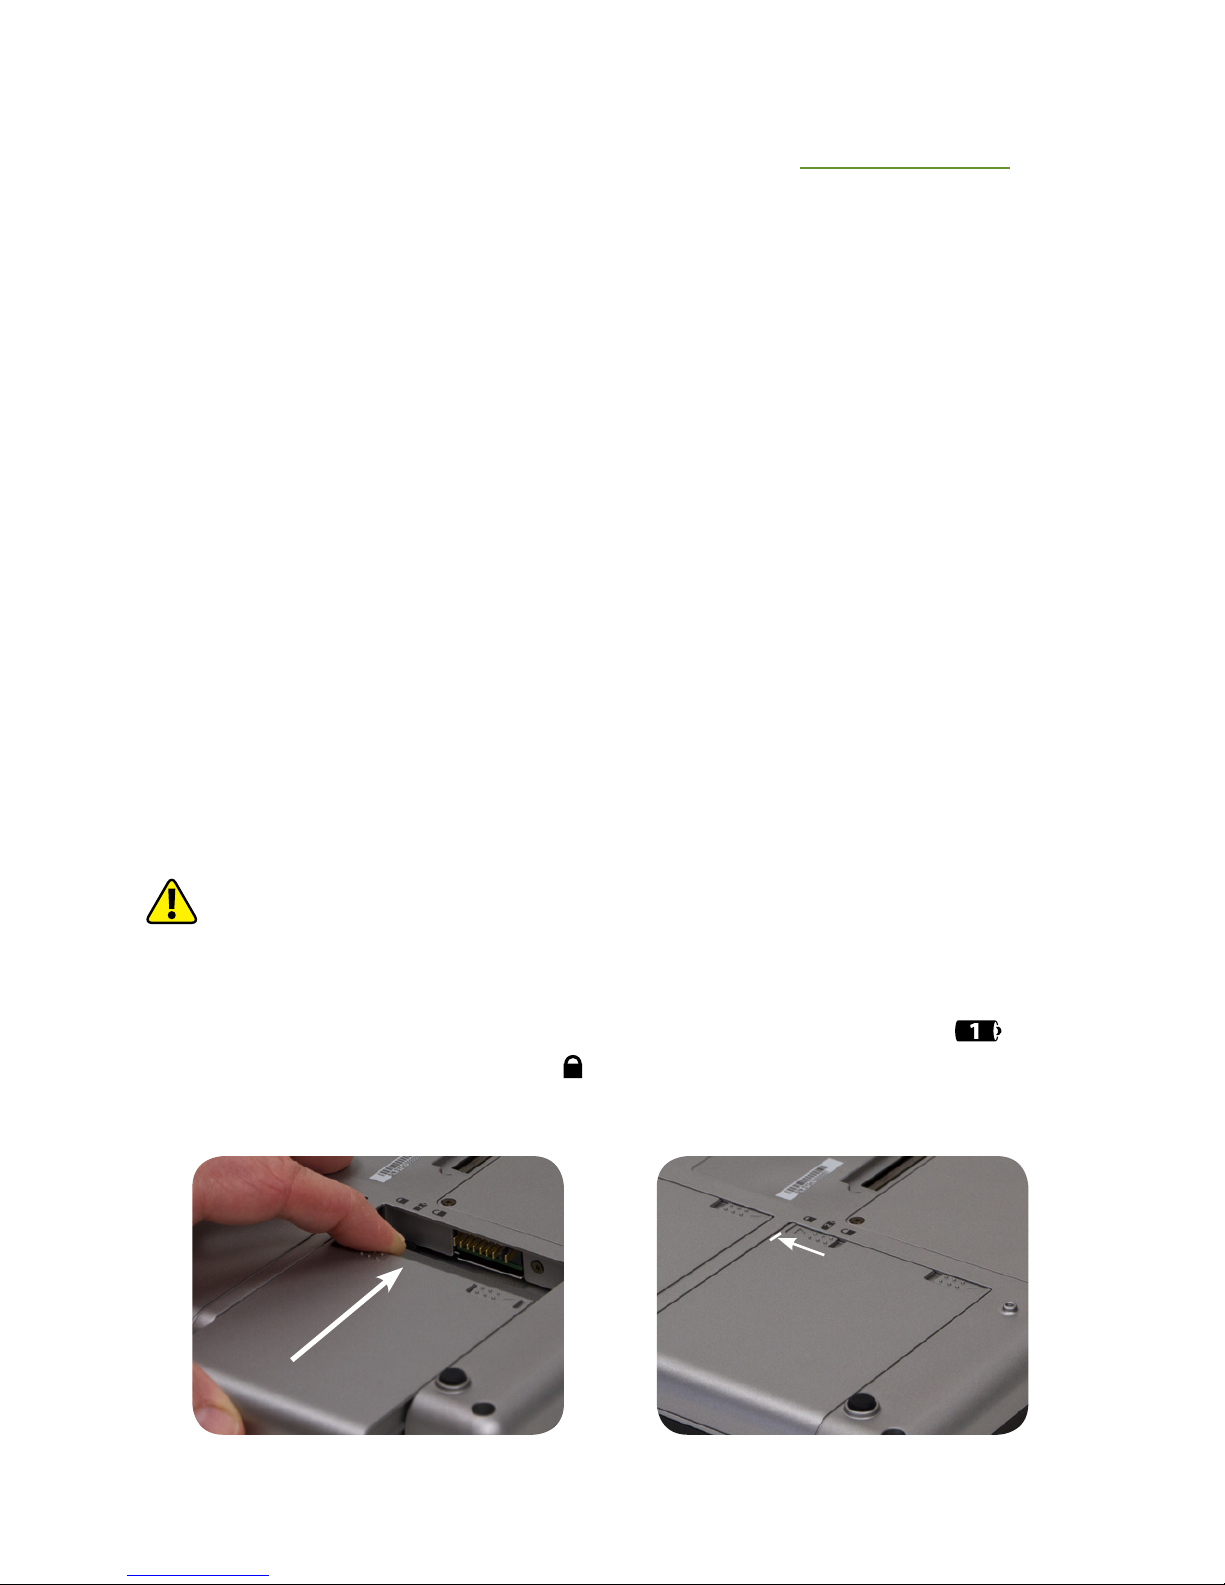
Step 1: Insert the Battery Pack(s)
Turn the tablet over so the back of the system is facing toward you.
CAUTION: When turning over the Sahara NetSlate, be careful not to place it on a surface that could scratch
or damage the LCD screen. You can place the included slip case on the surface before carefully setting the
computer down to protect the screen.
Align a battery into the battery compartment and then slide it into the computer until it clicks
securely into place. While it does not matter which battery (one or two) that you install first, if
you are only going to install one battery, it should be installed into battery bay one (
).
Slide the battery-locking tab to the locked (
) position. Once the locking tab clicks into position,
the battery should be securely seated. Repeat for the second battery if applicable.
Align the battery in the bay and slide it into
place. You will hear a click when the battery is
properly seated.
Slide the locking tab on the battery to the
locked position to keep the battery secured in
the bay.

Step 2: Connect the Sahara NetSlate to an External Power Source
Locate the AC adapter and the power cord. Plug the power cord securely into the AC adapter.
Plug the AC adapter’s connection cable into the DC In (
) port on the top side of the Sahara
NetSlate. Once the adapter is securely in place, plug the power cord into a power outlet.
IMPORTANT: You should allow the battery pack(s) to charge fully before disconnecting the Sahara NetSlate
from the AC adapter and running it on battery power for the first time.
NOTE: When you first connect the Sahara NetSlate into an external power source, the battery charge
indicator(s) will begin to glow orange. When the battery is fully charged the indicator(s) will turn green.
See the section later in this guide and in the User’s Guide entitled Battery Care for tips on maximizing
battery life and performance.
Step 3: Connect Any Applicable Peripherals and Networking Cables
If you would like to use any external peripherals with the tablet (i.e. USB mouse, USB keyboard,
etc.), or are planning to connect to the Internet and/or a corporate LAN using a wired Ethernet
connection (RJ45), connect them now.
Step 4: Power on the Sahara NetSlate
Locate the three power switches on the top of the tablet. The
switch is the computer’s main
power toggle. Slide and hold it until it emits a blue glow (about 3 seconds) and then release it.
The Sahara NetSlate will now boot up.
Step 5: Complete the Operating System Installation
When your system powers on for the first time, you may be prompted to enter your Windows
product key to complete set-up. The key can be found on the C.O.A. sticker located on the back
of the system underneath the battery pack in battery bay one (
). You will then be asked to
agree to Microsoft's licensing terms.
Plug the power cord into the DC In jack on the
top of the tablet.
Plug the power cord into the AC adapter brick
and then into a wall outlet.
Locate the system Power switch on the top of
the tablet.
Slide and hold it for about three (3) seconds
until it glows blue and the system powers up.

Windows will start its configuration and optimization routine and may restart. This is normal.
Windows will then have a few questions for you to answer in order to localize and finish your
installation. Refer to your operating system’s manual for information on any of the questions you
are unsure how to answer. When done, your system will complete the first time set-up and you
will be taken to the Windows desktop.
Step 6: Navigating the Operating System's GUI on a Tablet PC
Unlike a standard laptop or desktop PC, navigating the operating system’s graphical user interface (GUI) on a Tablet PC is performed using a stylus pen or your fingers.
Touch Screen: Navigating with a touch screen is different from navigating with a mouse. You
may use either a stylus pen or your fingers. If using a stylus, hold it as if you were writing with
a standard ink pen. Instead of sliding the stylus or your fingers around the screen to move the
pointer (as you would with a mouse or track pad), simply tap on what you want to interact with.
Sliding the stylus or your finger while touching the screen will move the on-screen pointer
around as if you were using a mouse and holding down the left mouse button. In other words,
you would be performing a drag operation. Also, remember that since the screen is sensitive to
the touch, resting your hand on it while working might make the pointer react unpredictably.
Active Digitizer (pen): When using a digitizer, you may only navigate using the pen. On a dual
mode Sahara NetSlate a510 Tablet PC, the screen will intelligently sense the tip of the stylus pen
when it draws near and automatically switch on the digitizer. Now the pen's tip doesn’t even
need to touch the screen to activate and move the pointer.
Hold the stylus pen as you would a standard ink pen. Simply place the tip of the stylus just
above the screen and move it around. The pointer should follow it as if you were using a mouse.
In this mode your hand may rest on the screen, since this will not affect the behavior of the
pointer. Like a touch screen, when you want to select or interact with an object, simply tap on it.
Keep the stylus tip on the screen while moving it around in order to perform a drag operation.
TIP: When trying to select or activate something on the screen with the stylus pen, pay attention to the
position of the pointer icon on the screen instead of the tip of the pen. By default, the pointer is diamond
shaped in Windows 7 when using a touch screen or digitizer unless you plug-in and use a mouse, then it
will switch to the standard arrow pointer.
Whether using either a touch screen or an active digitizer, tapping lightly on the screen will
perform a standard left mouse button click. Tapping twice in rapid succession will perform a
double-click. Pressing the tip of the stylus or your finger against the screen without moving it for
about a second or so will perform a standard right mouse button click.
NOTE: When pressing and holding to perform a right-click, keep your finger or stylus tip pressed to the
screen until you see a circle draw around where you are pressing before you release.
Inputting Data: You can use the Tablet PC Input Panel in Windows 7 to enter information
via the On-Screen Keyboard or Writing Pad. You’ll find the edge of the Tablet PC Input Panel
docked on the left-hand side of your screen. When in digitizer mode, hovering the pointer over
the panel will cause it to slide outward a bit making it easier to access. Tap on it once to activate
the panel and slide it to the center of your desktop. When finished, tap the “close” icon in the
upper right corner of the panel to re-dock it.
When using a touch screen, tap once on the input panel’s edge to slide it to the center of your
desktop. You can also enable the PC Input Panel Toolbar on the Windows Taskbar by pressing
and holding (right-clicking) on a blank space on the Taskbar and choosing "Toolbars Tablet
PC Input Panel" from the pop-up menu that appears.
For more information on using the input panels, see the digital User's Guide on your system's
desktop (you can also download it from www.tabletkiosk.com) or check out the Tablet PC
Tutorials in Windows.
 Loading...