

Page 1

USER MANUAL
HV-SERIES
SDV 3100 HV
Version V 1.0 Order No. 9103-0559 UK
Page 2

2
Page 3

Welcome.
We are delighted that you have decided to purchase a reference class product. With your new SDV 3100 HV you
have acquired a top-quality piece of equipment which has been designed and developed with the wishes of the
audiophile music lover as absolute top priority.
This system represents our very best efforts at designing practical electronic equipment incorporating solid quality,
user-friendly operation and a specification and performance which leaves nothing to be desired.
All these factors contribute to a piece of equipment which will satisfy your highest demands and your most
searching requirements for a period of many years. All the components we use meet the German and European
safety norms and standards which are currently valid. All the materials we use are subject to painstaking quality
monitoring.
At all stages of production we avoid the use of substances which are environmentally unsound or potentially
hazardous to health, such as chlorine-based cleaning agents and CFCs.
We also aim to avoid the use of plastics in general, and PVC in particular, in the design of our products. Instead we
rely upon metals and other non-hazardous materials; metal components are ideal for recycling, and also provide
effective electrical screening.
Our robust all-metal cases exclude any possibility of external sources of interference affecting the quality of
reproduction. From the opposite point of view our products’ electro-magnetic radiation (electro-smog) is reduced to
an absolute minimum by the outstandingly effective screening provided by the metal case.
The case of the SDV 3100 HV is built exclusively from the finest-quality non-magnetic metals of the highest purity. This
excludes the possibility of interaction with the audio signals, and guarantees uncoloured reproduction.
We would like to take this opportunity to thank you for the faith you have shown in our company by purchasing this
product, and wish you many hours of enjoyment and sheer listening pleasure with your SDV 3100 HV.
elektroakustik GmbH & Co KG
3
Page 4

License Notice
Qualcomm is a trademark of Qualcomm Incorporated, registered in the United States and other
countries, used with permission. aptX is a trademark of Qualcomm Technologies International,
Ltd., registered in the United States and other countries, used with permission
This product contains software in form of object code that is partially based on free software under different
licenses, especially the GNU General Public License. You can find details on this in the License Information which
you should have received with this product.
If you have not received a copy of the GNU General Public License, please see http://www.gnu.org/licenses/.
For a period of three years after last distribution of this product or its firmware, T+A offer the right to any third party
to obtain a complete machine-readable copy of the corresponding source code on physical storage medium (DVD-
ROM or USB stick) for a charge of 20€. To obtain such copy of the source code, please write to the following address
including information about product model and firmware version: T+A elektroakustik, Planckstr. 9-11, 32052
Herford, Germany.
The GPL license and further information about Licenses can be found on the internet under this link:
http://www.ta-hifi.com/license-information
It is also possible to retrieve the used licenses directly from the device with the help of an Internet browser. For
details, see the chapter entitled "Legal Information".
4
Page 5

About these instructions
Caution!
Text passages marked with this symbol contain important information which must be observed if the
machine is to operate safely and without problems.
This symbol marks text passages which provide supplementary notes and background information; they
are intended to help the user understand how to get the best out of the machine.
The operation instructions, the connection guidance and the safety notes are for your own good please read them carefully and observe them at all times. The operating instructions are an integral
part of this device. If you ever transfer the product to a new owner please be sure to pass them on to
the purchaser to guard against incorrect operation and possible hazards.
All the components we use meet the German and European safety norms and standards which are
currently valid. This product complies with the EU directives. The declaration of conformity can be
downloaded from www.ta-hifi.com/DoC.
All the controls and functions of the SDV 3100 HV which are frequently used are described in the first section of
these operating instructions.
The second part 'Basic settings, Installation, Using the system for the first time' covers connections and settings
which are very seldom required; they are generally required only when the machine is set up and used for the first
time. Here you will also find a detailed description of the network settings required for connecting the SDV 3100 HV
to your home network.
Symbols used in these instructions
Notes on software updates
Many features of the SDV 3100 HV are software based. Updates and new features will be made available from time
to time. The update process takes only a few minutes. See the chapter entitled “Software update” for how to update
your device via the internet connection.
We recommend you to check for updates before using your SDV 3100 HV for the first time. To keep your device up to
date you should check for updates from time to time.
5
Page 6

Contents
Page
Introduction ............................................................................................................................... 9
PCM and DSD ..................................................................................................................................................... 9
SDV 3100 HV and DSD ........................................................................................................................................ 9
SDV 3100 HV and PCM ..................................................................................................................................... 10
Front panel controls .................................................................................................................12
Remote control .........................................................................................................................16
Basic settings of the SDV 3100 HV ...........................................................................................18
Calling up and operating the menu ................................................................................................................. 18
D/A configuration ............................................................................................................................................ 18
Source names .................................................................................................................................................. 19
Pass through .................................................................................................................................................... 19
Headphone mode ............................................................................................................................................. 19
Left rotary knob ............................................................................................................................................... 19
Display Brightness ................................................................ ........................................................................... 19
Display Mode.................................................................................................................................................... 20
Language ................................................................................................ .......................................................... 20
Device name ..................................................................................................................................................... 20
Energy Saver ................................................................................................................................................... 20
Network ............................................................................................................................................................ 20
Music services ................................................................................................................................................. 20
Bandwidth limit................................................................................................................................................ 21
Device Info ........................................................................................................................................................ 21
D/A-Converter settings of the SDV 3100 HV ............................................................................22
Calling up and operating the menu ................................................................................................................. 22
Balance ............................................................................................................................................................ 23
PCM D/A mode ................................................................................................................................................. 23
DSD D/A mode .................................................................................................................................................. 23
Output .............................................................................................................................................................. 23
Bandwidth ........................................................................................................................................................ 23
Operating the source devices in detail .....................................................................................25
Operation with the F3100 remote control ....................................................................................................... 25
Operation with controls on the front panel of the device ............................................................................... 25
Favourites lists ................................................................................................ ........................................................ 26
General information ......................................................................................................................................... 26
Adding a favourite ............................................................................................................................................ 26
Erasing a favourite from the Favourites list .................................................................................................... 26
Selecting a favourite from the list ................................................................................................................... 27
Directly selecting a favourite ........................................................................................................................... 27
Sorting Favourites lists .................................................................................................................................... 27
Operating the radio ...................................................................................................................28
FM – Radio ........................................................................................................................................................... 28
Selecting FM radio ........................................................................................................................................... 28
Manual station search ..................................................................................................................................... 28
Automatic station search ................................................................................................................................ 29
Selecting a station from the Station list ................................................................................................ ......... 29
RDS functions .................................................................................................................................................. 29
Switching Radio Text on and off ...................................................................................................................... 30
6
Page 7

Mono / Stereo ................................................................................................................................................... 30
DAB - Radio ........................................................................................................................................................... 30
Selecting DAB radio .......................................................................................................................................... 30
Automatic station search ................................................................................................................................. 31
Selecting a station from the Station list .......................................................................................................... 31
RDS functions ................................................................................................................................................... 31
Internet Radio source (Streaming www) ............................................................................................................. 32
Selecting Internet Radio as source .................................................................................................................. 32
Selecting podcasts ........................................................................................................................................... 32
Playback ........................................................................................................................................................... 32
Favourites list ................................................................................................................................................... 32
Search function ................................................................................................................................................ 33
Operating music services ......................................................................................................... 34
General information .......................................................................................................................................... 34
Selecting a music service ................................................................................................ ................................. 34
Playback ........................................................................................................................................................... 34
Search function ................................................................................................................................................ 35
Playlists and favourites .................................................................................................................................... 35
Operating the UPnP / DLNA source (Streaming Client) ............................................................ 36
General information on the streaming client ................................................................................................... 36
Selecting the UPnP / DLNA source ................................................................................................................... 36
Playback ........................................................................................................................................................... 36
Playback of directories ..................................................................................................................................... 37
Search function ................................................................................................................................................ 37
Front panel display ........................................................................................................................................... 37
Playing USB memory media ...................................................................................................... 38
General information .......................................................................................................................................... 38
Selecting USB Media as source ....................................................................................................................... 38
Playback ........................................................................................................................................................... 38
Playback of directories ..................................................................................................................................... 39
Search function ................................................................................................................................................ 39
Operating the Bluetooth source ............................................................................................... 40
Selecting the Bluetooth Audio source ............................................................................................................. 40
Setting up audio transfer ................................................................................................................................. 40
Playback functions ........................................................................................................................................... 40
Controlling the SDV 3100 HV ............................................................................................................................ 41
NOTES ................................................................................................................................ ............................... 41
The SDV 3100 HV as D/A Converter........................................................................................... 42
General Information ......................................................................................................................................... 42
D/A Converter Operation ...................................................................................................................................... 42
Selecting a D/A Converter Source .................................................................................................................... 42
Screen Display .................................................................................................................................................. 42
USB DAC operation in detail .................................................................................................................................... 43
System-requirements ...................................................................................................................................... 43
Installing drivers ............................................................................................................................................... 43
Settings ............................................................................................................................................................. 43
Notes on software ............................................................................................................................................ 43
Notes on operation ........................................................................................................................................... 43
Notes on setting up .......................................................................................................................................... 43
Network Audio Adapter (NAA) .................................................................................................. 44
General information .......................................................................................................................................... 44
7
Page 8

Hardware and software requirements ............................................................................................................ 44
Network, connections ...................................................................................................................................... 44
Playback ........................................................................................................................................................... 44
Installation Using the system for the first time Safety notes ................... 47
Back panel connections ...........................................................................................................48
Installation and wiring ..............................................................................................................51
Safety notes ..............................................................................................................................53
Network Configuration .............................................................................................................55
General Information ......................................................................................................................................... 55
Compatible hardware and UPnP servers ........................................................................................................ 55
Network settings menu ................................................................................................................................... 55
Opening the network settings menu ............................................................................................................... 55
Operating the menu, changing and storing IP addresses ............................................................................... 55
Closing the menu ............................................................................................................................................. 56
Interrupting the menu without storing the settings ....................................................................................... 56
The Configuration for a Wired Ethernet LAN or Power-Line LAN connection ................................................... 57
Setting the Parameters for a Wired Network .................................................................................................. 57
The Configuration for a WLAN connection .......................................................................................................... 59
Setting the parameters for a wireless network .............................................................................................. 59
Selecting and connecting a WLAN by hand ........................................................................................................ 59
Searching for and Selecting the Network ....................................................................................................... 59
Entering the Password (for encoded networks) .............................................................................................. 59
Storing Network Settings and Restarting ....................................................................................................... 59
Connecting to WLAN via the WPS-function ........................................................................................................ 60
WPS-function ................................................................................................................................................... 60
Connecting WLAN automatically via the WPS function .................................................................................. 60
Selecting the WLAN manually and conneting via WPS ................................................................................... 60
Notes on Energy Saving ............................................................................................................61
Firmware update .......................................................................................................................62
Technical description Digital filters / Oversampling ...............................................................63
Network Terminology ...............................................................................................................66
Trouble shooting .......................................................................................................................68
Appendix ..................................................... Fehler! Textmarke nicht definiert.
Appendix A ................................................................................................................................71
Wiring diagram ................................................................................................................................................. 71
Appendix B ................................................................................................................................74
Specification ........................................................................................................................................................ 75
8
Page 9

Introduction
PCM and DSD
Two competing formats are available in the form of PCM and DSD, both of
which are used to store audio signals at very high resolution and quality.
Each of these formats has its own specific advantages. A vast amount has
been written about the relative merits of these two formats, and we have no
intention of participating in the dispute, much of which is less than objective
in nature. Instead we consider it our task to develop equipment which
reproduces both formats as effectively as possible, and exploits the
strengths of each system to the full.
Our many years of experience with both systems have clearly shown that
PCM and DSD cannot just be lumped together; it is essential to treat each
format separately, and take their specific requirements into account. This
applies both at the digital and analogue level.
For this reason the SDV 3100 HV employs two separate digital sections, two
D/A converter sections and two analogue back-ends - each optimised for
one format.
SDV 3100 HV and DSD
By its nature the DSD format involves a noise floor which rises above the
range of human hearing as frequency rises. Although this noise floor is not
directly audible, it does subject the treble units in the loudspeakers to a
significant load. It is also possible for the high-frequency noise to cause
distortion in many low-bandwidth amplifiers.
The lower the DSD sampling rate, the more severe the inherent noise, and it
cannot be disregarded, especially with the DSD64 format - as used on the
SACD. As the DSD sampling rate rises, the high-frequency noise becomes
increasingly insignificant, and with DSD256, DSD512 and DSD1024 it is
virtually irrelevant. In the past it has been standard practice to apply digital
and analogue filtering processes in an attempt to reduce DSD noise, but
such solutions are never entirely without side-effects on sound quality. For
the SDV 3100 HV we have developed two special techniques designed to
eliminate the sonic disadvantages:
1.) The True-DSD technique, consisting of a direct digital signal path
without filtering and noise-shaping, plus our True 1-bit DSD D/A converter
2.) Analogue reconstruction filter with selectable bandwidth
The True-DSD technique is available for DSD sampling rates from
DSD64 upwards.
9
Page 10

SDV 3100 HV and PCM
The PCM process makes extremely high-resolution sampling values
available: up to 32 bits. However, the sampling rate of PCM is significantly
lower than that of DSD, and the spacing in terms of time between the
sampling values is greater.
This means that it is extremely important with PCM to employ maximum
possible precision when converting the high resolution into analogue signals.
Here at
a four-fold improvement in accuracy over conventional converters. A further
very important aspect of PCM reproduction is to reconstruct the curve of the
original analogue signal between the sampling points with great accuracy,
since these points are much more widely spaced in comparison with DSD. To
this end the SDV 3100 HV employs a polynomial interpolation process
(Bezier-Spline interpolation) developed inmathematical terms delivers the smoothest curve for a given number of
reference points (sampling points). The output signal generated by Bezier
interpolation exhibits a very “natural” shape, devoid of the digital artefacts such as pre- and post-oscillation - which are usually produced by the
standard oversampling process. More detailed information on this can be
found in the chapter “Technical description, oversampling / up-sampling”
And one final comment: If you intend to carry out your own tests to decide
whether DSD or PCM is the superior format, please be sure to compare
recordings with comparable information density – i.e. DSD64 with
PCM96/24, DSD128 with PCM 192 and DSD256 with PCM384!
10
Page 11

11
Page 12

Front panel controls
ON / OFF SWITCH
Touching the -button briefly switches the device on and off.
The -button remains dimly lit even in stand-by mode, to indicate that the
SDV 3100 HV is ready for use.
Caution!
The -button is not an isolation switch. Certain parts of the machine remain
connected to mains voltage even when the screen is switched off and dark. To
disconnect the device completely from mains power supply, the mains plugs
must be withdrawn from the wall socket.
If you know you will not be using the machine for a long period, we recommend
that you disconnect it from the mains.
VOLUME CONTROL / SOURCE SELECTION
VOLUME / SOURCE
This rotary knob is used to set your preferred volume in accurate 1 dB
increments. The value currently set is displayed on the screen.
The desired listening source is selected by turning this rotary knob; your
chosen source then appears on the screen. After a short delay the machine
switches to the appropriate source.
The main function of this knob can be changed if necessary. In this case, the
button must be pressed briefly before the volume can be changed (see
chapter 'Basic settings of the SDV 3100 HV').
A long press on this knob switches to balance adjustment: turning the knob
to left or right then alters the balance in the corresponding direction. Press
the knob again long to conclude the adjustment and save the setting.
All the important functions of the SDV 3100 HV can be controlled using the buttons and rotary knobs on the front
panel. The large rotary knobs are used for navigation in lists and menus and to select the listening source. Functions
which are needed less frequently are controlled using a menu which is called up by pressing the -button.
All information relating to the machine’s state, the current track and the associated transmitting station are
displayed on the integral screen.
12
Page 13
NAVIGATION / CONTROL
SELECT
Rotating this control selects a track for playback; the selected track then
appears on the screen. As soon as the desired track number lights up, the
track can be started by pressing the incremental control.
In addition to selecting tracks, the SELECT-knob also has other purposes
such as menu and list control functions. For further details see the chapter
entitled ‘Basic settings of the SDV 3100 HV’
OPERATING BUTTONS
Calls up the Favourites list
Brief touch: Switches the display view from list navigation to the current
played music track. /
switches the CD- / Radio - Text on and off.
Long touch: Switches between different screen displays
Opens the ‘System Configuration’ menu
(for further details see the chapter entitled ‘Basic settings of the SDV 3100
HV’)
Starts playback
Halts current playback (pause)
Resumes playback after a pause
Ends playback
A brief press switches the outputs (XLR and Cinch) on and off (MUTING
function).
The outputs can also be switched automatically alternating with the
headphone jack. In automatic mode, the button is not visible when the
headphones are connected.
See chapter 'Basic settings of the SDV 3100 HV'.
This button is used to switch the headphone output on and off.
The headphone jack can also be switched automatically alternating with the
preamplifier outputs. In this case, the button is only visible when
headphones are connected. See chapter 'Basic settings of the SDV 3100 HV'.
HEADPHONES
PHONES
Sockets for stereo headphones with a minimum impedance of 16 .
Connection via a standard 6.3 mm jack socket or a symmetrical 4.4 mm
Pentacon jack socket.
In headphone mode, the volume setting is independent of the main volume
setting. The set values are stored or recalled each time you switch between
headphone and normal mode.
It is possible to connect two headphones at the same time, but this is not
recommended for reasons of sound quality. If two headphones are
connected, the impedance of each headphone must be at least 32 .
13
Page 14
Note regarding the use of headphones
Continuous listening to programme material at very high volume using
headphones or earphones can result in permanent loss of hearing. You can
avoid subsequent health problems by avoiding continuous listening at high
volume through headphones or earphones.
FRONT USB SOCKET (USB IN)
USB IN
Socket for a USB memory stick or an external hard disc.
The storage medium can be formatted with the FAT16, FAT32, NTFS, ext2,
ext3 or ext4 file system.
The USB storage medium can be powered via the USB socket provided that
its current drain meets the USB norm (< 500 mA). Normalised 2.5” USB hard
discs can be connected directly to this socket, i.e. they require no mains
PSU.
REMOTE CONTROL RECEIVER
When using the remote control system please point the F3100 handset in the
direction of the receiver.
It is essential to prevent potentially interfering light (from fluorescent lamps
and energy-saving bulbs) falling directly on the receiver, as this may
markedly reduce the effective range of the remote control system.
The line of sight between the F3100 and the remote control receiver in the
SDV 3100 HV must not be interrupted by any obstacles.
DISPLAY
The graphic screen of the SDV 3100 HV displays all information regarding the
status of the machine, the music track currently being played and the radio
station currently tuned. The display is context-sensitive and varies according
to the capabilities and facilities of the service or medium to which you are
currently listening.
The most important information is highlighted on the screen in a contextsensitive manner. Supplementary information is displayed above and below
the main text, or by means of symbols.
The displays and symbols which appear on the screen vary according to the
currently active function (Tuner, UPnP, etc.) and the type of music currently
being played.
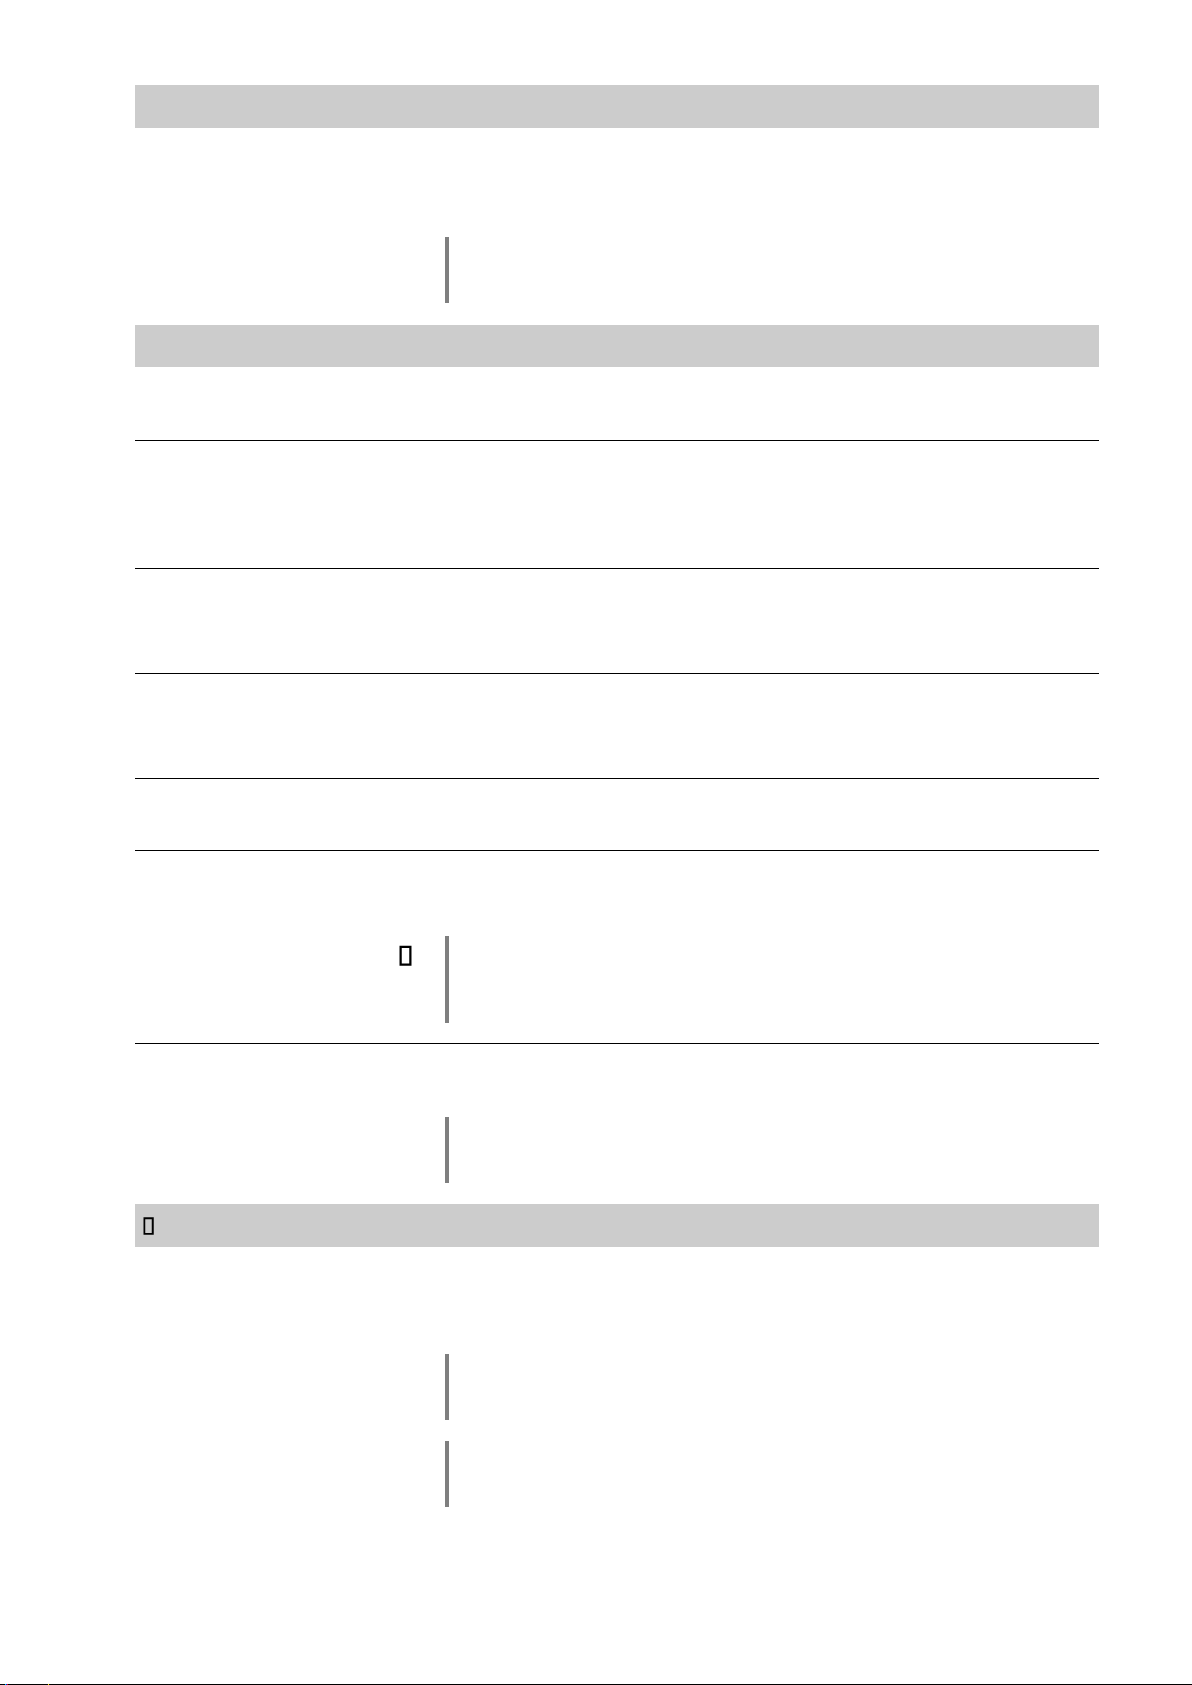
The basic areas of the screen:
Display field (a) shows the currently active source.
Display field (b) shows information relating to the piece of music being
played. The essential information is displayed enlarged in the main line.
Display field (c) shows information relating to the device and playback.
The bottom line (d) displays supplementary context-sensitive information
(e.g. bitrate, elapsed time, state of reception)
14
Page 15
The SDV 3100 HV provides different screen displays for the different sources
e.g. UPnP/DLNA and the radio.
Large-format display:
Enlarged display of the most important information, clearly legible even
from a distance
Detail display:
Small-text display showing a large number of additional information
points, e.g. bit-rate etc.
A long press on the button on the remote control handset or the
button on the front panel is used to switch between the display
modes.
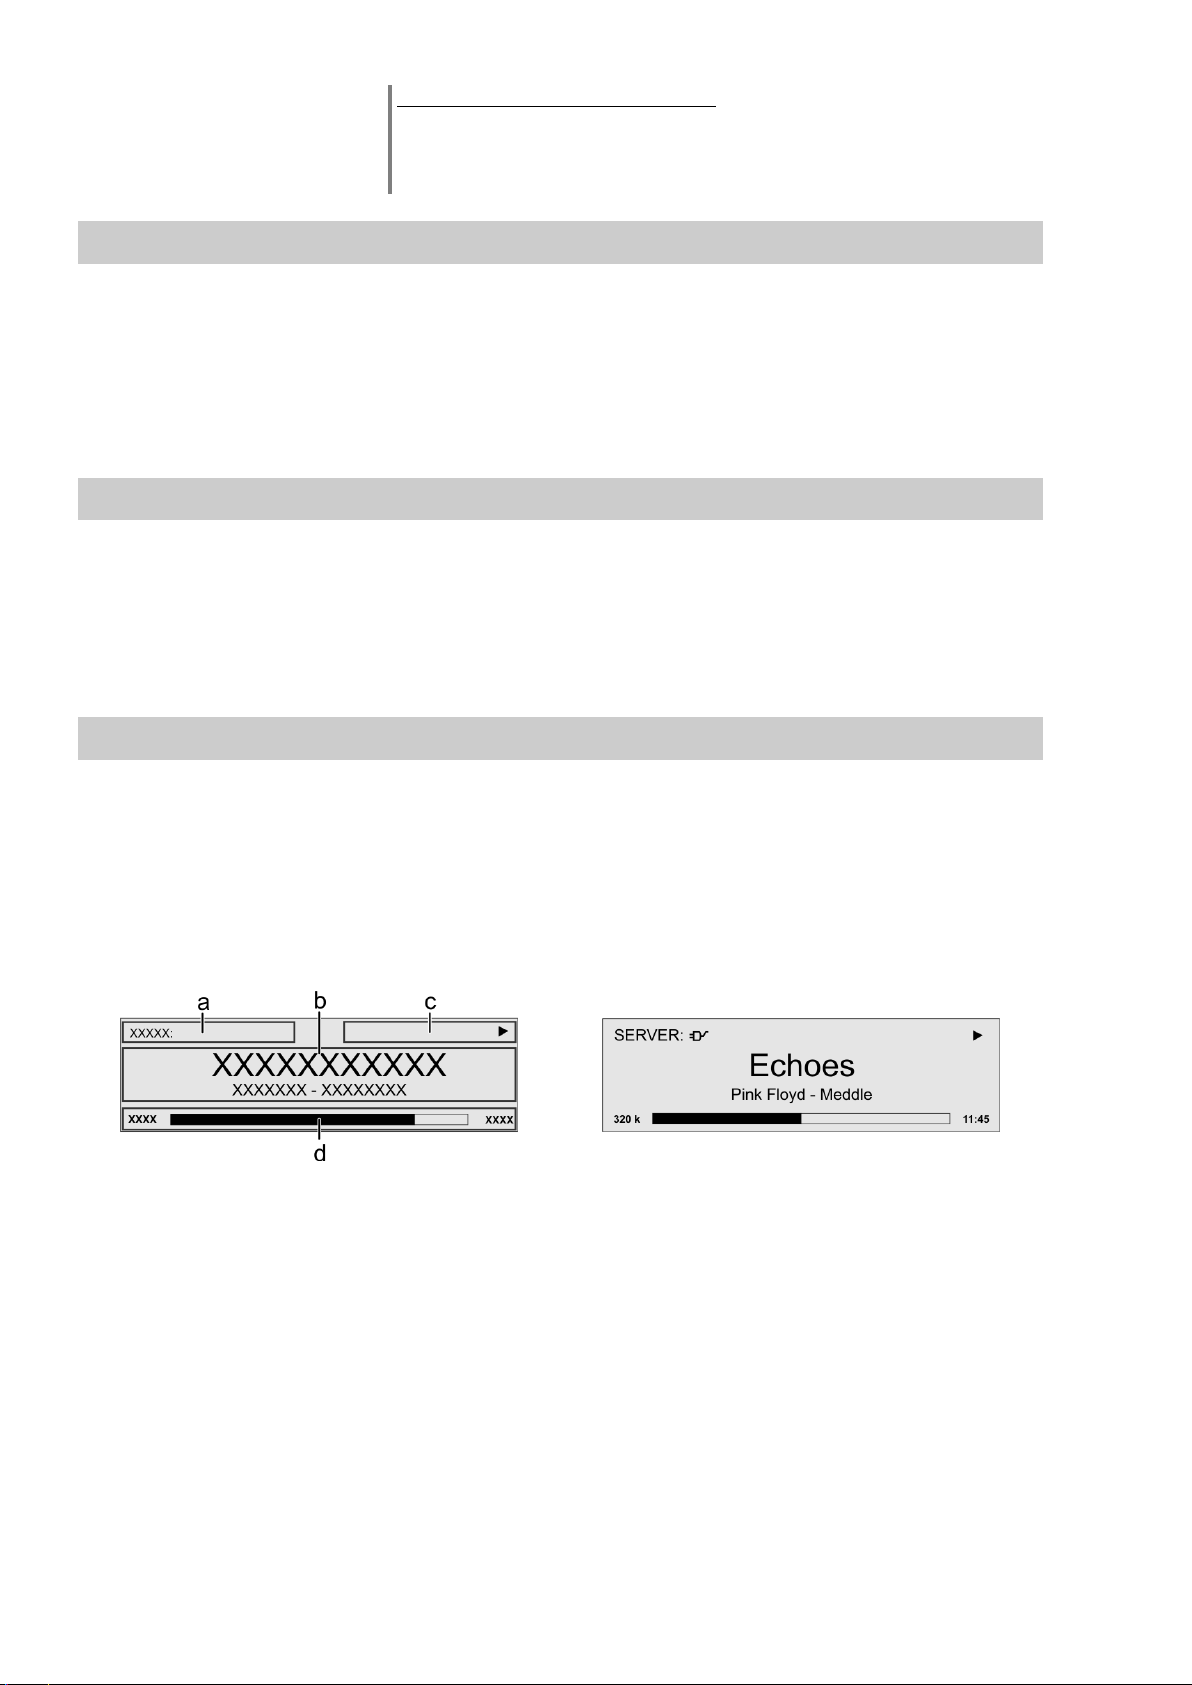
Screen symbols and their meaning
Making connection (Wait / Busy)
The rotating symbol indicates that the SDV 3100 HV is currently processing a
command, or is attempting to connect to a service. These processes may
take some time to complete depending on the speed of your network and the
load upon it.
During such periods the SDV 3100 HV may be muted, and may not respond to
the controls. Please wait until the symbol disappears, then try again.
Indicates a music track which can be played, or a playlist.
Indicates a folder which conceals further folders or lists.
Indicates that a source is being reproduced via a cable connection.
Indicates that a source is being reproduced via a radio connection.
Indicates that the SDV 3100 HV is reproducing a station or playing back a
music track.
Pause indicator
Buffer display (fullness indicator, memory display) and data rate indicator (if
available):
The higher the data rate, the better the quality of reproduction.
Display of the elapsed playback time.
This information is not available for all services.
Indicates that the button can be used to switch to a higher menu or
select level.
0 / 0 Position indicator in select lists. The first number shows the current position
in the list, the second number the total number of list entries (length of list).
Indicates that the selected menu item or list point can be activated by
pressing the button.
ABC or
Display of the symbol input modes
123 or
abc
Indicates the field strength of the radio signal.
If the symbol appears while playing back from a digital input - the
SDV 3100 HV has switched over to its internal precision oscillator (local
oscillator). This eliminates jitter effects, but is only possible if the clock
quality of the connected signal is adequate.
15
Page 16
Introduction
The following table shows the remote control buttons and their function
when operating the machine.
(red)
Switches the device on and off
Selects the SCL function (e.g. access to music servers,
streaming services or similar) or the USB DAC function
(playback from a connected computer), or selects the USB
Media function (connected USB memory media) of the
streaming client.
Press this button repeatedly until the desired source appears
on the screen.
With the SDV 3100 HV connected, selects the IPA-Link input as
the source.
A brief press on this button selects the analogue input you wish
to use. Press the button repeatedly until the desired input is
displayed on the screen.
A brief press on this button selects the digital input you wish to
use. Press the button repeatedly until the desired input is
displayed on the screen.
Selects FM, DAB, or Internet radio as source. Press this button
repeatedly until the desired source appears on the screen.
Selects Bluetooth as source.
abc
...
xyz
Direct alpha-numeric input, e.g. track number, fast station
select, radio station.
The and buttons are also used for nonstandard characters.
During text input you can switch between numeric and alphanumeric input, and between capitals and lower case by
pressing the button.
Switches the speaker output of a connected HV-series device
on and off.
Switches the preamplifier output of the SDV 3100 HV on and off.
- +
(yellow)
Increase / decrease volume
The volume can be increased / decreased in steps by tipping one
of the volume buttons. The current volume level is displayed on
the display screen. If one of the buttons is kept pressed for
approx.. 1 seconds the volume increases / decreases
continuously until the button is released.
Brief press:
Opens the Source menu
(not available for all sources)
Long press:
Opens the “System configuration menu”
(see the chapter entitled ‘Basic settings of the SDV 3100 HV’)
Long press:
Opens the “DAC configuration menu”
(see the chapter entitled “D/A-Converter settings of the SDV
3100 HV”)
Remote control
16
Page 17
Brief press
Returns to the previous point / change button
Long press
Fast rewind: searches for a particular passage.
Tuner: Search
Brief press
Confirms the input / change button
Long press
Fast forward: searches for a particular passage.
Tuner: Search
Selects the next point within a list / select button
Selects the next track / station during playback.
Selects the previous point within a list / select button
Selects the previous track / station during playback.
Brief press
Confirmation button during input procedures
Long press
Displays the Favourites list created on the SDV 3100 HV
Starts playback (Play function)
During playback: halts (Pause) or resumes playback
Stops playback.
During menu navigation: A brief press takes you back (higher) by one menu level or aborts the
current input process; the change is then abandoned.
Brief press
Switches between capitals and lower case, and numeric / letters, when entering data.
Long press
Cycles through the various screen displays.
Detailed display with / without CD text / Radiotext (if present) and large display with / without CD
text / Radiotext (if present).
Brief press
When necessary, repeated presses of the button cycle through the various playback modes (repeat
track, repeat all, etc.).
Long press
Switches between Stereo and Mono reception (only FM Radio)
Brief press
Adds a favourite to the Favourites list.
System configuration menu: enables a source
Long press
Removes a favourite from the Favourites list.
System configuration menu: disables a source
Opens the D/A mode selection menu.
The SDV 31000 HV can be
For Apple (iOS)
For Android
17
Page 18
Calling up and operating the
menu
To call up the menu, briefly press the -button on the front panel or the
-button on the remote control F3100.
When you open the menu, the following Select points appear on the
screen:
Using the front-panel controls:
The SELECT knob is used to select any item within the menu system.
To change a selected menu item, press the SELECT knob to confirm your
choice, then adjust the value by rotating the knob.
After making the adjustment, press the SELECT knob again to adopt the
new setting.
You can interrupt the process at any time by touching the button; in
this case any changes you have made are discarded.
Holding the SELECT knob pressed in takes you one level further down in
the menu system.
Touch the button again to quit the menu.
Using the remote control handset:
Use the / buttons to select an item in the menu.
If you wish to change a selected menu item, first press the
-button, and then use the / -buttons to alter it.
After making the change, press the -button again to accept the
new setting.
You can press the -button at any time to interrupt the process; the
change is then abandoned.
Press the button again to leave the menu.
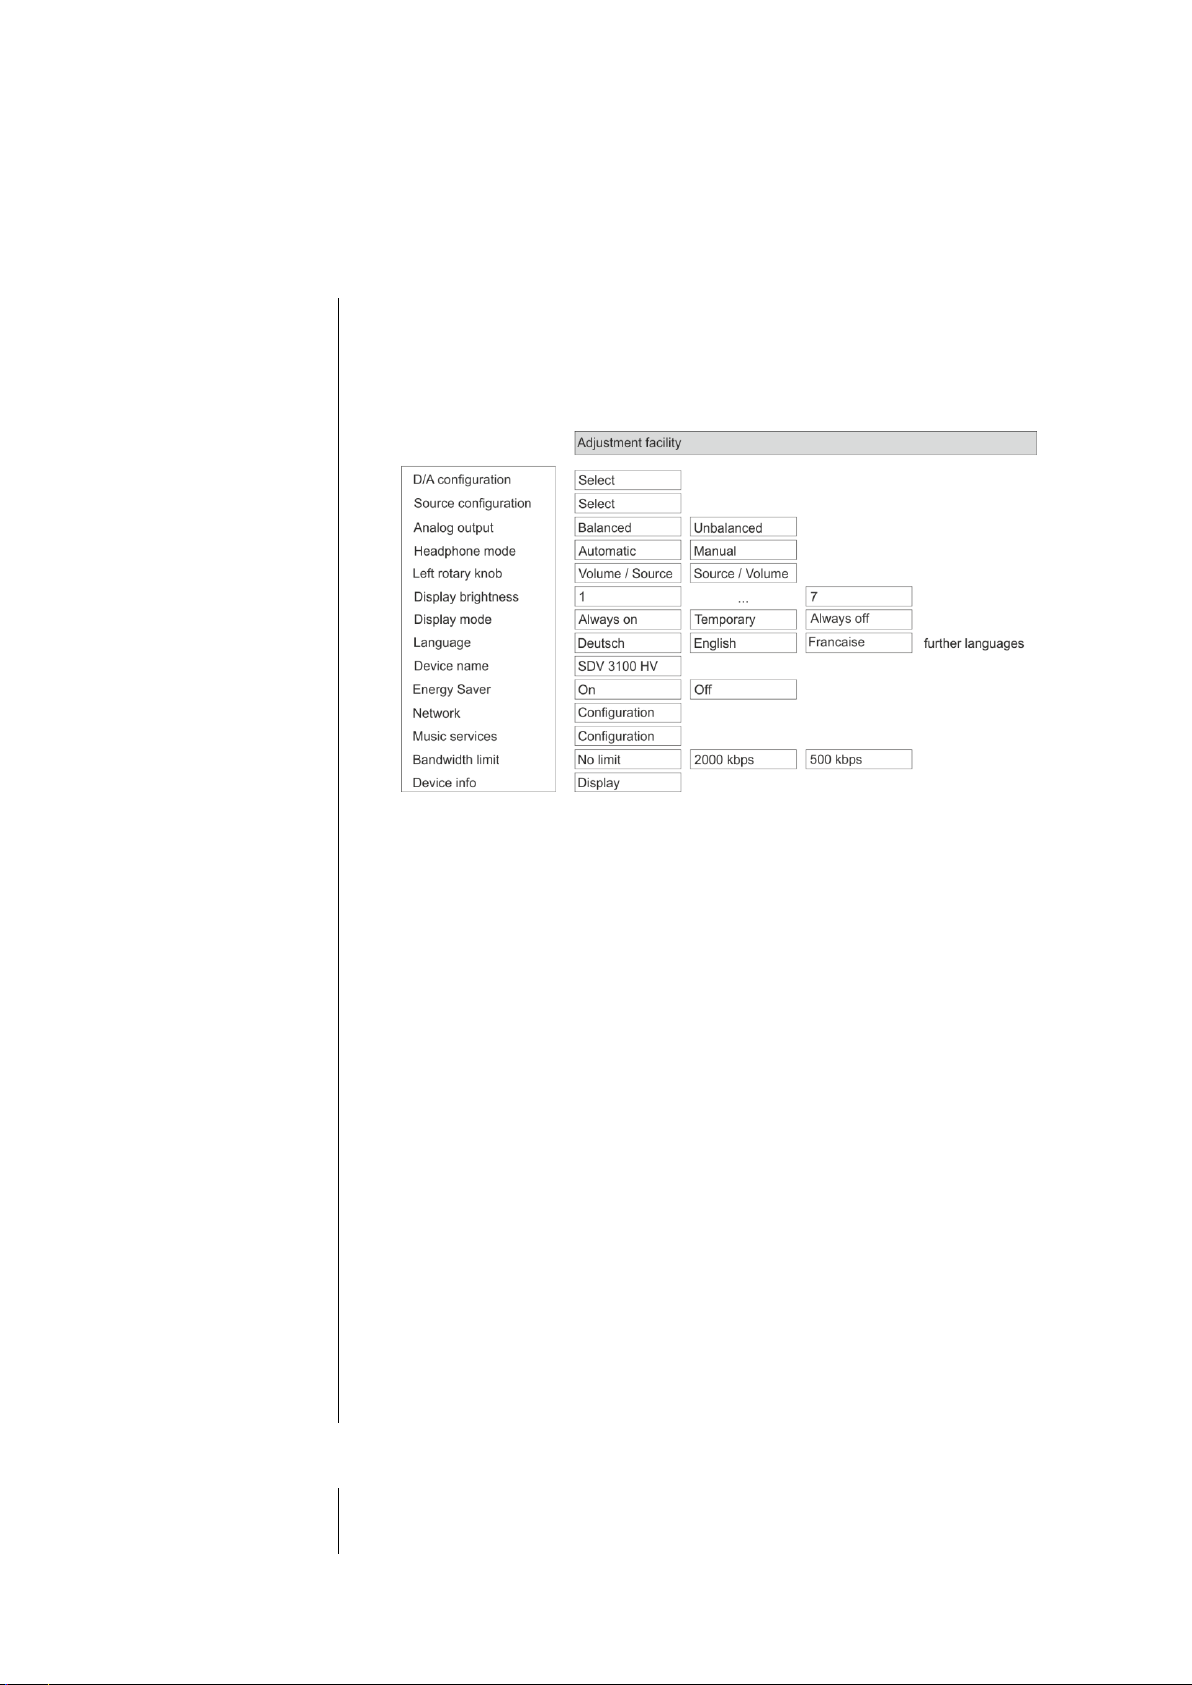
D/A configuration
menu item
This item opens the D/A Converter Settings menu. For details, refer to
chapter "D/A converter settings of the SDV 3100 HV" (p. 22).
Basic settings of the SDV 3100 HV
System Configuration menu
In the System Configuration menu general device settings are adjusted. This menu is described in detail in the
following chapter.
18
Page 19

Source names
menu item
At this menu item you can activate and disable external sources, and assign
a plain text name to each source; this name then appears in the screen
displays.
When you call up this menu item using the button, a list of all the
external and internal sources of the SDV 3100 HV appears. Each source is
followed by the assigned name, or if you have disabled the source concerned
the note 'disabled'.
If you want to activate / disable a source, or change the plain text name,
navigate to the appropriate line.
To activate a source, press the green button; a long press on the
green button disables the source.
To change the plain-text name, move to the appropriate line and press the
button. Now use the alpha-numeric keypad of the F3100 to change the name
as required, then confirm your choice with ; this saves the settings for
that source.
The button is used to switch between numeric and alpha-numeric
input, and between capitals and lower-case letters.
Letters can be erased by pressing the -button.
The source name can only be changed for the external sources.
If you should wish to restore the factory default source name, erase the whole
name before saving the empty field with the button: this action resets
the display to the standard source names.
The only available method of entering the name is to use the alpha-numeric
keypad on the remote control handset.
sub point
Pass through
If you wish to connect a device with its own volume control (e.g. TV set), this
menu point can be used to disable the volume control of the SDV 3100 HV for
the Analog IN 1 or Analog IN 2 input (pass-through mode).
You should only select this setting if a device with its own volume control is
connected to the unit. Ensure that the volume of the source device is turned
down to zero before connecting it to the SDV 3100 HV, otherwise the
speakers connected to it may be ruined through overloading.
Headphone mode
menu item
The SDV 3100 HV detects headphones automatically.
In the “Automatic” setting the pre-amplifier output is automatically
switched off when headphones are connected. If you wish to be able to
control these outputs separately, select the “Manual” setting.
Left rotary knob
menu item
Under this menu item you can define the main function of the left rotary
knob. The set main function can be operated without pressing the knob first.
For the second function, the knob must be pressed briefly first.
Select "Volume/Source" when volume control should be the main function or
select "Source/Volume" if source selection is the main function.
Display Brightness
menu item
(screen brightness)
At this point you can adjust the brightness of the integral screen to suit your
personal preference for normal use.
We recommend that brightness settings 6 and 7 should only be used when
the screen is difficult to read due to very bright ambient light.
A lower brightness setting will extend the useful life of the screen.
19
Page 20

Display Mode
menu item
This menu item offers the choice between three different display operation
modes:
Always on
Temporary
Always off
Selecting 'Temporary' will switch the display is on for a short while each
time the SDV 3100 HV is being operated. Shortly after operation the display
will be switched off again automatically.
The brightness of the display can be adjusted separately with the menu item
'Display Brightness' (see above).
Language
menu item
In this menu item you define the language to be used for the displays on the
screen of the front panel of the SDV 3100 HV.
The language used for data transferred to the machine, e.g. from an Internet
radio station, is determined by the supplying device or the radio station; you
cannot define the language on the SDV 3100 HV.
Device name
menu item
This menu point can be used to assign an individual name to the
SDV 3100 HV. In a home network the device then appears under this name.
If an amplifier is connected via the HLink connection, then the amplifier is
able to accept this name automatically, and display it on the screen.
The amplifier only accepts this name if an individual name has not already
been assigned at the amplifier itself.
Energy Saver
menu item
The SDV 3100 HV features two stand-by modes: ECO Standby with reduced
stand-by current drain, and Comfort Standby with additional functions, but
slightly higher current drain. You can select your preferred stand-by mode in
this menu point:
On (ECO standby):
Active functions in ECO standby mode:
Power-on at the device itself.
Automatic power-down after ninety minutes without signal (only possible
with certain sources).
Off (Comfort standby):
The following expanded functions are available:
Unit can be switched on using the app.
The automatic power-down function is disabled in Comfort standby
mode.
The picture and sound signals at the HDMI 1 and 2 sources are passed
on to the connected TV even if the device is in standby mode.
Network
menu item
All network settings can be carried out at this menu point. For a detailed
description on setting up a LAN or WLAN connection please also refer to the
section entitled “Network configuration” on page 51.
Music services
menu item
At this point you can enter the access data for the music streaming services
(TIDAL etc.) supported by the SDV 3100 HV.
Calling up this menu point by pressing the button displays a list of
the supported music services.
Select the service you wish to use, then confirm your choice with the
button.
Now use the alpha-numeric keypad of the F3100 to enter the access data
which you have received from your service provider in the lines “User” and
“Passphrase”.
20
Page 21

Use the button to switch between numeric and alpha-numeric input,
and between capitals and lower-case letters.
Press the button to erase any letter.
In each case confirm your input of user name and password by pressing the
button.
To conclude the procedure and save the data, select the menu entry “Store
and exit?” and confirm by pressing the button.
If access data for the selected music service has already been stored, the
new data will overwrite them. To use the new access data you must first
perform a “Logout” for the service in question, then switch the SDV 3100 HV
off and on again.
The music streaming services supported by the SDV 3100 HV require a
subscription to the appropriate service provider.
Bandwidth limit
menu item
This menu point can be used to adjust the link speed of the Internet
connection. The bitrate of the Internet radio stations and streaming services
is adjusted automatically to match your chosen setting. If you select “no
limit” for bandwidth limit, the highest available quality is always selected
automatically.
If you do not know the exact bandwidth of the internet connection, we
recommend that you select the setting at which no drop-outs occur during
playback.
Device Info
menu item
At this menu point you will find information on the status of the installed
software and the factory reset.
Sub-point
Update
At this point it is possible to initiate a firmware update.
Sub-point
Update package
This point displays the currently installed software package.
Sub-point
Control
Display of the control software version
Sub-point
Client
Display of the Streaming Client software version
Sub-point
DAB / FM
Display of the tuner software version.
Sub-point
Bluetooth
Display of the Bluetooth module software
Sub-point
DSP
Display of the DSP-processor software
Sub-point
Default settings
Calling up and confirming this menu point erases all personal settings, and
restores the machine to the state as delivered (factory defaults).
Sub-point
Legal information
Information on accessing the legal information and license notices.
For further information, see the chapter entitled "Legal Information".
21
Page 22
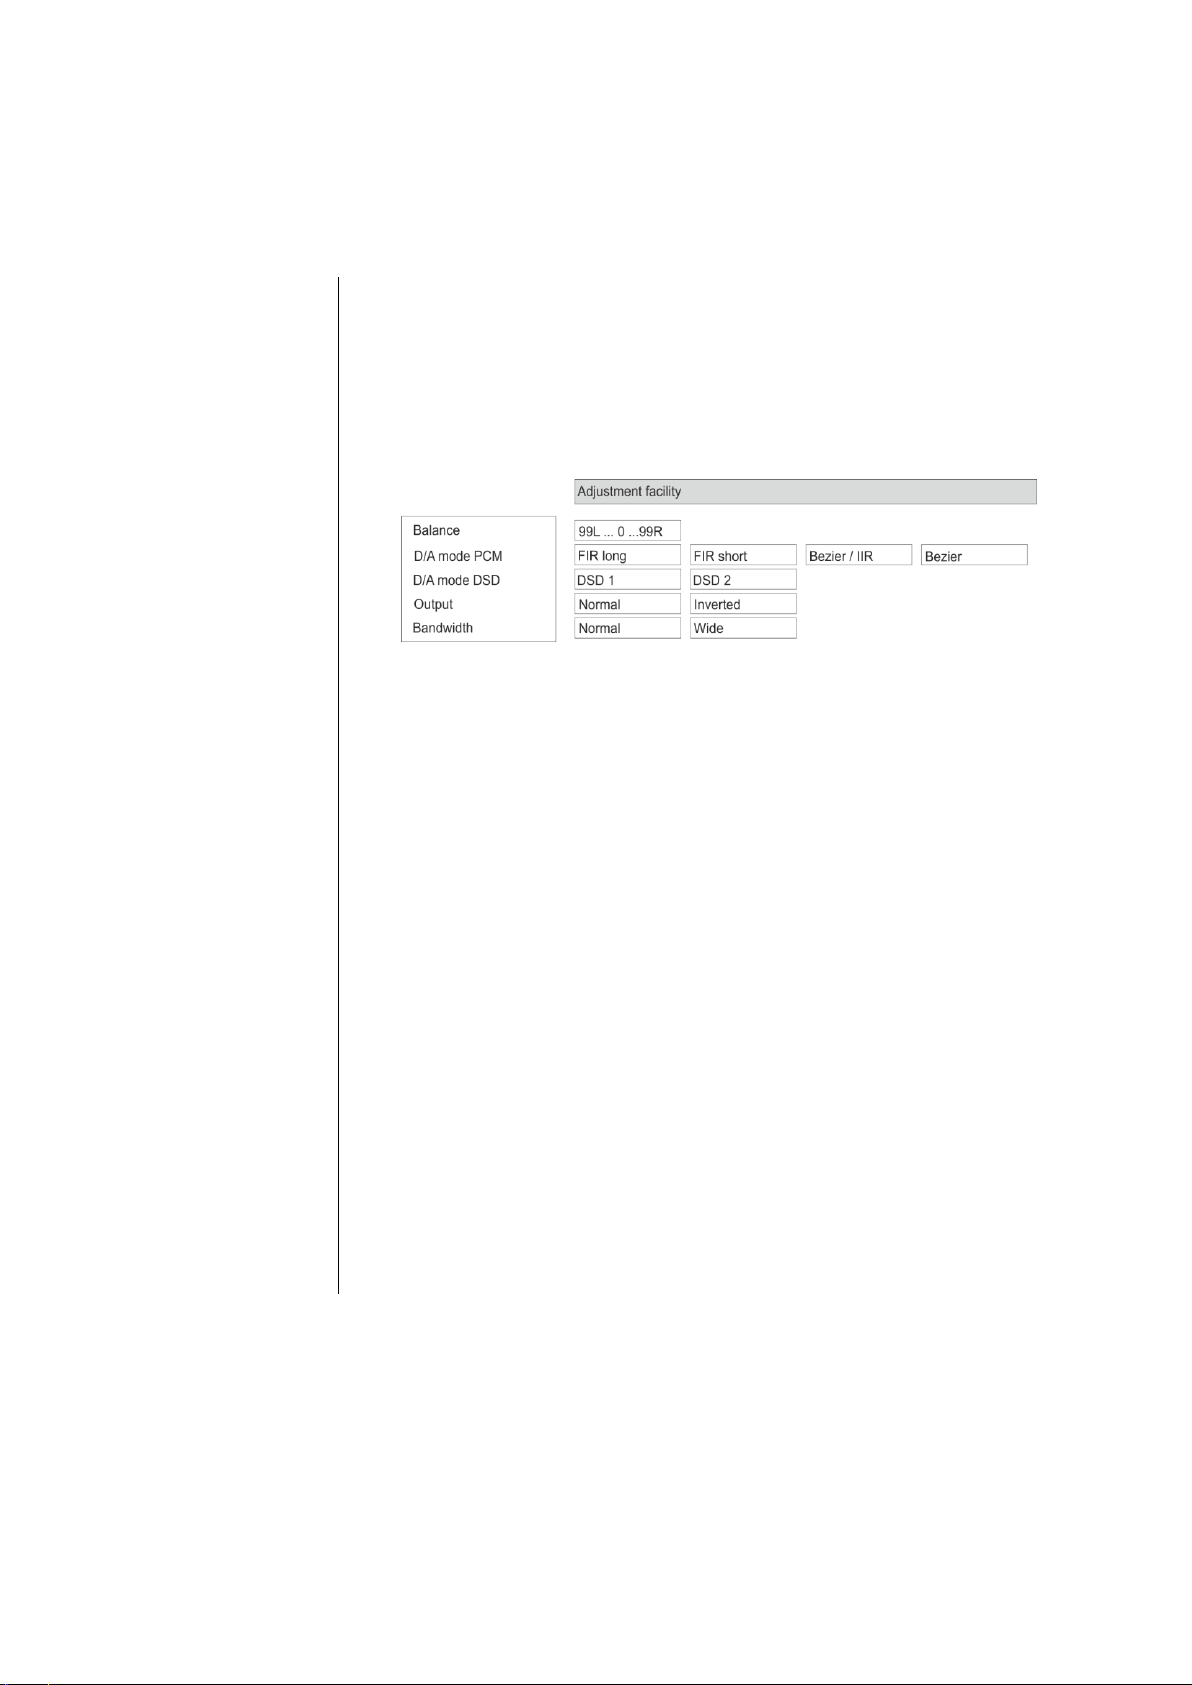
D/A-Converter settings of the SDV 3100 HV
Calling up and operating the
menu
To call up the menu, press and hold the button on the F3100.
To call up the menu on the front panel, touch the button and select
the menu item "D/A configuration" with the SELECT knob and press it to
access the menu.
When you open the menu, the following Select points appear on the
screen:
Using the front-panel controls:
The SELECT knob is used to select any item within the menu system.
To change a selected menu item, press the SELECT knob to confirm your
choice, then adjust the value by rotating the knob.
After making the adjustment, press the SELECT knob again to adopt the
new setting.
You can interrupt the process at any time by touching the button; in
this case any changes you have made are discarded.
Holding the SELECT knob pressed in takes you one level further down in
the menu system.
Touch the button again to quit the menu.
Using the remote control handset:
Use the / buttons to select an item in the menu.
If you wish to change a selected menu item, first press the
-button, and then use the / -buttons to alter it.
After making the change, press the -button again to accept the
new setting.
You can press the -button at any time to interrupt the process; the
change is then abandoned.
Press the button again to leave the menu.
A number of special settings are available for the SDV 3100 HV D/A converter; they are designed to fine-tune the
characteristics of your amplifier to suit your listening preferences.. This settings are described in detail in the
following chapter.
22
Page 23

set-up option
Balance
This menu point is used to alter the balance in level between the left and
right channels, e.g. to compensate for non-symmetrical loudspeaker
positioning. The balance can be adjusted in increments of 1 dB; the screen
always displays the current value.
This menu item is displayed according to the format currently being played.
This means that the DSD D/A mode can be selected during DSD playback and
the oversampling types can be selected during PCM playback.
set-up option
PCM D/A mode
(PCM playback only)
The SDV 3100 HV can exploit four different filter types offering different
tonal characters:
OVS long FIR (1)
is a classic FIR filter with an extremely linear frequency response.
OVS short FIR (2)
is a FIR filter with improved peak handling.
OVS Bezier / FIR (3)
is a Bezier interpolator combined with a IIR filter. This process produces
a result very similar to an analogue system.
OVS Bezier (4)
is a pure Bezier interpolator – offering perfect “timing” and dynamics.
Please refer to the Chapter 'Technical description - Digital filters /
Oversampling' for an explanation of the different filter types.
set-up option
DSD D/A mode
(DSD playback only)
The SDV 3100 HV offers two different converter modes for DSD playback.
DSD 1
DSD 2
set-up option
Output
With particular instruments or voices the human ear is certainly capable of
detecting whether absolute phase is correct or not. However, absolute phase
is not always correctly recorded.
In this menu item the phase of the signal can be changed from normal to
inverse phase and back.
The correction is carried out at the digital level, and has absolutely no
adverse effect on sound quality.
set-up option
Bandwidth
In this menu item, the bandwidth of the analogue output filter can be
switched between 60 kHz (normal mode) or 120 kHz ('WIDE' mode).
The ‘WIDE’ setting allows a more spacious music reproduction.
Please refer to the Chapter 'Technical description - Digital filters /
Oversampling ' for an explanation of the different filter types.
23
Page 24

24
Page 25

Operating the source devices in detail
Operation with the F3100
remote control
The operation of the source devices is described in the following chapters
using the F3100 remote control because only with this remote control all
functions of this device can be operated (e.g. adding favourites).
Operation with controls on
the front panel of the device
The front panel controls can be used to operate the basic functions of the
SDV 3100 HV.
The SELECT knob can be used to navigate through lists and menus or to
control the Disc- player in the same way as the cursor and OK buttons of the
F3100 remote.
In Lists
Choose a list or menu item by turning the SELECT knob.
By pressing the SELECT knob you can select an item or start playback of a
title or station.
By pressing the SELECT knob for a longer time you can leave a submenu
or navigate to the parent menu level (BACK).
25
Page 26

Favourites lists
General information
The SDV 3100 HV includes the facility to create Favourites lists. The purpose
of these lists is to store radio stations and podcasts, so that they can be
accessed swiftly.
Each of the sources FM radio, DAB radio, and Internet radio (incl. podcasts)
features its own Favourites list.
Once stored, the favourites can either be selected from the Favourites list, or
called up directly by entering the program location number. The option of
selecting using the location number is particularly useful when you wish to
call up favourites when the screen is not in view (e.g. from an adjacent room)
or using a house control system.
Favourites lists for the various music services (TIDAL etc.) are not supported.
Instead it is usually possible to add Favourites and Playlists on-line via the
provider’s account. These can then be called up and played via the
SDV 3100 HV.
Calling up the
Favourites list
The first step is to switch to one of the sources listed above.
Call up the Favourites list by a long press on the button on the F3100
remote control or by a brief press on the button on the SDV 3100 HV’s
front panel.
a) Here the program location number is displayed within the list. Since it is
possible to erase individual list items, the numbering may not be
continuous.
b) The selected list entry is displayed in enlarged form.
c) Position display in the Favourites list.
Adding a favourite
If you especially enjoy the piece of music or radio station to which you are
currently listening, simply press the green -button on the F3100; this
action stores the station in the corresponding Favourites list.
Each Favourites lists features 99 program locations.
Favourites lists can only be used to store the piece of music and station
which is currently playing.
Erasing a favourite from the
Favourites list
Call up the Favourites list by a long press on the button on the F3100
remote control or by a brief press on the button on the SDV 3100 HV’s front
panel.
Use the / buttons to select the station in the list which you
wish to erase, then hold the green button pressed in; this action
removes the item from the Favourites list.
Erasing a Favourite does not cause the following Favourites to move up the
list. The station position is no longer displayed after erasure, but a new
Favourite can still be assigned to it.
26
Page 27

Selecting a favourite from
the list
Call up the Favourites list.
Use the / buttons to select a stored item from the Favourites
list. The selected favourite is displayed in enlarged form.
Select the favourite to be played by pressing the or button.
You can return to the station to which you are currently listening (quit) by
pressing the button.
Directly selecting a favourite
In addition to the option of selecting favourites using the Favourites list, it is
possible to access the desired favourite directly by entering the program
location number.
To select a stored favourite directly during playback, enter the two-digit
program location number of the new favourite using the numeric buttons
(to) on the remote control handset.
After you have pressed the numeric buttons, playback switches to the
favourite you have just selected.
Sorting Favourites lists
The sequence of items in the Favourites list you have created can be altered
in any way you wish. This is the procedure for changing the order of the list:
The first step is to call up the Favourites list.
Use the / buttons to select the favourite whose position you
wish to change. The selected Favourite is displayed in enlarged form.
Pressing the button activates the Sort function for the selected
favourite. The favourite is highlighted on the screen.
Now move the activated favourite to your preferred position in the
Favourites list.
A further press on the button de-activates the Sort function, and
the favourite is stored at the new position.
To close the Favourites list, press and hold the button on the F3100
or briefly press the button on the SDV 3100 HV.
If you have previously erased a number of favourites, you may well find that
some program locations in the Favourites list are missing (empty).
Nevertheless, the favourites can still be moved to any location in the list!
27
Page 28

Operating the radio
Selecting FM radio
Select the source "FM Radio" with the source selection button on the
F3100 or by turning the SOURCE / VOLUME knob on the front panel of the
SDV 3100 HV.
Display
a) Displays the type of reception currently in use.
b) Hear the music type or style is displayed, e.g. Pop Music.
This information is only displayed if the transmitting station broadcasts it
as part of the RDS system. If you are listening to a station which does not
support the RDS system, or only supports it in part, these information
fields remain empty.
c) The frequency and / or the station name is displayed in enlarged form. If a
station name is displayed, its frequency is shown in area 'e'.
d) These lines display information which is broadcast by the station (e.g.
Radiotext).
e) Display of Stereo '' / Mono '
f) The field strength and therefore the reception quality to be expected
from the set transmitting station can be assessed from the field strength.
Manual station search
Holding one of the / buttons pressed in initiates a station
search for FM tuner in the upward or downward direction. The station search
stops automatically at the next station.
As soon as the station is audible, you can add it to your Favourites list by
pressing the button.
Operation on the front panel
It is also possible to select a frequency directly, by rotating the knob on the
machines front panel. By pressing the SELECT knob, repeatedly if necessary,
the following operation modes can be temporary selected: The currently
selected operating mode is shown on the left side of the display.
Display indicator
Function
Freq
Manual frequency selection
Fav Selects a favourite from the list
No display
(standard setting)
Selects a station from the complete station list
The SDV 3100 HV features an FM tuner (VHF radio), a DAB / DAB+ receiving section (digital radio) and also includes
the facility to stream Internet radio. The following section describes in detail how to operate the individual radio
sources.
FM – Radio
28
Page 29

Automatic station search
A long press on the button on the front panel or a brief press on the
button on the F3100 calls up the Station list menu. The following
Select points are available:
If you wish to create a new station list, select the item “Create new list”
and confirm your choice with .
The station search begins, and automatically searches for all radio
stations which the machine is able to pick up.
If you wish to update an existing list, select the item “Add new stations”.
The menu item “Sorting by …” allows you to sort the stored list by any of
several criteria.
Selecting a station from the
Station list
Pressing the / buttons on the F3100 or rotating the SELECT
knob on the front panel opens the list of all stored stations.
a) Select one of the stored stations with the / buttons or by
rotating the SELECT knob. The station you choose is now displayed in
enlarged form.
Press the or button to select the enlarged station for
playing.
Pressing the button returns you to the station to which you are
currently listening (quit).
b) Position indicator in the Favourites list.
Stations to which you often listen can be stored in a Favourites list; this makes it
easier to select them (see the section entitled “Favourites list”).
RDS functions
If the station being received is broadcasting relevant RDS data, the following
information will be displayed on the screen:
Station name
Radiotext
Program type (genre)
For stations that do not support the RDS system or only partially or with
weak reception, no information will be displayed.
29
Page 30

Switching Radio Text on and
off
The Radio text function can be switched on and off by long presses on the
button on the remote control handset. Repeatedly if necessary.
Mono / Stereo
(only FM – Radio)
You can toggle the radio of the SDV 3100 HV between stereo and mono
reception by a long press on the button on the F3100. The reception
mode is shown on the screen by the following symbols:
' ' (Mono) or '' (Stereo)
If the station you wish to listen to is very weak or very distant, and can only
be picked up with severe background noise, you should always switch to
MONO mode as this reduces the unwanted hiss significantly.
The Mono and Stereo symbols are only shown in the detailed screen display.
Selecting DAB radio
Select the source "DAB Radio" with the source selection button on
the F3100 or by turning the SOURCE / VOLUME knob on the front panel of the
SDV 3100 HV.
Depending on the frequency band (block), it may take up to two seconds to
switch stations when in DAB mode.
Display
a) Displays the type of reception currently in use.
b) Hear the music type or style is displayed, e.g. Pop Music.
This information is only displayed if the transmitting station broadcasts it
as part of the RDS system. If you are listening to a station which does not
support the RDS system, or only supports it in part, these information
fields remain empty.
c) The frequency and / or the station name is displayed in enlarged form. If a
station name is displayed, its frequency is shown in area 'e'.
d) These lines display information which is broadcast by the station (e.g.
Radiotext).
e) Display of Stereo ''.
f) The field strength and therefore the reception quality to be expected
from the set transmitting station can be assessed from the field strength.
g) Bit-rate of the broadcasting station when listening to DAB radio.
* The higher the bit-rate, the better the station’s sound quality.
DAB - Radio
30
Page 31

Automatic station search
A long press on the button on the front panel or a brief press on the
button on the F3100 calls up the Station list menu. The following
Select points are available:
If you wish to create a new station list, select the item “Create new list”
and confirm your choice with .
The station search begins, and automatically searches for all radio
stations which the machine is able to pick up.
If you wish to update an existing list, select the item “Add new stations”.
The menu item “Sorting by …” allows you to sort the stored list by any of
several criteria.
Selecting a station from the
Station list
Pressing the / buttons on the F3100 or rotating the SELECT
knob on the front panel opens the list of all stored stations.
a) Select one of the stored stations with the / buttons or by
rotating the SELECT knob The station you choose is now displayed in
enlarged form.
Press the or button to select the enlarged station for
playing.
Pressing the button returns you to the station to which you are
currently listening (quit).
b) Position indicator in the Favourites list.
Stations to which you often listen can be stored in a Favourites list; this makes it
easier to select them (see the section entitled “Favourites list”).
RDS functions
If the station being received is broadcasting relevant RDS data, the following
information will be displayed on the screen:
Station name
Radiotext
Program type (genre)
For stations that do not support the RDS system or only partially or with
weak reception, no information will be displayed.
31
Page 32

Internet Radio source (Streaming www)
Selecting Internet Radio as
source
First choose Internet Radio as listening source by pressing the -
button on the F3100 or by turning the SOURCE / VOLUME -Knob on the front
panel of the SDV 3100 HV.
Selecting podcasts
Select the “Podcasts” entry instead of the “Internet Radios”.
The method of operating music services is described separately in the
section entitled “Operating music services”.
Playback
The music content to be played is selected with the help of Select lists.
These lists are controlled using the navigation buttons (cursor buttons) on
the remote control handset or by the SELECT knob on the machine’s front
panel.
a) Select one of the stored stations with the / buttons (or by
rotating the SELECT knob). The station you choose is now displayed in
enlarged form.
A brief press selects the previous / next entry within the list. The
scrolling speed can be increased by holding the button pressed.
The list entry you choose is now displayed in enlarged form.
Press the or button to open or start the list entry shown
in enlarged form.
Pressing the button returns you to the previous folder level.
b) Indicates the currently selected point within the opened list.
Starting playback
Press the button on the remote control handset or the machine’s
front panel to start playback.
Stopping playback
Pressing the button halts playback.
Favourites list
Stations and podcasts to which you often listen can be stored in a Favourites list;
this makes it easier to select them (see the section entitled “Favourites list”).
32
Page 33

Front panel display
While playing back the SDV 3100 HV can be switched to either of two
different screen displays with a long press on the button:
Large-format display:
Enlarged display of the most important information, clearly legible even
from a distance
Detail display:
Small-text display showing a large number of additional information
points, e.g. bit-rate etc.
Search function
The Search function provides a means of locating Internet radio stations
swiftly.
This is the procedure for searching for a particular Internet radio station:
Use the / buttons to select the “Search” item, and
confirm your choice by pressing the button or while navigating
within lists alternatively call up the search function by pressing the
button.
You will now see a window in which you can enter the keyword using the
remote control handset’s alpha-numeric keypad.
Press the button to erase any letter.
Briefly press the button to start the search.
After a short delay you will see a list of the search results.
The search function can be called up from every point within the lists by
pressing the button.
Search strings can consist of up to eight characters. It is also possible to
enter multiple keywords separated by a space character, e.g. “BBC RADI”.
To search for a podcast, select the “Search” entry under “Podcasts”.
33
Page 34

Operating music services
General information
The SDV 3100 HV supports playback of music services such as TIDAL.
To make use of music services you may need to take out a paid subscription
with the appropriate provider.
Use of music services requires the input of access data (username and
password. These access data can be stored separately for each provider in
the “Music services” menu within the System Configuration menu (see the
section entitled “Basic settings of the SDV 3100 HV”).
Future music services and others which are not currently supported may be
added subsequently by updates to the firmware of the SDV 3100 HV.
Selecting a music service
First choose the desired music service as listening source by pressing the
-button on the F3100 or by turning the SOURCE / VOLUME -Knob on
the front panel of the SDV 3100 HV.
Playback
The music content to be played is selected with the help of Select lists.
These lists are controlled using the navigation buttons (cursor buttons) on
the remote control handset or by the SELECT knob on the machine’s front
panel.
a) Use the / buttons to select the desired entry from the
list.
A brief press selects the previous / next entry within the list. The
scrolling speed can be increased by holding the button pressed.
The list entry you choose is now displayed in enlarged form.
Press the or button to open or start the list entry shown
in enlarged form.
Pressing the button returns you to the previous folder level.
b) Indicates the currently selected point within the opened list.
34
Page 35

Starting playback
Press the button on the remote control handset or the machine’s
front panel to start playback.
Stopping playback
Pressing the button halts playback.
Skipping tracks
A brief press on the / buttons during playback causes the
device to jump to the next or previous piece of music within the current
playlist.
The exact form of the displayed list and the preparation of the content
depend to a large extent on the music service provider. You may therefore
find that in some cases not all the functions described in these instructions
can be used.
Search function
In order to find quickly what you want in the wide range of services on offer,
it is possible to search for specific items in the content available from music
service providers.
The first step in the procedure is to open the Select list of the appropriate
music service. Navigate to the “Search” entry, and confirm by pressing the
button. As an alternative it is possible to call up the search function
by pressing the button while navigating in lists.
A window now opens in which the keyword can be entered using the remote
control handset’s alpha-numeric keypad.
Press the button to erase any letter.
Start the search by briefly pressing the button.
After a short delay a list appears showing the search results.
The results list varies from one music service to another. Many services allow
you to filter the search results by artiste, album or track once the search has
been completed.
The search function can be called up from every point within the lists by
pressing the button.
The search strings can consist of up to eight characters. It is also possible to
enter multiple keywords separated by a space character, e.g. “The Beatles”.
Playlists and favourites
Most music services offer the facility to register on the provider’s website
with the user data, create dedicated playlists, and manage the lists
conveniently.
Once created, the playlists appear in the Select list of the corresponding
music service, where they can be called up and played via the SDV 3100 HV.
The location within the select list at which the playlists can be accessed
varies from one music service to another. Often these folders are named “My
music”, “Library”, “Favourites” or similar.
Front panel display
While playing back the SDV 3100 HV can be switched to either of two
different screen displays with a long press on the button:
Large-format display:
Enlarged display of the most important information, clearly legible even
from a distance
Detail display:
Small-text display showing a large number of additional information
points, e.g. bit-rate etc.
35
Page 36

Operating the UPnP / DLNA source
General information on the
streaming client
The SDV 3100 HV features what is know as a ‘streaming client’. This facility
makes it possible to play music files stored on PCs or servers (NAS) within
the network.
The media content formats which the SDV 3100 HV can reproduce are very
wide-ranging, and extend from compressed formats such as MP3, AAC and
OGG Vorbis to high-quality non-compressed data formats such as FLAC,
ALAC, AIFF and WAV, which are thoroughly audiophile in nature. A full listing
of all possible data and playlist formats is included in the Specification,
which you will find in the Appendix to these instructions.
Since virtually no read or data errors occur when electronic memory media
are accessed, the potential reproduction quality is even higher than that of
CD. The quality level may even exceed that of SACD and DVD-Audio.
Selecting the UPnP / DLNA
source
Choose “UPnP / DLNA” as listening source by pressing the -button on
the F3100 (repeatedly if necessary), until the source “UPnP / DLNA” is
displayed on the screen.or by turning the SOURCE / VOLUME -Knob on the
front panel of the SDV 3100 HV.
Playback
The music content to be played is selected with the help of Select lists.
These lists are controlled using the navigation buttons (cursor buttons) on
the remote control handset or by the SELECT knob on the machine’s front
panel.
a) Use the / buttons to select the desired entry (Server /
Folder / Track) from the list.
A brief press selects the previous / next entry within the list. The
scrolling speed can be increased by holding the button pressed.
The list entry you choose is now displayed in enlarged form.
Press the or button to open or start the list entry shown
in enlarged form.
Pressing the button returns you to the previous folder level.
b) Indicates the currently selected point within the opened list.
The exact form of the displayed list and the preparation of the content also
depend to a large extent on the capabilities of the server, i.e. the full
facilities of the SDV 3100 HV cannot be exploited with all servers or media.
You may therefore find that in many cases not all the functions described in
these instructions can be used.
(Streaming Client)
36
Page 37

Starting playback
Press the button on the remote control handset or the machine’s
front panel to start playback.
Stopping playback
Pressing the button halts playback.
Skipping tracks
A brief press on the / buttons during playback causes the
device to jump to the previous or next piece of music within the current
playlist.
Playback of directories
In addition to the facility to play back
individual folder content, it is also
possible to play back entire
directories. This is accomplished by
selecting the folder of the directory
to be played, then pressing the
button to start playback.
Playback commences with the first
entry in the list of content to be
played. If an entry in the list should
contain a folder with additional sub-
folders, the content of the lowest
folder is always played first. This is
followed by the content of the next
higher folder level, etc. (see diagram
right).
Search function
When you are navigating through lists you can call up the SDV 3100 HV `s
letter search function at any time by briefly pressing the button. The
screen now displays the message “Search”. While this is on the screen, enter
up to eight letters or numerals using the remote control handset; the letters
assigned to the numeric buttons are printed below the buttons. To obtain a
particular letter, press the appropriate button repeatedly until the correct
letter appears on the screen. Before entering the next character you have to
wait until the cursor is displayed again. Press the button to erase any
letter.
After pressing the button or after a brief delay with no further input
the SDV 3100 HV moves to the first entry in the list which starts with the
characters you entered.
If the text searched for is not found the best matching result will be shown.
You can abort the search using the -button.
The function searches only the current folder. Eventually existing subfolders
are ignored.
Front panel display
The SDV 3100 HV provides different screen displays for the UPnP/DLNA
source.
A long press on the –button on the remote control handset is used to
switch between the display modes.
Large-format display:
Enlarged display of the most important information, clearly legible even
from a distance
Detail display:
Small-text display showing a large number of additional information
points, e.g. bit rate etc.
37
Page 38

Playing USB memory media
General information
The SDV 3100 HV is capable of playing music files stored on USB memory
media, and features two USB sockets for this purpose: USB IN on the
machine’s front panel, and USB HDD on the back panel.
The memory medium can be formatted with any of the following file systems:
FAT16, FAT32, NTFS, ext2, ext3 or ext4.
It is also possible to power the USB memory medium via the USB socket,
provided that the unit’s current drain accords with the USB norm. Normed
2.5 inch USB hard discs can be connected to the socket directly, without
requiring their own mains PSU.
Selecting USB Media as
source
First choose USB Media as listening source by opening the source selection
menu on the F3100 remote by pressing the -button or by turning the
SOURCE-Knob on the front panel of the SDV 3100 HV.
All USB memory media connected to the machine are now displayed. If no
USB memory medium is found, the screen displays the message “No data
available”.
Playback
The music content to be played is selected with the help of Select lists.
These lists are controlled using the navigation buttons (cursor buttons) on
the remote control handset or by the SELECT knob on the machine’s front
panel.
a) Use the / buttons to select an (a) USB memory / folder /
track from the list.
A brief press selects the previous / next entry within the list. The
scrolling speed can be increased by holding the button pressed.
The list entry you choose is now displayed in enlarged form.
Press the or button to open or start the list entry shown
in enlarged form.
Pressing the button returns you to the previous folder level.
b) Indicates the currently selected point within the opened list.
Starting playback
Press the button on the remote control handset or the machine’s
front panel to start playback.
Stopping playback
Pressing the button halts playback.
Skipping tracks
A brief press on the / buttons during playback causes the
device to jump to the previous or next piece of music within the current
playlist.
(USB Media source)
38
Page 39

Playback of directories
In addition to the facility to play back
individual folder content, it is also
possible to play back entire
directories. This is accomplished by
selecting the folder of the directory
to be played, then pressing the
button to start playback.
Playback commences with the first
entry in the list of content to be
played. If an entry in the list should
contain a folder with additional sub-
folders, the content of the lowest
folder is always played first. This is
followed by the content of the next
higher folder level, etc. (see diagram
right).
Search function
When you are navigating through lists you can call up the SDV 3100 HV`s
letter search function at any time by briefly pressing the button. The
screen now displays the message “Search”. While this is on the screen, enter
up to eight letters or numerals using the remote control handset; the letters
assigned to the numeric buttons are printed below the buttons. To obtain a
particular letter, press the appropriate button repeatedly until the correct
letter appears on the screen. Before entering the next character you have to
wait until the cursor is displayed again. Press the button to erase any
letter.
After pressing the button or after a brief delay with no further input
the SDV 3100 HV moves to the first entry in the list which starts with the
characters you entered.
If the text searched for is not found the best matching result will be shown.
You can abort the search using the -button.
The function searches only the current folder. Eventually existing subfolders
are ignored.
Front panel display
While playing USB memory media the SDV 3100 HV can be switched to either
of two different screen displays with a long press on the button:
Large-format display:
Enlarged display of the most important information, clearly legible even
from a distance
Detail display:
Small-text display showing a large number of additional information
points, e.g. bit-rate etc.
39
Page 40

Operating the Bluetooth source
The SDV 3100 HV’s integral Bluetooth interface provides a means of
transferring music wirelessly from devices such as smart-phones, tablet
PCs, etc. to the SDV 3100 HV.
For a successful audio Bluetooth transfer from a mobile device to the
SDV 3100 HV the mobile device must support the A2DP Bluetooth audio
transfer protocol.
Selecting the Bluetooth
Audio source
First choose BLUETOOTH as listening source by opening the source selection
menu on the F3100 remote by pressing the -button or by turning the
SOURCE-Knob on the front panel of the SDV 3100 HV.
Setting up audio transfer
Before music from a Bluetooth-capable device can be played through the
SDV 3100 HV, the external device must first be registered to the SDV 3100
HV. As long as the SDV 3100 HV is switched on and no device is connected, it
is always ready to receive. In this state the screen displays the message 'not
connected'.
This is the procedure for establishing a connection:
Start a search for Bluetooth equipment on your mobile device.
When it finds the SDV 3100 HV, make the connection to your mobile
device.
Once the connection is successfully established, the message on the SDV
3100 HV’s screen switches to 'connected to YOUR DEVICE'.
If your device requests a PIN code, this is always '0000'.
The procedure for establishing a connection can only be made if the
Bluetooth source is activated (see chapter “Basic settings of the SDV 3100
HV”).
Due to the large number of different equipment on the market, we are only
able to provide a general description for setting up the radio connection. For
detailed information please refer to the operating instructions supplied with
your device.
Playback functions
Information on the piece of music currently being played is displayed on the
screen of the SDV 3100 HV if this function is supported by the device
connected to the unit.
The behaviour and method of operating the connected mobile device are
determined by the device itself. In general terms the function of the buttons
of the SDV 3100 HV or the F3100 remote control handset are as follows:
40
Page 41

Start and pause playback
The / buttons on the remote control handset or the front panel are
used to start and pause playback (PLAY / PAUSE function).
Stop playback
Pressing the button halts playback.
Skipping tracks
A brief press on the / buttons during playback causes the
device to jump to the next or previous piece of music within the current
playlist.
Please note that many AVRCP-capable mobile devices do not support the
controlling through the SDV 3100 HV. In case of doubt, please ask the
manufacturer of your mobile device.
Controlling the SDV 3100 HV
The SDV 3100 HV can also be controlled from the mobile device (Start/Stop,
Pause, Volume, etc.). To control the SDV 3100 HV the mobile device must
conform to the Bluetooth AVRCP protocol.
Please note that many AVRCP-capable mobile devices do not support all the
SDV 3100 HV’s control functions. In case of doubt, please ask the
manufacturer of your mobile device.
NOTES
The SDV 3100 HV has been tested with a large number of Bluetooth-capable
mobile devices. However, we are unable to guarantee general compatibility
with all devices available commercially since the range of equipment is so
wide, and the various implementations of the Bluetooth standard differ
widely in some cases. If you encounter a problem with Bluetooth transfer,
please contact the manufacturer of the mobile device.
The maximum range of a Bluetooth audio transfer is normally about 3 to 5
metres, but the effective range may be affected by a number of factors. To
achieve good range and interference-free reception there should be no
obstacles or persons between the SDV 3100 HV and the mobile device.
Bluetooth audio transfers take place in what is known as the “everyman
frequency band”, in which many different radio transmitters operate -
including WLAN, garage door openers, baby intercoms, weather stations,
etc. Radio interference caused by these other services may cause brief
dropouts or - in rare cases - even failure of the connection, and such
problems cannot be excluded. If problems of this kind occur frequently in
your environment, we recommend that you use the Streaming Client or the
USB input of the SDV 3100 HV instead of Bluetooth.
By their nature, Bluetooth transmissions always involve data reduction, and
the attainable sound quality varies according to the mobile device in use,
and the format of the music to be played. As a basic rule the maximum
quality of music which is already stored in a data-reduced format, such as
MP3, AAC, WMA or OGG-Vorbis, is worse than with uncompressed formats
such as WAV or FLAC. For the highest reproduction quality we always
recommend the use of the Streaming Client or the USB input of the
SDV 3100 HV instead of Bluetooth.
Qualcomm is a trademark of Qualcomm Incorporated, registered in the United States and
other countries, used with permission. aptX is a trademark of Qualcomm Technologies
International, Ltd., registered in the United States and other countries, used with permission
41
Page 42

The SDV 3100 HV as D/A Converter
General Information
The SDV 3100 HV can be used as a high-quality D/A converter for other
devices such as computers, streamer, digital radios etc. which are fitted with
poor-quality converters or no converter at all. The SDV 3100 HV features two
optical, five electrical S/P-DIF digital inputs and two HDMI-inputs on the
back panel to allow this usage.
Two USB-DAC inputs on the back panel permits to use the SDV 3100 HV as
D/A converter for computers.
S/P-DIF (Digital IN 1 … IN7
You can connect devices with electrical co-axial, BNC, AES-EBU or optical
output to the digital inputs of the SDV 3100 HV. At inputs DIGITAL IN 1 to
DIGITAL IN 7 the SDV 3100 HV accepts digital stereo signals conforming to
the S/P-DIF norm, with sampling rates of 32 to 192 kHz.
HDMI
At the HDMI 1 and HDMI 2 inputs, the SDV 3100 HV accepts digital PCM
encoded stereo signals with sampling rates of 44.1 … 384 kHz (32 bit) and
DSD data with a sampling rate of DSD64.
If a TV is connected to the HDMI OUT output, the TV sound can be
transmitted to the SDV 3100 HV via ARC (Audio Return Channel) if supported
by the TV.
If necessary, the SDV 3100 HV can be switched to By-Pass mode by a long
press on the button. In this case, the sound is played back on the TV.
To use the ARC function, the TV must support it and the SDV 3100 HV must
be connected to an ARC compatible input.
USB DAC
At the USB DAC inputs the SDV 3100 HV accepts digital PCM-encoded stereo
signals with sampling rates of 44.1 to 384 kHz (32-bit) and DSD data with
sampling rates of DSD64, DSD128, DSD256 DSD512* and DSD1024*.
* DSD512 and DSD1024 only with a Windows PC.
If you wish the SDV 3100 HV to convert audio files from a Windows PC
connected to it, you must first install driver software on the computer (see
the chapter entitled ‘USB DAC operation in detail’). If you are using a
computer running Mac OS X 10.6 or higher no drivers are necessary.
Before switching to another input, you should stop playback in the player
software.
If you switch to another USB input, the connection will be lost.
D/A Converter Operation
Selecting a D/A Converter
Source
Choose the digital input to which you have already connected the source
device which is to be played.
As soon as the source device delivers digital music data, the SDV 3100 HV
automatically adjusts itself to the format and sampling rate of the signal,
and you will hear the music.
Screen Display
During D/A converter operations the SDV 3100 HV integral screen displays
the characteristics of the digital input signal.
42
Page 43

USB DAC operation in detail
System-requirements
Intel Core i5 or higher or a comparable AMD Processor.
4 GB RAM
USB 2.0 Interface
Microsoft Windows 10, 8.1, 8 or 7
or MAC OS X 10.13.6 or higher version
Installing drivers
The SDV 3100 HV can be operated with the listed MAC operating systems
without requiring the installation of a driver. Playback of DSD streams up to
DSD256 and PCM streams up to 768 kHz is possible with MAC operating
systems.
If the device is to be operated in conjunction with one of the stated Windows
operating systems, a dedicated driver must first be installed. With the driver
installed, it is possible to play DSD streams up to DSD1024 and PCM streams
up to 768 kHz.
The drivers required are available for downloading from our website at
http://www.ta-hifi.com/support
Settings
A number of system settings have to be altered if you wish to operate
SDV 3100 HV with your computer. These changes must be made regardless
of the operating system. The installation instructions provide detailed
information on how and where the settings are to be changed.
Notes on
software
By default, the operating systems listed above do not support ‘native’ music
playback. This means that the PC always converts the data stream to a fixed
sample rate, regardless of the sample rate of the file to be played. Separate
software is available - e.g. J. River Media Center or Foobar - which prevents
the operating system converting the sample rate.
The installation instructions included in the driver package contain further
information on audio playback via USB.
Notes on
operation
To prevent fail functions and system crashes of your computer and the
playback program, please note the following:
For Windows OS: Install the driver before you use the SDV 3100 HV for
the first time.
Use only drivers, streaming methods (e.g. WASAPI, Directsound) and
playback software which are compatible to your operating system and
between each other.
Never connect or disconnect the USB connection while the system is
running.
Notes on setting up
Do not set up the SDV 3100 HV on or immediately adjacent to the computer
to which it is connected, otherwise the device could be affected by
interference radiated by the computer.
43
Page 44

Network Audio Adapter (NAA)
General information
Extremely high-resolution music is normally delivered to the SDV 3100 HV by
the direct route via a USB connection between the audio workstation (Audio
PC) and the SDV 3100 HV. However, since USB connections are limited to a
maximum length of 3m the Audio PC must be set up in the immediate vicinity
of the SDV 3100 HV.
In installations where the distance between PC and SDV 3100 HV is greater
than this, what is known as a Network Audio Adapter is required, and the
SDV 3100 HV incorporates this facility. This technology makes it possible to
convey extremely high-resolution music files on the network: up to PCM768
and DSD1024. The Audio PC can then be installed in any location in the
house.
Hardware and software
requirements
In addition to the SDV 3100 HV you will need a high-performance Audio PC, a
GigaBit network router, a LAN connection between the Audio PC and the
SDV 3100 HV and “HQPlayer” software from the Signalyst company. A copy
of “roon-Server” software from the roonlabs company can also be installed
on the Audio PC to help you manage your music archive; it also provides a
convenient means of controlling the entire system.
More information on HQPlayer and roon software can be found on the
Internet at:
https://www.signalyst.com/consumer.html
and
https:/www./roonlabs.com/
Network, connections
Since the transmission of ultra-high resolution music data using what is
known as isochronous transfer mode requires data transfer at rates of up to
300 MBit per second with total immunity to interruption, all network
components involved in the signal transfer must guarantee completely
interference-free data transfer.
It therefore follows that it is not possible to use WLAN, or a 10 or 100 MBit
LAN network, for this purpose. It is also necessary to isolate the audio
network from the rest of the home network, so that other network traffic
cannot interrupt or interfere with the audio data transmission. For details on
connections please see the Wiring diagram in Appendix A.
Playback
Select the NAA input (Network Audio) on the SDV 3100 HV.
(it may be necessary to activate the input beforehand in the System
Configuration menu. Please refer to the section entitled “Basic settings
of the SDV 3100 HV”).
Start HQ Player on the Audio PC.
In HQPlayer select “NetworkAudioAdapter” as Backend under
File/Settings.
In HQPlayer select “TA-NetworkAudio:DAC SDV 3100 HV: USB Audio”
as Device under File/Settings.
In HQPlayer select “None” as SDM Pack under File/Settings (this
enables native DSD transmission).
Complete the remaining settings in accordance with the characteristics
and capabilities of your Audio PC, then confirm with “OK” and leave the
Settings menu.
If you now select a track in the HQPlayer control window, it should be
audible via the SDV 3100 HV.
44
Page 45

Switching to a different input on the SDV 3100 HV
Before switching to a different input you should stop playback in HQPlayer.
Switching to another USB input interrupts the connection to HQPlayer;
playback in HQPlayer then stops, and the SDV 3100 HV disappears from the
list of devices which can be selected in the Settings menu.
If you subsequently switch back to the “NAA (Network Audio)” input on the
SDV 3100 HV, then the SDV 3100 HV automatically re-appears in HQPlayer,
and you can resume playback.
Switching to a source other than USB maintains the connection between the
SDV 3100 HV and HQPlayer. If music is playing in HQPlayer, it does not stop
automatically; playback continues to run unless you stop or pause playback
in HQPlayer.
45
Page 46

46
Page 47

Installation
Using the system for the first time
Safety notes
This section describes all those matters which are of fundamental importance when setting up and first using the
equipment. This information is not relevant in daily use, but you should nevertheless read and note it before using the
equipment for the first time.
47
Page 48

Back panel connections
ANALOG OUT
BALANCED
The symmetrical XLR output delivers analogue stereo signals with a fixed
level. It can be connected to the CD-input (line input) of any stereo pre-
amplifier, integrated amplifier or receiver.
UN-
BALANCED
The unbalanced RCA output of the SDV 3100 HV delivers analogue stereo
signals with a fixed level. It can be connected to the CD-input (line input) of
any stereo pre-amplifier, integrated amplifier or receiver.
If both types of connection are present on the connected amplifier, we
recommend the symmetrical option to obtain the best possible sound
quality.
ANALOG
IN
BALANCED
Universal line input for connecting any stereo audio device with balanced
XLR output.
UN-
BALANCED
Universal line input for connecting any stereo audio device with unbalanced
RCA (Cinch) output.
USB HDD
(Host mode)
Socket for a USB memory stick or external hard discs
The storage medium can be formatted with the FAT16, FAT32, NTFS, ext2,
ext3 or ext4 file system.
The USB storage medium can be powered directly via the USB port provided
that its current drain is in accordance with the USB norm. Normalised 2.5”
USB hard discs can be connected directly, i.e. without a separate mains PSU.
HLINK
Control output for HLINK – systems:
Both sockets are equivalent.
LAN
Socket for connection to a wired LAN (Ethernet) home network.
The setting whether the device should be connected via WLAN or wired LAN
must be set in the network configuration menu. See chapter "Network
configuration".
48
Page 49

WLAN
Input socket for WLAN antenna
The setting whether the device should be connected via WLAN or wired LAN
must be set in the network configuration menu. See chapter "Network
configuration".
The aerial should be set up free-standing using the magnetic base supplied
in the set; this ensures maximum possible range.
DIGITAL IN (IN 1 … IN 7)
Inputs for digital source devices with optical, co-axial (RCA / BNC) or AES-
EBU digital outputs.
At its digital inputs the SDV 3100 HV accepts digital stereo signals (S/P-DIF
signals) with sampling rates from 32kHz up to 192 kHz.
DIGITAL OUT
The signals of the selected source are available at this socket. They can be
forwarded to another device such as a surround decoder or other DACs, e.g.
for multi-room operation.
It is not always possible to produce a digital version for all media, as in some
cases the original contains copy protection measures which prevent this.
IPA LINK
Special digital interface to connect the PDT 3100 HV.
This connector is used to transmit digital signals in PCM and DSD format
natively in the best possible quality.
This connector is intended exclusively for use with the PDT 3100 HV.
USB DAC
(Device mode)
Sockets for connecting a PC or MAC computer.
At this input the SDV 3100 HV accepts digital PCM stereo signals with
sampling rates in the range 44.1 to 768 kSps, and digital DSD stereo signals
from DSD64 to DSD1024*.
* DSD512 and DSD1024 only with a Windows PC.
If you wish the SDV 3100 HV to convert audio files from a Windows PC
connected to it, you must first install the appropriate drivers on the
computer. No drivers are required if you are using a Linux or MAC computer
(see the chapter ‘USB DAC operation in detail’).
HDMI
HDMI inputs (IN 1 and IN 2) for connecting a Blu-ray player or similar. At the
"OUT" socket, the picture signals of the two input sockets "IN 1" and "IN 2"
are available for passing on to a television.
RADIO ANT
The SDV 3100 HV features a 75 aerial input FM ANT, which is suitable both
for a normal domestic aerial and a cable connection. For first-class
reception quality a high-performance, professionally installed aerial system
is indispensable.
49
Page 50

POWER SUPPLY
To avoid any coupling of unwanted noise signals from the digital power
supply to the analogue power supply of the MP 3100 HV, the digital and
analogue power supplies are located in separate shielded compartments on
the left and right sides of the device. For best possible separation the power
supplies have their own separate power supply sockets.
Always connect both mains sockets to the mains supply when operating the
SDV 3100 HV.
Digital power supply
The mains lead for the digital power supply is plugged into this socket.
Analogue power supply
The mains lead for the analogue power supply is plugged into this socket.
For correct connections refer to the sections 'Installation and wiring' and
'Safety notes'.
50
Page 51

Installation and wiring
Carefully unpack the unit and store the original packing material carefully.
The carton and packing are specially designed for this unit and will be
needed again if you wish to move the equipment at any time.
If you have to transport the device, it must always be carried or sent in its
original packaging in order to prevent damage and defects.
The device is extremely heavy - caution is required when unpacking and
transporting it. Always lift and transport the device with two persons.
Legal requirements pertaining to the lifting of heavy loads prohibit the
transport of the device by women.
Ensure that you have a firm, secure hold on the device. Do not let it fall. Wear
safety footwear when moving the device. Take care not to stumble. Ensure
an unobstructed area of movement by removing obstacles and possible
hindrances from the route.
Take care when lowering the device! To avoid your fingers being crushed,
ensure that they are not trapped between the device and the support
surface.
If the unit gets very cold (e. g. when being transported), condensation may
form inside it. Please do not switch it on until it has had plenty of time to
warm up to room temperature, so that any condensation evaporates
completely.
If the device has been in storage, or has not been used for a protracted
period (> two years), it is essential to have it checked by a specialist
technician before re-use.
Before placing the unit on sensitive lacquer or wood surfaces please check
the compatibility of the surface and the unit's feet on a non-visible point and
if necessary use an underlay. We recommend a surface of stone, glass, metal
or the like.
The unit should be placed on a rigid, level base (See also chapter “Safety
notes”). When placing the unit on resonance absorbers or anti-resonant
components make sure that the stability of the unit is not reduced.
The unit should be set up in a well ventilated dry site, out of direct sunlight
and away from radiators.
The unit must not be located close to heat-producing objects or devices, or
anything which is heat-sensitive or highly flammable.
Mains and loudspeaker cables, and also remote control leads must be kept
as far away as possible from signal leads and antenna cables. Never run
them over or under the unit.
Notes on connections:
A complete connection diagram is shown in 'Appendix A' .
Be sure to push all plugs firmly into their sockets. Loose connections can
cause hum and other unwanted noises.
When you connect the input sockets of the SDV 3100 HV to the output
sockets on the source devices always connect like to like, i. e. 'R' to 'R' and 'L'
to 'L'. If you fail to heed this then the stereo channels will be reversed.
The device is intended to be connected to mains outlet with protective
earth connector. Please connect it only with the mains cables supplied to
properly installed mains outlets with protective earth connector.
To achieve maximum possible interference rejection the mains plug should
be connected to the mains socket in such a way that phase is connected to
the mains socket contact marked with a dot (). The phase of the mains
socket can be determined using a special meter. If you are not sure about
this, please ask your specialist dealer.
We recommend the use of the 'POWER THREE' ready-to-use mains lead in
conjunction with the 'POWER BAR' mains distribution panel, which is fitted
with a phase indicator as standard.
51
Page 52

When you have completed the wiring of the system please set the volume
control to a very low level before switching the system on.
The screen on the SDV 3100 HV should now light up, and the unit should
respond to the controls.
If you encounter problems when setting up and using the amplifier for the first
time please remember that the cause is often simple, and equally simple to
eliminate. Please refer to the section of these instructions entitled 'Trouble
shooting'.
Loudspeaker and signal
cables
Loudspeaker cables and signal cables (inter-connects) have a significant
influence on the overall reproduction quality of your sound system, and their
importance should not be under-
the use of high-quality cables and connectors.
Our accessory range includes a series of excellent cables and connectors
whose properties are carefully matched to our speakers and electronic units,
and which harmonise outstandingly well with them.
For difficult and cramped situations the range also includes special-
length cables and special-purpose connectors (e. g. right-angled versions)
which can be used to solve almost any problem concerning connections and
system location.
Mains cables and mains
filters
The mains power supply provides the energy which your sound system
equipment needs, but it also tends to carry interference from remote devices
such as radio and computer systems.
Our accessory range includes the specially shielded 'POWER THREE' mains
cable and the 'POWER BAR' mains filter distribution board which prevent
electro-magnetic interference from entering your Hi-Fi system. The
reproduction quality of our systems can often be further improved by using
these items.
dealer who will gladly give you comprehensive expert advice without obligation.
We would also be happy to send you our comprehensive information pack on
this subject.
Care of the unit
Disconnect the mains plug at the wall socket before cleaning the case.
The surfaces of the case should be wiped clean with a soft, dry cloth only.
Never use solvent-based or abrasive cleaners!
Before switching the unit on again, check that there are no short-circuits at
the connections, and that all cables are plugged in correctly.
Storing the unit
If the device has to be stored, place it in its original packaging and store it in
a dry, frost-free location. Storage temperature range 0...40 °C
Changing the batteries:
Remove the screw marked in the figure below, to open the battery
compartment, then withdraw the cover. Insert two new cells of the LR 03
(MICRO) type, taking care to maintain correct polarity as shown. Please note
that you must always replace all the cells.
Caution!
Batteries shout not be exposed to excessive heat like sunshine, fire or the
like.
Disposing of exhausted
batteries
Exhausted batteries must never be thrown into the household waste! They
should be returned to the battery vendor (specialist dealer) or your local
toxic waste collection point, so that they can be recycled or disposed in a
proper way. Most local authorities provide collection centres for such waste,
and some provide pick-up vehicles for old batteries.
52
Page 53

Safety notes
For your own safety please consider it essential to read these operating
instructions right through, and observe in particular the notes regarding
setting up, operation and safety.
Installation
Please consider the weight of the device. Never place the device on an
unstable surface; the machine could fall off, causing serious or even fatal
injury. Many injuries, especially to children, can be avoided if the following
simple safety precautions are observed:
Use only such items of furniture which can safely bear the weight of the
device.
Ensure that the device does not project beyond the edges of the
supporting furniture.
Do not place the device on tall furniture (e.g. bookshelves) without
securely anchoring both items, i.e. furniture and device.
Explain to children the hazards involved in climbing on furniture to reach
the device or its controls.
When installing the unit on a shelf or in a cupboard it is essential to provide
an adequate flow of cooling air, to ensure that the heat produced by the unit
is dissipated effectively. Any heat build-up will shorten the life of the unit
and could be a source of danger. Be sure to leave free space of 10 cm around
the unit for ventilation.
The ventilation openings must not be covered or closed.
If the system components are to be stacked then the device must be the top
unit. Do not place any object on the top cover.
The unit must be set up in such a way that none of the connections can be
touched directly (especially by children). Be sure to observe the notes and
information in the section 'Installation and Wiring'.
Connection
The terminals marked with the -symbol can carry high voltages.
Always avoid touching terminals and sockets and the conductors of cables
connected to them. Unless ready-made cables are used, all cables
connected to these terminals and sockets must always be deployed by a
trained person.
Power supply
The device is intended to be connected to mains outlets with protective earth
connector. Please connect it only with the mains cables supplied to properly
installed mains outlets with protective earth connector.
The power supply required for this unit is printed on the mains supply
sockets. The unit must never be connected to a power supply which does not
meet these specifications. If the unit is not to be used for a long period
disconnect it from the mains supply at the wall socket.
Mains leads / Mains plug
Mains leads must be deployed in such a way that there is no danger of
damage to them (e. g. through persons treading on them or from furniture).
Take particular care with plugs, distribution panels and connections at the
device.
To disconnect the device completely from mains power supply, the mains plugs
must be withdrawn from the wall socket. Please make sure that the mains
plugs is easily accessible.
Enclosure openings
Liquid or particles must never be allowed to get inside the unit through the
ventilation slots. Mains voltage is present inside the unit, and any electric
shock could cause serious injury or death. Never exert undue force on mains
connectors.
Protect the unit from drips and splashes of water; never place flower vases
or fluid containers on the unit.
Do not place naked flame sources, such as candle lights on the device.
Supervision of device
operation
Like any other electrical appliance this device should never be used without
proper supervision. Take care to keep the unit out of the reach of small
children.
53
Page 54

Service, Damage
The case should only be opened by a qualified specialist technician. Repairs
and fuse replace
workshop. With the exception of the connections and measures described in
these instructions, no work of any kind may be carried out on the device by
unqualified persons.
If the unit is damaged, or if you suspect that it is not functioning correctly,
immediately disconnect the mains plug at the wall socket, and ask an
Over voltage
The unit may be damaged by excess voltage in the power supply, the mains
circuit or in aerial systems, as may occur during thunderstorms (lightning
strikes) or due to static discharges.
Special power supply units and excess voltage protectors such as the
'Power Bar' mains distribution panel offer some degree of protection from
damage to equipment due to the hazards described above.
However, if you require absolute security from damage due to excess
voltage, the only solution is to disconnect the unit from the mains power
supply and any aerial systems.
To avoid the risk of damage by overvoltages we recommend to disconnect all
cables from this device and your HiFi system during thunderstorms.
All mains power supply and aerial systems to which the unit is connected
must meet all applicable safety regulations and must be installed by an
approved electrical installer.
Approved usage
The device is designed to operate in a temperate climate and altitudes up to
2000 m above sea level. The range of permissible operating temperatures is
+10 … +35°C. This device is designed exclusively for reproducing sound
and/or pictures in the domestic environment. It is to be used in a dry indoor
room which meets all the recommendations stated in these instructions.
Where the equipment is to be used for other purposes, especially in the
medical field or any field in which safety is an issue, it is essential to
establish the unit’s suitability for this purpose with the manufacturer, and to
obtain prior written approval for this usage.
Approval and conformity
with EC directives
In its original condition the unit meets all currently valid European
regulations. It is approved for use as stipulated within the EC.
By attaching the CE symbol to the unit declares its conformity the EC
directives and the national laws based on those directives. The declaration
of conformity can be downloaded from www.ta-hifi.com/DoC.
The original, unaltered factory serial number must be present on the outside
of the unit and must be clearly legible! The serial number is a constituent
part of our conformity declaration and therefore of the approval for
operation of the
documentation supplied with it (in particular the inspection and guarantee
certificates), must not be removed or modified, and must correspond.
nformity and approval, and
the unit may not be operated within the EC. Improper use of the equipment
makes the user liable to penalty under current EC and national laws.
Any modifications or repairs to the unit, or any other intervention by a
workshop or o
and operational permit for the equipment.
devices which are themselves approved and fulfil all currently valid legal
requirements.
When used in conjunction with auxiliary devices or as part of a system this
unit may only be used for the purposes stated in the section 'Approved
usage'.
Disposing of this product
The only permissible method of disposing of this product is to take it to your
local collection centre for electrical waste.
54
Page 55

Network Configuration
General Information
The SDV 3100 HV can be operated in wired LAN networks (Ethernet LAN or
Powerline LAN) or in wireless networks (WLAN).
If you wish to use your SDV 3100 HV in your home network, you must first
enter the necessary network settings on the SDV 3100 HV. This includes
entering the network parameters such as the IP address etc. both for wired
and wireless operation. If you wish to use a wireless connection, a number of
additional settings for the WLAN network also have to be entered.
Please refer to the Chapter 'Glossary / Additional Information' and 'Network
Terms' for additional explanations of terminology relating to network
technology.
In the following sections we assume that a working home network (cable
network of WLAN network) with router and (DSL) Internet access is present.
If you are unclear about some aspect of installing, setting up and configuring
your network, please address your queries to your network administrator or a
network specialist.
Compatible hardware and
UPnP servers
The marketplace offers a vast number of routers, NAS devices and USB hard
discs made by a very wide range of manufacturers. equipment is generally
compatible with other makes of machine which bear the UPnP label.
Network settings menu
All network settings are entered in the Network Configuration menu. This
menu will vary slightly in appearance depending on the type of your network,
i.e. whether you have a wired (LAN) or wireless (WLAN) network.
In the network configuration menu under the item 'Interface', first the desired
connection type must be set.
Opening the network
settings menu
Open the System Configuration menu by pressing the button on the
remote control handset or the button on the front panel of the
SDV 3100 HV.
Use the / buttons to select the “Network” menu item, then
confirm by pressing the button.
Operating the menu,
changing and storing
IP addresses
Use the / buttons in the menu to select the network parameter
to be changed, and activate the entry with the button.
You can now change the setting using the following buttons, depending on the
type of setting:
/ button for simple selection (ON / OFF)
Numeric buttons to for entering IP addresses
Alpha-numeric input for entering text
When the setting process is complete, or when you have entered the
complete address, press the button to confirm your action.
55
Page 56

Alpha-numeric entry
At certain points, e.g. for entering server names or passwords, it is necessary
to input series of characters (strings). At such points you can enter letters,
numbers and special characters by repeatedly pressing the numeric buttons
on the F3100 remote control handset, as when writing SMS news. The
assignment of letters to the buttons is printed below the buttons. Special
characters can be accessed using the and buttons:
0 + - * / ^ = { } ( ) [ ] < >
. , ? ! : ; 1 \ " ' _ @ $ % & # ~
Use the button for toggling between numbers, capitals and lowercase letters. The bottom line of the screen shows which input mode is
currently selected.
At certain points (e.g. DNS server name) it is possible to enter both an alphanumeric string and an IP address. At these points an IP address should be
entered like a string (with separating dots as special characters). In this case
an automatic check for valid address ranges (0 … 255) is not carried out.
Closing the menu
Once you have correctly set all the parameters, select the menu item 'Store
and exit?', then press the button. This action causes the SDV 3100 HV
to accept the settings, and you should see the available network media
sources (Internet radio, UPnP-AV server, etc.) displayed in the main menu.
Interrupting the menu
without storing the settings
At any time you can leave the network configuration menu without making any
changes to the network settings: this is done by pressing the button,
which takes you to the menu item 'Store and exit?'. If you wish to quit at this
point without saving, use the / buttons to select the ‘Discard
and exit?’ menu item, then confirm with the button.
56
Page 57

The Configuration for a Wired Ethernet LAN or Power-Line LAN connection
Setting the Parameters for a
Wired Network
Connect the SDV 3100 HV to an operational network or Power-Line modem
using the LAN socket on the back panel.
Switch the SDV 3100 HV on, Open the System Configuration menu by
pressing the button on the remote control handset or the
button on the front panel of the SDV 3100 HV.
Use the / buttons to select the menu point “Network”, then
confirm your choice with the button.
If necessary select under the menu item "Interface" the option "LAN"
You should now see the menu reproduced below, displaying the network
parameters.
You can now select the individual menu points and adjust them to match
your network conditions. The illustration below shows the possible button
inputs after each menu item.
Possible entries
/ : Switching ON / OFF
(0...9): Numeric input, separating dots are automatically generated;
input limited to valid addresses
(0...9, A...Z): Alpha-numeric input and special characters.
IP - separating dots must be entered as special characters.
The parameters illustrated above are only typical values.
Addresses and settings may require different values for your network.
57
Page 58

Menu Point
Description
MAC
The MAC address is a hardware address which uniquely identifies your
machine. The address displayed is determined by the manufacturer, and
cannot be altered.
Connection state
Shows the connection state: WLAN, LAN or not connected.
Interface
Here you can select whether the device should be connected via WLAN or
LAN.
DHCP
ON
If your network includes a DHCP server, please select the ON setting at this
point. In this mode an IP address is automatically assigned to the
SDV 3100 HV by the router. The screen shows only the MAC address and the
message DHCP state ON. In this case the address input fields shown in the
illustration do not appear in the menu.
OFF
If your network does not include a DHCP server, please select the OFF setting.
In this mode you must configure the following network settings manually.
Please ask your network administrator for the addresses to be entered for
your network.
IP IP address of the SDV 3100 HV
Subnet mask
Network mask
Gateway
IP address of the router
DNS
Name / IP of the name server (optional)
Store and exit?
Stores the network parameters, and restarts the SDV 3100 HV with the new
settings.
Discard and exit?
Closes the menu: data already entered is discarded.
58
Page 59

The Configuration for a WLAN connection
Setting the parameters for a
wireless network
Check that there is no cable connected to the LAN socket of the
SDV 3100 HV.
Connect one of the WLAN aerials from the accessories enclosed to the
WLAN socket.
Switch the SDV 3100 HV on, open the System Configuration menu by
pressing the button on the remote control handset or the button on the
front panel of the SDV 3100 HV.
Use the / buttons on the remote control handset to select
the menu point “Network”, then confirm your choice with the
button.
Select under the menu item "Interface" the option "WLAN"
The following menu items are displayed for WLAN configuration:
Possible
entries
Searching for and Selecting
the Network
First select the menu point “Scan for WLAN”, and activate it by
pressing the button.
A list of the WLANs found is displayed on the screen.
Use the / buttons to select the WLAN to which you
wish the SDV 3100 HV to be connected, and confirm your choice
with the button.
Entering the Password (for
encoded networks)
If the network is encoded, the window shown below will appear once the
WLAN is selected.
At this point please enter the network passphrase and confirm your
input by pressing .
Select the “Store and exit?” point, and confirm your choice with
.
Storing Network Settings
and Restarting
Finally select the “Store and exit?” menu point and press the button to
accept the settings.
If a WEP code is used, the password must be entered as a hexadecimal code
(0 - 9, A - F).
Selecting and connecting a WLAN by hand
59
Page 60

Connecting to WLAN via the WPS-function
WPS-function
The SDV 3100 HV supports WPS for WLAN setup. WPS (Wi-Fi Protected
Setup) an easy process for establishing a secure WLAN connection. WPS can
be used to connect the SDV 3100 HV with your router in a quick and
convenient way. For that usage most modern routers have implemented the
WPS function.
Connecting WLAN
automatically via the WPS
function
First activate the WPS-function of the Router or Repeater to which you
wish the SDV 3100 HV to be connected. For details please refer the
manual of the device in question.
Start the WPS-Autoconnect function of the SDV 3100 HV within 2
minutes.
Use the / buttons to select the menu point “WPS-
Autoconnect”, then confirm your choice with the button.
After the connection is established, the line “Status” shows the
connected WLAN network.
Finally select the “Store and exit?” menu point and press the
button to accept the settings.
Selecting the WLAN
manually and conneting via
WPS
If the WPS function connects the SDV 3100 HV to the wrong WLAN, the
preferred WLAN can be also selected manually and only the authentication
can be done by the WPS function. The procedure is described in the
following:
First activate the WPS-function of the Router or Repeater to which you
wish the SDV 3100 HV to be connected. For details please refer the
manual of the device in question.
First select the menu point “Scan for WLANs”, and activate it by
pressing the button.
A list of the WLANs found is displayed on the screen.
Use the / buttons to select the WLAN to which you wish
the SDV 3100 HV to be connected, and confirm your choice with the
button
The window shown below will appear once the WLAN is selected:
Select the “Login” menu point and press the button to activate
it. Now select the setting „Auto (WPS)“ and confirm it with the
button.
Now select the “Store and exit?” menu point and press the
button.
After the connection is established, the line “Status” shows the
connected WLAN network.
Finally select the “Store and exit?” menu point and press the
button to accept the settings.
60
Page 61

Notes on Energy Saving
General information
The SDV 3100 HV satisfies the requirements of the latest directives
concerning energy-saving measures (EuP directive). The modern design of
the mains power supply makes an important contribution to this.
The internal micro-processor constantly ensures that sub-assemblies which
are not currently required are automatically switched off. The microprocessor itself operates in stand-by mode at a relatively low clock speed,
and only responds to the remote control receiver.
In stand-by mode the current drain of the SDV 3100 HV is less than 0.5 Watt.
If you intend not to use the device for a long period, it should be
disconnected from the mains socket, i.e. the mains plug should be
withdrawn from the wall socket.
Automatic power-down
(Energy saver)
The device features an automatic power-down function. If the SDV 3100 HV
detects no operation or no music signal for a period longer than ninety
minutes, it automatically switches to stand-by mode. Two minutes before
the device enters the standby mode, a pop-up window appears on the
screen. If the device should stay in operation please press any button while
this message is displayed.
In countries outside the EU, in which the EuP directive has no validity, the
automatic power-down feature can be disabled if necessary (see chapter
entitled ‘Basic settings of the SDV 3100 HV).
61
Page 62

Firmware update
General information
Many features of the SDV 3100 HV are software based. Updates and new
features will be made available from time to time. For updating the firmware
of the SDV 3100 HV there is a convenient method which requires an existing
Internet connection
If you are operating the SDV 3100 HV in conjunction with a PDT 3100 HV, the
machine can also be updated via the HLink connection.
The wiring diagram for the machine is shown in 'Appendix A'.
The following section describes the exact method of updating the firmware in
detail.
Updating via the Internet
Updating the firmware via the SDV 3100 HV’s Internet connection
The basic requirement is a functioning network with router and access to
a broadband Internet connection; the system must be operating.
Switch the machine on.
Call up the System menu by pressing the button on the front panel.
Rotate the SELECT knob on the front panel to select the “Device info”
menu point, and confirm your selection by pressing the SELECT knob.
If the SDV 3100 HV is connected to a PDT 3100 HV via the HLink
connection, the Select Device menu appears at this point. In this case
select the device to be updated by turning the SELECT knob, then press
the SELECT knob to confirm your choice.
(If the SDV 3100 HV is not connected to a PDT 3100 HV, the Software
Update menu of the SDV 3100 HV appears directly.)
Select the “Update” menu point by rotating the SELECT knob, then press
the SELECT knob to confirm your choice.
The Select option “WEB” should now be active (highlighted).
The firmware update can now be started by pressing the SELECT knob.
The screen displays the current state of progress of the update.
Once the update has been completed (duration around ten minutes) the
device automatically switches itself off and restarts.
When the machine has restarted, the update is complete.
To ensure that the update was successful, access the “Device Info” menu
point mentioned above, and check the new firmware status.
It is also possible to carry out the update process using the F3100 remote
control handset, as an alternative to operating the machine directly. The
method of operating the menu using the handset is described in the chapter
entitled “Basic settings of the SDV 3100 HV” (Using the remote control
handset).
62
Page 63

Technical description
Oversampling
The audio data on for example CDs is stored at a sampling rate of 44.1 kHz i. e. for each second of music 44.100 sampled values are available for each
channel. In the SDV 3100 HV the audio data read from the CD is „multiplied“
to a higher sampling rate before it is converted back into analogue music
signals. This process delivers a very much better, more finely graduated
signal to the converter, which can then be converted with correspondingly
higher precision. The raised sampling rate is a calculating process for which
there are many different mathematical methods. In almost all digital audio
devices which exploit the advantages of increased digital sampling rate a
process known as a FIR filter is employed for this purpose. At we have
been carrying out research for more than ten years, aimed at improving the
oversampling process, because the standard FIR method has one drawback
to set against its indisputable advantages: it adds small pre- and postechoes to the music signals. At we have developed mathematical
processes (known as Bezier polynomial interpolators) which do not share
this disadvantage. For this reason they should sound better and more
natural than the usual standard process. Since the calculating procedure
employed by us is considerably more complex than the standard method, the
SDV 3100 HV features a digtal high precision floating point signal processor
(DSP) which carries out the over-sampling process using special algorithms
developed by .
The freely programmable DSP which we use is capable of carrying out the
oversampling process using any method of calculation. For this reason we
have implemented a slightly modified Bezier process (filters 3) in the
SDV 3100 HV in addition to the pure Bezier process (filter 4), together with
two variants of the standard process (filter 1 and filter 2). For more
information on the different processes please refer to the next section. You
can switch between the various algorithms, then decide for yourself which of
the filters gives the results you prefer.
FIR long (Standard FIR Filter)
The long FIR filter is the standard oversampling process in digital technology,
offering extremely linear frequency response, very high damping, linear
phase characteristics and constant group delays. The disadvantage is the
pre- and post-echoes which are added to the signal. These „time range
errors“ tend to affect the music signal’s dynamics, precision and
naturalness, and reduce spatial orientation.
Frequency response and transient characteristics of the long FIR filter
Digital filters / Oversampling
63
Page 64

FIR short (Impulse optimised filter)
Shortening the filter (lower coefficient) reduces the time range errors, albeit
combined with a slight loss of linearity in the frequency range and damping
performance.
Frequency response and transient characteristics of the short FIR filter
Bezier / IIR (Bezier-interpolator plus IIR-filter)
In this process an ideal Bezier interpolator is combined with what is known
as an IIR filter. This eliminates the problematic pre-echo of the FIR method.
This process produces highly „analogue“ system characteristics, with a
sound quality and measured performance similar to those of good analogue
record players.
Frequency response and transient characteristics of the Bezier interpolator
plus IIR filter
Bezier (pure Bezier interpolator)
This process delivers a perfect reconstruction of the original music signal. It
exhibits no pre- or post-echoes of any kind, and does not add coloration or
timing errors to the original signal. In sonic terms this method offers an
impressive blend of naturalness, good dynamics and accuracy.
Frequency response and transient characteristics of the Bezier interpolator
64
Page 65

Frequency bandwidth of the analogue reconstruction filter
Normal operation up to 60 kHz and 'Wide'-Mode up to 120 kHz
The 'WIDE' setting produces the best sound quality, but only with highquality amplifiers which are able to process signal frequencies up to 300 kHz
without generating distortion.
If you are in any doubt about the ability of your amplifier to deal with very
high signal frequencies up to 300 kHz, please check this with the
manufacturer of your equipment.
Alternatively you can set the switch to the WIDE setting, and simply listen to
the results. If you hear no interference, and if the sound image is better than
that in the NORMAL setting, leave in the WIDE mode.
Frequency bandwidth of the two settings
The 'WIDE' setting can be used without restriction with all
65
Page 66

Network Terminology
General information
The Switch ensures that the individual components within a network are
connected correctly. This is only possible if it can identify each device within
the network unambiguously; this is the reason why every component is
assigned a form of “house number” (IP address). The IP address consists of
four number blocks each containing three digits separated by dots (e.g.
192.168.1.1).
Each of the individual number blocks may contain values between 1 and 254
(the values 0 and 255 are reserved for certain special functions, and should
therefore not be used). However, if the network is to operate reliably, the
network owner should only select addresses designed for home network use
- i.e.: the first two number blocks should always be 192.168.xxx.xxx; the
third block can be selected without restriction within the above limits (but
should be the same for all devices on the network), and the fourth block
must distinguish each device uniquely (e.g.: SDV 3100 HV 192.168.001.001,
NAS: 192.186.001.002, PC: 192.168.001.003, ...).
If this local network is to include Internet music sources (Internet radio) as
well as physical devices, then the SDV 3100 HV must have access to the
Internet. This facility is provided by a device such as a router with connection
to the DSL network. This router is also a constituent part of the network, and
is assigned its own IP address. The SDV 3100 HV must also be informed of
the address of the router (Gateway) to enable it to gain access to the outside
world.
Please ensure that the first three blocks of the Device IP, Gateway IP and
DNS 1 share the same address space (e.g. 192.168.0.xxx). The fourth block
assigns a unique address (house number) to the components in the local
network. This number must not be present more than once in the local
network.
The Device IP mask should always be assigned the address 255.255.255.0.
DNS
The Domain Name System (DNS) is one of the most important services on the
Internet. Its primary task is to convert “Internet addresses”, such as
www.taelektroakustik.de, into the associated IP address. In most home
networks the router carries out the DNS function.
If you decide to configure your network manually (without DHCP), then
simply enter the address of your router as the DNS address when configuring
the network.
Ethernet-LAN
Wired network. Interference-free network technology, with the drawback of
having to deploy a network cable.
Gateway
The computer or router in your network which is responsible for managing
data traffic between your home network and the outside world (i.e. the
Internet).
Client
Network device which obtains data from the network, decodes it and
converts it into, for example, analogue music signals which can then be
reproduced via an amplifier and loudspeakers. Streaming Clients also
contain functions for displaying media content, and for navigating on the
Internet or servers.
DHCP
DHCP is an abbreviation of Dynamic Host Configuration Protocol. The
primary purpose of DHCP is to enable Clients to obtain your network
configuration automatically from a server or router.
IP-Address
Network address. Each device in the network requires an IP address at which
it can be accessed, and by which it is unambiguously identifiable. No
individual network address may be present more than once. This is
important if you are entering network addresses manually. If the addresses
in your network are assigned by DHCP, you do not need to worry about IP
addresses at all, as the DHCP server manages the addresses automatically
without your intervention.
66
Page 67

NAS
(Network Attached Storage)
Network storage facility. This is generally a very large-capacity (> 200 GB)
storage device to which other devices have access. If the NAS server
includes an UPnP-AV server service, then the SDV 3100 HV has access to
media files stored on the NAS, and can play them back.
Powerline-LAN
In a Power-Line LAN data is transferred via the existing mains power cabling.
Devices known as “Power-Line modems” are required at the transmitting
and receiving end. In most cases Power-Line offers relatively problem-free
data transfer with adequate data rates for audio streaming. We recommend
Power-Line modems with bit rates of 85 or 200 Mbit/s.
Proxy server
A Proxy or Proxy server is a computer in the network which is capable of
carrying out data transfers faster and more efficiently, and can increase
security through the use of access control mechanisms. Most home
networks do not include a proxy server. In this case there is no need to enter
a Proxy address when configuring the SDV 3100 HV network.
Router
Central network device which creates and manages the connections
between the network devices. In most networks the router also assumes the
function of Gateway to the outside world.
Server
Network device which provides data and services for other devices in the
network. For example, an UPnP-AV server typically stores audio / video data,
and makes it available to other devices (the Streaming Clients). Many
UPnP-AV servers also offer functions such as cataloguing, and easy
identification of media content using criteria such as artiste, album name,
genre, etc.
UPnP-AV
Network protocol that makes media files available on the home network.
On PCs and NAS storage devices an UPnP-AV server software must be
installed to enable the SDV 3100 HV to access media files stored on these
devices.
Examples for UPnP-AV server software compatible with the SDV 3100 HV:
Windows:
Twonky Media Server
http://www.twonkyvision.de/
Windows Media Player 11
http://www.microsoft.com/windows/windowsmedia/de/default.aspx
Linux:
Mediatomb
http://mediatomb.cc/
GmediaServer
http://www.gnu.org/software/gmediaserver/
WLAN
(also W-LAN, Wireless LAN)
Radio network. The network is connected by means of radio waves operating
in the 2.4 GHz frequency band. Radio networks are easy to install as no
cables have to be deployed, but they are often problematic and unreliable especially when the transmission distances are substantial. Power-Line
networks, which can also be installed without separate cabling, are a better
choice in many situations. In every case the deployment of a network cable is
the most reliable and problem-free technology for data transfer.
Compatible hardware
and UPnP servers
The marketplace offers a vast number of routers, NAS devices and USB hard
discs made by a very wide range of manufacturers. equipment is generally
compatible with other makes of machine which bear the UPnP label. A list of
devices which has checked for compatibility can be found on the Internet
at: http://www.taelektroakustik.de/hardware/comp_lan_hw.pdf.
67
Page 68

Trouble shooting
Machine does not switch on
Cause 1:
Mains lead not plugged in correctly.
Remedy:
Check connection, push connector in firmly.
Cause 2:
Mains switch on the back panel not switched on.
Remedy:
Switch the mains switch on.
Device makes click noises
Cause :
The clicking is caused by the gold contact relays. These are responsible for
the volume control, switching and muting of the audio signal. Relays are the
technically best solution for these applications. Therefore, clicking is a
quality feature and not a shortcoming.
Whistling or whispering
noises from the speakers.
Cause:
The antenna lead is routed too close to a mains, remote control or audio
signal cable.
Remedy:
Move the leads so that they are spaced well apart. Use the domestic (loft or
outside) antenna or a cable connection.
The RDS station name does
not appear in the display.
Cause 1:
The station is not broadcasting RDS information.
Cause 2:
Reception is poor, interference is severe, or the field strength (signal
strength) is low.
Remedy:
Select only those stations which can be received with a strong signal: hissfree and without interference.
The unit can be operated
normally, but very few
stations or none at all can be
picked up.
Cause:
The antenna system or antenna cable is faulty.
Remedy:
Check the antenna lead for good contact at the antenna socket (at the wall)
and in the back of the tuner. As a test, try using the system with a trailing
antenna. If you can now receive stations reasonably well, we recommend
that you call out an expert antenna technician to check your antenna system.
Many problems have a simple cause and a correspondingly simple solution. The following section describes a few
difficulties you may encounter, and the measures you need to take to cure them. If you find it impossible to solve a
problem with the help of these notes please disconnect the unit from the mains and ask your authorised
specialist dealer for advice.
FM radio
68
Page 69

Streaming Client
USB Storage device is not
recognised
Cause 1:
The storage device (especially USB hard discs without separate power
supply) draws more electrical current from the USB interface than is
permitted by the USB standard.
Remedy:
Only use USB storage devices that conform to the USB standard or use
storage devices with own power supplies.
The streaming client cannot
connect to a network.
On the display the indication
'Cannot connect to...'
is displayed.
Cause 1 (cable LAN):
Network cable not properly connected
Remedy:
Connect network cable, check connection to router
Cause 2 (wireless LAN):
WLAN reception quality bad (low field strength). Possibly too much
attenuated by walls/ceilings on the transmission path.
Remedy:
Optimize location of receiver and transmitter antennas.
Alternative:
If transmission problems persist a so called ‚Power Line‘ network might be
good alternative to establish a good and stable network connection.
The best, safest and most secure network however will always be a cable
LAN network.
Cause 3:
Network parameters not properly configured.
Remedy:
Configure the network parameters correctly (see chapter 'Network
configuration').
Cause 4:
The network cable was connected after switching on the device.
Remedy:
Switch the device at the front off and on again. The network parameters
correctly (see chapter 'Network configuration').
Transmission interruptions
occur when listening to
internet radio stations.
Cause 1:
The capacity of the internet radio station‘s server is at its limit.
Remedy:
Choose a different station.
Cause 2:
Network problems occurred.
Remedy:
Check your network (see above).
Some internet radio stations
cannot be received
Cause:
The internet radio station has been switched off, it transmits only at certain
hours of the day or it has changed its internet address.
Remedy:
Try to get information from the website of the station regarding transmission
hours and internet address (URL).
Try to establish a connection to the station at a later time.
Bad sound quality at certain
internet radio stations
Cause:
The station transmits with a low audio bandwidth (low bitrate).
Remedy:
Use stations transmitting at least at 128 kBit/s. This is the lowest
recommended bitrate for adequate sound quality. For good sound quality we
recommend high bitrates like 320 kBit/s
69
Page 70

70
Page 71

* If both types of connection are present on the amplifier , we recommend the symmetrical option
Wiring diagram
Appendix A
71
Page 72

Wiring diagram
Attention!
A properly set up home network with router must be installed and in
operation to use the SDV 3100 HV.
For the use of internet radio a DSL access to the internet is needed.
For questions regarding setting up your network and internet connection
please ask your system administrator or any network specialist.
*1 Music Server with UPnP-AV server software installed
*2 Connection either via Cable-LAN or Wireless-LAN
72
Page 73

Wiring diagram
Network Audio (NAA source)
73
Page 74

Wiring diagram
Note!
Please note that the digital radio DAB+ and the analogue FM radio transmitting in different frequency ranges.
Depending on the existing antenna configuration, it may therefore be necessary to combine the two ranges with a
DAB+/UKW feed-in crossover. When using an indoor antenna, do not place it in close proximity to sources of
interference such as cordless telephones, WLAN routers or LED lights.
74
Page 75

Specification
Streaming Client
Formats
MP3, WMA, AAC, OGG Vorbis, FLAC, WAV, AIFF, ALAC / UPnP AV,
T+A Control
Data rates
PCM 32...192 kHz,16/24 Bit; MP3 bis 320 kBit, konstante und
variable Datenrate
Services
Tidal, Deezer, qobuz. (Abonnement erforderlich)
Features
Gapless Playback für MP3 (Lame), WAV, FLAC. T+A Control App für
iOS und Android )
Interfaces
LAN: Fast Ethernet 10/100 Base-T,
WLAN: 2,4 GHz, +20 dBm (100 mW), IEEE 802.11 b/g/n
Tuner
Internet Radio
FM, FM-HD
87,5 - 108 MHz; sensitivity 1 µV; S/N > 65 dBA
DAB, DAB+
168 -240 MHz (Band III); Sensitivity 2,0 µV, S/N > 96 dBA
Features
RDS/RDBS, Stationname (PS), Programm type (PTY), Radiotext (Rt)
Bluetooth
Bluetooth standards
Bluetooth standard BT 4.2
Profiles
A2DP 1.2 (Advanced Audio Distribution Profile), AVRCP 1.5 (Audio
Video Remote Control Profile) / aptX ® , MP3, SBC, AAC.
Frequency band
2,4 GHz
Max. transmit power
+4dBm (2,5 mW)
Connections
Analogue inputs
asymmetric co-axial (RCA)
250 mVeff ... 9 Veff / 10 kOhm
symmetric (XLR)
500 mVeff ...18 Veff / 20 kOhm
Analogue outputs
asymmetric co-axial (RCA)
nom 1 Veff, max 9,5 Veff / 50 Ohm
symmetric (XLR)
nom 1,45 Veff, max 19,6 Veff / 50 Ohm
Output digital
1x co-ax, IEC 60958 (LPCM)
Digital inputs
1x AES-EBU 192 kSps /24 bit
6x S/P-DIF: 2x standard coax, 2 high quality BNC and 2 optical TOSLink (32…192kSps / 16-24 bit).
2x USB: Device-Mode up to. 768 kSps (PCM) and DSD1024,
supports asynchronous data
transfer, * DSD512 and DSD1024 only with a Windows PC with
appropriate driver installed
Appendix B
75
Page 76

D/A-Converter
PCM
Double-Differential-Quadruple-Converter with 4 D/A converters per
channel, 32-Bit Sigma Delta, 705,6 / 768 kSps.
DSD
T+A True-1Bit DSD D/A-Converter native bitstream, up to DSD 1024
Upsampling (PCM)
Programmable Digital Signal Processor with 4 selectable
oversampling algorithms: FIR short, FIR long, Bezier/IIR, Bezier
Analogue filter
Phase-linear Bessel filter 3rd order, switchable 60 kHz or 120 kHz
Frequency response
PCM 44.1 kSps: 2 Hz - 20 kHz
PCM 48 kSps: 2 Hz - 22 kHz
PCM 96 kSps: 2 Hz - 40 kHz
PCM 192 kSps: 2 Hz - 80 kHz
PCM 384 kSps: 2 Hz - 100 kHz
PCM 768 kSps: 2 Hz - 120 kHz
DSD 64: 2 Hz - 44 kHz
DSD 128: 2 Hz - 60 kHz
DSD 256: 2 Hz - 80 kHz
DSD 512: 2 Hz - 100 kHz
DSD 1024: 2 Hz - 120 kHz
Total harm. distortion
< 0.001 %
Signal : noise ratio, A-weighted:
117 dB
Channel separation
110 dB
Power requirement
230 V version
115 V version
2x 220 - 240 V~ , 50-60 Hz
2x 110 - 120 V~, 50-60 Hz
Power consumption
max. 2x 40 W
Standby < 0,5 W
Dimensions and weight
H x W x D [cm]
17 x 46 x 46
26 kg
Accessories
Remote control F3100, W-LAN aerial, BNC to RCA adaptor, 2x power
cord, XLR cord, RCA cord, USB cable, FM aerial, HLink cable, user
manual
We reserve the right to alter specifications.
76
Page 77

77
Page 78

T+A elektroakustik GmbH & Co. KG
Planckstraße 9 – 11
D - 32052 Herford
T +49 (0) 5221 / 7676-0
F +49 (0) 5221 / 7676-76
info@ta-hifi.com
www.ta-hifi.com
 Loading...