

T+A MP 8 Owner's Manual

Bestell-Nr. 9103-0547 (V1.0)
Owner`s Manual

2

3
Welcome.
We are delighted that you have decided to purchase a product. With your new MP 8 you
have acquired a top-quality piece of equipment which has been designed and developed with the
wishes of discerning listeners as absolute top priority.
This system represents our very best efforts at designing practical electronic equipment
incorporating solid quality, user-friendly operation and a specification and performance which
leaves nothing to be desired.
All these factors contribute to a piece of equipment which will satisfy your highest demands and
your most searching requirements for a period of many years. All the components we use meet
the German and European safety norms and standards which are currently valid. All the
materials we use are subject to painstaking quality monitoring.
At all stages of production we avoid the use of substances which are environmentally unsound or
potentially hazardous to health, such as chlorine-based cleaning agents and CFCs.
We also aim to avoid the use of plastics in general, and PVC in particular, in the design of our
products. Instead we rely upon metals and other non-hazardous materials; metal components
are ideal for recycling, and also provide effective electrical screening.
Our robust all-metal cases exclude any possibility of external sources of interference affecting
the quality of reproduction. From the opposite point of view our products’ electro-magnetic
radiation (electro-smog) is reduced to an absolute minimum by the outstandingly effective
screening provided by the metal case.
Our range of accessories includes high-quality cables and connectors
We would like to take this opportunity to thank you for the faith you have shown in our company
by purchasing this product, and wish you many hours of enjoyment and sheer listening pleasure
with your MP 8.
elektroakustik GmbH & Co KG

4
About these instructions
All the controls and functions of the MP 8 which are frequently used are described in the first
section of these operating instructions.
The second part 'Basic settings, Installation, Using the system for the first time' covers
connections and settings which are very seldom required; they are generally required only
when the machine is set up and used for the first time. Here you will also find a detailed
description of the network settings required for connecting the MP 8 to your home network.
Symbols used in these instructions
Caution!
Text passages marked with this symbol contain important information which
must be observed if the machine is to operate safely and without problems.
This symbol marks text passages which provide supplementary notes and
background information; they are intended to help the user understand how to
get the best out of the machine.
Notes on software updates
Many features of the MP 8 are software based. Updates and new features will be made
available from time to time. The update process takes only a few minutes. See the chapter
entitled “Software update” for how to update your device via the internet connection.
We recommend you to check for updates before using your MP 8 for the first time. To keep
your device up to date you should check for updates from time to time.
The operation instructions, the connection guidance and the safety notes are
for your own good - please read them carefully and observe them at all times.
The operating instructions are an integral part of this device. If you ever
transfer the product to a new owner please be sure to pass them on to the
purchaser to guard against incorrect operation and possible hazards.
All the components we use meet the German and European safety norms and
standards which are currently valid. This product complies with the EU
directives 2014/35/EC, 2014/30/EC, 2009/125/EC, 2011/65/EC + 2015/863,
1999/5/EC and 2012/19/EC.

5
Contents
Front panel controls .............................................................................................. 8
Remote control .................................................................................................... 14
Charging the remote control handset ......................................................................16
Operation with the App or the FM1000 ....................................................................16
Basic settings of the MP 8 .................................................................................. 17
Calling up and operating the menu .........................................................................17
Source names ........................................................................................................17
Display brightness ..................................................................................................18
Display mode .........................................................................................................18
Language ...............................................................................................................18
Device name ..........................................................................................................18
Network ..................................................................................................................18
Music services ........................................................................................................19
Bandwidth limit .......................................................................................................19
Energy saver .......................................................................................................... 19
Device Info .............................................................................................................20
Operating the sources in detail .......................................................................... 21
Favourites lists ..............................................................................................................21
General information ................................................................................................21
Adding a favourite ..................................................................................................21
Calling up the Favourites list ..................................................................................21
Erasing a favourite from the Favourites list .............................................................22
Selecting a favourite from the list ............................................................................22
Sorting Favourites lists ...........................................................................................22
Operating the radio ............................................................................................. 24
FM - Radio .................................................................................................................24
Selecting FM radio ................................................................................................ .24
General..................................................................................................................24
Automatic station search ........................................................................................25
Selecting a station from the Station list ...................................................................25
RDS functions ........................................................................................................25
Switching Radio Text on and off .............................................................................26
Mono / Stereo.........................................................................................................26
DAB - Radio ...............................................................................................................26
Selecting DAB radio ...............................................................................................26
Display ...................................................................................................................26
Automatic station search ........................................................................................27
Selecting a station from the Station list ...................................................................27
RDS functions ........................................................................................................28
Internet-Radio and podcasts ....................................................................................28
Selecting Internet Radio as source .........................................................................28
Selecting podcasts .................................................................................................28
Playback ................................................................................................................28

6
Favourites lists ....................................................................................................... 29
Search function ...................................................................................................... 29
Operating music services ................................................................................... 30
General information................................................................................................ 30
Selecting the music service .................................................................................... 30
Playback ................................................................................................................ 30
Search function ...................................................................................................... 31
Playlists and favourites .......................................................................................... 31
Operating the UPnP source .......................................................................................... 32
General information on the streaming client ........................................................... 32
Selecting the UPnP source .................................................................................... 32
Playback ................................................................................................................ 32
Playback of directories ........................................................................................... 33
Playing USB memory media ......................................................................................... 34
General information................................................................................................ 34
Selecting USB Media as source ............................................................................. 34
Playback ................................................................................................................ 34
Playback of directories ........................................................................................... 35
Operating the Bluetooth source ......................................................................... 36
Selecting Bluetooth ................................................................................................ 36
Setting up audio transfer ........................................................................................ 36
Playback functions ................................................................................................. 36
Notes ..................................................................................................................... 37
Operating the Disc player ................................................................................... 38
Selecting CD as source ....................................................................................... 38
Inserting a CD ................................ ........................................................................ 38
Playing a CD .......................................................................................................... 38
Variations .................................................................................................................................39
Track Select ........................................................................................................... 39
During playback ..................................................................................................... 39
CD Text.................................................................................................................. 39
Playback mode ...................................................................................................... 39
Playback Program ..................................................................................................... 40
Creating a Playback Program................................................................................. 40
Playing a playback program ................................................................................... 40
Erasing a playback program ................................................................................... 40
Installation, Using the system for the first time, Safety notes .. 41
Back panel connections ...................................................................................... 42
Installation and wiring ......................................................................................... 44
Safety notes ......................................................................................................... 46
Network Configuration ........................................................................................ 49
The Configuration for a Wired Ethernet LAN or Power-Line LAN connection ........... 51
Setting the Parameters for a Wired Network........................................................... 51

7
The Configuration for a WLAN connection ..................................................................53
Setting the parameters for a wireless network ........................................................53
Selecting and connecting a WLAN by hand ............................................................53
Searching for and Selecting the Network ................................................................53
Entering the Password (for encoded networks) ......................................................53
Storing Network Settings and Restarting ................................................................54
Connecting to WLAN via the WPS-function ............................................................54
WPS-function .........................................................................................................54
Connecting WLAN automatically via the WPS function ...........................................54
Selecting the WLAN manually and conneting via WPS ...........................................54
Trouble shooting ................................................................................................. 56
Software update .................................................................................................. 58
Software update generally ......................................................................................58
Updating via the Internet ........................................................................................58
Notes on Energy Saving ..................................................................................... 59
General information ................................................................................................59
Automatic power-down (Energy saver) ...................................................................59
Appendix A .......................................................................................................... 60
Wiring diagram ..........................................................................................................60
Wiring diagram ..........................................................................................................61
Appendix B .......................................................................................................... 62
Specification ..............................................................................................................62
IMPORTANT! CAUTION!
This product contains a laser diode of higher class than 1. To ensure continued safety, do not
remove any covers or attempt to gain access to the inside of the product.
Refer all servicing to qualified personnel.
The following caution labels appear on your device:
Rear Panel:
CLASS 1
LASER PRODUCT
8
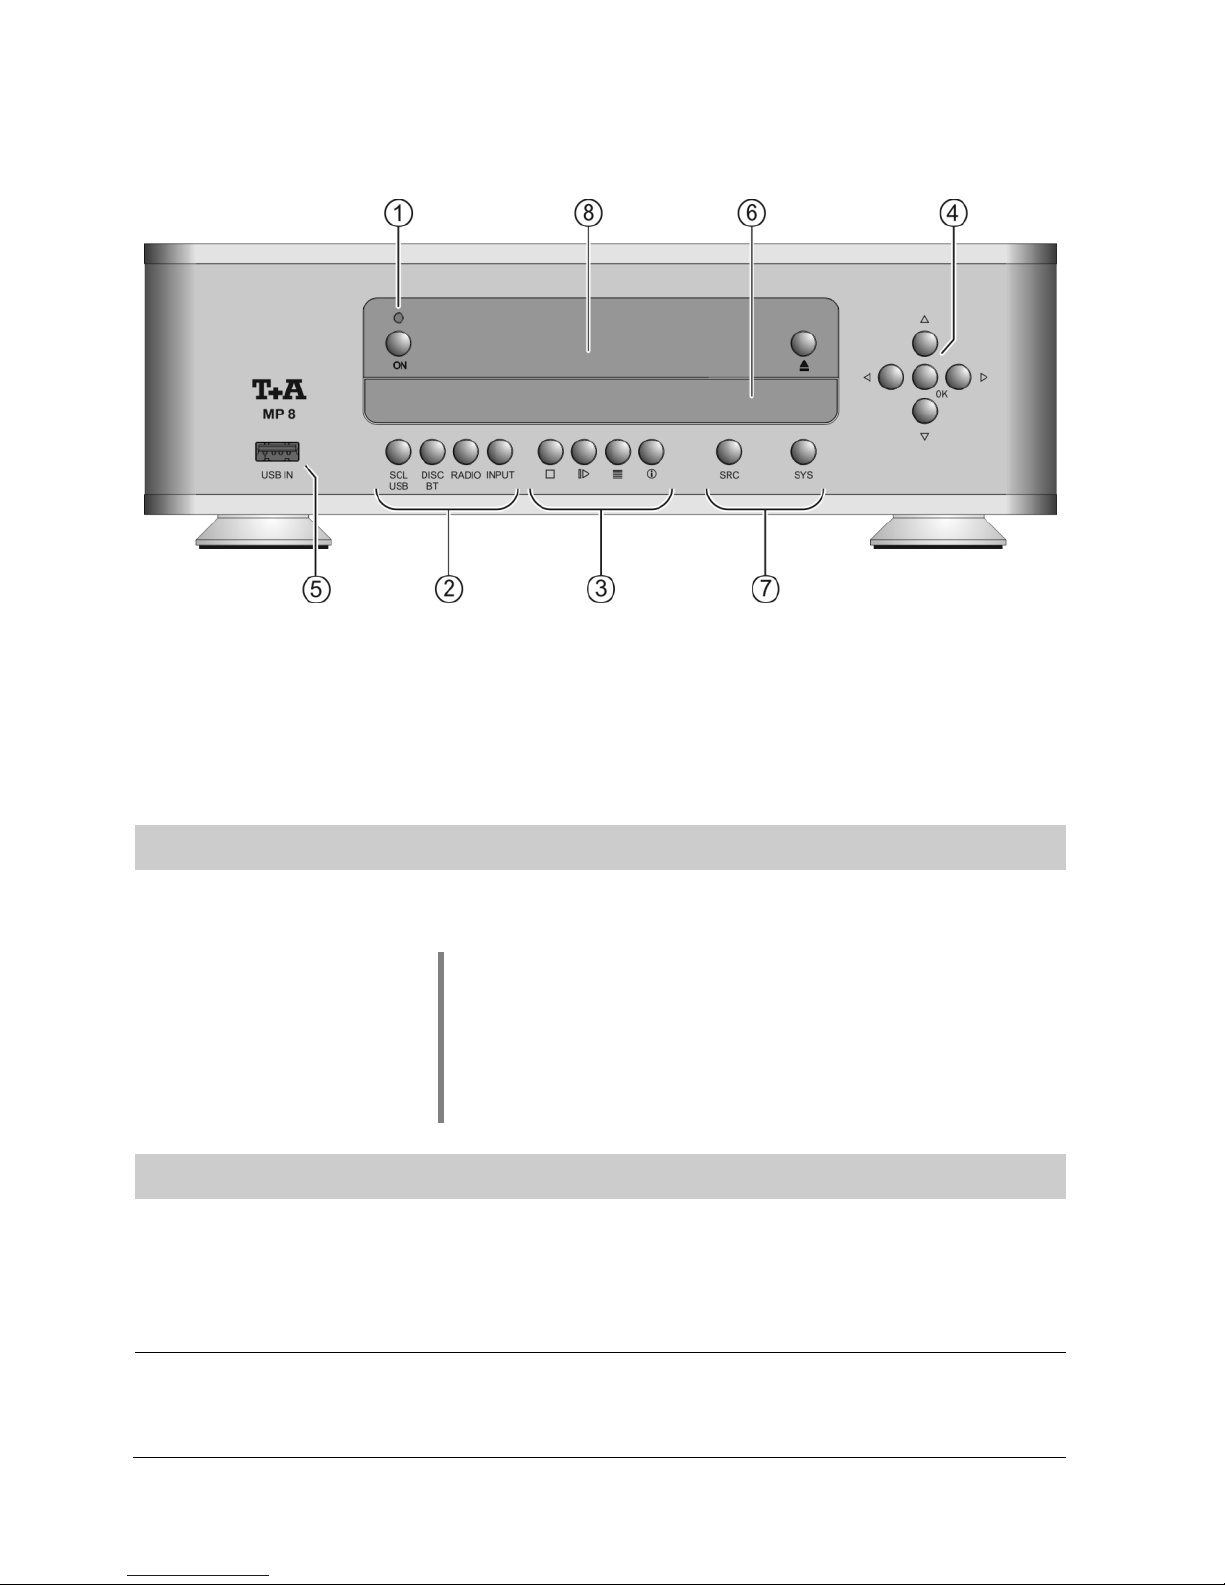
Front panel controls
All the important functions of the MP 8 can be operated using the buttons on the front panel.
Direct-acting buttons are provided for fundamental functions. Functions not needed so frequently
are controlled using menus which are called up using the and -button. The
following section explains the functions of the buttons on the machine, and the information
provided on the screen.
On / Off switch
(On / Off switch)
A brief press on the -button switches the unit on and off.
Caution!
The mains button is not a mains isolation switch. Even when the
LED is not glowing, some parts of the machine are still
connected to mains voltage. If you know you will not be using
the machine for a long period, we recommend that you
disconnect it from the mains by withdrawing the mains plug from
the wall socket.
Source selection
Selects the SCL-function (e.g. access to music servers,
streaming services or similar) or the USB Media function
(connected USB memory media) of the streaming client.
Press this button repeatedly until the desired source appears on
the screen.
Selects the CD player or the Bluetooth function of the MP 8.
Press this button once or twice until the desired source appears
on the screen.

9
Selects one of the following radio sources: FM / VHF (FM
RADIO source), DAB (DAB RADIO source), Internet radio
(INTERNET RADIO source) or Podcasts. Press this button
repeatedly until the desired source is displayed on the screen.
A brief press on this button selects the digital input you wish to
use. Press the button repeatedly until the desired input is
displayed on the screen.
Playback
Ends playback
During menu navigation:
A brief press takes you back (higher) by one menu level or
aborts the current input process; the change is then abandoned.
Starts playback / halts playback (pause) / resumes playback
after a pause
Calls up the Favourites list
Brief press:
Cycles through the various screen displays.
Detailed display with / without CD text / Radiotext (if
present) and large display with / without CD text / Radiotext
(if present).
Switches between capitals and lower case, and numeric /
letters, when entering data.
Long press:
When necessary, repeated long presses of the button
cycle through the various playback modes (repeat track,
repeat whole disc, etc.).
For details see chapter entitled “Operating the disc player”.
Navigation
Returns to the previous point / change button
Returns from the play screen back to list navigation.
Confirms the input / change button

10
Selects the next point within a list / select button
Selects the next track / station during playback.
Selects the previous point within a list / select button
Selects the previous track / station during playback.
Confirmation button during input procedures
USB-input
USB IN
Socket for a USB memory stick or an external hard disc.
The storage medium can be formatted with the FAT16, FAT32,
NTFS, ext2, ext3 or ext4 file system.
The USB storage medium can be powered via the USB socket
provided that its current drain meets the USB norm (< 500 mA).
Normalised 2.5” USB hard discs can be connected directly to
this socket, i.e. they require no mains PSU.
This socket can be used to recharge the battery in the FM8.
Also possible if the MP 8 is in stand-by mode.
CD drawer
The CD drawer is located below the display. Please insert the
disc with the label side facing upwards into the appropriate
depression of the tray.
The drawer is opened and closed by pressing the
button.
Settings
System
configuration
Opens the “System configuration” menu
(for details see Chapter “System settings”)
Source
configuration
Opens the setup menu for the source device just selected.
Not all sources have their own setup menu. For this reason the
button does not have a function with all sources.
11
Display
Display
All information relating to machine status, the current music
track and list navigation is displayed on the graphic screen of
the MP 8. The display is context-sensitive, and in part varies
according to the capabilities and facilities of the service to which
you are currently listening.
The most important information is highlighted on the screen
according to context. Supplementary information is provided by
symbols above and below the main data.
The displays and symbols which appear on the screen vary
according to the currently active function.
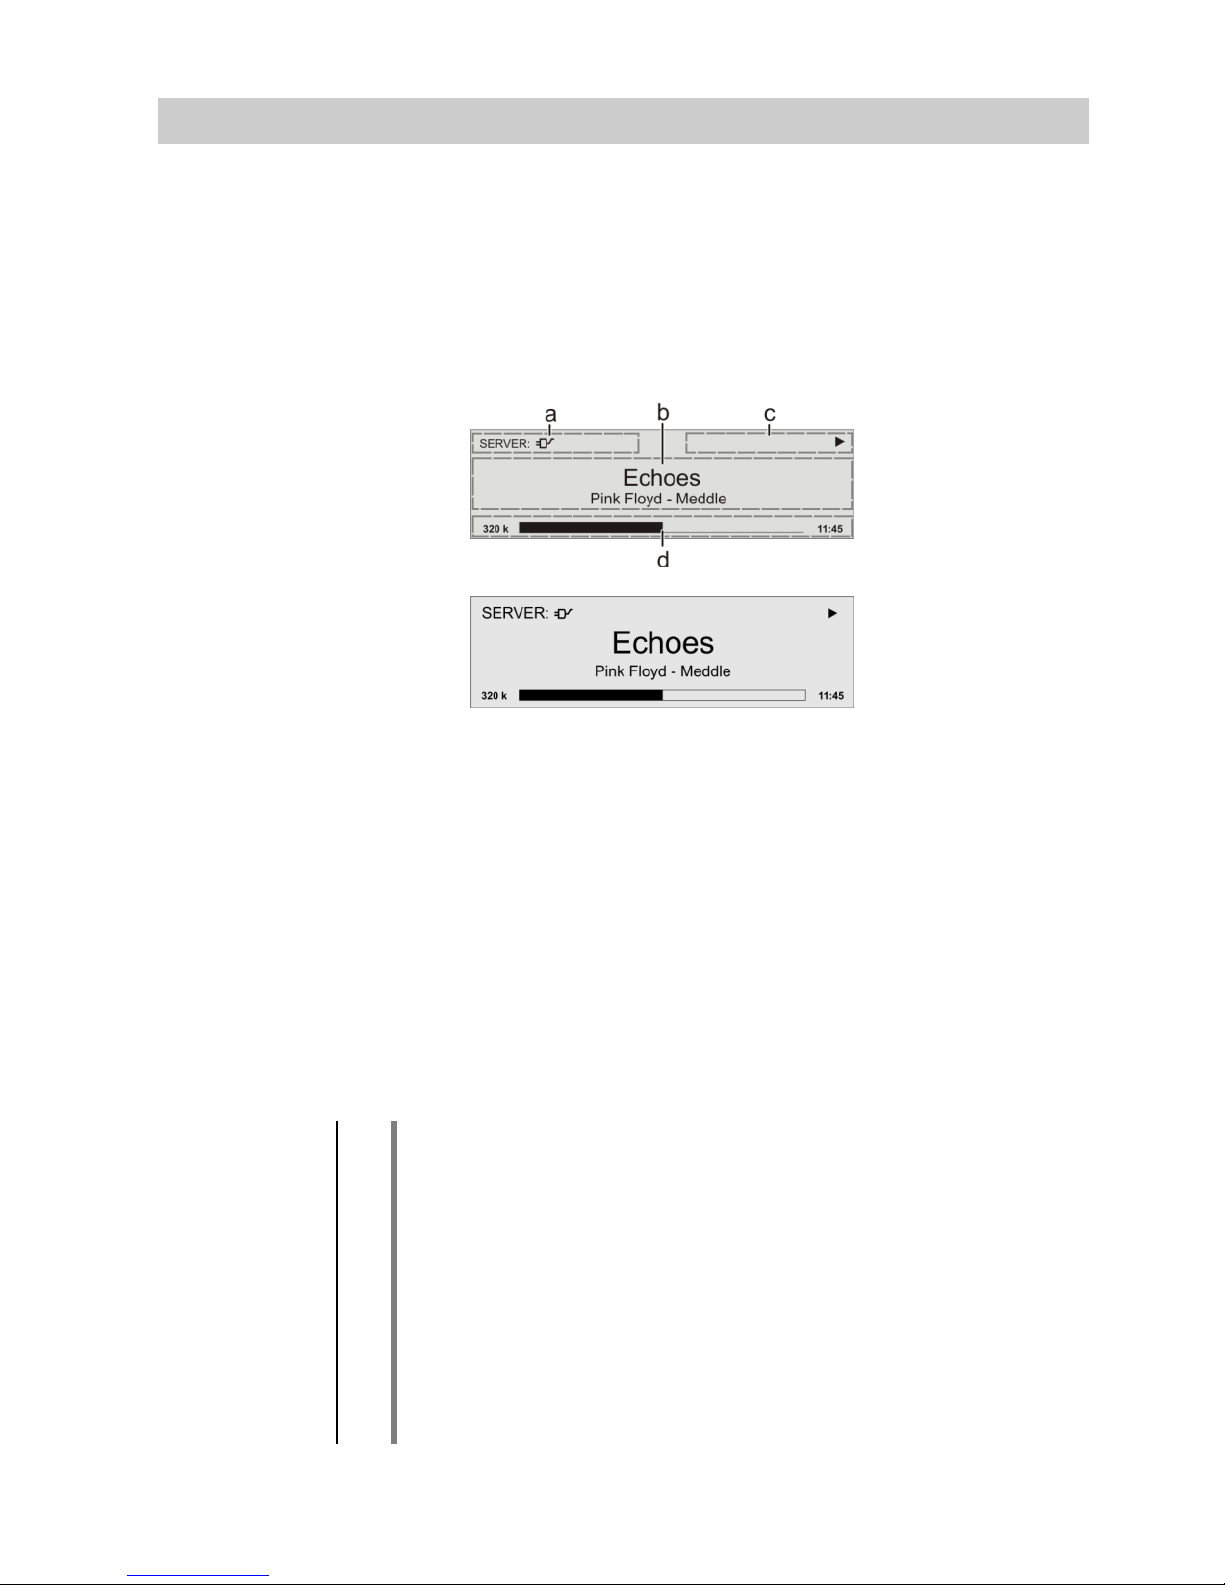
The basic areas of the screen:
Display field (a) shows the currently active source.
Display field (b) shows information relating to the piece of
music being played. The essential information is displayed
enlarged in the main line.
Display field (c) shows information relating to the device and
playback.
The bottom line (d) displays supplementary context-sensitive
information (e.g. sampling frequency, elapsed time)
The MP 8 features different display views for the playback of the sources.
Large-format display:
Enlarged display of the most important information, clearly legible
even from a distance
Detail display:
Small-text display showing a large number of additional information
points, e.g. bit-rate etc.
A brief press on the –button on the remote control handset is
used to switch between the two display modes.
For the sources FM Radio and Disc, the radio and CD text (if available)
are also turned on and off (cycles through the different modes) with this
button.
12
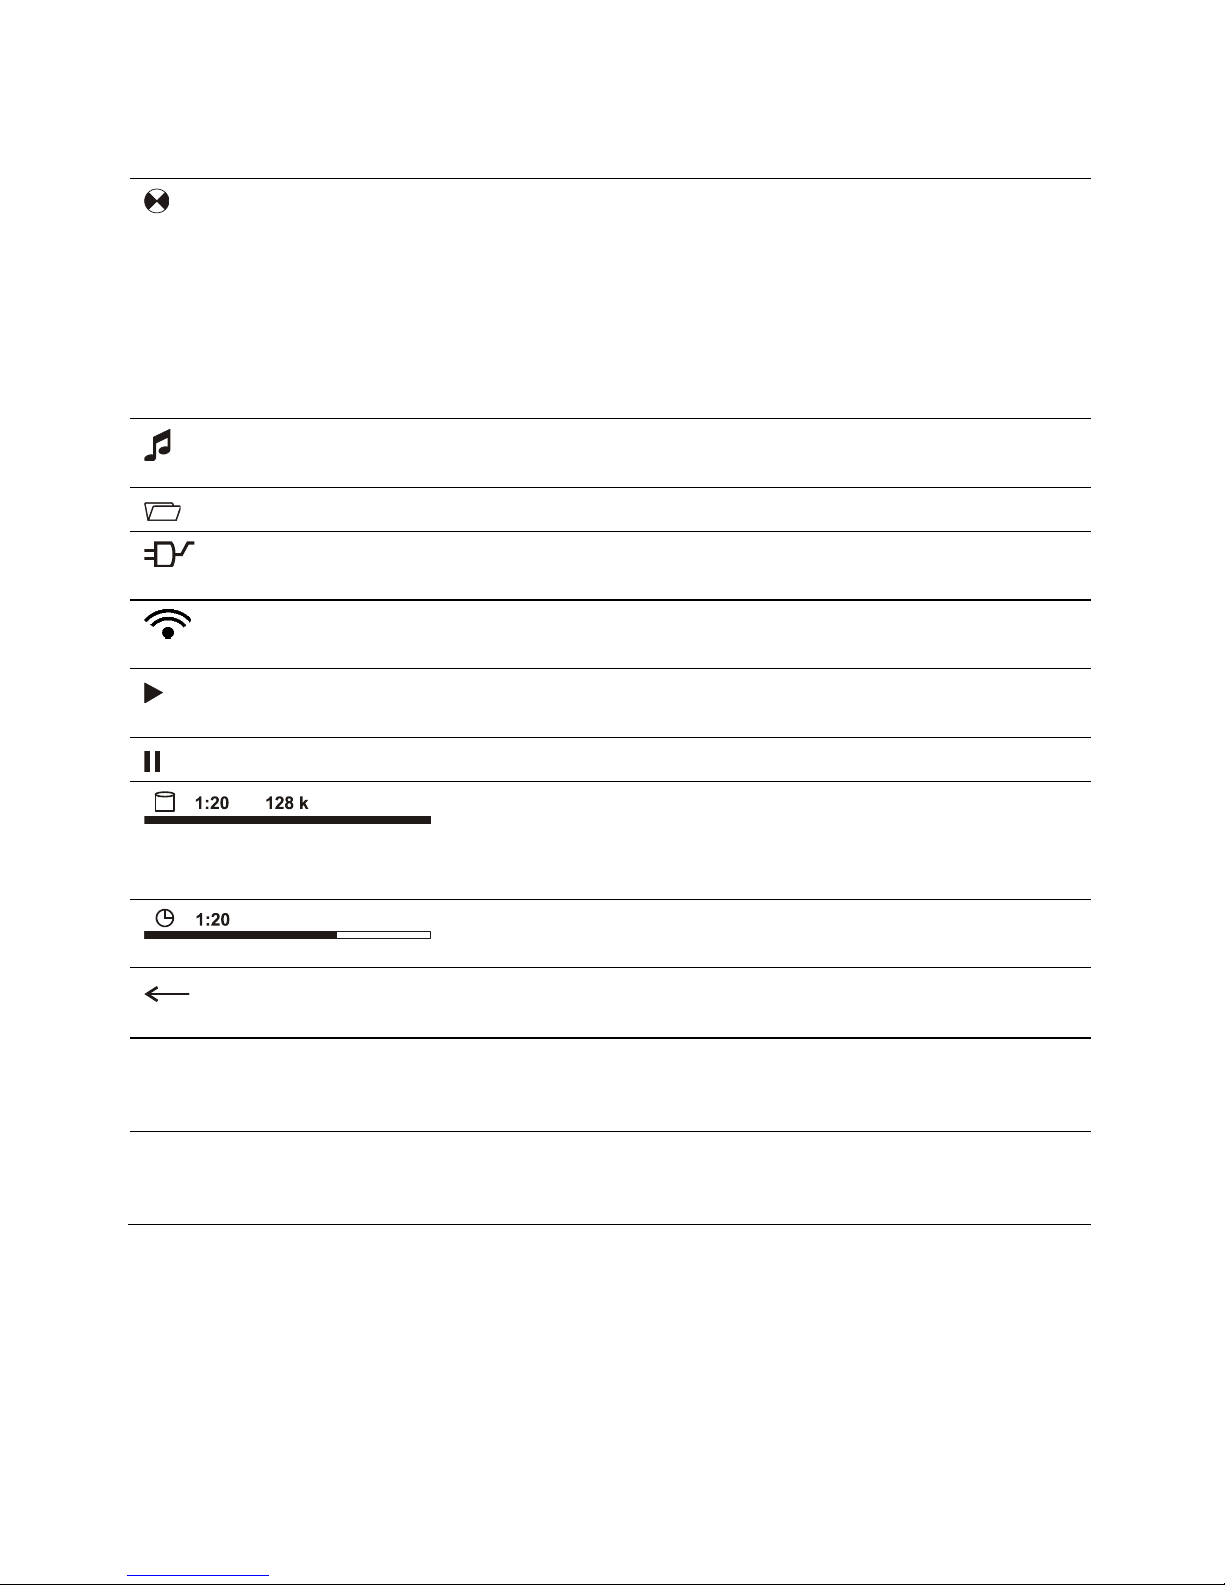
Screen symbols and their meaning
Making connection (Wait / Busy)
The rotating symbol indicates that the MP 8 is currently
processing a command, or is attempting to connect to a
service. These processes may take some time to complete
depending on the speed of your network and the load upon
it.
During such periods the MP 8 may be muted, and may not
respond to the controls. Please wait until the symbol
disappears, then try again.
Indicates a music track which can be played, or a
playlist.
Indicates a folder which conceals further folders or lists.
Indicates that a source is being reproduced via a cable
connection.
Indicates that a source is being reproduced via a radio
connection.
Indicates that the MP 8 is reproducing a station or playing
back a music track.
Pause indicator
Buffer display (fullness indicator, memory display) and data
rate indicator (if available):
The higher the data rate, the better the quality of
reproduction.
Display of the elapsed playback time.
This information is not available for all services.
Indicates that the -button can be used to switch to a
higher menu or select level.
0 / 0
Position indicator in select lists. The first number shows the
current position in the list, the second number the total
number of list entries (length of list).
ABC or
Display of the symbol input modes
abc or
123

13
14
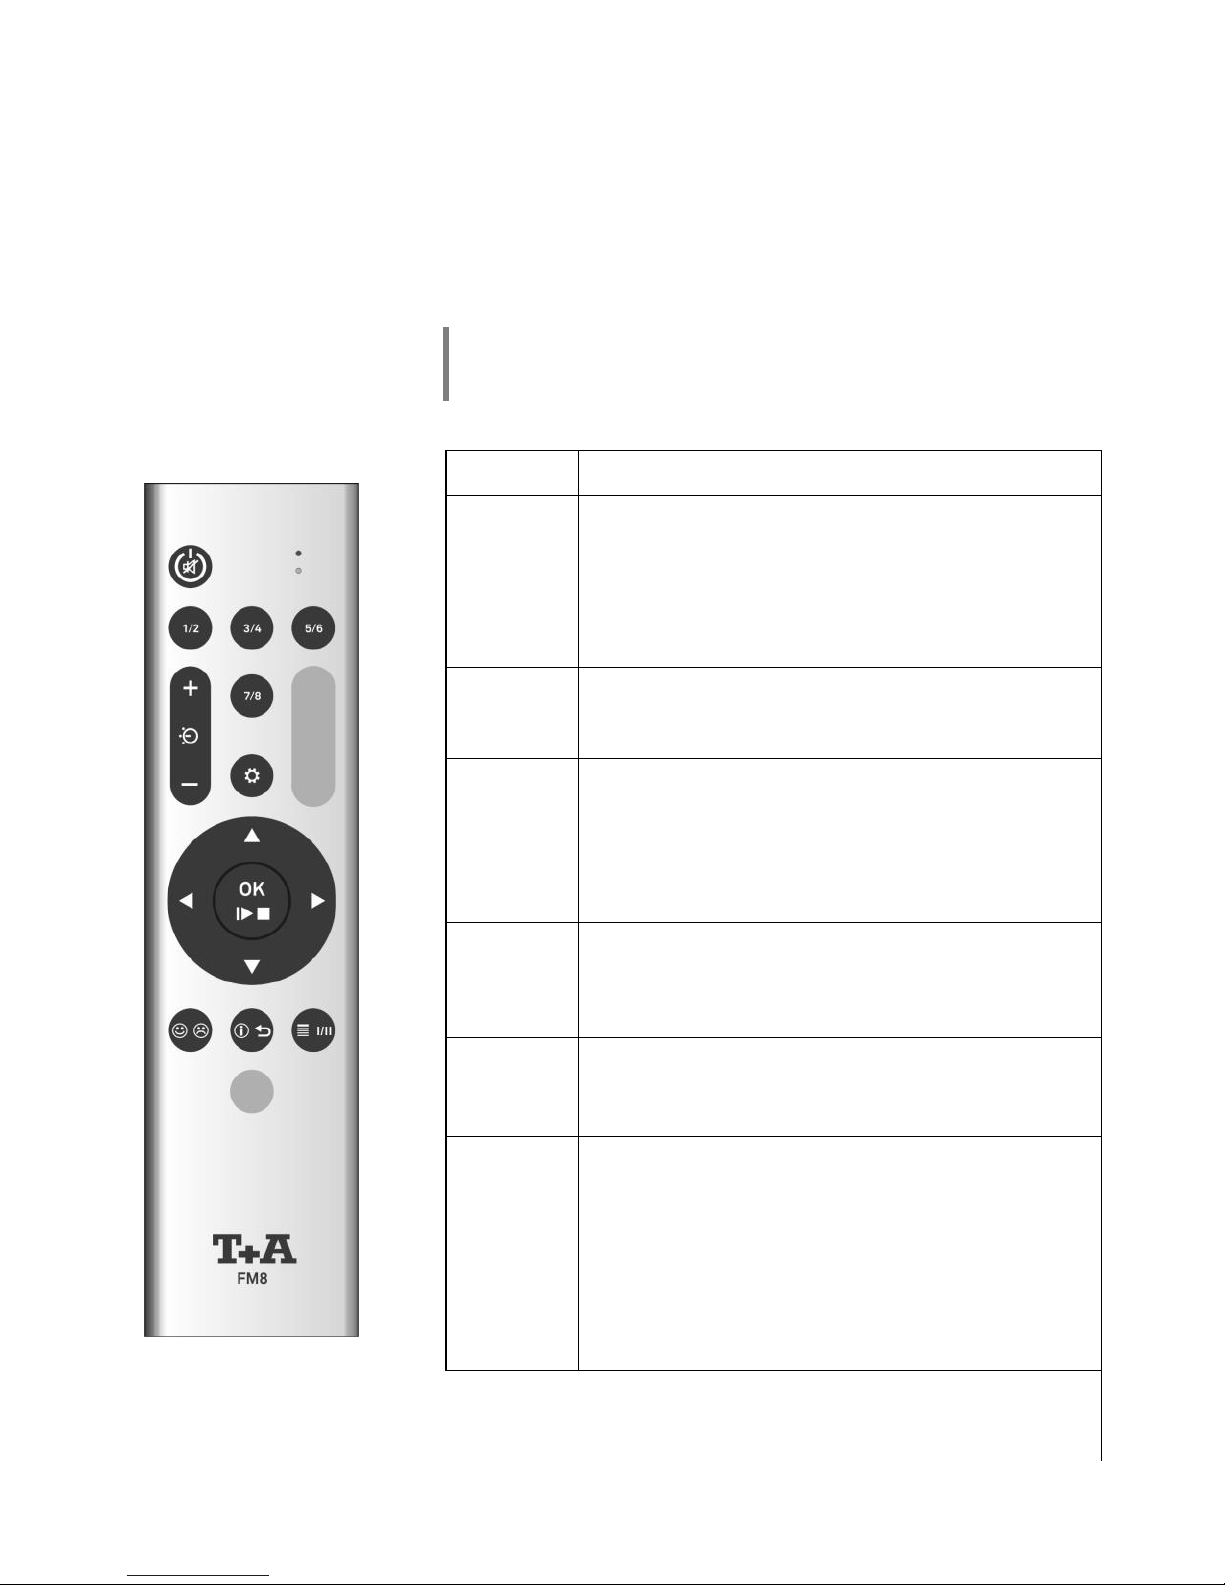
Remote control
Introduction
The infrared receiver for the remote control handset is located left of the screen area. There must be
line of sight contact between the FM8 and the screen.
The following tables show the remote control buttons and their function when operating the
machine.
The illustration shows only those buttons which are required to
control the MP 8. The buttons not shown are needed to operate
the equipment in conjunction with a DAC 8 DSD.
Switches the machine on and off
*
Selects the SCL function (e.g. access to music
servers, streaming services or similar) or the
USB Media function (connected USB memory
media) of the streaming client.
Press this button repeatedly until the desired
source appears on the screen.
*
Selects the CD player or the Bluetooth function
of the MP 8. Press this button once or twice until
the desired source appears on the screen.
*
Selects one of the following radio sources:
FM / VHF (FM RADIO source), DAB (DAB
RADIO source), Internet radio (Internet radio
source) or Podcasts. Press this button
repeatedly until the desired source is displayed
on the screen.
*
A brief press on this button selects the digital
input you wish to use. Press the button
repeatedly until the desired input is displayed on
the screen.
Rocker button for source selection.
Briefly press this button (+ or - ) until the desired
source appears on the screen.
Brief press:
Opens the “System configuration menu”
(see chapter entitled “Basic settings of the
MP 8”)
Long press:
Opens the Source menu
(not available for all sources)
* Only possible when the MP 8 is operated stand-alone. When the MP 8 is used in combination
with a DAC 8 DSD, these buttons select the desired input on the DAC 8 DSD. In this case the
source is selected on the MP 8 using the buttons only. (see above)

15
Brief press:
Confirmation button in lists and menus
Starts playback
Pauses current playback
Resumes playback after a pause
Long press:
In menus: one level higher
In menus: interrupts current input
Stops playback
Opens and closes the CD drawer when the disc is stopped.
Selects the next point within a list / select button
Selects the next track / station during playback.
Selects the previous point within a list / select button
Selects the previous track / station during playback.
Returns to the previous point / change button
Returns to list navigation while playback
Confirms the input / change button
Brief press:
Cycles through the various screen displays.
Detailed display with / without CD text / Radiotext (if present) and large
display with / without CD text / Radiotext (if present).
Switches between capitals and lower case, and numeric / letters, when
entering data.
Long press:
When necessary, repeated long presses of the button cycle through the
various playback modes (repeat track, repeat whole disc, etc.).
For details see chapter entitled “Operating the disc player”.
Brief press
Calls up the Favourites list stored on the MP 8.
Long press
Switches between stereo and mono reception during radio playback (FM
Radio source only).
The Stereo setting is constantly displayed in the screen window by a
symbol. The Mono setting is constantly displayed in the screen window by a
symbol.

16
Brief press
Adds a favourite to the Favourites list.
CD - player: Activates playback programming
Adds a track to the playback program during playback programming
Long press
Removes a favourite from the Favourites list.
CD - player: Erases the playback program.
Charging the remote control handset
The FM 8 is fitted with an internal rechargeable battery (Li-Ion battery)
which cannot be removed or replaced by the user. The battery in the
remote control handset is automatically recharged when it is connected
to the USB IN socket of the MP 8 using the USB lead supplied in the set.
The LED on the remote control handset flashes red when charging is in
progress. The LED lights a solid red when the battery is fully charged.
The FM8 cannot be used to control the MP 8 when the battery is on
charge.
Alternatively the FM8 can be recharged using any 5V USB mains PSU
instead of the USB IN socket of the MP 8.
Operation with the App or the FM1000
An even more convenient method of controlling the MP 8 is to use the
'TA Control' App.
As a further alternative the MP 8 can be operated using the FM1000
remote control handset which is available as an accessory. This includes
additional features such as a numeric keypad for entering numbers.
Information on this can be found on our website at: www.ta-hifi.com
17
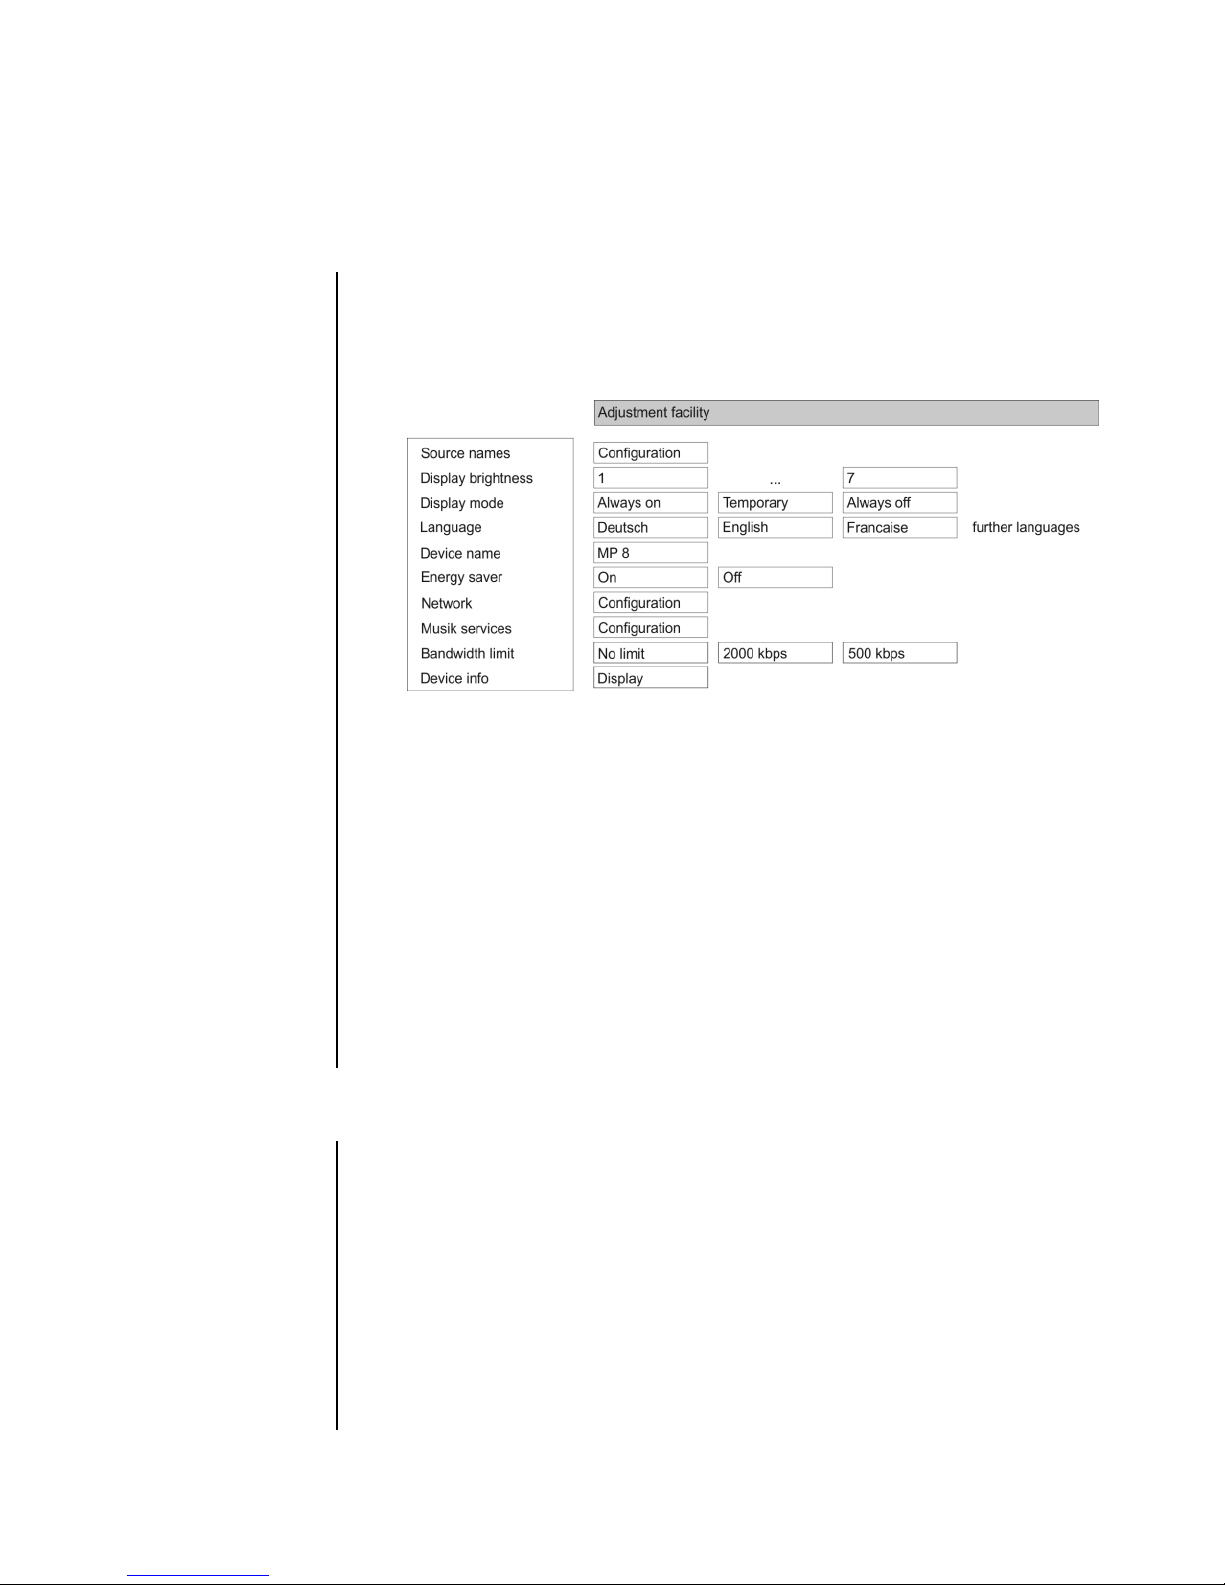
Basic settings of the MP 8
(System Configuration menu)
The System Configuration menu is used for adjusting the general settings of the machine. This
menu is described in detail in the following chapter.
Calling up and
operating the
menu
Briefly press the -button on the front panel or the –
button on the remote control handset to call up the menu.
When the menu is opened, the screen displays the following Select
points:
Use the / buttons to select a point in the menu.
If you wish to change the selected menu point, first press the
/ -button, then use the / -buttons to
alter the value.
To accept the setting once you have changed the value, press the
/ -button again.
A long press on the / button also takes you back
(higher) by one menu level.
You can press the / button at any time to interrupt
the process; the change is then abandoned.
Press the / –button again to leave the menu.
Source names
menu item
At this menu item you can activate and disable external sources, and
assign a plain text name to each source; this name then appears in the
screen displays.
When you call up this menu item using the / -button, a list
of all the external sources of the MP 8 appears. Each source is followed
by the assigned name, or if you have disabled the source concerned the
note “disabled”.
To activate a source, press the button on the FM8; a long press
on the button disables the source.
To change the plain-text name, move to the appropriate line and press
the / -button.

18
Change the name to your choice using the / / /
buttons on the FM8, and confirm with . This action stores
the settings for that source. The / - button is used to
switch between numeric and alpha-numeric input, and between capitals
and lower-case letters. Letters can be erased by pressing the button.
If you should wish to restore the factory default source name, erase the
whole name before saving the empty field with the / button: this action resets the display to the standard source names.
Display
brightness
menu item
At this point you can adjust the brightness of the integral screen to suit
your personal preference for normal use; eight levels are available.
We recommend that brightness settings 7 and 8 should only be used
when the screen is difficult to read due to very bright ambient light.
A lower brightness setting will extend the useful life of the screen.
Display mode
menu item
This menu item offers the choice between three different display
operation modes:
Always on
Temporary
Always off
Selecting 'Temporary' will switch the display is on for a short while each
time the MP 8 is being operated. Shortly after operation the display will
be switched off again automatically.
To switch the display on again, from the “always off” setting, call up the
system settings menu by a brief press on the -button on the FM8
or the -button on the MP 8`s front panel.
Language
menu item
In this menu point it is possible to determine the language which is to be
used for the displays on the integral screen on the front panel of the
MP 8.
The language used for any transferred data, e.g. from an Internet radio
station, is determined by the device itself or the radio station, and
therefore cannot be selected on the MP 8.
Device name
menu item
This menu point can be used to assign an individual name to the MP 8.
In a home network the device then appears under this name.
Network
menu item
All network settings can be carried out at this menu point. For a detailed
description on setting up a LAN or WLAN connection please also refer to
the section entitled “Network configuration”.

19
Music services
menu item
At this point you can enter the access data for the music streaming
services (TIDAL etc.) supported by the MP 8.
Calling up this menu point by pressing the / -button
displays a list Select the service you wish to use, then confirm your
choice with the / -button.
Now use the / / / buttons on the FM8 to
enter your access data in the lines “Username” and “Password”; this
data is provided by your service provider.
Use the / -button to switch between numeric and alphanumeric data entry, and between capitals and lower case.
Press the -button to erase a letter.
When you have entered your username and password confirm each step
by pressing the / -button.
To conclude the procedure and save the data, select the menu entry
“Store and exit?” and confirm by pressing the / -button.
To conclude the procedure and save the data, select the menu entry
“Store and exit?” and confirm by pressing the / -button.
If access data for the selected music service has already been stored,
the new data will overwrite them. To use the new access data you must
first perform a “Logout” for the service in question, then switch the MP 8
off and on again.
The music streaming services supported by the MP 8 require a
subscription to the appropriate service provider.
Bandwidth
limit
menu item
This menu point can be used to adjust the link speed of the Internet
connection. The bitrate of the Internet radio stations and streaming
services is adjusted automatically to match your chosen setting. If you
select “no limit” for bandwidth limit, the highest available quality is
always selected automatically.
If you do not know the exact bandwidth of the internet connection, we
recommend that you select the setting at which no drop-outs occur
during playback.
Energy saver
(Stand-by
mode)
menu item
The MP 8 features two stand-by modes: ECO Standby with reduced
stand-by current drain, and Comfort Standby with additional functions,
but slightly higher current drain. You can select your preferred stand-by
mode in this menu point:
On (ECO Standby)
Active functions in ECO Standby mode:
Can be switched on by remote control
Automatic power down function after 90 minutes without signal
Off (Comfort-Standby)
The following expanded functions are available:
Can be switched on by App
Automatic power down function off

20
Device Info
menu item
At this menu point you will find information on the status of the installed
software and the factory reset.
Sub-point
Update
At this point it is possible to initiate a firmware update. The update can be
accessed from an Internet connection.
Sub-point
Update
package
This point displays the currently installed software package.
Sub-point
Control
Display of the control software version
Sub-point
Client
Display of the Streaming Client software version
Sub-point
DAB / FM
Display of the tuner software version.
Sub-point
Decoder
Display of the CD mechanism decoder software
Sub-point
Default
settings
Calling up and confirming this menu point erases all personal settings,
and restores the machine to the state as delivered (factory defaults).
 Loading...