

Page 1

AGRAS T16
Quick Start Guide
v1.0
Page 2
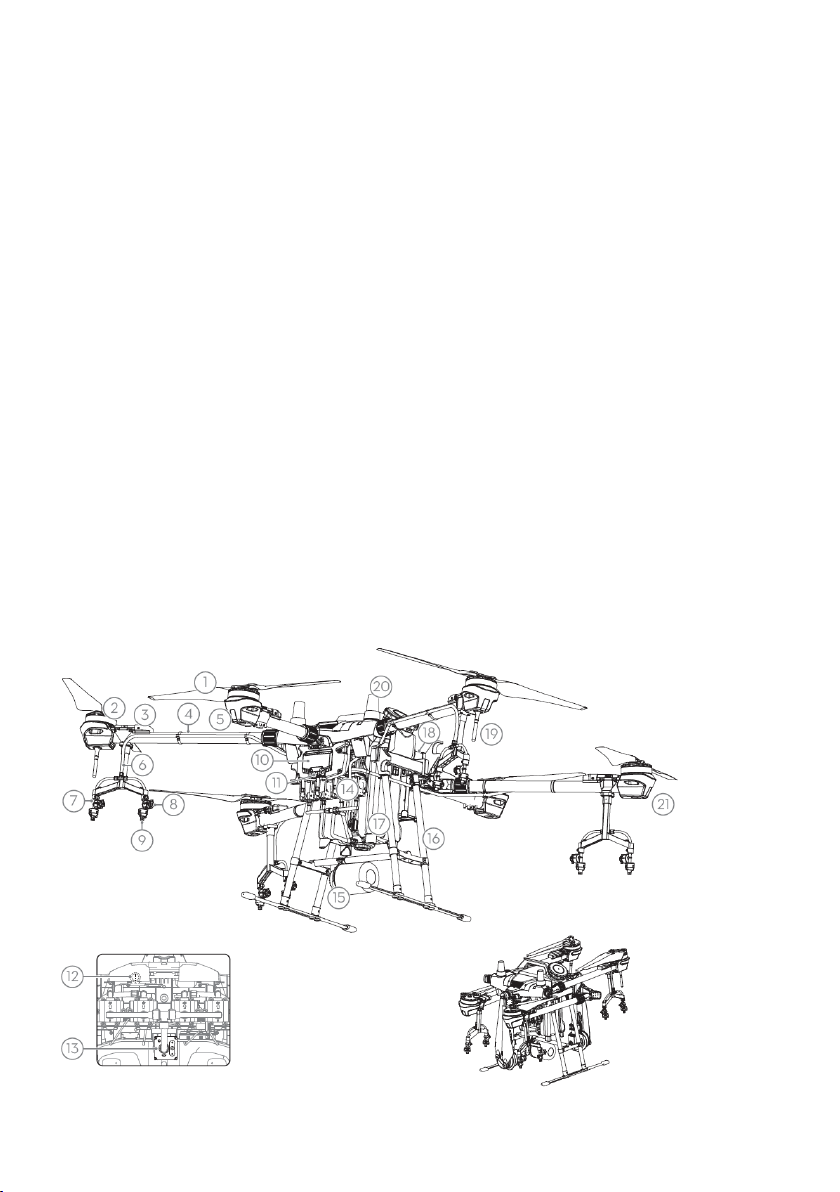
Aircraft
● Aircraft Front
Bottom View
Folded
The T16 features a brand-new design including a foldable frame and quick-release spray tank and flight battery, making
replacement, installation, and storage easy.
The stable and reliable modular aerial-electronics system is integrated with the dedicated industrial flight controller,
OCUSYNCTM 2.0 HD transmission system, and RTK module. It has dual IMUs and barometers and adopts a propulsion
control system redundancy design including both digital and analog signals to ensure flight safety. The GNSS+RTK dual-
redundancy system supports GPS+GLONASS+BeiDou+Galileo and centimeter-level positioning* when used with the
built-in onboard D-RTKTM antennas. The T16 also supports dual-antenna technology that provides strong resistance
against magnetic interference.
The upgraded spraying system features an improvement in payload, spray rate, and spray width. It also has a new-
generation electromagnetic flow meter, providing high precision and stability. The all-new digital beam forming (DBF)
imaging radar features obstacle sensing and terrain following capabilities during both day and night, without being
affected by light or dust. It can also plan a flight path to actively circumvent obstacles. The aircraft is equipped with a
wide-angle FPV camera enabling observation of the landscape from the front of the aircraft.
The quality of the aircraft’s industrial design and materials make it dustproof, waterproof, and corrosion-resistant. The
aircraft has a protection rating of IP54 (IEC standard 60529), while the protection rating of the aerial-electronics system,
spray control system, and propulsion ESC system is up to IP67.
Page 3

1. Propellers
2. Motors
3. ESCs
4. Frame Arms
5. Aircraft Front LEDs (on the three front
arms)
6. Hoses
7. Sprinklers
8. Manual Relief Valve
9. Nozzles
10. Aerial-Electronics System
11. FPV Camera
12. USB-C Port (on the bottom of the aerial-
electronics system, with a water-proof cover)
13. Flow Meter
14. Delivery Pumps
15. DBF Imaging Radar
16. Landing Gear
17. Spray Tank
18. Battery Compartment
19. OcuSync Antennas
20. Onboard D-RTK Antennas
21. Aircraft Status Indicators (on the three rear
arms)
14. Spray Rate Dial
15. Aircraft Control Switch Dial
16. Spray Button
17. Pause Switch
18. Button A (customizable)
19. Button B (customizable)
20. Button C1 (customizable)
21. Button C2 (customizable)
22. Battery Compartment Cover
23. Battery Compartment Cover Lock
24. Dongle Compartment Cover
1. Power Button
2. RTH Button
3. Control Sticks
4. Speaker
5. Lanyard Attachment
6. Status LED
7. Battery Level LEDs
8. USB-C Port
9. 3.5 mm Audio Jack
10. microSD Card Slot
11. Display Device
12. Sleep/Wake Button
13. Antennas
* This should be used with a DJI D-RTK 2 High Precision GNSS Mobile Station (sold separately) or a DJI-approved Network RTK service.
Remote Controller
The remote controller uses the DJI OcuSync dual-band transmission system, has a maximum control distance of up to
3.11 mi (5 km), * and is equipped with a bright, dedicated screen with the new DJI MG app built in. Operation planning
can be performed using the remote controller, an RTK hand-held mapping device, or by flying the aircraft to waypoints
results in an upgraded spraying system, making flight operation more flexible and efficient. The Multi-Aircraft Control
mode of the remote controller can be used to coordinate the operation of up to five aircraft at the same time, enabling
pilots to work efficiently. Replaceable batteries make it easy to use the remote controller every day, and removable
antennas make maintenance easier.
Page 4
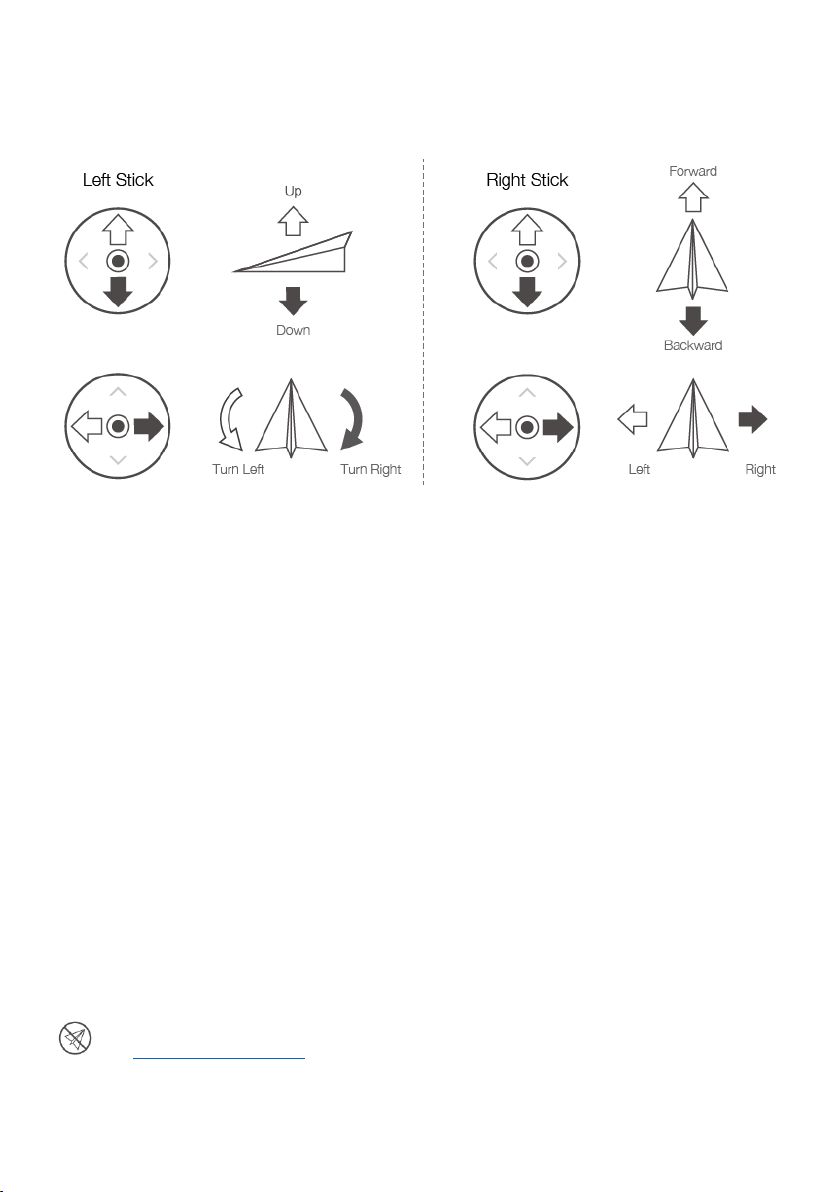
The figure below shows the function that each control stick movement performs, using Mode 2 as an example. In Mode
2, the left stick controls the aircraft’s altitude and heading while the right stick controls its forward, backward, left, and
right movements.
* The remote controller is able to reach its maximum transmission distance (FCC: 3.11 mi (5 km); CE/KCC/MIC/SRRC: 1.86 mi (3 km)) in an
open area with no electromagnetic interference, and at an altitude of approximately 8.2 feet (2.5 m).
Fly Safe
It is important to understand some basic flight guidelines, both for your protection and for the safety of those around
you.
1. Flying in Open Areas: Pay attention to utility poles, power lines, and other obstacles. DO NOT fly near or above water,
people, or animals.
2. Maintain Control at All Times: Always keep your hands on the remote controller and maintain control of your aircraft
when it is in flight, even when using intelligent functions such as the Route and A-B Route operation modes and Smart
Return to Home.
3. Maintain Line of Sight: Maintain visual line of sight with your aircraft at all times and avoid flying behind buildings or
other obstacles that may block your view.
4. Monitor Your Altitude: For the safety of manned aircraft and other air traffic, always fly at altitudes lower than 98 feet
(30 meters) and in accordance with all local laws and regulations.
Visit https://www.dji.com/flysafe for more information on critical safety features such as GEO Zones.
Flying Considerations
1. DO NOT use the aircraft to spray in winds exceeding 11 mph (18 kph).
Page 5
2. DO NOT use the aircraft in adverse weather conditions such as winds exceeding 17 mph (28 kph), heavy rain
● Obstacle avoidance is disabled in Attitude mode (which the aircraft enters in situations such as when the GNSS signal is
weak) and is not available if the operating environment is not suitable for the radar module. Extra caution is required in such
situations.
(precipitation rate exceeding 25 mm or 0.98 inches in 12 hours), snow, or fog.
3. The recommended operating altitude is 6,560 feet (2 km) above sea level. DO NOT fly over 9,842 feet (3 km) above
sea level.
4. The payload of the spray tank should reduce by 2 kg once the operating altitude increases 3,280 feet (1 km) above sea
level.
5. Make sure that there is a strong GNSS signal when operating.
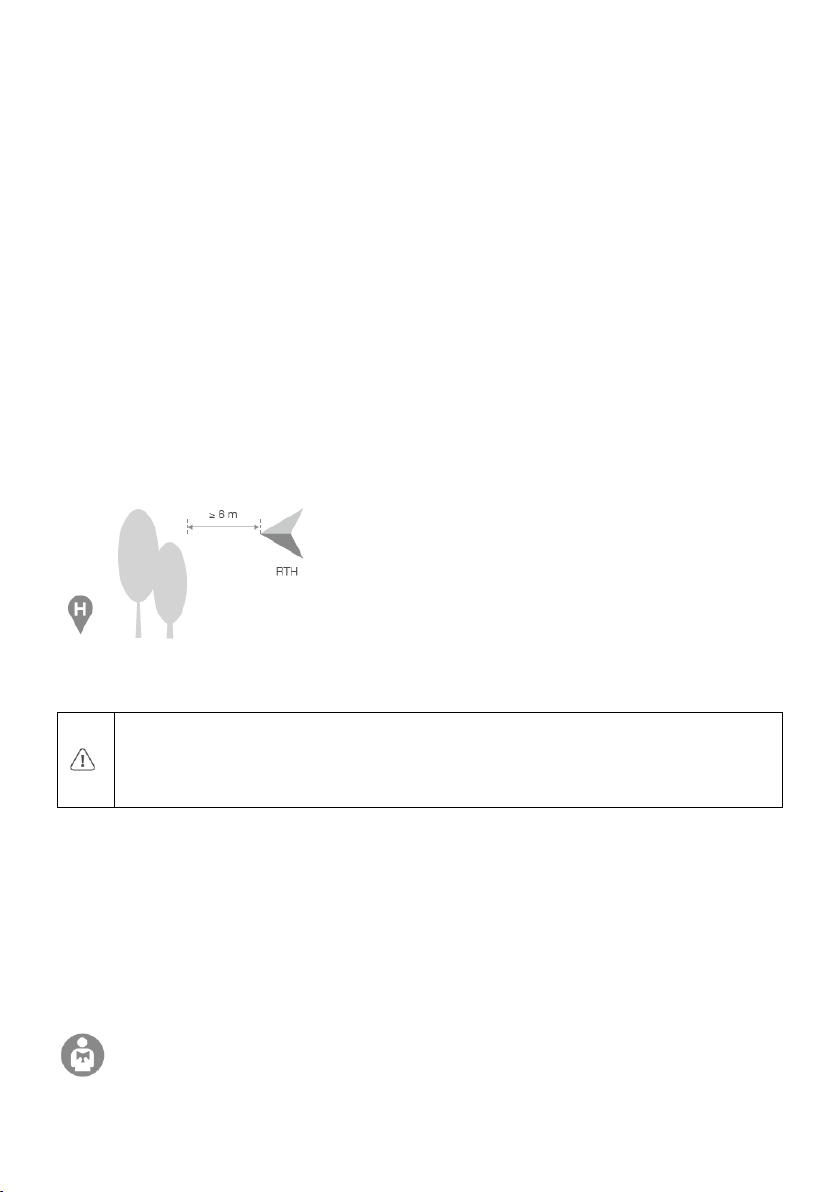
Return to Home (RTH)
The aircraft will automatically return to the Home Point in the following situations:
Smart RTH: You press the RTH button.
Failsafe RTH: The remote controller signal is lost. *
During RTH, if there is an obstacle within 20 m of the aircraft, the aircraft decelerates and then stops and hovers. While
decelerating, if the aircraft comes within 6 m of the obstacle, it flies backward to a distance of around 6 m from the
obstacle and hovers. The aircraft then exits the RTH procedure and waits for pilot commands.
* If Failsafe RTH is disabled (the default setting in the DJI MG app), the aircraft hovers in place when the remote controller
signal is lost.
Pesticide Usage
1. Avoid the use of powder pesticides as much as possible as they may reduce the service life of the spraying system.
2. Pesticides are poisonous and pose serious risks to safety. Only use them in strict accordance with their specifications.
3. Use clean water to mix the pesticide to avoid blocking the strainer. Clear any blockage before using the equipment.
4. Effective use of pesticides relies on pesticide density, spray rate, spray distance, aircraft speed, wind speed, and wind
direction. Consider all factors when using pesticides.
5. Never compromise the safety of people, animals, or the environment during operation.
It is important to understand basic flight guidelines for the safety of both you and those around you.
DO NOT forget to read the Disclaimer and Safety Guidelines.
Page 6
Using the T16
●
Make sure that the battery is firmly attached to the aircraft. Only insert or remove the battery when it is powered off.
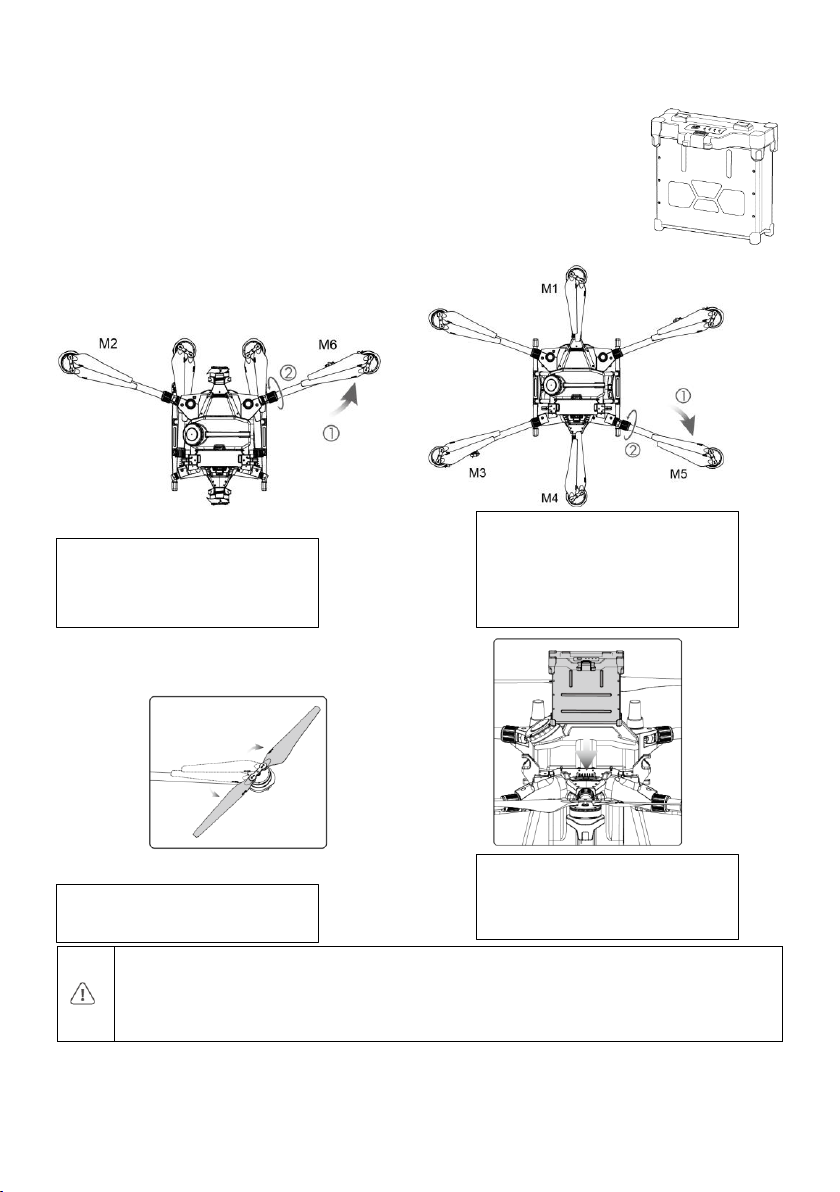
●
When folding the arms, make sure to fold the M3 and M5 arms first, and then M2 and M6. Otherwise, the arms may be
damaged. Lift and lower the M1 and M4 arms gently to reduce wear and tear.
Unfold the M2 and M6 arms, and
tighten the two arm sleeves.
Unfold the M3 and M5 arms, then M1
and M4, and then tighten the four
arm sleeves.
Unfold the propeller blades.
Insert the Intelligent Flight Battery into
the aircraft until you hear a click.
1. Preparing the Intelligent Flight Battery
Only use DJI-approved flight batteries (model: AB2-17500mAh-51.8V). Check the battery level
before flying, and charge it according to the corresponding document.
2. Preparing the Aircraft
3. Preparing the Remote Controller
Charging the Battery
Press the battery level button once to check the battery level. Fully charge the batteries before initial use.
Page 7

Place the battery into the charging hub, connect the AC power adapter to the charging hub, and then connect the AC
● To remove the Intelligent Battery, open the cover, press and hold the battery release button, then push the battery
downward.
● Only use a DJI-approved dongle.
● The dongle supports various network standards. Use a SIM card that is compatible with the chosen mobile network
provider, and select a mobile data plan according to the planned level of usage.
● The dongle and SIM card are used to enable the remote controller to access to specific networks and platforms, such as
the DJI AG platform. Be sure to employ them correctly, or else network access will not be available.
Battery Release
Button
Lift the dongle compartment cover at the gap at its lower right corner, then
remove it.
Insert the dongle into the USB port with the SIM card inserted into the dongle and
test it. *
Reattach the cover. To secure the cover, open the silicone protectors on it, insert
and tighten two Phillips screws, then close the protectors.
Dongle
power adapter to a power outlet (100-240 V, 50/60 Hz).
Charging Hub AC Power Adapter Power Outlet
Mounting the Battery
The remote controller uses an easily removable, interchangeable
Intelligent Battery for long-term operation.
① Slide the battery compartment cover lock on the back of the remote
controller down to open the cover.
② Insert the Intelligent Battery into the compartment and push it to the
top.
③ Close the cover.
Mounting the Dongle and SIM Card
Page 8

* Test procedure: Press the remote controller power button once, then press again and hold to turn the remote controller
Unfold
Strong
Weak
Low → High
on. In the DJI MG app tap > and select Network Diagnostics. If the status of all the devices in the network chain
are shown in green, the dongle and SIM card are functioning properly.
Checking the Battery Level
Press once to check the battery level. Press once, then press again and hold for two seconds to turn on/off.
Adjusting the Antennas
Tilt the display device on the remote controller to the desired position, then adjust the antennas, so they are facing
outward. The strength of the remote controller signal is affected by the position of the antennas.
Page 9

Optimal Transmission Zone
● Avoid using wireless devices that use the same frequency bands as the remote controller.
Try to keep the aircraft inside the optimal transmission zone. If the signal is weak, adjust the antennas or fly the aircraft
closer.
4. Getting Ready for Takeoff
A. Place the aircraft on open, flat ground with the Aircraft Status Indicators facing toward you.
B. Make sure that the propellers are securely mounted, there are no foreign objects in or on the motors and propellers,
the propeller blades and arms are unfolded, and the arm sleeves are firmly tightened.
C. Make sure that the spray tank and flight battery are firmly in place.
D. Pour liquid into the spray tank, and tighten the cover. Make sure that the four fins on the cover are in horizontal or
vertical positions respectively.
E. Power on the remote controller, make sure that the DJI MG app is open, and then power on the aircraft.
When using for the first time, activate it using the DJI MG app. Your DJI account and an Internet connection
are required.
Calibrating the Spraying System
Make sure to calibrate the spraying system before your first operation, or else it will adversely affect the spraying
performance.
A. Preparation before calibration: If there are any bubbles in the hoses, discharge them before calibrating. If there are no
Page 10

bubbles, proceed with calibration.
OR
Throttle Stick
(left stick in Mode 2)
① Fill the spray tank with about 10 L of water.
② Loosen all the manual relief valves and press the Spray button on the remote controller until the bubbles in the hoses
have been fully discharged. * Tighten the valves and press the Spray button to stop spraying.
* If the bubbles have still not been fully discharged after an extended period, rotate and remove the valve cover. Reattach
the cover once the bubbles have been fully discharged.
B. Spraying System Calibration
① Make sure that there is more than 6 L of water in the spray tank. In the DJI MG app, tap Execute Operation to enter
Operation View, tap > , then select the correct nozzle model (the standard nozzle is model XR11001VS).
② Tap Calibrate. Select the pump requiring calibration (all of the four pumps are selected by default), and tap Calibration.
③ Calibration will start automatically. After several minutes, the calibration result will be displayed in the app.
● If the app displays a successful calibration, users can proceed with the operation.
● If calibration fails, tap “?” to view the problem and resolve it. Afterwards, select the pump that failed to re-calibrate.
Calibrating the Compass
When the app prompts that compass calibration is required, tap > , slide to the bottom, and select
Advanced Settings > Sensors. Tap Calibration in the compass calibration section, then follow the on-screen instructions.
5. Flight
In the DJI MG app, go to Operation View. Make sure that there is a strong GNSS signal, and the system status bar indicates
Manual Route (GNSS) or Manual Route (RTK). * Otherwise, the aircraft cannot take off.
It is recommended to create a plan for a field and select an operation to enable the aircraft to take off and perform the
operation automatically. Refer to Starting Operations for more information. In other cases, take off and land manually.
* RTK positioning is recommended. In the DJI MG app, go to Operation View > > RTK to enable Aircraft RTK and
select a method for receiving RTK signals.
Takeoff
Perform a Combination Stick Command (CSC) and lowly push the throttle stick up to take off.
Page 11

Landing
● Spinning propellers can be dangerous. Stay away from spinning propellers and motors. DO NOT start the motors in
confined spaces or when there are people nearby.
● Always keep your hands on the remote controller when the motors are spinning.
● DO NOT stop the motors mid-flight unless in an emergency situation where doing so will reduce the risk of damage or
injury.
● Method 1 is the recommended method for stopping the motors. When using Method 2 to stop the motors, the aircraft
may roll over if it is not completely on the ground. Use Method 2 with caution.
● After landing, power off the aircraft before turning off the remote controller.
OR
To land, pull down on the throttle stick to descend until the aircraft touches the ground. There are two methods to stop
the motors.
Method 1: When the aircraft has landed, push and hold the throttle stick down. The motors will stop after 3 seconds.
Throttle Stick
Method 2: When the aircraft has landed, push the throttle stick down, then perform the same CSC that was used to start
the motors. Release both sticks once the motors have stopped.
Method 1 Method 2
Starting Operations
The remote controller is equipped with a screen with a built-in Android system that can run the DJI MG app. The
Intelligent Operation Planning system built into the app can be used to measure the operation area, identify obstacles,
configure waypoints, set aircraft settings, and produce flight route plans. Once flight routes have been planned, they can
be used to command the aircraft to fly routes automatically.
In scenarios with complicated terrain, users can use the Phantom 4 RTK and DJI Terra to plan 3D flight routes, and then
import the routes to the DJI MG app for operation. Refer to the user manual for more information.
Planning Field
DJI MG app supports flight route planning by walking to waypoints, obstacles, and calibration points carrying the remote
controller or an RTK handheld mapping device, or by flying the aircraft to these points. The following description takes
planning by flying the aircraft to these points as an example.
Page 12

● Operate the aircraft carefully when flying near obstacles to avoid a collision.
● Calibration points are used to rectify flight route biases caused by GNSS positioning deviations. Choose one or more fixed
reference points for calibration like a metal peg or obvious marker that are easy to identify for bias rectification when using
the plan.
Power on the remote
controller, followed by the
aircraft
Tap Plan a Field > Fly the
aircraft
The app will display Manual
Route (GNSS) or Manual
Route (RTK)
Tap Start Measuring
Fly the aircraft alongside the
boundary of the operation
area and tap Add Waypoint
at turning points.
Fly near each obstacle * in turn
and tap Start Obstacle
Measurement.
Fly the aircraft around the
obstacle and tap Add
Waypoint at several points
around the obstacle. *
Tap End Obstacle
Measurement. *
Fly to the location of each
calibration point and tap Add
Calibration Point.
Tap End Measurement.
Adjust the flight route: route
angle, line spacing, and collision
avoidance safety margin.
Save the field plan.
* If any obstacles are in the operation area.
Once you have finished planning, tap in the upper left corner of the screen to return to the main screen.
Performing an Operation
Page 13

● Only take off in open areas, and set an appropriate auto-takeoff height according to the operating environment.
● An operation can be paused by toggling the Pause switch. The aircraft will hover and record the breakpoint, and then the
aircraft can be controlled manually. To continue the operation, select it again from the Executing tag in list, and the
aircraft will return to the breakpoint automatically and resume the operation. Pay attention to aircraft safety when returning
to the breakpoint.
●
In Route Operation mode, the aircraft is able to circumvent obstacles, which is disabled by default and can be enabled in
the app. If the function is enabled, the aircraft will plan a flight path, slow down, and fly across the obstacles after the radar
detects the obstacles, then return to the operation path to resume the operation.
● The aircraft will hover at the endpoint of the flight route after the operation is completed. Instead of hovering, the aircraft
can also be set to perform other actions in the app.
Take the aircraft to
one of the calibration
points.
Tap Execute Operation in the
main screen of the app.
Tap , select the field from the field
list, and select Invoke.
Adjust the flight route: route
angle, line spacing, and collision
avoidance safety margin.
Tap Rectify Offset.
Tap Start.
Set the operation parameters,
then confirm.
Set the auto-takeoff height, move the slider
to take off and perform the operation
automatically.
More Operation Modes
Refer to the user manual for more information about the A-B Route, Manual, and Manual Plus Operation modes.
More Functions
Operation Resumption System Data Protection Empty Tank Warning
Refer to the user manual for more information.
6. Maintenance
Clean all parts of the aircraft daily, immediately after spraying:
A. Completely fill the spray tank with clean water or soapy water and spray the water through the nozzle until the tank
is empty. Repeat the step two more times.
B. Detach the spray tank to clean it. Remove the spray tank strainer, nozzle strainers, and nozzles to clean them and clear
Page 14

any blockage. Afterwards, immerse them in clean water for 12 hours.
Airframe
Max Diagonal Wheelbase
1895 mm
Stator Size
100×15 mm
Max Thrust
13.5 kg/rotor
Max Power
2400 W/rotor
Weight
616 g
ESC
Max Working Current (Continuous)
40 A
Working Voltage
51.8 - 58.8 V (14S LiPo)
Foldable Propellers (R3390)
Diameter × Pitch
33×9 in
Weight (Single propeller)
90 g
Spraying System
Spray Tank
Volume
Rated: 15 L, Full: 16 L
Operating Payload
Rated: 15 kg, Full: 16 kg
Nozzle
Model
XR11001VS (Standard), XR110015VS (Optional, purchase
separately)
Quantity
8
C. Use a water-filled spray washer to clean the aircraft body and wipe it with a soft brush or wet cloth before cleaning
water stains with a dry cloth. DO NOT splash the aircraft body with an excessive volume of water.
Refer to the Disclaimer and Safety Guidelines for more information on product maintenance.
Specifications
2509×2213×732 mm (Arms and propellers unfolded)
Dimensions
Propulsion System
Motor
KV 75 rpm/V
1795×1510×732 mm (Arms unfolded and propellers folded)
1100×570×732 mm (Arms and propellers folded)
Max Spray Rate XR11001VS: 3.6 L/min, XR110015VS: 4.8 L/min
Page 15

Spray Width 4-6.5 m (8 nozzles, at a height of 1.5-3 m above crops)
Droplet Size
XR11001VS: 130-250 m, XR110015VS: 170-265 m (Subject to
operating environment and spray rate)
Flow Meter
Measurement Range
0.45-5 L/min
Error
< ±2%
Measurable Liquid
Conductivity > 50 S/cm
(Liquids such as water or pesticides that contains water)
DBF Imaging Radar
Model
RD2418R
Operating Frequency
SRRC (China)/ CE (Europe)/ FCC (United States): 24.00 GHz-24.25
GHz
MIC (Japan) / KCC (Korea): 24.05 GHz-24.25 GHz
Obstacle Avoidance System*
Obstacle sensing range: 1.5-30 m
FOV: Horizontal: ±50°, Vertical: 0-10°
Working conditions: Flying higher than 1.5 m over the obstacle at
a speed lower than 7 m/s
Safety distance: 2.5 m (Distance between the front of propellers
and the obstacle after braking)
Obstacle avoidance direction: Forward and backward obstacle
avoidance depending on direction of flight.
IP Rating
IP67
*The effective radar range varies depending on the material, position, shape, and other properties of the
obstacle.
FPV Camera
FOV
Horizontal: 98°, Vertical: 78°
Resolution
1280×960 30 fps
FPV Spotlight
FOV: 110°, Max brightness: 12 lux at 5 m of direct light
Power Consumption 15 W
Altitude Detection & Terrain
Follow*
Altitude detection range: 1-30 m
Stabilization working range: 1.5-15 m
Max slope in Mountain mode: 35°
Page 16

Flight Parameters
Operating Frequency
2.4000 GHz-2.4835 GHz
5.725 GHz-5.850 GHz (Not available in Japan, Korea, and Europe)
Total Weight (Excluding battery)
18.5 kg
Standard Takeoff Weight
39.5 kg
Max Takeoff Weight
40.5 kg (At sea level)
Max Thrust-Weight Ratio
2.05 (Takeoff weight of 39.5 kg)
Battery
DJI-approved battery pack (AB2-17500mAh-51.8V)
Max Power Consumption
5600 W
Hovering Time*
18 min (Takeoff weight of 24.5 kg with a 17500 mAh battery)
10 min (Takeoff weight of 39.5 kg with a 17500 mAh battery)
Max Operating Speed
7 m/s
Max Flying Speed
10 m/s (With strong GNSS signal)
Max Wind Resistance
8 m/s
Max Service Ceiling Above Sea
Level
2000 m
Recommended Operating
Temperature
0° to 40°C (32° to 104°F)
*Hovering time acquired at sea level with wind speeds lower than 3 m/s.
Remote Controller
Model
GL300N
Hovering Accuracy (With strong
GNSS signal)
D-RTK enabled: Horizontal: ±10 cm, Vertical: ±10 cm
D-RTK disabled: Horizontal: ±0.6 m, Vertical: ±0.3 m (Radar
module enabled: ±0.1 m)
RTK/ GNSS Operating Frequency RTK: GPS L1/L2, GLONASS F1/F2, BeiDou B1/B2, Galileo E1/E5
GNSS: GPS L1, GLONASS F1, Galileo E1
Hovering Power Consumption 4600 W (Takeoff weight of 39.5 kg)
Max Tilt Angle 15°
Operating Frequency 2.4000 GHz - 2.4835 GHz
Page 17

5.725 GHz- 5.850 GHz (Not available in Japan, Korea, and Europe)
Effective Transmission Distance
(Unobstructed, free of interference)
SRRC/ MIC/ KCC/ CE: 3 km, NCC/ FCC: 5 km
Display
5.5-inch screen, 1920×1080, 1000 cd/m2, Android system, 4G RAM
+
16G ROM storage
Power Consumption
16 W (Typical value)
Operating Temperature
-10° to 40°C (14° to 104°F)
Charging Temperature
5° to 40°C (40° to 104°F)
Model
WB37-4920mAh-7.6V
Voltage
7.6 V
Charging Temperature
5° to 40°C (40° to 104°F)
Model
WCH2
Input Voltage
17.3-26.2 V
Output Voltage and Current
8.7 V, 6 A
Operating Temperature
5° to 40°C (40° to 104°F)
Remote Controller Power Adapter
Model
A14-057N1A
Input Voltage
100-240 V, 50/60 Hz
Output Voltage
17.4 V
Rated Power
57 W
Storage Temperature Less than 3 months: -20° to 45°C (68° to 113°F)
More than 3 months: 22° to 28°C (70° to 82°F)
Remote Controller Intelligent Battery
Battery Type 2S LiPo
Capacity 4920 mAh
Energy 37.39 Wh
Remote Controller Charging Hub
Page 18

FCC/ISEDC Compliance Notice
This device complies with Part 15 of the FCC Rules and ISEDC licence-exempt RSS standard..
Operation is subject to the following two conditions:
(1)This device may not cause harmful interference, and
(2) This device must accept any interference received,including interference that may cause undesired
operation.
Any changes or modifications not expressly appr oved by the party responsible for compliance could
void the user’s authority to operate the equipment.
Cet appareil est conforme à la section 15 du règlement de la FCC et à la norme RSS sans licence
ISEDC. Son utilisation est soumise aux deux conditions suivantes:
(1) Cet appareil ne doit pas causer d’interférences nuisibles, et
(2) Cet appareil doit accepter toutes les interférences reçues, y compris celles susceptibles de provoquer
un fonctionnement indésirable.
Tout changement ou modification non expressément approuvé par la partie responsable de la
conformité peut annuler le droit de l'utilisateur à utiliser l'équipement.
This equipment has been tested and found to comply with the limits for a Class A digital device,
pursuant to part 15 of the FCC Rules. These limits are designed to provide reasonable protection
against harmful interference when the equipment is operated in a commercial environment. This
equipment generates, uses and can radiate radio frequency energy and, if not installed and used in
accordance with the instruction manual, may cause harmful interference to radio communications.
Operation of this equipment in a residential area is likely to cause harmful interference in which case
the user will be required to correct the interference at his own expense.
RF Exposure Information
Aircraft complies with FCC/ISEDC radiation exposure limits set forth for an uncontrolled environment.
In order to avoid the possibility of exceeding the FCC/ISEDC radio frequen cy exposure limits, human
proximity to the antenna shall not be less than 20cm during normal operation.
For Remote Controller (model:GL300N),SAR tests are conducted using standard operatin g positions
accepted by the FCC/ISEDC with the device transmitting at its highest certified power level in all
tested frequency bands, although the SAR is determined at the highest certified power level, the actual
SAR level of the device while operating can be well below the maximum value. Before a new model is
a available for sale to the public, it must be tested and certified to the FCC/ISEDC that it does not
exceed the exposure limit established by the FCC/ISEDC, Tests for each product are performed in
positions and locations as required by the FCC/ISEDC. For Handheld operation, this device has been
tested and meets the FCC/ISEDC RF exposure guidelines when used with an accessory designated for
this product or when used with an acces sory that contains no metal.
For body worn operation, Remote Controller (model:GL300N) has been tested and meets the
FCC/ISEDC RF exposure guidelines when used with an accessory designated for this product or when
used with an accessory that Contains no metal and that positions the handset a minimum of 0 cm from
the body.
Non-compliance with the above restrictions may result in violation of RF exposure guidelines.
Page 19

Informations sur l'exposition RF
L’aéronef est conforme aux limites d’exposition aux rayonnements FCC/ISEDC établies pour un
environnement non contrôlé. Afin d'éviter tout risque de dépassement des limites d'exposition aux
radiofréquences FCC/ISEDC, la proximité humaine de l'antenne ne doit pas être inférieure à 20 cm en
fonctionnement normal.
Pour le contrôleur à distance (modèle GL300N), les tests SAR sont effectués sur des positions de
fonctionnement standard acceptées par la FCC/ISEDC, le dispositif émettant à son niveau de puissance
certifié le plus élevé dans toutes les bandes de fréquences testées, bien que le SAR soit déterminé au
niveau de puissance certifié le plus élevé, le niveau de SAR réel de l'appareil en cours d'utilisation peut
être bien inférieur à la valeur maximale. Avant qu'un nouveau modèle ne soit disponible à la vente au
public, il doit être testé et certifié conforme par la FCC/ISEDC qu'il n'excède pas la limite d'exposition
établie par la FCC/ISEDC. Les tests de chaque produit sont effectués à requis par la FCC/ISEDC. En
mode portatif, cet appareil a été testé et respecte les directives d'exposition RF de la FCC/ISEDC
lorsqu'il est utilisé avec un accessoire conçu pour ce produit ou avec un accessoire ne contenant pas de
métal.
Pour le fonctionnement sur le corps, la télécommande (modèle GL300N) a été testée et répond aux
directives d'exposition RF de FCC/ISEDC lorsqu'elle est utilisée avec un accessoire conçu pour ce
produit ou avec un accessoire ne contenant pas de métal et positionnant le combiné au minimum de 0
cm du corps.
Le non-respect des restrictions ci-dessus peut entraîner une violation des consignes d'exposition aux
RF.
EU Compliance Statement: SZ DJI TECHNOLOGY CO., LTD. hereby declares that this device
is in compliance with the essential requirements and other relevant provisions of the RED Directive.
This equipment must be installed and operated in accordance with provide instructions and th e antenna
used for this transmitter must be installed to provide a separation distance of at least 20cm from all
persons and must not be co-located or operation in conjunction with any other antenna or
transmitter.End-users and installers must be provide with antenna installation instructions and
transmitter operating conditions for satisfying RF exposure compliance.
A copy of the EU Declaration of Conformity is available online at www.dji.com/euro-compliance
Warning: Operation of this equipment in a residential environment could cause radio interference.
Page 20

KCC Wa rning Message
해당무선설비는운용중전파혼신가능성이있
해당무선설비는전파혼신가능성이있으므로인명안전과관련된서비스는할수없음
NCC W arning Message
低功率電波輻射性電機管理辦法
第十二條 經型式認證合格之低功率射頻電機,非經許可,公司、商號或使用者均不得擅自變更
頻率、加大功率或變更原設計之特性及功能。
第十四條 低功率射頻電機之使用不得影響飛航安全及干擾合法通信;經發現有干擾現象時,應
改善至無干擾時方得繼續使用。前項合法通信,指依電信法規定作業之無線電通信。低功率射頻
電機須忍受合法通信或工業、科學及醫療用電波輻射性電機設備之干擾。
應避免影響附近雷達系統之操作。
高增益指向性天線只得應用於固定式點對點系統。
 Loading...