

Page 1
MANIFOLD 2 SERIES
User Guide
V1.0 2018.12
1
Page 2

Disclaimer
Congratulations on purchasing your new DJITM product. The information in
this document affects your safety and your legal rights and responsibilities.
Read this entire document carefully to ensure proper configuration before
use. Failure to read and follow instructions and warnings in this document
may result in serious injury to yourself or others, damage to your DJI product,
or damage to other objects in the vicinity. This document and all other
collateral documents are subject to change at the sole discretion of DJI.
By using this product, you hereby signify that you have read this disclaimer
and warning carefully and that you understand and agree to abide by the
terms and conditions herein. You agree that you are solely responsible for
your own conduct while using this product, and for any consequences
thereof. You agree to use this product only for purposes that are proper and
in accordance with all applicable laws, rules, and regulations, and all terms,
precautions, practices, policies and guidelines DJI has made and may make
available.
DJI accepts no liability for damage, injury or any legal responsibility incurred
directly or indirectly from the use of this product. The user shall observe safe
and lawful practices including, but not limited to, those set forth in this
document.
Notwithstanding above, your statutory rights under applicable national
legislation are not affected by this disclaimer.
DJI is a trademark of SZ DJI TECHNOLOGY CO., LTD. (abbreviated as “DJI”) and
its affiliated companies. Names of products, brands, etc., appearing in this
document are trademarks or registered trademarks of their respective owner
companies. This product and document are copyrighted by DJI with all rights
reserved. No part of this product or document shall be reproduced in any
form without prior written consent of or authorization from DJI.
2
Page 3

Warning
1. Make sure to use DJI designated cables and connect external devices to
the ports in strict accordance with specifications of these ports.
2. DO NOT disassemble the Manifold 2 and its accessories.
3. Ensure that the Manifold 2 and its components are free from
contamination such as water, oil, soil, and sand.
4. Mount the Manifold 2 to an appropriate position for heat dissipation.
5. DO NOT touch or let your hands or body come in contact with any
components as they may be hot during operation.
6. Avoid vibrations and impacts when using the Manifold 2 or during storage
or transportation.
7. The USB 3.0 devices connected to the Manifold 2 may cause interference
to the GNSS or Wi-Fi signals. Take electromagnetic shielding measures to
reduce the interference if necessary.
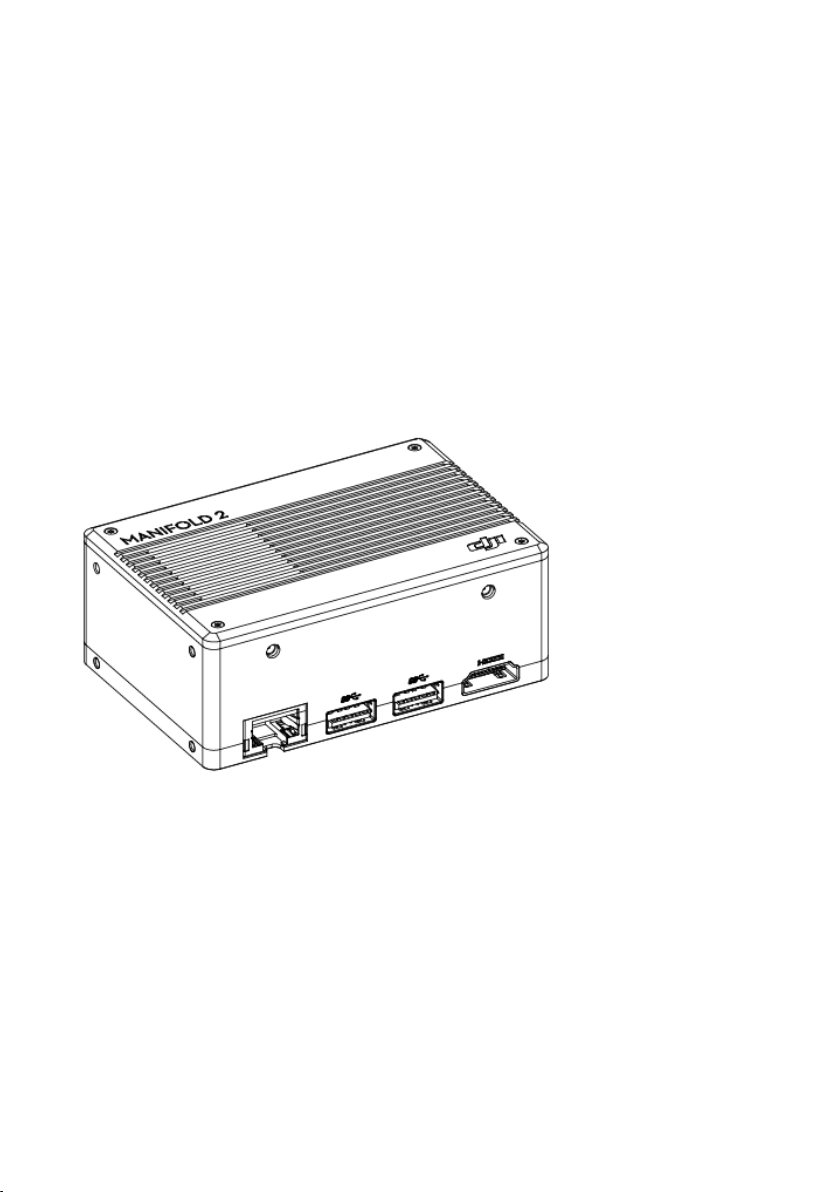
Introduction
The Manifold 2 is DJI's second-generation microcomputer for Onboard SDK
developers. There are two versions: Manifold 2-G (128G), Manifold 2-C
(256G). The Manifold 2-G is equipped with an NVIDIA Jetson TX2 module for
faster complex graphics processing and Wi-Fi for network connectivity. The
Manifold 2-C has an Intel Core i7-8550U processor with excellent processing
power and responsiveness. With a variety of ports to connect different
external devices, the Manifold 2 is compatible with many of DJI flight
platforms, flight control systems and other devices*, with greater flexibility
and extensibility, to provide a rich and convenient development ways for
developers.
3
Page 4
* Support for DJI devices will be added as testing and development
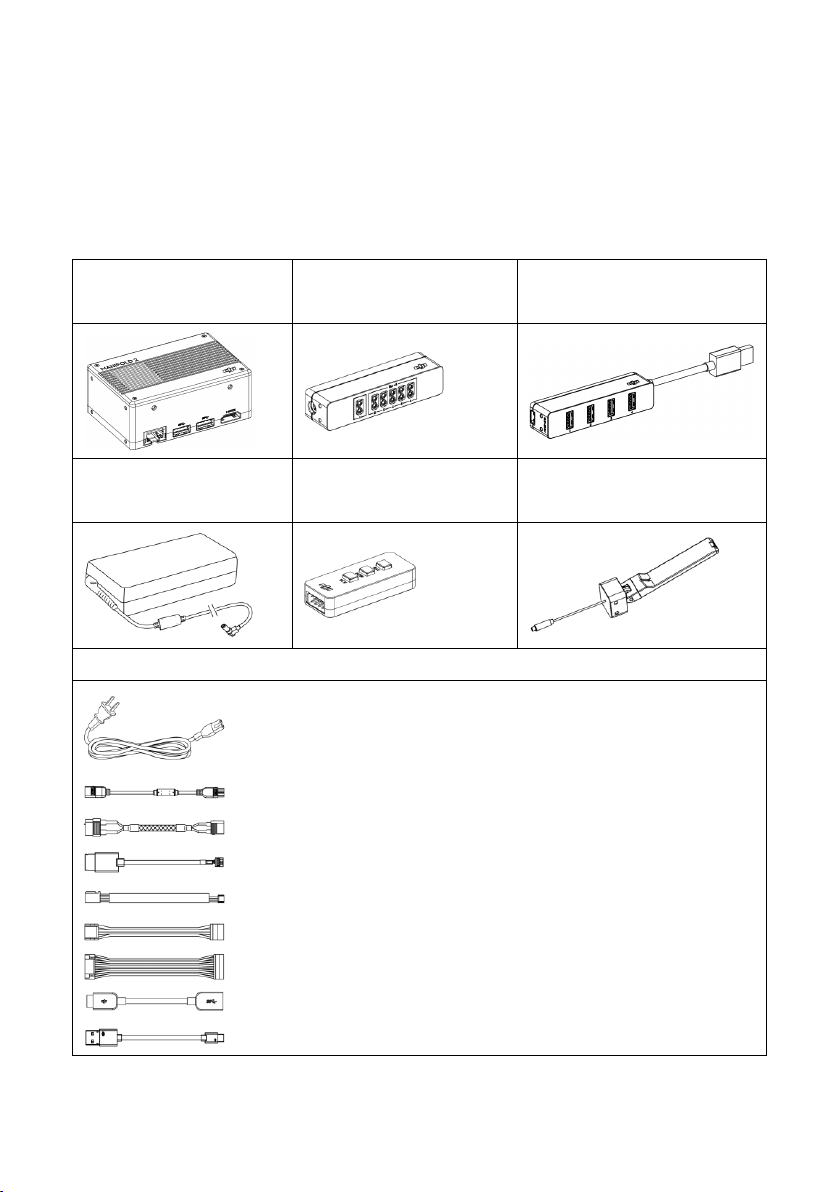
Manifold 2 1
Power Distribution
Unit 1
USB 3.0 Hub 1
AC Power Adapter 1
Button I/O Extension
Unit 1
Wi-Fi Antenna 2
Cables
AC Power Cable 1
XT30 Power Cable 3
XT60 to XT30 Power Cable 1
UART Cable for A3/N3 Flight Controller 1
UART Cable for M210 Series 2
CAN/UART Cable 2
I/O Cable 1
OTG Cable 1
Micro USB Cable 1
continues. Visit the Manifold 2 product page on dji.com for a complete list.
http://www.dji.com/ground-station-pro http://www.dji.com/manifold2
In the Box
4
Page 5

Overview
Manifold 2
The illustrators below take the Manifold 2-G as an example. Unless otherwise
specified, the descriptions apply to Manifold 2 series.
1. Ethernet Port (RJ-45)
Connect a network cable to the port to have access to the Internet.
2. USB 3.0 Ports
Connects to an external device supporting USB3.0.
3. HDMI Output Port
Connects to a display device.
4. Antenna Ports (for the Manifold 2-G only)
Mount the Wi-Fi antennas to the ports to have access to the Internet via WiFi. Make sure that the two antennas are vertical to each other or towards to
the signal source. DO NOT block the antennas with metal objects.
5. Power Ports
5
Page 6

Connects to an external power source to supply power for the Manifold 2.
1 2 3
4
GND
RXD
TXD
N/A
The ports are standard XT30 ports with an input voltage of 13.2 - 27 V and
independent from each other. When connecting power source to both ports,
the Manifold 2 will automatically choose the power source with a higher
voltage.
6. Power Indicator
The indicator is on when powered on, and off when powered off.
7. OTG Port
The OTG port on the Manifold 2-G allows it to be used as both a host and a
device. When used as a host, connect the OTG cable to the Manifold 2-G and
then connect a USB device to the other end of the OTG cable. When used as
a device, connect the Manifold 2-G to a host using a Micro USB cable for
system image backup and recovery.
The OTG port on the Manifold 2-C is same as a USB 3.0 port to allow the
Manifold 2-C to be used as a host. Connect the OTG cable to the Manifold 2-C
and then connect a USB device to the other end of the OTG cable.
8. UART Ports
The operating level is 3.3 V TTL. For the Manifold 2-C, there is only one UART
port available, and the other port is marked with N/A indicating not available.
These ports cannot supply power.
Pins description:
6
Page 7
The UART0 port is for the debug terminal with a baud rate of
115200. DO NOT connect it to the DJI SDK API Port or any other
non-stream input port.
Access UART0 from ttyS0 in the kernel of the operating system,
while access UART1 (for the Manifold 2-G only) from ttTHS2 in the
kernel of the operating system.
The UART ports of the Manifold 2-G support a baud rate up to 3M.
The baud rate of 921600 is a rated value. The actual baud rate is
910000. As a result, the UART ports may be unavailable to
communicate with other devices such as OSDK devices that have a
baud rate with bias when using a baud rate of 921600.
The UART port of the Manifold 2-C supports a baud rate up to
115200.
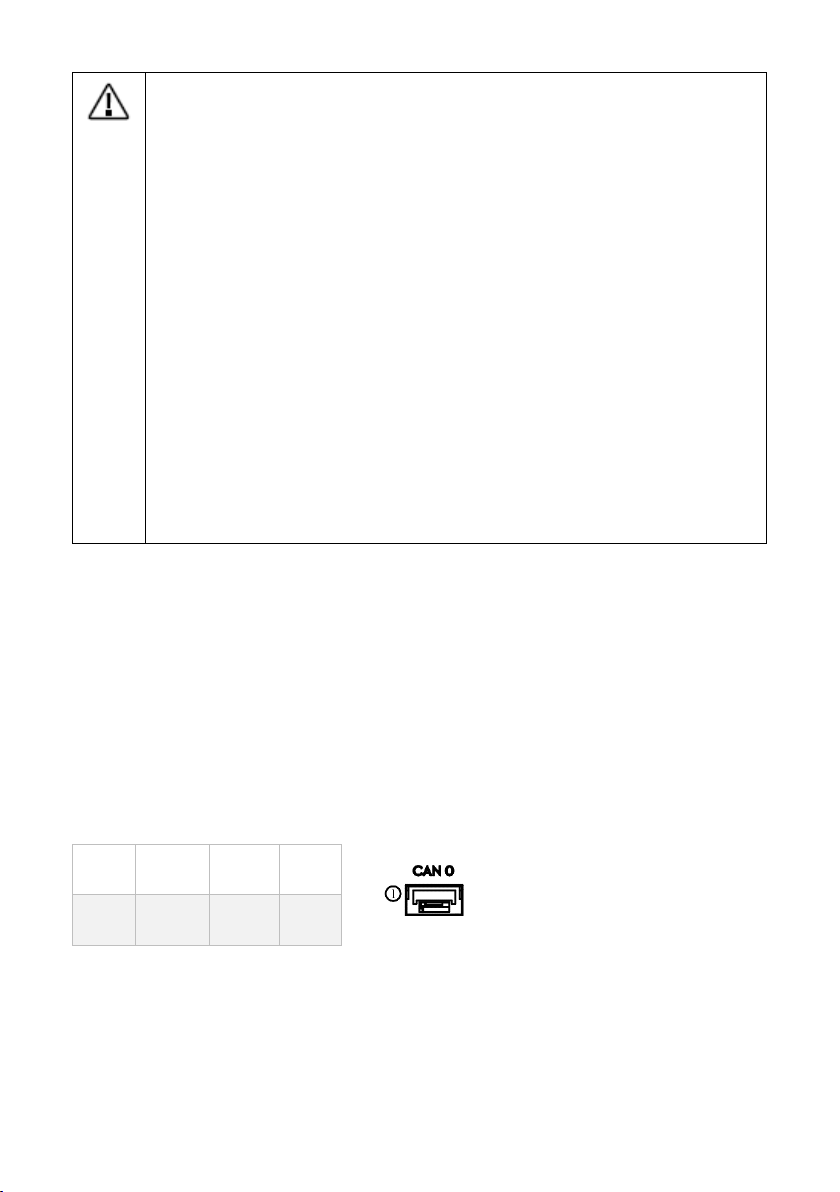
1 2 3
4
GND
CANH
CANL
N/A
9. CAN Ports (for the Manifold 2-G only)
Only the Manifold 2-G has CAN ports. The ports on the Manifold 2-C are
marked with N/A indicating not available. The operating level of the CAN
ports are 3.3 V TTL. The max transmission speed is 2 M. These ports cannot
supply power.
Pins description:
10. I/O Port
7
Page 8

Connects to the Button I/O Extension Unit using the I/O cable to control
1 2 3 4 5
RST
PWR
RCV
SPI:MOSI
SPI:MISO
6 7 8 9 10
SPI:CS
SPI:CLK
GND
I2C:SCL
I2C:SDA
some specific functions of the Manifold 2. DO NOT hot swap the devices
connected to the I/O port to avoid damage to the devices.
Pins description:
Pins 1, 2, and 3 are mapped to the RST, PWR, and RCV buttons on the Button
I/O Extension Unit respectively.
Power Distribution Unit
Connect the Power Distribution Unit to a power source to power the
connected Manifold 2 and other external devices for debugging. Make sure
to connect corresponding devices in strict accordance to the specifications of
the ports.
1. Low Power Output Port (XT30)
The max continuous current is 15 A and the max peak current is 30A. The
power input of this port is from Port 7 (Power Adapter Input Port).
8
Page 9

2-6. High Power Output Port (XT30)
Connect Port 1 and one of Port 2 - 6 to the two power ports on the
Manifold 2 simultaneously to supply power to the Manifold 2
independently.
It is recommended to use the Power Distribution Unit for power
management since the optimal electromagnetic compatibility can
reduce interference to the GPS or Wi-Fi signal from the power
supply.
Connect devices of high power to Port 2 - 6 in sequence according to
their power, from low to high, to avoid potential heat.
The max continuous current is 15 A and the max peak current is 30A. The five
ports are parallel with power input from Port 8 (High Power Input Port).
7. Power Adapter Input Port
Connect the power adapter to the port, connect the power adapter to the AC
power source (100 - 240 V, 50/60 Hz), and then Port 1 can supply power to
the Manifold 2 continuously. Many of DJI’s power adapters are available for
this port. Refer to the Specifications for details.
The following situation is an example to use this port. Connect this port to a
power source, and connect Port 1 to the power port of the Manifold 2. The
Manifold 2 will keep powering on even when replacing the input battery
connected to Port 8 on the Power Distribution Unit.
8. High Power Input Port (XT60)
Connects to a 4S - 6S LiPo battery to supply power to the Manifold 2 and
other devices through Port 2 - 6 on this unit. The max continuous current is
30 A and the max peak current is 60A.
9
Page 10

USB 3.0 Hub
1 2 3 4 5 6 7
8
N/A
SPI:CLK
GND
SPI:CS
I2C:SDA
SPI:MISO
I2C:SCL
SPI:MOSI
The USB 3.0 Hub includes four USB 3.0 ports and one XT30 port. Connect a 4S
- 6S LiPo battery to supply output current of up to 1 A for each USB port.
Button I/O Extension Unit
Connect the Button I/O Extension Unit to the I/O port on the Manifold 2 to
control some specific functions of the Manifold 2.
1. Extension Port
Pins description:
2. RCV Button
10
Page 11

This recovery button is only available for the Manifold 2-G. When using with
the RST button, the Manifold 2-G can enter Recovery Mode. Refer to System
Image for details.
3. PWR Button
Power button. Press once to power on/off the Manifold 2. Press and hold for
10 seconds to force the Manifold 2 to power off.
4. RST Button
Reset button. Press once to reset the Manifold 2.
5. I/O Port
Connects to the I/O port on the Manifold 2 using the I/O cable.
System Configuration
Perform basic setup in the terminal interface.
Basic Configuration
The Manifold 2 comes with pre-installed Ubuntu 16.04 operating system.
Users can log in with the information below when connecting a monitor with
a HDMI port, mouse and keyboard after powered on.
User name: dji Password: dji
Network Configuration
Access the Internet using a network cable or Wi-Fi (for the Manifold 2-G
only). The Manifold 2 will be assigned with an IP address automatically, if
DHCP service is available on the connected network. Otherwise, run the
following commands to obtain an IP address:
11
Page 12

Wired Network
Manifold 2-G
Manifold 2-C
JetPack 3.2
√
X
Ubuntu 16.04
√ √
CUDA 9
√
X
OpenCV 3.0
√ √
ROS
√ √
CMake
√ √
Git
√ √
htop
√ √
Terminator
√ √
Eigen3.3
√ √
Ceres
√ √
GCC 7.2
√ √
$ sudo ifconfig eth0 xxx.xxx.xxx.xxx
$ ifconfig
Wireless Network
$ sudo ifconfig wlan0 xxx.xxx.xxx.xxx
$ ifconfig
xxx.xxx.xxx.xxx is the IP address that you wish to use. The commands above
can also be used to check if the configuration is correct.
Software Installation
The Manifold 2-G and Manifold 2-C come with the following pre-installed
software. Users can install other software according to different applications.
12
Page 13

Installation and Connection
The size of the screw holes on the Manifold 2 is M2.5 with a thread
depth of 5 mm. The size of the screw holes on the accessories is
M2.5 with a thread depth of 3.5 mm. DO NOT use screws that are
too long to avoid damage to the inner components.
1. It is recommended to use the Power Distribution Unit, USB 3.0 Hub
included and an optional Manifold 2 Mini Network Switch with the Manifold
2, and assemble them as shown using the Assembly Bar Set.
2. When using with DJI flight platforms, mount the Manifold 2 and other
external devices to the flight platform using a compatible mounting bracket.
3. Connection:
When using with the A3 or N3 flight controller or the M600 series flight
platforms, connect the API port on the flight controller to the UART port on
the Manifold 2. Make sure to use the UART Cable for A3/N3 Flight Controller
included.
13
Page 14

Name
Manifold 2-G
Manifold 2-C
Model
MF2G
MF2C
Weight
220 g
220 g
Dimensions
916135 mm
Processing
Unit
NVIDIA TX2
Intel Core i7 8550U
RAM
8GB 128 bit,DDR4 1333 MHz
8GB 64 bit,DDR4 2400 MHz
eMMC
32 GB (approx. 28 GB available)
N/A
SATA-SSD
128 GB
256 GB
Network
Gigabit Ethernet RJ-45 Port
Wi-Fi
Transmission Standard:
Gigabit Ethernet RJ-45 Port
When using the M210/M210 RTK flight platforms, connect the OSDK port on
the left of the expansion ports on the aircraft to the UART port on the
Manifold 2. Make sure to use the UART Cable for M210 Series included.
Specifications
Manifold 2
14
Page 15

IEEE 802.11a/b/g/n/ac
Max Transmission Speed:
866.7 Mbps
Operating Frequency:
2.4000 - 2.4835 GHz; 5.150 - 5.250
GHz; 5.250 - 5.350 GHz
EIRP:
< 20dBm (5.150 - 5.250 GHz)
< 23 dBm (5.250 - 5.350 GHz)
USB
USB 3.0 Port 2, USB 3.0 OTG
Port 1
USB 3.0 Port 2, USB 3.0 OTG
Port 1
I/O
CAN Port 2, UART Port 2,
I2C Port 1, SPI Port 1
UART Port 1
Power
3 - 25 W
5 - 60 W
Operating
Temperature
-13 to 113 F (-25 to 45 C)
Input Power
13.2 - 27.0 V Power Port 2, independent power supply
Model
A14-057N1A
Voltage
17.4 V
Rated Power
57 W
AC Power Adapter
15
Page 16

FCC Compliance Notice
This device complies with Part 15 of the FCC Rules. Operation is subject to
the following two conditions: (1) This device may not cause harmful
interference, and (2) This device must accept any interference received,
including interference that may cause undesired operation.
Any changes or modifications not expressly approved by the party
responsible for compliance could void the user’s authority to operate the
equipment.
This equipment has been tested and found to comply with the limits for a
Class B digital device, pursuant to part 15 of the FCC Rules. These limits are
designed to provide reasonable protection against harmful interference in a
residential installation. This equipment generates, uses and can radiate radio
frequency energy and, if not installed and used in accordance with the
instructions, may cause harmful interference to radio communications.
However, there is no guarantee that interference will not occur in a particular
installation. If this equipment does cause harmful interference to radio or
television reception, which can be determined by turning the equipment off
and on, the user is encouraged to try to correct the interference by one or
more of the following measures:
—Reorient or relocate the receiving antenna.
—Increase the separation between the equipment and receiver.
—Connect the equipment into an outlet on a circuit different from that to
which the receiver is connected.
—Consult the dealer or an experienced radio/TV technician for help.
RF Exposure Information
This equipment complies with FCC radiation exposure limits set forth for an
uncontrolled environment. In order to avoid the possibility of exceeding the
FCC radio frequency exposure limits, human proximity to the antenna shall
not be less than 20cm during normal operation.
16
Page 17

ISED Warning
This device contains licence-exempt transmitter(s)/receiver(s) that comply
with Innovation, Science and Economic Development Canada’s licenceexempt RSS(s). Operation is subject to the following two conditions: (1)This
device may not cause interference.(2)This device must accept any
interference, including interference that may cause undesired operation of
the device.
L’émetteur/récepteur exempt de licence contenu dans le présent appareil est
conforme aux CNR d’Innovation, Sciences et Développement économique
Canada applicables aux appareils radio exempts de licence. L’exploitation est
autorisée aux deux conditions suivantes :(1)L’appareil ne doit pas produire de
brouillage; (2)L’appareil doit accepter tout brouillage radioélectrique subi,
même si le brouillage est susceptible d’en compromettre le fonctionnement.
This equipment complies with ISED radiation exposure limits set forth for an
uncontrolled environment. End user must follow the specific operating
instructions for satisfying RF exposure compliance. This transmitter must not
be co-located or operating in conjunction with any other antenna or
transmitter.The device is designed to meet the requirements for exposure
to radio waves established by the ISED.
Cet équipement est conforme aux limites d’exposition aux rayonnements
ISED établies pour un environnement non contrôlé. L’utilisateur final doit
suivre les instructions spécifiques pour satisfaire les normes. Cet émetteur ne
doit pas être co-implanté ou fonctionner en conjonction avec toute autre
antenne ou transmetteur. Le dispositif portatif est conçu pour répondre aux
exigences d’exposition aux ondes radio établie par le développement
énergétique DURABLE.
This equipment complies with RSS‐102 radiation exposure limits set forth
for an uncontrolled environment. This equipment should be installed and
operated with minimum distance 20cm between the radiator and your body.
This transmitter must not be co-located or operating in conjunction with any
other antenna or transmitter.
17
Page 18

Cet équipement est conforme aux limites d'exposition aux radiations CNR‐
102 établies pour un environnement non contrôlé. Cet équipement doit ê
tre installé et utilisé avec une distance minimale de 20 cm entre le radiateur
et votre corps.
KCC Warning Message
“해당무선설비는 운용 중 전파혼신 가능성이 있으므로 인명안전과
관련된 서비스는 할 수 없습니다.”
“해당 무선설비는 운용 중 전파혼신 가능성이 있음”
NCC Warning Message
低功率電波輻射性電機管理辦法
第十二條 經型式認證合格之低功率射頻電機,非經許可,公司、商號或
使用者均不得擅自變更頻率、加大功率或變更原設計之特性及功能。
第十四條 低功率射頻電機之使用不得影響飛航安全及干擾合法通信;經
發現有干擾現象時,應改善至無干擾時方得繼續使用。前項合法通信,
指依電信法規定作業之無線電通信。低功率射頻電機須忍受合法通信或
工業、科學及醫療用電波輻射性電機設備之干擾。
EU Compliance Statement: SZ DJI TECHNOLOGY CO., LTD. hereby declares
that this device is in compliance with the essential requirements and other
relevant provisions of the Directive 2014/53/EU.
A copy of the EU Declaration of Conformity is available online at
www.dji.com/euro-compliance
EU contact address: DJI GmbH, Industriestrasse 12, 97618, Niederlauer,
Germany
Declaración de cumplimiento UE: SZ DJI TECHNOLOGY CO., LTD. por la
presente declara que este dispositivo cumple los requisitos básicos y el resto
de provisiones relevantes de la Directiva 2014/53/EU.
Hay disponible online una copia de la Declaración de conformidad UE en
www.dji.com/euro-compliance
18
Page 19

Dirección de contacto de la UE: DJI GmbH, Industriestrasse
12, 97618, Niederlauer, Germany
EU-verklaring van overeenstemming: SZ DJI TECHNOLOGY CO., LTD. verklaart
hierbij dat dit apparaat voldoet aan de essentiële vereisten en andere
relevante bepalingen van Richtlijn 2014/53/EU.
De EU-verklaring van overeenstemming is online beschikbaar op
www.dji.com/euro-compliance
Contactadres EU: DJI GmbH, Industriestrasse
12, 97618, Niederlauer, Germany
Declaração de conformidade da UE: A SZ DJI TECHNOLOGY CO., LTD. declara,
através deste documento, que este dispositivo está em conformidade com os
requisitos essenciais e outras disposições relevantes da Diretiva 2014/53/EU.
Existe uma cópia da Declaração de conformidade da UE disponível online em
www.dji.com/euro-compliance
Endereço de contacto na UE: DJI GmbH, Industriestrasse
12, 97618, Niederlauer, Germany
Dichiarazione di conformità UE: SZ DJI TECHNOLOGY CO., LTD. dichiara che il
presente dispositivo è conforme ai requisiti essenziali e alle altre disposizioni
rilevanti della direttiva 2014/53/EU.
Una copia della dichiarazione di conformità UE è disponibile online
all'indirizzo Web www.dji.com/euro-compliance
Indirizzo di contatto UE: DJI GmbH, Industriestrasse
12, 97618, Niederlauer, Germany
19
Page 20

Déclaration de conformité UE : Par la présente, SZ DJI TECHNOLOGY CO., LTD
déclare que cet appareil est conforme aux principales exigences et autres
clauses pertinentes de la directive européenne 2014/53/EU.
Une copie de la déclaration de conformité UE est disponible sur le site
www.dji.com/euro-compliance
Adresse de contact pour l'UE : DJI GmbH, Industriestrasse
12, 97618, Niederlauer, Germany
EU-Compliance: Hiermit erklärt SZ DJI TECHNOLOGY CO., LTD., dass dieses
Gerät den wesentlichen Anforderungen und anderen einschlägigen
Bestimmungen der EU-Richtlinie 2014/53/EU entspricht.
Eine Kopie der EU-Konformitätserklärung finden Sie online auf
www.dji.com/euro-compliance.
Kontaktadresse innerhalb der EU: DJI GmbH, Industriestrasse
12, 97618, Niederlauer, Germany
CAUTION: RISK OF EXPLOSION IF BATTERY IS REPLACED BY AN INCORRECT
TYPE. DISPOSE OF USED BATTERIES ACCORDING TO THE INSTRUCTIONS
Environmentally friendly disposal
Old electrical appliances must not be disposed of together with
the residual waste, but have to be disposed of separately. The
disposal at the communal collecting point via private persons is
for free. The owner of old appliances is responsible to bring the
appliances to these collecting points or to similar collection
points. With this little personal effort, you contribute to recycle valuable raw
materials and the treatment of toxic substances.
20
Page 21

Umweltfreundliche Entsorgung
Elektro-Altgeräte dürfen nicht mit gewöhnlichem Abfall entsorgt
werden und müssen separat entsorgt werden. Die Entsorgung
an kommunalen Sammelstellen ist für Privatpersonen kostenlos.
Die Eigentümer der Altgeräte sind für den Transport zu den
Sammelstellen verantwortlich. Durch diesen geringen Aufwand
können Sie zur Wiederverwertung von wertvollen Rohmaterialien beitragen
und dafür sorgen, dass umweltschädliche und giftige Substanzen
ordnungsgemäß unschädlich gemacht werden.
Tratamiento de residuos responsable con el medio ambiente
Los aparatos eléctricos viejos no pueden desecharse junto con
los residuos orgánicos, sino que deben ser desechados por
separado. Existen puntos limpios donde los ciudadanos pueden
dejar estos aparatos gratis. El propietario de los aparatos viejos
es responsable de llevarlos a estos puntos limpios o similares
puntos de recogida. Con este pequeño esfuerzo estás contribuyendo a
reciclar valiosas materias primas y al tratamiento de residuos tóxicos.
Mise au rebut écologique
Les appareils électriques usagés ne doivent pas être éliminés
avec les déchets résiduels. Ils doivent être éliminés séparément.
La mise au rebut au point de collecte municipal par
l'intermédiaire de particuliers est gratuite. Il incombe au
propriétaire des appareils usagés de les apporter à ces points de
collecte ou à des points de collecte similaires. Avec ce petit effort personnel,
vous contribuez au recyclage de matières premières précieuses et au
traitement des substances toxiques.
Smaltimento ecologico
21
Page 22

I vecchi dispositivi elettrici non devono essere smaltiti insieme ai
rifiuti residui, ma devono essere smaltiti separatamente. Lo
smaltimento da parte di soggetti privati presso i punti di raccolta
pubblici è gratis. È responsabilità del proprietario dei vecchi
dispositivi portarli presso tali punti di raccolta o punti di raccolta
analoghi. Grazie a questo piccolo impegno personale contribuirete al riciclo di
materie prime preziose e al corretto trattamento di sostanze tossiche.
Milieuvriendelijk afvoeren
Oude elektrische apparaten mogen niet worden weggegooid
samen met het restafval, maar moeten afzonderlijk worden
afgevoerd. Afvoeren via het gemeentelijke inzamelpunt is gratis
voor particulieren. De eigenaar van oude toestellen is
verantwoordelijk voor het inleveren van de apparaten op deze
of vergelijkbare inzamelpunten. Met deze kleine persoonlijke inspanning
lever je een bijdrage aan de recycling van waardevolle grondstoffen en de
verwerking van giftige stoffen.
Eliminação ecológica
Os aparelhos elétricos antigos não podem ser eliminados
juntamente com os materiais residuais. Têm de ser eliminados
separadamente. A eliminação no ponto de recolha público
através de entidades particulares é gratuita. É da
responsabilidade do proprietário de aparelhos antigos levá-los a
estes pontos de recolha ou a pontos de recolha semelhantes. Com este
pequeno esforço pessoal, contribui para a reciclagem de matérias-primas
úteis e para o tratamento de substâncias tóxicas.
22
 Loading...