

Page 1

SPARK
Remote Controller C2
User Guide
使用说明
使用說明
ユーザーガイド
사용자 가이드
Bedienungsanleitung
Guía de usuario
Guide de l'utilisateur
Guida dell'utente
Gebruiksaanwijzing
Manual do utilizador
Руководство пользователя
2017.04V1.0
Page 2

Disclaimer
Congratulations on purchasing your new DJITM product. The information in this
document affects your safety and legal rights and responsibilities. Read this entire
EN
document carefully to ensure proper configuration before use. Failure to read and
follow instructions and warnings in this document may result in serious injury to yourself
or others, damage to your DJI product, or damage to other objects in the vicinity.
This document and all other collateral documents are subject to change at the sole
discretion of DJI. For the latest product information, please go to http://www.dji.com
and visit the ofcial page for this product.
By using this product, you hereby signify that you have read this disclaimer and warning
carefully and that you understand and agree to abide by the terms and conditions herein.
You agree that you are solely responsible for your own conduct while using this product,
and for any consequences thereof. You agree to use this product only for purposes
that are proper and in accordance with all applicable laws, rules, and regulations, and
all terms, precautions, practices, policies and guidelines DJI has made and may make
available. Users shall observe safe and lawful practices including, but not limited to,
those set forth in this document.
Notwithstanding above, your statutory rights under applicable national legislation are not
affected by this disclaimer.
DJI is a trademark of SZ DJI TECHNOLOGY CO., LTD. (abbreviated as “DJI”) and its
affiliated companies. Names of products, brands, etc. appearing in this document are
trademarks or registered trademarks of their respective owner companies. This product
and document are copyrighted by DJI with all rights reserved. No part of this product or
document shall be reproduced in any form without the prior written consent or authorization
of DJI.
Warning
1. Always ensure the remote controller is fully charged before each ight.
2. If the remote controller is powered on and has NOT been used for 5 minutes, it will
sound an alert. After 6 minutes it will automatically power off. Move the sticks or
perform some other action to cancel the alert.
3. Adjust the mobile device clamp to allow a rm grip on your mobile device.
4. Ensure the antennas of the remote controller are unfolded and adjusted to the proper
position to achieve optimal transmission quality.
5. Repair or replace the remote controller if damaged. A damaged remote controller
antenna will greatly decrease performance.
6. Fully charge the battery at least once every three months to maintain battery health.
Introduction
SPARK™’s remote controller features a brand new, amplied Wi-Fi signal transmission
system, capable of controlling the aircraft* and the gimbal camera at a maximum
transmission range of 1.2 mi (2 km)**. The remote controller can connect to a mobile
device wirelessly and display a live video feed via the DJI GO™ 4 app. The folding
mobile device clamp allows you to secure your mobile device. Maximum remote
controller battery life is approximately 2.5 hours**.
2
Page 3

1. Sport Mode Switch
1
2
3
4
5
6
7
9
8
10
11
2. Function Button
3. Control Sticks
4. Antennas
5. Power Button
6. Mobile Device Clamp
7. Power Port (Micro USB)
8. Flight Pause Button
9. RTH Button
10. Status LED
11. Battery Level LEDs
9
10
8
2
7
4
11
1
3
6
EN
5
12. Gimbal Dial
13. Customizable Button
14. Record Button
15. Shutter Button
1. Checking Battery Level and Charging
Checking Battery Level
12
14
13
15
Low High
Press the Power Button once to check the current battery level. Press once, then again
and hold to turn on/off the remote controller.
Charging the Battery
It takes approximately 2 hours to fully charge the remote controller.
Micro USB Port USB Charger Power Outlet 100~240V
* Spark's remote controller is currently only compatible with Spark aircraft.
** The remote controller can reach its maximum transmission distance (FCC) in a wide open area
with no Electro-Magnetic interference and at an altitude of about 120 meters. Maximum ight time
was tested in windless conditions ying at a constant speed of 12.4 mph (20 kph). This value
should be taken for reference only.
3
Page 4

2. Linking
1
2
Spark_RC-xxxx
The aircraft and the remote controller are linked before shipment if you purchase the
Spark Combo (with the remote controller included). To link a remote controller to Spark,
follow the instructions below:
EN
Power on the aircraft and the remote controller. Wait until aircraft status
indicators blink yellow.
Press and hold the power button of the Intelligent Flight Battery for 3 sec.
Release the button by hearing a single beep. Then the front LEDs blink red.
Press and hold the Flight Pause Button, the Function Button and the
Customizable Button simultaneously. When the alarm turns to a quick
single beep after an alternating single and double beep, linking has
begun.
Then the front LEDs turn solid red after blinking green. When the status
LED on the remote controller turns solid green, linking is complete.
Ensure the remote controller is within 16.4 ft (5 m) of the aircraft during linking.
Apart from using the remote controller to y, you may also control the aircraft
using Virtual Joysticks with just your mobile device. However, while the remote
controller is linked to the aircraft, Virtual Joystick control will be disabled. You
may enable Virtual Joysticks by pressing and holding the power button of the
Intelligent Flight Battery for 6 sec until hearing a double beep to disconnect
the remote controller and the aircraft. Please refer to the Spark User Manual for
detailed information.
3. Preparing the Remote Controller
1
2
Unfold the antennas and the mobile device clamps Attach a mobile device
Connect the mobile device to the remote controller Wi-Fi network
Connect to
the Wi-Fi
Power on the
aircraft and the
remote controller
4
DJI GO 4
App
Launch the DJI
GO 4 app
Tap GO FLY to enter
the main page
Page 5
4. Flight
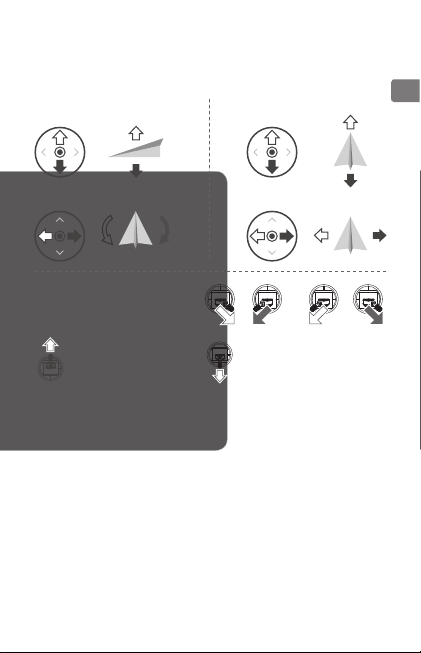
The default Stick Mode is Mode 2. In Mode 2, the left stick controls the aircraft's
altitude and heading, while the right stick controls forward, backward, and left and right
movements.
Left Stick Right Stick
Up
Forward
EN
Down
Turn Left Turn Right
The Combination Stick Command
(CSC) can be used to start or stop the
motors.
Takeoff
Push the left stick up slowly to
takeoff.
Specications
Operating Frequencies 2.412-2.462 GHz; 5.745-5.825 GHz
Max Transmission Distance
(unobstructed, free of interference)
Operating Temperature Range 32° - 104℉ (0° - 40℃)
Built-in Battery 2970mAh
Operating Voltage 950 mA @3.7 V
Supported Mobile Device Size Thickness supported: 6.5mm-8.5mm;
Landing
Pull the left stick down slowly until you
touch the ground. Hold the left stick down
for a few seconds to stop the motors.
2.4 GHz: 1.2 mi (2 km, FCC); 0.31 mi (0.5 km, CE);
0.31 mi (0.5 km, SRCC)
5.8 GHz: 1.2 mi (2 km, FCC); 0.19 mi (0.3 km, CE);
0.75 mi (1.2 km, SRCC)
Max length: 160mm
Backward
Left Right
Page 6
免责声明
感谢您购买 DJI™ 产品。本文所提及的内容关系到您的安全以及合法权益与责任。使用本
产品之前,请仔细阅读本文以确保已对产品进行正确的设置。不遵循和不按照本文的说明
与警告来操作可能会给您和周围的人带来伤害,损坏本产品或其它周围的物品。本文档及
本产品所有相关的文档最终解释权归大疆 ™ 创新(DJI)所有。如有更新,恕不另行通知。
CHS
请访问 www.dji.com 官方网站以获取最新的产品信息。
一旦使用本产品,即视为您已经仔细阅读本免责声明与警告,理解、认可和接受本声明全
部条款和内容。您承诺对使用本产品以及可能带来的后果负全部责任。您承诺仅出于正当
目的使用本产品,并且同意本条款以及大疆创新(DJI)制定的任何相关条例、政策和指引。
大疆创新(DJI)对于直接或间接使用本产品而造成的损坏、伤害以及任何法律责任不予
负责。用户应遵循包括但不限于本文提及的所有安全指引。
即使存在上述规定,消费者权益依然受当地法律法规所保障,并不受本免责声明影响。
DJI 是深圳市大疆创新科技有限公司及其关联公司的商标。本文出现的产品名称、品牌等,
均为其所属公司的商标或注册商标。本产品及手册为大疆创新版权所有。未经许可,不得
以任何形式复制翻印。
产品注意事项
1. 每次飞行前,确保遥控器电量充满。
2. 遥控器闲置 5 分钟后将发出报警,闲置超过 6 分钟将自动关机。拨动摇杆可让遥控器
回复为正常工作状态。
3. 使用遥控器上的手柄时,务必压紧避免移动设备滑落。
4. 确保遥控器天线展开并调整到合适的位置,以获得最佳的通信效果。
5. 遥控器天线如有损坏将影响使用性能,请及时返修。
6. 每隔 3 个月左右重新充电一次以保持电池活性。
认识您的遥控器
SPARK™ 遥控器使用全新增强型 Wi-Fi 技术,配合完备的功能按键,可在最大 2 千米 *
通信距离内完成飞行器 ** 与相机的各种操作与设置。遥控器通过无线方式连接移动设备,
并可通过 DJI GO™ 4 App 在移动设备实时显示高清画面。折叠式手柄可稳定放置移动设
备。遥控器最长可工作时间约为 2.5 小时 *。
1. 运动模式开关
2. 功能按键
3. 摇杆
4. 天线
5. 电源按键
6. 手柄
7. 充电接口(Micro USB)
8. 急停按键
9. 智能返航按键
10. 状态指示灯
11. 电量指示灯
6
9
10
11
1
8
2
3
7
6
4
5
Page 7

12. 云台俯仰控制拨轮
1
2
3
4
5
6
7
9
8
10
11
13. 自定义功能按键
14. 录影按键
15. 拍照按键
12
14
13
15
1. 检查电量及充电
检查电量
低 高
短按一次电源按键,查看电量。短按一次电源按键,再长按 2 秒以开启、关闭遥控器。
充 电
完全充满约需 2 小时
Micro USB 接口 电源适配器(自备) 交流电源 100~240V
2. 对频
Spark 飞行器(含遥控器)套装在出厂时已完成飞行器和遥控器对频。其他情况,请按照
以下步骤连接遥控器和飞行器。
开启飞行器及遥控器,等待飞行器状态指示灯呈黄灯闪烁。
长按飞行器电池开关约 3 秒,听到“嘀”一声后松开。此时机头指示灯呈
红灯闪烁。
同时按下急停按键、功能按键和自定义功能按键,等待遥控器提示音变为
B.B.B.B.B... 对频开始。
机头指示灯绿灯闪烁,然后呈红灯常亮,且遥控器状态指示灯绿灯常亮,
对频成功。
* 在开阔无遮挡、电磁干扰的环境飞行,并且飞行高度为 120 米左右,在 FCC标准下遥控器可以达
到最大通信距离。最长工作时间为实验环境下测得,仅供参考。
** Spark 遥控器目前仅支持配合 Spark 飞行器使用。
CHS
7
Page 8

对频过程中,请保持遥控器与飞行器距离在 5 米内。
若飞行器与遥控器成功对频,则移动设备无法连接飞行器,其虚拟摇杆功能将不
能使用。如需使用移动设备虚拟摇杆功能控制飞行器,请长按智能飞行电池开关
约 6秒直到听到“嘀嘀”声断开飞行器与遥控器的连接。更多方法,请参见《Spark
用户手册》。
CHS
3. 准备遥控器
1
2
展开天线、手柄 安装移动设备
使用移动设备 Wi-Fi 连接遥控器和移动设备
开启飞行器
和遥控器
4. 飞行
遥控器出厂默认操控方式为“美国手”。左摇杆控制飞行高度与方向,右摇杆控制飞行器
的前进,后退以及左右飞行方向。
左摇杆 右摇杆
Spark_RC-xxxx
移动设备连接
遥控器 Wi-Fi
上升
DJI GO 4
App
运行 DJI GO 4 App 点击开始飞行
进入操控界面
前
下降
左转 右转
8
后
左 右
Page 9

掰杆动作:
电机启动 / 停止
起飞
缓慢向上推动油门杆
(默认左摇杆)飞行器起飞。
技术规格
工作频率 2.412-2.462 GHz;5.745-5.825 GHz
信号有效距离
( 无干扰、无遮挡 )
工作环境温度 0℃ 至 40℃
电 池 2970 mAh
工作电流 / 电压 950 mA @3.7 V
支持移动设备 厚度 6.5-8.5 mm,最大长度 160 mm
2.4 GHz: 2000 m (FCC); 500 m (CE); 500 m(SRCC)
5.8 GHz: 2000 m (FCC); 300 m (CE); 1200 m (SRCC)
降落
向下拉动油门杆至飞行器落地,
在最低位置保持 2 秒,电机停止。
CHS
Page 10

免責聲明
感謝您購買 DJI™ 產品。本文所提及的內容關係到您的安全及合法權益與責任。使用本產
之前,請仔細閱讀本文以確保已對產品進行正確的設定。若未遵循及未按照本文的說明
品
與警告來操作,可能會對您和周圍的人造成傷害,損壞本產品或其它鄰近的物品。本文件
及本產品所有相關文件的最終解釋權歸大疆 ™ 創新 (DJI) 所有。如有更新,恕不另行通知。
請前往 www.dji.com 官方網站以獲取最新的產品資訊。
CHT
一旦使用本產品,即視為您已經仔細閱讀本免責聲明與警告,理解、認可和接受本聲明全
部條款和內容。您承諾對使用本產品及可能帶來的後果負全部責任。您承諾僅出於正當目
的使用本產品,並且同意本條款以及大疆創新 (DJI) 制定的任何相關條例、政策和指南。
大疆創新 (DJI) 對於直接或間接使用本產品而造成的損壞、傷害及任何法律責任概不負責。
使用者應遵循包括但不限於本文提及的所有安全指南。
即使存在上述規定,消費者權益依然受當地法律法規所保障,並不受本免責聲明影響。
DJI 是深圳市大疆創新科技有限公司及其附屬公司的商標。本文出現的產品名稱、品牌等,
均為其所屬公司的商標或註冊商標。本產品及手冊之版權為大疆創新所有。未經許可,不
得以任何形式複製翻印。
產品注意事項
1. 每次飛行前,確定遙控器電池已充飽電。
2. 遙控器閒置 5 分鐘後將發出警告
回復為正常運作狀態。
3.
使用遙控器上的把手時務必壓緊,以免行動裝置滑落。
4. 確定遙控器天線已展開並調整到合適位置,以取得最佳通訊效果。
5. 遙控器天線如有損壞將影響使用性能,請及時送修。
6. 請每 3 個月左右重新充電一次,以保持電池活性。
認識您的遙控器
SPARK™ 遙控器使用全新加強型
通訊距離內,完成航拍機 ** 與相機的各種操作與設定。遙控器透過無線方式連接行動裝置,
並可透過 DJI GO™ 4 應用程式在行動裝置上即時顯示高畫質畫面。折疊式把手可穩定放
置行動裝置。遙控器最長可運作時間約為 2.5 小時 *。
運動模式開關
1.
2. 功能按鈕
3. 搖桿
4. 天線
5. 電源按鈕
6. 把手
7. 充電連接埠 (Micro USB)
8. 急停按鈕
9. 智能返航按鈕
10. 狀態指示燈
11. 電量指示燈
10
,閒置超過 6 分鐘將自動關機。撥動搖桿可讓遙控器
Wi-Fi 技術,配合完備的功能按鈕,可在最大 2 千公尺 *
9
10
11
1
8
2
3
7
6
4
5
Page 11

12. 雲台俯仰控制轉盤
1
2
3
4
5
6
7
9
8
10
11
13. 自訂功能按鈕
14. 錄影按鈕
15. 拍照按鈕
12
14
13
15
1. 檢查電量及充電
檢查電量
低 高
短按一次電源按鈕以查看電量。短按一次電源按鈕,再長按 2 秒以開啟、關閉遙控器。
充 電
完全充飽電約需 2 小時
Micro USB 連接埠 電源配接器 (自備 ) 交流電源 100~240V
2. 配對
Spark 航拍機 ( 含遙控器 ) 套件在出廠時已完成航拍機和遙控器配對
按照以下步驟連接遙控器和航拍機。
開啟航拍機及遙控器,等待航拍機狀態指示燈呈黃燈閃爍。
長按航拍機電池開關約 3 秒,聽到「滴」一聲後鬆開。此時機頭指示燈呈
紅燈閃爍。
同時按下急停按鈕
B.B.B.B.B...,表示配對開始。
機頭指示燈綠燈閃爍,然後呈紅燈恆亮,且遙控器狀態指示燈綠燈恆亮,
表示配對成功。
* 若在開闊無遮擋
** Spark 遙控器目前僅支援配合 Spark 航拍機使用。
、無電磁干擾的環境下,於高度 120 公尺左右飛行時,遙控器即可依據 FCC 標
準達到最大通訊距離。最長運作時間為實驗環境下測得,僅供參考。
、功能按鈕和自訂功能按鈕,等待遙控器提示音變為
。在其他情況下,請
CHT
11
Page 12

配對過程中,請保持遙控器與航拍機距離在 5 公尺內。
若航拍機與遙控器成功配對,則行動裝置無法連接航拍機,其虛擬搖桿功能將
不能使用。如需使用行動裝置虛擬搖桿功能控制航拍機,請長按航拍機電池開
關約 6 秒,直到聽到
參閱 《Spark 用戶手冊》。
3. 準備遙控器
CHT
使用行動裝置的 Wi-Fi 連接遙控器和行動裝置
開啟航拍機
以及遙控器
4. 飛行
遙控器出廠預設操控方式為
的前進、後退以及左右飛行方向。
左搖桿 右搖桿
「滴滴」聲後斷開航拍機與遙控器的連接。更多方法,請
1
展開天線、把手 安裝行動裝置
DJI GO 4
Spark_RC-xxxx
行動裝置連接
遙控器 Wi-Fi
「美國手」。左搖桿控制飛行高度與方向,右搖桿控制航拍機
上升
App
執行 DJI GO 4
應用程式
2
點選「開始飛行」
( 开始飞行 )
進入操控介面
前
下降
左轉 右轉
12
後
左 右
Page 13

綜合控制桿指令:
馬達啟動 / 停止
起飛
緩慢向上推動油門桿
( 預設左搖桿) 使航拍機起飛。
技術規格
運作頻率 2.412-2.462 GHz;5.745-5.825 GHz
訊號有效距離
( 無干擾、無遮擋 )
操作溫度 0℃ 至 40℃
電池
運作電流 / 電壓
支援行動裝置 厚度 6.5-8.5 mm,最大長度 160 mm
2.4 GHz:2000 m (FCC);500 m (CE);500 m (SRCC)
5.8 GHz:2000 m (FCC);300 m (CE);1200 m (SRCC)
2970 mAh
950 mA @3.7 V
降落
向下拉動油門桿至航拍機落地,
在最低位置保持 2 秒,馬達接著
停止。
CHT
13
Page 14

고지 사항
DJITM
신제품을 구매해주셔서 감사합니다. 본 문서의 정보는 사용자의 안전은 물론 법적 권리 및 책임에
영향을 미칩니다. 제품을 사용하기 전에 전체 문서를 주의 깊게 읽고 구성이 올바른지 확인하십시오. 본
문서의 지침 및 경고 사항을 읽고 따르지 않으면 자신 또는 다른 사람이 심각한 부상을 입거나 DJI 제품
또는 근처에 있는 다른 물체가 손상될 수 있습니다. 이 문서 및 기타 모든 부수 문서는 DJI의 단독 재량
에 따라 변경될 수 있습니다. 최신 제품 정보는 http://www.dji.com
를 방문하십시오.
제품을 사용하는 것은 본 문서의 고지 사항 및 경고를 주의 깊게 읽었으며 명시된 이용 약관을 이해하고
준수하는 것에 동의한 것으로 간주됩니다. 본 제품 사용 시 귀하의 행위와 그에 따른 결과에 대한 책임은
전적으로 본인에게 있다는 것에 동의합니다. 또한 적용 가능한 모든 법규, 규칙은 물론 DJI에서 제정하
고 제공하는 모든 이용 약관, 예방책, 사례, 정책 및 지침에 따라 적절한 목적으로 본 제품을 사용하는 것
KR
에 동의합니다. 사용자는 이 문서에 명시된 내용을 포함하여(단, 이에 국한되지 않음) 안전하고 적법한
사례를 준수해야 합니다.
상기 내용에도 불구하고 해당 국가의 법률에 따른 사용자의 법적 권리는 이 고지 사항의 영향을 받지 않
습니다.
DJI는 SZ DJI TECHNOLOGY CO., LTD. (약어로 “DJI”)와 해당 자회사의 상표입니다. 이 문서에 표시된
제품 이름, 브랜드 이름 등은 해당 소유자의 상표 또는 등록 상표입니다. DJI는 본 제품과 문서의 소유권
과 함께 모든 권한을 보유합니다. 본 제품 또는 설명서의 어떤 부분도 DJI의 서면 허가 또는 동의 없이
어떤 형식으로도 재생산할 수 없습니다.
경고
1. 각 비행 전에 조종기가 완전히 충전되었는지 항상 확인합니다.
2. 조종기의
전원을 켜고 5분 동안 사용하지 않으면 경고음이 울립니다. 6분이 지나면 전원이 자동으로
꺼집니다. 경고음을 해제하려면 스틱을 움직이거나 다른 동작을 수행하십시오.
모바일 기기 클램프를 조정하여 모바일 기기를 단단히 고정합니다.
3.
4. 조종기의
안테나가 접혀 있지 않은지 확인하고 최적의 전송 품질을 얻을 수 있도록 적합한 위치로 조
정합니다.
조종기가
5.
손상된 경우 수리하거나 교체합니다. 조종기 안테나가 손상되면 성능이 현저히 떨어질 수
있습니다.
배터리 상태를 올바르게 유지하려면 적어도 3개월에 한 번은 배터리를 완전히 충전하십시오.
6.
소개
SP
ARK™ 의 조종기는 새로운 증폭형 Wi-Fi 신호 전송 시스템을 장착하여 최대 전송 범위 2km(1.2mi)**
에서 기체* 및 짐벌 카메라를 조종할 수 있도록 합니다. 조종기를 모바일 기기에 무선으로 연결
하고 DJI GO™ 4 앱을 통해 라이브 동영상 피드를 표시할 수 있습니다. 접이식 모바일 기기 클
램프를 사용하면 모바일 기기를 고정할 수 있습니다. 최대 조종기 배터리 수명은 약 2.5시간입
니다.**
이동해 이 제품의 공식 페이지
으로
14
Page 15

1. 스포츠 모드 스위치
1
2
3
4
5
6
7
9
8
10
11
2. 기능 버튼
3. 제어 스틱
4. 안테나
5. 전원 버튼
6. 모바일 기기 클램프
7. 전원 포트(Micro USB)
8. 비행 일시 정지 버튼
TH 버튼
9. R
10.
상태 LED
11. 배터리 수준 LED
9
10
8
2
7
4
11
1
5
3
6
KR
12. 짐벌 다이얼
13. 사용자 지정 가능 버튼
14. 녹화 버튼
15. 셔터 버튼
1. 배터리 수준 및 충전 상태 확인
배터리 수준 확인
12
14
13
15
낮음 높음
버튼을 한 번 눌러 현재 배터리 수준을 확인합니다. 한 번 누른 다음 다시 길게 누르면 조종기가 켜
전원
지거나 꺼집니다.
배터리 충전
조종기를 완전히 충전하는 데 약 2시간 걸립니다.
Micro USB 포트 USB 충전기 전원 출력 100~2
* 현재 Spark 의 조종기는 Spark 기체에만 호환됩니다.
전자기 간섭이 없는 확 트인 넓은 지역의 약 120m 고도에서 최대 전송 거리(FCC)에 도달할 수 있습니다.
** 조종기는
최대 비행 시간은 20km/h(12.4mph)의 일정 속도로 비행하며 무풍 환경에서 테스트되었습니다. 이 값은 참조용으
로만 사용해야 합니다.
40V
15
Page 16

2. 연결
1
2
콤보(조종기 포함)를 구매하면 기체와 조종기가 배송 전에 연결됩니다. 조종기를 Spark 에 연결
Spark
하려면 아래 지침을 따르십시오.
조종기의 전원을 켭니다. 기체 상태 표시기가 노란색으로 빠르게 깜박일 때까
기체와
지 기다립니다.
인텔리전트
플라이트 배터리의 전원 버튼을 3초 동안 누르고 단일 신호음이 울리면
KR
버튼에서 손을 뗍니다. 그러면 전방 LED가 빨간색으로 깜박입니다.
일시 정지 버튼, 기능 버튼 및 사용자 지정 가능 버튼을 동시에 길게 누릅니다. 단
비행
일 신호음과 이중 신호음이 번갈아 울린 후 빠른 단일 신호음으로 바뀌면 연결이 시작
된 것입니다.
그런 다음 전방 LED가 녹색으로 깜박인 후 빨간색으로 일정하게 유지됩니다. 조종기
의 상태 LED가 녹색으로 일정하게 유지되면 연결이 완료된 것입니다.
연결하는 동안 조종기가 기체에서 5m(16.4f
조종기를 사용하여 비행하는 것 외에도 모바일 기기로 가상 조이스틱을 사용하여 기체를 제
어할 수 있습니다. 하지만 기체에 조종기가 연결되어 있는 동안에는 가상 조이스틱 제어가
비활성화됩니다. 이중 신호음이 울리면서 조종기와 기체 연결이 끊어질 때까지 인텔리전트
플라이트 배터리의 전원 버튼을 6초 동안 누르고 있으면 가상 조이스틱을 활성화할 수 있습
니다. 자세한 내용은 Spark 사용자 매뉴얼을 참조하십시오.
t) 내에 있는지 확인합니다.
3. 조종기 준비
1
안테나와 모바일 기기 클램프 펴기 모바일 기기 연결
2
모바일 기기를 조종기 Wi-Fi 네트워크에 연결
기체와 조종기의
전원을 켭니다.
16
Spark_RC-xxxx
Wi-Fi에 연결
합니다.
DJI GO 4 앱을
시작합니다.
DJI GO 4
App
GO FLY를 탭해 기본 페
이지로 이동합니다.
Page 17

4. 비행
스틱 모드는 모드 2입니다. 모드 2에서 왼쪽 스틱은 기체의 고도 및 방향을 제어하고 오른쪽 스틱
기본
은 전진, 후진, 왼쪽 및 오른쪽 이동을 제어합니다.
왼쪽 스틱 오른쪽 스틱
모터를
시동 또는 정지할 때 스틱 조합 명령
(CSC)을 사용할 수 있습니다.
사양
작동 주파수 2.4
최대 전송 거리
(장애물과 간섭이 없는 상태)
작동 온도 범위 0°~40℃(32°~104℉)
내장 배터리 2970mAh
작동 전압 950mA @3.7V
지원되는 모바일 기기 크기
Up
아래로
왼쪽으로 오른쪽으로
이륙
스틱을 천천히 위로 눌러 이륙합
왼쪽
니다.
착륙
지면에 닿을 때까지 왼쪽 스틱을 천천히 아래로
내립니다. 왼쪽 스틱을 몇 초 동안 유지하면 모
터가 정지합니다.
12~2.462GHz, 5.745~5.825GHz
2.4GHz: 2km(1.2mi, FCC), 0.5km(0.31mi, CE), 0.5km(0.31mi, SRCC)
5.8GHz: 2km(1.2mi, FCC), 0.3km(0.19mi, CE), 1.2km(0.75mi, SRCC)
지원되는 두께: 6.5mm~8.5mm,
최대 길이: 160mm
전방
후방
왼쪽 오른쪽
KR
17
Page 18

认证信息
FCC Compliance Notice
This device complies with Part 15 of the FCC Rules. Operation is subject to the following
two conditions: (1) This device may not cause harmful interference, and (2) This device
must accept any interference received, including interference that may cause undesired
operation.
This equipment
device, pursuant to part 15 of the FCC Rules. These limits are designed to provide
reasonable protection against harmful interference in a residential installation. This
equipment generates, uses and can radiate radio frequency energy and, if not installed
and used in accordance with the instructions, may cause harmful interference to radio
communications. However, there is no guarantee that interference will not occur in a
particular installation. If this equipment does cause harmful interference to radio or
television reception, which can be determined by turning the equipment off and on,
the user is encouraged to try to correct the interference by one or more of the following
measures:
— Reorient or relocate the receiving antenna.
— Increase the separation between the equipment and receiver.
— Connect the equipment into an outlet on a circuit different from that to which the
receiver is connected.
— Consult the dealer or an experienced radio/TV technician for help.
RF Exposure Information
This equipment complies with FCC radiation exposure limits set forth for an uncontrolled
environment. In order to avoid the possibility of exceeding the FCC radio frequency
exposure limits.
ISEDC RSS W
This
to the following two conditions: (1) this device may not cause interference, and (2) this device
must accept any interference, including interference that may cause undesired operation of the
device.
Le présent appareil est conforme aux CNR d'Industrie
radio exempts de licence.
L'exploitation est autorisée aux deux conditions suivantes:
(1) l'appareil ne doit pas produire de brouillage, et
(2) l'utilisateur de l'appareil doit accepter tout brouillage radioélectrique subi, même si le
brouillage est susceptible d'en compromettre le fonctionnement.
ISEDC Radiation Exposure Statement:
This equipment complies with ISEDC RF radiation exposure limits set forth for an uncontrolled
environment. This transmitter must not be co-located or operating in conjunction with any
other antenna or transmitter.
Cet appareil est
conforme aux limitesd'exposition de rayonnement RF ISEDC établiespour un environnement
non contrôlé. Cetémetteur ne doit pas être co-implanté oufonctionner en conjonction avec
toute autreantenne ou transmetteur.
has been tested and found to comply with the limits for a Class B digital
arning
device complies with Industry Canada licence-exempt RSS standard (s). Operation is subject
Canada applicables aux appareils
Page 19

Fo
r Remote controller:
This device has been tested and meets applicable FCC limits for radio frequency (RF) exposure. Specific Absorption
Rate (SAR) refers to the rate at which the body absorbs RF energy. During SAR testing, the device is set to the
highest transmission levels and placed in positions that simulate use near the body with 10 mm separation and
against the hand, with no separation. To ensure exposure levels remain at or below the as-tested levels, use the
accessories designated and tested with this product. Accesso
the device, including its compliance with RF exposure guide
Any Changes or modifications not expressly approved by the party responsible for
compliance could void the user's authority to operate the equipment.
arning Message
KCC W
“해당무선설비는 운용 중 전파혼신 가능성이 있으므로 인명안전과 관련된 서비스는 할 수 없습니다 .”
“해당 무선설비는 운용 중 전파혼신 가능성이 있음”
NCC Warning Message
低功率電波輻射性電機管理辦法
第十二條 經型式認證合格之低功率射頻電機,非經許可,公司、商號或使用者均不得擅
自變更頻率、加大功率或變更原設計之特性及功能。
第十四條 低功率射頻電機之使用不得影響飛航安全及干擾合法通信;經發現有干擾現象
時,應改善至無干擾時方得繼續使用。前項合法通信,指依電信法規定作業之無線電通信。
低功率射頻電機須忍受合法通信或工業、科學及醫療用電波輻射性電機設備之干擾。
E
U Compliance Statement: SZ DJI TECHNOLOGY CO., LTD. hereby declares that this
device is in compliance with the essential requirements and other relevant provisions of
the RED Directive.
A copy of the EU Declaration of Conformity is available online at www.dji.com/euro-
compliance
Declaración de cumplimiento UE: SZ DJI TECHNOLOGY CO., LTD. por la presente
declaraque este dispositivo cumple los requisitos básicos y el resto de provisiones
relevantes de la Directiva RED.
Hay disponible online una copia de la Declaración de conformidad UE en www.dji.com/
euro-compliance
EU-verklaring van overeenstemming: SZ DJI TECHNOLOGY CO., LTD. verklaart
hierbij dat dit apparaat voldoet aan de essentiële vereisten en andere relevante
bepalingen van Richtlijn RED.
De EU-verklaring van overeenstemming is online beschikbaar op www.dji.com/euro-
compliance
Declaração de conformidade da UE: A SZ DJI TECHNOLOGY CO., LTD. declara,
através deste documento, que este dispositivo está em conformidade com os requisitos
essenciais e outras disposições relevantes da Diretiva RED.
Existe uma cópia da Declaração de conformidade da UE disponível online em www.dji.
com/euro-compliance
Declaración de cumplimiento UE: SZ DJI TECHNOLOGY CO., LTD. por la
presente declara que este dispositivo cumple los requisitos básicos y el resto
de provisiones relevantes de la Directiva RED.
ries with metal parts may change the RF performance of
lines, in a manner that has not been tested or certified.
Page 20

Hay
disponible online una copia de la Declaración de conformidad UE en www.dji.com/
euro-compliance
EU-verklaring van overeenstemming: SZ DJI TECHNOLOGY CO., LTD. verklaart
hierbij dat dit apparaat voldoet aan de essentiële vereisten en andere relevante
bepalingen van Richtlijn RED.
De EU-verklaring van overeenstemming is online beschikbaar op www.dji.com/euro-
compliance
Declaração de conformidade da UE: A SZ DJI TECHNOLOGY CO., LTD. declara,
através deste documento, que este dispositivo está em conformidade com os requisitos
essenciais e outras disposições relevantes da Diretiva RED.
Existe uma cópia da Declaração de conformidade da UE disponível online em www.dji.
com/euro-compliance.
EU contact address: DJI GmbH, Industriestrasse. 12, 97618, Niederlauer, Germany
CAUTION: RISK OF EXPLOSION IF BATTERY IS REPLACED BY AN INCORRECT TYPE.
DISPOSE OF USED BATTERIES ACCORDING TO THE INSTRUCTIONS
Environmentally friendly disposal
Old electrical appliances must not be disposed of together with the
residual waste, but have to be disposed of separately. The disposal at
the communal collecting point via private persons is for free. The owner
of old appliances is responsible to bring the appliances to these collecting
points or to similar collection points. With this little personal effort, you contribute
to recycle valuable raw materials and the treatment of toxic substances.
arning Message
Thailand W
เครื่องโทรคมนาคมและอุปกรณ์นี้ มีความสอดคล้องตามข้อกำาหนดของ กทช
.
Page 21

DJI Support
DJI
技术支持
DJI
技術支援
サポート
DJI
고객지원
DJI
DJI Support
Servicio de asistencia de DJI
Service client DJI
Assistenza DJI
DJI-ondersteuning
Suporte DJI
Техническая поддержка DJI
.dji.com/support
http://www
If you have any questions about this document, please
contact DJI by sending a message to
如果您对说明书有任何疑问或建议,请通过以下电子邮箱
DocSupport@dji.com
联系我们:
DocSupport@dji.com
。
Printed in China.
.
中国印制
 Loading...