

Page 1
DJI Goggles
User Guide
2017.01
Page 2
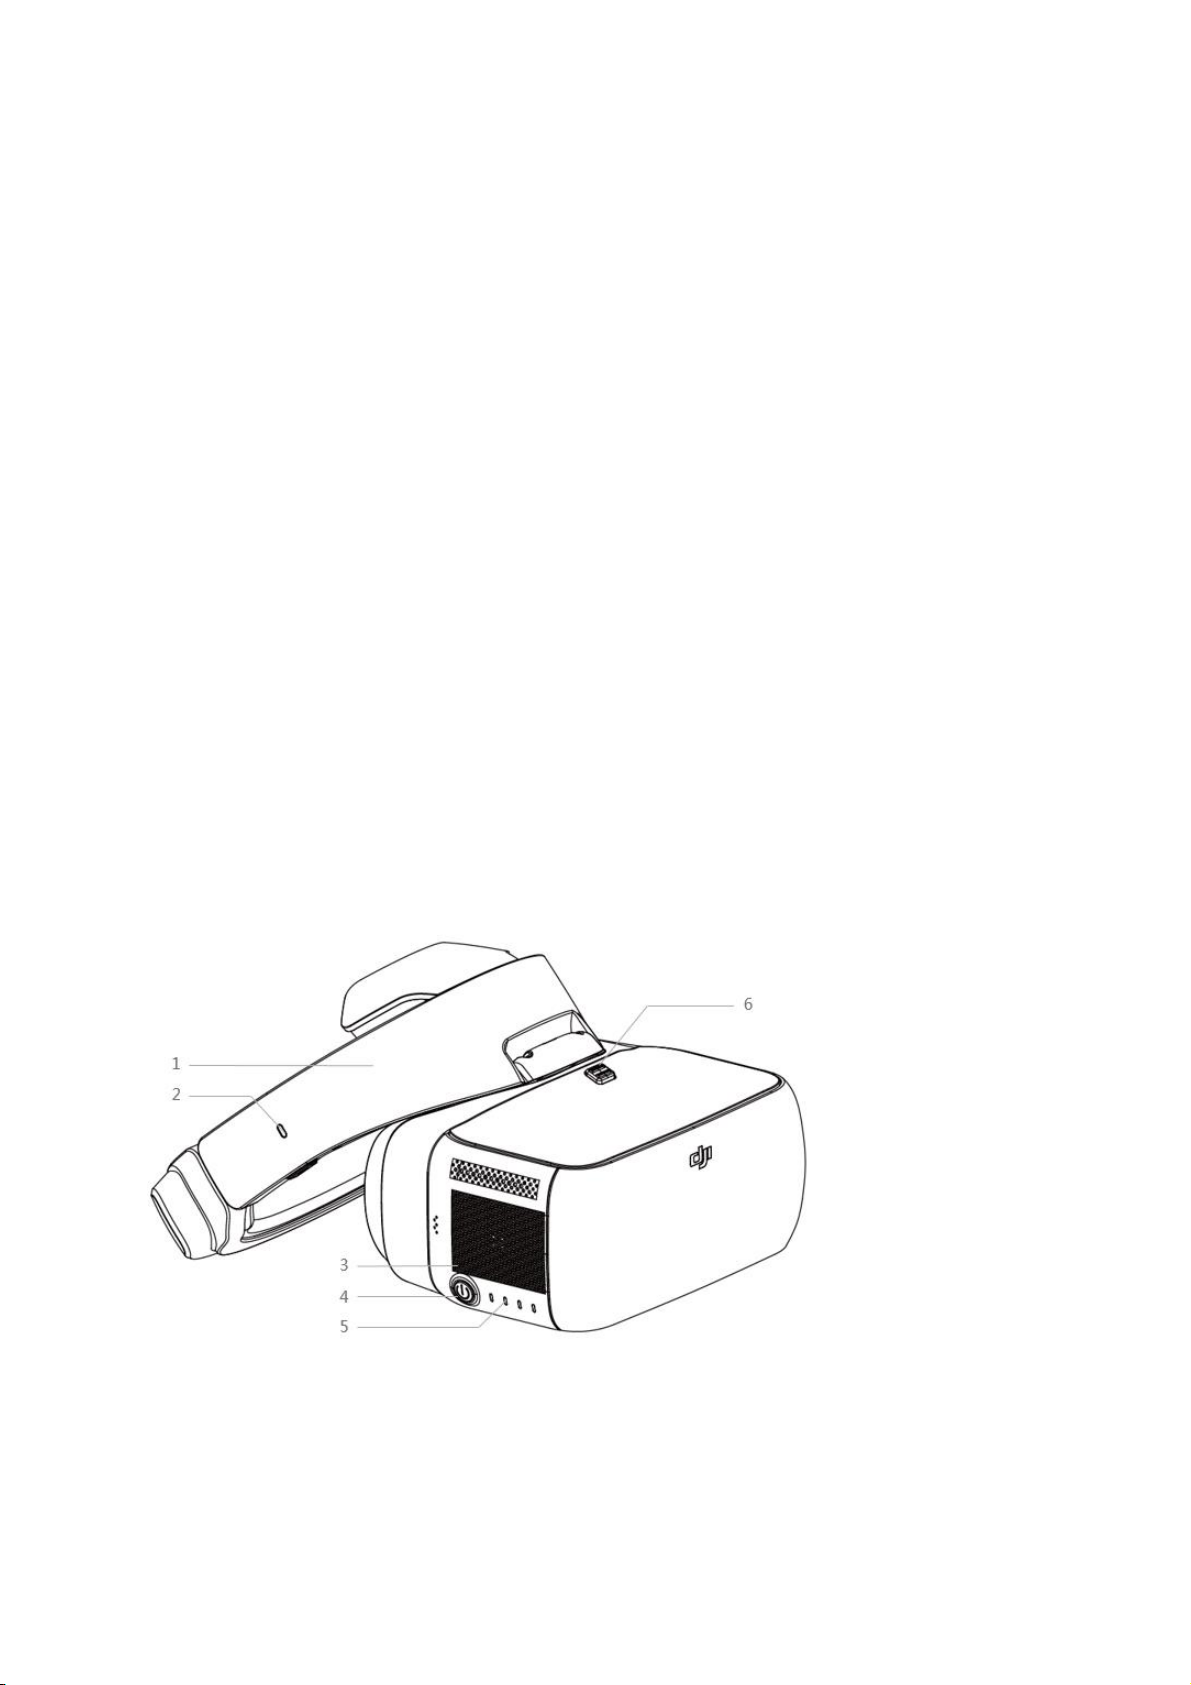
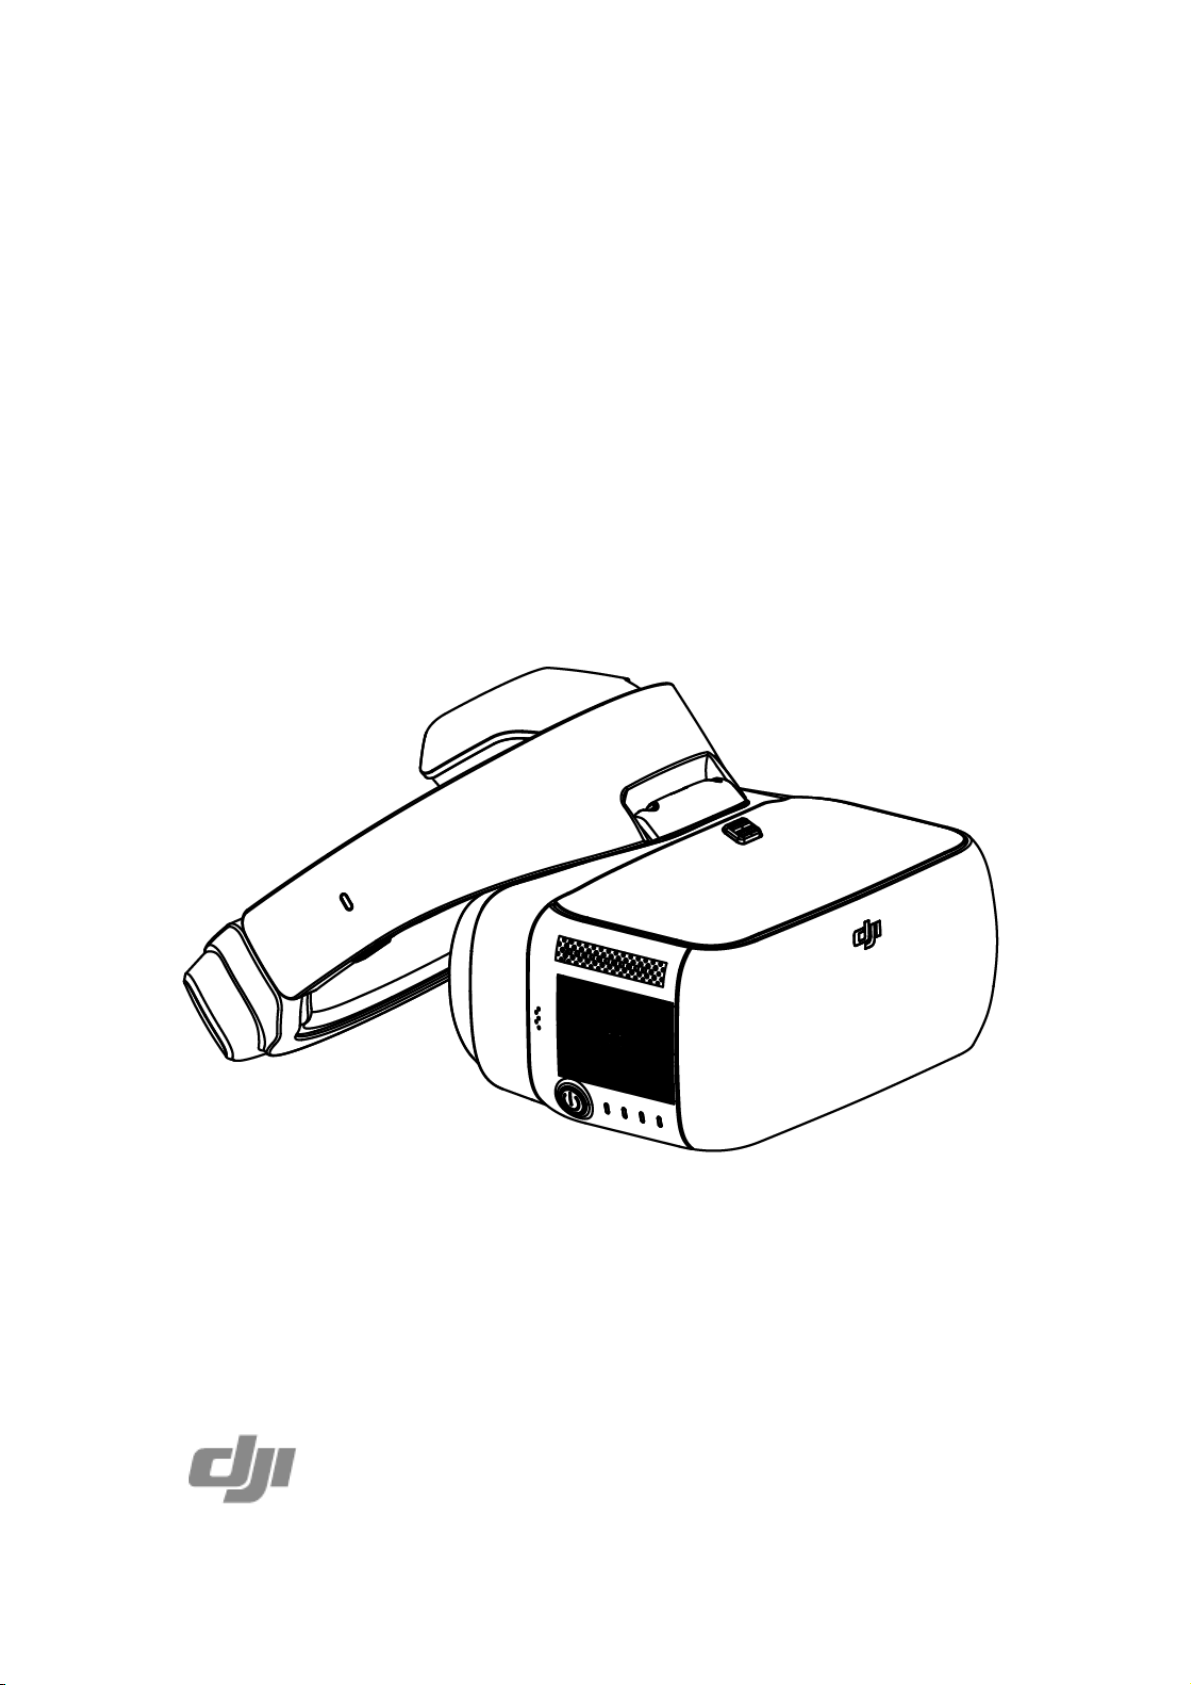
Product Profile
1. Strap
2. Charging Status
Indicator
3. Touch Panel
4. Power Button
5. Battery Level
Indicators
6. Strap Buckle
Introduction
DJI Goggles (abbreviated as “Goggles”) is equipped with high-performance
displays and an ultra-low latency video downlink for use with DJI aircraft, giving you
a real-time aerial FPV (First Person View) experience. Goggles can also be used to
play HD videos, bringing you an immersive high-definition viewing experience.
Their intuitively functional design makes them easy to operate using only the right
hand. Goggles support head tracking, allowing aircraft and/or gimbal to be
controlled using head movements. Used with Intelligent Flight Modes, this
introduces a new style of flying.
At a Glance
Page 3
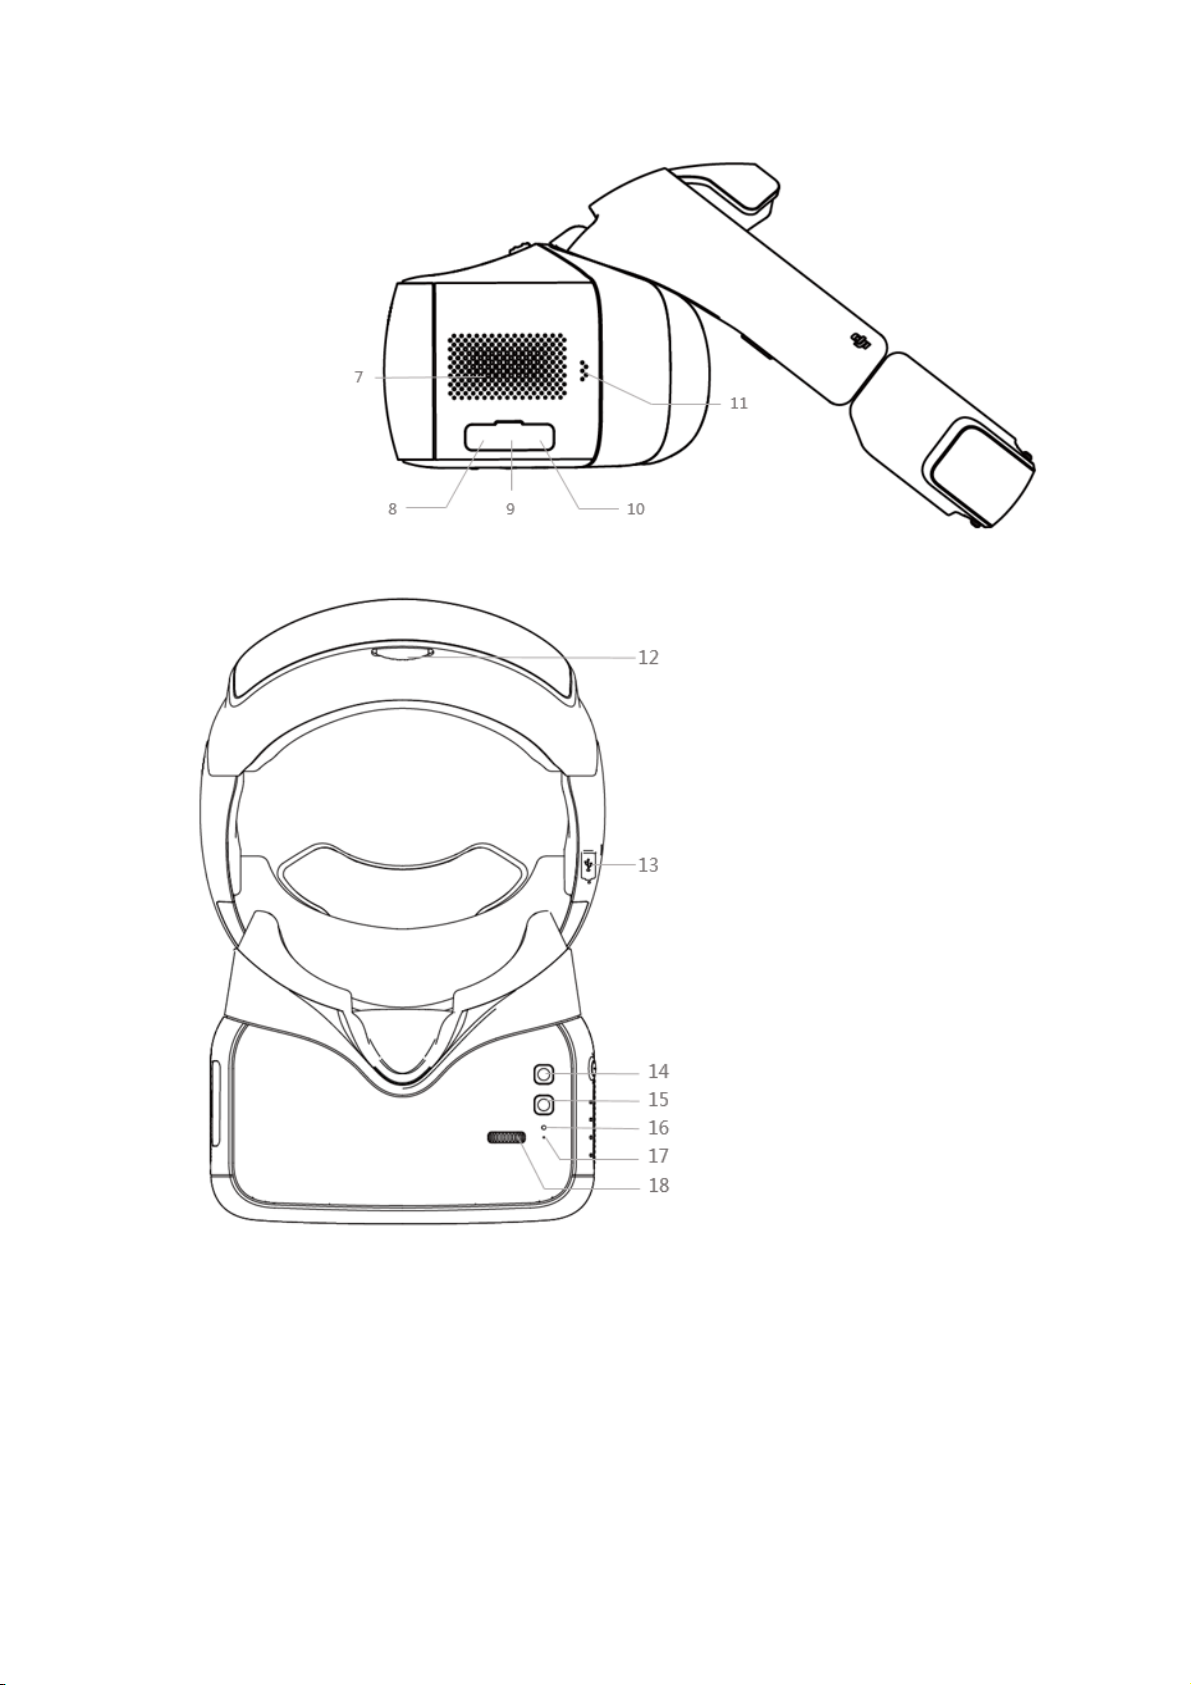
7. Heat Vent
8. Micro SD
Card Slot
9. Audio Port
10. HDMI Port
11. Speaker
12. Strap Knob
13. Charging/Upgrade Port
(Micro USB)
14. Back Button
15. Focus Button
16. Link Button
17. Linking Status Indicator
18. IPD (Interpupillary Distance)
Knob
Page 4
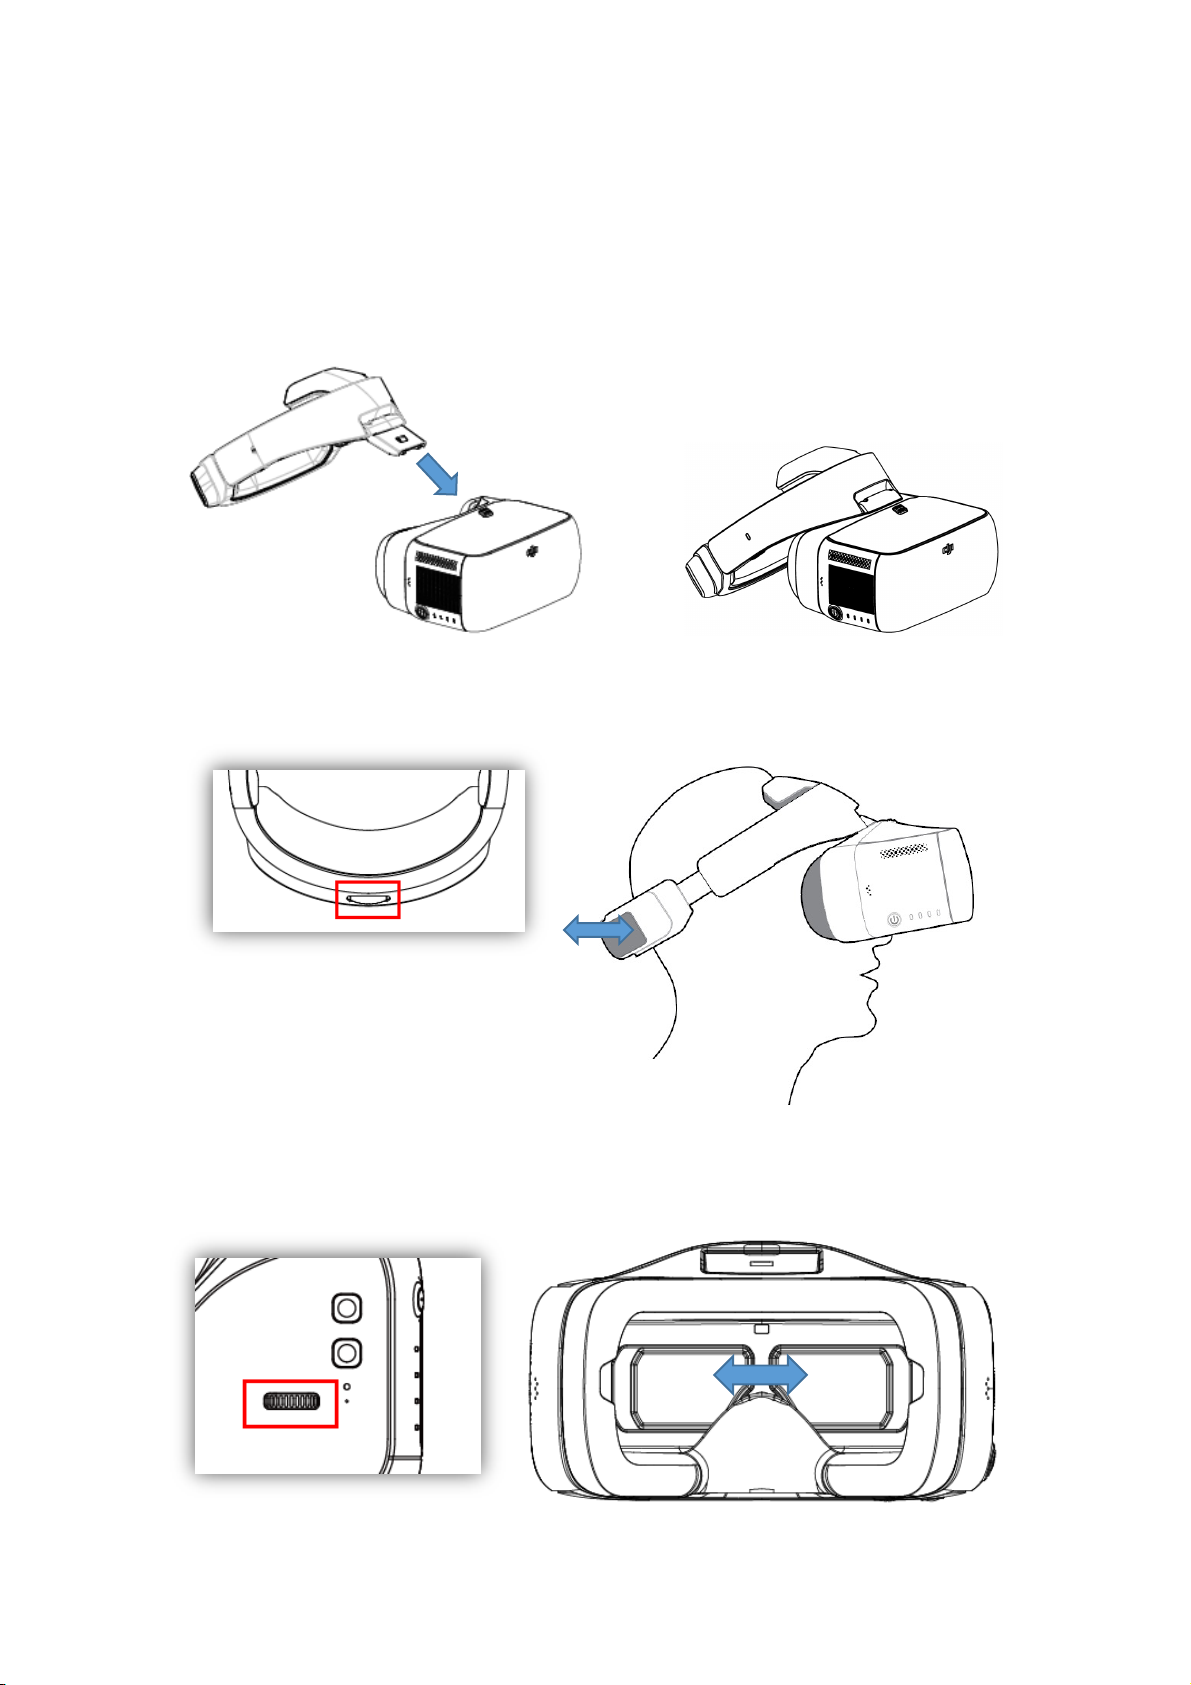
Installation and Wearing
1. Insert the Strap Buckle into the slot above the lenses until you hear a click. Check
that it has been securely fastened.
2. Align the lenses over your eyes and pull the strap down. Adjust the Strap Knob
fit the Goggles snugly and comfortably.
3. Turn the IPD Knob to adjust the distance between the lenses until images are
aligned.
Page 5

Goggles can be worn over glasses.
When putting the Goggles on, flip the lens portion to see outside the
goggles. Flip it back down for immersion.
Page 6

Usage
The Battery Level Indicators will also show the current battery level during
charging and discharging. The indicators are defined below.
LED on LED flashing LED off
Controls and Operations
[1] Power Button
Press the Power Button once, the press again and hold for 2 seconds to turn
the Goggles on/off. Battery Level Indicators will display the current battery level.
[2] Battery Level Indicators
When the battery is off, press the Power Button once to light up Battery Level
Indicators to display the current battery level.
[3] Touch Panel
Page 7

Use the touch panel with your right hand to control on-screen operations.
Action
Description
Swipe forward/backward
with one finger
Browse the menu and scroll right/left
Swipe upward/downward
with one finger
Browse the menu and scroll up/down
In the Main view, swipe upward to hide warnings
Swipe backward with two
fingers
Lock the touch panel. It will become non-functional
Swipe forward with two
fingers
Unlock the touch panel
Swipe downward with two
fingers
Enter the shortcut menu
Swipe upward with two
fingers
Exit the shortcut menu
Tap with one finger
Confirm
[4] Charging Status Indicator
Indicates the current charging status, the LED be solid red, yellow, green to
reflect low, medium and high power levels respectively.
Page 8

[5] Back Button
Only supported on the Mavic Pro, Phantom 4 Pro/Pro+ and Inspire 2.
Press to return to the previous menu.
[6] Focus Button
Press to show the focus cursor on the display screen, and move your head to
define the focus point. Tap the touch panel then swipe forward/backward with
one finger to zoom in or zoom out.
[7] Linking Status Indicator
Indicates the linking status of the Goggles and the Mavic Pro. The indicator
will be solid red while linking, and it will go solid green when linked.
Connection
Goggles supports a wide range of DJI aircraft and different uses. Follow the steps
below to connect.
Mavic Pro
Goggles connect wirelessly to the Mavic Pro using OcuSync.
This connection is suitable for both single and dual operator aircraft control. In this
setup, the pilot using the remote controller can focus on flight, while the Goggles
Page 9

operator can view the environment in real-time FPV for more intuitive control. By
If the Remote Controller and Goggles are operated by the same user,
a spotter able to instruction and warnings is required to ensure safe
flying.
In Motion-controlled-controlled Flight mode, aircraft yaw can be
controlled by both the Goggles and the Remote Controller. In Motion-
controlled-controlled Gimbal mode, only the gimbal will move with the
Goggles.
When linked to the Mavic Pro, the remote controller can be used to
control the Goggles. 5D Button = Touch Panel, C1 Button = Focus
Button, C2 Button = Back Button. These buttons will no longer control
the aircraft. Fly with caution.
moving their head, the Goggles wearer can control aircraft orientation or gimbal
movement.
Linking Method
1. Ensure both the aircraft and the remote controller are powered on and linked.
2. Put on Goggles and power on.
3. Use the touch panel to enter Tools > Settings > Pairing.
Page 10

4. Choose “Normal” and confirm. The Goggles’ linking status indicator will go
Toggle the control mode switch of the Remote Controller to RC mode
before linking.
solid red to wait for linking.
5. Press the Linking Button on the Mavic Pro. Once linked, the Goggles’ linking
status indicator will turn solid green.
Other DJI Aircraft
Goggles also supports other DJI aircraft. Connect Goggles to the either the Micro
USB port or the HDMI port of the Remote Controller.
Main Screen
The main screen of Goggles and functions are described as follows:
Page 11

1. Aircraft Status
Indicates the aircraft’s flight status.
2. Flight Mode and GPS status
Indicates the current flight mode and GPS signal strength.
3. Obstacle Detection Status
Red bars are displayed when obstacles are close to the aircraft. Orange bars are
displayed when obstacles are in detection range.
4. Motion-controlled Mode
Shows the current Motion-controlled Mode, including motion-controlled flight,
motion-controlled gimbal, TapFly, ActiveTrack and focus.
5. Connection Status
Indicates the connection status of the aircraft and Goggles. Green indicates that
the connection is good, yellow indicates that the connection signal is weak or
unstable, and red indicates disconnected. Goggles will attempt to reconnect if
Page 12

disconnected.
6. Touch Panel Lock Status
Indicates the lock status of the touch panel. A locked touch panel will be
unresponsive to touch to avoid accidental control. Swipe forward with two
fingers to unlock it.
7. Remaining Flight Time
Shows the remaining flight time of the aircraft.
8. Aircraft Battery Level
Shows the current battery level of the Intelligent Flight Battery.
9. Goggles Battery Level
Shows the current battery level of the Goggles.
10. Intelligent Flight Mode
Tap to select TapFly, ActiveTrack, Terrain Follow and Tripod Modes.
11. Tools
Tap to set the Goggles’ settings, select Auto Takeoff/Landing, HDMI video
playback or flight photos/videos playback.
12. Camera Settings/Shoot/Record Button
Tap to set ISO, shutter, aperture and auto exposure values of the camera.
Swipe left or right to switch to Shoot or Record mode, tap to start shooting
photos or recording video.
13. Camera Parameters and Video Downlink Resolution
Shows the setting parameters of the camera and Video Downlink Resolution.
Page 13

14. Flight Attitude
The triangle indicates the direction the aircraft is facing.
The horizontal level indicates the aircraft’s roll angle.
The scale indicates the tilt angle of the gimbal.
15. Prompt Message
Shows warning messages. Swipe up or down to select and tap to delete prompts.
16. Flight Telemetry
The horizontal/vertical distance between the aircraft and the Home Point, and
the movement speed across horizontal/vertical distance of the aircraft.
When the aircraft is close to the ground, the altitude will be displayed.
Controlling the Aircraft
Intelligent Flight Mode
Goggles support Intelligent Flight Modes including TapFly, ActiveTrack, Terrain
Follow and Tripod. Refer to the aircraft’s user manual for more details.
Shortcut Menu
Swipe downward with two fingers on the touch panel to enter the shortcut menu.
Move the cursor and tap the touch panel to turn functions on/off. Goggles supports
head tracking control, allows the aircraft follow head movements.
Motion-controlled flight
Move your head to control the aircraft and the gimbal. Turn left and right to
Page 14

control the yaw of the aircraft, turn up and down to control the pitch of the
While browsing photos or videos, swipe upward/downward to
download or delete files.
gimbal (-90° to 30°).
Motion-controlled gimbal
Move your head to control the gimbal. Turn left and right to control the yaw of
the gimbal (-30° to 30°), and turn up and down to control the pitch of the gimbal
(-90° to 30°).
Video Play
Watch flight videos or HD video content through the Goggles for an immersive
viewing experience.
Flight Photo/Video
Select Tools > Replay to enter the playback page for flight photos and videos.
Local Storage
Remove the Micro SD card from the aircraft and insert it into the Micro SD card
slot on the Goggles then select Local Storage.
Aircraft Storage
Select Aircraft Storage to preview images stored on the aircraft.
Page 15

Video Play
Connect a video source to the Goggles with an HDMI cable, and select Tools > HDMI
Input to view in HD. Set the brightness, volume and input source. Charging the
Goggles
Charging the Goggles
1. Connect the battery charger to a power outlet (100-240V, 50/60Hz).
2. With the Goggles powered off, connect the charging port on the strap to the
charger with the Micro USB cable included.
3. The Charging Status Indicator will go solid red, yellow and green in order when
charging. Battery Level Indicators will blink green to indicate the current
battery level.
4. The Battery is fully charged when the Charging Status Indicator or the Battery
Level Indicators turn off. Disconnect the Goggles from the charger.
Page 16

The Goggles’ battery is located on the strap. Connect the strap to the
charger for charging. The battery is fully charged when the Charging
Status Indicator turns off.
A standard charger is recommended for charging. It takes
approximately 4 hours to fully charge the battery. Other chargers may
take longer.
Page 17

Upgrading the Firmware
Use DJI Assistant 2 to upgrade the Goggles.
1. Power on the Goggles and connect it to a computer with a Micro USB cable.
2. Launch DJI Assistant 2 and login with a DJI account.
3. Select “Goggles” and click “Firmware Upgrade” on the left.
4. Select the firmware version required.
5. DJI Assistant 2 will download and upgrade the firmware automatically.
6. Restart Goggles after the firmware upgrade is complete.
Page 18

Specifications
Weight
Lenses: 490 g
Strap: 520 g
Dimensions
Lenses: 195×155×110 mm
Strap (Folded): 255×205×92 mm
FOV
85° (single screen)
Screen Size
5 inch×2
Interpupillary
Distance Range
58 – 70 mm
Screen Resolution
3840×1080 (single screen: 1920×1080)
Operating Frequency
2.4 GHz
Max. Transmission
Distance
Same as the aircraft connected
Video Downlink
Resolution
1080p30, 720p60, 720p30
Min. Video Downlink
Latency
(Near field and free of
interference)
120 ms (Mavic Pro, 720p60, video format: 720p120)
150 ms (Phantom 4, 720p60, video format: 720p60)
150 ms (Phantom 4 Pro, 720p60, video format:
720p60/720p120)
140 ms (Inspire 2+X5S, 720p60, video format: 16:9 120p)
190 ms (Inspire 2+X4S, 720p60, video format: 1080p60)
Page 19

Battery Capacity
9440 mAh
Battery Energy
35.44 Wh
Max Operating Time
6 hrs
Operating
Temperature Range
32°F (0°C) - 104°F (40°C)
I/O Interface
Micro USB, audio jack, HDMI type D, Micro SD card slot
HDMI Supported
HDMI 1.4b, HDCP 1.4
Sensors
Gyroscope, Accelerometer, Proximity sensor
Page 20

Compliance Information
FCC Regulatory Statement
This device complies with Part 15 of the FCC Rules. Operation is subject to the following
two conditions: (1) This device may not cause harmful interference, and (2) This device
must accept any interference received, including interference that may cause undesired
operation.
Any changes or modifications not expressly approved by the party responsible for
compliance could void the user’s authority to operate the equipment.
Notice:
This equipment has been tested and found to comply with the limits for a Class B digital
device, pursuant to Part 15 of the FCC Rules. These limits are designed to provide
reasonable protection against harmful interference in a residential installation. This
equipment generates, uses and can radiate radio frequency energy and, if not installed
and used in accordance with the instructions, may cause harmful interference to radio
communications. However, there is no guarantee that interference will not occur in a
particular installation.
If this equipment does cause harmful interference to radio or television reception, which
can be determined by turning the equipment off and on, the user is encouraged to try to
correct the interference by one or more of the following measures:
Reorient or relocate the receiving antenna.
Increase the separation between the equipment and receiver.
Connect the equipment into an outlet on a circuit different from that to which the
receiver is connected.
Consult the dealer or an experienced radio/TV technician for help.
FCC Radiation Exposure Statement
This equipment complies with FCC radiation exposure limits set forth for an uncontrolled
environment. This transmitter must not be co-located or operate in conjunction with any
other antenna or transmitter.
This equipment has been tested and meets the FCC RF exposure guidelines. During
testing, Goggles radios were set to their highest transmission levels and placed in positions
that simulate normal use. Operate the Goggles according to the manual to keep
compliance.
ISEDC RSS Regulatory Statement
This device complies with ISEDC license-exempt RSS standard(s). Operation is
subject to the following two conditions:
(1) this device may not cause interference, and
(2) this device must accept any interference, including interference that may cause
undesired operation of the device.
Le présent appareil est conforme aux CNR d'ISEDC applicables aux appareils
radio exempts de licence. L'exploitation est autorisée aux deux conditions suivantes :
(1) l'appareil ne doit pas produire de brouillage, et
Page 21

(2) l'utilisateur de l'appareil doit accepter tout brouillage radioélectrique subi, même si le
brouillage est susceptible d'en compromettre le fonctionnement.
ISEDC Radiation Exposure Statement
This equipment complies with ISEDC radiation exposure limits set forth for an uncontrolled
environment.This transmitter must not be co-located or operating in conjunction with any
other antenna or transmitter.
Cet appareil est
conforme aux limitesd'exposition de rayonnement RF ISEDC établiespour un environnement
non contrôlé. Cetémetteur ne doit pas être co-implanté oufonctionner en conjonction avec
toute autreantenne ou transmetteur.
CAN ICES-3 (B)/NMB-3(B)
EU Compliance Statement
SZ DJI TECHNOLOGY CO., LTD. hereby declares that this device is in compliance with
the essential requirements and other relevant provisions of the RED Directive.
A copy of the EU Declaration of Conformity is available online at www.dji.com/eurocompliance
EU contact address: DJI GmbH, Industrie Strasse. 12, 97618, Niederlauer, Germany.
Environmentally friendly disposal
Old electrical appliance must not be disposed of together with the residual waste,
but have to be deposed of separately. The disposal at the communal collection point
via private person is for free. The owner of old appliance is responsible to bring the
appliances to these collecting point or to similar collection points. With this little personal
effort, you contribute to recycle valuable raw materials and the treatment of toxic
substances.
KCC Warning Statement
(1) 이 기기는 가정용으로 전자파적합등록을 한 기기로서 주거지역에서는 물론 모든
지역에서 사용할 수 있습니다.
(2) 당해 무선설비는 전파혼신 가능성이 있으므로 인명안전과 관련된 서비스는 할
수 없음。
NCC Warning Statement
根據 NCC 低功率電波輻射性電機管理辦法 規定:
(1) 第十二條經型式認證合格之低功率射頻電機,非經許可,公司、商號或使用者均不得擅
自變更頻率、加大功率或變更原設計之特性及功能。
(2) 第十四條低功率射頻電機之使用不得影響飛航安全及干擾合法通信;經發現有干擾現象
Page 22

時,應立即停用,並改善至無干擾時方得繼續使用。
前項合法通信,指依電信法規定作業之無線電通信。
低功率射頻電機須忍受合法通信或工業、科學及醫療用電波輻射性電機設備之干擾。
NBTC Warning Statement
.
IFETEL Warning Statement
“La operación de este equipo está sujeta a las siguientes dos condiciones: (1) es posible
que este equipo o dispositivo no cause interferencia perjudicial y (2) este equipo o
dispositivo debe aceptar cualquier interferencia, incluyendo la que pueda causar su
operación no deseada.”
 Loading...