

Page 1

DJI FOCUS
Wireless Lens Control System
User Manual
V1.0 2015.09
Page 2

Disclaimers and Warnings
Congratulations on purchasing your new DJI product. Please read this manual and disclaimer
carefully before using this product. By using this product, you hereby agree to this disclaimer and
signify that you have read it fully. You agree that you are responsible for your own conduct and any
content created while using this product, and for any consequences thereof. You agree to use this
product only for purposes that are proper and in accordance with local regulations, terms and any
applicable policies and guidelines.
By reading this disclaimer, you also agree:
1. Any part of this disclaimer is subject to change without prior notice, refer to www.dji.com for
the latest version.
2. DJI reserves the right of final interpretation of this disclaimer.
As DJI has no control over use, setup, final assembly, modification or misuse, no liability shall be
assumed or accepted for any resulting damage or injury. By the using, setting up, or assembling of
the product, the user accepts all resulting liability. DJI assumes no liability for damages or injuries
incurred directly or indirectly from the use of this product.
DJI is registered trademark of DJI. All names of products, brands, etc., appearing in this manual are
trademarks or registered trademarks of their respective owner companies. This product and
manual are copyrighted by DJI, with all rights reserved. No part of this product or manual shall be
reproduced in any form without the prior written consent or authorization of DJI. No patent liability
is assumed with respect to the use of the product or information contained herein.
Page 3

*Navigating to a Topic
View a complete list of topics in the table of contents. Click on a topic to navigate to that section.
*Searching for Keywords
Search for keywords such as “battery” and “install” to find a topic. If you are using Adobe Acrobat
Reader to read this document, press Ctrl+F on Windows or Command+F on Mac to begin a search.
Using this Manual
Legend
Important Tips
Page 4

Content
Disclaimers and Warnings ................................................................................................................. 2
Using this Manual ............................................................................................................................. 3
Legend ....................................................................................................................................... 3
In the Box .......................................................................................................................................... 5
Introduction ...................................................................................................................................... 6
Controller .................................................................................................................................. 6
Motor ........................................................................................................................................ 8
Installation......................................................................................................................................... 8
Mounting Antenna .................................................................................................................... 8
Mounting Follow Focus Ring ..................................................................................................... 9
Mounting the Motor ............................................................................................................... 10
Binding .................................................................................................................................... 11
System Status LED Information ............................................................................................... 12
Settings ............................................................................................................................................ 13
Calibrate .................................................................................................................................. 13
Menu ....................................................................................................................................... 14
Quick Focus Settings ............................................................................................................... 15
Locking Buttons ....................................................................................................................... 15
Using with Zenmuse X5 ................................................................................................................... 16
Connection .............................................................................................................................. 16
Settings .................................................................................................................................... 17
Upgrade ........................................................................................................................................... 17
Install DJI PC/MAC Assistant.................................................................................................... 17
Upgrade ................................................................................................................................... 18
Specifications .................................................................................................................................. 19
Page 5
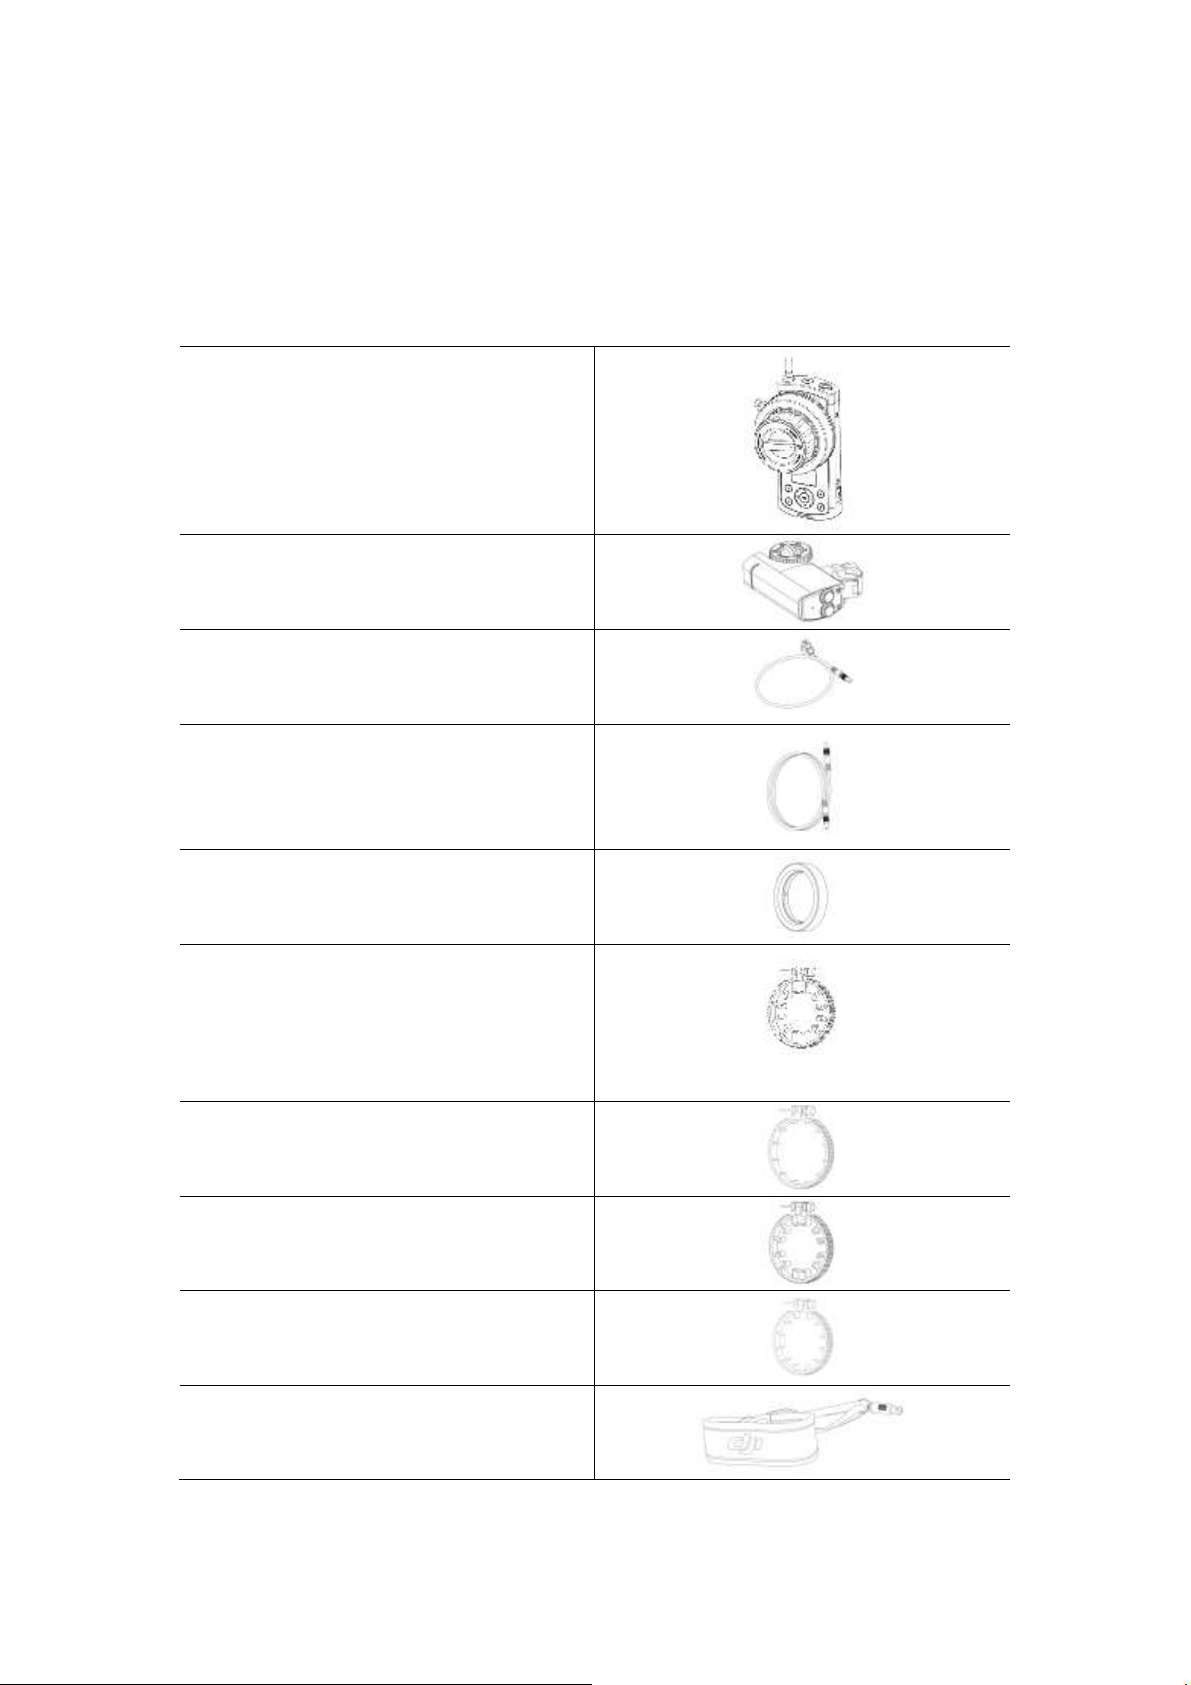
In the Box
Controller X 1
Modular hand-held control unit, for controlling
Motor.
Motor X 1
For controlling lens.
Power Cable X 2
For connecting the motor to an external power
supply.
Signal Cable X 1
Connecting the controller and motor for cable
mode or upgrade.
Marker Ring X 3
For motor control knob.
Lens Ring X 1
For mounting on the lens.
Number of teeth: 105,Module: 0.8,Inner
diameter: 60mm
Lens Ring X 1
Number of teeth: 105,Module: 0.8,Inner
diameter: 80 mm
Lens Ring X 1
Number of teeth: 105,Module: 0.8,Inner
diameter: 70 mm
Lens Ring X 1
Number of teeth: 105,Module: 0.8,Inner
diameter: 90 mm
Strap X 1
For carrying the controller around the neck or
over a shoulder between takes.
Check to ensure that all of the following items are included in the package. If any items are missing,
contact DJI or your local dealer.
Page 6

Introduction
The DJI Focus is a professional Wireless Lens Control System, consist with a controller and motor.
The controller is the modular hand-held control unit, with ergonomic design and a simple, intuitive
interface for controller the motor. The motor is virtually silent at less than 25 dB(when motor speed
is at 96 rpm), its maximum speed can up to 192 rpm, and the maximum torque can reach at 0.35Nm.
The DJI Focus is able to work on wireless mode and cable mode, the max transmission distance is
100 m.
Controller
1. Antenna
The operating frequency is 2.4 GHz.
2. Power Button
Press the power button and hold it for 2 seconds to turn on/off the controller.
3. Data Port
To communicate with the motor by connecting the data ports on the controller and motor, and
Page 7

also can be used to upgrade.
4. Marker Ring
For marking scale values, it can be exchanged easily.
5. Control Knob
For controlling motor by turning the control knob.
6. Micro USB Port
For charging or upgrading the controller via a micro USB cable.
7. Menu Button
Including an OK button and four direction buttons.
8. Quick Focus Buttons
A, B, C, D buttons are separately represent a corresponding focus value, you may pre-set the focus
and quickly switch to your desired focus by pressing the button.
9. OLED Screen
Displays the communication status, battery level and menu.
10. Damping Control Knob
The damping of the control knob can be adjusted by this knob.
11. System Status LED
Indicates the system status.
12. Reserved Plate Mount
Reserved.
13. 14 Mechanical Limits
Control knob limits allow you to use a portion of the knob rotation to control the corresponding
portion of lens scale.
15. LED
For LED scale illumination.
16. Strap mounting Hole
For mounting the Strap.
17. Bind Button
For binding with the motor or enabling force upgrade.
18. Screw
Page 8

To remove the cover of the controller by loosen this screw, so that you can replace the battery.
Motor
1. Gear Screw
For secure the gear, the gear can be mounted on both sides of the motor.
2. Gear
For controlling the lens.
3. Quick-released Mount
For mounting the motor on the camera. The mounting place can be adjusted by sliding the mount
upward or downward.
4. Power/Data Port
The two ports are the same. Connect the motor to an external power supply through one port. If
you are willing to enable cable mode, connect another port to the controller.
5. Bind Button
For binding with the controller.
6. System Status LED
Indicates the system status.
Installation
Mounting Antenna
Tighten the antenna to the mounting position on the controller.
Page 9

If your camera comes with lens ring, please skip this step.
Mounting the Strap
Pull down the switch and attach the strap to the mounting place on the bottom of controller, then
release the switch. The fastener is designed to enable the controller to rotate freely. Ensure the
fastener is secure.
Mounting Lens Ring
DJI Focus provides four different types of lens ring, please choose the proper ring according to your
camera lens.
Insert the ring to the lens and tighten the screw. Be sure the ring and the lens make good contact.
Page 10

Mounting the Motor
The following steps show how to mount the motor to camera support rods. The motor comes with
rod clamp with two inner diameters.
1. Loosen the knob on the quick-release mount and attach the motor to the rod, and adjust the
quick-released mount on the motor so that the gear can make full contact with the lens.
2. Press the gear firmly against the lens and tighten the knob. Ensure the motor gear and the lens
ring make good contact.
3. Connect the power port on the motor to an external power supply by using the provided power
cable. For example, if you are using the camera mounted on the Ronin-M, connect the motor to
the P-TAP accessories power port on the Ronin-M.
Page 11

If the data ports on the controller and motor is connected, the DJI Focus will work on
cable mode and the wireless mode is disable.
Make sure the motor is mounted securely.
Do not put your fingers near the motor when it is moving.
4. DJI Focus is able to work on cable mode and wireless mode. If you willing to use cable mode,
connect the data port on the controller to the other data port on the motor by using the signal
cable.
Binding
The controller is bind to the motor before delivery. Binding is only required when using a new
controller or motor for the first time. Following shows two ways to bind a new controller or motor.
With controller is power on and motor is connected to an external power supply:
1: Press the bind button on the controller, and then press the bind button on the motor within the
following 5 seconds. The system status LEDs on both controller and motor blink slowly (blink once
in a second) indicates the binding is successful.
Page 12

Controller Status LED
Description
Solid on
The controller is connected to the motor,
functioning normally
Blinking quickly(blinks four times a second)
The controller is not connected to the motor /
charging
Solid on
Force upgrade(loader mode)
Motor Status LED
Description
Solid on
The controller is connected to the motor,
functioning normally
Blinking quickly(blinks four times a second)
The controller is not connected to the
motor/overcurrent protection/ charging
Solid on
Force upgrade(loader mode)
2: On the controller, select Menu->Settings->Connect Motor->Connect, and then press the bind
button on the motor within the following 5 seconds. The system status LEDs on both controller and
motor blink slowly (blink once in a second) indicates the binding is successful.
System Status LED Information
The system status LED indicates the status for controller and motor.
Page 13

Settings
Turn on the controller and power on the motor. The OLED of controller will display the following
information:
[1] Battery Level
[2] Scale Percentage
[3] Scale Bar
[4] Menu
[5] Calibrate
[6] Signal Strength
Calibrate
To control the lens accurately, you need to know the lens scale by calibrating the motor. The motor
must be calibrated once restart it.
Auto
It is recommended to calibrate the motor through the auto calibration if the lens has mechanical
limit. Auto calibration use the whole scale of the lens.
On the controller, select ‘Calibrate—>Auto’, the motor will control the lens to rotate until it reaches
the limit. When calibration is complete, select ‘Back’ to apply. You can suspend the calibration by
selecting ‘Stop’.
Manual
Manual calibration enables calibration of devices with no mechanical scale stops. To manually
calibrate:
1. Manual-Remote
Select ‘Calibrate—>Manual-Remote—>Start’, press the upward button and hold it to move the
motor to your desired value. Press the OK button to ‘set’. Then press the downward button and
Page 14

hold it to move the motor to your desired value, then press the OK button to ‘set’. Now you have
● You cannot calibrate lens motor while the camera is running.
● Choose one of the calibration according to your camera lens.
choose a portion of the lens scale.
The order to press the upward and downward button can be switched.
2. Manual-Hand
To quickly calibrate the motor by hand. Select ‘Calibrate—>Manual-Hand—>Start’, rotate the lens
by hand and choose your desire scale and press OK button to ‘set’.
Select ‘Back’ after the calibration is complete. You can suspend the calibration by selecting ‘Stop’.
Menu
Press the right button or OK button to enter Menu. The motor parameters and system parameters
can be configured here. The current firmware version also can be viewed here.
Motor Para
Cali Torque: to set up the auto calibrate stiffness for motor. There are three options:Min, Normal
or Max.
Run Torque: set Min, Normal or Max stiffness for motor as needed when controlling the lens.
Speed: Setting the running speed for the motor, providing three options: Slow, Medium or Fast.
Acceleration: Setting the running acceleration for the motor, providing three options: Slow,
Medium or Fast.
Rack Speed: Setting the speed when switch the pre-set focus between A, B, C or D. The rack speed
can be set among 1% to 100%, and the value is proportional to the Speed and Acceleration.
Direction: Under the ‘Normal’ setting, the lens rotates in the same direction of the motor control
knob. Selecting ‘Reverse’, the rotate direction of lens and motor control knob will in reverse.
Default: Select ‘Default Para’ to restore the motor to default settings.
Settings
Power Off: if the controller has been idle for longer than the specified amount of time, it will turn
off.
Connect Motor: Select ‘Connect’ and then press the bind button on the motor within the following
5 seconds to connect the controller with motor.
Page 15

● After select one of the quick focus, you may still fine tuning the focus by turning the
control knob.
● There are mechanical limits on both control knob and motor. If you are setting the
lens scale at 0% or 100%, please mind that you may fail to fine tuning while control knob
or motor has reach its mechanical limit.
Endpoint: for setting the scale of controller to control the entire lens scale. Select End Point->Set
Point 1, you are setting the starting point. Select Set Point 2, you are setting the end point. This
indicates turning the controller move from point 1 to point 2 to control the entire lens scale.
LED Control: to turn on/off the LED and status LED on controller and motor.
Default: to restore the controller settings to default settings.
About
Displays the firmware version that is currently installed on the controller.
Quick Focus Settings
There are four letter buttons A/B/C/D on the controller, which represent four different focus values.
You may pre-set the four focus so that you can quickly switch to your desired focus by simply press
one button.
Settings
Turn the control knob to control the lens to one focus, then press one of the A/B/C/D buttons and
hold it for a while until the corresponding letter appears on the screen, the letter button will blink
at that time. The focus has been set.
Press the letter button and hold it for a while will disable the chosen focus. The letter will disappear
from the screen.
Apply the Quick Focus
Press the letter button once, the lens will switch to the corresponding focus value, and there will
be a tip on the screen. The selected letter button will show solid on while other letter buttons will
blink at the same time. Repeat to cancel application.
Locking Buttons
All of the buttons on the controller can be locked to avoid wrong operation during usage.
On the main GUI, press and hold the OK button until the lock mark appears on the screen,
Page 16

indicating all the buttons on the controller are locked and any input is invalid. Repeat to unlock
● Make sure the Zenmuse X5 camera is set on AF mode when using the DJI Focus to
control lens motor.
the buttons.
Setting Mechanical Knob Limits
Control knob limits allow you to use a portion of the knob rotation to control the portion lens scale.
1. Loosen the mechanical stops, move one and lock it in your desired position.
2. Move the other mechanical stop so that the space within the two stops represents the portion
of the control knob rotation that you wish to define. Lock the stop.
Using with Zenmuse X5
DJI Focus supports the Zenmuse X5 gimbal and camera. Connect the Focus controller to the remote
controller will be able to control lens motor of Zenmuse X5.
Connection
Using the provided customizable cable connect the data port on the controller to the CAN Bus port
on the Inspire 1 Pro remote controller.
Page 17

Settings
DMG installer supports Mac OS X 10.9 or above.
Enter Menu->Motor Para->Direction/Default
Direction: The direction for motor can be changed here. Under the ‘Normal’ setting, the lens
rotates in the same direction of the motor control knob. Selecting ‘Reverse’, the rotate direction of
lens and motor control knob will in reverse.
Default: Select ‘Default Para’ to restore the motor to default settings.
Upgrade
You can upgrade the firmware through the DJI PC/MAC Assistant.
Install DJI PC/MAC Assistant
a. Installing and Running on Windows
1. Download the DJI WIN DRIVER INSTALLER from the product page on DJI.com.
2. Download the appropriate Assistant installer from DJI.com.
3. Double click the Assistant installer and follow the steps to finish the installation, then launch
the Assistant.
The Assistant installer can be used on Windows XP, Win7, and Win8 (32 or 64 bit)
b. Installing and Running on Mac OS X
1. Download the Assistant installer (.DMG) from DJI.com, then Run the installer and follow the
prompts to finish the installation.
2. When launching for the first time, if using Launchpad to run the Assistant, Launchpad will block
access because Assistant has not been reviewed by the App Store. Locate the Gimbal icon using
the Finder, press “Control,” then click the icon (or right-click the icon using a mouse). Choose
Open from the shortcut menu, then click Open in the dialog box to launch the program.
3. After the first successful launch, double click the Gimbal icon, as usual, to launch the program
using the Finder or Launchpad.
Page 18

Upgrade
You can view the latest firmware version information on this page.
Upgrade the firmware by following the steps below:
Upgrade the Controller
Turn of the controller and connect it to your computer via the Micro-USB cable and wait until the
indicator LED in the Assistant blinks blue. Click “Upgrade” to upgrade the Follow Focus Remote and
Follow Focus Remote Radio.
Upgrade the Motor
Turn on the controller, and connect to the motor through data cable, then connect the controller
to your computer. Click “Upgrade” to upgrade the Follow Focus Motor and Follow Focus Motor
Radio.
Force Upgrade
If you fail to upgrade, press and hold the bind button of the controller or motor, then release the
bind button after powering on, now you can force upgrade.
1. Ensure that your computer is connected to the Internet.
2. Close any antivirus programs and network firewalls.
3. Ensure that the controller or the motor is powered on during the upgrade.
4. Do not disconnect the USB cable during the upgrade.
Page 19

General
Operating Frequency
2.415-2.473 GHz
Max. Transmission Distance
100 m(out and unobstructed)
Transmitter Power
12 dBm
Operating Temperature Range
-20 to 55 ℃
Motor
Weight
170 g
Dimensions
90*50*26 mm
Max. Torque
0.35 Nm
Max. Speed
192 rpm
Working Current
Static current: 80 mA (@12 V)
Stall current: 2.5A (@12 V)
Working Voltage
9-16 V
Noise
<25 dB(@96 rpm)
Rob Clamp Inner Diameter
19 mm or 15 mm
Gear
Teeth: 40, Module: 0.8
Controller
Weight
745 g
Dimensions
153*86*90 mm
Battery
Model: FB01-554461
Type: LiPo
Specifications
Capacity: 1700 mAh,6.29 Wh
Voltage: 3.7 V
Page 20

FCCWarningMessage
Any Changes or modifications not expressly approved by the party responsible for
compliance could void the user’s authority to operate the equipment.
This device complies with part 15 of the FCC Rules. Operation is subject to the following two
conditions: (1) This device may not cause harmful interference, and (2) this device must
accept any interference received, including interference that may cause undesired operation.
This equipment complies with FCC radiation exposure limits set forth for an
environment.
between the radiator& your body.
conjunction with any other antenna or transmitter.
Note: This equipment has been tested and found to comply with the limits for a Class B digital
device, pursuant to part 15 of the FCC Rules. These limits are desi gned to provi de re asonable
protection against harmful interference in a residential installation. This eq uipment generates
uses and can radiate radio frequency energy and, if not installed and used in accordance with
the instructions, may cause harmful interference to radio communications. However, there is
no guarantee that interference will not occur in a particular installation. If this equipment does
cause harmful interference to radio or television reception, which ca n be determined by turning
the equipment off and on, the user is encouraged to try to correct the interference by one or
more of the following measures:
—Reorient or relocate the receiving antenna.
—Increase the separation between the equipment and receiver.
—Connect the equipment into an outlet on a circuit different from that to which the receiver is
connected.
The motor should be installed and operated with minimum distance 20cm
This transmitter must not be co-located or operating in
uncontrolled
—Consult the dealer or an experienced radio/TV technician for help.
ICRSSwarning
This device complies with Industry Canada licence‐exempt RSS standard (s).
Operationis subject to the followingtwo conditions: (1) this device may not cause
interference,and (2)thisdevice mustacceptanyinterference,includinginterference
thatmaycauseundesiredoperationofthedevice.
Le présent appareil est conforme aux CNR d'Industrie Canada applicables aux
appareilsradioexemptsdelicence.
L'exploitationestautoriséeauxdeuxconditionssuivantes:
(1)l'appareilnedoitpasproduiredebrouillage,et
(2)l'utilisateurdel'appareildoit accepter tout brouillage radioélectriquesubi,même
silebrouillageestsusceptibled'encompromettrelefonctionnement.
Page 21

ICRadiationExposureStatement:
This equipment complies with IC RF radiation exposure limits set forth for an
uncontrolled environment. This transmitter must not be co‐located or operatingin
conjunctionwithanyotherantennaortransmitter.
The motor should be installed and operated with minimum distance 20cm between the
radiator& your body.
Any Changes or modifications not expressly approved by the party responsible for
compliancecouldvoidtheuser’sauthoritytooperatetheequipment.
KCCWarningMessage
“해당무선설비는 운용 중 전파혼신 가능성이 있으므로 인명안전과 관련된
서비스는 할 수 없습니다.”
“해당 무선설비는 운용 중 전파혼신 가능성이 ”있음
NCCWarningMessage
低功率電波輻射性電機管理辦法
第十二條經型式認證合格之低功率射頻電機,非經許可,公司、商號或使用者均不得擅
自變更頻率、加大功率或變更原設計之特性及功能。
第十四條低功率射頻電機之使用不得影響飛航安全及干擾合法通信;經發現有干擾現象
時,應改善至無干擾時方得繼續使用。前項合法通信,指依電信法規定作業之無線電通
信。低功率射頻電機須忍受合法通信或工業、科學及醫療用電波輻射性電機設備之干擾。
 Loading...