

Page 1
Page 2

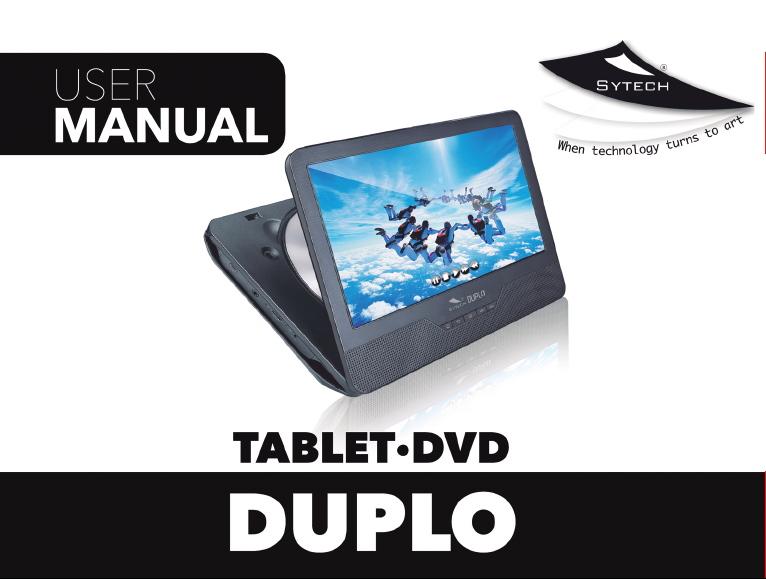
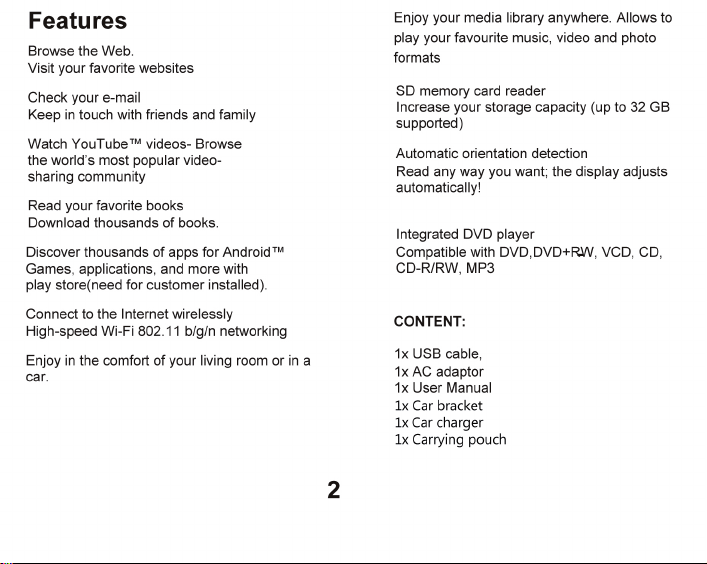
Welcome to Sytech! Thank you for purchasing the 9” Tablet with integrated DVD DUPLO
SY-Z4900. Please read this manual carefully before operating your product and pay close
attention to the precautions which are mentioned below Store this user manual in a safe
place for future reference.
Page 3

SAFETY WARNING
Before operating the unit, please read this
manual thoroughly.
Placement
•Do not place the product on an unstable cart,
stand, tripod, bracket, table or shelf.
•Do not expose the product to direct sunlight and
other sources of heat.
•Do not handle liquids near or on the product.
•Do not put the product near appliances that
create magnetic fields.
•Do not put heavy objects on top the product.
•Do not use a microwave to dry the product. •Do
not let the product fall.
Power Supply
•Check that products operating voltage is identical
with the local 5V/2.5A power adaptor. •Please
unplug power supply and aerial plug when the
weather is thunder storm or lightning.
•Please unplug power supply when there is
nobody at home or didn’t use over a long
period of time.
•Please keep power cord from physical or
mechanical damage.
•Please use original power supply.
•Fever after charging or long – time use is a
normal phenomenon.
Remark:Unit must be charged-up 4 hours
before use.
Temperature
•Do not place the product near or over a radiator or
a heater register.
•If your product is suddenly moved from a cold to a
warm place, unplug the power cord for at least two
hours so that moisture that may have formed inside
the unit can dry completely.
Humidity
•Do not expose the unit to rain, damp or places
near water.
Ventilation
•Please use a dry soft cloth to clean the product.
Do not use alcohol to clean the product.
Battery
•Please do not unplug the battery by yourself. •Please
do not charge the product for too long time.
Storage
•To avoid damage to your SD card/USB storage,
please use setting/storage/ SD Card (USB storage)
unmount storage before unplugging your SD card
or USB storage.
NOTE: Sytech recommends
the use of a screen protector in
1
order to maintain the tablet in
perfect conditions.
Page 4
Page 5
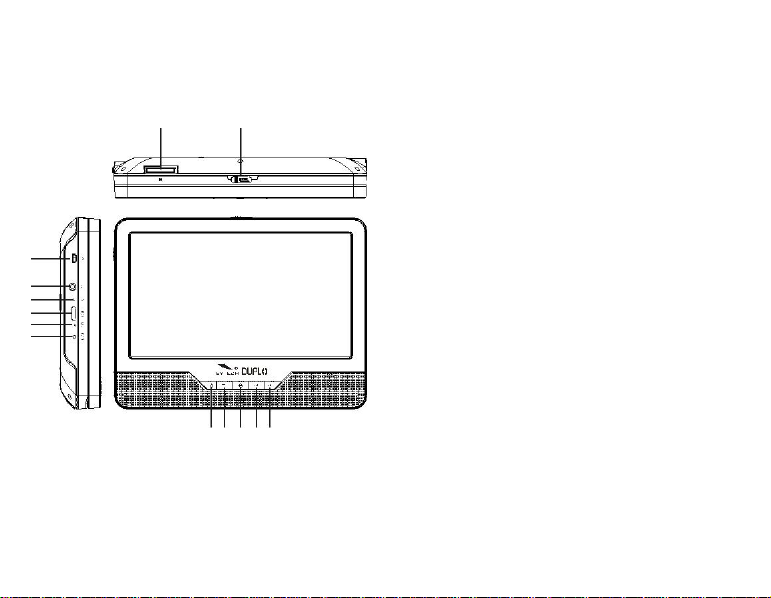
Unit at a Glance
12
13
6
7
8
9
10
11
1. POWER
Press to turn the unit on or off, or to turn the screen
on or off.
a. To turn the unit on, press and hold the power button.
b. To turn the unit off
press and hold the power button to access the
Power Off menu, then you can tap “Power off” to
turn off the unit.
1 2 3 4 5
When in DVD mode, power button is unavailable to be
used. Please return to the Tablet interface for powering
off.
2. Return
Press this button return to the previous page.
3. Home
Press this button return to the home page.
4. VOL-
Decreases the volume.
5. VOL+
Increase the volume.
6. USB HOST
Connect to a USB device or a computer to
transfer data (e.g. music, videos, photos, files).
7. Headphone
Audio output connection for headphones.
8. RESET
Re-start and reset the unit
9. Mini HDMI
Connect to a TV or other displays.
10. MIC
11. DC IN Socket
12. SD CARD
Insert external SD memory cards here.
13. OPEN Switch
Open the disc tray
3
Page 6
Getting Started
Turning the Tablet on or off
To turn the tablet on:
Press and hold the Power key until the LCD
screen turns on. Wait until the home screen
appears; the tablet is now ready for use.
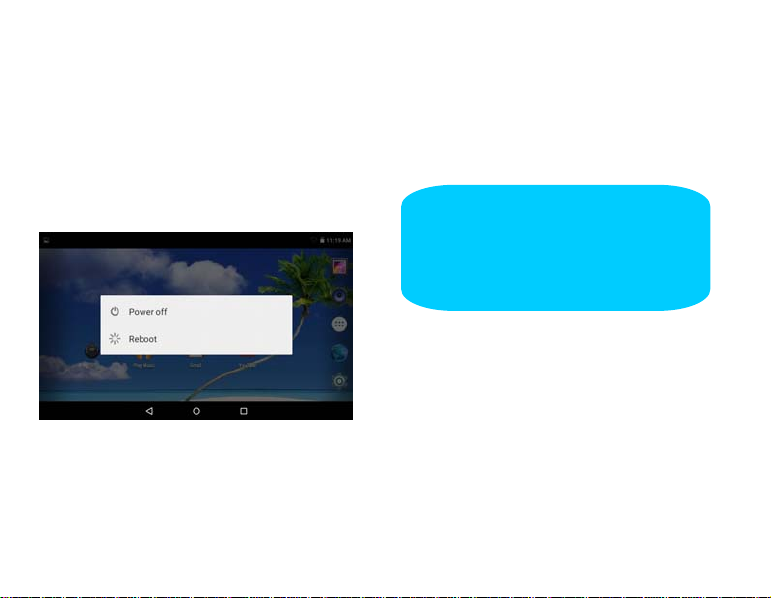
To turn the tablet off:
1. Press and hold the Power key until the
Device Options menu appears.
2. Touch “Power Off” on the screen to turn off
the tablet.
Turning the Screen On or off
(Standby)
When the tablet is on, you can turn off the screen
to conserve battery power. Simply press the Power
key once to turn the screen off. Press the Power
key again to turn the screen back on.
NOTE: To conserve battery power, the
screen can be set to turn off
automatically when the tablet is not in
use (between1 minute and 30
minutes).This Screen timeout option can
be found in the Display menu.
4
Page 7
Getting Started
Unlocking the Screen
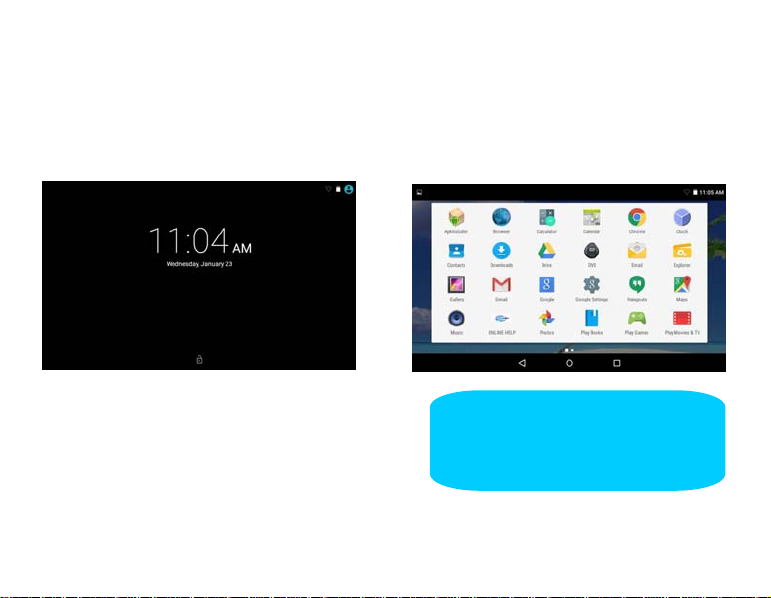
When the screen turns off, you will have to
unlock the screen
To unlock the screen, simply swipe the lock
upwards.
when you turn it back on.
5
About Applications
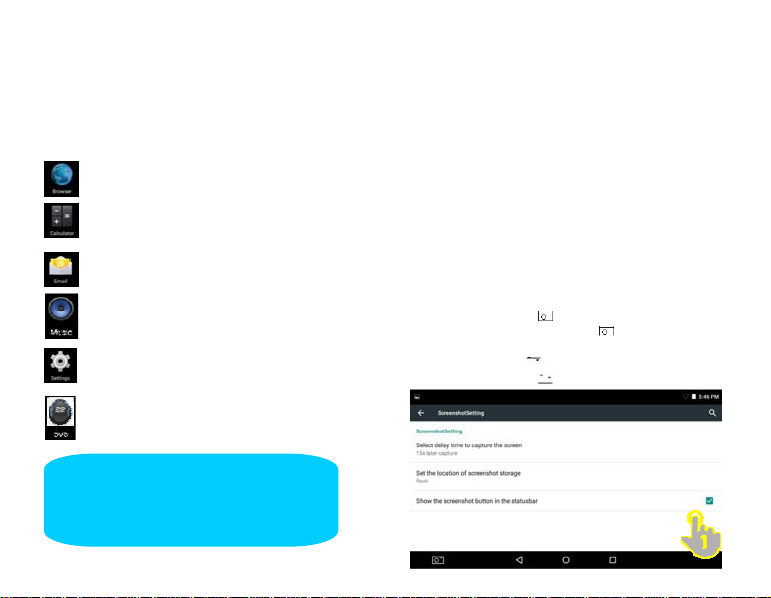
To open an application, touch the application
icon on the home screen or in the Launcher
where you can tap the icon right up on the home
screen to get in.
Launcher screen:
NOTE: The screen shown above is for
illustrative purposes only. Reserves the
right to modify and improve the final list
of applications available on the tablet.
Page 8
About Applications
Preinstalled Applications
Some applications have been installed on your
tablet for your convenience.
These applications include:
Browse the web.
Perform simple mathematical operations.
Check your e-mail.
Play music.
Access the Settings menu to adjust the
tablet’s options.
Access DVD mode
NOTE: Some applications may not
work on the DUPLO tablet as they are
specially created for Mobile phones
Preinstalled Applications
Installing Applications
You can also download and install additional
applications from the device’s applications
marketplace, the web browser, or other sources.
The tablet must be set to allow installation of
applications from non-Market sources. The
Unknown sources option can be set in the
Application settings menu.
Available space for Applications: Up to 2GB
Screenshot Setting
1. Go to SETTINGS-> Device-> Screenshot setting,
2. Tap “Show the screen shot button in the status
bar ”,(1). Then the “
left corner of the screen, tap“
screen
” icon will appear on the lower
” to screen shot any
6
Page 9
Connect to a Wi-Fi network
The Notification bar displays icons that indicate
your tablet’s Wi-Fi status.
Notification that an open Wi-Fi network is in
range.
[No icon] There are no Wi-Fi networks in
range, or the Wi-Fi is off.
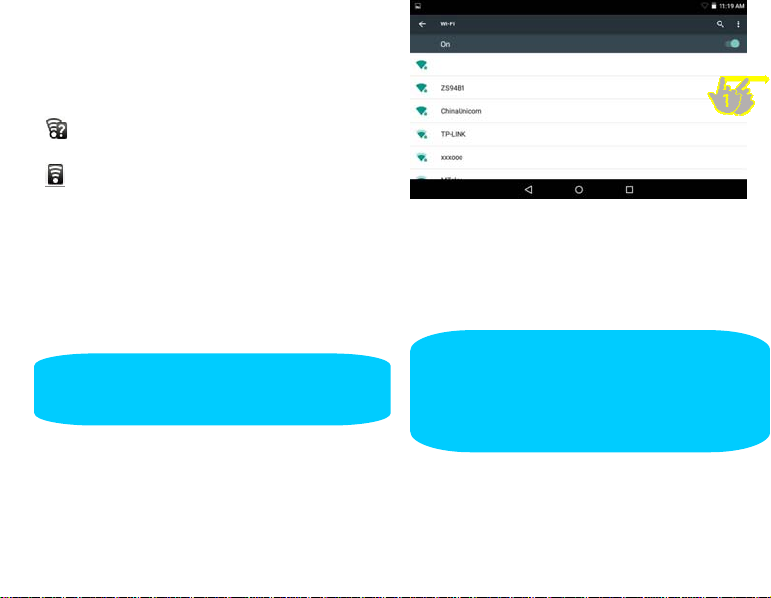
1. Turn on the Wi-Fi feature if it is not already
on. To turn on Wi-Fi:
a. Go to the Home screen: Press the
b. Open the Settings menu
c. Open the Wireless & networks menu:
Connected to a Wi-Fi network (waves
indicate connection strength).
Home key.
Slide the icon to ON status (1)
NOTE: The DUPLO SY-Z4900 is compatible with
the following security and encryption standards:
WEP, WPA, WPA2, TKIP and AES.
When Wi-Fi is on, the tablet will look for and
display a list of available Wi-Fi networks.
NOTE: If a network that you have connected to
previously is found, the tablet will connect to it. If
you don’t see your network in the list, you can
force the tablet to re-scan. To scan for networks,
tap the Menu key, and then touch Scan.
7
Page 10
Connect to a Wi-Fi network
2. Select an available Wi-Fi network to
connect to:
In the same Wi-Fi settings menu above, touch
a network in the list.
If the network is open, the tablet will prompt you
to confirm connection to the network. Touch
Connect to confirm.
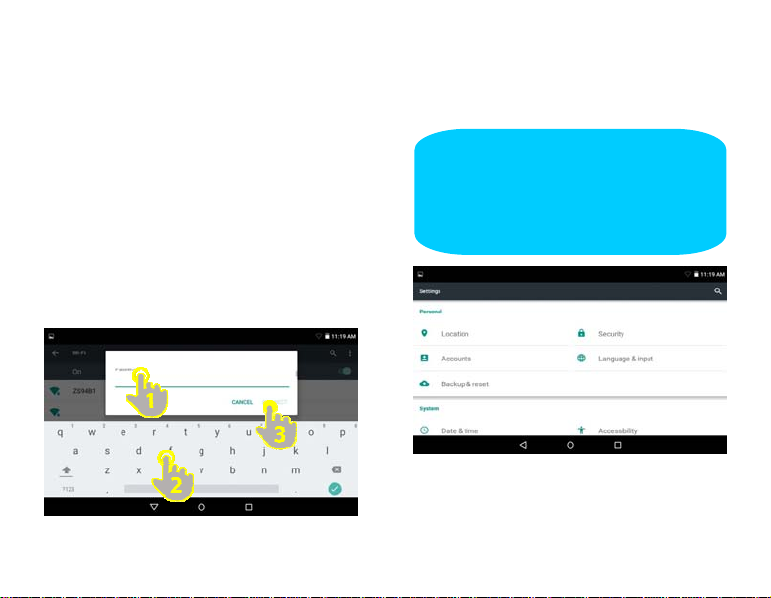
If the network is secured (as indicated by a Lock
icon), the tablet will prompt you to enter a
password or other credentials. Touch the
Wireless password box (1) to show the onscreen keyboard and then use it to enter the
password (2). Touch Connect to confirm.(3)
SYTECH
SYTECH
8
When you have successfully connected to a
Wi-Fi network, the Notifications bar at the upper right of
the screen will show a Wi-Fi signal indicator.
NOTE: To learn about how to add a WiFi network when it is not in range or
when the router is set to obscure the
network name (SSID); or to configure
advanced Wi-Fi options, please refer to
the manual.
Note:
Reset function is only valid when the device is in
charging status. Please connect the power
adaptor when you want to reset.
Page 11
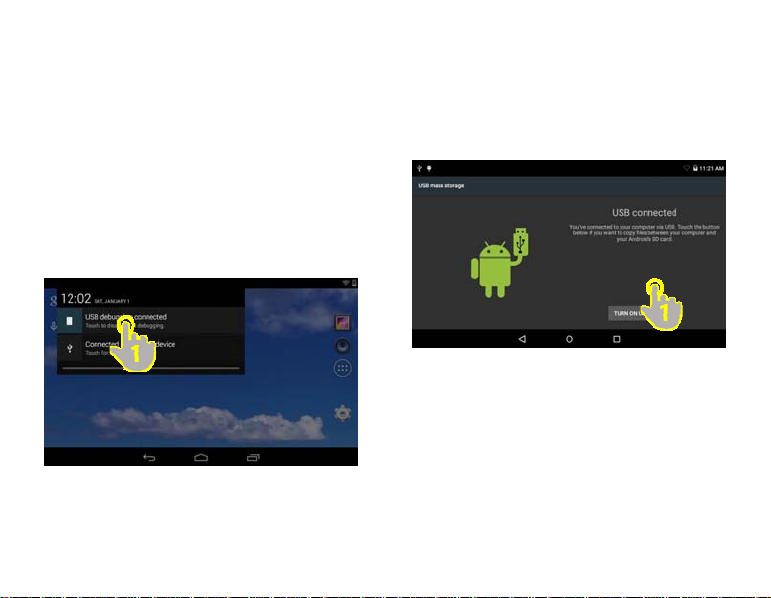
Optional Connections
Connecting to a Computer
Connect the tablet to a computer to transfer files.
1.Connect your tablet to the computer.
With the included USB cable: Plug the small
end of the cable into the USB 2.0 high speed
connector of the tablet. Plug the large end of the
cable into an available USB 2.0 high speed port
on the computer.
2. When your tablet is connected, slide the
USB icon down on the screen and then touch
the icon of USB connected (1).
3. Mount the storage.
Touch the button Turn on USB storage (1) to
connect the tablet’s built-in storage. When it is
connected, you can copy files to or from your
tablet onto the computer.
9
Page 12
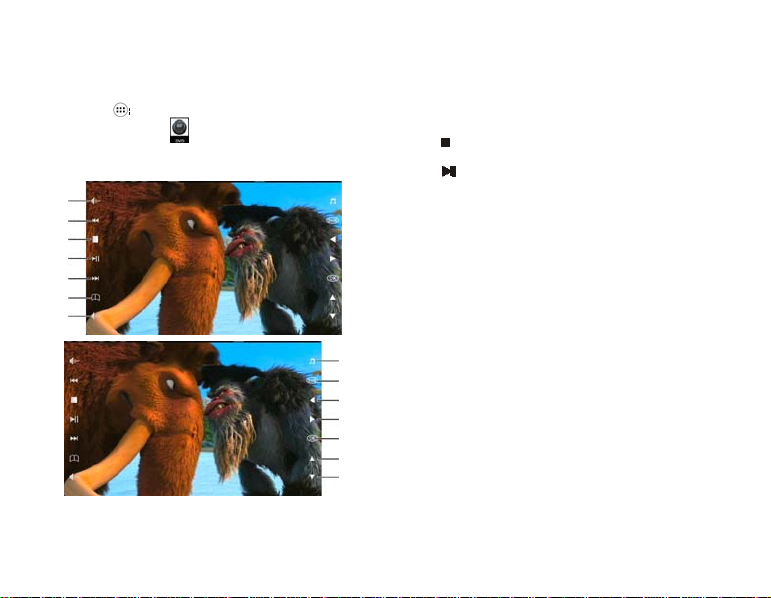
DVD mode
Slide the OPEN switch to open the disc cover .
Load the disc to the disc tray.
Close the disc cover.
Press the “ ” to enter home screen,
then tap DVD icon to playback the disc.
During disc playback,1--14 icons will appear.
1
2
3
4
5
6
7
8
9
10
11
12
13
14
1. VOL-
Decreases the volume.
Play or pause the disc playback
2.Backward
Backward previous titles/chapters/tracks.
3. Stop
Stop playing a disc
4.
5. Forward
Move forward next titles/chapters/tracks.
6.Menu
Enter and exit the main DVD menu.
7. VOL+
Increase the volume.
8. Audio
Select one of the audio sound tracks on a DVD (if
more than one is available) or select the audio output
mode on a CD/MP3.
9. Subtitle
Select a subtitle language programmed on a DVD (if
available)
10/11/13/14 Left/Right/Up/Down/ Cursor
Move between selections on a menu screen and
adjust certain settings.
12. OK
Confirm selections on a menu setting
10
Page 13
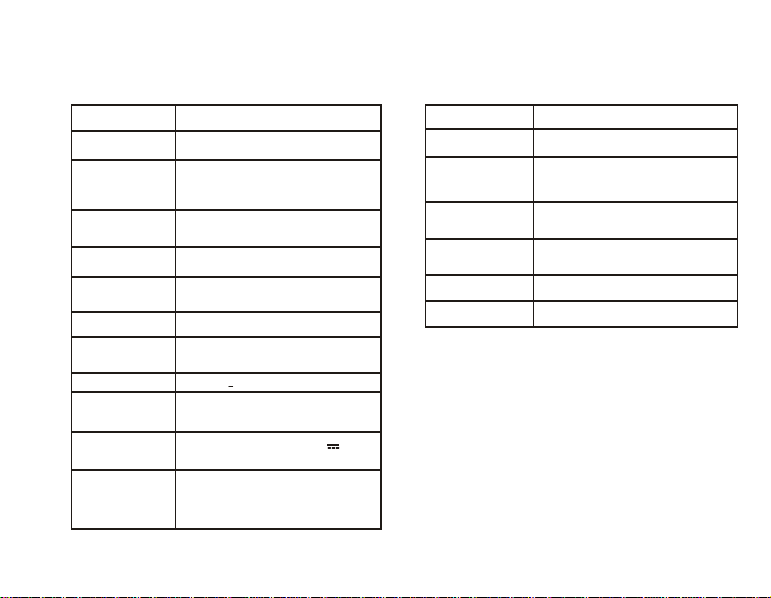
Specifications
Tablet:
Processor RK3128 Quad core 1.3GHz
RAM 1GB DDR3
Storage SD card slot
Display
Wi-Fi
Networking
Audio Output 3.5mm headphone
PC Interface USB 2.0 high speed
Additional Built-in microphone
Features 2x1W speaker
Decoding Format DVD, DVD+RW, VCD, CD, CD-R/RW, MP3
Operating
System
Power
Playback Time
(hours)
8GB flash built-in;
(max.32GB supported)
9 ” TFT LCD (800X480),
Capacitive touch screen
IEEE 802.11 b/g/n
Android™ 5.1
Mains adapter output: 5V 2.5A
Rechargeable Li-poly battery
Up to 6 hours music,
2 hours video,
3 hours web browsing
11
DVD:
Disc format DVD, CD, CD-R, CD- RW, JPEG
Video System PAL, NTSC
Operation
Time
Battery
Capacity
Power
Consumption
Weight 0.8KG
Dimension L225 X W170 X D36MM
* On the mode of DVD playback,
the unit does not support HDMI output
2 Hours fully charged
4000 mAh
< 15W
Features and sp ecifications
are subject to change without prior notice.
Page 14

Environmental disposal
You can help protect the environment!
Please remember to respect the local regulations: hand-in the non-working electrical equipment
to an appropriate waste disposal centre
If you want to dispose of this equipment, please do not use the ordinary dust bin!
- The presence of dangerous substances in the electrical and electronic equipments can have potential
consequences on the environment and human health in the cycle of reprocessing this product.
- Therefore, at the end of its lifetime, this product shall not be disposed with other non-recycled waste.
Used electrical and electronic equipment must be treated separately and in accordance with legislation that
requires proper treatment, recovery and recycling of used electrical and electronic equipment.
- Local authorities and resellers have set special procedures for the purpose of collecting and recycling
this product (please contact your local authority for further details). You have the obligation to use the
selective waste collection systems put in place by your local authority.
- If your used electrical or electronic equipment has batteries or accumulators, please dispose of these
separately beforehand according to local requirements.
By disposing of this product correctly you will help ensure that the waste undergoes the necessary
treatment, recovery and recycling and thus prevent potential negative effects on the environment and
human health which could otherwise arise due to inappropriate waste handling.
12
Page 15
Declaration of Conformity
Manufacturer Name: Satyatrade S. L.
Address: Pol.Ind.La Raya. C/ Guadalquivir, 2.
Camarma de Esteruelas, 28816 Madrid
Tel: 902 430 967
Fax: 91 8864285
NIF: B83254763
Manufacturing country: China
Description: Tablet with integrated portable DVD player
Sytech® SY-Z4900 (DUPLO) complies with the following directives:
CE Standard: Directive 2004/108/EC
ROHS Standard: Directive 2011/65/EU Restriction of Hazardous Substances
Signed: Ajeet Nebhwani Utamchandani
Sole Administrator
13
 Loading...