

Page 1
Page 2

WELCOME
Thank you for having purchased our Digital Recorder SY-1709. In order to fully benefit from the recorder,
please read carefully the user manual and keep it safe for future reference.
SAFETY INSTRUCTIONS
Read this manual before use and keep it handy for future reference.
Precautions
To maintain optimum performance:
Do not use the unit in extreme hot, cold, dusty or high humid places.
Do not use or keep the unit in following places.
● In a high humid area, such as a bathroom or hypogeum.
● In an area exposed to direct sunlight (e.g. inside car where it becomes extreme hot).
● Near sources with strong magnetism, such as television, speaker or magnet.
● In trembled places, such as on the car dashboard or shaky shelf.
For safety
● Do not attempt to disassemble this unit.
● Avoid pins or else objects inside the unit.
● Take care of it, do not throw the unit.
Attention: Do not listen with the earphones as following circs.
● Listen at moderate volume in case of hearing harm.
●
Do not wear the earphones while driving or cycling.it may cause traffic
● You should use it with extreme caution or temporary pause in latent accident situation while walking.
Jogging, etc.
● If you hear soundless, do not turn the volume up too high because the music may suddenly begin at high
volume in case of hurting your ears or damaging the headphone, turn the volume control to the lowest level
before starting playing back and turn it up slowly to the desired level.
accident.
Page 3
LOCATION OF INDICATORS
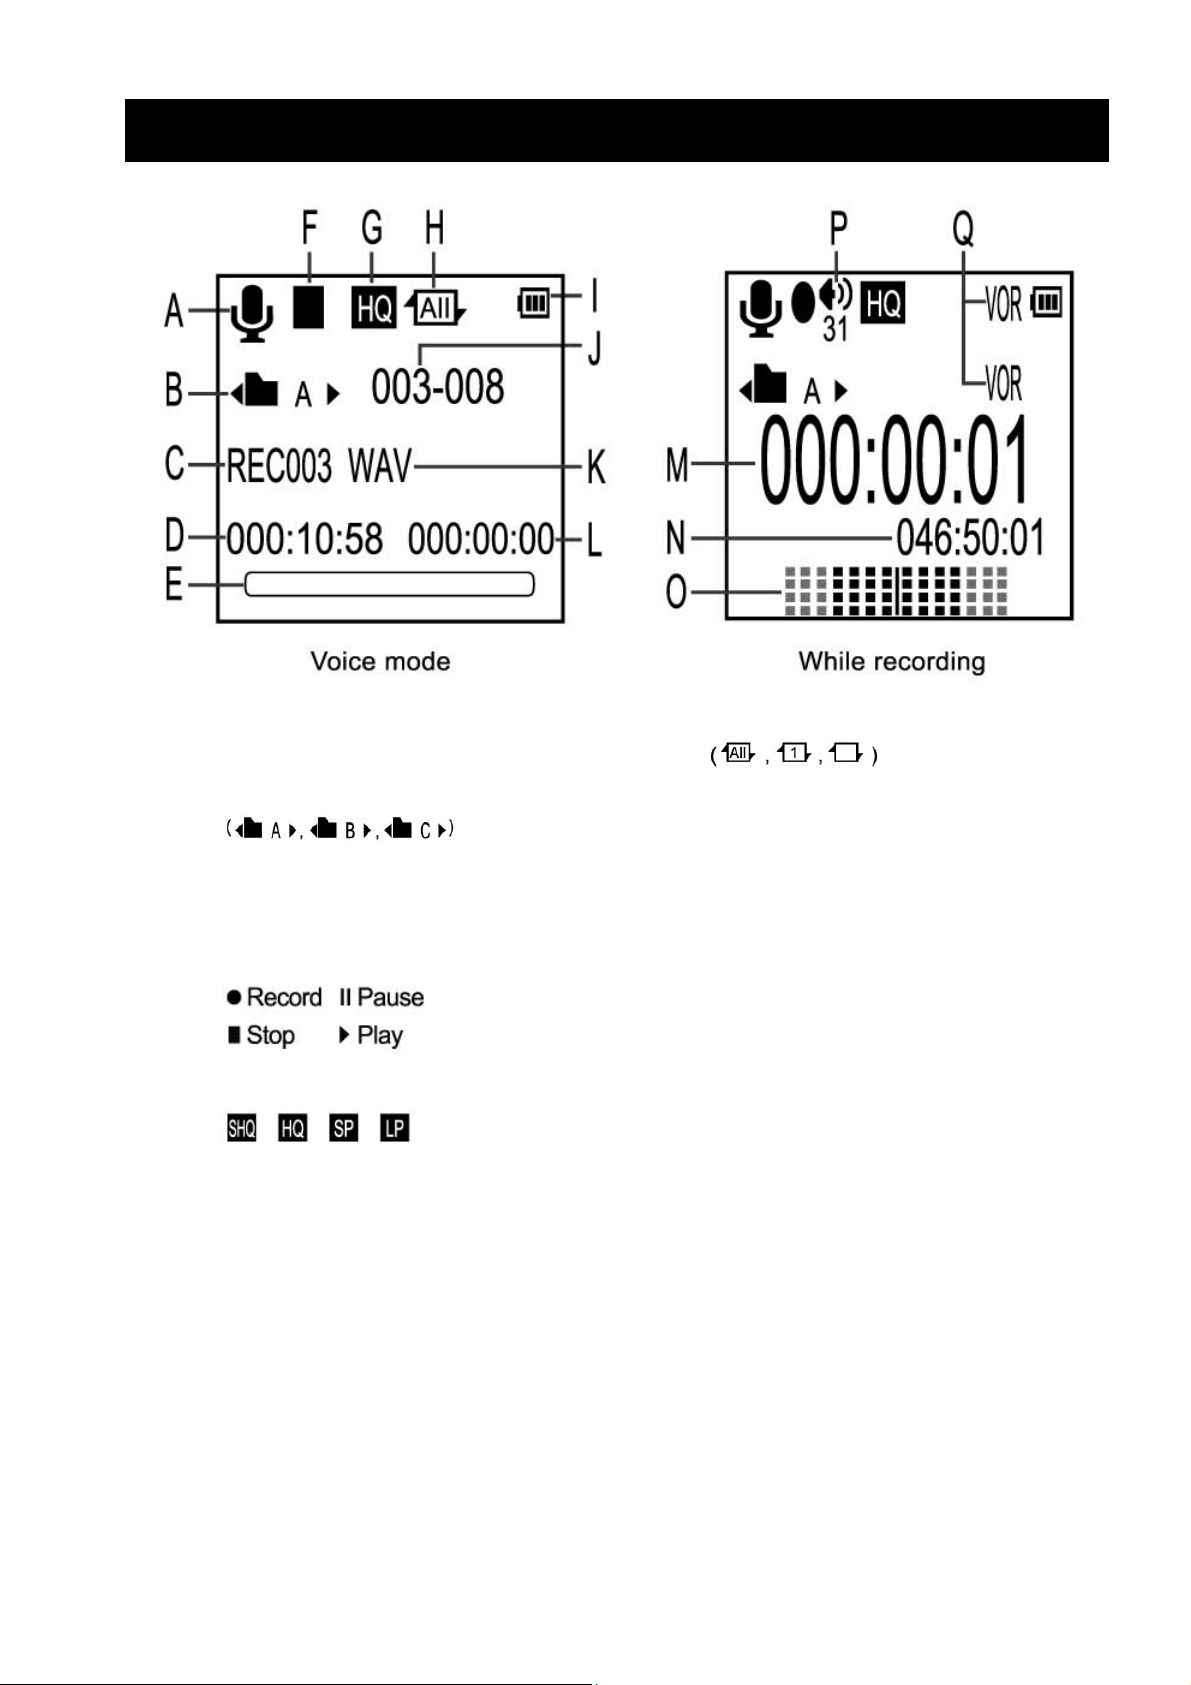
A. Voice mode H. Repeat mode
B. File folder I. Battery level
J. File number
C. file name K. file format
D. Duration of file L. Playing time
E. Navigation bar of playing M. Recording time
F. Operation status N. Remaining recording time
O. Dynamic sound level
G. Recording P. Volume of hearing aid
Q. VOR on indicator.
Page 4
LOCATION OF KEYS
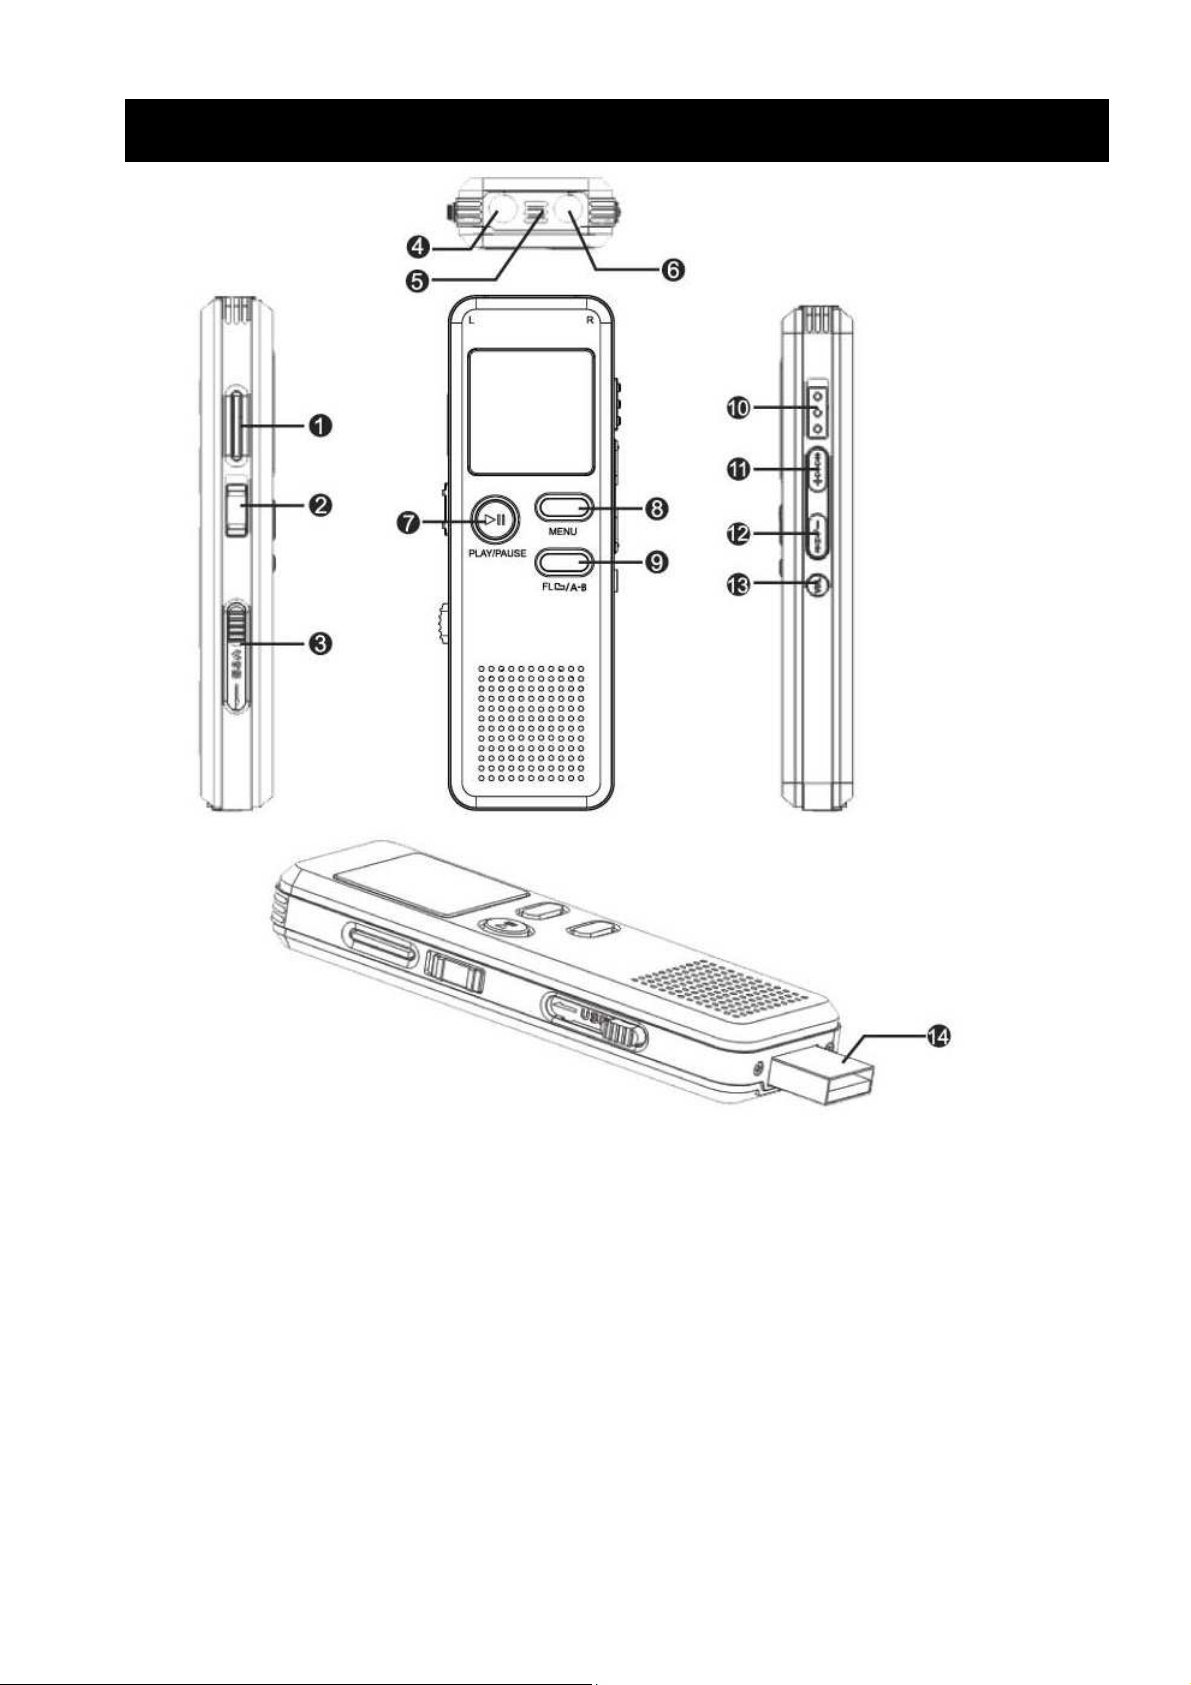
1. Micro SD card slot 8.Menu key
2. Power key 9. File/A-B key
3. USB plug switch 10. Record key
4. Earphones jack 11. Up key(Fast rewind)
5. Built-in microphone 12. Down key(Fast forward)
6. Microphone jack 13.Vol key(volume)
7. Play/Pause key 14.USB plug
Page 5
BASIC OPERATION
It will never affect files stored in the unit to recharge the built-in polymer battery(4 hours).
If you shut down the unit with normal operation, it will keep the date and time by last setting.
① Press down and push the USB plug switch to open the USB plug.
② Connect this unit to the USB interface for battery changing or computer connection.
BATTERY INDICATORS: The battery is full.
The battery is exhausted, and needs to be charged.
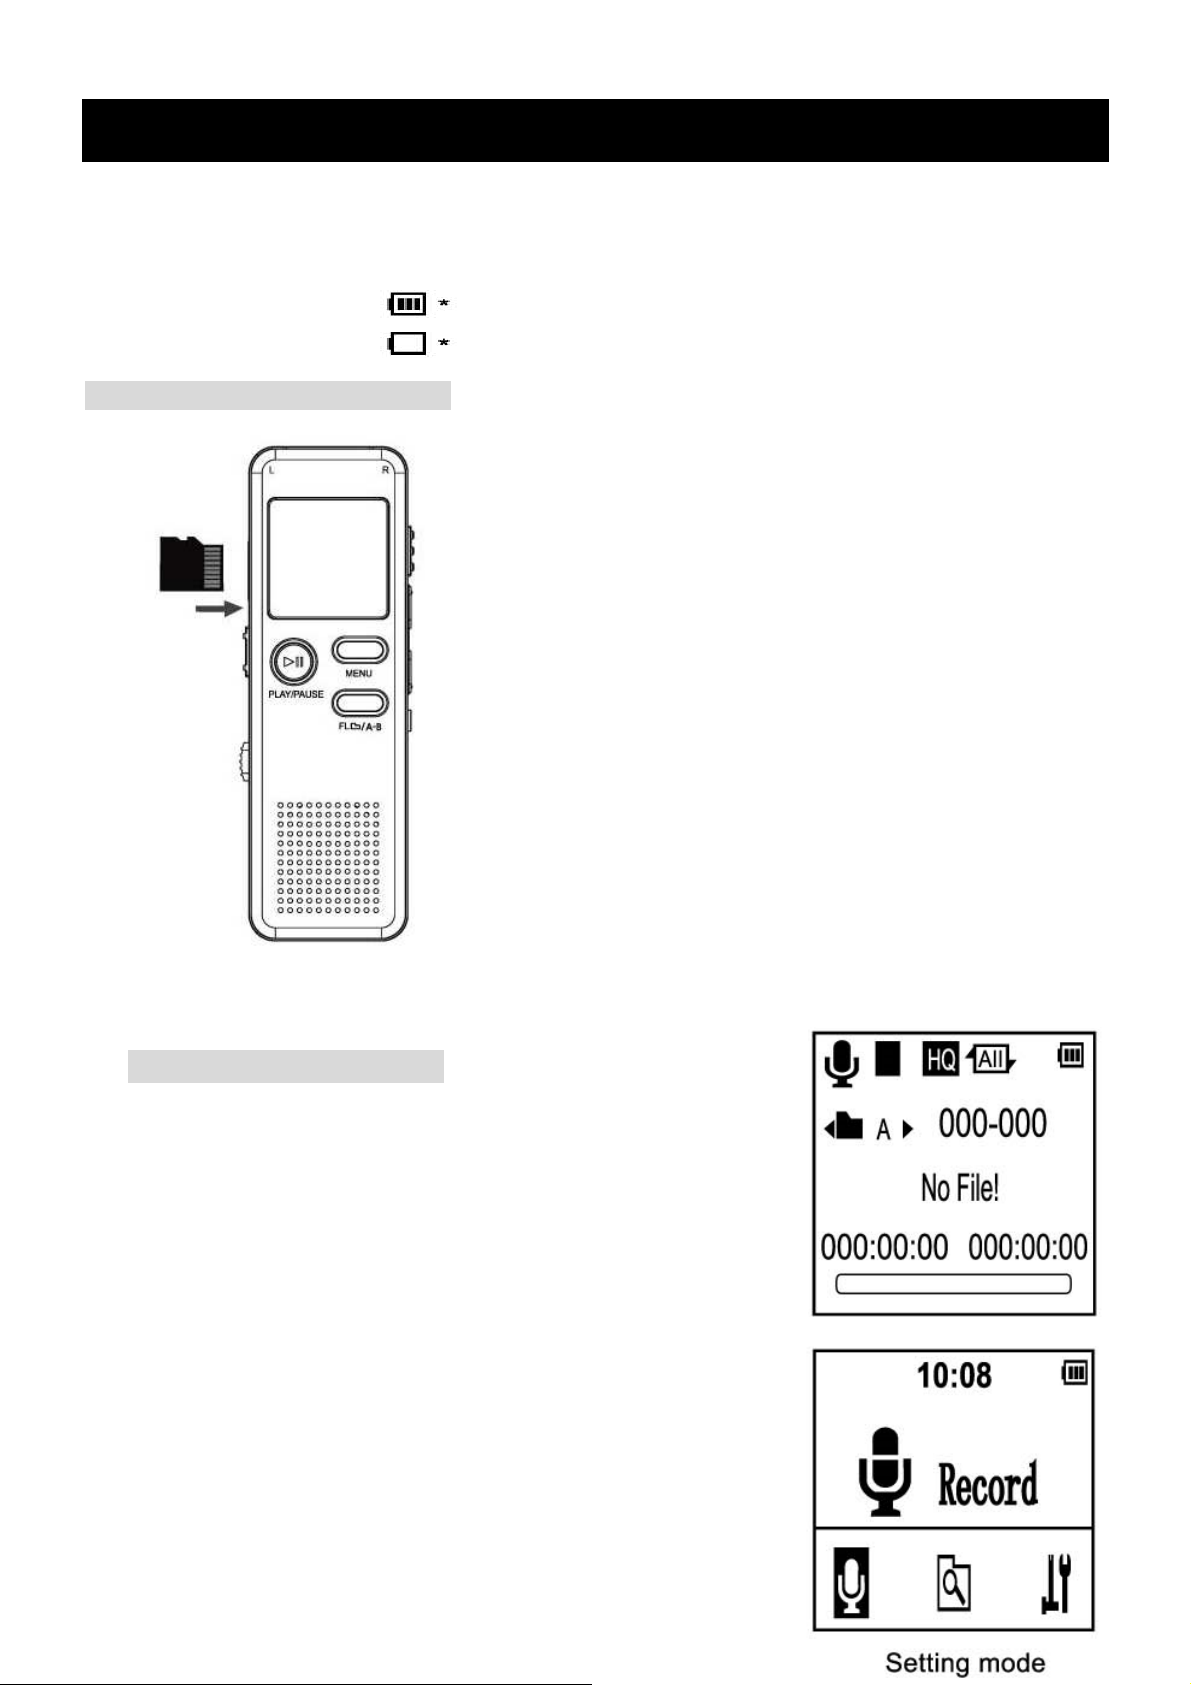
Inserting and removing the card
- This unit is with built-in 8GB flash memory, and you may add
a Micro SD card for extending memory.(128MB~32GB Micro
SD card)
- Insert the Micro SD card into the slot till it ticks, then you may
select this Micro SD card as the storage medium of
recording files.
To turn ON/OFF the unit
1. Push the power key up to turn on the unit, it will turn to the Voice
mode.
2. Push the power key down to power off this unit, then the LCD goes
off, and the unit is turned off.
* You may press and hold PLAY/PAUSE key more than 3secs.to turn it
on/off while the power key is in up position.
1. It’ll turn to Setting mode automatically without any key pressed
after 3mins, and then it’ll turn off without any key pressed after
10mins.
Page 6
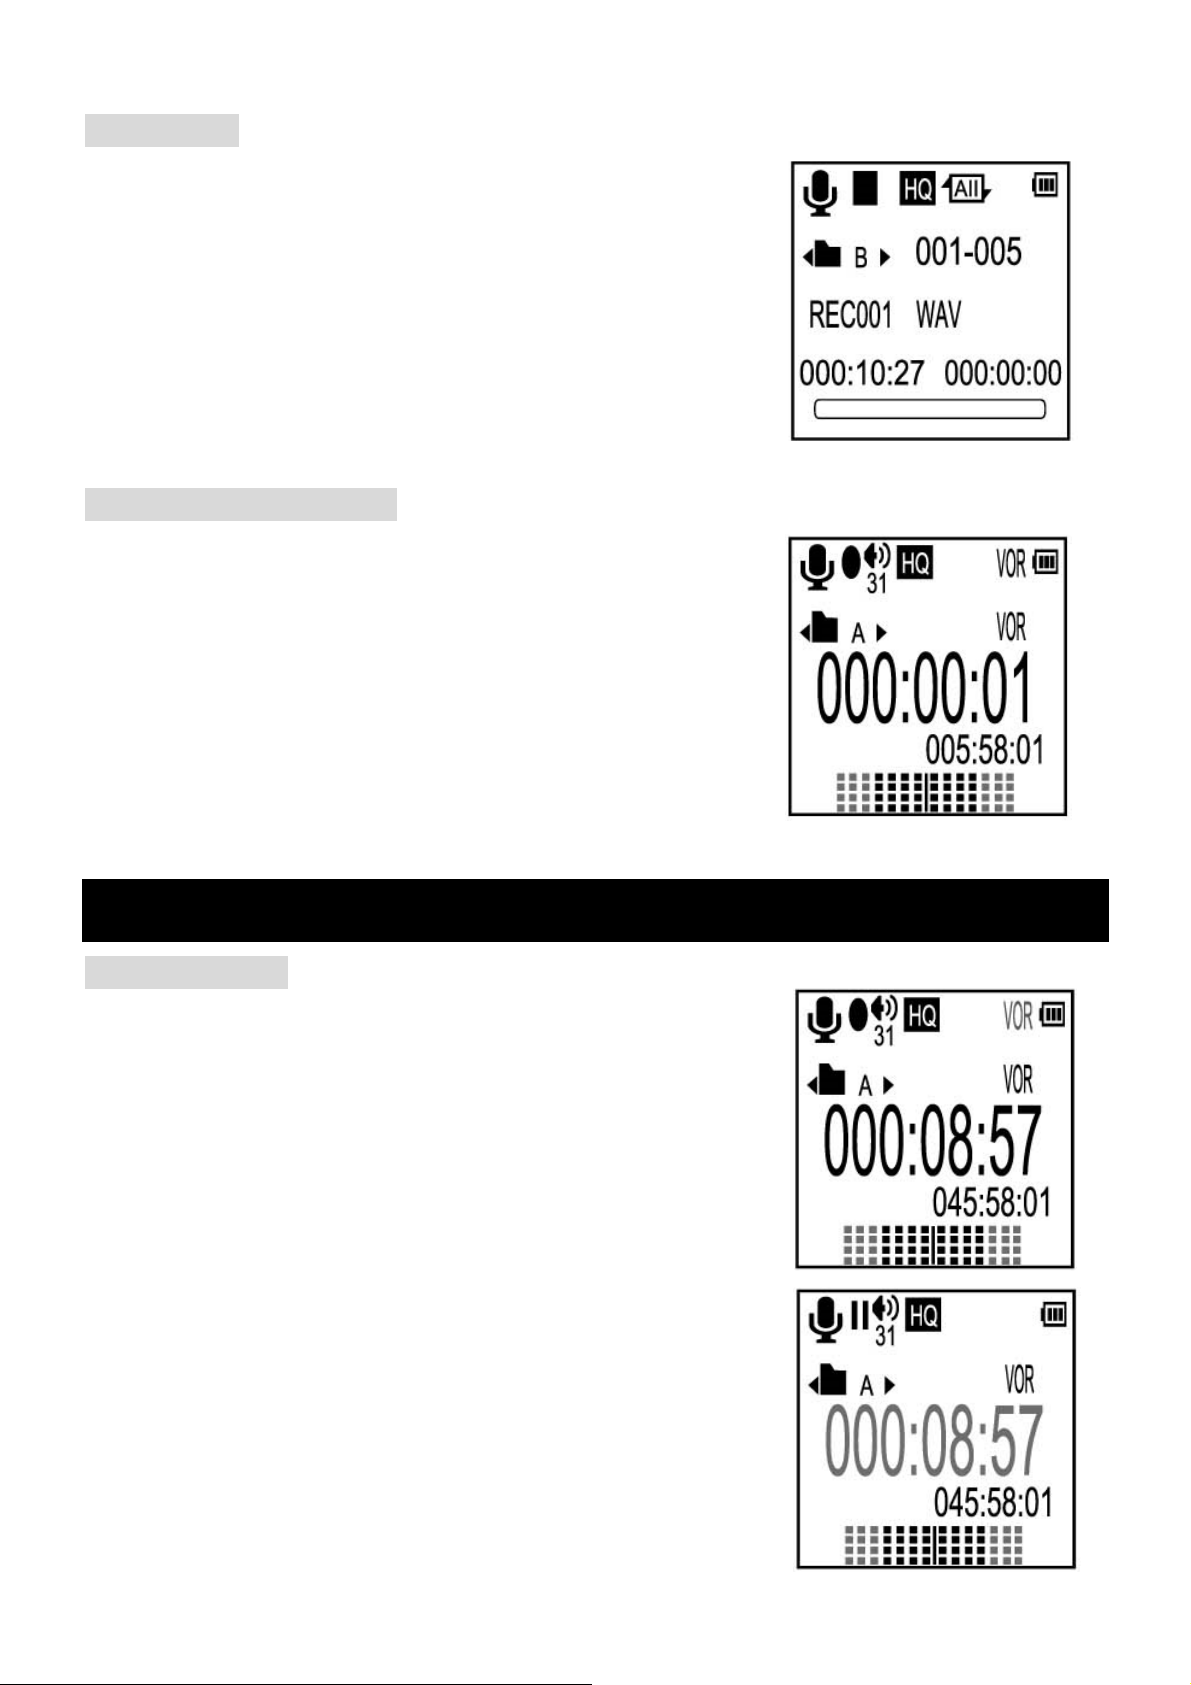
Select a file
There are three memory storage areas (file folder) labeled A,B,C in the
unit for your choice, it can store 999 files in each file folder, so it can store
2997 in all. Absolutely, it must be subject to its memory capacity.
1. At voice mode, press the File/A-B key to switch file folder.
* The Factory setting is “A”
2. As shown on the right picture, it shows the file folder and other
detailed information of this recording file on the LCD.
NOTE: If the memory is full, “FULL” will appear on the LCD, so delete or
remove files, or replace a new Micro SD card as storage.
Preparing for recording
Before recording, you can set the VOR function. If it is turned on and the
detected volume doesn’t reach the VOR level value (set by system), the
recording will pause until it detects eligible volume, otherwise it will
continue recording a soundless section in this file.
1. At voice mode, you may select a desired file by using the file/A-B
key. You may set VOR function in advance.
2. The first several minutes sound may not be recorded, it’s just for
activating the recorder.
OPERATION
Recording files
1. After finishing preparing the operation, just push the Record key up
to start a recording, the elapsed recording time and the other
status will be shown on the LCD.
2. When it doesn’t detect voice, the elapsed recording time will pause,
and the upper “VOR” will blink until it can detect voice again.
1. If you need a pause, just press PLAY/PAUSE key, and the elapsed
recording time pauses and blinks, then press it again to continue
recording. At last, push the Record key down to stop and save this
recording.
NOTE
** There are two ways for recording input (Internal Mic, External Mic).
** It is recommended to place the unit 50mm from the sound source.
Page 7
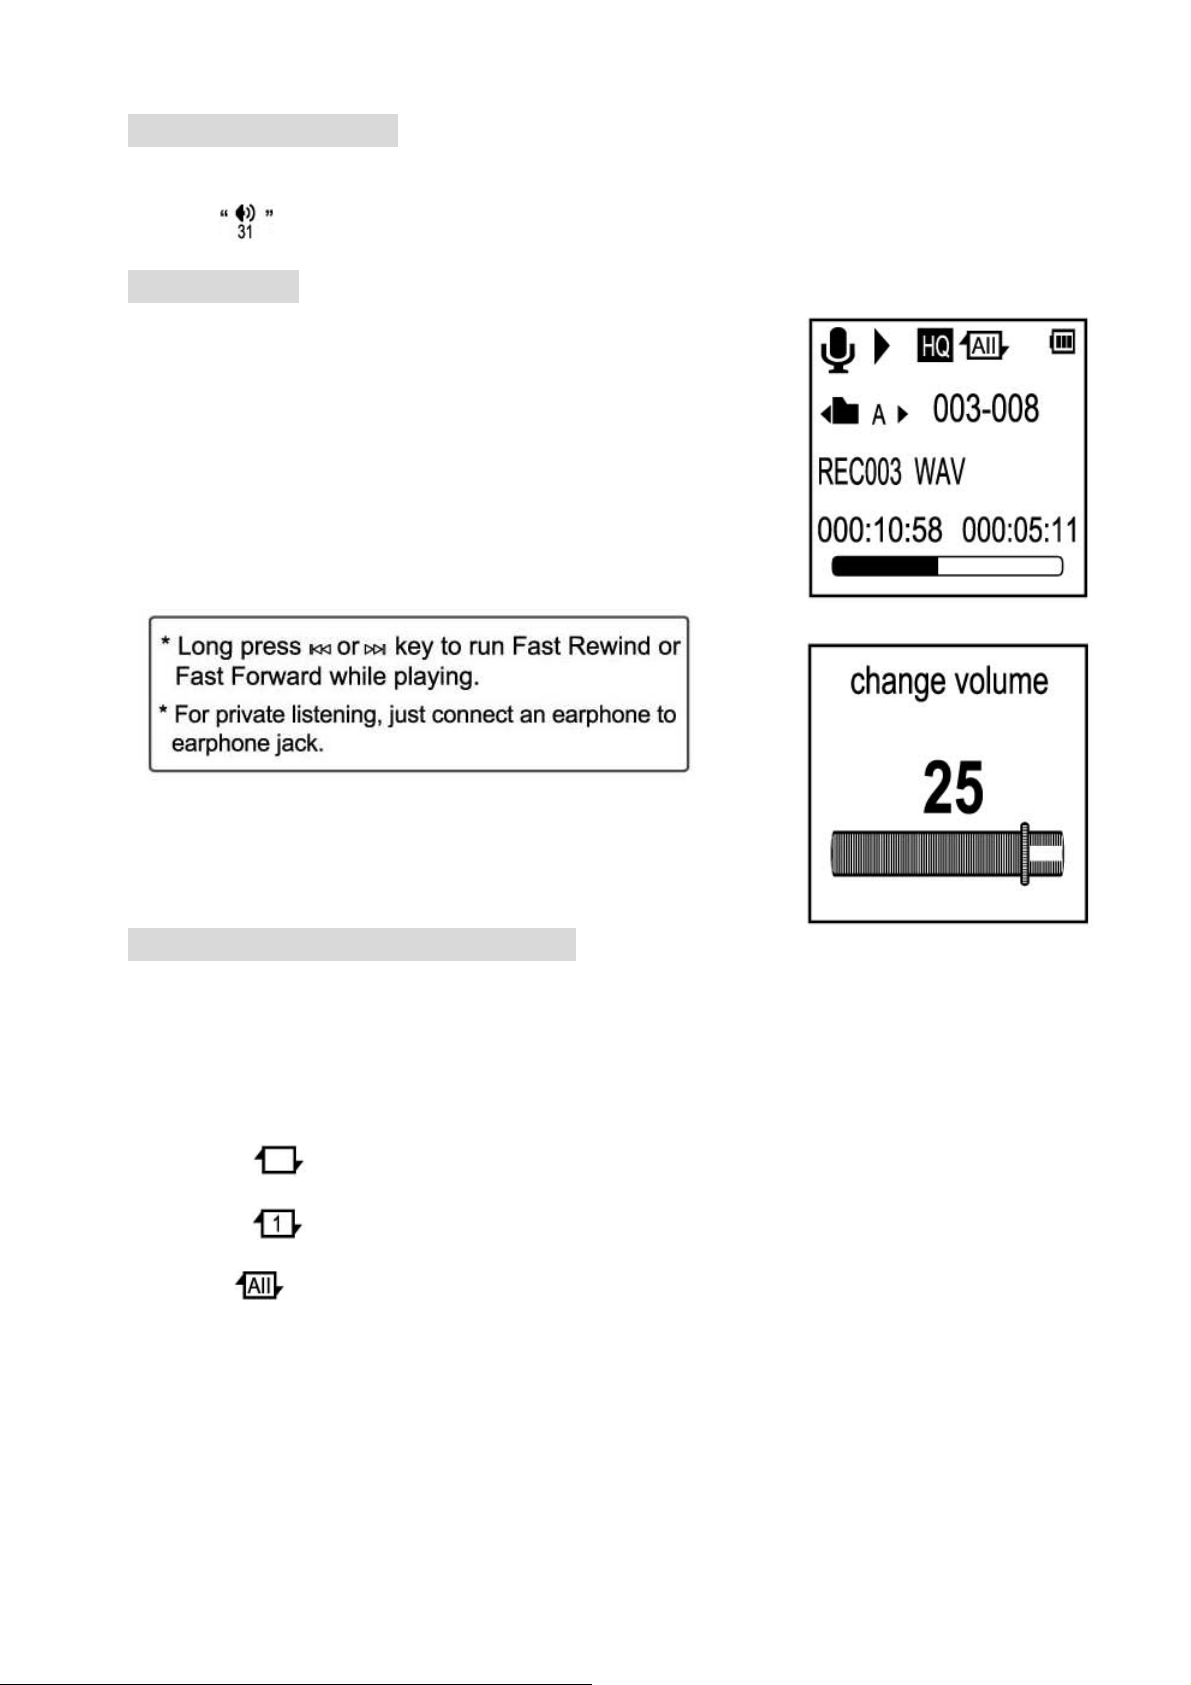
Hearing aid function
1. Connect the earphone to unit it while recording, and you may press UP key or Down key to adjust the
volume (from 0 to 31 level), and then you may hear the higher or lower voice from the earphone.
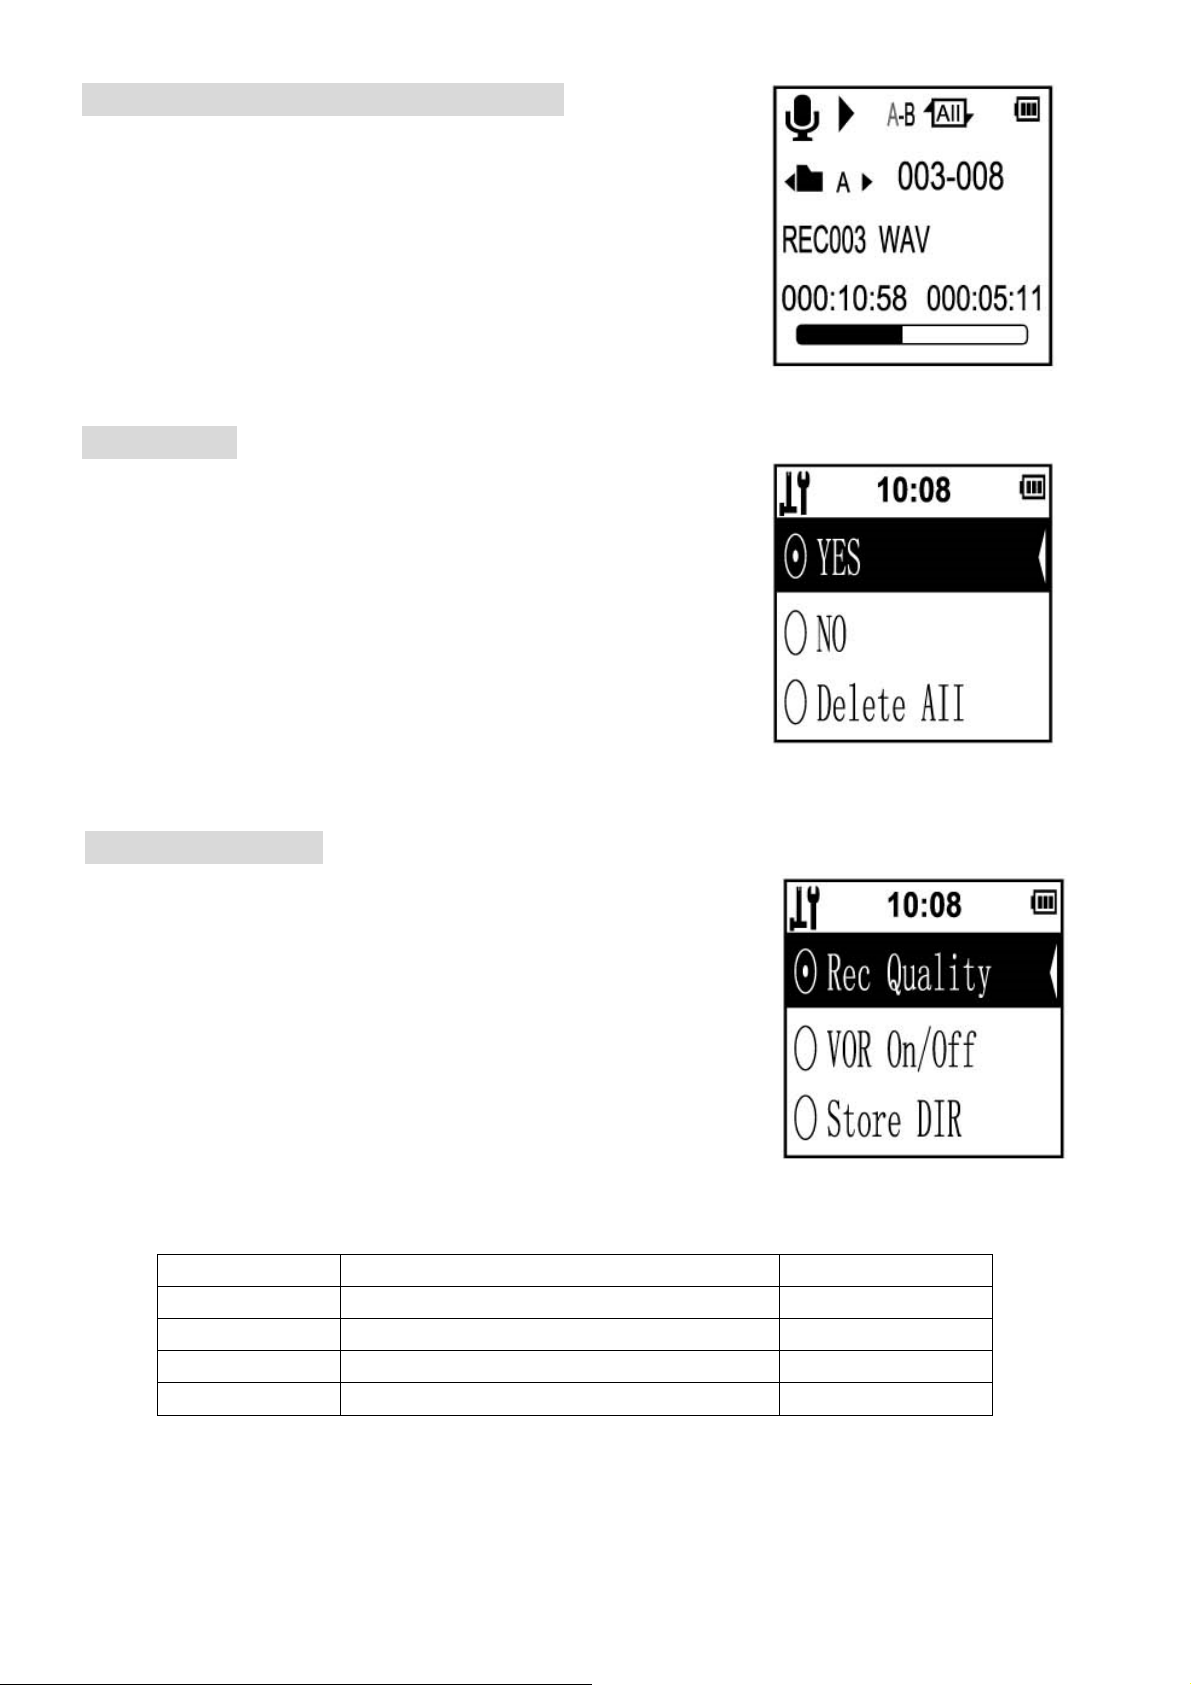
Playing a file
1. Select a desired file by UP/DOWN key, then press PLAY/PAUSE key
to play it.
2. You may press PLAY/PAUSE key for a pause, then press it again to
continue playing. While playing, you may press UP/DOWN key to go
to next or previous file for playing, or press VOL key once and press
UP/DOWN key to adjust volume, then press PLAY/PAUSE key to
confirm.
“0” is minimum volume. “31”is maximum volume.
Playing recording files repeatedly
1. There are there repeat modes for playing file.
The icon will show on LCD according as your setting, refer to page 8 for detailed setting.
NOTE:
Normal Play : Playing all the files in current file folder orderly for one time.
Repeat One : Playing the current selected file repeatedly;
Repeat All : Playing all files in current file folder repeatedly.
Page 8
Playing a section of a file repeatedly
1. While playing, press File/A-B key, and the “A-B” shows on LCD,
the “A” blinks, then press File/A-B key or UP key at desired start
point, and the “B” blinks, and then press it again at desired end
point, so it’ll play this section repeatedly.
2. In this state, you may press DOWN key to reset it, and the ”A” will
blinks again, then just set it as above.
3. Finally, you may press File/A-B, MENU, PLAY/PAUSE or UP key
to stop this repeat and turn to normal playing.
Delete a file
1. At voice mode, press and hold File/A-B key more than 3secs. To
turn to deletion menu.
2. Then you may press PLAY/PAUSE key to confirm deleting current
file, or press UP/DOWN key to select deleting all files within
current file folder.
3. If no need to delete files, just select “NO” or press MENU key to
cancel and return to voice mode.
Recording setting
1. At voice mode, press MENU key to enter into recording setting
menu.
2. Press UP/DOWN key to select desired setting item, press
PLAY/PAUSE key to enter into or confirm, or press MENU key to
return to upper menu.
*It’ll return to upper menu or voice mode after 1 min. without any key
pressed.
1. Finally, press MENU key or select “Exit” and press PLAY/PAUSE key to exit and return to voice mode.
*Rec Quality Recording quality Recording time
SHQ For super high quality recording 46h
HQ For high quality recording 98h
SP For standard quality recording 146h
LP For low quality recording(save memory) 290h
Page 9
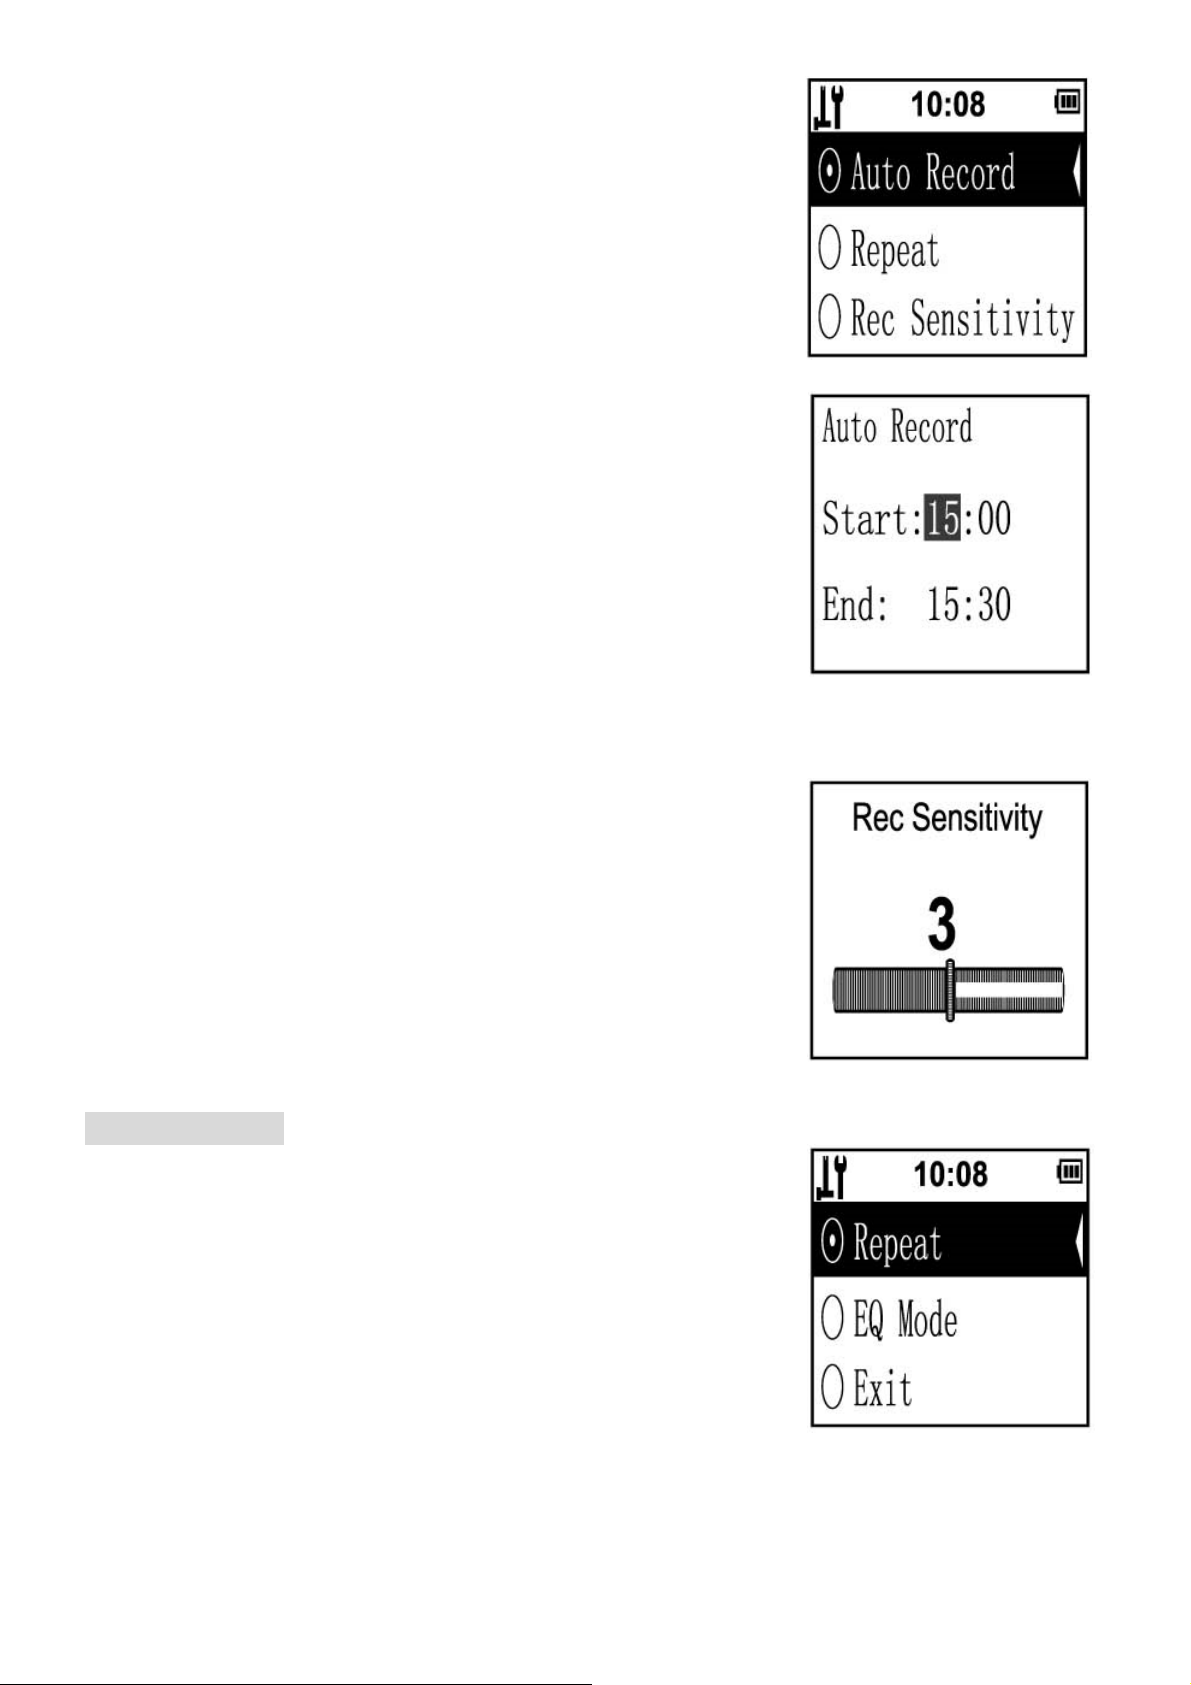
* Store DIR: select "Flash Catalog" or TF Catalog for files storage.
* Auto Record: Record file automatically on or off.
Press UP/DOWN key to adjust the hour and minute data , and press VOL
key to skip to next item, then press PLAY/PAUSE key to confirm and turn to
the upper menu, or press MENU key to cancel.
It'll turn on automatically and start a recording, even though its power is off.
* Repeat: Select the repeat mode for playing.
* Rec Sensitivity: there are six levels (from 0 to5) for your choice. For
recording, if the voice is far from the unit or is not quite high, you should
adjust it higher to ensure normal recording. In the opposite case, you should
adjust it lower.
For common surrounding circumstances, just set it at "3".
Playing setting
1. While playing, press MENU key to enter into playing setting menu.
2. Press UP/DOWN key to select desired setting item, press PLAY/PAUSE
key to enter into or confirm, then press MENU key to return to voice mode.
* It'll return to Voice mode after 1 min. without any key pressed.
3. While setting, press MENU key or select "Exit" to exit and return to voice
mode.
* EQ Mode: Select desired EQ mode for playing from "NOR",
“ROCK","POP","CLAS","SOFT",JASS",AND "DBB".
Page 10
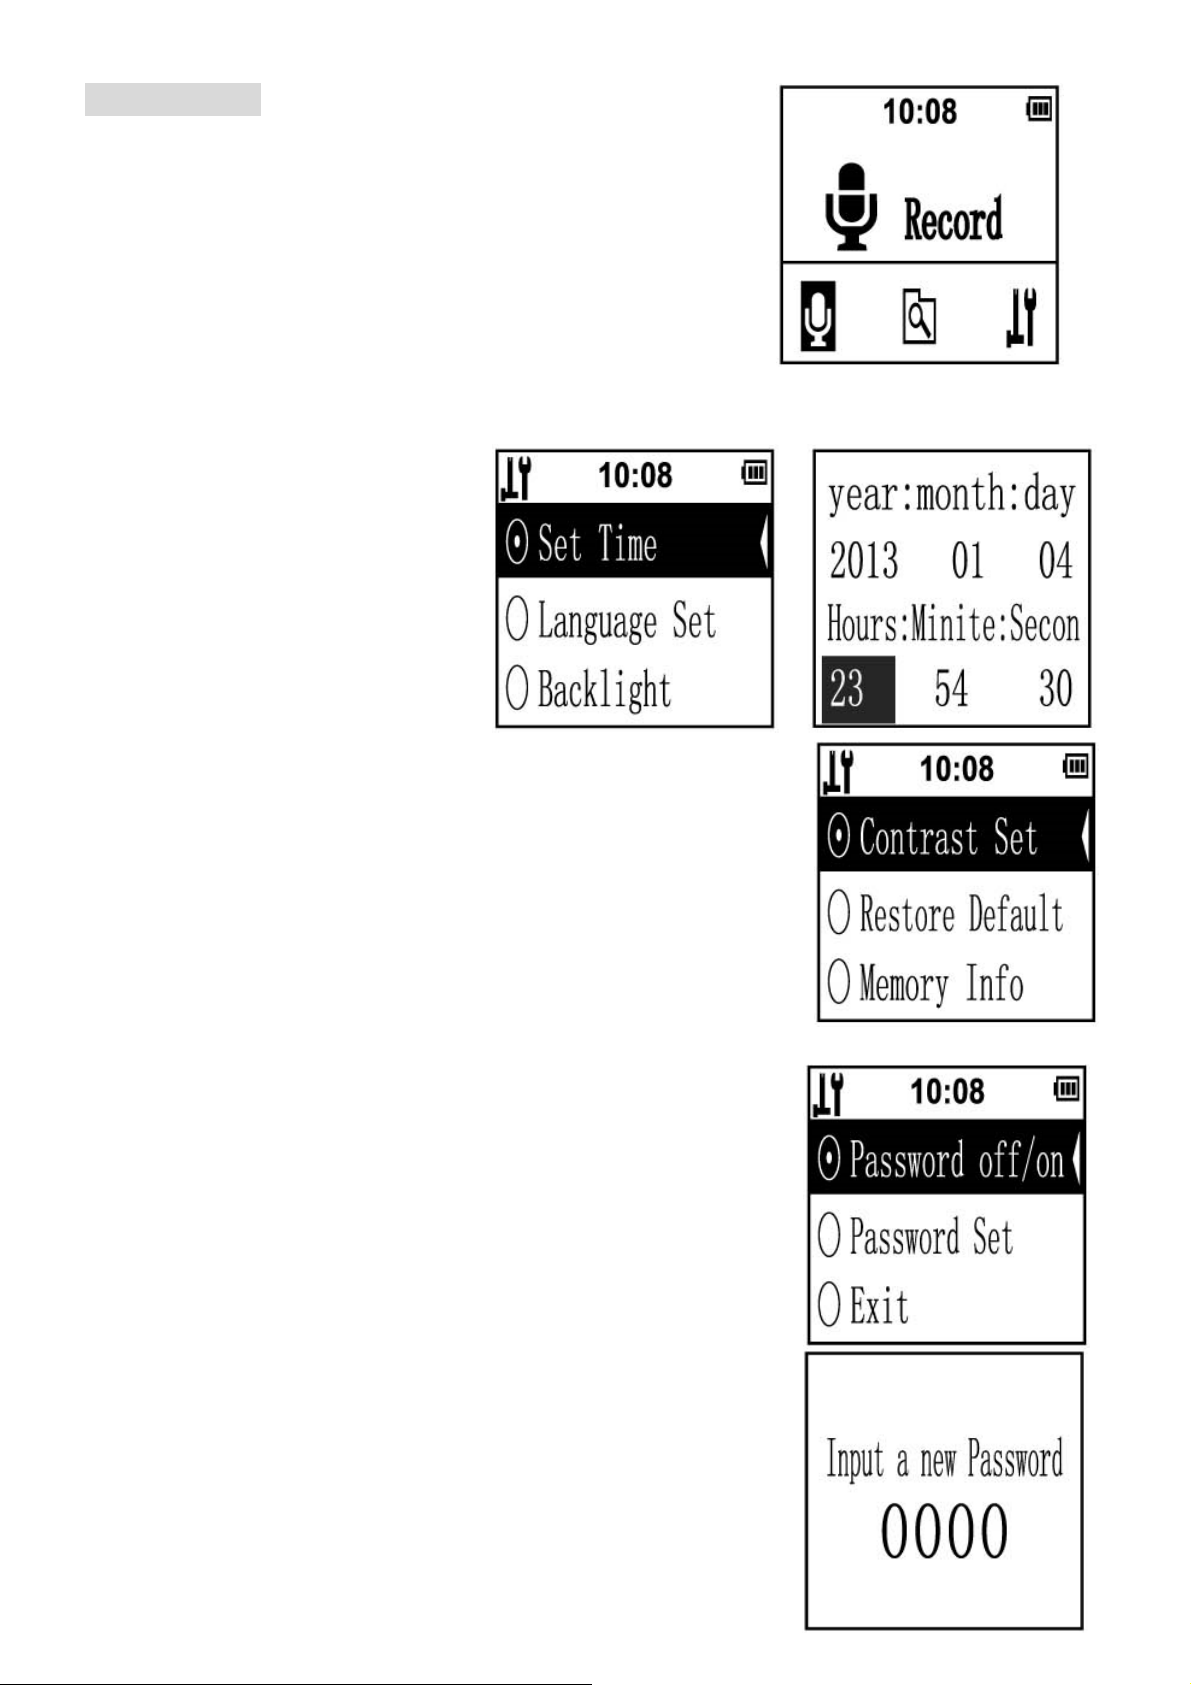
Setting Mode
1. At Voice mode, press and hold MENU key more than 3secs. to enter
into Setting mode.
2. Press UP/DOWN key to select desired item, press PLAY/PAUSE key
to enter into (Voice mode, Browser mode, System setting)
1. Enter into system setting, press
UP/DOWN key to select desired item,
press Play/pause KEY TOSET.
*Set Time: adjust the data by UP/DOWN
key, and press VOL key to skip to next
item, then press PLAY/PAUSE key to
confirm and return to the upper menu, or
press MENU to cancel setting and return
to the upper menu.
* Backlight: set the LCD backlight time for
always open, 10secs, or 30secs.
* Contrast Set: adjust the LCD contrast from 1 to 15 by using the UP/DOWN
key, then press the PLAY/PAUSE key to confirm.
* Restore Default: select to recover the factory default settings only if desired.
(Note: once this option has been chosen, everything will be deleted)
* Memory Info: to show the current memory info..
* Password off/on: Set the power-on password on or off.
* Password set: Adjust the data by UP/DOWN key, and press VOL key to
skip to next data, then press PLAY/PAUSE key to confirm (Be valid only
when you set the "Password on").
If you need to change the password, just enter into Password Set and follow
the prompt "Input old Password", then press PLAY/PAUSE key to confirm,
and then reset it.
Page 11
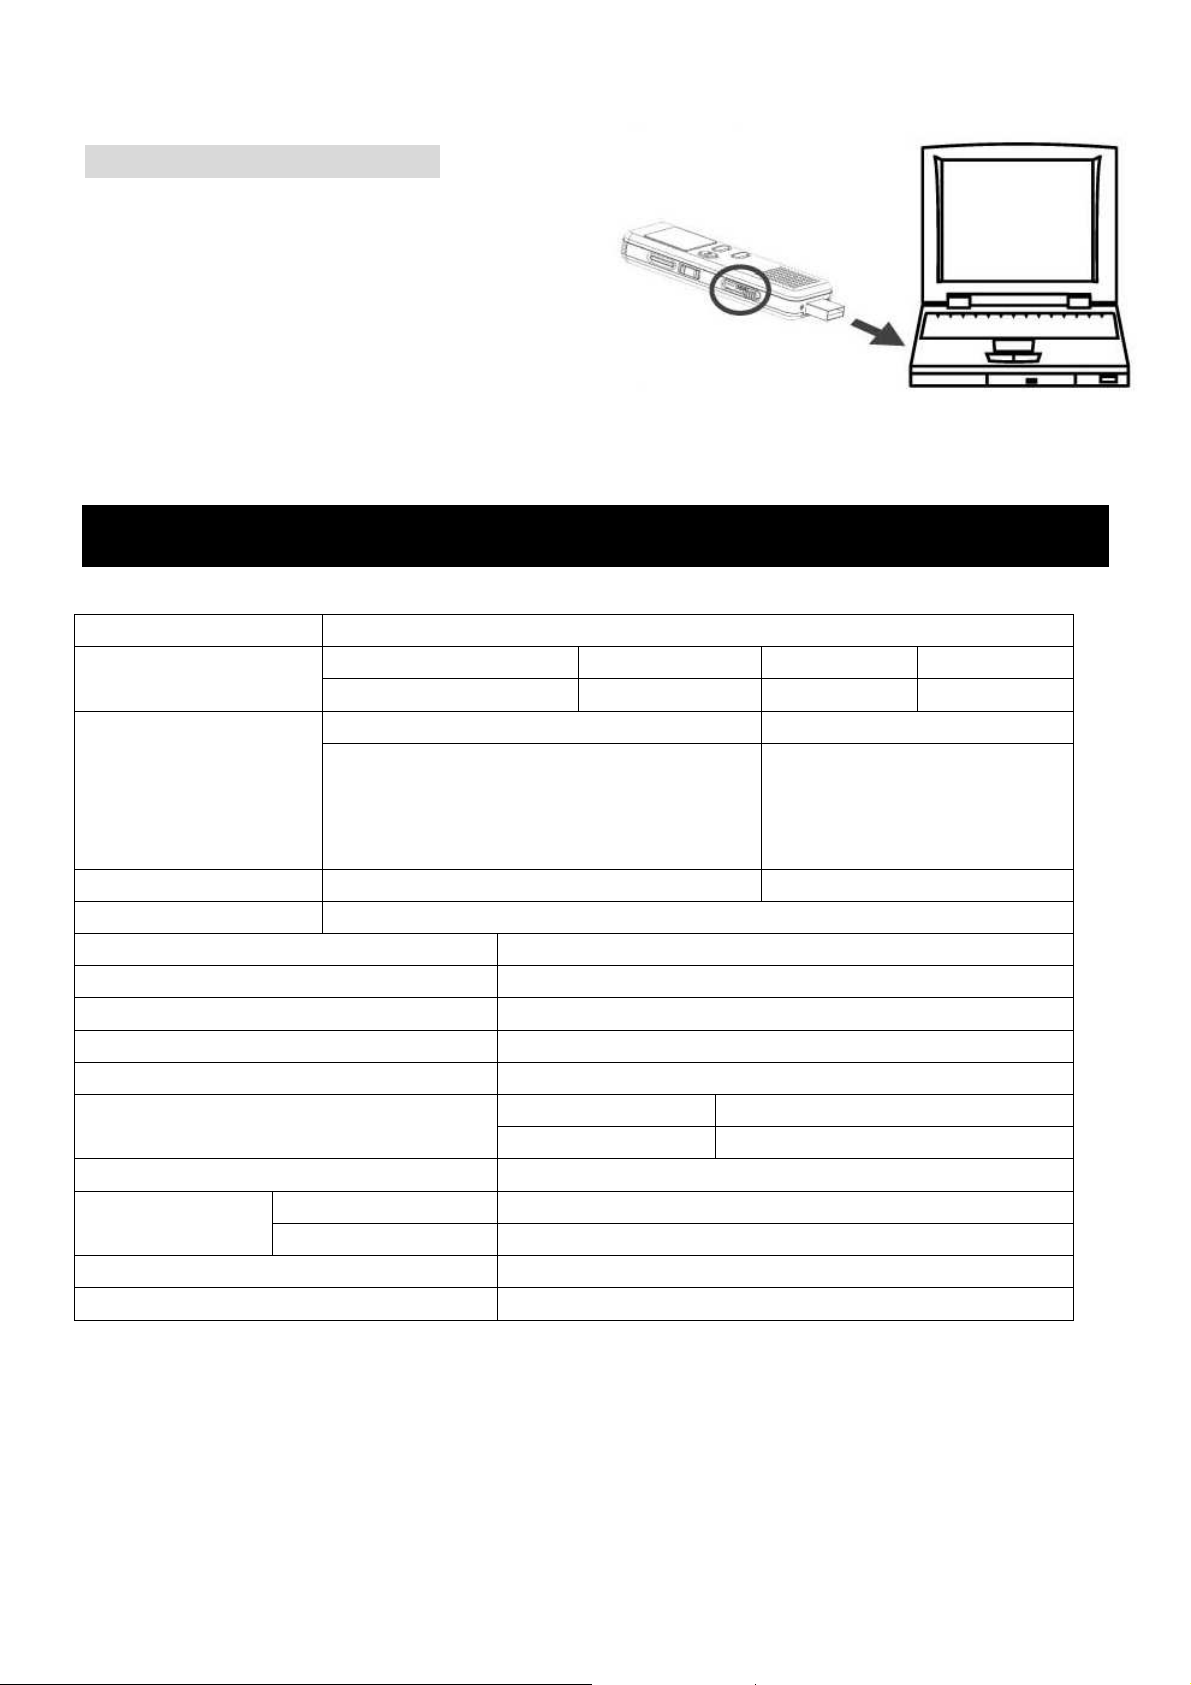
Download and upload files
1. Press down and push the USB plug switch to open
the USB plug, Connect this unit to the USB
interface for computer connection.
2. Copy (recording) files to a removable disk or
computer, or copy music files (wav)to your recorder
according as your demand.
3. After finishing your operation, disconnect the unit
with your PC by the safety Remove Hardware
procedure
SPECIFICATIONS
File Number 2997 (3 file folders x 999)
Recording time
8GB
Recording Format WAV
Playing Format WAV, MP3
SINR >= 90dB
Frequency Response 20Hz-20KHz
Memory Build-in memory 8GB
Microphone Ext. Mic (D3.5mm, Stereo)
Earphone Earphone (D3.5mm, Stereo)
Speaker 8 ohms dynamic speaker
Output power Speaker 1W(8ohm)
Power supply Built-in Polymer battery,3.7V, 320mAh
Power life Recording About 25hours
Size
Weight 45g
Specifications are subject to change without notice.
SHQ HQ SP LP
46h 98h 146h 290h
Sample rate 384kbps48Khz, 192kpbs
128kbps16Khz, 64kpbs
Earphone 10m(32ohm)
Playing About 16hours (Earphone). 4hours(Loudspeaker)
93*32*13.5mm
24Khz,
8Khz,
Page 12
IMPORTANT NOTICE
May all users backup data themselves, Sytech is not responsible for any personal data loss or
damage caused by wrong operation of software, hardware and maintenance; Sytech takes no
responsibility on the accidental damage that may occur in the using process or compensation
claimed by a third party.
DECLARATION OF CONFORMITY
Manufacturer Name: Satyatrade S. L.
Address: Pol.Ind.La Raya. C/ Guadalquivir, 2.
Camarma de Esteruelas, 28816 Madrid
Tel: 902 430 967
Fax: 91 8864285
NIF: B83254763
Manufacturing country: China
Description: Voice Recorder
Sytech® SY-1709 complies with the following directives:
CE (EC & R&TTE) Standard: Directive 2004/108/CE
ROHS Standard: 2011/65/EU Restriction of Hazardous Substances
Signed: Ajeet Nebhwani Utamchandani
Sole Administrator
 Loading...