

Sysvideo SNK RAID series Administrator's Manual

SNK RAID Series NVR
Administrator Guide
Only For SNK 8, 16 HDD series RAID NVR
Version 02
April 2015
Sysvideo Technology Limited

Trademark
Sysvideo™ are registered trademarks of Sysvideo Technology Limited in China and various other
countries. All other trademarks mentioned in this document are the property of their respective holders.
Sysvideo Technology Limited
http://www.sysvideo.cn
Tel: +86-755-27721887
Fax: +86-755-27721807
© 2015 Sysvideo Technology Limited All rights reserved.
Without the prior written permission of Sysvideo Technology Limited, any reproduction, translation or
re-transmission of all or any part of this document for any purpose in either electronic or mechanical form
is not allowed.
Notice
The information in this document is subject to change without notice. Every effort has been made in the
preparation of this document to ensure accuracy of the contents, but all statements, information, and
recommendations in this document do not constitute a warranty of any kind, express or implied.
Sysvideo Technology Limited is not responsible for printing or clerical errors.

III
Contents
About This Document.......................................................................................................................................3
1 About SNK 8/16 HDD RAID series NVRs................................................................................... 4
1.1 Product Introduction.......................................................................................................................... 4
1.2 Key Features........................................................................................................................................4
1.3 Major Specifications.......................................................................................................................... 6
2 Getting Started............................................................................................................................................. 8
3 Logging In to the NVR............................................................................................................................14
4 Configuring Network Settings........................................................................................................... 16
4.1 Ethernet Ports....................................................................................................................................16
4.2 System Ports......................................................................................................................................17
4.3 PPPoE.................................................................................................................................................. 18
4.4 DDNS.................................................................................................................................................... 20
4.5 Static Route........................................................................................................................................ 24
4.6 NAT........................................................................................................................................................ 25
4.7 COM Ports.......................................................................................................................................... 28
4.8 Registering with a VMS................................................................................................................. 30
4.9 Conducting Connectivity Tests....................................................................................................31
4.10 Miscellaneous....................................................................................................................................32
5 Configuring Disk Management Settings...................................................................................... 34
5.1 One-Click Partition and Formatting.......................................................................................... 34
5.2 Setting the Storage Mode.............................................................................................................36
5.3 Creating RAID Arrays..................................................................................................................... 38
5.4 IP SAN.................................................................................................................................................. 43
5.5 Miscellaneous....................................................................................................................................45
6 Configuring Cameras............................................................................................................................. 51
6.1 General.................................................................................................................................................51
6.2 Main Video.......................................................................................................................................... 52

6.3 Secondary Video.............................................................................................................................. 52
6.4 Image Adjust.......................................................................................................................................53
6.5 Show Text............................................................................................................................................ 54
6.6 Audio..................................................................................................................................................... 56
6.7 Dome..................................................................................................................................................... 57
6.8 COM.......................................................................................................................................................58
6.9 Network................................................................................................................................................ 59
6.10 PPPoE.................................................................................................................................................. 60
6.11 Alarm..................................................................................................................................................... 62
7 Miscellaneous.............................................................................................................................................63
7.1 User Authorizaiton............................................................................................................................63
7.2 Display.................................................................................................................................................. 67
7.3 Logs....................................................................................................................................................... 68
7.4 Restoring Factory Defaults...........................................................................................................70
7.5 Scheduled Rebooting..................................................................................................................... 71
7.6 Upgrading the System....................................................................................................................72
8 Abbreviations and Acronyms............................................................................................................ 74

5
About This Document
Intended Audience
This document is intended for the personnel who:
Manage SNK 8/16 HDD RAID series Network Video Recorders (NVRs)
Know video surveillance basics
Document Versions
Version 02 (2015-04-30)
Compared with Version 01 (2014-08-30), Version 02 (2015-04-03) includes the changes described in the
following table.
Change Type
Description
Feature change
Added the UPnP technology to the SNK16000RD series.
Editorial change
Changed the list of recommended third-party disks.
Version 01 (2014-08-30)
Compared with Version 00 (2014-06-30), Version 01 (2014-08-30) includes the changes described in the
following table.
Change Type
Description
Feature change
Added the functions of the SNK16000RD series.
Editorial change
Updated screenshots.
Version 00 (2014-06-30)

This is a draft.
Compatibility
The following table provides the products and NVR software version to which this document applies.
Product
SNK series 8/16 HDD RAID NVR
NVR Software Version
NVR V5R1B2
7
1 About SNK 8/16 HDD RAID series NVRs
1.1 Product Introduction
Sysvideo SNK 8/16 HDD RAID series NVR is a turnkey solution for video surveillance and video
recording. SNK 8/16 HDD RAID series NVRs support Open Network Video Interface Forum (ONVIF)
and Real Time Streaming Protocol (RTSP) interoperability standards. Additionally, SNK 8/16 HDD RAID
series NVRs feature native integration to cameras and encoders from third party manufacturers,
therefore making them an open system.
The advanced system capabilities make SNK 8/16 HDD RAID series NVRs easy to use with functions
like Automatically Adding Devices and One-Click Partition and Initialization and meet various customer
needs with functions like Record Fragment and Privacy Mask for every day security users to advanced
video surveillance users.
SNK 8/16 HDD RAID series NVRs work with the following management system and applications:
NVR Station: is a complete system for device management and video viewing/recording/playback.
NVR Station Web: is a web-based application of the NVR Station.
Mobile NVR Client (MNC): is an iOS/Andriod-compatible mobile application of the NVR Station.
Note
In this document, the NVR refers to a SNK 8/16 HDD RAID series NVR.
1.2 Key Features
The following table lists key features provided by SNK 8/16 HDD RAID series NVRs to meet vairous
customer needs.
Item
Feature
Description
Adding devices
Automatically Adding
Devices
This feature allows you to quickly add cameras to your
NVR.
This feature is available to all SNK RAID series enterprise
NVRs. For details on how to use this feature, see section
3.1 "Automatically Adding the Target Camera."

Item
Feature
Description
Disk management
One-Click Partition and
Formatting
Before starting a recording, you must partition and format
disks. With this feature, you can complete the two
operations with one click.
This feature is available to all SNK RAID series enterprise
NVRs. For detais on how to use this feature, see section
4.1 of SNK RAID series enterprise NVR Administrator
Guide.
Viewing
Dual-Stream and Audio
SNK RAID series enterprise NVRs offer the ability to
record the main and secondary streams for each camrea.
Along with exceptional image quality, these NVRs can
also record audio.
This feature is available to all SNK RAID series enterprise
NVRs.
Dual/Triple-Monitor Live
Viewing
The SNK0800RD can connect to two monitors, allowing
for dual-monitor live viewing.
The SNK1600RD can connect to three monitors, allowing
for triple-monitor live viewing.
For feature details, see section 3.8 "Enabling
Dual/Triple-Monitor Viewing."
Note:
For the SNK16128RD, you cannot use the
dual/triple-monitor viewing feature if you already create
RAID arrays. In other words, you cannot create RAID
arrays if you already use the dual/triple-monitor viewing
feature.
Privacy Mask
This feature prevents a camera from monitoring sensitive
objects or areas in a scene. When privacy masks are
created in a scene, you cannot track objects if the objects
move to a masked area. You can create up to 4 privacy
masks (24 privacy blocks) for a camera.
This feature is available to all SNK RAID series enterprise
NVRs. For details on how to use this feature, see section

9
Item
Feature
Description
3.5 "Setting Privacy Masks."
Image Flip
This feature allows you to track an object continuously as
it passes beneath a camera.
This feature is available to all SNK RAID series enterprise
NVRs. For details on how to use this feature, see section
3.3.2 "Advanced PTZ Controls."
Playback
16-Channel 1080p Video
Playback
A spectacular 1920x1080 resolution lets you see more of
your high-resolution images with pixel-for-pixel accuracy.
When you play back videos on a screen, the solution
allows you to capture more details.
This feature is available to all SNK RAID series enterprise
NVRs.
Record Fragment
This feature breaks one piece of record into several parts
and plays these parts at the same time.
This feature is available to all SNK RAID series enterprise
NVRs. For details on how to use this feature, see section
5.1 "Multi-Record Playback."
Alarming
Motion Detection
With this feature, an NVR can detect a change in the
position of an object relative to its surroundings.
This feature is available to all SNK RAID series enterprise
NVRs. For details on how to use this feature, see section
6.1 "Motion Detection."
E-Mail Notification
Alarm notification via an e-mail alert is offered as a
standard feature with all Sysvideo NVRs. You can
program an NVR to send a message to a designated
address whenever an alarm is triggered.
This feature is available to all SNK RAID series enterprise
NVRs. For feature details, see section 7.5 "E-Mail
Notification."

Item
Feature
Description
Storage
ANR
The automatic network replenishment (ANR) feature
enables an IP camera to locally save records when the
connection between it and the NVR is broken and send the
records to the NVR when the connection is resumed.
This feature is available to all SNK RAID series enterprise
NVRs. For details on where to enable this feature, see
section 4.3 "Setting the Recording Policy."
1.3 Major Specifications
Resolution of 3840x 2160
The SNK16000RD series provides a resolution of 3840 x 2160, allowing you to see a more detailed
picture compared with a resolution of 1920 x 1080.
Homing
From a single NVR, you can view and control up to 128 cameras.
WDR
This feature allows you to record greater scene details, from shadows to highlights than normal.
IR
Infrared camreas can capture objects when there is insufficient visible light to see.
Three-Megapixel Lens
SNK 8/16 HDD RAID series NVRs can work with three-megapixel lenses so that you can capture
stunning nad high-resolution digital images.
11
2 Getting Started
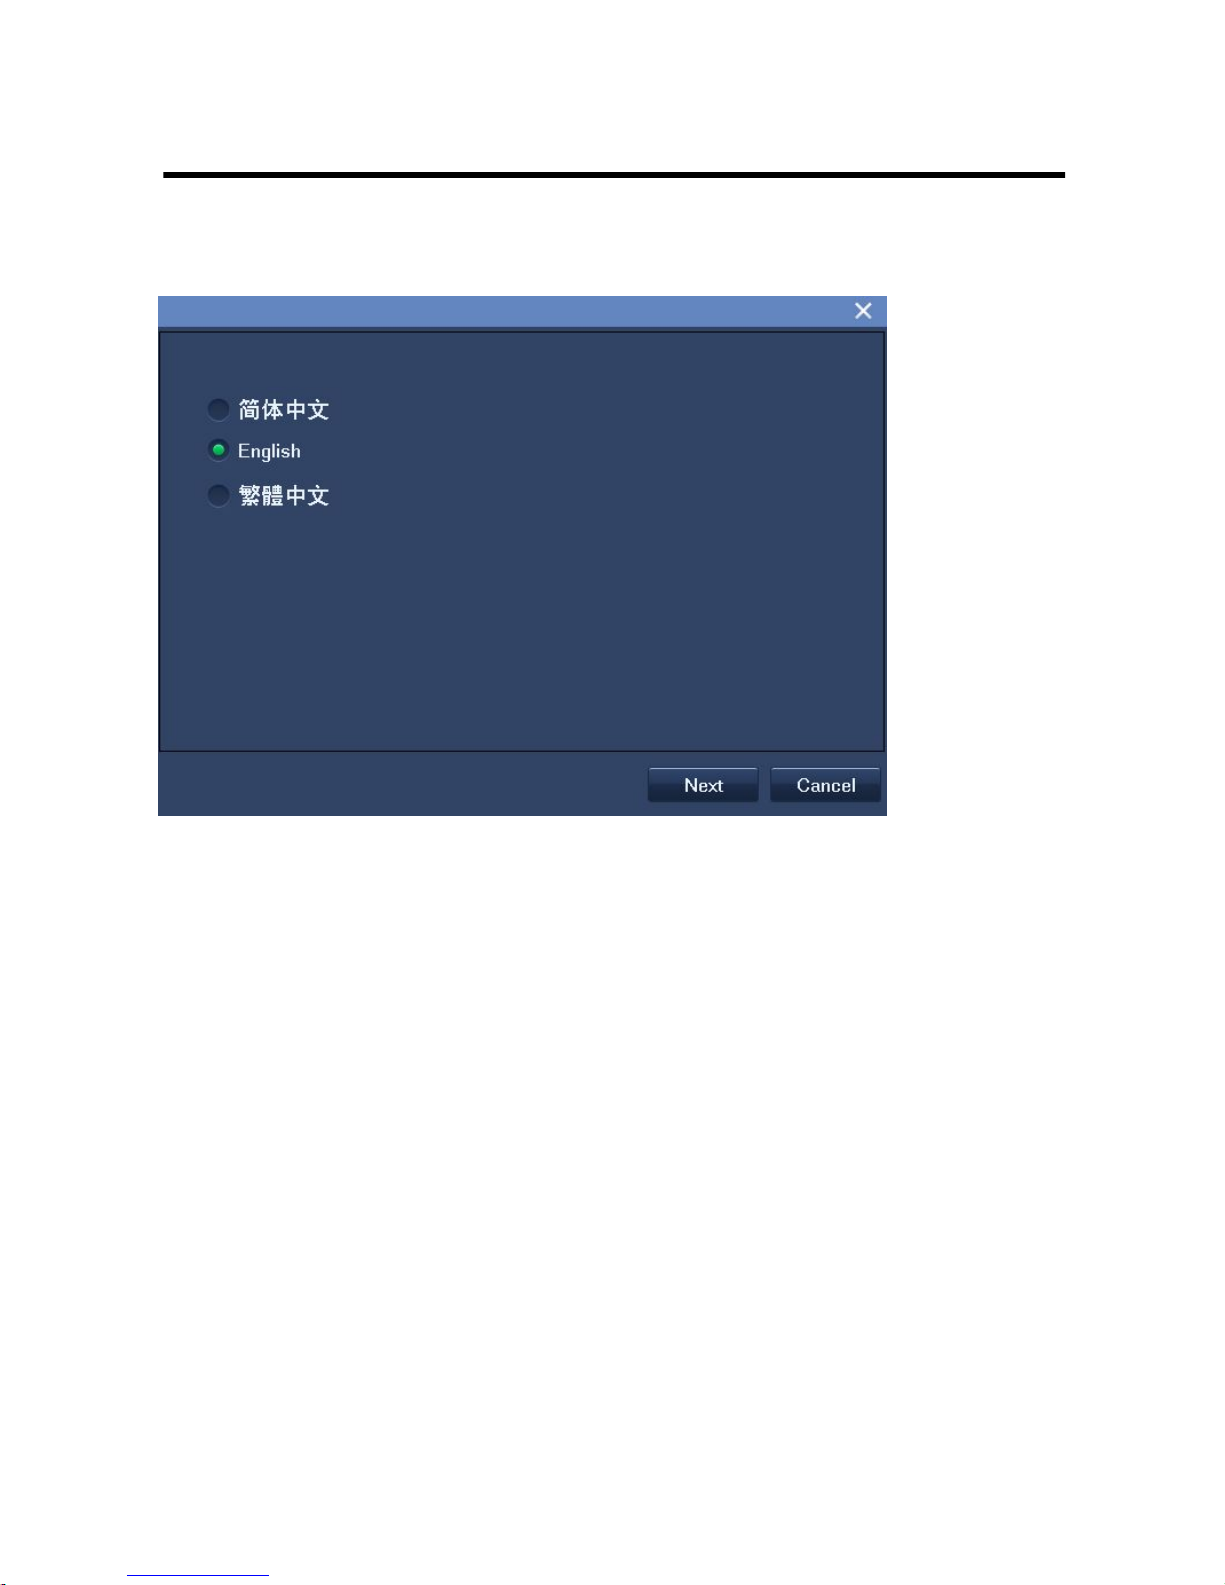
After an NVR is started up, choose a display language, as shown in the following figure.
Then, you can find the Setup Wizard on the main screen, as shown in the following figure.
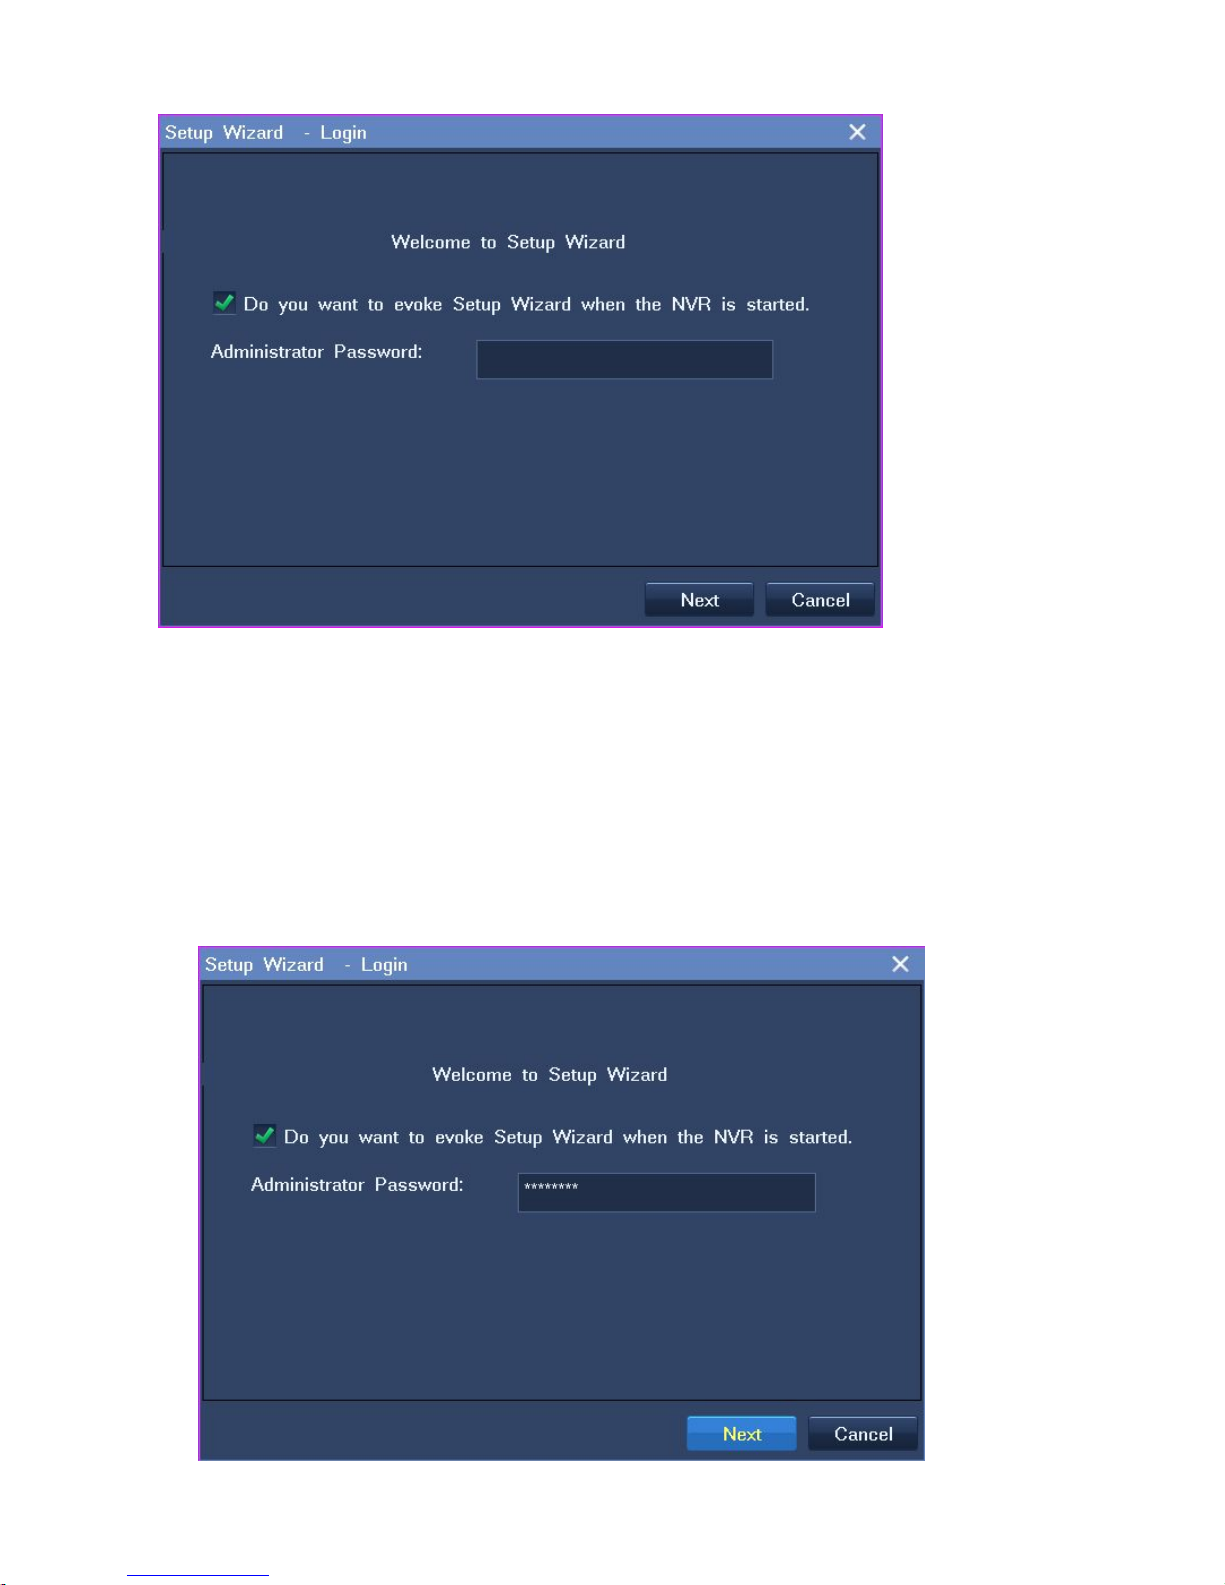
The Setup Wizard will walk you through some important settings of the NVR. However, you can choose
not to use the Setup Wizard to configure those settings. If so, click Cancel.
If you want to use the Setup Wizard at a later time, select the Do you want to evoke Setup Wizard
when the NVR is started. option.
To use the Setup Wizard:
1. Enter admin123 in the Administartor Password text box, as shown in the following figure.
13
2. Click Next.
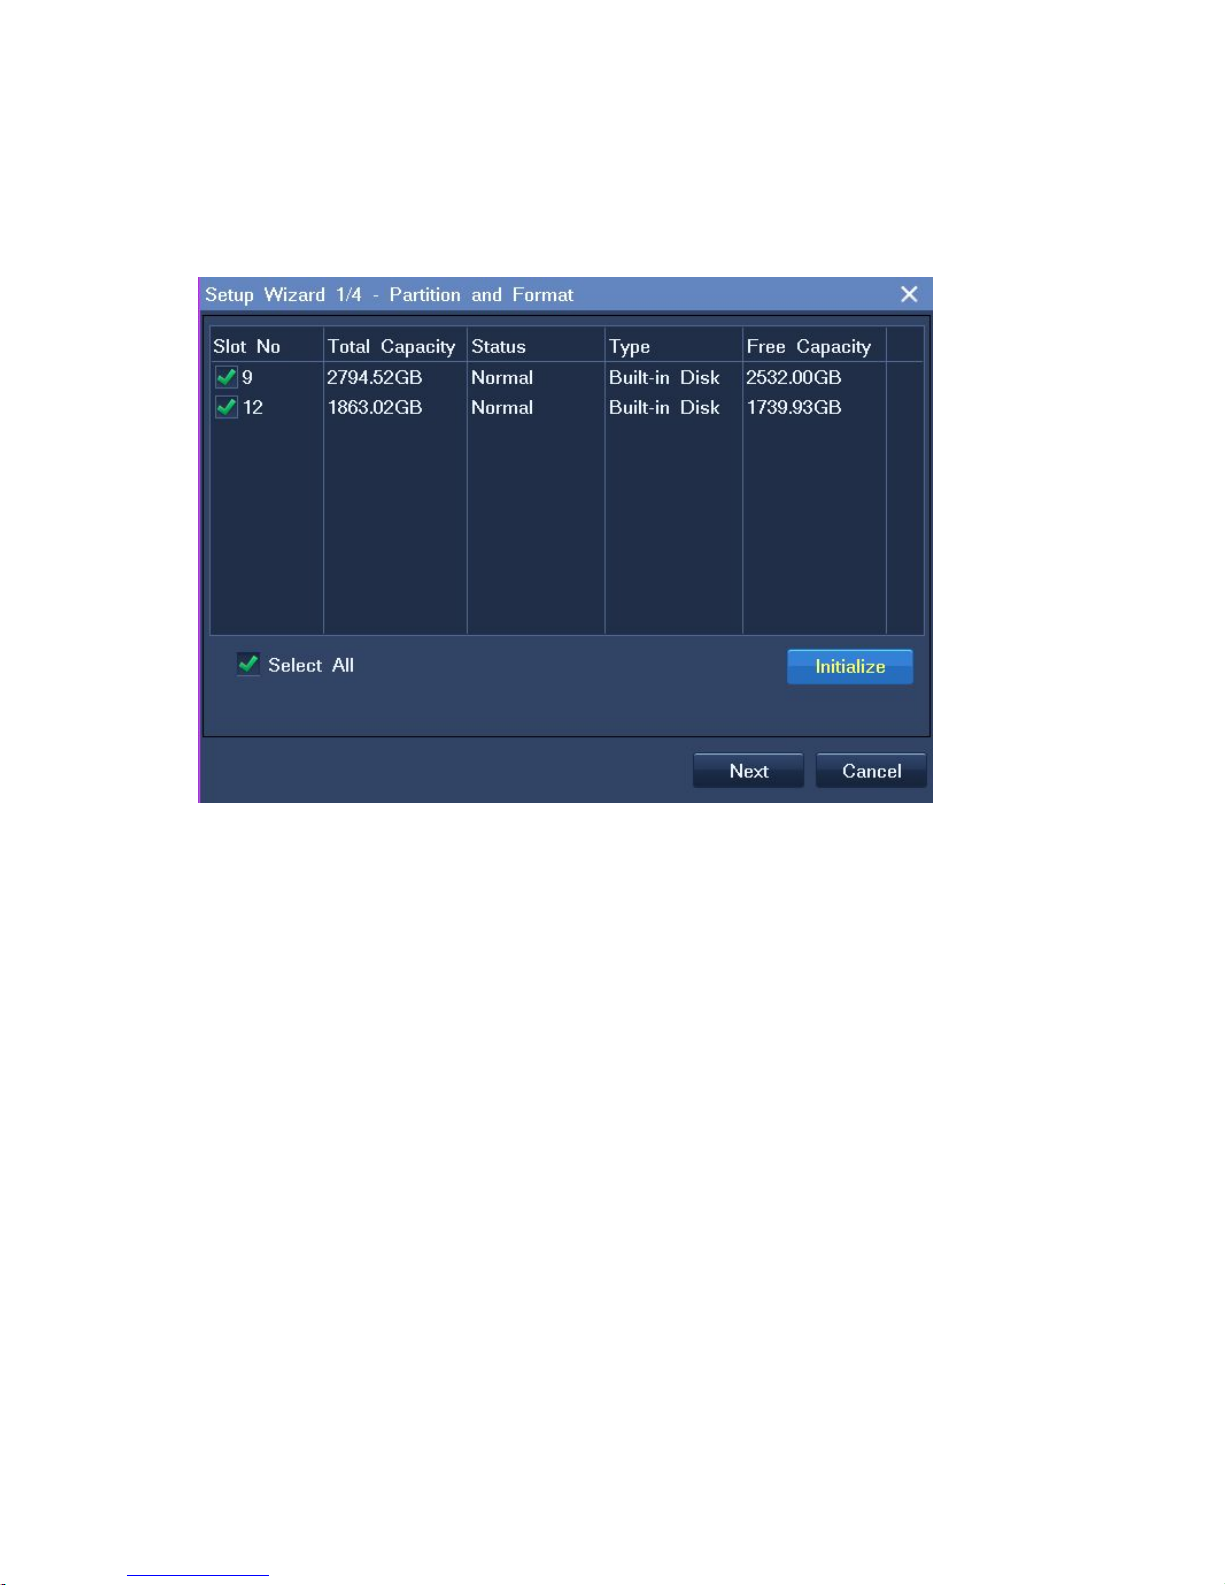
3. Select all disks and click Initialize to partition and format all these disks, as shown in the following
figure.
4. Click Next.
5. Configure the time settings, as shown in the following figure.
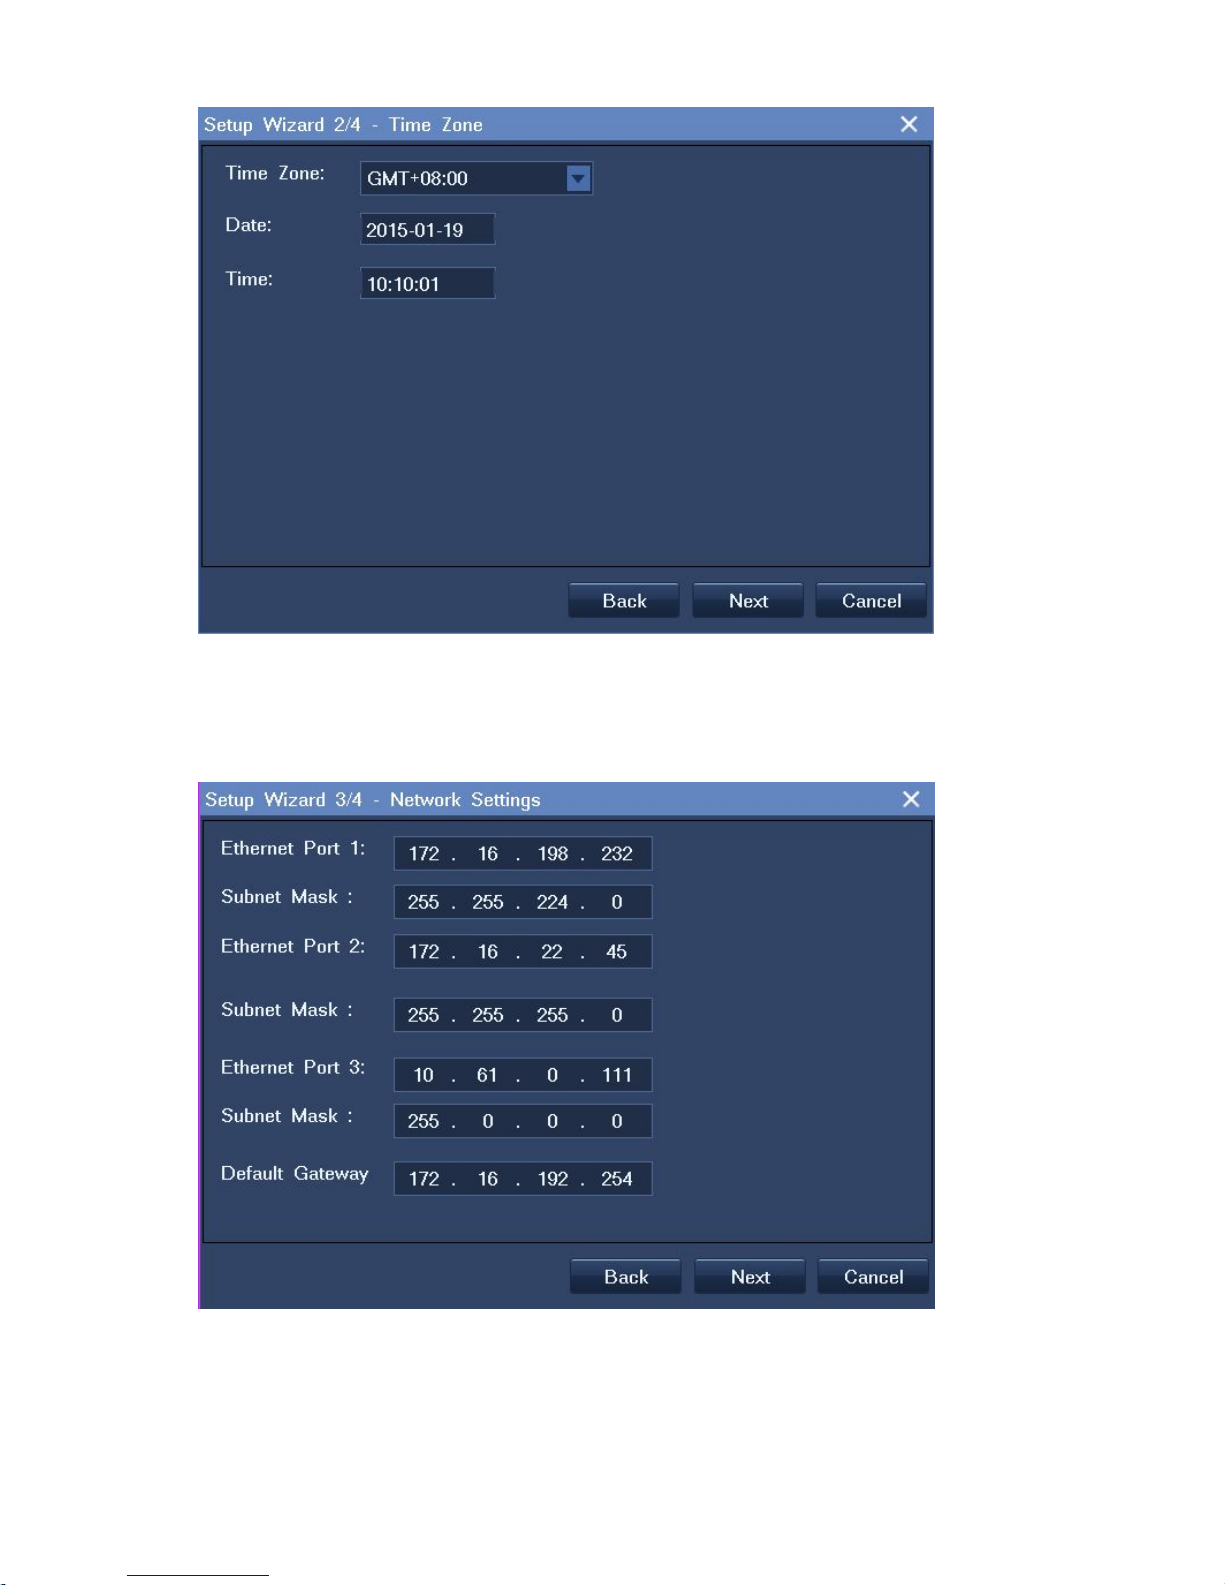
6. Click Next.
7. Configure the network settings, The following is an example.
8. Click Next.
9. Add devices.
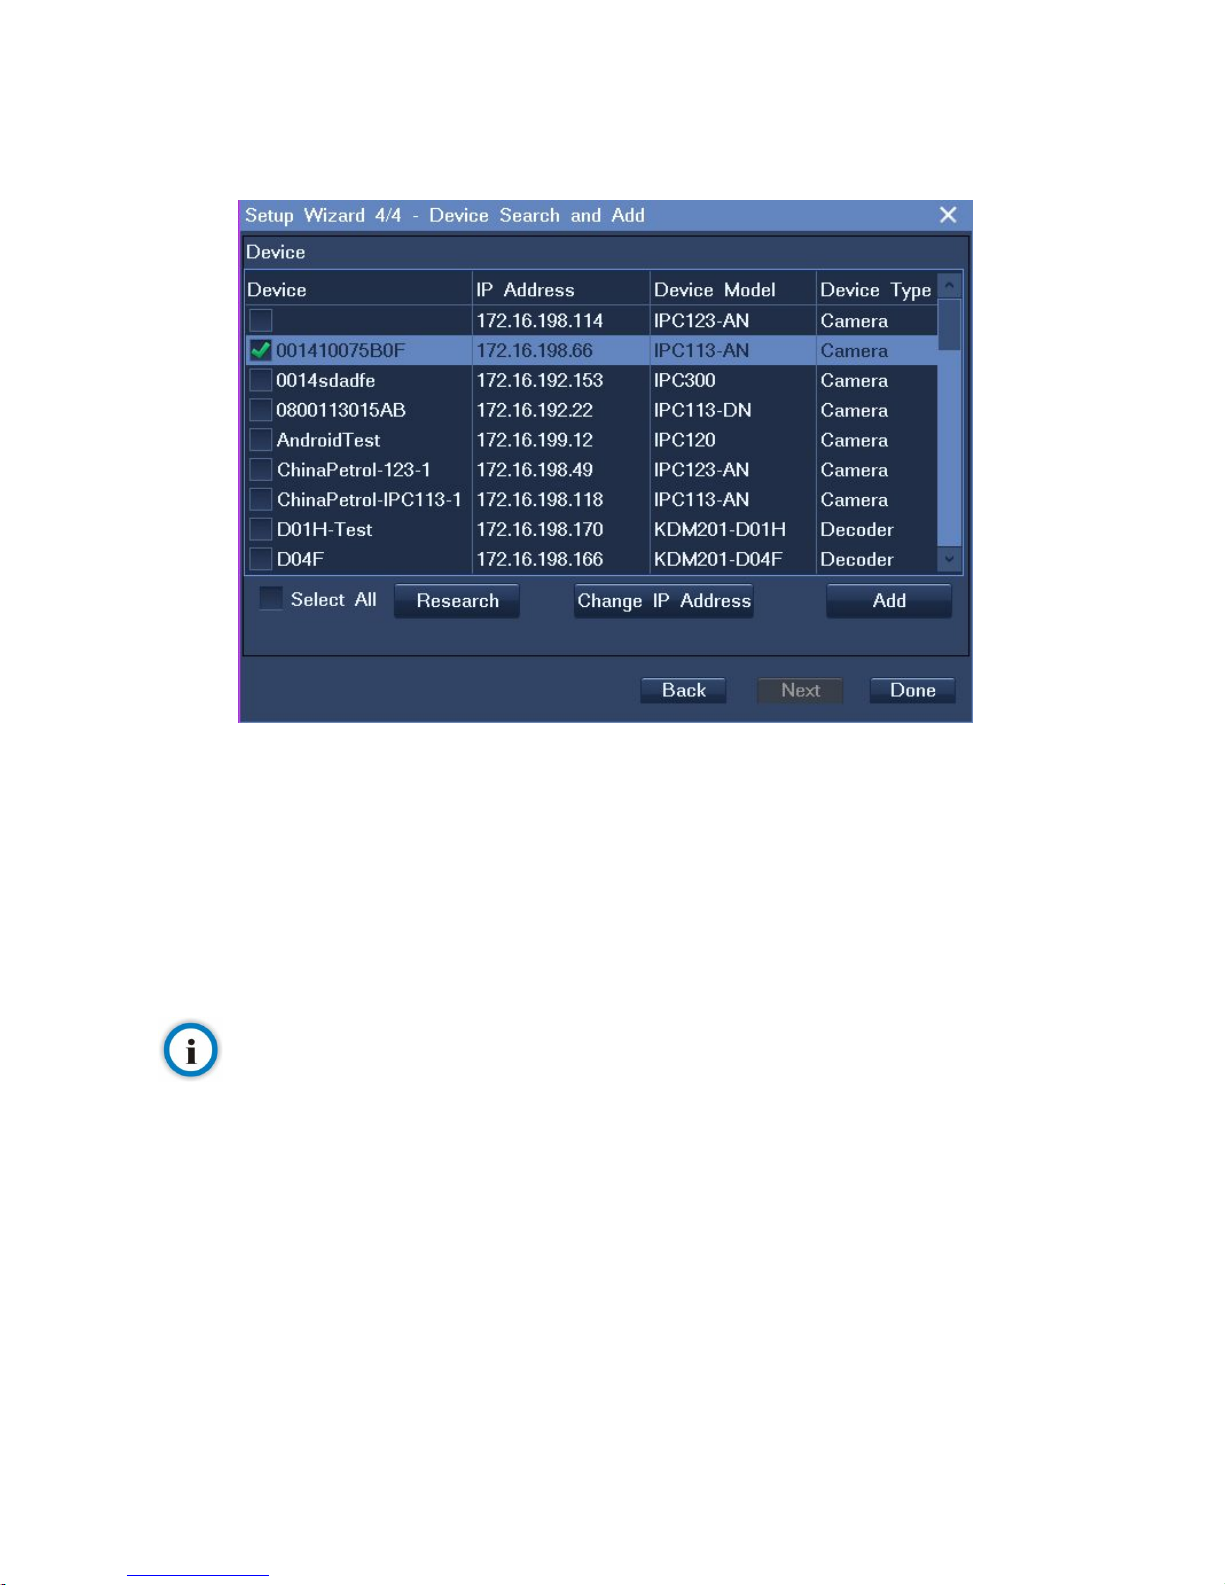
15
To add a device:
1) Select the device from the device list, as shown in the following figure.
2) Click Change IP Address to change the registration address of the device.
Note that you can change registration addresses only for cameras that use the factory defaults.
3) Click OK.
4) Click Add.
10. Click Done.
Note
The registration address of a device is one IP address of the NVR to which the device registers.

3 Logging In to the NVR
The NVR comes with an administrator account whose user name is admin and the password is
admin123.
To log in to the NVR as an administrator:
1. Click any button on the control panel located at the bottom of the main screen of the NVR.
2. In the displayed User Login dialog box, set User Name and Password to admin and admin123,
respectively.
In this step, you can select a display language.
3. Click OK.
If you enter an incorrect password three times in succession, your account will be locked for 10 minutes.
If you forget your new password:
1. Click Retrieve Default Password in the User Login dialog box.
2. Write down the product serial number and the product random number.
The following is an example.

17
3. Contact the local authorized Sysvideo agent and inform them of the previous product serial number
and product random number.
4. After obtaining an authentication password, enter the password in the Authentication Password
text box.
5. Click OK.
After you perform the previous steps, you will be prompted that the default password for the
administrator account is restored. Then, you can log in to the NVR using the password admin123.
Note
The graphical user interface (GUI) of the NVR is continuously changed. Therefore, do not be alarmed when you find the
screenshots in this document are different from actual ones. We greatly appreciate your understanding.
Most screenshots in this document are taken from the SNK16000RD series. If you find some options are missing, contact
the NVR system administrator to check whether these options are supported by your NVR. If so, contact the local
authorized Sysvideo agent.
4 Configuring Network Settings
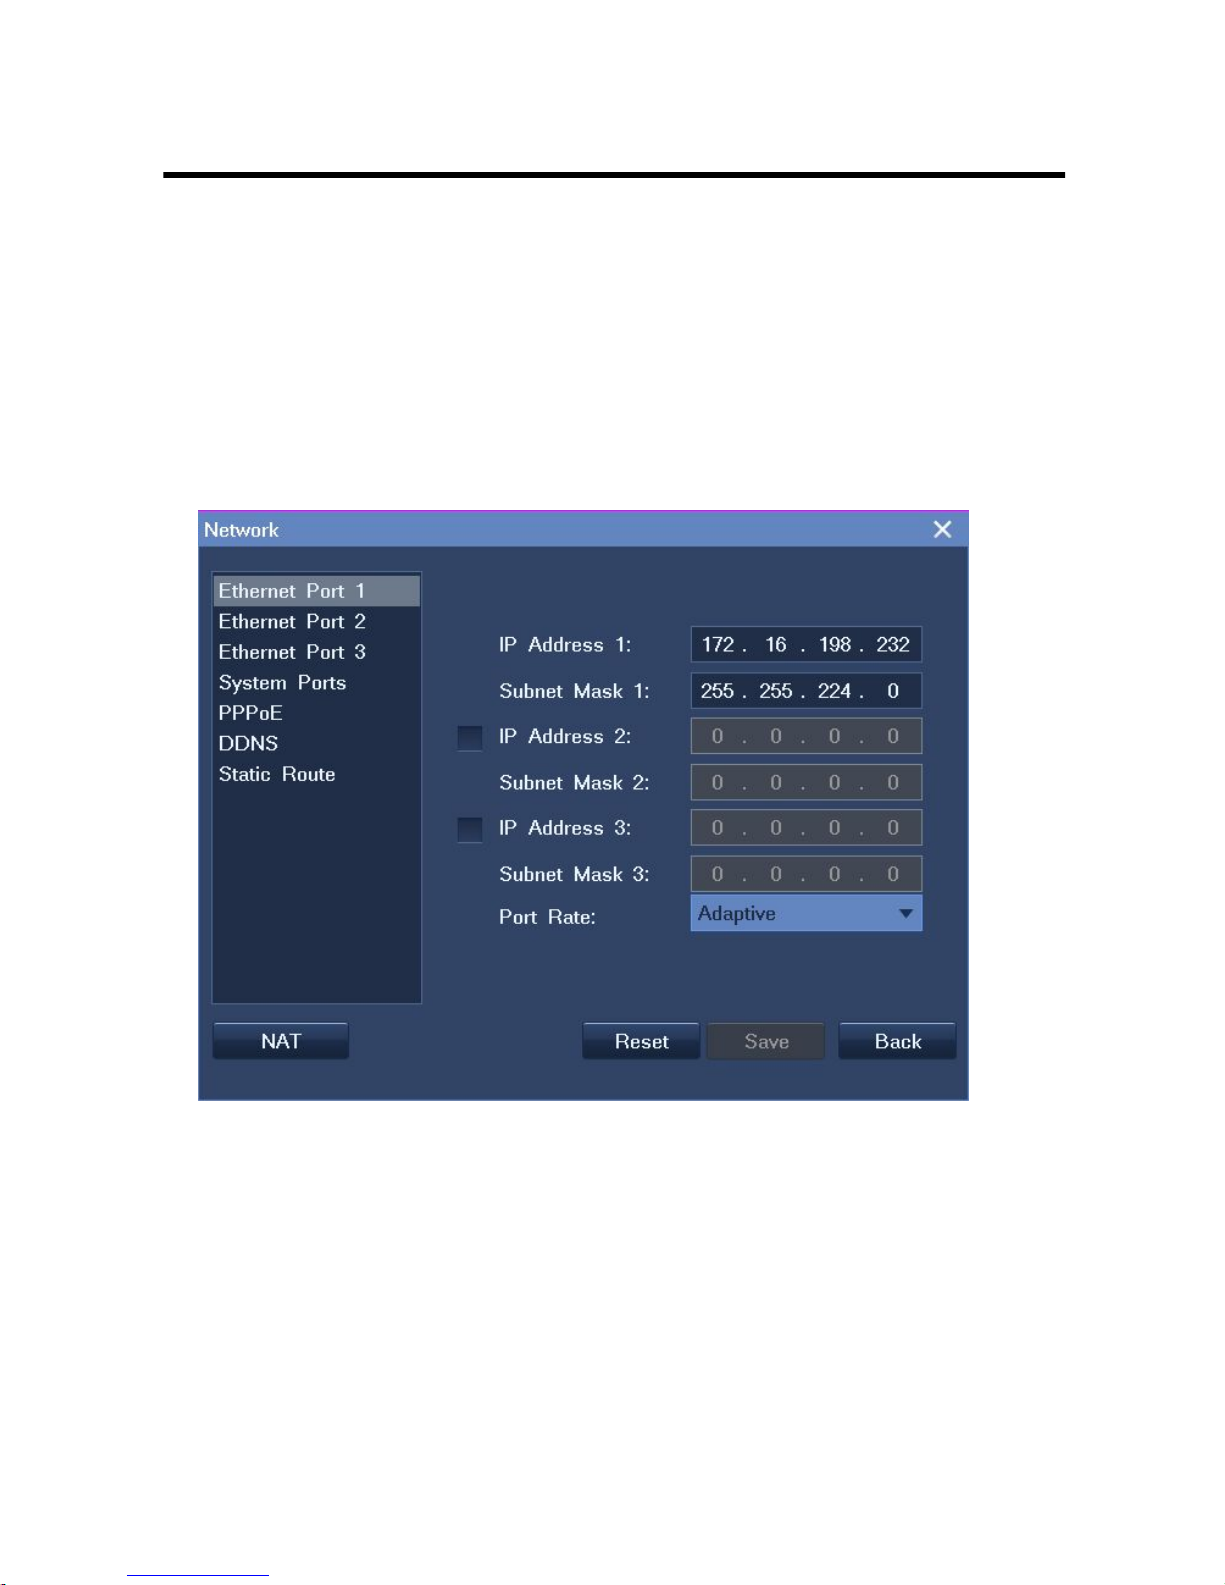
4.1 Ethernet Ports
To configure Ethernet ports:
1. Choose Main Menu > Network > Ethernet Port 1, Ethernet Port 2, or Ethernet Port 3.
2. Configure parameters displayed according to onsite conditions.
The following is an example.
3. Click Save.
The default value for IP Address 1 of Ethernet Port 1 is 192.168.1.100. The subnet mask for this IP
address is 255.255.255.0.
The default value for IP Address 2 of Ethernet Port 2 is 172.26.1.100. The subnet mask for this IP
address is 255.255.255.0.
The default value for IP Address 3 of Ethernet Port 3 is 10.26.1.100. The subnet mask for this IP
address is 255.255.255.0.
19
Note
Clicking the Reset button will restore the previously saved parameter settings. For example, IP address 1 of Ethernet port
1 is 1.1.1.1 and this address is successfully saved. If you change the address to 2.2.2.2 without clicking Save, clicking
Reset will change the address back to 1.1.1.1.
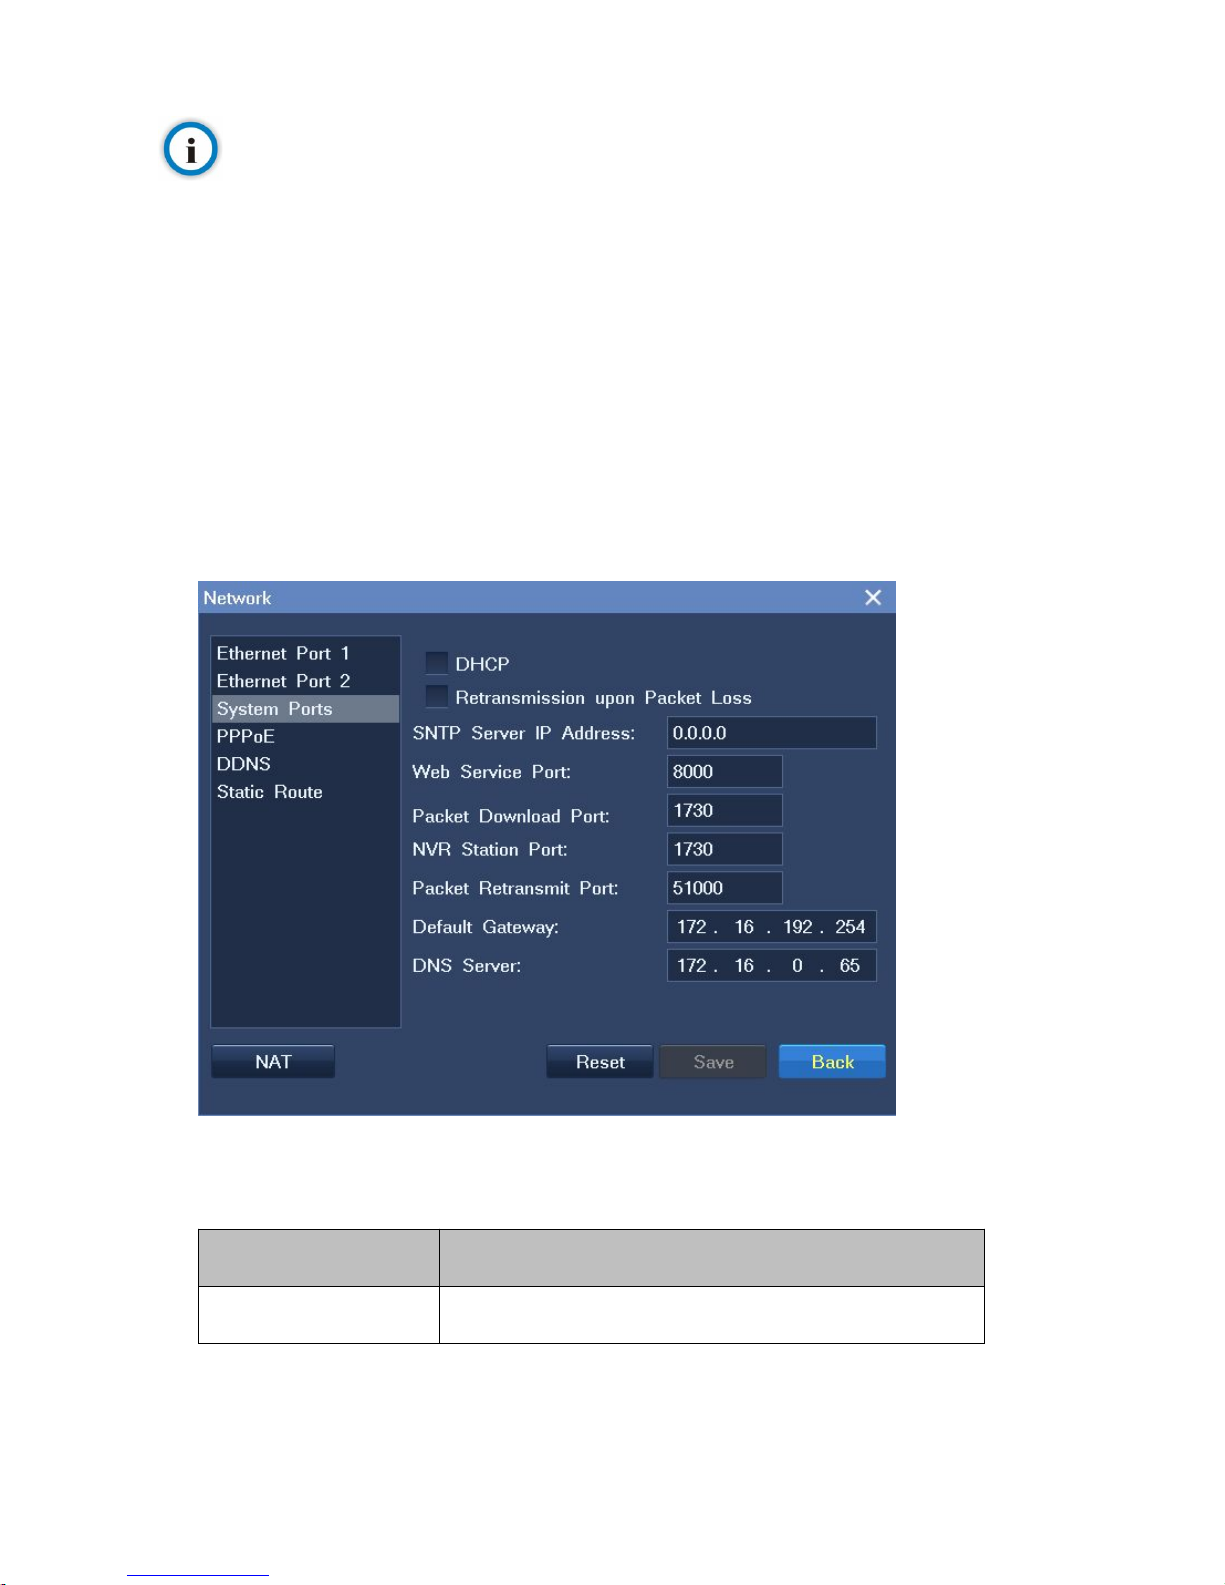
4.2 System Ports
To configure system ports:
1. Choose Main Menu > Network > System Ports.
2. Configure parameters displayed according to onsite conditions.
The following is an example.
The following table provides the descriptions for key parameters.
Parameter
Description
Web Service Port
Port for web-based access to the NVR.
Parameter
Description
The default value for this parameter is 80.
Packet Download Port
Port for the NVR Station to download data from the NVR.
The default value for this parameter is 1730.
NVR Station Port
Port for the NVR Station to communicate with the NVR.
The default value for this parameter is 1730.
Packet Retransmit Port
Port for the NVR to retransmit packets to the NVR Station.
The default value for this parameter is 51000.
3. Click Save.
Note
Clicking the Reset button will restore the previously saved parameter settings.
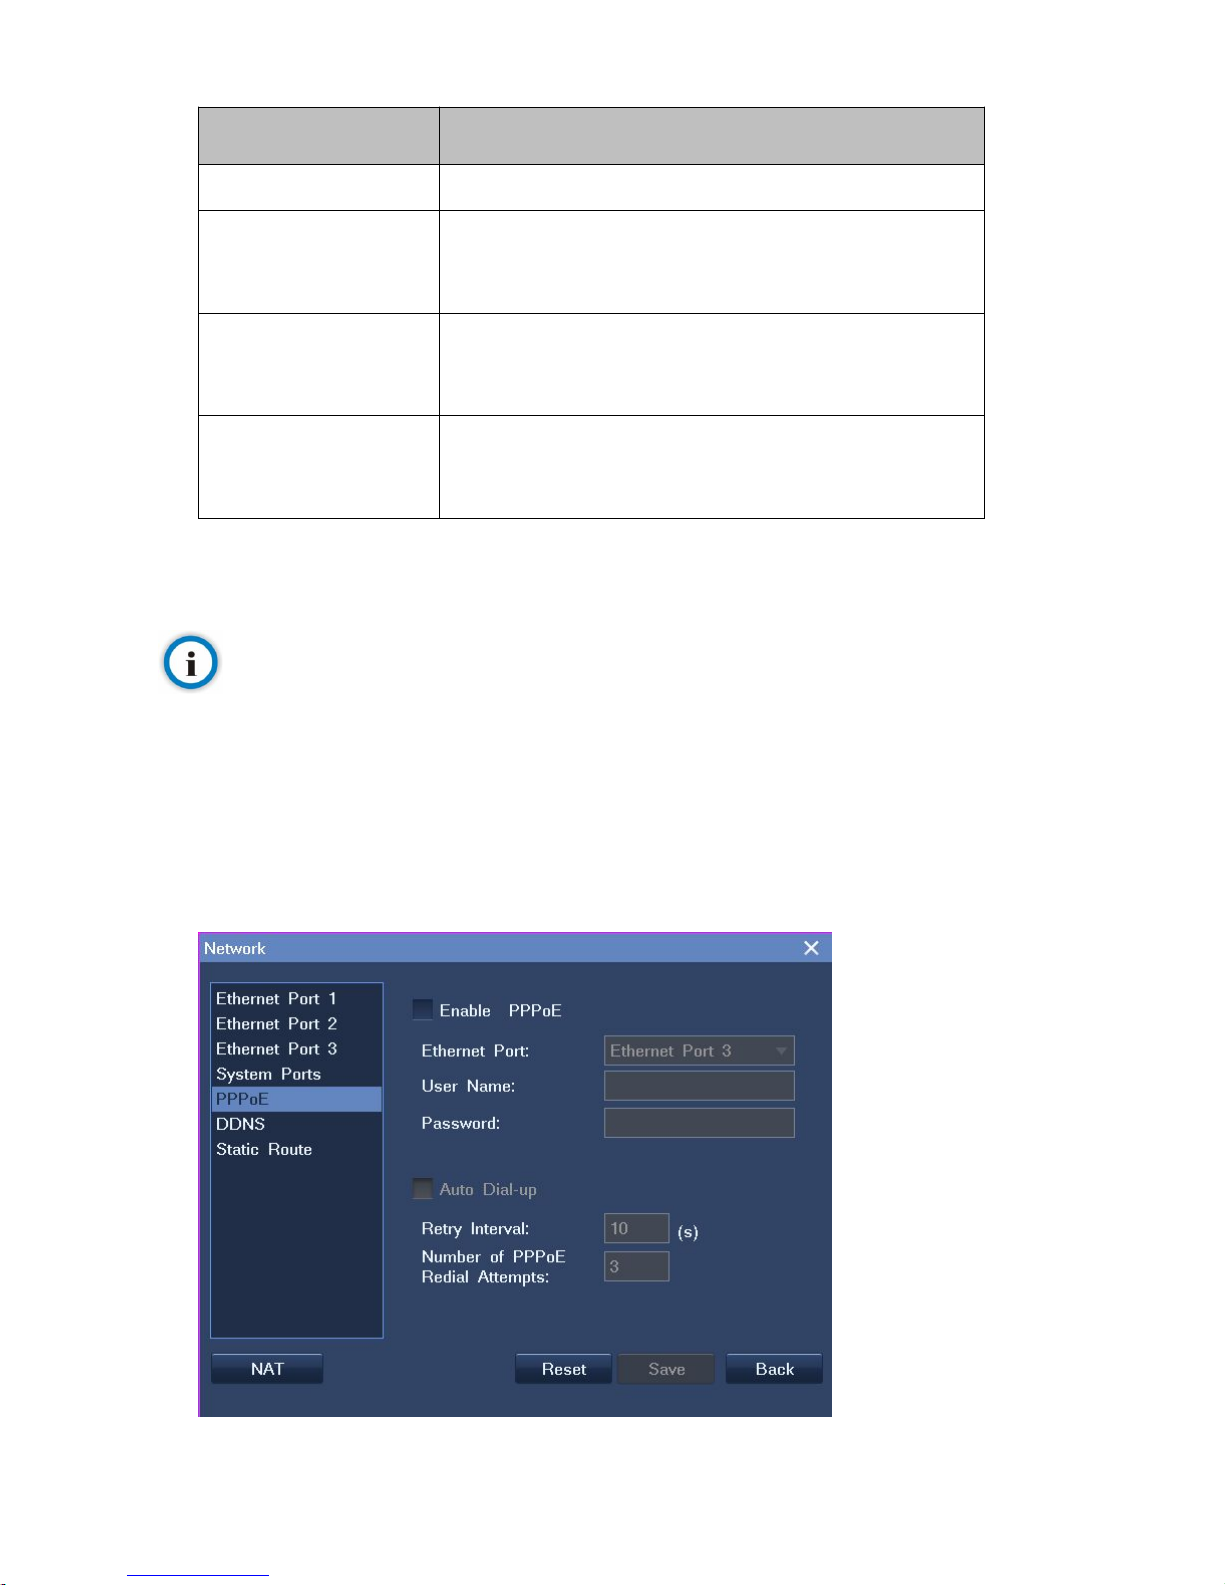
4.3 PPPoE
To enable PPPoE for an Ethernet port:
1. Choose Main Menu > Network > PPPoE > Enable PPPoE, as shown in the following figure.

21
2. Select the Ethernet port from the Ethernet Port drop-down list.
3. Specify User Name and Password.
4. Click Save.
If the existing dial-up connection is broken, choose Main Menu > Network > PPPoE > Save to manually
establish a new dial-up connection.
To enable the system to automatically establish a new dial-up connection when the existing dial-up
connection is broken:
1. Select Auto Dial-up.
2. Specify Retry Interval and Number of PPPoE Redial Attempts.
3. Click Save.
When PPPoE is enabled, you are advised to enable the DDNS technique to facilitate access from other
devices to the NVR.
Note
Clicking the Reset button will restore the previously saved parameter settings.
4.4 DDNS
The Dynamic Domain Name System (DDNS) update integrates DNS with DHCP. The two protocols are
complementary: DHCP centralizes and automates IP address allocation; DDNS update automatically
records the association between assigned addresses and hostnames at pre-defined intervals.
The DDNS allows frequently changing address-hostname associations to be updated frequently. Mobile
hosts, for example, can then move freely on a network without user or administrator intervention. DDNS
provides the necessary dynamic update and synchronization of the name-to-address mapping and
address-to-name mapping on the DNS server.
Before enabling DDNS, go to the System Ports tab to configure the DNS Server and Default Gateway
parameters and ensure that the NVR connects to the Internet.
To enable DDNS:
1. Choose Main Menu > Network > DDNS > Enable DDNS.
2. Configure parameters displayed.
The following figure shows the parameters displayed when the server type is set to Oray.cn
PeanutHull DDNS.
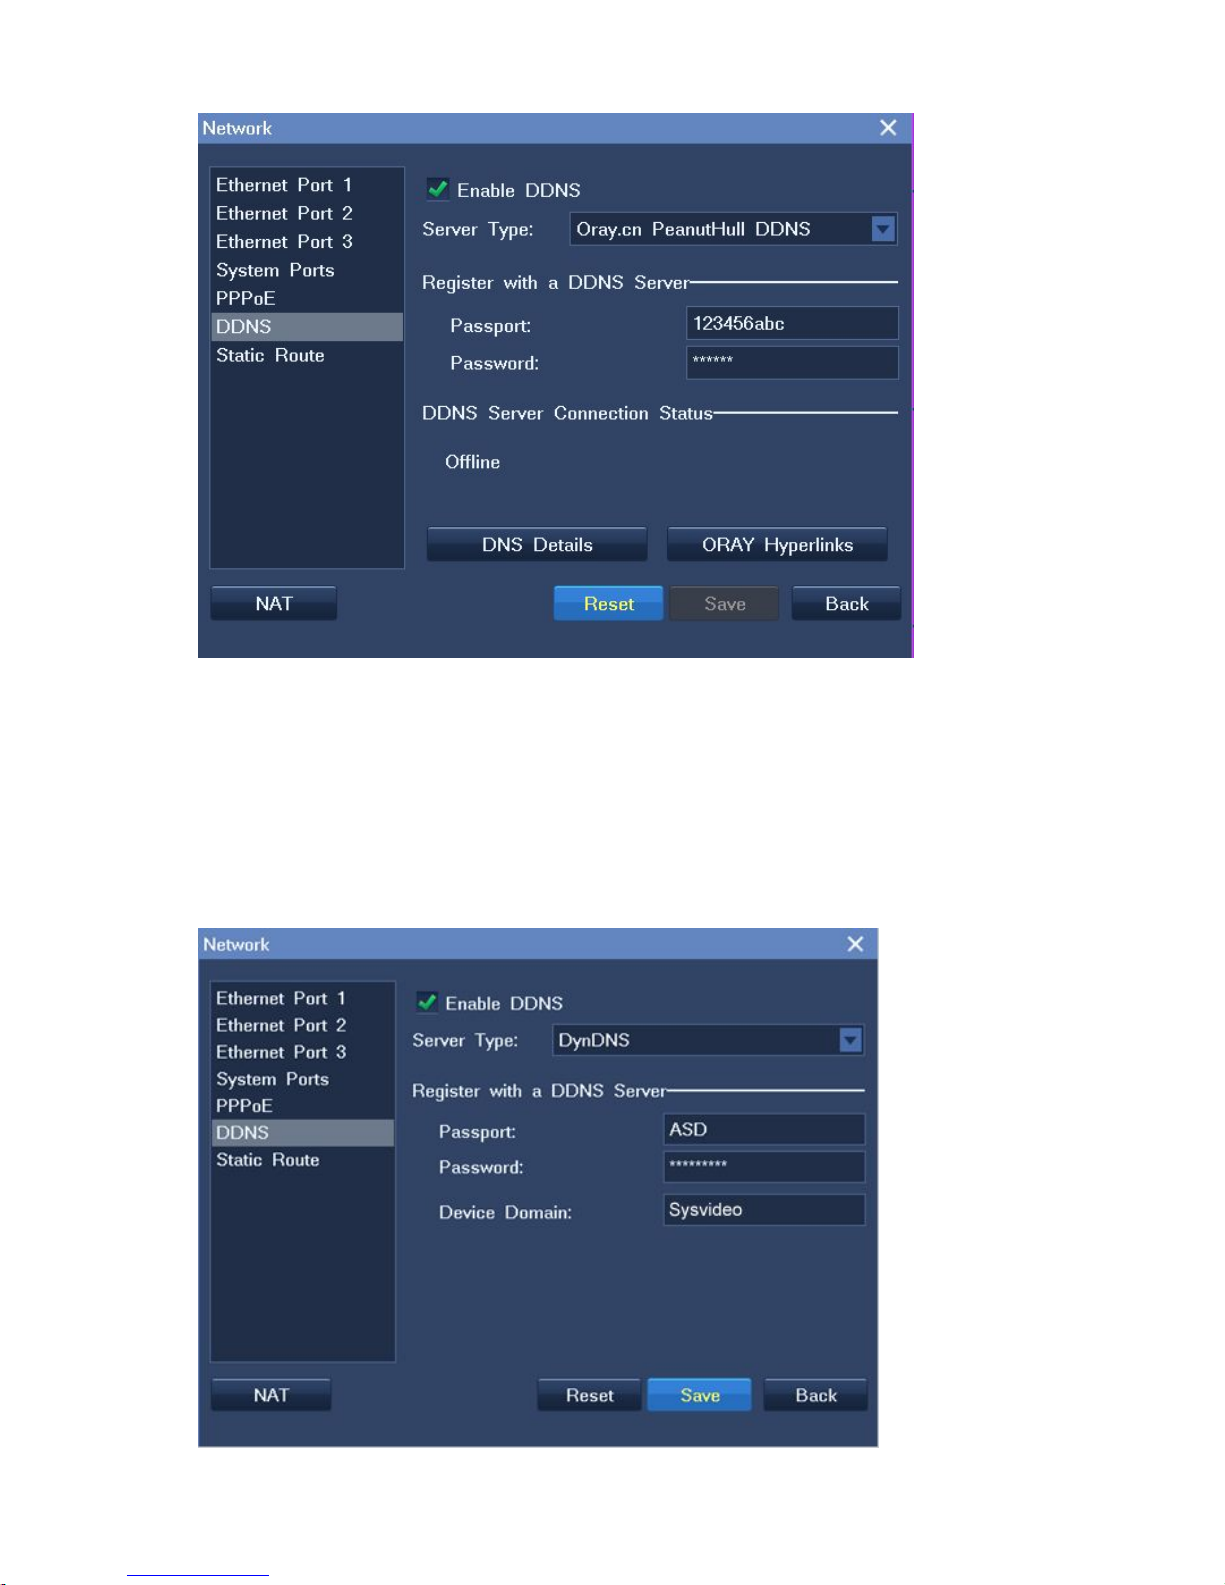
(Before configuring the Passport and Password parameters, register with the Oray (www.oray.com)
to obtain a passport. Note that the Oray will automatically assign the NVR a domain, which can be
queried by clicking DNS Details.
To query DNS details, click DNS Details. To query Oray hyperlinks, click ORAY Hyperlinks.)
The following figure shows the parameters displayed when the server type is set to DynDNS.
23
(Before configuring the Passport, Password, and Device Domain parameters, register with the
Dyn (www.dyndns.com) to obtain a passport and domain. One example for the Device Domain
parameter is Sysvideo.)
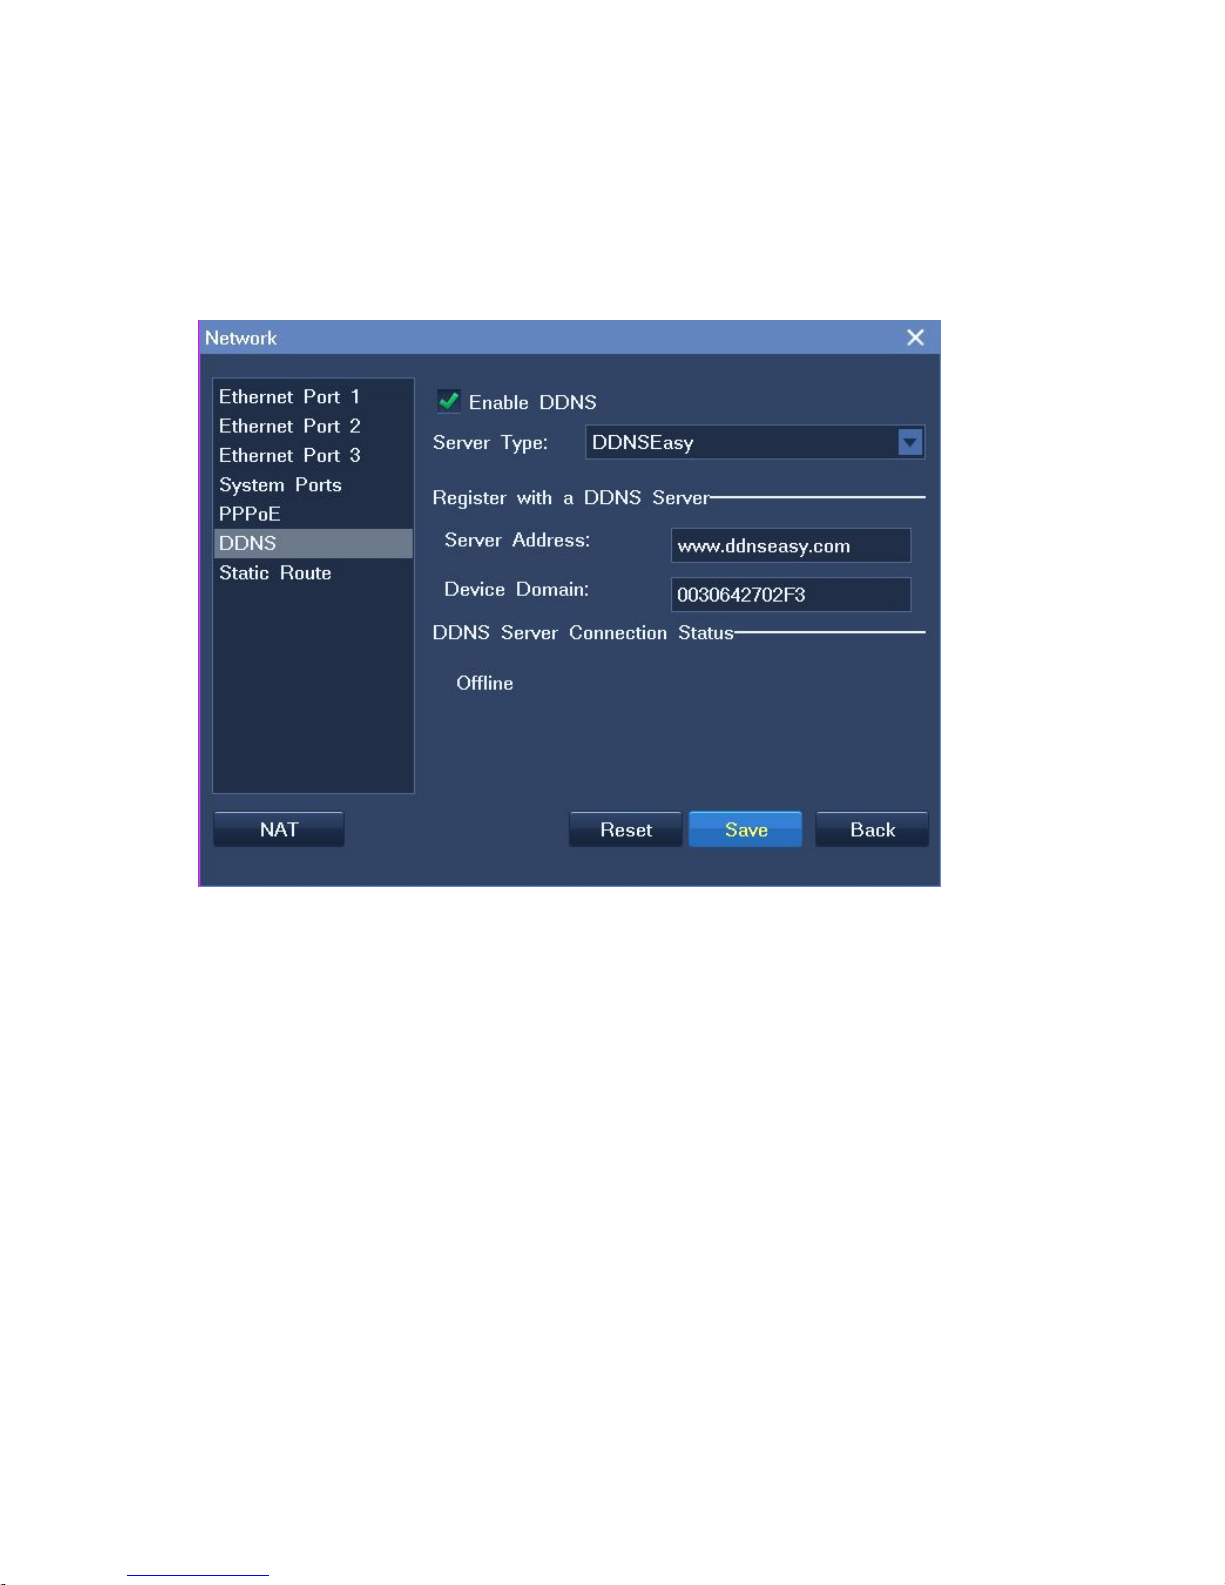
The following figure shows the parameters displayed when the server type is set to DDNSEasy.
(You must keep the default value (www.ddnseasy.com) for the Server Address parameter. Every
NVR comes with a unique value for the Device Domain parameter. You can either keep this value
or change the parameter value.)
After being configured with a domain, the NVR can be reached using this domain. On the NVR
Station, enter the domain of the NVR in the URL text box to connect to the NVR.
The following figure assumes that the domain (http://sysvideo.dyndns.org) of the NVR is provided
by the Dyn.
 Loading...