


SYSTRONIK
Elektronik u. Systemtechnik GmbH
Gewerbestrasse 57
D-88636 Illmensee
Tel.: +49 (0) 7558 / 9206-0
Fax: +49 (0) 7558 / 9206-20
E-Mail: info@systronik.de
Internet: www.systronik.com
Read instructions before using device!
Observe all safety information!
Keep instructions for future use!
12.2015
854.001.0690 SYSTRONIK part no.: 523538
Operating instructions
Pressure measuring instrument
S4600-ST® (BLE)

2 S4600-ST®

S4600-ST® 3
Table of contents
1 This instruction manual ............................................................................................ 5
1.1 Precautions .................................................................................................. 5
1.2 Explanation of symbols and typeface ........................................................... 5
2 Safety ....................................................................................................................... 6
2.1 Intended use ................................................................................................. 6
2.2 Predictable incorrect application .................................................................. 6
2.3 Safe handling ............................................................................................... 6
2.4 Staff qualification .......................................................................................... 6
2.5 Calibration / adjustment ............................................................................... 7
2.6 Modifications to the product ......................................................................... 7
2.7 Usage of spare parts and accessories ......................................................... 7
2.8 Liability information ....................................................................................... 7
3 Product description .................................................................................................. 8
3.1 Scope of delivery .......................................................................................... 8
3.2 Properties and functions .............................................................................. 8
3.3 Technical specifications ............................................................................... 9
3.4 Approvals, tests and conformities .............................................................. 11
4 Transport and storage ........................................................................................... 11
5 Commissioning ...................................................................................................... 11
5.1 Using the IR printer .................................................................................... 11
5.2 Using the Bluetooth Smart printer .............................................................. 12
6 Operation ............................................................................................................... 14
6.1 Measuring mode ......................................................................................... 14
6.2 Changing the units ..................................................................................... 18
6.3 Setting time and date ................................................................................. 19
6.4 Setting the display ...................................................................................... 19
6.5 Setting the key tone and the alarm tone .................................................... 20
6.6 Displaying device information .................................................................... 21
6.7 Generating QR-CODE................................................................................ 22
6.8 Data Logger function (option) ..................................................................... 22
6.9 "Pressure Measurement" program ............................................................. 25
6.10 "Pressure Loss Measurement" program .................................................... 26
6.11 "Pitot Measurement" program (option) ....................................................... 28
6.12 "Leakage measurement" program (option) ................................................ 30
6.13 "Leakage rate measurement" program (option) ......................................... 32
7 Memory mode and memory structure ................................................................... 38
7.1 How to save ................................................................................................ 38
7.2 Database Memory (option) ......................................................................... 41
7.3 Entering the user address .......................................................................... 48

4 S4600-ST®
8 Battery management ............................................................................................. 49
8.1 Battery operation / charging mode ............................................................. 49
8.2 Charging the batteries ................................................................................ 49
9 Maintenance .......................................................................................................... 51
10 Troubleshooting ..................................................................................................... 51
11 Disposal ................................................................................................................. 52
12 Warranty ................................................................................................................ 52
13 Copyright ............................................................................................................... 52
14 Customer satisfaction ............................................................................................ 52
15 Addresses .............................................................................................................. 52
16 Appendix ................................................................................................................ 53
16.1 DIN EN 50379 certificate ............................................................................ 53

This instruction manual
S4600-ST® 5
1 This instruction manual
This instruction manual is part of the product.
Read this manual before using the product.
Keep this manual during the entire service life of the product
and always have it readily available for reference.
Always hand this manual over to future owners or users of the
product.
1.1 Precautions
WARNING TERM
Type and source of the danger are shown here.
Precautions to take in order to avoid the danger are shown
here.
There are three different levels of warnings:
Warning term
Meaning
DANGER
Immediately imminent danger!
Failure to observe the information will result in
death or severe injuries.
WARNING
Possibly imminent danger!
Failure to observe the information may result in
death or severe injuries.
CAUTION
Dangerous situation!
Failure to observe the information may result in
minor or severe injuries as well as damage to
property.
1.2 Explanation of symbols and typeface
Symbol
Meaning
Prerequisite for an activity
Activity consisting of a single step
1.
Activity consisting of a several steps
Result of an activity
Bulleted list
Text
Indication on display
Highlighting
Highlighting

Safety
6 S4600-ST®
2 Safety
2.1 Intended use
The pressure measuring instrument S4600-ST© may only be used to
measure pressure of gaseous media in non-hazardous areas. The
measuring instrument S4600-ST® must not be used for pressure
measurement at gas lines.
Any use other than the application explicitly permitted in this
instruction manual is not permitted.
2.2 Predictable incorrect application
The pressure measuring instrument S4600© must never be used in
the following cases:
Hazardous area (Ex)
If the device is operated in hazardous areas, sparks may cause
deflagrations, fires or explosions.
Applications involving persons and animals
2.3 Safe handling
This product represents state-of-the-art technology and is made
according to the pertinent safety regulations. Each device is
subjected to a function and safety test prior to shipping.
Operate the product only when it is in perfect condition. Always
observe the operating instructions, all pertinent local and
national directives and guidelines as well as the applicable
safety regulations and directives concerning the prevention of
accidents.
Extreme environmental conditions have negative effects on the
function of the product.
Protect the product from shocks.
Only use the product in rooms.
Protect the product from humidity.
2.4 Staff qualification
The product may only be mounted, commissioned, operated,
maintained, shut down and disposed of by qualified, specially trained
staff.
Electrical work may only be performed by trained electricians and in
compliance with all applicable local and national directives.

Safety
S4600-ST® 7
2.5 Calibration / adjustment
S4600-ST® must be calibrated on an annual basis. Calibration and
adjustment may only be performed by the manufacturer or by third
parties authorised by the manufacturer.
2.6 Modifications to the product
Changes or modifications made to the product by unauthorised
persons may lead to malfunctions and are prohibited for safety
reasons.
2.7 Usage of spare parts and accessories
Usage of unsuitable spare parts and accessories may cause
damage to the product.
Use only genuine spare parts and accessories of the
manufacturer.
2.8 Liability information
The manufacturer shall not be liable in any form whatsoever for
direct or consequential damage resulting from failure to observe the
technical instructions, guidelines and recommendations.
The manufacturer or the sales company shall not be liable for costs
or damages incurred by the user or by third parties in the usage or
application of this device, in particular in case of improper use of the
device, misuse or malfunction of the connection, malfunction of the
device or of connected devices. The manufacturer or the sales
company shall not be liable for damage whatsoever resulting from
any use other than the use explicitly permitted in this instruction
manual.
The manufacturer shall not be liable for misprints.
Product description
8 S4600-ST®
3 Product description
3.1 Scope of delivery
Scope of delivery:
Measuring instrument S4600-ST®
USB mains adaptor
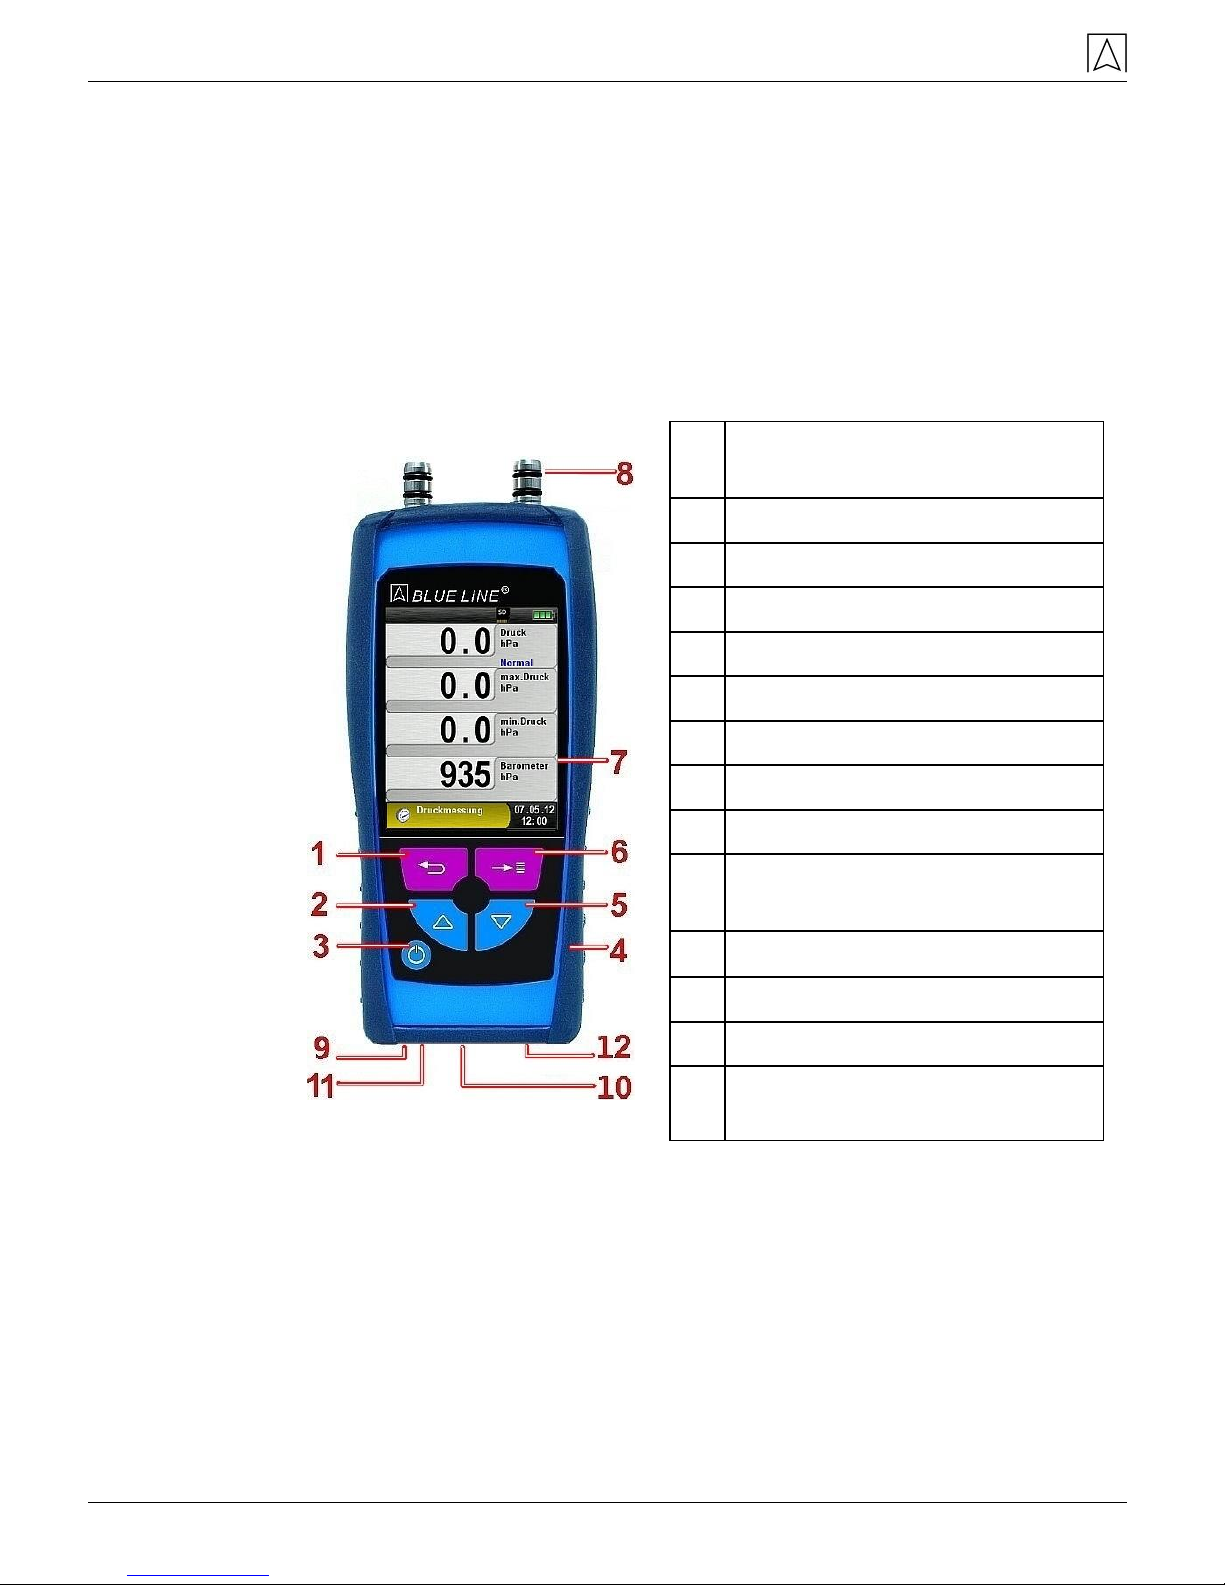
3.2 Properties and functions
1
Cancel ("Clear" key) / direct
access
2
Up key
3
On/off key
4
Protective sleeve
5
Down key
6
Menu / Enter key
7
Display
8
Pressure connections
9
Sensor
10
Charger/power supply unit
connection
11
IR printer connection
12
MicroSD card slot

Product description
S4600-ST® 9
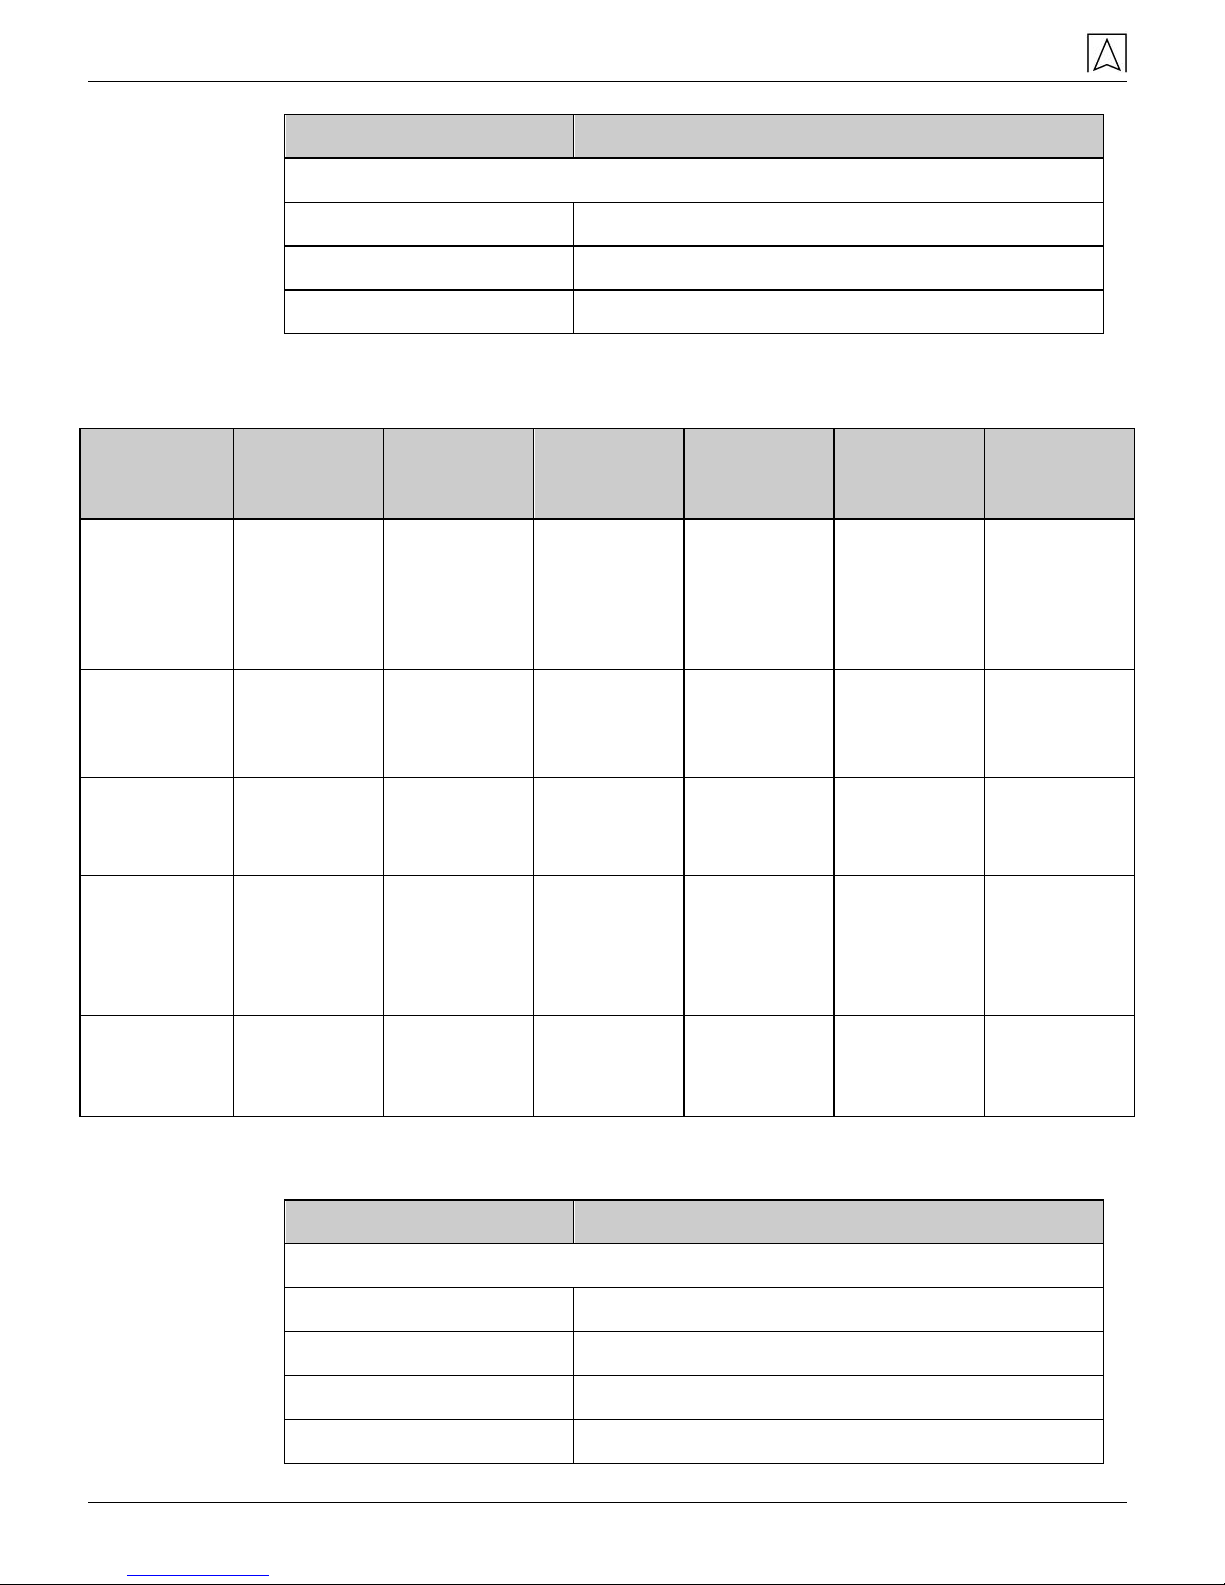
3.3 Technical specifications
Table 1: Device description
Parameters
Value
General specifications
Dimensions of housing
with protective sleeve
(H x W x D)
143 mm x 66 mm x 37 mm
(5.6 in x 2.6 in x 1.5 in)
Weight (with protective
sleeve)
Approx. 220 g (7.76 oz)
Housing material
Polyamide (PA)
Display
High-resolution graphical 2.8" TFT display
(240 x 320).
Data communication
Infrared printer interface.
Bluetooth® Smart interface (Bluetooth® low
energy).
Printer
External infrared thermal printer
(EUROprinter)
Memory
MicroSD card with folder/file structure
Operating temperature range
Ambient
0 °C to +40 °C (+32 °F to +104 °F)
Medium
0 °C to +40 °C (+32 °F to +104 °F)
Storage
-20 °C to +50 °C (-4 °F to +122 °F)
Atmospheric pressure range
Ambient
750 hPa to +1100 hPa
Humidity range
Ambient
20 % rH to 80 % rH
Supply voltage
Battery operation
Lithium-ion battery 3.6 V / 1800 mAh
Mains operation
Mains adaptor (USB)
Electrical safety
Degree of protection
IP 40 EN 60529
Product description
10 S4600-ST®
Parameters
Value
Electromagnetic compatibility (EMC)
Interference
EN 55022 (VDE 0875-22)
Noise immunity
EN 61000 (VDE 0847-4-2)
ESD
EN 61000-4-2
Table 2: Device specifications (pressure measurement)
S4602-ST
S4601-ST
S4610-ST
S4650-ST
S4680-ST
S4699 ST
Measuring
range [mbar]
- nominal
- maximum
± 20
± 20
± 150
± 180
± 1,000
± 1,500
± 5,000
± 7,000
± 8,000
± 10,000
± 18.000
± 20.000
Max.
overpressure
[bar]
0.25
1.35
16.0
16.0
16.0
28.0
Resolution
[mbar]
0.001
0.01 (<99.99)
0.1 (>100.0)
0.1 (< 999.9)
1 (> 1000)
0.1 (< 999.9)
1 (> 1000)
0.1 (< 999.9)
1 (> 1000)
1
Accuracy
[% of
measured
value]
0.003 mbar
or
0.5 ± 1 digit
0.03 mbar
or
0.5 ± 1 digit
0.3 mbar
or
0.5 ± 1 digit
0.7 mbar
or
0.5 ± 1 digit
1.2 mbar
or
0.5 ± 1 digit
3 mbar
or
0.5 ± 1 Digit
Mechanical
connections
2 x standard
( 8 mm)
2 x standard
( 8 mm)
2 x standard
( 8 mm)
2 x standard
( 8 mm)
2 x standard
( 8 mm)
2x Festo
( 3 mm)
Table 3: Additional device specifications
Parameters
Value
Barometric pressure measurement
Measuring range
500 – 1150 hPa
Max. deviation
± 1.5 hPa
Resolution
± 10 hPa
Sensor
Semiconductor sensor

Transport and storage
S4600-ST® 11
3.4 Approvals, tests and conformities
The S4600-ST® pressure measuring instrument is approved as per
the German Federal Immission Act (1. BImSchV) and EN 50379-2
and is TÜV-tested. It complies with the EMC Directive
(2004/108/EC).
4 Transport and storage
CAUTION
Damage to the device due to improper transport.
Do not throw or drop the device.
CAUTION
Damage to the device due to improper storage.
Protect the device from shock when storing it.
Store the device in a clean and dry environment.
Only store the device within the permissible temperature
range.
5 Commissioning
5.1 Using the IR printer
For data transmission from the measuring instrument to the
corresponding IR printer (EUROprinter), align the bottom of the
S4600-ST® and the printer as shown in the following illustration.
Switch on the printer. Start the data transmission via the menu of the
measuring instrument. The measurement log is printed. Keep a
minimum distance of approx. 25 cm! (Max. approx. 70 cm).
Fig. 1: Alignment of the two devices for printing
CAUTION
Transmission errors due to incorrect alignment
The transmission path must be straight and unobstructed.

Commissioning
12 S4600-ST®
5.2 Using the Bluetooth Smart printer
Measuring Data could be also transferred via Bluetooth Smart to the
“EUROprinter-BLE”. Activate the Bluetooth Smart in the S4600-ST®
Settings and on the printer. To activate the Bluetooth Smart on the
printer press the keys “OFF” and “ON” at once. A blue flashing LED
means activated Bluetooth Smart otherwise the IR modus is
activated. The Bluetooth Smart connection between device and
printer is described below:

Commissioning
S4600-ST® 13
Select the detected printer to activate the printer.
The IR modus could be set by deactivating the „Bluetooth Printer“ in
the settings menu. Set the printer to IR modus as well. Press the
keys „OFF“ and „ON“ at once and the blue flashing LED goes out.

Operation
14 S4600-ST®
6 Operation
Switch on the device: Briefly press the "On/Off" key .
6.1 Measuring mode
Program selection
The program selection section displays the available programs as
symbols. Programs can be selected and started.
Fig. 2: Program selection in the start menu
(example: S4600-ST® Pressure Measurement)
Main display
1
Status line
2
Measured values
3
Information line
4
Optional information
line
5
Individual measured
value
Fig. 3: Display when measuring program is running

Operation
S4600-ST® 15
Status line
The status line provides information on the status of relevant
parameters data such as battery, Hold function, Pressure function,
Bluetooth® Smart function, MicroSD card, etc. The type of
information displayed depends on the operating mode and functionspecific criteria.
Information line
The information line provides information on the current measuring
program, time, date, etc.
Main menu
Display the main menu with the "Menu/Enter" key.
The main menu provides access to the main functions of the device.
All other functions and settings are accessed via submenus.

Operation
16 S4600-ST®
Optional information line
The optional information line provides additional information on the
corresponding measured value such as measuring velocity of the
pressure sensor, barometric pressure sensor during Pitot
measurement, etc.
Direct Access menu
Print measured value / terminate measurement.
Press the "Clear" key to display the Direct Access menu. In the
Direct Access Menu, you can print the measured values via the
"Menu/Enter" key or terminate the measurement and return to the
Start menu.
As soon as the print command is chosen, the measurement log is
printed in parallel with the measuring task ( multitasking function),
i.e. the measurement mode remains active without limitations.
Edit mode
The Edit mode is activated if you select certain submenus so that
you can edit the appropriate values, such as the interval time for the
data logger function.
Editing the interval time of the data logger function
For example, if you want to change the interval time for the Data
Logger function, you must first select the appropriate line using the
arrow keys and then confirm with the "Menu/Enter" key. Once the
background colour of the line changes to blue, you are in Edit mode
and can change the corresponding value using the arrow keys. The
change must be confirmed with the "Menu/Enter" key. The Edit mode
is activated for the next number. Once you have changed and
confirmed all numbers, the Edit mode is disabled and the blue
background disappears.

Operation
S4600-ST® 17
Fig. 4: Edit mode, example: changing the interval time
Switching off the device, automatic Off function
Switching off the device: Briefly press the "On/Off" key and
confirm with the "Menu/Enter" key. The S4600-ST® measuring
instrument also features a time-dependent automatic Off function;
this function can be enabled or disabled.
The switch off time can be changed in Edit mode. The Edit mode is
described in chapter 6.1, page 16.

Operation
18 S4600-ST®
6.2 Changing the units
Displaying the main menu.
Various units are available for pressure measurements.
Operation
S4600-ST® 19
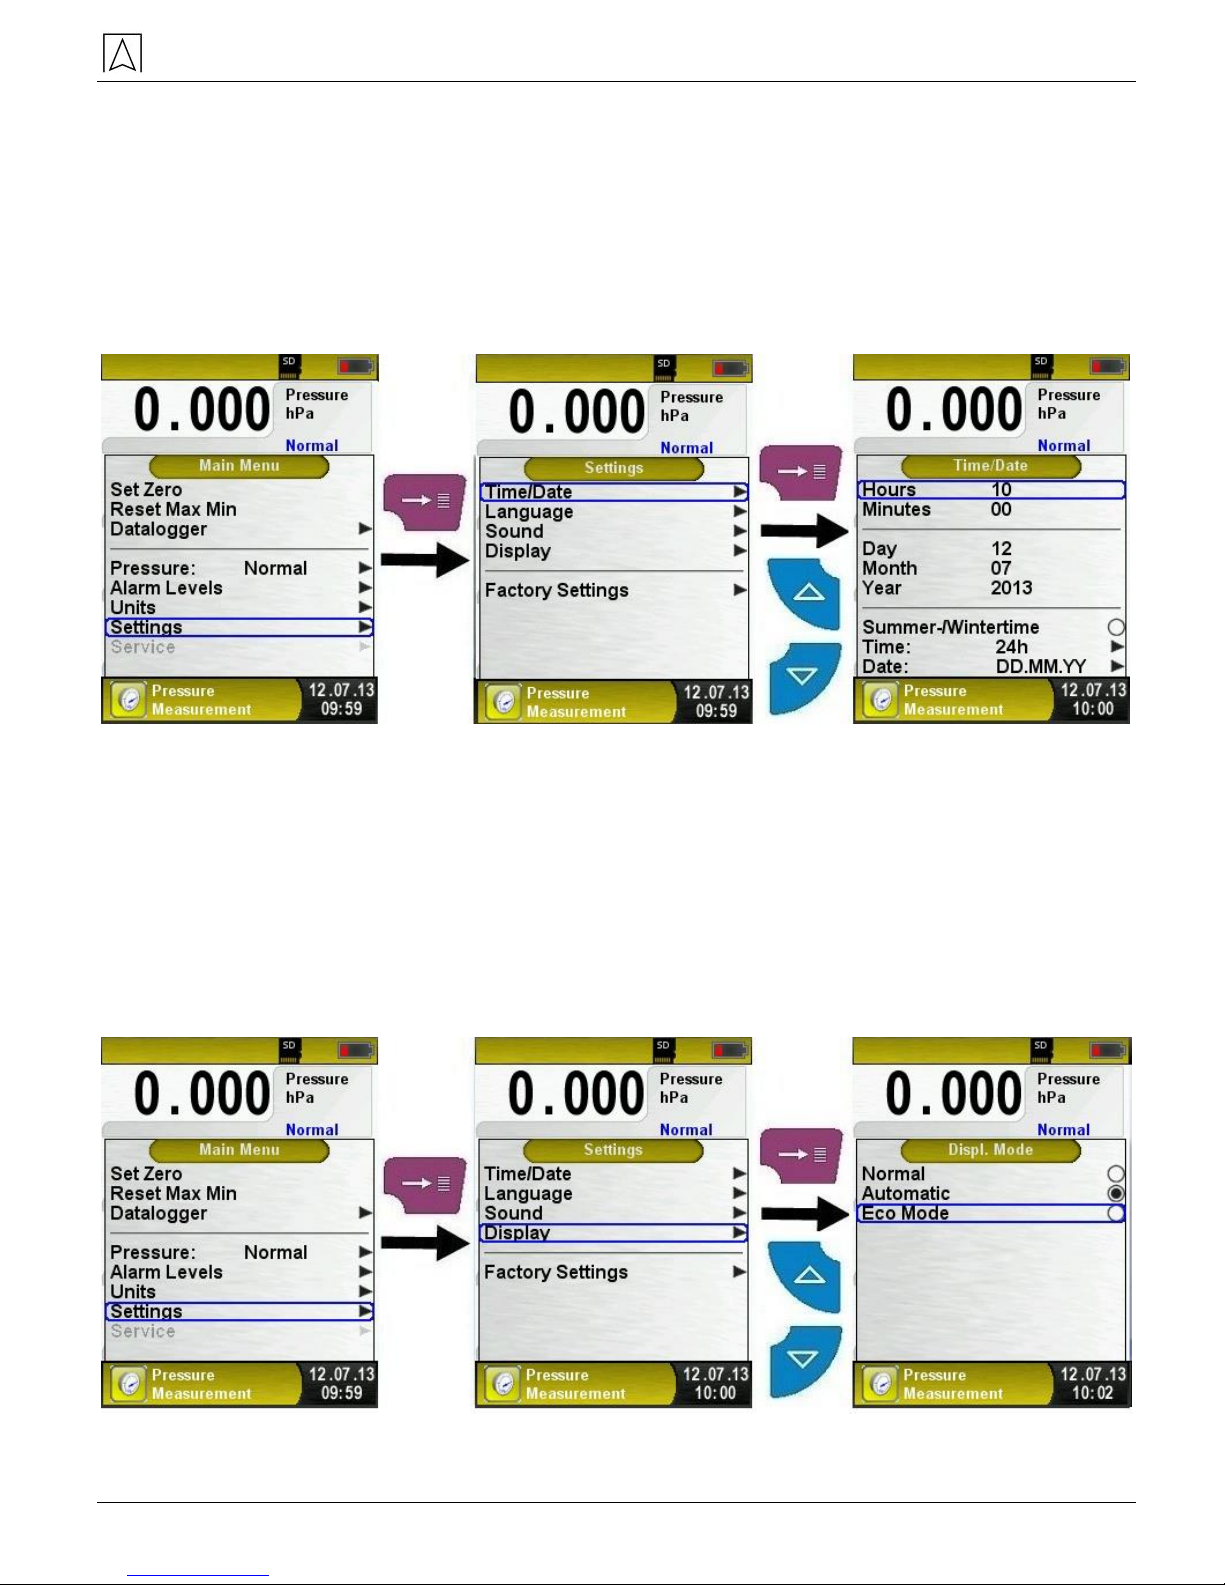
6.3 Setting time and date
Changing time and date
Time and date can be changed in Edit mode. The Edit mode is
described in chapter 6.1, page 16. The device automatically
considers leap years and daylight-saving time/wintertime; the time
and date formats are adjustable.
6.4 Setting the display
The intelligent power management of S4600-ST© allows for
optimisation of the battery life.
Three display settings are available: "Normal", "Automatic" and "Eco
Mode". The selected setting influences the battery life, see chapter
8.1, page 49.
Change the display setting.

Operation
20 S4600-ST®
6.5 Setting the key tone and the alarm tone
Setting the key tone and the alarm tone.
There are four sound levels for the key tone and the alarm tone:
Off
Low
Medium
Loud

Operation
S4600-ST® 21
6.6 Displaying device information
Displaying device information
Press the "Clear" key in the program selection area to display the
device data. The Info menu displays, among other things, the
firmware version, the release date and the serial number.
Displaying diagnostics data
Press the "Clear" key in the program selection area to display the
diagnostics data. The Diagnostics menu displays, among other
things, the firmware version, the release date and the serial number.
Operation
22 S4600-ST®
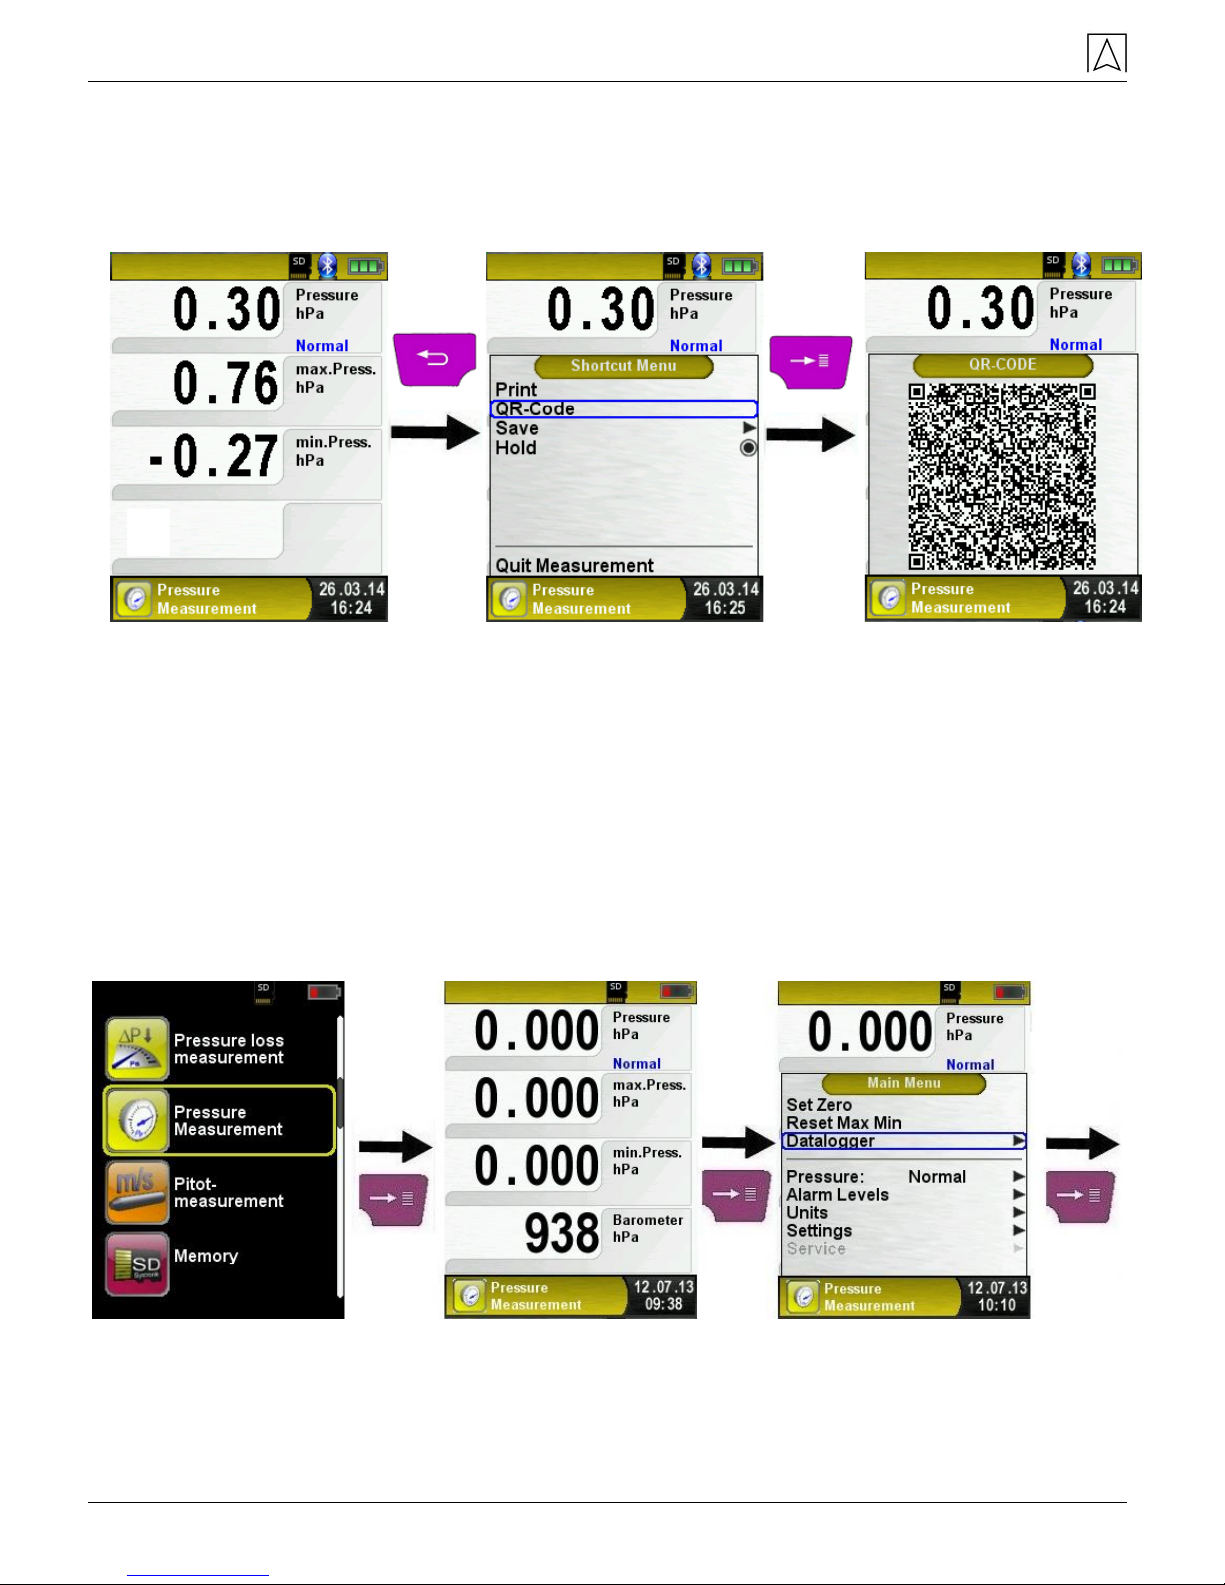
6.7 Generating QR-CODE
With the QR-Code the measured values could be transferred to a
Tablet or Smartphone.
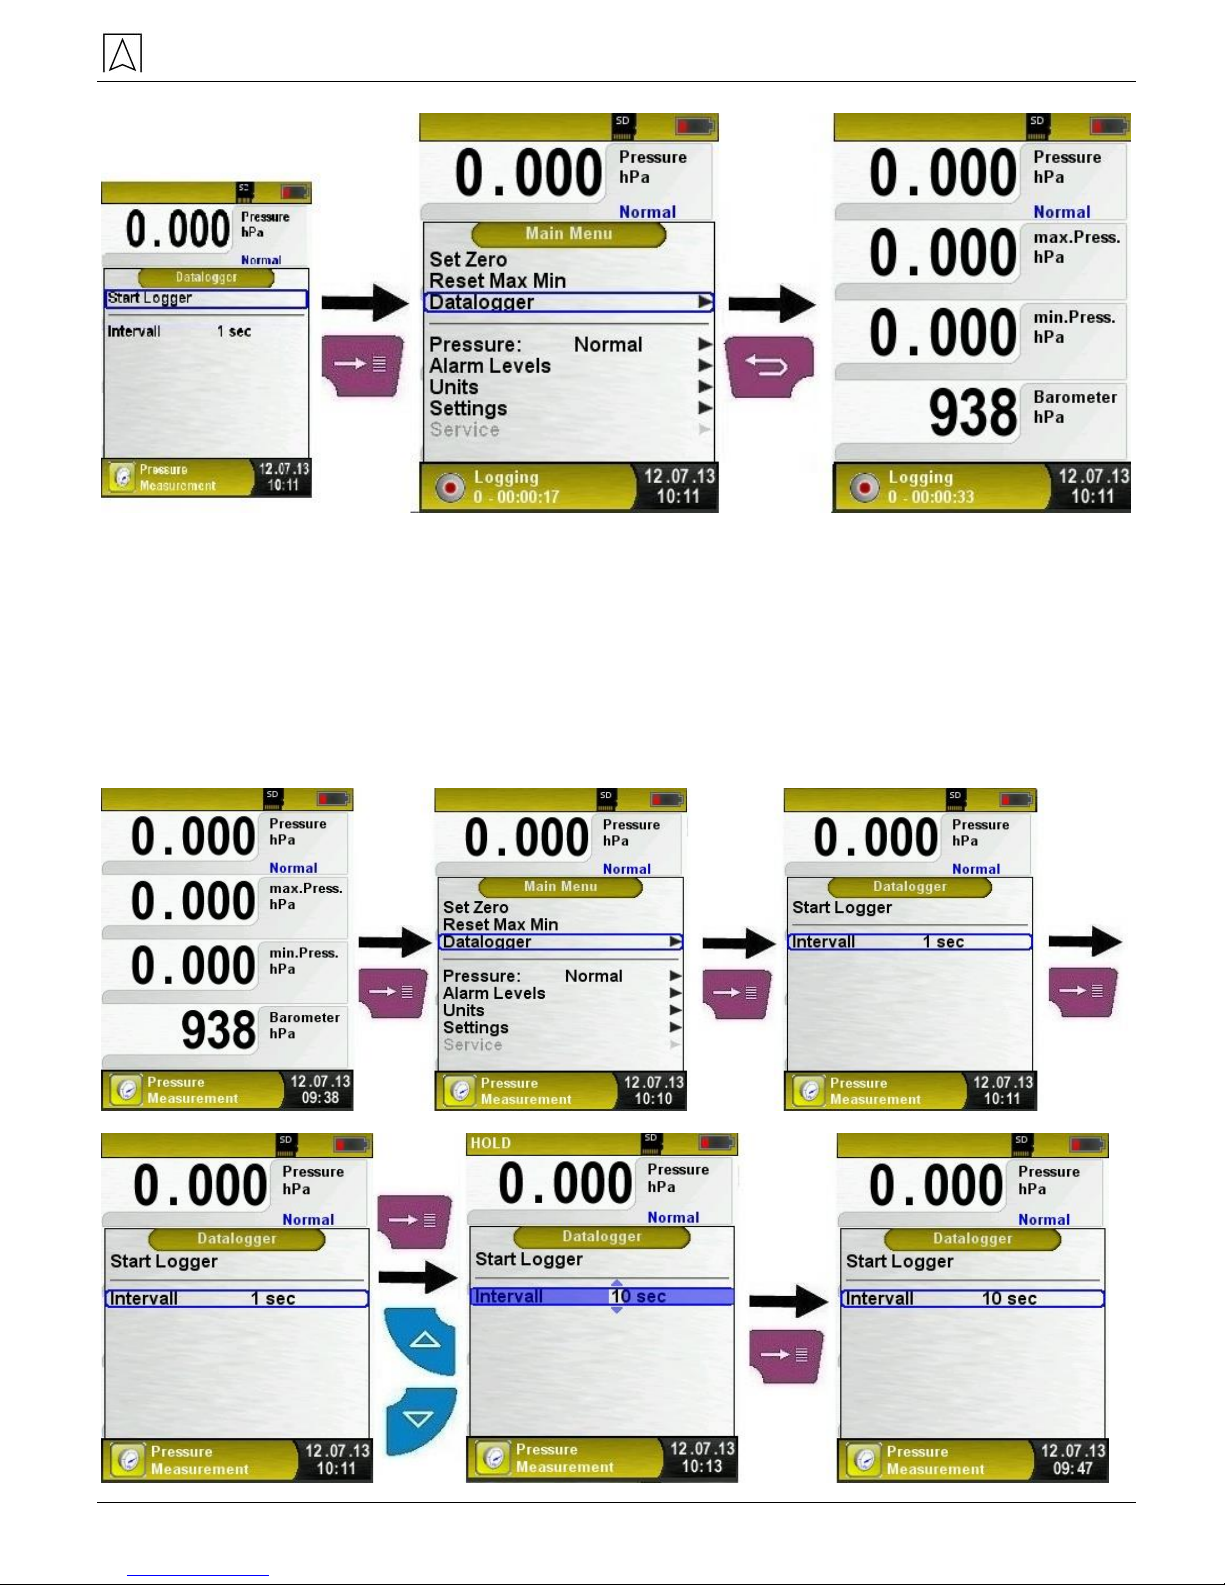
6.8 Data Logger function (option)
Starting the Data Logger function
The "Datalogger" function can be operated via the main menu. The
MicroSD card must have been inserted and sufficient memory must
be available.
The following screenshots use the "Pressure Measurement" program
as an example; the Datalogger function is also available in the "Pitot
Measurement" program (option).
Operation
S4600-ST® 23
The logging time that has already passed is shown in the Information
line.
Changing the data logger interval.
The sampling rate can be changed in Edit mode. The Edit mode is
described in chapter 6.1, page 16. The sampling rate (interval time)
can be set between 1 and 999 seconds.
Operation
24 S4600-ST®
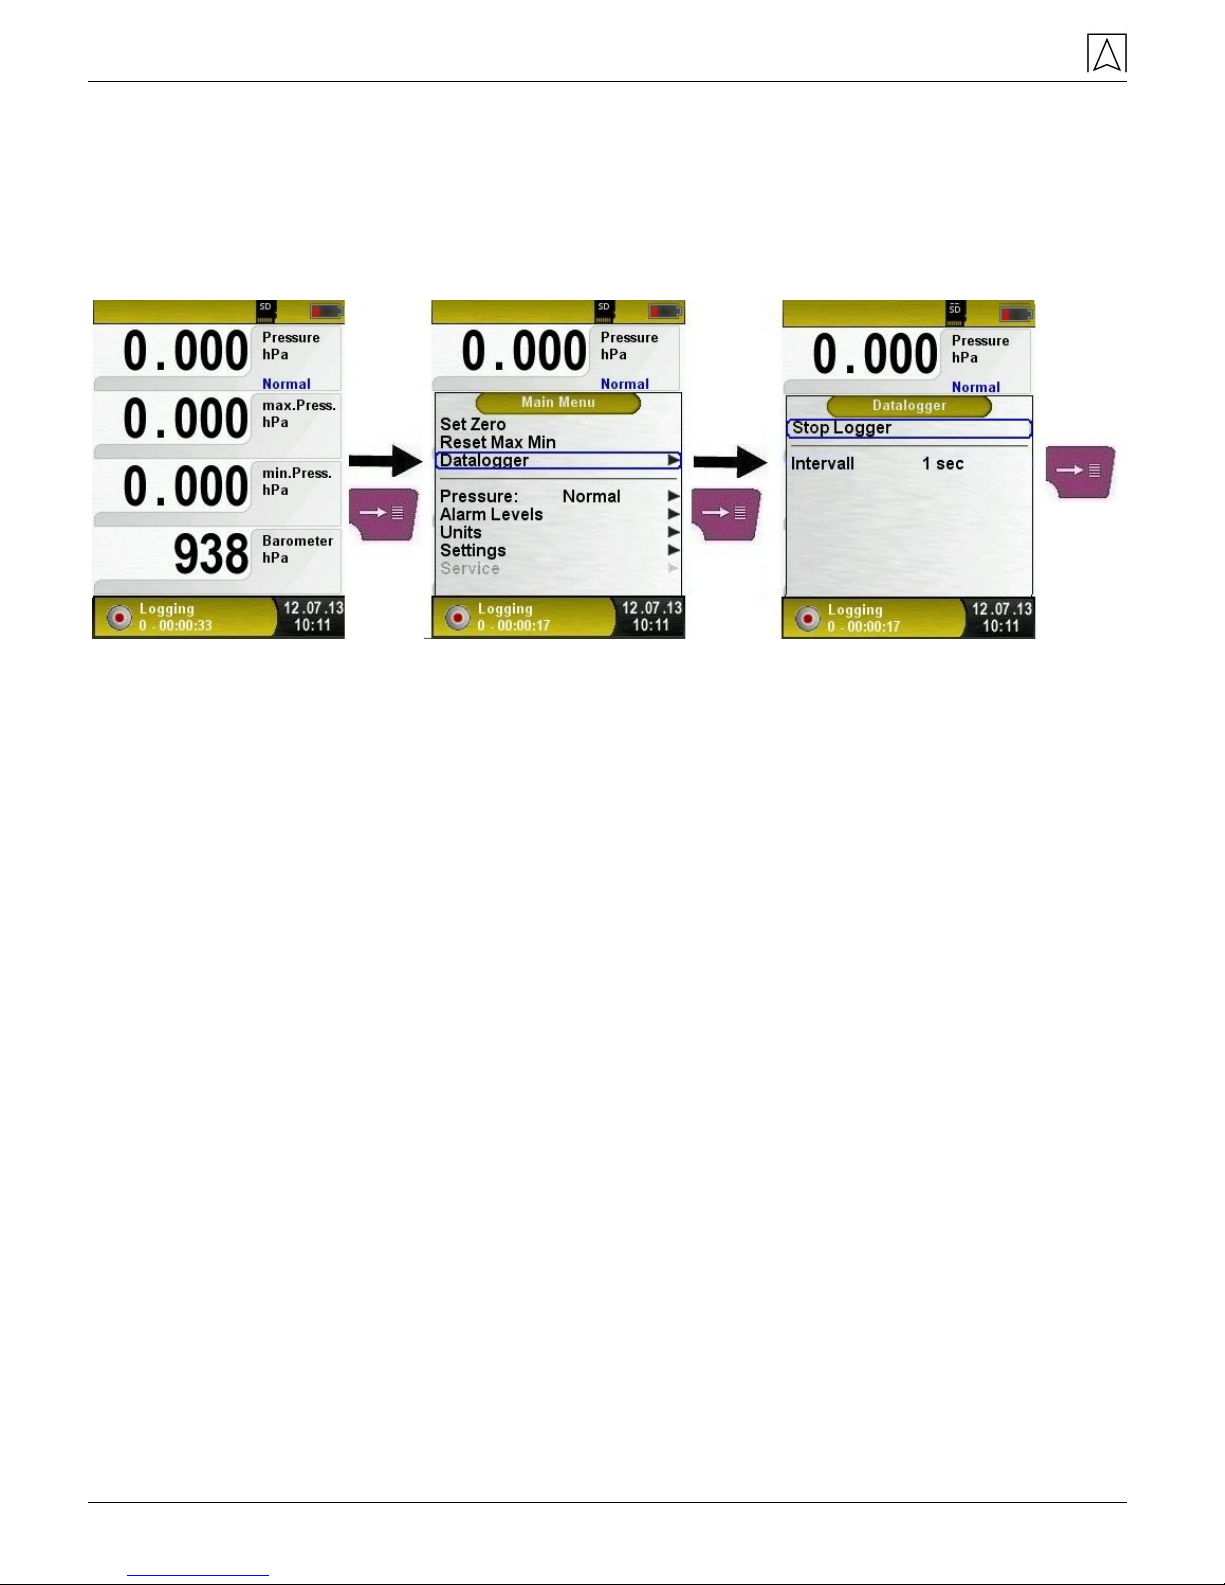
Stopping the Data Logger function
The Data Logger function can be stopped via the main menu at any
time. The data stored on the MicroSD card in XML format can be
read and further processed via an Internet browser or other XML
tools.
Operation
S4600-ST® 25
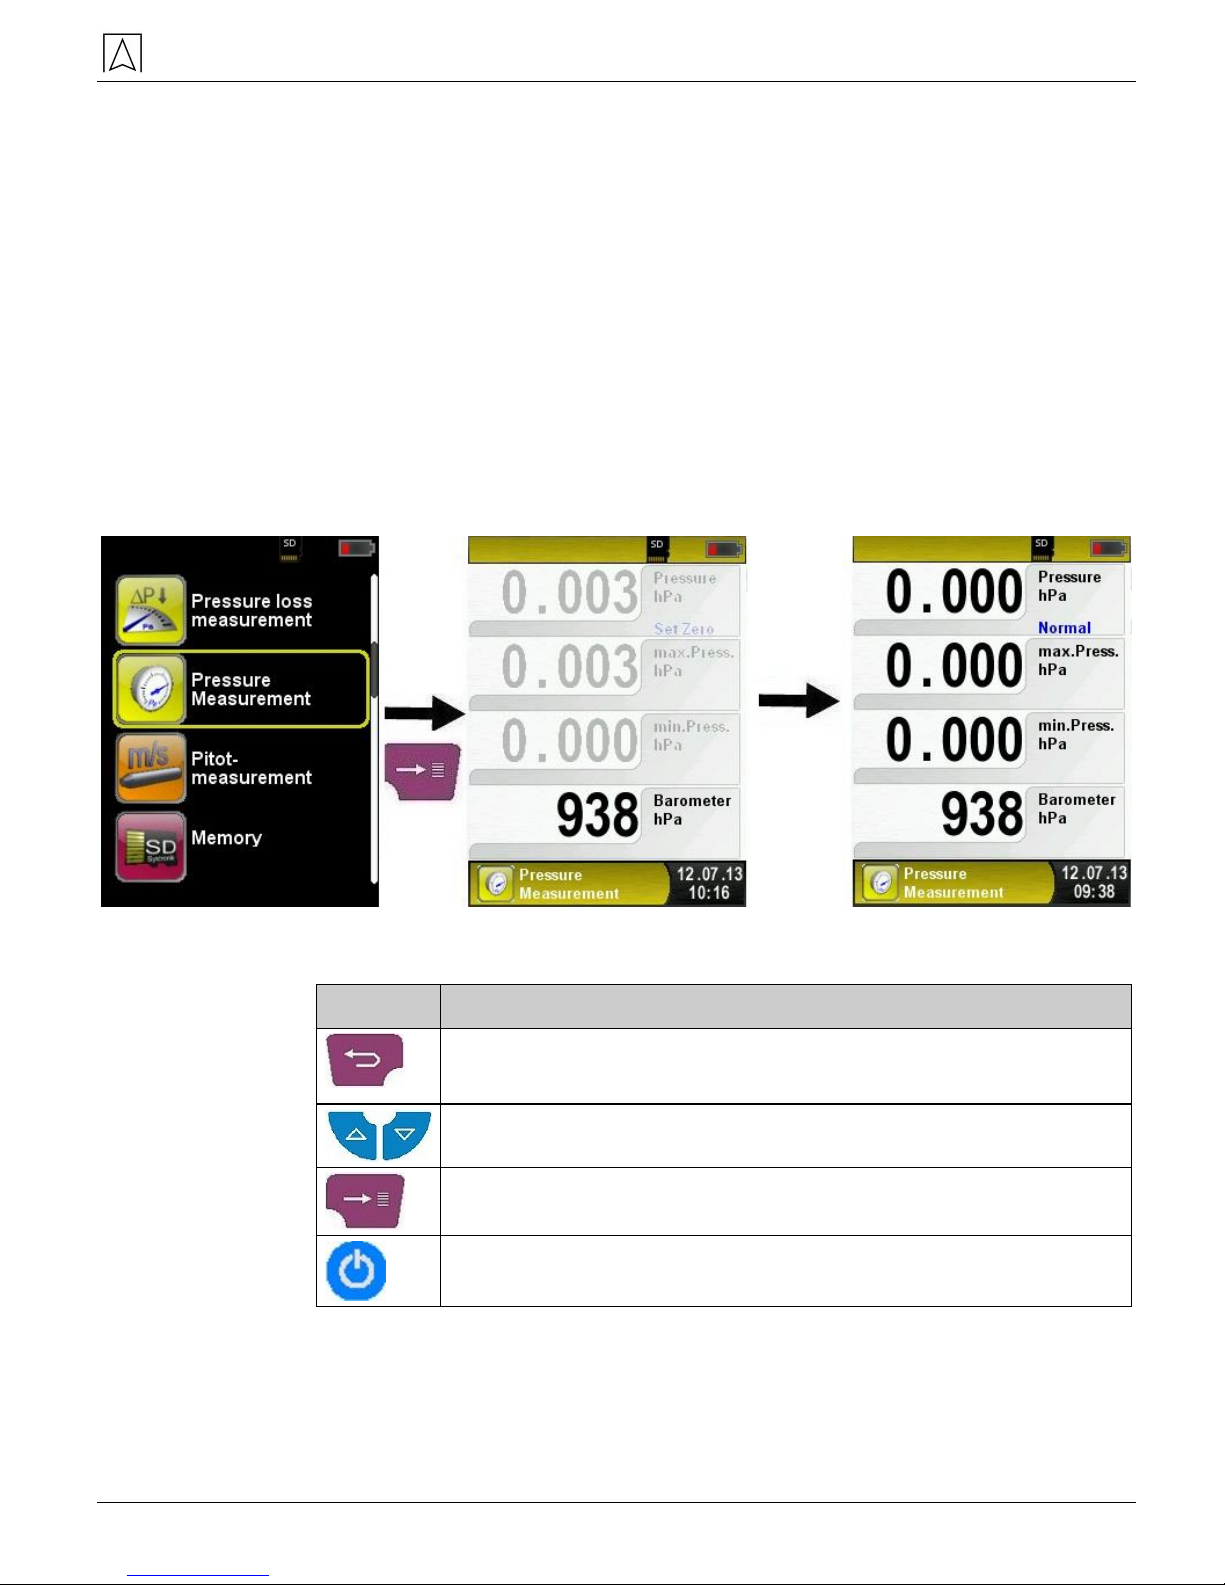
6.9 "Pressure Measurement" program
Starting the "Pressure Measurement" program
When you start the "Pressure Measurement" program, the pressure
sensor is first zero-balanced; this takes a few seconds.
The colour of the pressure value then changes from grey to black.
The black colour indicates that the device is ready for
measurements. Zero balancing can also be performed manually via
the main menu.
The optional Data Logger function is also available; it allows you to
save a series of measured values to the MicroSD card. The Data
Logger function is described in chapter 6.7, page 22.
Key
Function
Quitting the program "Pressure Measurement" /
displaying the Direct Access menu.
Changing selection in the menu.
Displaying the main menu.
Switch off the device.
Operation
26 S4600-ST®
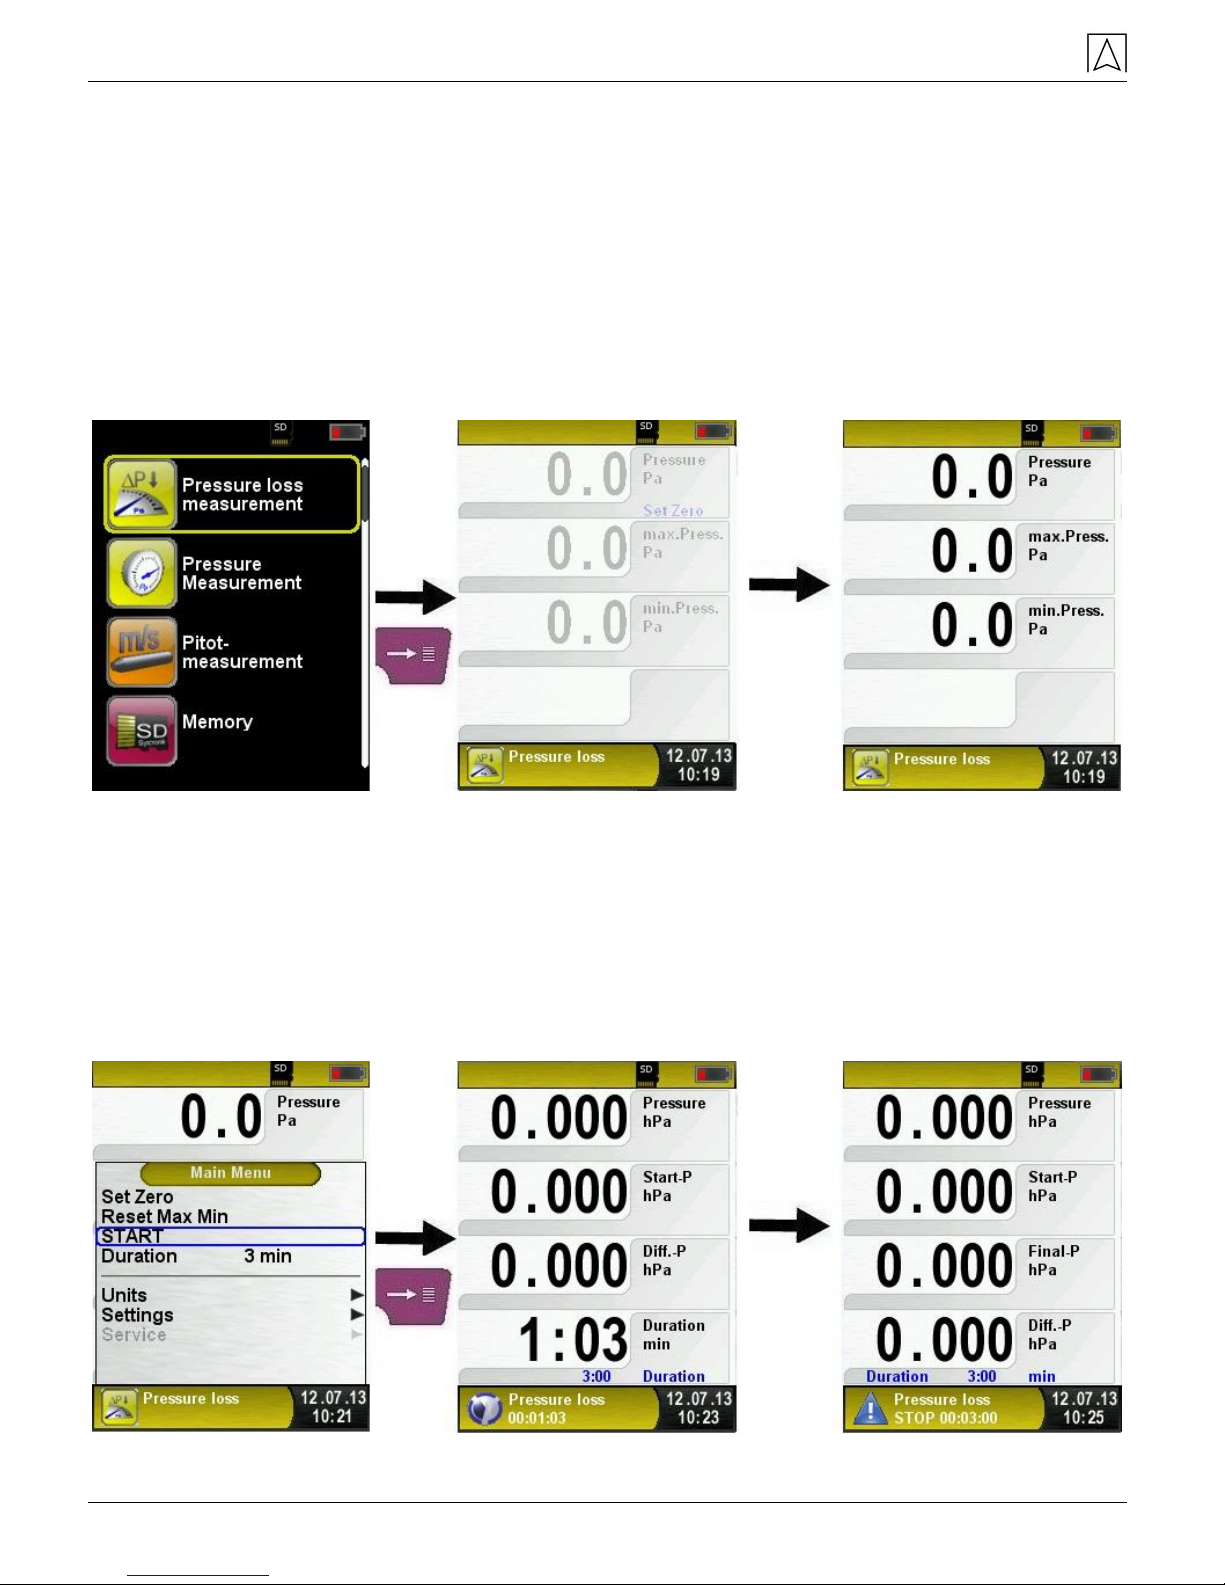
6.10 "Pressure Loss Measurement" program
Starting the "Pressure Loss Measurement" program
When you start the "Pressure Loss Measurement" program, the
pressure sensor is first zero-balanced; this takes a few seconds.
The colour of the pressure value then changes from grey to black.
The black colour indicates that the device is ready for
measurements. Zero balancing can also be performed manually via
the main menu.
Connecting the system to S4600-ST®.
The system to be measured must be connected to S4600-ST®. The
pump is then used to apply the test pressure to the system as per
instruction.
"START" starts the pressure loss measurement. A counter in the
main display shows the duration of the running pressure loss
measurement in seconds and minutes.

Operation
S4600-ST® 27
After the pressure loss measurement, a sound is triggered and the
information line displays the message "Pressure Loss STOP" along
with the duration of the measurement duration. The measured values
are held in the main display; you can save or print the measurement
log.
Key
Function
Quitting the program "Pressure Loss Measurement" /
displaying the Direct Access menu.
Changing selection in the menu.
Displaying the main menu.
Switch off the device.
Operation
28 S4600-ST®
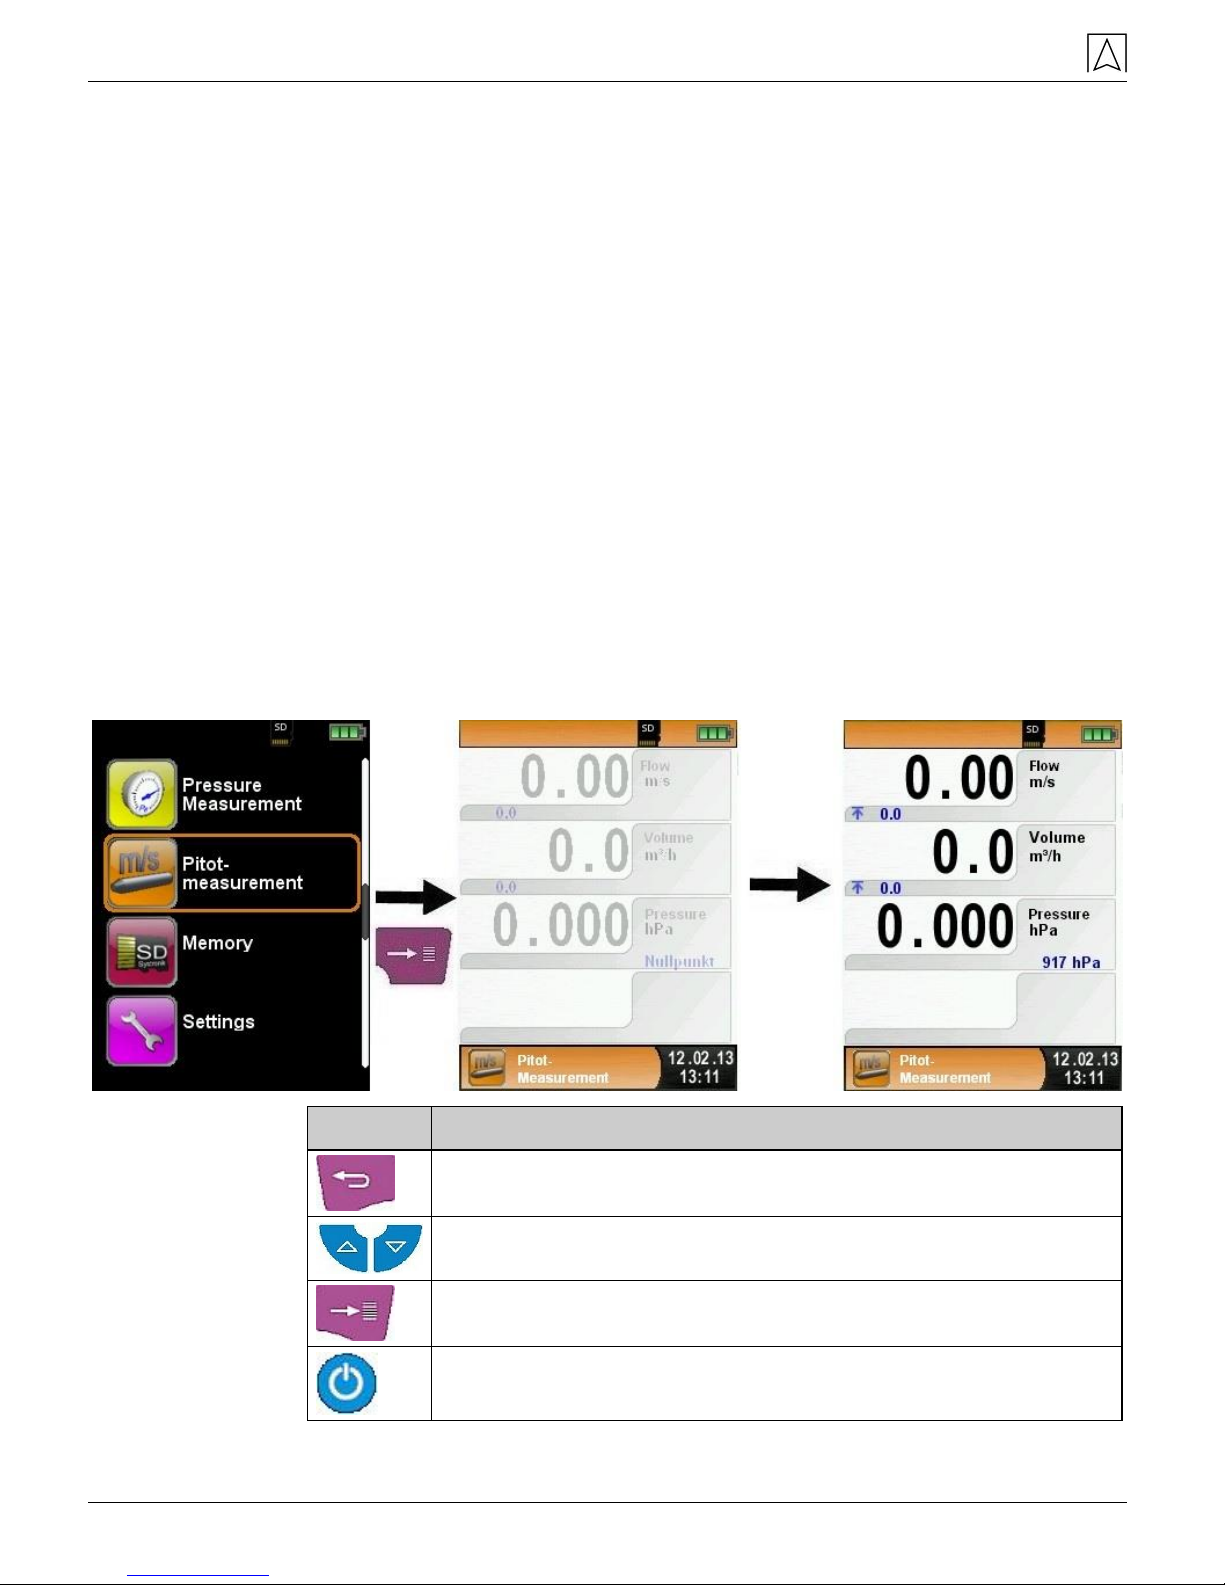
6.11 "Pitot Measurement" program (option)
Starting the "Pitot Measurement" program
When you start the "Pitot Measurement" program, the pressure
sensor is first zero-balanced; this takes a few seconds.
The colour of the pressure value then changes from grey to black.
The black colour indicates that the device is ready for
measurements. Zero balancing can also be performed manually via
the main menu.
The main display shows the following measured values with
adjustable units:
Flow (m/s, km/h)
Volume (m³/h, l/s, m³/s)
Pressure (hPa)
Barometric pressure (hPa)
The optional Data Logger function is also available; it allows you to
save a series of measured values to the MicroSD card. The Data
Logger function is described in chapter 6.7, page 22.
Key
Function
Quitting the program "Pitot Measurement".
Changing selection in the menu.
Displaying submenu.
Switch off the device.
Entering measurement data (units, K factor of the Pitot tube,
chimney shape, chimney size)

Operation
S4600-ST® 29
The values entered are used for flow measurement /volume
measurement.
The menu "Units" allows you to set the units for the flow
measurement / volume measurement.
The K factor of the Pitot tube can be set via the main menu; the
default value is 1.00.
The submenu "Volume" lets you select the chimney shapes "Round"
and "Rectangular. If you select the chimney shape "Round", you can
set the diameter in mm; if you select the chimney shape
"Rectangular, you can set the height and width in mm. The Edit
mode is described in chapter 6.1, page 16.
If you select the menu item "Deactivated" in the submenu "Shape",
volume measurement is hidden in the main display.

Operation
30 S4600-ST®
6.12 "Leakage measurement" program (option)
Starting the "Leakage mesurement" program
When you start the "Leakage measurement" program, the pressure
sensor is first zero-balanced; this takes a few seconds.
The colour of the pressure value then changes from grey to black.
The black colour indicates that the device is ready for
measurements. Zero balancing can also be performed manually via
the main menu.
First set the settling time with the arrow keys.

Operation
S4600-ST® 31
Confirm the settling time with “Next” and set the measurement time.
Then start the measurement with “START leakage test”.
The leakage measurement starts with the settling phase and after
the set time the pressure measurement will start. A counter in the
main display shows the duration of the running measurement in
seconds and minutes.
The start and the end of the pressure measurent is signalled
acoustically.
The measured values are held in the main display; you can save or
print the measurement log.

Operation
32 S4600-ST®
6.13 "Leakage rate measurement" program (option)
Starting the "Leakage mesurement" program
When you start the "Leakage measurement" program, the pressure
sensor is first zero-balanced; this takes a few seconds.
The colour of the pressure value then changes from grey to black.
The black colour indicates that the device is ready for
measurements. Zero balancing can also be performed manually via
the main menu.
It is possible to enter the system (tube) volume manually. If the
system volume is unknown the device can calculate the volume
automatically.
Manually:
If the system volume is known select “Enter vol. manually” and use
the editor to set the volume.

Operation
S4600-ST® 33
Automatically:
To identify the system volume connect the candidate system with the
device: First connect the shut-off valve (1) with the measurement
device. Then connect the plug (2) with the candidate system. Open
the shut-off valve (1) and with the pumpball (1) give a pressure
(working pressure) to the candidate system. In this example 4.80
hPa.

Operation
34 S4600-ST®
Then close the shut-off valve (1) and connect the syringe (3) to the
shut-off valve (1). Best case is to connect the already air filled
syringe.
With “START meas.” start the measurement. Then open the shut-off
valve (1) and add (or minus) the syringe (3) volume. The volume of
the SYSTRONIK syringe (3) is 108 ml. Close the shut-off valve (1)
and confirm the volume change with “CONFIRM change”. The
calculation will start and stop at the entered measuring time
automatically.

Operation
S4600-ST® 35
The device shows the calculated volume in the last line. Confirm the
volume and exit the calculation menu with the “Back” key.
Set the settling time with the arrow keys, and confirm with “Next”.

Operation
36 S4600-ST®
Set the measuring time with the arrow keys, and confirm with “Next”.
Then set the working pressure according to the current pressure. A
rough eastimation of the current value is sufficient. In the next step
the measured media must be selceted. Available media are air and
methane.
It is possible either to set the barometric pressure manually or
measure by the device. Disselect the item “Manual amb. press.” To
activate the automatic measurement by the device.

Operation
S4600-ST® 37
“START meas.” will start the leakage rate measurement with the
settling phase and after the set time the pressure measurement will
start. A counter in the main display shows the duration of the running
measurement in seconds and minutes.
The start and the end of the pressure measurent is signalled
acoustically.
The measured values are held in the main display; you can print
save, or show the measurement log as QR code.

Memory mode and memory structure
38 S4600-ST®
7 Memory mode and memory structure
7.1 How to save
The use of MicroSD memory cards as system-independent storage
media ensures maximum flexibility in terms of storing and managing
the measured data. MicroSD cards with a memory of up to 16 GB
can be used. The card can be read without any additional software
by all SD-card-enabled data processing systems (PCs, laptops,
notebooks, etc.) using a web browser. More than 1,000,000
measured values can be saved with the recommended memory
capacity of 1 GB.
CAUTION
Damage to the memory card slot due to improper plugging in
Always insert the MicroSD straight and with the contacts
pointing up as shown above.
Displaying the "Memory" menu.

Memory mode and memory structure
S4600-ST® 39
Before you use a MicroSD card for the first time, you should
create the folder structure.
The function "Create Memory" creates 10 folders with 10 files each
on the MicroSD card; this represents the memory structure of S4600ST®. The function takes a few seconds to finish.
Note: This function deletes a memory structure that may already be
available on the card. However, private user data (such as pictures,
documents, etc.) are not deleted by this function.
The memory structure of S4600-ST® consists of 100 memory
blocks; one measurement log can be written to each of these
blocks.
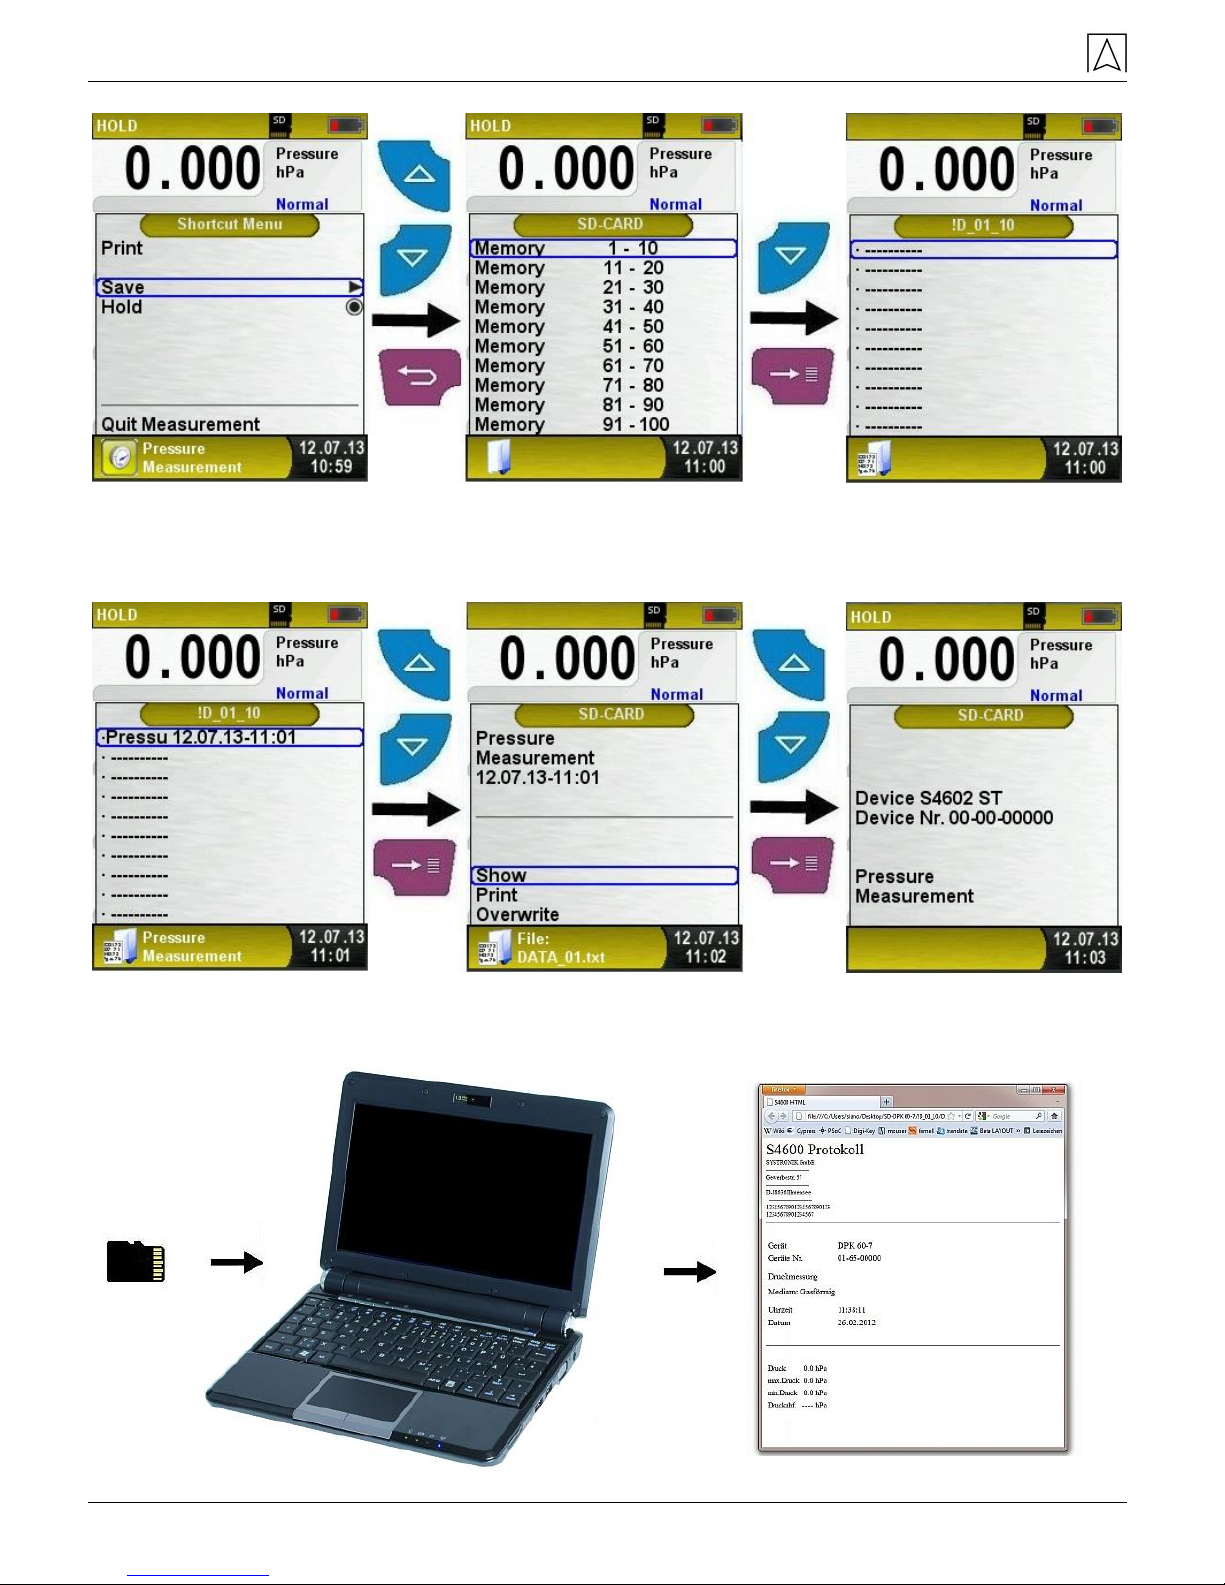
At the end of a measurement, the measurement log can be saved to
a free memory block. A total of 10 x 10 memory blocks are available.
The file name is automatically generated by the device according to
the following structure:
Type of measurement (e.g. pressure measurement) date
(day.month.year) and time
Note:
A file which has been created and saved on the card is protected
against manipulation and, if manipulated, can neither be displayed
by the device nor printed!
Pressu 26.02.12-08:41
Memory mode and memory structure
40 S4600-ST®
A saved file may there be displayed, printed or overwritten by a new
measurement.
The saved file can also be displayed via a browser (such as Mozilla
Firefox).

Memory mode and memory structure
S4600-ST® 41
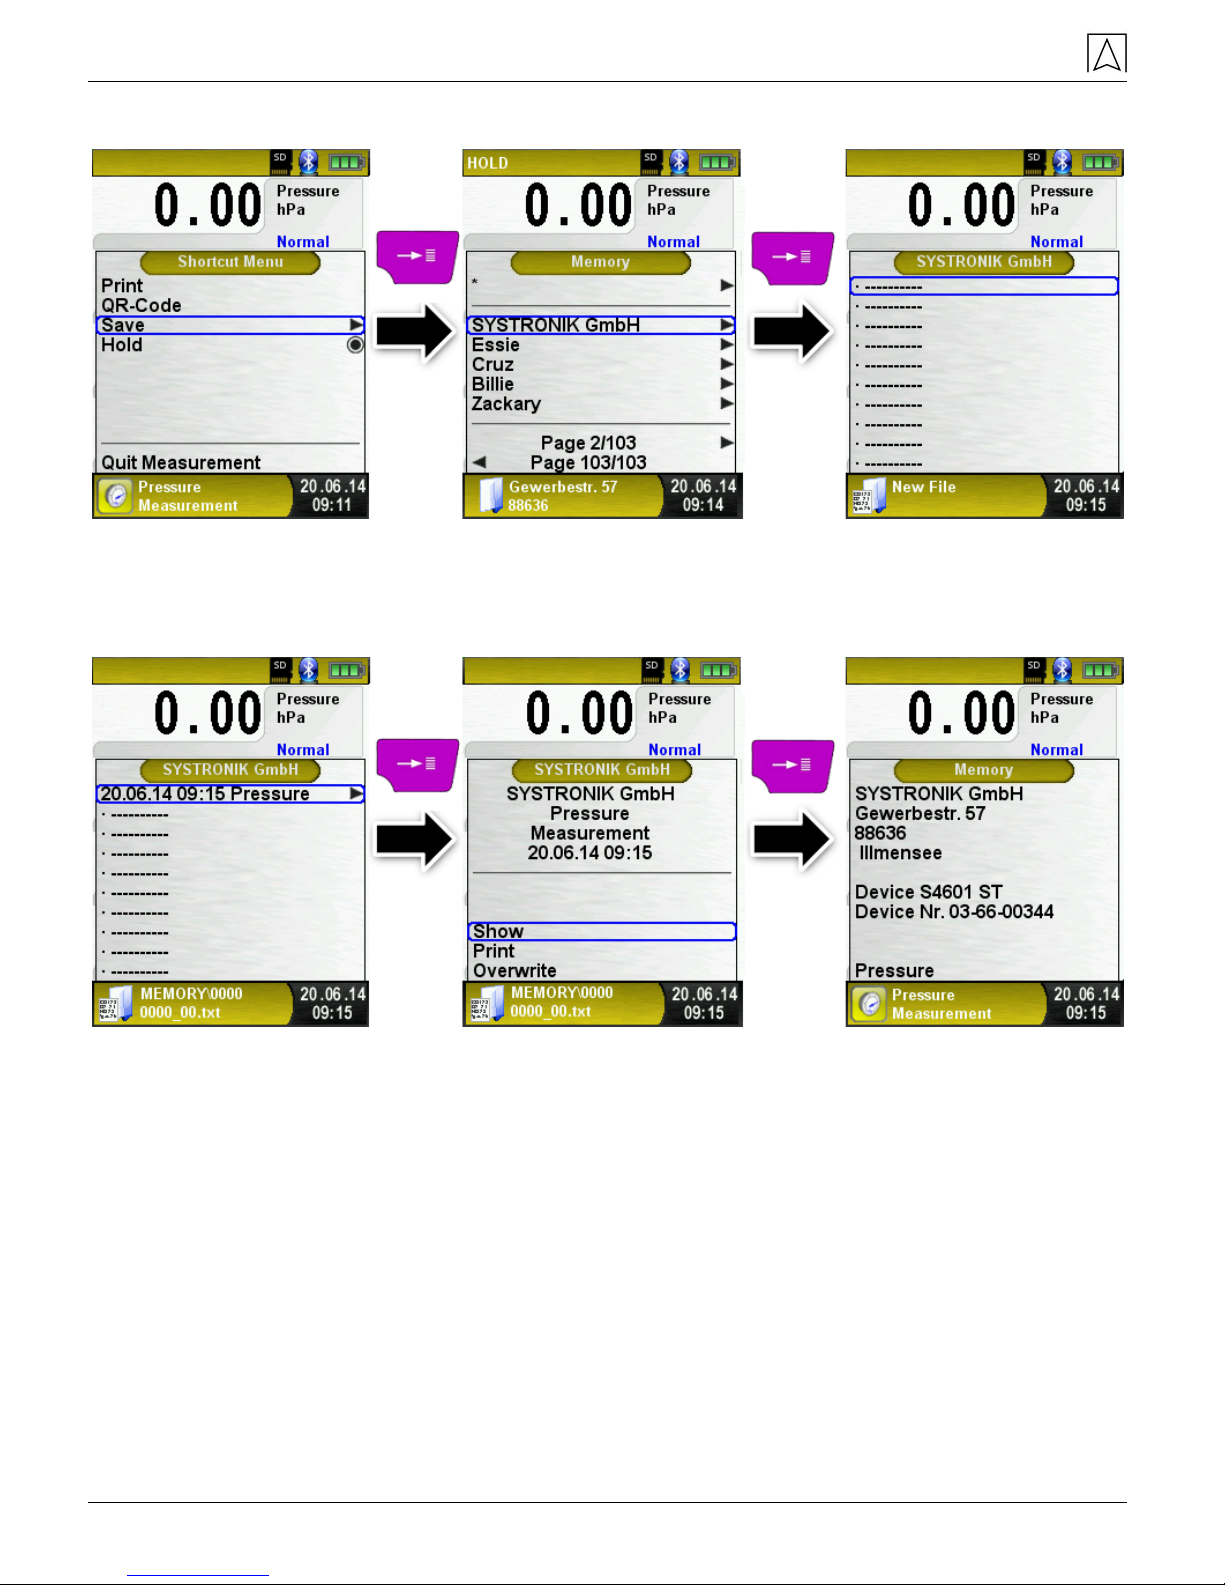
7.2 Database Memory (option)
Create a customer database
Measurements can be saved direct in the customer folder. Every
folder has 8 entry lines with 20 characters. The first entry is the key
word for the search function in the device. The further lines are for
detailed customer information like: Street, City, Email, Phone No…
The customer information will be print out with every measurement
print and shown in the protocol.
It is possible to create or modify the customer database either on the
S4600-ST® or on a PC.
For first use of the MicroSD card the database should be
generated
For new database open menu „Memory“ and choose “Create
Database”. Confirm the warning “All entries will be deleted” with yes.
With this procedure a file named DATABASE.CSV will be generated
on the MicroSD card. This file will show the database entries of the
S4600-ST®. This process needs a few seconds.
HINWEIS
Existing Database will be deleted! Private files (images,
documents etc.) won’t be deleted!
Memory mode and memory structure
42 S4600-ST®
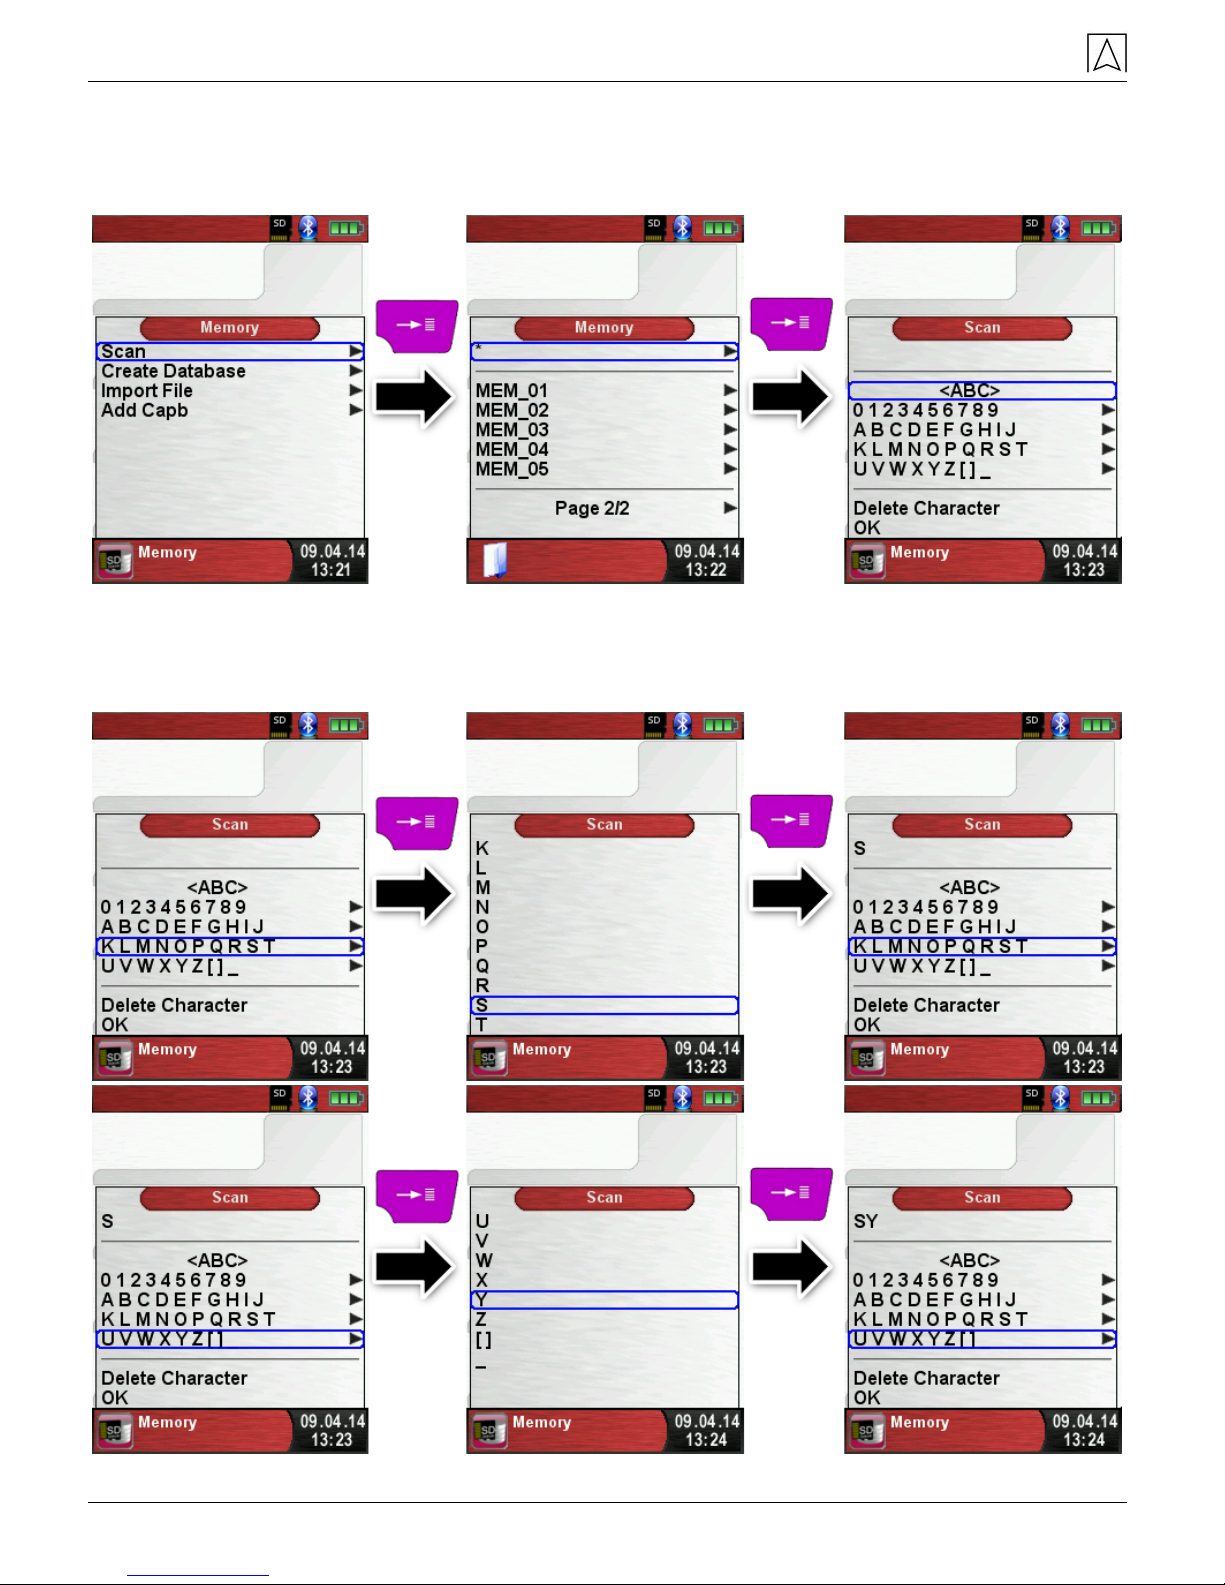
Create / modify customer database on the S4600-ST®
Select „Scan“ in the menu „Memory“ and type the customer
name:
Select with the arrow keys the row with the desired character. Open
the row with the „enter key“ and select the desired character using
the arrow keys. Select letter by letter in this way:

Memory mode and memory structure
S4600-ST® 43
Switch between upper and lower case letters and special characters
with „<ABC>“. “Delete character“ will delete the last character. With
„OK“ save the customer name. Already existing name will be shown.
If the name doesn’t exist it is possible to save the customer name
with „New entry“.
Now additional information could be saved. (Street, City, Email, and
Phone No.):

Memory mode and memory structure
44 S4600-ST®
Select „OK“ to save the individual lines. Finally select “Save
changes” to save all customer information.
To delete customers in the database there mustn’t be any
measurements stored. Select the customer and choose „Scan“, if
there are no measurements stored the request „Entry is empty
delete?“ will occur. Confirm the request with “Yes“.
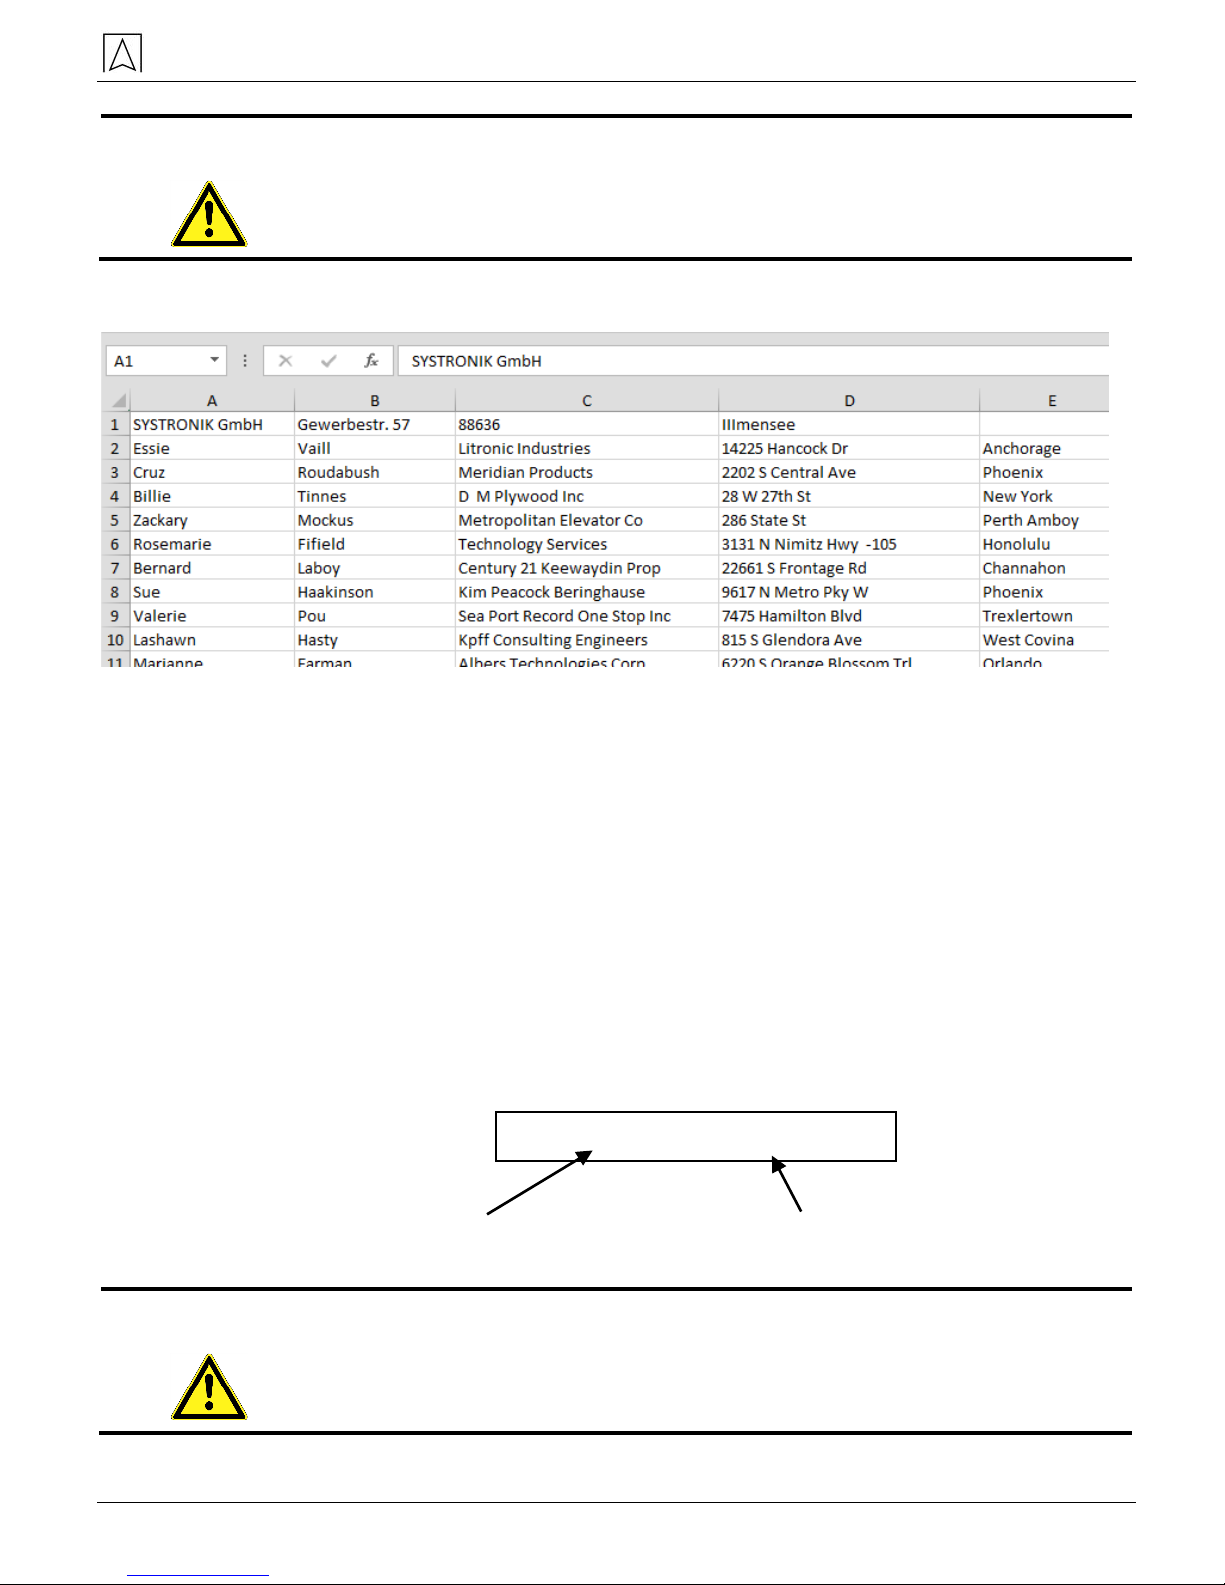
Create / modify customer database on PC
The customer database can be create / modify on the PC as well.
Open the file “DATABASE.CSV” on the MicroSD card with the PC.
Now type customer information in the table of the “DATABASE.CSV“
file. Column A is the customer name and column B – H are for
additional customer information. Don’t use special characters only
„@“, „_“ and „.“. Maximum 20 characters per field.
Memory mode and memory structure
S4600-ST® 45
CAUTION
Incorrect editing of the „DATABASE.CSV“ could generate errors
in the S4600-ST®.
Finally save the „DATABASE.CSV“ and restart the S4600-ST®
before import the MicroSD card. In this way the database will be
newly read.
Use of the memory
The memory structure consists of 1,000 memory entries (customer
or location), within every entry 10 measurements protocols can be
stored. In total 10,000 measurements can be stored.
At the end of a measurement you can take the measurement
protocol in a free space. The file name is automatically assigned by
the device and is structured as follows:
Date and time Type of measurement (ex.: Pressure)
CAUTION
A file which has been created and saved on the card is protected
against manipulation and, if manipulated, can neither be displayed
by the device nor printed!
26.05.14 08:41 Pressure
Memory mode and memory structure
46 S4600-ST®
, print or override it with a new measurement.
The file name and the storage location is shown in the lower bar. In
this example: Storage folder: MEMORY/0000 and file name
0000_00.txt:
The customer information will be shown in the header of the
measurement report.
Memory mode and memory structure
S4600-ST® 47
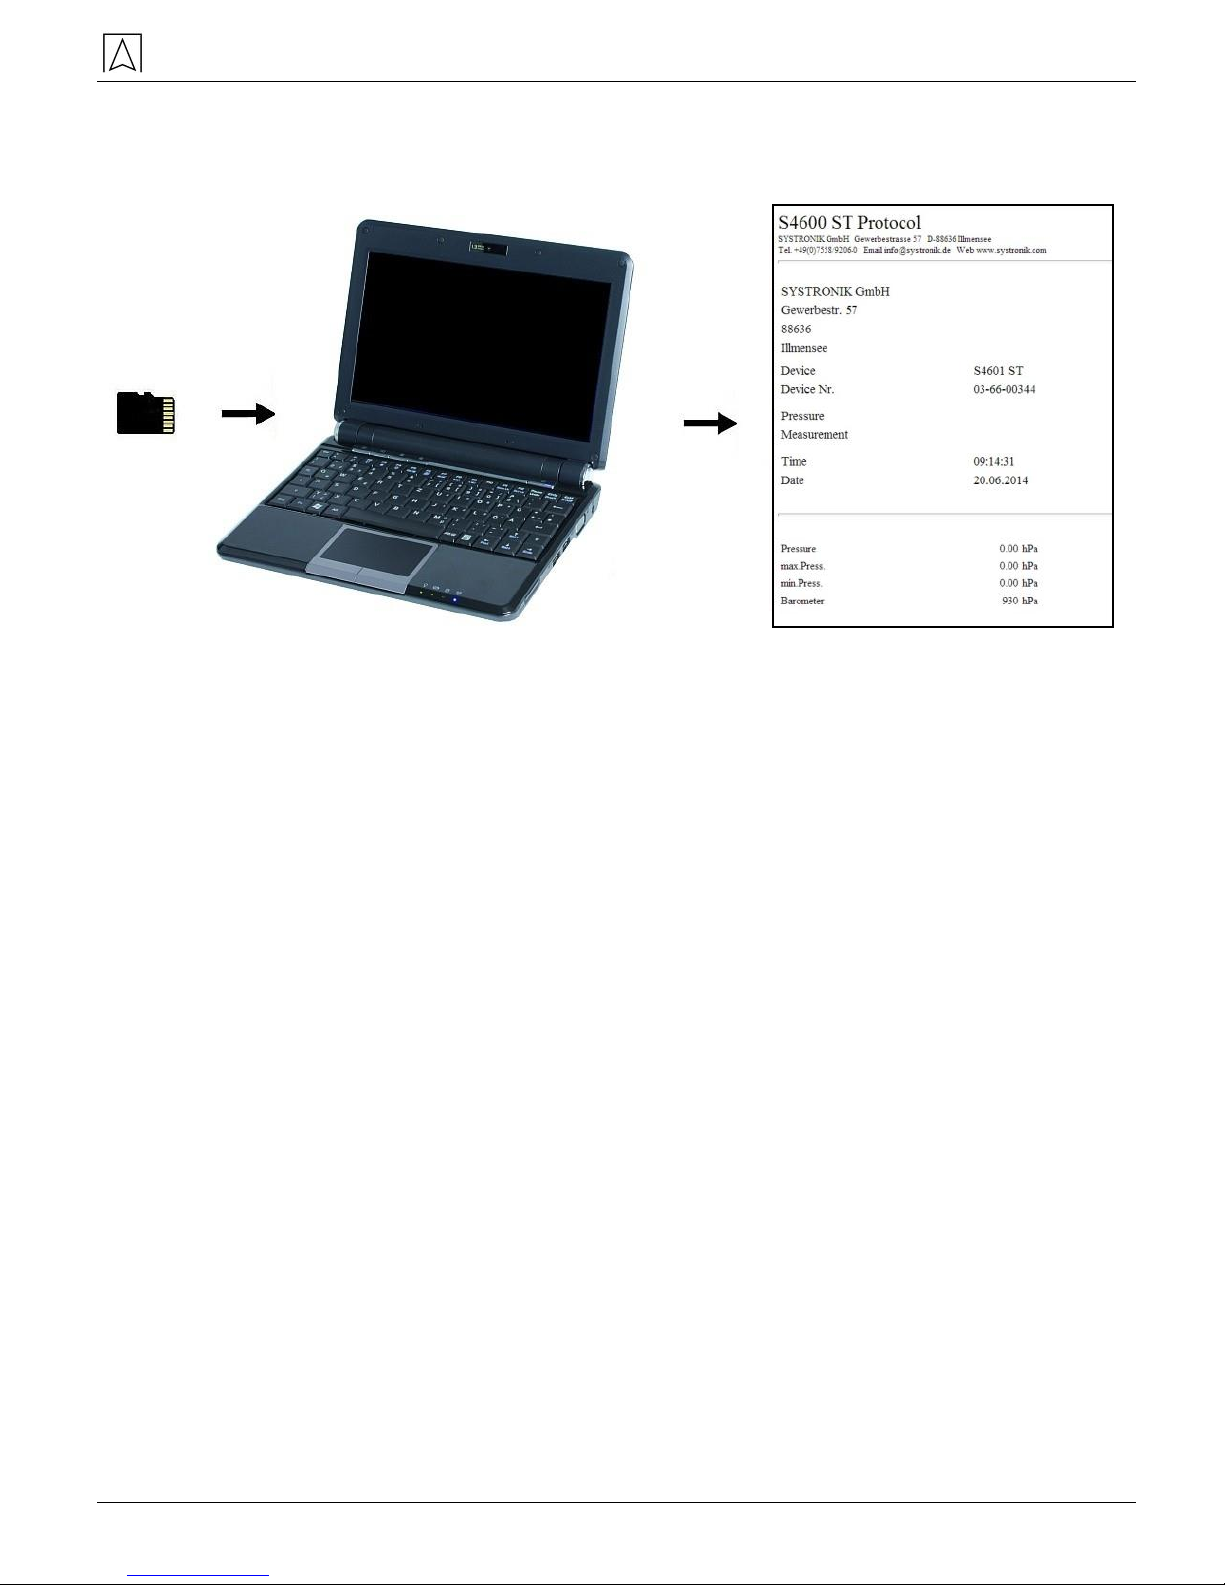
The saved file can be opened with a web browser (e.g.: Chrome,
Firefox, Explorer, Opera, etc.)

Memory mode and memory structure
48 S4600-ST®
7.3 Entering the user address
For importing the user address, you must first create s special file
"Address.txt" on the MicroSD card. This is a plain text file with the
extension .txt. The text file can be created on the PC using any text
editor (such as Notepad). The maximum length is 8 lines with
22 characters each.
Note: A new user address overwrites an existing user address.

Battery management
S4600-ST® 49
8 Battery management
8.1 Battery operation / charging mode
Battery operation: The battery life in continuous measurement
mode depends on the selected display mode. With display
setting "Normal", continuous measuring is possible for up to 18
hours, with display setting "Automatic" for up to 25 hours and
with display setting "Eco Mode" of up to 38 hours.
Charging mode: External power supply unit 100-240 V~/50-
60 Hz. Intelligent charging by means of an integrated charging
management system.
8.2 Charging the batteries
CAUTION
Damage to the battery or the device caused by power supply
units that are not device-specific.
Use only the power supply unit delivered with the device for
charging the batteries.
Connect the device-specific power supply unit to mains and
then to the S4600-ST®.
The charging process of the batteries starts automatically:
Green
area
Current battery capacity
Key
Function
Close battery menu.

Battery management
50 S4600-ST®
During measurements, the battery is also charged continuously
and monitored by the system.
When the battery is fully charged and if the Battery menu is
active, the device automatically switched off; if it is not active,
the device switches to passive recharging mode (trickle
charging).
When recharging is finished, the charger can remain connected
to S4600-ST© without the battery being damaged.
Service life and capacity of the battery
S4600-ST© is equipped with a high-performance lithium ion battery.
The service life and capacity of the battery are primarily determined
by the way the device is charged and used. In order to make
handling safer, the device features efficient and battery-saving
charge management suitable for all application situations.
The graphical charge level indicator of S4600-ST© consists of three
elements of a battery symbol and helps the user to correctly estimate
the capacity of the battery. Five different battery states are detected.
The battery can be recharged at any time given that the charge
management system recognises the need to recharge the battery.
Otherwise, the charge management system will not release the
battery for charging.
Operating the device at temperatures below +5 °C will considerably
reduce the service life of the lithium ion battery.

Maintenance
S4600-ST® 51
9 Maintenance
Table 4: Maintenance times
When
Activity
If required
Clean the device.
Replacing the battery
For technical reasons, old battery blocks may only be replaced by
the manufacturer or an authorised service partner.
To protect the environment, batteries must not be disposed of
together with normal household waste. Return old batteries to
the point of purchase or to a collecting point.
10 Troubleshooting
Repairs may only be performed by specially trained, qualified staff.
Table 5: Troubleshooting
Problem
Possible reason
Repair
Device switches off
automatically.
Battery empty.
Charge battery.
Battery defective.
Take device to
service centre.
Device cannot be
switched on.
Battery empty.
Charge battery.
No indication of
pressure.
Sensor defective.
Send the device to
the manufacturer.
Display frozen /
device does not
respond to key
presses.
–
Hold down
"On/Off" key for six
seconds,
Other malfunctions
–
Send the device to
the manufacturer.

Disposal
52 S4600-ST®
11 Disposal
To protect the environment, this device must not be disposed of
together with the normal household waste. Dispose of the
device according to according to local directives and guidelines.
This device consists of materials that can be reused by recycling
firms. The electronic inserts can be easily separated and the device
consists of recyclable materials.
If you do not have the opportunity to dispose of the used device in
accordance with environmental regulations, please contact us for
possibilities to return it.
12 Warranty
The manufacturer's warranty for this product is 12 months after the
date of purchase. This warranty shall be good in all countries in
which this device is sold by the manufacturer or its authorised
dealers.
13 Copyright
The manufacturer retains the copyright to these operating
instructions. These operating instructions may not be reprinted,
translated, copied in part or in whole without prior written consent.
We reserve the right to technical modifications with reference to the
specifications and illustrations in this manual.
14 Customer satisfaction
Customer satisfaction is our prime objective. Please get in touch with
us if you have any questions, suggestions or problems concerning
your product.
15 Addresses
The addresses of our worldwide representations and offices can be
found on the Internet at www.afriso.de.

Appendix
S4600-ST® 53
16 Appendix
16.1 DIN EN 50379 certificate

Appendix
54 S4600-ST®
 Loading...