

Page 1

INSTALLATION AND MAINTENANCE INSTRUCTIONS
PF24VA Directional Sounder with Voice Messaging
Specications
Mechanical
Input terminals: 12 – 24 AWG
Sounder size: 4 inches (101mm)
Grille Size: 4 7/8˝ (127mm)
Electrical
Voltage Input: Regulated 24 Volts DC
Operation Voltage Range: 16 to 33 Volts
Operating Humidity Range: 10% to 93% relative humidity non-condensing
Frequency range: 707 Hz to 11314 Hz
Operating Temperature range: 32° to 120°F (0° to 49°C)
Power: Selectable Low, Med-Low, Medium, Medium-High, High
Listings: ULC
NOTICE: This manual should be left with the owner/user of the equipment.
General Description
Before installing, please read the Directional Sound Applications Guide, available through System Sensor. The
installation must meet the requirements of the authority
having jurisdiction, CAN/ULC S524 and CSA C22.1. Directional sounders are used as supplemental signals on a
re alarm system to aid in the evacuation of building occupants. Although directional sounders may be connected to
notication appliance circuits (NAC) for re alarm service,
they are not a replacement for audible or visible notication
appliances as required by the authority having jurisdiction.
The directional sounder can be installed in systems using 24 Volt DC regulated power supplies only. It is not approved for use with FWR unregulated power supplies.
Directional sound is a broadband, multi-frequency sound.
The sound source is easily and quickly located by building occupants, making it ideal for rapid building evacuation. The sounder incorporates four different speed settings
which consist of broadband noise. The four speed settings
can be used to create an egress pathway out of a building. The speed setting should be set faster for units installed
at the perimeter exit. In addition to the broadband noise,
the sounder is capable of playing an alert message in the
form of a recorded voice message or other audible signals.
These messages will instruct the occupant of what action
to take as they approach the directional sounder. The voice
messages include: exit here, stairs up, stairs down, or area
of refuge.
Speed settings are made via DIP switches on the back
of the sounder.
Power Supply Considerations for
Directional Sounders
Panels typically supply DC ltered voltage or FWR (fullwave rectied) voltage. This device is only compatible with
DC ltered supplies and must not be used with panel sup-
plies that are FWR. Be certain the sum of all the device
currents do not exceed the current capability of the panel
power supply. Calculations are based on using the device
current found in Table 1 and must be the current specied
for the installed settings of the device.
Wire Sizes
The last device on the circuit must have sufcient voltage
to operate the device within its rated voltage range. When
calculating the voltage available to the last device, it is
necessary to consider the voltage drop due to the resistance of the wire. The thicker the wire, the less the voltage
drop. Generally, for purposes of determining the wire size
necessary for the system, it is best to consider all of the
devices as “lumped” on the end of the supply circuit (simulates “worst case”).
Typical wire size resistance:
18 AWG solid: Approximately 8 ohms/1,000 ft.
16 AWG solid: Approximately 5 ohms/1,000 ft.
14 AWG solid: Approximately 3 ohms/1,000 ft.
12 AWG solid: Approximately 2 ohms/1,000 ft.
Example: Assume you have 10 devices on a zone and
each requires 50mA average and 2000 ft. of 14 AWG wiring (total length = outgoing + return). The voltage at the
end of the loop is 0.050 Amps per device × 10 devices × 3
ohms/1000 ft. × 2000 ft. = 3 volts drop.
6581 Kitimat Road, Unit 6
Mississauga, Ontario. L5N-3T5
www.systemsensor.ca
D690-06-00 1 I56-3071-000
Page 2
The same number of devices using 12 AWG wire will produce only a 2 volt drop. The same number of devices using
18 AWG wire will produce an 8 volt drop. Consult your panel
manufacturer’s specications, as well as the sounder’s operating voltage to determine the acceptable voltage drop.
NOTE: If class “A” wiring is installed the wire length may
be up to 4 times the single wire length in this calculation.
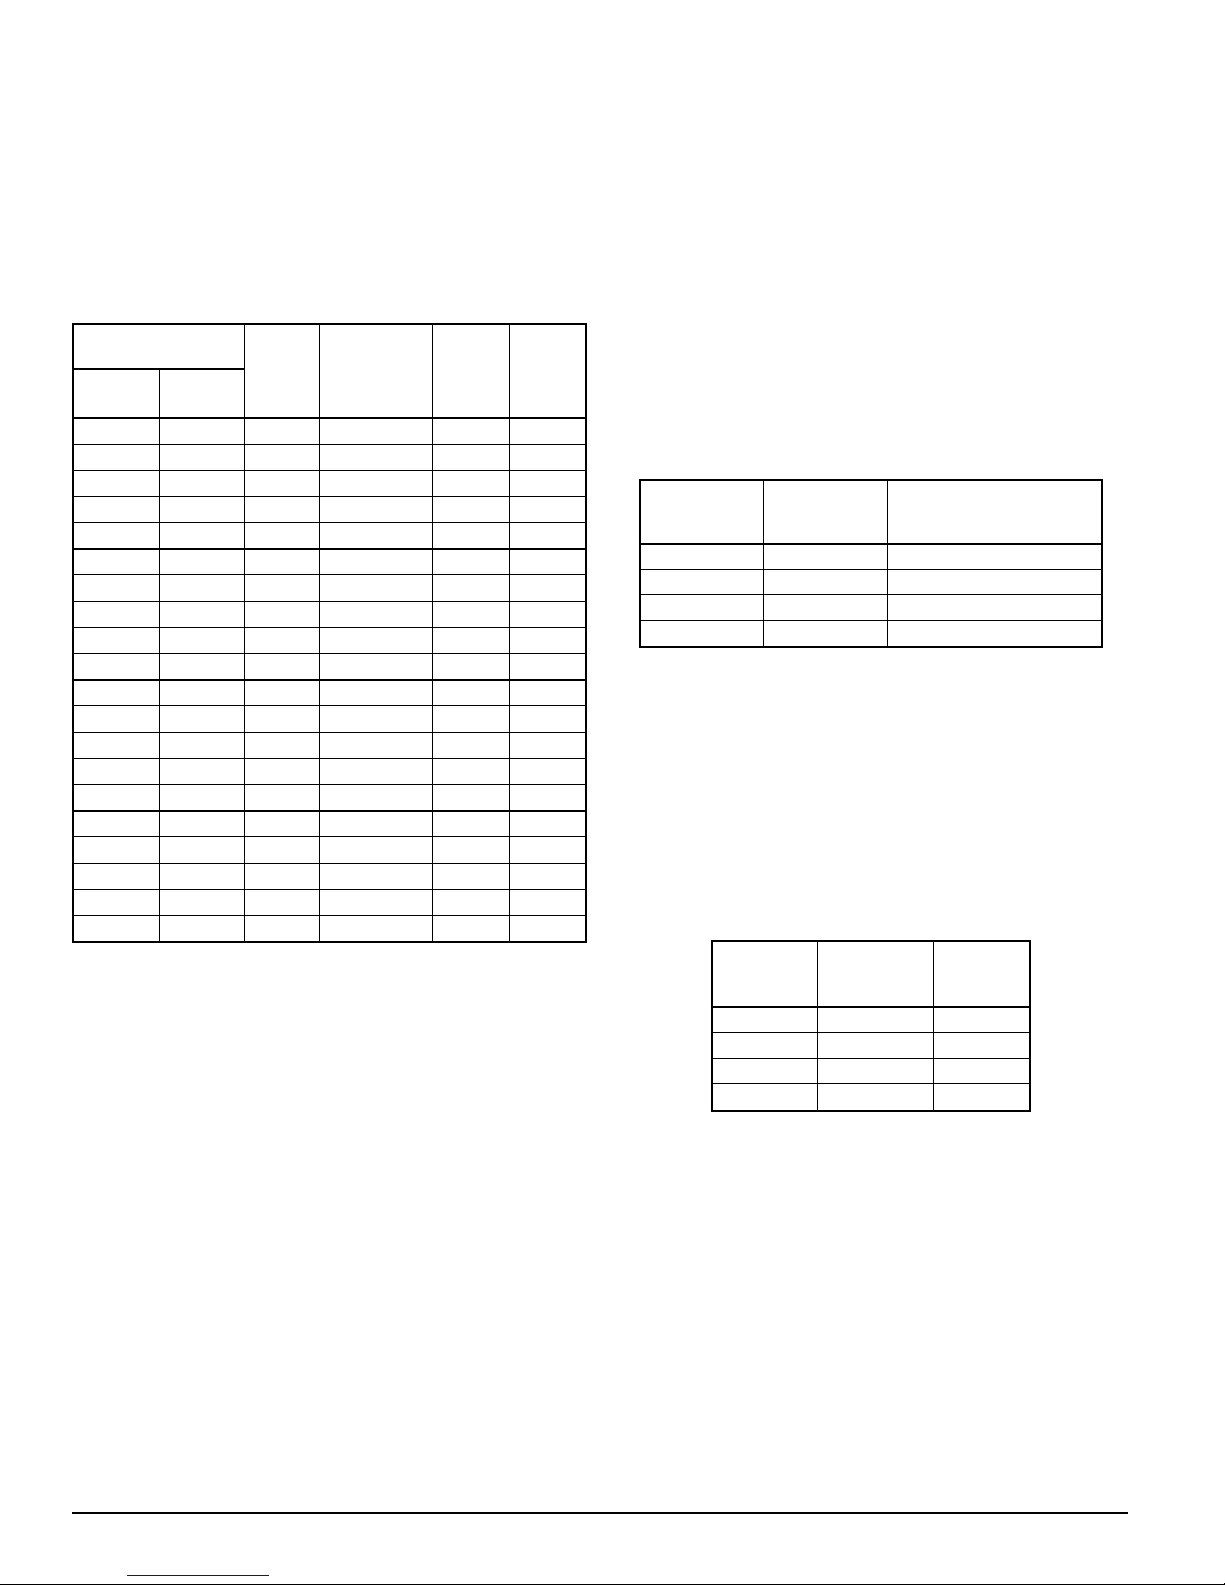
Table 1. Current Draw Measurements and
Sound Output Guide:
Maximum DC
Speed Selection
DIP Switch
Selection
FAST (exit) 10 High 185 98 75
FAST (exit) 10 Med-High 131 95 72
FAST (exit) 10 Med 78 92 69
FAST (exit) 10 Med-Low 76 89 66
FAST (exit) 10 Low 64 86 63
MED-FAST 9 High 170 98 74
MED-FAST 9 Med-High 124 95 71
MED-FAST 9 Med 75 93 68
MED-FAST 9 Med-Low 73 90 65
MED-FAST 9 Low 62 87 62
MED-SLOW
MED-SLOW
MED-SLOW
MED-SLOW
MED-SLOW
SLOW 7 High 163 98 72
SLOW 7 Med-High 103 95 69
SLOW 7 Med 76 92 66
SLOW 7 Med-Low 61 89 63
SLOW 7 Low 61 86 60
8 High 160 97 73
8 Med-High 104 95 70
8 Med 76 92 67
8 Med-Low 65 89 64
8 Low 57 87 61
Power
Setting
Operating
Current
(mA RMS)
(16 to 33V)
Audibility
(dBA)
(16 to
33V)
Note 1
Audibility
(dBA)
(16 to
33V)
Note 2Speed
NOTE 1: Sound output measured in an anechoic room at 10
feet.
NOTE 2: Sound output measured in a reverberant room
at 10 feet.
Installation
Consult the Directional Sound Applications Guide (A051048-XXX) for information regarding the appropriate
mounting locations of directional sounders.
DIP Switches for Speed Settings
DIP switch positions 7-10 are used to select the speed setting of the sounder. Switch 10 is the fastest speed and is
used to mark perimeter exits and stairwells. The remaining settings are used for egress guidance to the perimeter
exits. The egress route would begin with the slow setting
(switch 7) and follow medium fast (switch 9) and medium
slow (switch 8) and nally the fast setting (switch 10). If
more than one switch is selected the sounder will default to
the fastest setting.
DIP Switch Settings for Alerting Messages
DIP switch positions 5 and 6 are used to select additional
tone pulses that can be inserted between bursts of directional sound pulses. These messages are used to give
building occupants instructions. There are four messaging
options to choose from. “Stairs Up” (Switch 5 off, Switch 6
on) will notify occupants that they are approaching a stairwell and will need to go up. “Stairs Down” (Switch 5 on,
Switch 6 off) will notify occupants that they are approaching a stairwell and will need to go down. “Area of Refuge”
(Switches 5 & 6 on) alerts people who need to nd these
areas of refuge in a building. “Exit Here” (Switches 5 & 6
off ) noties occupants that they have reached the perimeter exit.
Table 2. Additional Tone Selection Guide:
DIP Switch
Position 5
Setting
on on Area of Refuge
on off Stairs DOWN
off on Stairs UP
off off Exit Here
DIP Switch
Position 6
Setting
Sound Output
DIP switch setting 4 enables a directional sound device to
become disabled when used in conjunction with devices
with dry contacts such as heat sensors or control modules.
The sounder has a set of input terminals that can be con-
gured for an “active open” or “active closed” state. When
the switch is in the “on” position, the sounder is “on” when
the disable connection is closed. When the switch is in the
“off” position, the sounder is “on” when the disable connection is open. See Table 3 for operation modes.
Table 3. Enable/Disable Function Logic Table:
DIP Switch
Position 4
Setting
on open disabled
on closed enabled
off open enabled
off closed disabled
Wiring
Terminals
3 & 4
Sound
Output
There are ve different power settings for the sound output
pressure. Switch settings 1, 2, and 3 set the power setting for the sounder. Switch 1 selects the Med-High setting,
switch 2 selects the Medium setting, switch 3 selects the
Med-Low setting. If all three switches are “off” this selects
the High setting and if all three switches are “on” this selects the Low setting.
Directional Characteristics are as follows:
-3dBA angles- 40, 130 horizontal and vertical
-6dBA angles- 15, 160 horizontal and vertical
D690-06-00 2 I56-3071-000
Page 3

S
:
DIRECTIONAL
SOUNDER
vide coded signals to the sounders by pulsing the power
supply on and off in specic patterns such as the temporal 3 evacuation signal. The directional sounders should
not be connected to 4-wire sounder circuit power supplies
where coded signals are used to pulse the sounders. Di-
Table 4. Power Setting Guide:
DIP Switch
Position 1
Setting
DIP Switch
Position 2
Setting
DIP Switch
Position 3
Setting
Power
Setting
off off off High
on off off Med-High
off on off Med
off off on Med-Low
on on on Low
NOTE 1: Any other combinations of switch setting for positions 1, 2, and 3 are invalid and should not be used.
Consult the Directional Sound Applications Guide for information regarding the appropriate power, speed, and additional tone selections.
Language Selection
Language selection and audible tones are selected via the
rotary code switch. If no language is selected, the device
rectional sounders may be used in conjunction with sync
modules such as the System Sensor MDLA.
All wiring must be installed in compliance with the Canadian Electrical Code and applicable local codes as well as
special requirements of the authority having jurisdiction.
Figure 1.
DIRECTIONAL
(+)
(–)
HORN
(+)
(–)
SOUNDER
(+)
(–)
HORN/STROBE
(+)
(–)
OPTIONAL DISABLE CONTACT
NOTE: SWITCH POSITION 4 SETS
THIS INPUT TO EITHER
ACTIVE OPEN OR ACTIVE CLOSED.
STROBE ONLY
(+)
(–)
E
TWO WIRE SYSTEM
O
ANY MIX OF MODEL
L
A0338-00
Figure 2.
(+)
POWER
SUPPLY
(–)
HORN/STROBE
(+)
(–)
SOUNDER
(+)
(–)
HORN
(+)
(–)
FOUR WIRE SYSTEM
E
ANY MIX OF HORNS
O
AND SOUNDERS OR
L
HORN/STROBES
is capable of playing audible tones to alert occupants of
stairs up, stairs down, and area of refuge. Refer to Table 5
language selection and Figure 3 for diagram.
Table 5. Language/audible tone selection guide:
Rotary Switch Selection Tone/Language
0 Audible tone/sweep
1 English
2 Spanish
3 French
4 English/Spanish
5 English/French
6 Korean
7 Cantonese
8 Mandarin
9 English/Cantonese
10 English/Mandarin
11 Cantonese/Mandarin
12 English/Korean
13 English/Portuguese
14 English/Russian
15 English/Polish
Electrical
Connect the Sounder as shown in Figure 1 for 2-wire applications. Connect the sounder as shown in Figure 2 for
(+)
STROBE
POWER
SUPPLY
(–)
Figure 3.
(+)
(–)
ROTARY SWITCH
USED FOR
LANGUAGE
SELECTION
STROBE
(+)
(–)
FOUR WIRE SYSTEM:
E
ANY MIX OF STROBES
O
L
AND HORN/STROBES
USED FOR SPEED
SETTINGS, POWER
ADDITIONAL TONES,
A0344-00
DIP SWITCHES
SELECTION,
AND DISABLE
FUNCTION
4-wire applications.
4-wire notication appliance circuits are circuits that use a
separate power supply and pair of wires for sounder and
strobe circuits. Some types of notication circuits may pro-
NOTE: DO NOT loop electrical wiring under terminal
screws. Wires connecting the device to the control panel
A0928-00
must be broken at the device terminal connection in order
D690-06-00 3 I56-3071-000
Page 4

WARNING
to maintain electrical supervision. See Figure 4.
LEADS TO EXTEND BEYOND SWITCH
BACKBOX
Figure 4.
BREAK WIRE AS SHOWN FOR
SUPERVISION OF CONNECTION.
DO NOT ALLOW STRIPPED WIRE
HOUSING. DO NOT LOOP WIRES.
A0337-00
The sounder has a set of input terminals to provide additional control of the sound output of the directional sounder.
These terminals can be connected to the dry relay contacts
of control devices such as heat sensors or control modules. When the input is active it will disable the sound output of the Sounder. Connect the disable function as shown
in Figure 5. Refer to Table 3 for function switch settings.
Figure 5.
OPTIONAL DISABLE CONTACT
Mechanical
Two screws are included for attaching the sounder to the
electrical junction box.
NOTE: If surface mounting is required, an extension ring
will be necessary to give proper depth for mounting the
sounder. The minimum depth required, in the backbox/
extension ring combination, is 21/4˝. Any combination of
4˝ × 4˝ backbox and 4˝ × 4˝ extension ring that gives an
interior depth of at least 21/4˝ may be used.
Mounting
See Figure 6. The sounder can be ush mounted on a
4˝ × 4˝ × 21/4˝ back box, as follows:
A. Use the two 8-32 × 13/4˝ screws (provided) to attach
the Sounder to the back box.
B. Plug the remaining two holes that will not be used
for attachment with the plugs provided.
Figure 6.
TO NEXT DEVICE
OR EOL
Please refer to insert for the Limitations of Fire Alarm Systems
The Limitations of Directional Sounders
The directional sounder will not work without power. The directional sounder
gets its power from the fire/security panel monitoring the alarm system. If power
is cut off for any reason, the directional sounder will not provide the desired audio
warning.
The directional sounder may not be heard. The directional sounder may not be
System Sensor warrants its enclosed product to be free from defects in
materials and workmanship under normal use and service for a period of
three years from date of manufacture. System Sensor makes no other
express warranty for the enclosed product. No agent, representative,
dealer, or employee of the Company has the authority to increase or alter
the obligations or limitations of this Warranty. The Company’s obligation
of this Warranty shall be limited to the replacement of any part of the
product which is found to be defective in materials or workmanship under
normal use and service during the three year period commencing with
the date of manufacture. After phoning System Sensor’s toll free number
800-SENSOR2 (736-7672) for a Return Authorization number, send
defective units postage prepaid to: System Sensor, Returns Department,
NOTE: Directional Sounder has been tested and found to comply with the limits for a
Class A digital device pursuant to part 15 of the FCC Rules. These limits are designed
to provide reasonable protection against harmful interference when the equipment is
operated in a commercial environment. This equipment generates, uses, and can
radiate radio frequency energy and, if not installed and used in accordance with the in-
D690-06-00 4 I56-3071-000
– VDC
+ VDC
4" x 4" x 2-1/4"
BACKBOX
A0929-00
heard if it is placed on a different floor from the person in hazard or if placed too far
away to be heard over the ambient noise such as traffic, air conditioners, machinery
or music appliances that may prevent alert persons from hearing the sounder. The
Sounder may not be heard by persons who are hearing impaired.
Three-Year Limited Warranty
RA #__________, 6581 Kitimat Road, #6, Mississauga, Ont. L5N-3T5.
Please include a note describing the malfunction and suspected cause
of failure. The Company shall not be obligated to replace units which
are found to be defective because of damage, unreasonable use,
modifications, or alterations occurring after the date of manufacture. In
no case shall the Company be liable for any consequential or incidental
damages for breach of this or any other Warranty, expressed or implied
whatsoever, even if the loss or damage is caused by the Company’s
negligence or fault. Some states do not allow the exclusion or limitation of incidental or consequential damages, so the above limitation or
exclusion may not apply to you. This Warranty gives you specific legal
rights, and you may also have other rights which vary from state to state.
FCC Statement
struction manual, may cause harmful interference to radio communications. Operation
of this equipment in a residential area is likely to cause harmful interference in which
case the user will be required to correct the interference at his own expense.
This Class B Digital Apparatus complies with Canadian ICES-003.
4" x 4" x 2-1/4"
Skirt, BBS-SP201W
PF24V
SCREWS
FILL
8-32
PLUGS
SCREWS
PF24V
A0359-00
FILL
8-32
PLUGS
A0176-05
 Loading...