

Page 1
Doc XPCB820
PCB820 Colour NiteDevil Board Camera Instructions
E-mail Support: support@kovert.com
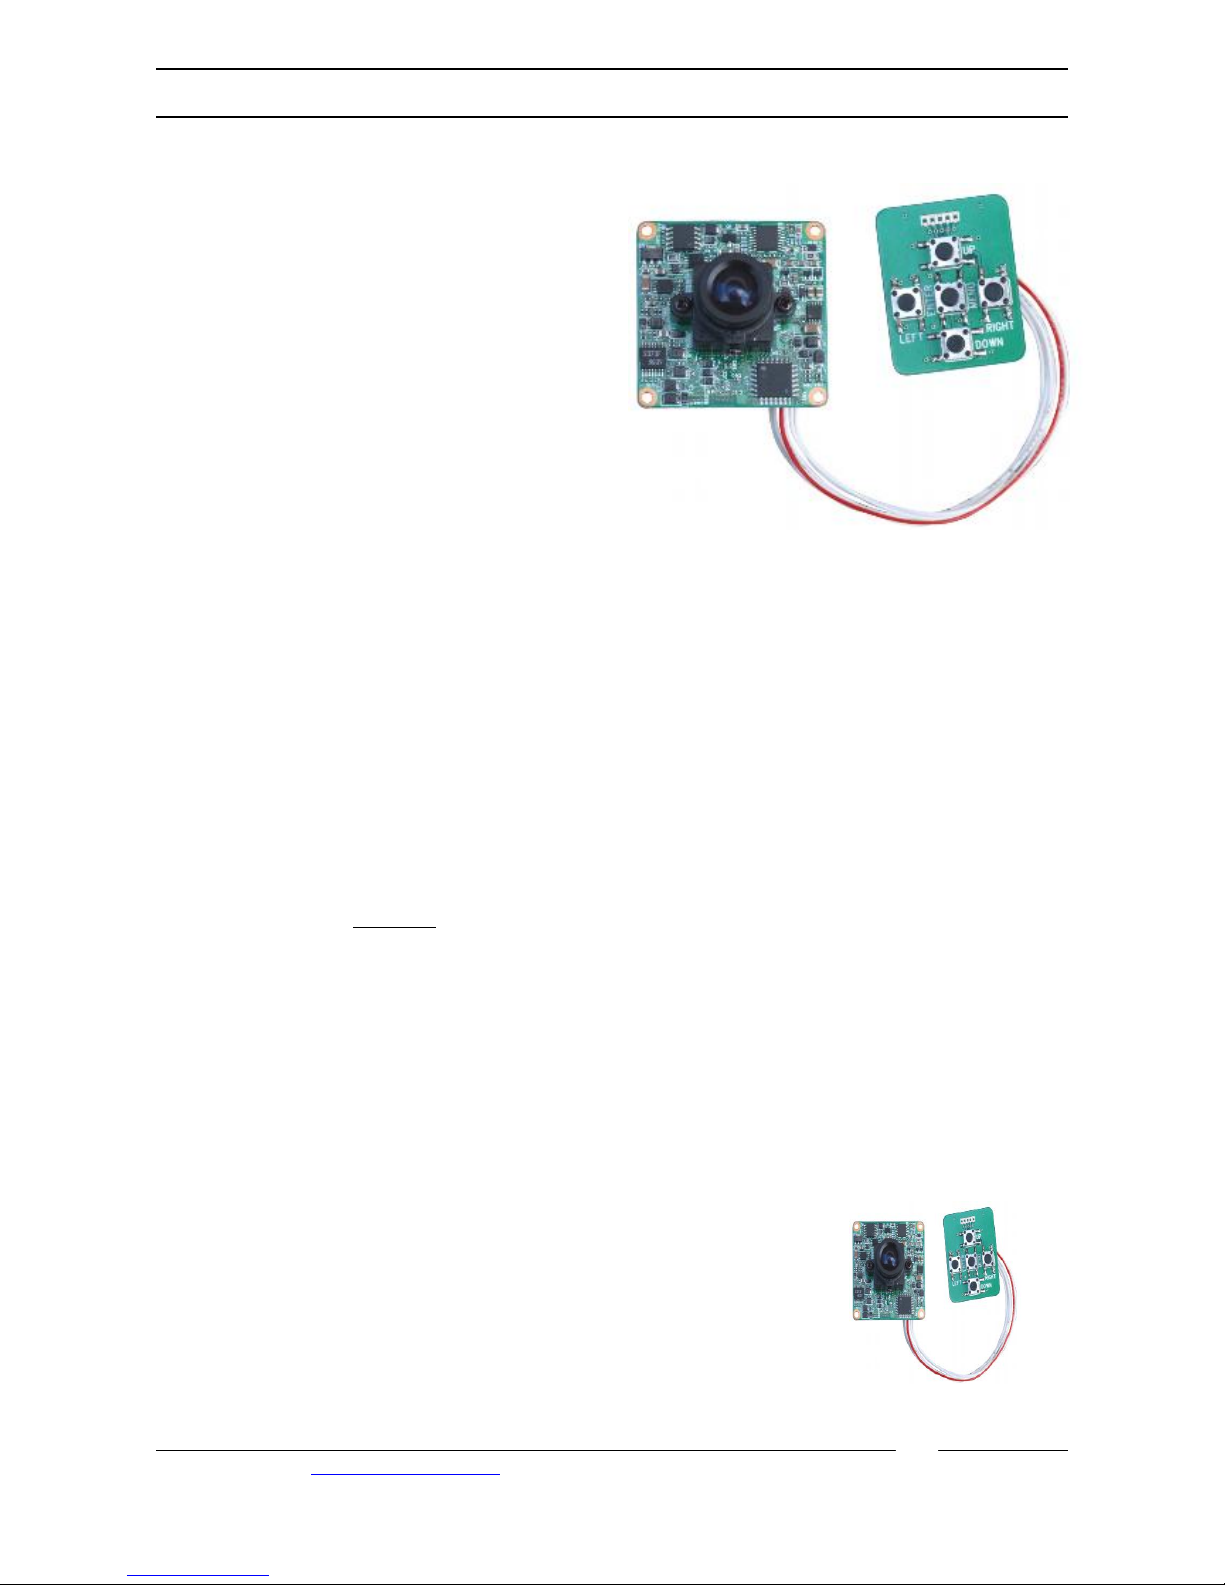
Mounting the Camera
These board cameras come with four fixing holes at the corners of the board. The camera has two
connection leads, one fitted for 12v DC power and video, and a separate cable for menu control.
Powering the Camera
This board camera requires a 12V DC regulated power supply. The board camera is provided with a
2.1 jack plug connected. The centre pin of the jack plug connects to 12vDC + on the power supply.
The black power ground (0v outer connection on jack plug) connects to 12vDC-. It is recommended
to use a power supply that is rated higher than the current consumption of the camera e.g. POW150
would be adequate for powering one camera, but when powering more you must look at the bigger
power supplies. Using an underrated power supply will cause it to run hot and will greatly reduce
its life. If you are using the Easy Connection Kits that comprise of the (CCT801/802/808/809) to
power and connect your camera (12V models only) please proceed as per the instructions supplied
with The Easy Connection Kit. You will need to cut off the DC Plug ONLY and use the bare wires
to connect through a terminal block. The 12V positive is the RED wire, the 0V is the BLACK wire.
Always use a 12vDC regulated
power supply. This board camera draws 250mA so the power
supply must be rated at 300mA minimum to provide sufficient headroom.
Video Connection
The same fly lead is used for the video connection. The board camera is provided with a BNC
connection for video. The inner connection of the BNC is the video connection and the BNC outer
is the video ground. Remember that the Video out from the camera is like any other electrical
circuit and requires two wires to complete the circuit. When using a coax type cable such as RG59
or similar for video, the outer braid of the coax provides the ground connection and the inner the
video connection.
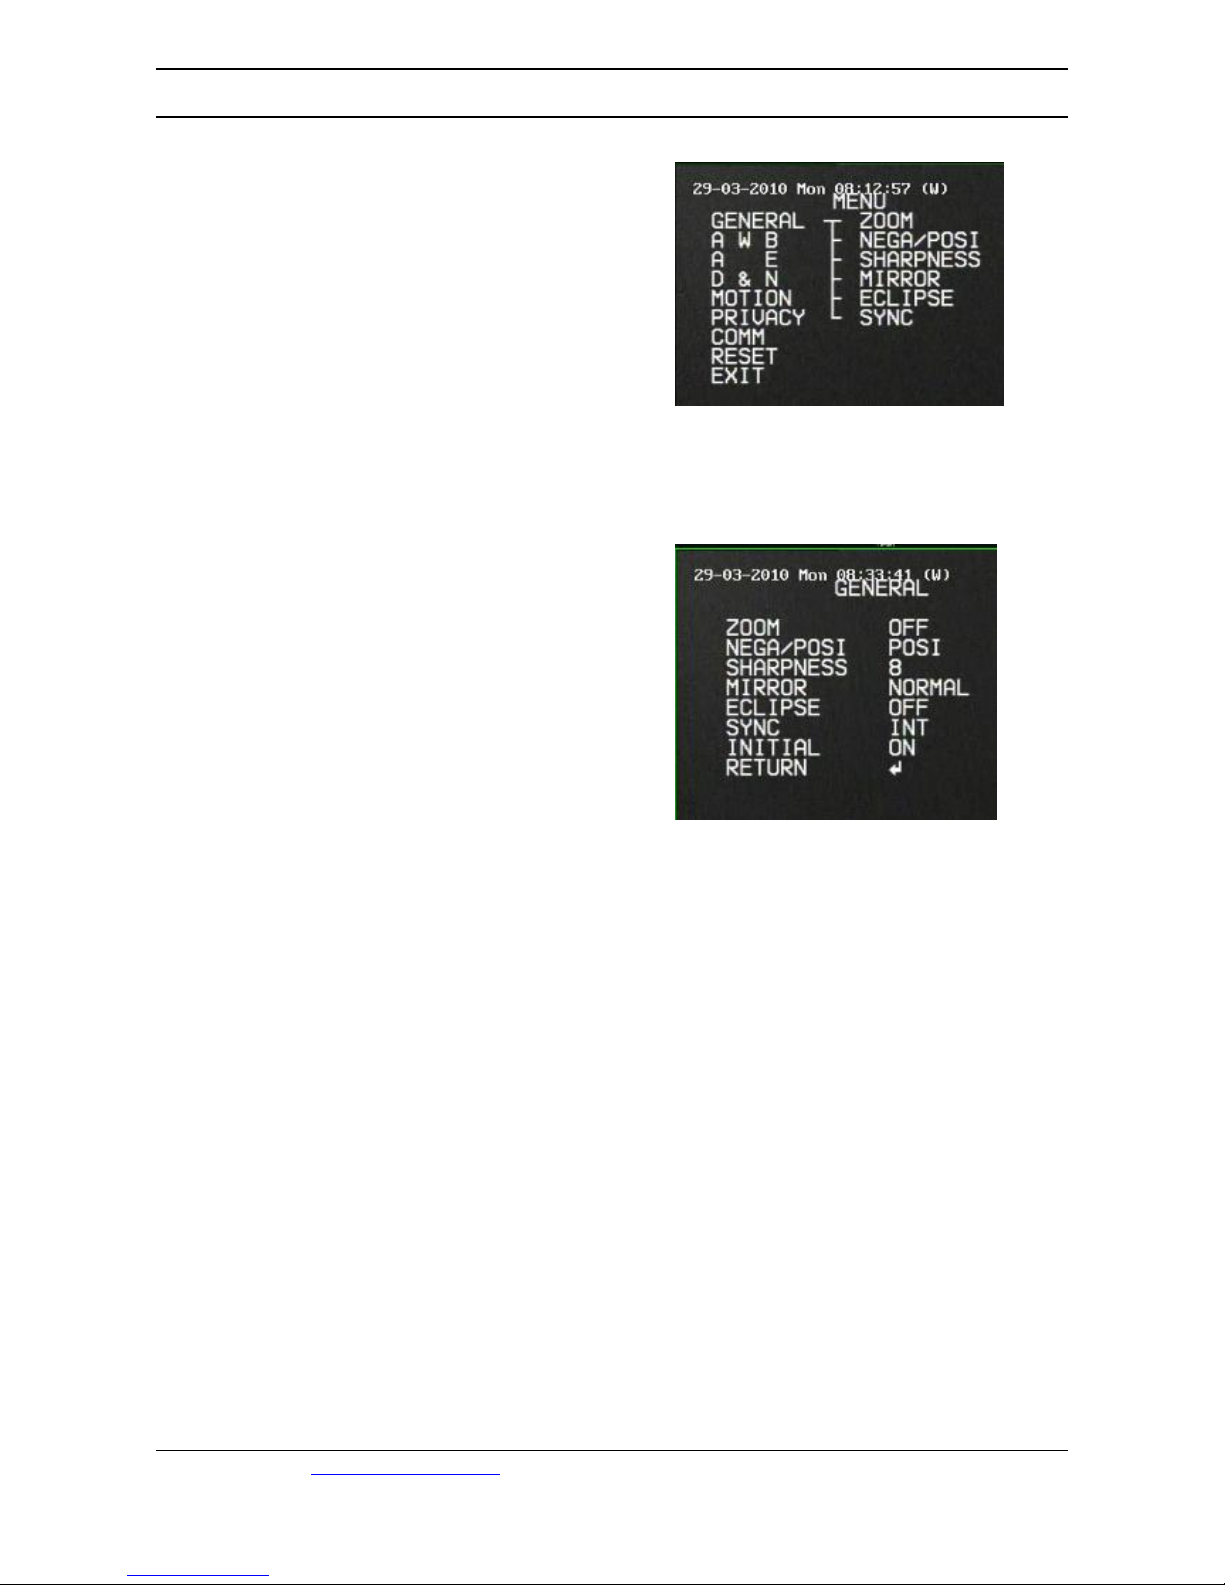
Camera Menu
This board camera provides additional camera options selected using the
OSD menu. To enter the menu, press the centre menu button.
The PCB820 520 TVL Hi
-
Res
NiteDevil 3.8mm Board Camera
produces excellent quality images. It provides
fantastic colour representation and a very clear
image. The PCB820 comes with an OSD menu
and a small control board. This 12v DC camera
offers Digital Noise Reductio n, Mirror and Flip
functions, Privacy Masking, Day/Night settings
plus other functions, and can be used most
effectively in covert operations.
Page 2
Doc XPCB820
PCB820 Colour NiteDevil Board Camera Instructions
E-mail Support: support@kovert.com
When you
enter the menu you will see the
menu options displayed down the left hand
side of the screen and the submenus for the
relevant option shown down the right hand
side of the screen. If you press the down
button you can move to the required option
and by pressing the right button can enter
or change the option.
GENERAL MENU
ZOOM OFF / 1.25x / 1.5x /1.75x / 2x
NEGA/POSI POSI positive or NEGA negative
SHARPNESS 0 ~ 10 (default 8)
MIRROR Normal / Horizontal / Vertical /
Rotate
ECLIPSE
No function available
SYNC INT - internal sync not changeable
INITIAL Set to ON to default camera to manufacturers settings.
RETURN Return to main menu
Page 3
Doc XPCB820
PCB820 Colour NiteDevil Board Camera Instructions
E-mail Support: support@kovert.com
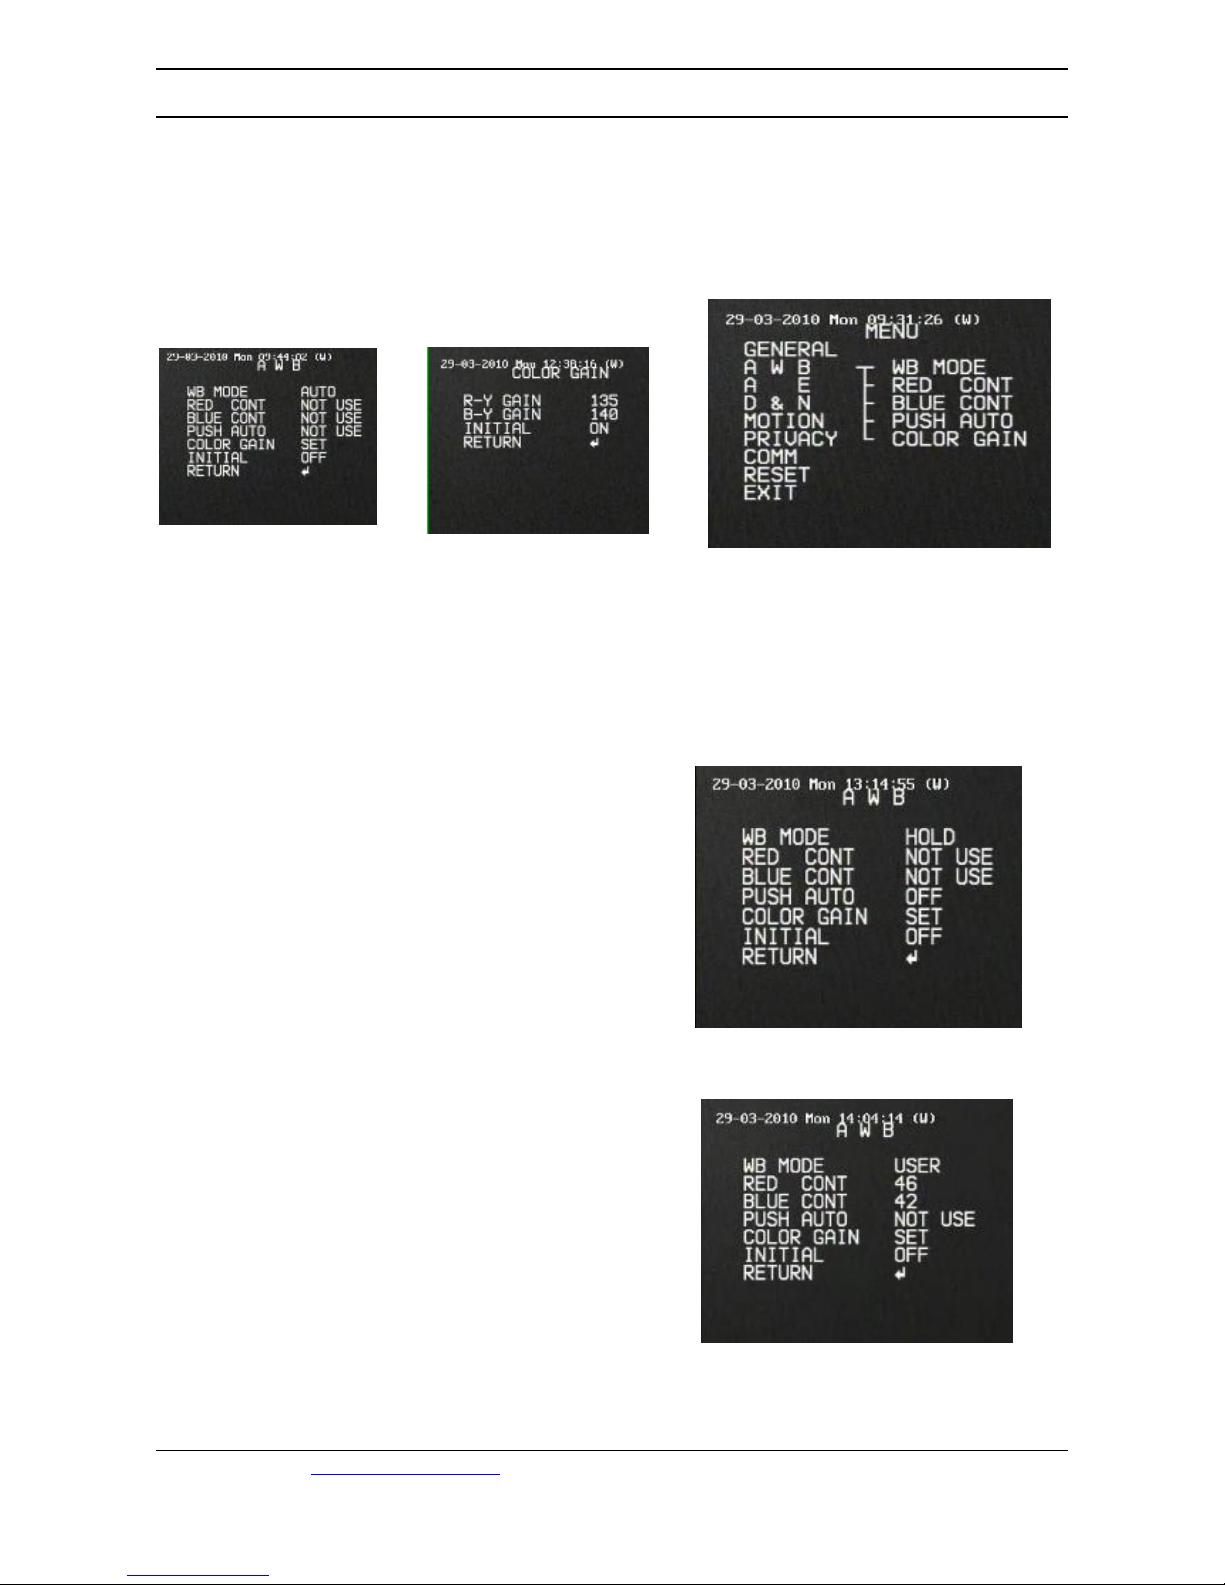
AUTOMATIC WHITE BALANCE
WB MODE Auto / Hold / User
If Auto selected only Colour Gain can
be adjusted. Red 32 ~ 192 Def 135
Blue 32 ~ 192 Def 140
Initial - defaults settings.
The Hold option allows the Push Auto option to
be used. This is similar to the Auto option.
Push Auto is not functional.
Colour Gain can be adjusted.
Red 32 ~ 192 Def 135 / Blue 32 ~ 192 Def 140
The User option allows the setting of
the Red and Blue contrast. These are
different from the colour gain controls
that adjust colour hue as these control
the overall picture contrast in red and
blue.
Page 4

Doc XPCB820
PCB820 Colour NiteDevil Board Camera Instructions
E-mail Support: support@kovert.com
AUTOMATIC EXPOSURE
Allows you to set Lens settings, Brightness, Automatic Gain Control and Backlight Compensation
A E Automatic Expo
sure
LENS SELECT ELC – Electronic Light Control
Fixed Iris Lens
DC - Direct Drive Lens
Auto Iris Lens
Use ELC with this camera.
BRIGHTNESS 0 ~ 60 Default 20
BACKLIGHT Backlight Compensation
Evens out light levels.
OFF / LOW / MID / HIGH
FLICKERLESS
Not used.
SHUTTER SPEED Not used.
AGC MAX SET Automatic Gain Control AGC OFF / LOW / MID / HIGH
Default = MID
MAX FLD SET OFF / 2 FLD / 4 FLD / 8 FLD / 16 FLD / 32 FLD / 64 FLD
Default = 32 FLD
This is the SENSE-UP option.
INITIAL Default settings
Page 5

Doc XPCB820
PCB820 Colour NiteDevil Board Camera Instructions
E-mail Support: support@kovert.com
DAY & NIGHT
Allows you to set colour during day and black & white at night or continuous colour or black & white.
D & N Day and Night Mode
AUTO Automatically swit ches from colour to black & white at night
DAY Permanently stays in colour mode.
NIGHT Permanently stays in black & white mode.
LUX SET LOW / MID / HIGH Set Lux level for switching
FILTER DLY 0 ~ 10 SECS Default 5 Number of seconds before switching
BURST Considers light burst before switching Default ON
INITIAL ON / OFF Defaults settings
EXT External
EXT INPUT HI-COLOR High Colour
LOW-COLOR Low Colour
Page 6

Doc XPCB820
PCB820 Colour NiteDevil Board Camera Instructions
E-mail Support: support@kovert.com
MOTION
Allows you to set motion so that a warning can be displayed on screen when motion is detected.
MOTION Motion Detection
DETECT MODE OFF / ON Sets Motion Detection on or off
MD DISPLAY OFF / ON Sets Motion Detection display on or off.
DETECT AREA CENTER Sets central area for detection as shown above
OUT Sets area surrounding central area but not top line
UPPER Sets top line only
WHOLE Sets whole area for motion detection
USER Sets individual areas by pressing right button followed by
down button
USER AREA SET Saves settings
SENSITIVITY 0 ~ 8 Default = 4
ALARM TIME 1 ~ 60 seconds
INITIAL ON / OFF Defaults settings
This camera can only display motion detection option as it has no alarm facilities.
Page 7

Doc XPCB820
PCB820 Colour NiteDevil Board Camera Instructions
E-mail Support: support@kovert.com
PRIVACY MASKING
This option allows you to set up to 4 masking areas so that video can be excluded.
AREA 1 ~ 4 Select between 1 and four areas for privacy masking
MASK OFF / ON Switch area privacy masking to ON
COLOR BLACK / GREY / WHITE / Select colour for masking
START X Start position for horizontal position for mask area
END X End position for horizontal position for mask area
START Y Start position for vertical position for mask area
END Y End position for vertical position for mask area
INITIAL ON / OFF Defaults settings
COMM
This option in not available on this camera.
RESET
Allows all manufacturers settings to be applied
Page 8

Doc XPCB820
PCB820 Colour NiteDevil Board Camera Instructions
E-mail Support: support@kovert.com
Technical Specifications
Model PCB820
Mode PAL
Image Sensor 1/3” CCD interline transfer type
CCD Total Pixels 752 x 582
Sync Syst em Internal
Scanning 2:1 Interlace
Lens 3.8mm
Resolution 520 TVL
Horizontal frequency 15.625kHz
Vertical frequency 50.00Hz
White Balance White Balance adjustment using menu
S/N Ratio Typical (max) 50dB
Min/Max Sense-Up Minimum 0.3 Lux (F1.4 20IRE) / Maximum 64 times
Horizontal Mirror Function OFF (Normal Image) / ON (Horizontal Image Inversion)
Vertical Mirror Function OFF (Normal Image) / ON (Vertical Image Inversion)
BLC Function Backlight Compensation adjustable using menu
Digital Noise Reduction Built In
Electronic Shutter 1/50 ~ 1/120000 sec
Gamma Correction 0.45
Gain Control Automatic Gain Control adjustment using menu +18dB Maximum
Video Output 1.0v p~p composite video @ 75ohms Video 0.714v p~p Sync 0.286v p~p
Burst level 0.286v p~p
Operation Temperature -10°C ~ +45°C
Operation Humidity Within 85% Relative Humidity
Power Consumption 12vDC 250mA (Use minimum 300mA power supply unit.)
Dimensions of camera board 38mm x 38mm x 33mm depth
Dimensions of controller 33mm (w) x 28mm (h) x 6.5mm (d)
Video/Power flylead BNC (video) and 2.1 jack socket (power) on shared flylead 43.5cm
Controller flylead 10.0 cm
All specifications are approximate. Kovert.com reserves the right to
change any product specification or features without notice. Whilst
every effort is made to ensure that these instru ctions are complete and
accurate, k overt.com cannot be held responsible in any way for any
losses, no matter how they arise, from errors or omissions in these
instructions, or the performance or non-performance of the camera or
other equipment that these instructions refer.
 Loading...