

Page 1
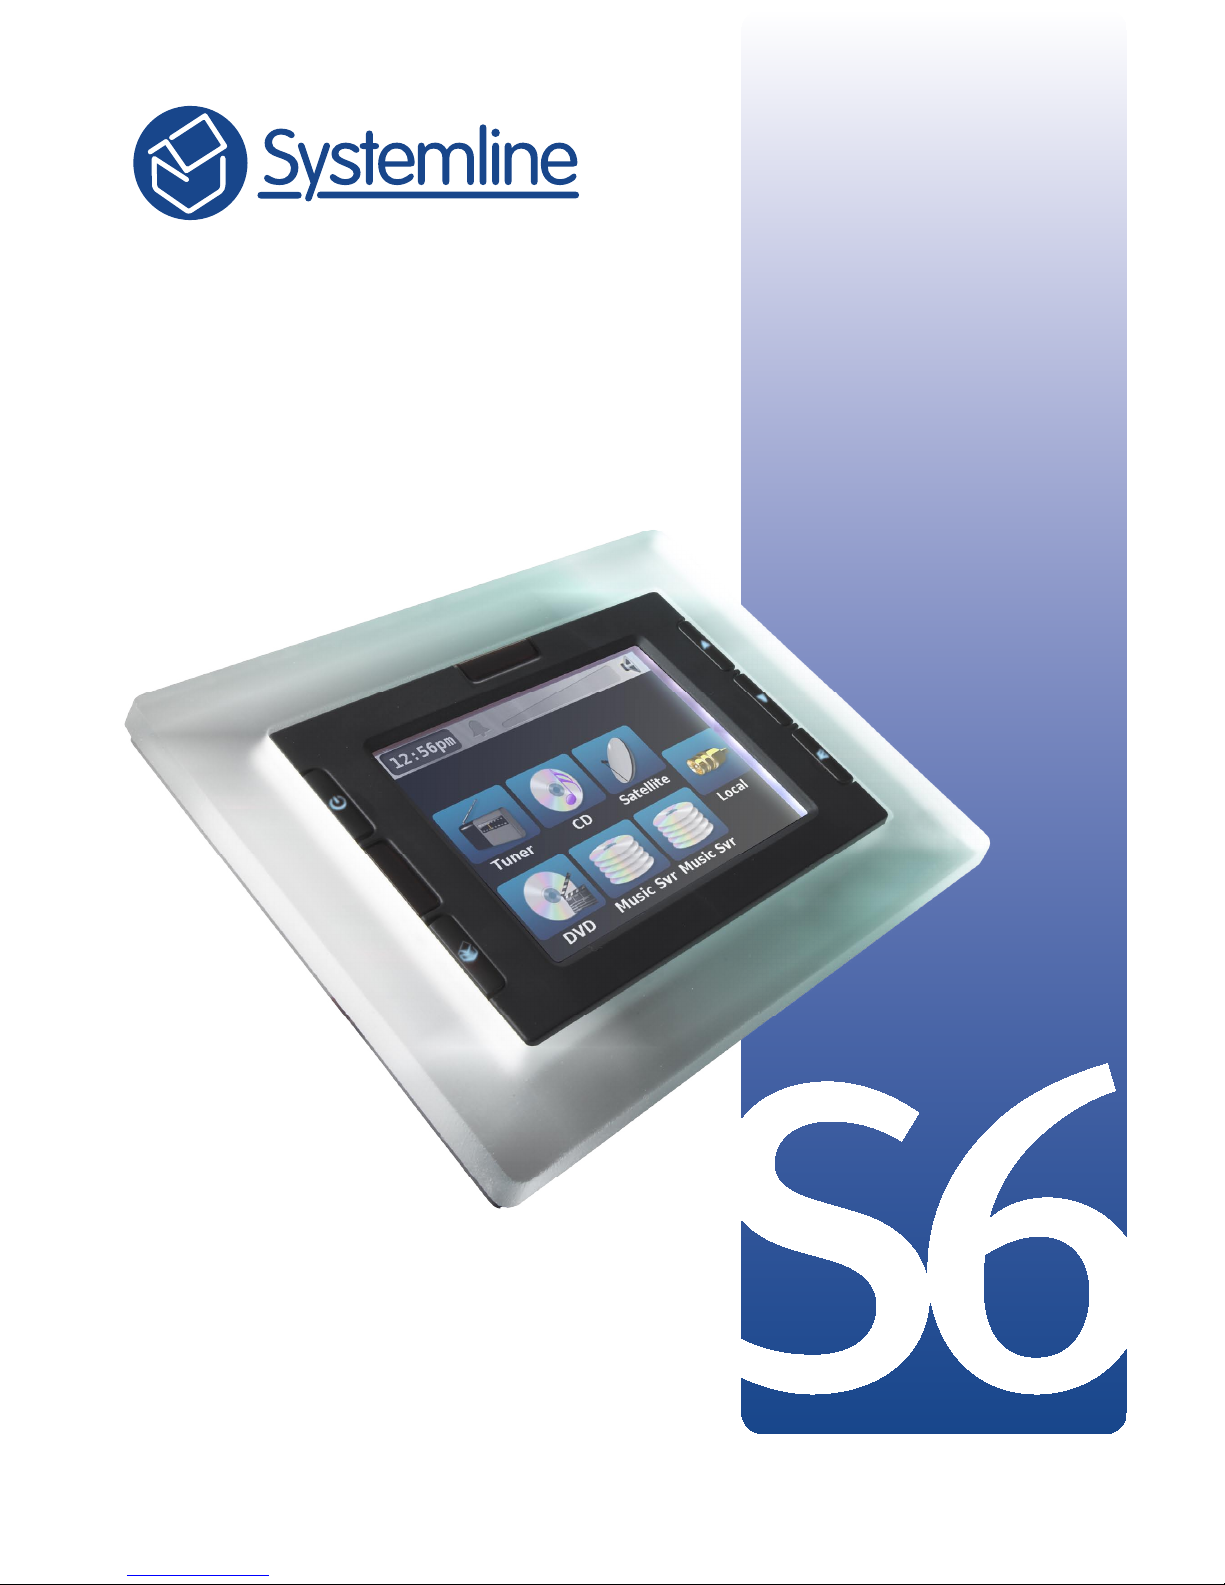
User Guide
Page 2
Page
Declaration Of Conformity
The Systemline S6 Multiroom Controller has been
designed and independently
tested to be in compliance with
the following standards:
SAFETY
BS EN 60065:2002
IEC 60065:2001 7th Edition
EMC
BS EN 55022 Class B 2006
BS EN 55103-1:1997
BS EN 55103-2:1996
BS EN 61000-4-(2 to 6 & 11) 2004
This product is designed and
manufactured to comply with the
radio interference requirements
of EEC directive 89/336/EEC,
93/68/EEC and 73/23/EEC.
Safety
This Symbol is to alert the user to
the presence of dangerous voltages
inside the Systemline Power supplies.
To reduce the risk of electric shock do
not dismantle these power supplies.
This symbol is to alert the user of
important operating instructions
included in this manual
accompanying the Systemline Unit.
1. Read these instructions.
2. Keep these instructions.
3. Heed all warnings.
4. Follow all instructions.
5. Do not use this
apparatus near water.
6. Clean only with dry cloth.
7. Do not block any ventilation
openings. Install only in accordance
with the manufacturer’s instructions.
8. Do not install near any heat sources
such as radiators, heat registers,
stoves, or other apparatus (including
amplifiers) that produce heat.
9. Protect the power cord from
being walked on or pinched,
particularly at plugs, convenience
receptacles and the point at which
they exit from the apparatus.
10. Only use attachments/accessories
specified by the manufacturer.
11. Use only with the cart, stand,
tripod, bracket or table specified
by the manufacturer, or sold
with the apparatus. When a
cart is used, use caution when
moving the cart/apparatus to
avoid injury from tip-over.
12. Unplug this apparatus during
lightning storms or when unused
for long periods of time.
13. Refer all servicing to qualified
personnel. Servicing is required
when the apparatus has been
damaged in any way, such as power
supply cord or plug is damaged,
liquid has been spilled or objects
have fallen in to the apparatus, the
apparatus has been exposed to
rain or moisture, does not operate
normally or has been dropped.
WARNING: Do Not Remove the
cover. There are no user serviceable
parts inside. Refer all servicing
issues to qualified personnel.
WARNING: To reduce the risk of
fire or electric shock, do not expose
this product to rain or moisture.
This apparatus must not be exposed
to dripping or splashing. Objects
filled with liquids such as vases must
not be placed on the apparatus. The
rear panel power switch disconnects
mains live only. The power cord
must be disconnected from the
rear of the apparatus, or the wall
socket, to provide total isolation.
One or other of these connections
must be readily accessible when
the apparatus is in use.
WARNING: Changes or modifications
not expressly approved by the
party responsible for Compliance
could void the user’s authority
to operate the equipment.
Page 3

Page
Notes on Handling
• When shipping the Systemline
S6 Controller product, always use
the original shipping carton and
packing materials. For maximum
protection, repack the unit as it was
originally packed at the factory.
• Do not use volatile liquids,
such as insect spray, near the
product. Do not leave rubber or
plastic products in contact with
the product for a long time. They
will leave marks on the finish.
• The top and rear panels of the
product may become warm
after a long period of use. This is
normal and not a malfunction.
• When the product is not in use,
be sure to turn off the power.
Notes on Locating
• Locate this product away from any
direct sources of heat (e.g. radiators
or heaters) or magnetism (old style
TVs or computer monitors).
• Avoid placing the unit in the direct
airflow from an air conditioning unit
as this may lead to condensation
being developed inside the product.
• The rocker switch at the rear
of the equipment is the primary
means of disconnecting the
mains supply and therefore this
should be accessible. If access
is not feasible then a secondary
means of disconnection must be
readily available and accessible.
Notes on Cleaning
• Use a dry soft cloth for cleaning.
• For stubborn dirt, soak the cloth
in a weak detergent solution, wring
very well and wipe the exterior
surfaces of the product. Use a dry
cloth to wipe it dry. Do not use any
type of solvent, such as thinners
and benzene, as they may damage
the surface of the product.
• If you use a chemical saturated
cloth to clean the unit, follow
that product’s instructions.
Notes on Moisture
Condensation
Moisture condensation is likely
to damage this product. Please
read the following carefully:
• Moisture inside the product is most
likely to arise when transferring
the unit from a cold location to
a warm one. Wherever possible
avoid doing this, or let the unit
acclimatise for at least 3 hours
before attempting to switch it on.
• Do not use the product in
a cold room where you just
turned on the heater, or a place
where the cold wind from the air
conditioner directly hits the unit.
Acknowledgements
Copyright © 2007 Armour Home
Electronics Ltd. All rights reserved.
The information in this guide is
believed to be correct as of the date
of publication. However, our policy
is one of continuous development
and so the information is subject to
change without notice, and does not
represent a commitment on the part
of Armour Home Electronics Ltd.
Systemline is a registered trademark
of Armour Home Electronics Ltd.
Sistema 45 and System 45 are
trademarks of AVE s.p.A. All other
product names are trademarks
or registered trademarks of
their respective owners.
Armour Home Electronics Ltd
Stortford Hall Industrial Park
Dunmow Road
Bishops Stortford
Hertfordshire CM23 5GZ
Web: www.systemline.co.uk
Page 4

Page
CONTENTS
CAPABILITIES 6
LOCATION 6
SWITCHES AND DISPLAY 6
Power Switch 6
Front Panel Display
6
Front Panel Standby Button
6
Resetting the S6 Controller to Factory Default Conditions
7
USING THE S6 CONTROLLER 7
Selecting Audio Sources 7
Volume Controls
7
Treble and Bass Controls
7
Party Feature
7
Switch All Zones Off
8
TOUCHSCREEN OPERATION 9
Switching the system on From the touchscreen 9
Radio play screen 1
0
Home Screen 1
0
NAvIGATING THE SYSTEM 11
Selecting a Music Server source from the home screen 11
Music Selection Screen 1
3
SELECTING TUNER FROM THE HOME SCREEN 14
Brings up Tuner play screen 14
The tuner pre-sets screen 1
5
BASIC CONTROLS 17
ONE-WAY SOURCES(CD, SATELLITE, DvD ETC.) 17
LOCAL INPUT 17
ALARM FEATURE 18
The Alarm Screen 18
Cancelling the Alarm 1
9
INSTALLATION DETAILS 20
Page 5

Page
CAPABILITIES
The S6 Controller allows selection of up to 6 audio sources (such
as CD players, tuners etc) to any of 8 Zones.
Remote control handsets or wall-mounted keypads are used to
select and control sources from within each Zone.
Additionally, an audio source device located within a Zone can be
selected to be played in that Zone. Alternatively, from the first 6
Zones, these local sources can be chosen as one of the sources
that is available to all other Zones.
An audio source device such as a CD player, located within a Zone
can be played in that Zone, provided that the necessary cables
and wall plates have been installed. Such a Zone-located source
can be allocated, during installation, as one of the 6 sources that
can be selected by any Zone.
The details of your installation are written on the inside of the rear
cover of this guide.
Video sources can be automatically selected at the same time,
provided the necessary video switching equipment has been
installed.
The two sockets on the front panel are for Installation purposes
only and the user must not connect anything to these sockets. To
do so will invalidate the Warranty.
LOCATION
The S6 Controller and audio sources such as CD players, tuners,
music servers together with lighting controllers will usually be
located centrally from where the necessary wiring will be run to
each Zone. Music from any of these audio sources can be listened
to and controlled from any zone.
SWITCHES AND DISPLAY
Power Switch
The rocker switch located at the rear at the right hand side
switches on mains power. In normal use, the S6 Controller should
not be switched off at the rear, especially if lighting control
systems are employed and controlled by Systemline touch screen
keypads as the keypads, and hence the lighting system, are not
able to function without power.
Front Panel Display
This show the current status of each Zone preamplifier plus data
traffic LEDs.
Page 6
Page
Front Panel Standby Button
When the adjacent LED is red, the S6 Controller is in STANDBY
• Zone Audio controls will not function
• Zone pre-amplifier outputs will be muted
• Touch screen keypads will still be able to control lighting systems,
if these are installed
When the LED is green or flashing green, the S6 Controller is fully
operational
• A short press of the STANDBY button will place the S6 Controller
into standby and will mute all Zone pre-amplifier outputs and all
Zones. The LED changes to red
USING THE S6 CONTROLLER
Selecting Audio Sources
Please refer to the Keypad and LRN7 Handset manuals for these
details.
Volume Controls
You can control volume levels and mute from within each Zone
using a keypad or the LRN7 handset.
Treble and Bass Controls
You can adjust Treble and Bass for each Zone from within the Zone
by using the LRN7 handset. Refer to the LRN7 manual for the
details.
Party Feature
When you are having a party, you can easily set all Zones to listen
to the same source.
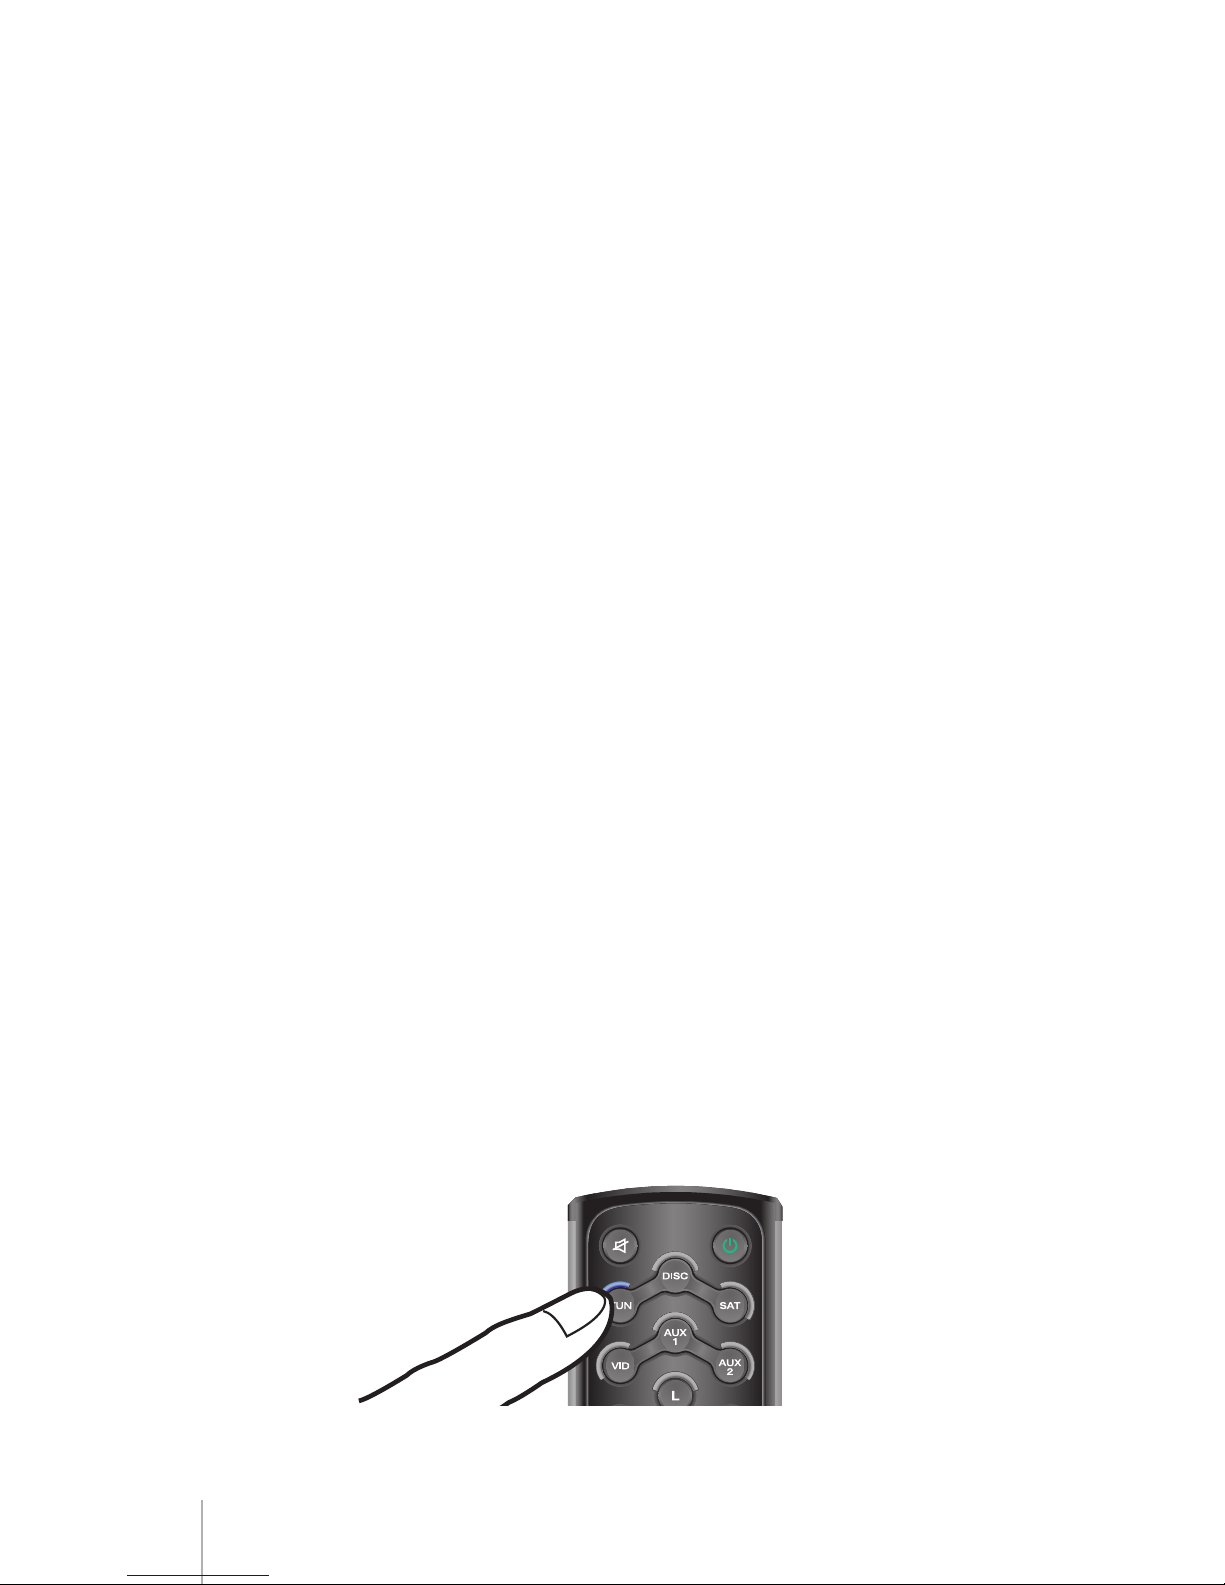
Activate party from any Zone by pressing the appropriate source
button on the LRN7 remote control handset and holding it down,
for at least 2 seconds.
2 Seconds
Page 7

Page
If there is a Zone that you do not want to include simply switch
that Zone back to standby or to another source, from the keypad
or LRN7 within that Zone.
Switch All Zones Off
To switch off (set to standby) all Zones at once, press and hold
down (for at least 2 seconds) the Standby button on the LRN7
handset from within any Zone. All zones can also be switched
off by pressing the standby switch on the front panel of the S6
Controller.
Page 8
Page
TOUCHSCREEN OPERATION
Switching the system on from the touchscreen
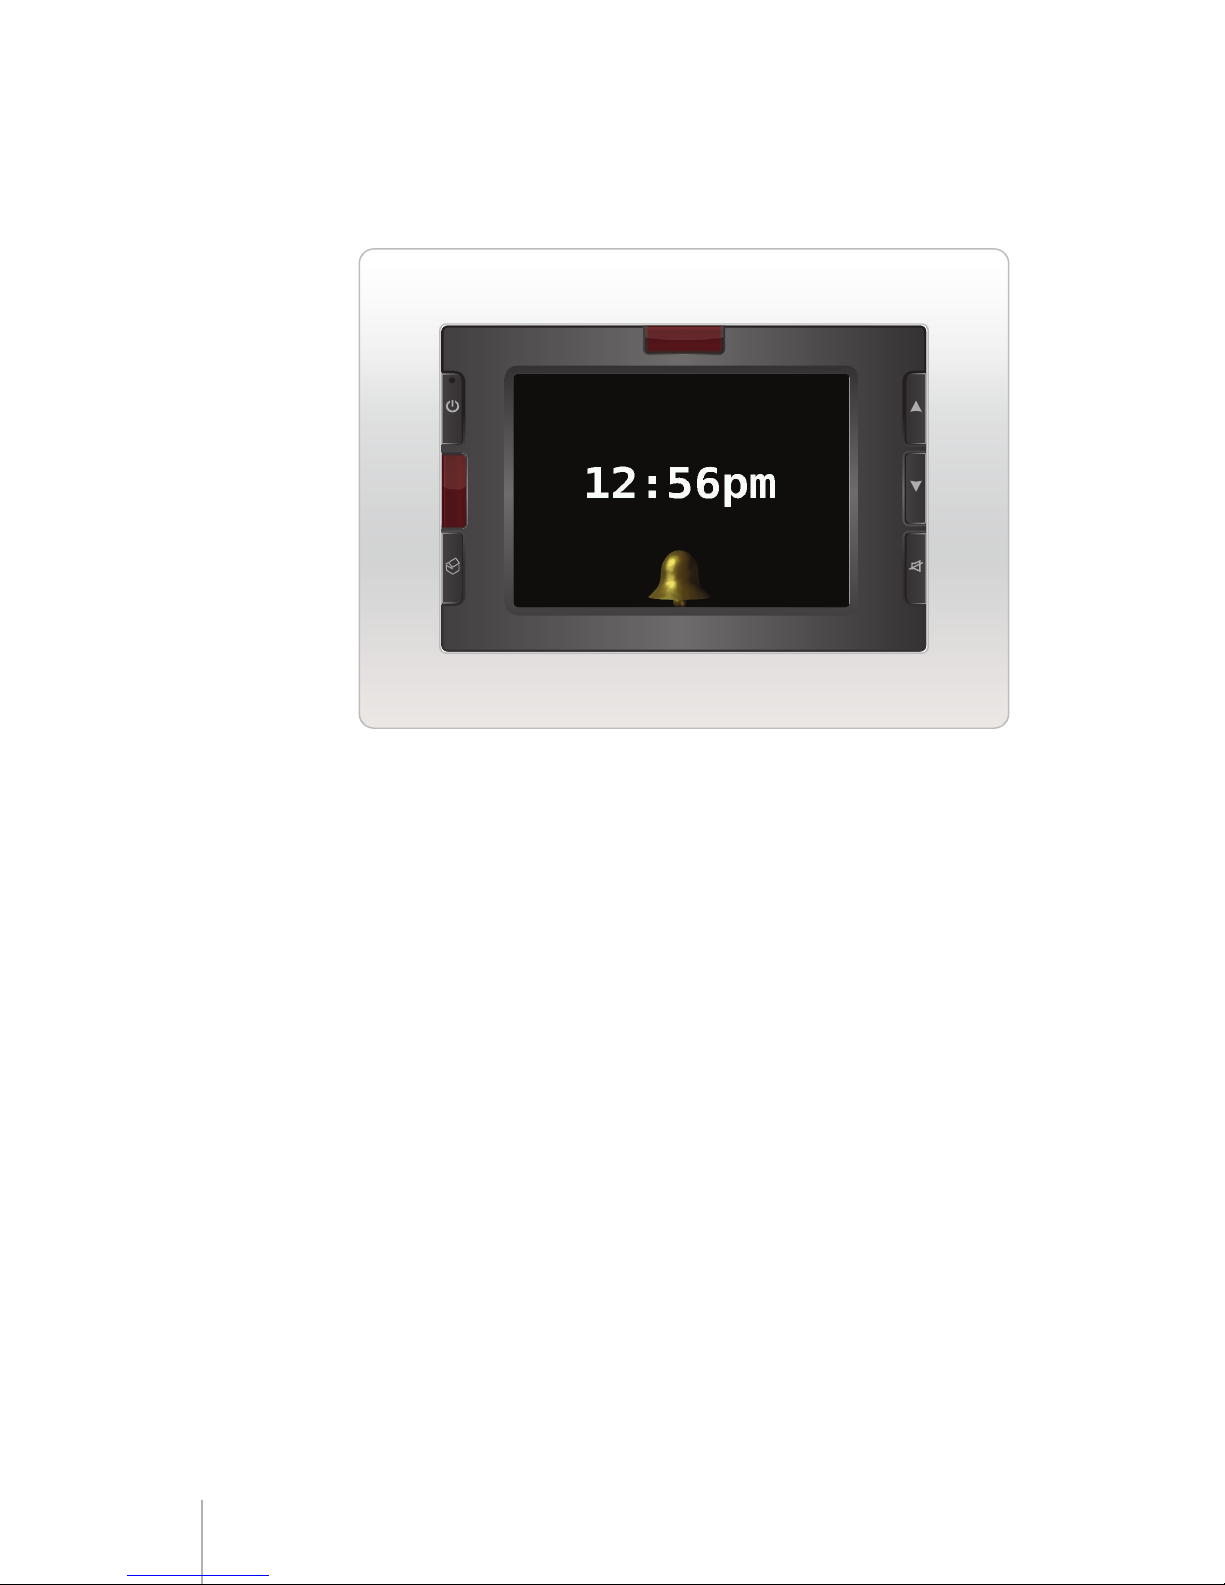
Standby Screen
➊ Press the “power” button (hard button on top left hand side of
screen) and it will switch the zone on and select input 1 which
is normally a radio tuner – so by doing this, you will always hear
something.
➋Press the “Home” button (hard button on bottom left hand side of
screen) to go to the Home page and from there, select the source
you want to watch or listen to.
Note: Source symbols are normally displayed in blue. If a source symbol
is displayed in orange, it means that the source is already being
used by another person in another location. You can go ahead and
listen, but it would be polite not to change stations or tracks.
Page 9
Page
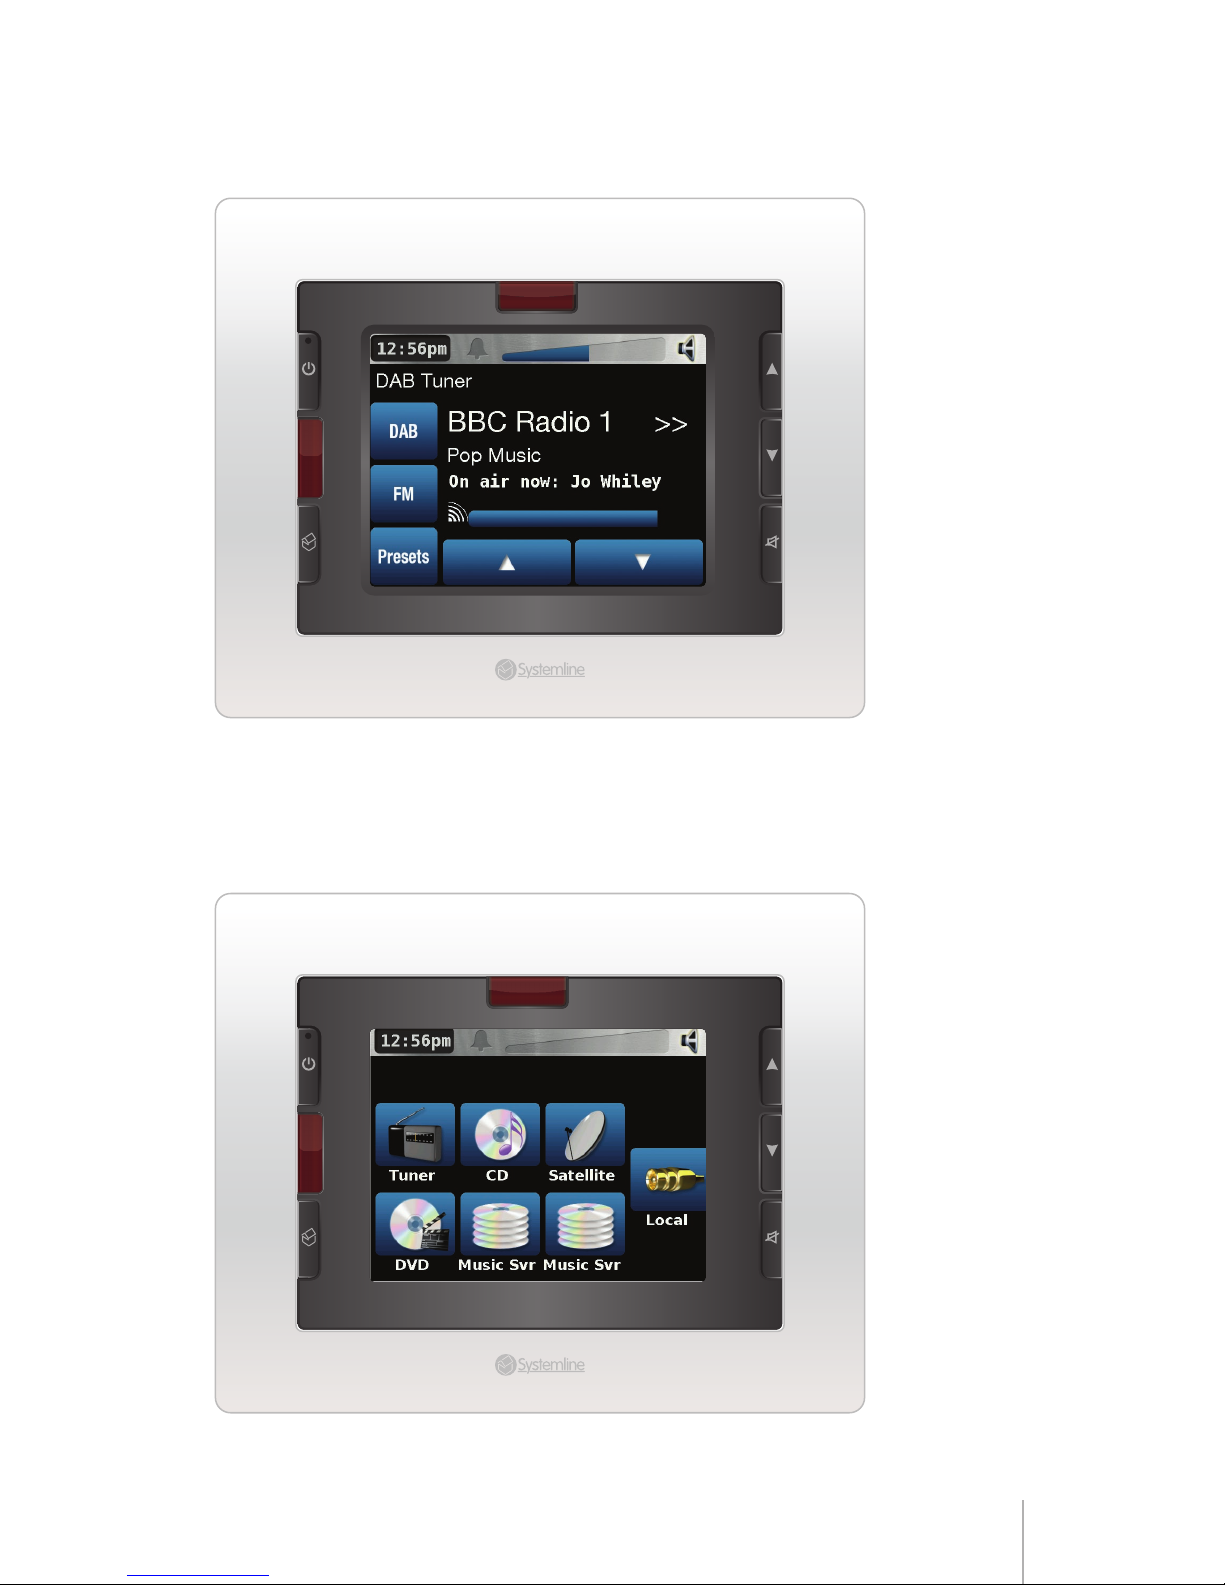
Radio play screen
12.56pm
DAB
Presets
FM
DAB Tuner
Newsbeat - all the latest news
Email - newsbeat@bbc.co.uk
BBC Radio 1
Home screen
(Sources available vary according to installation requirements).
Page 10
Page 10
NAVIGATING THE SYSTEM
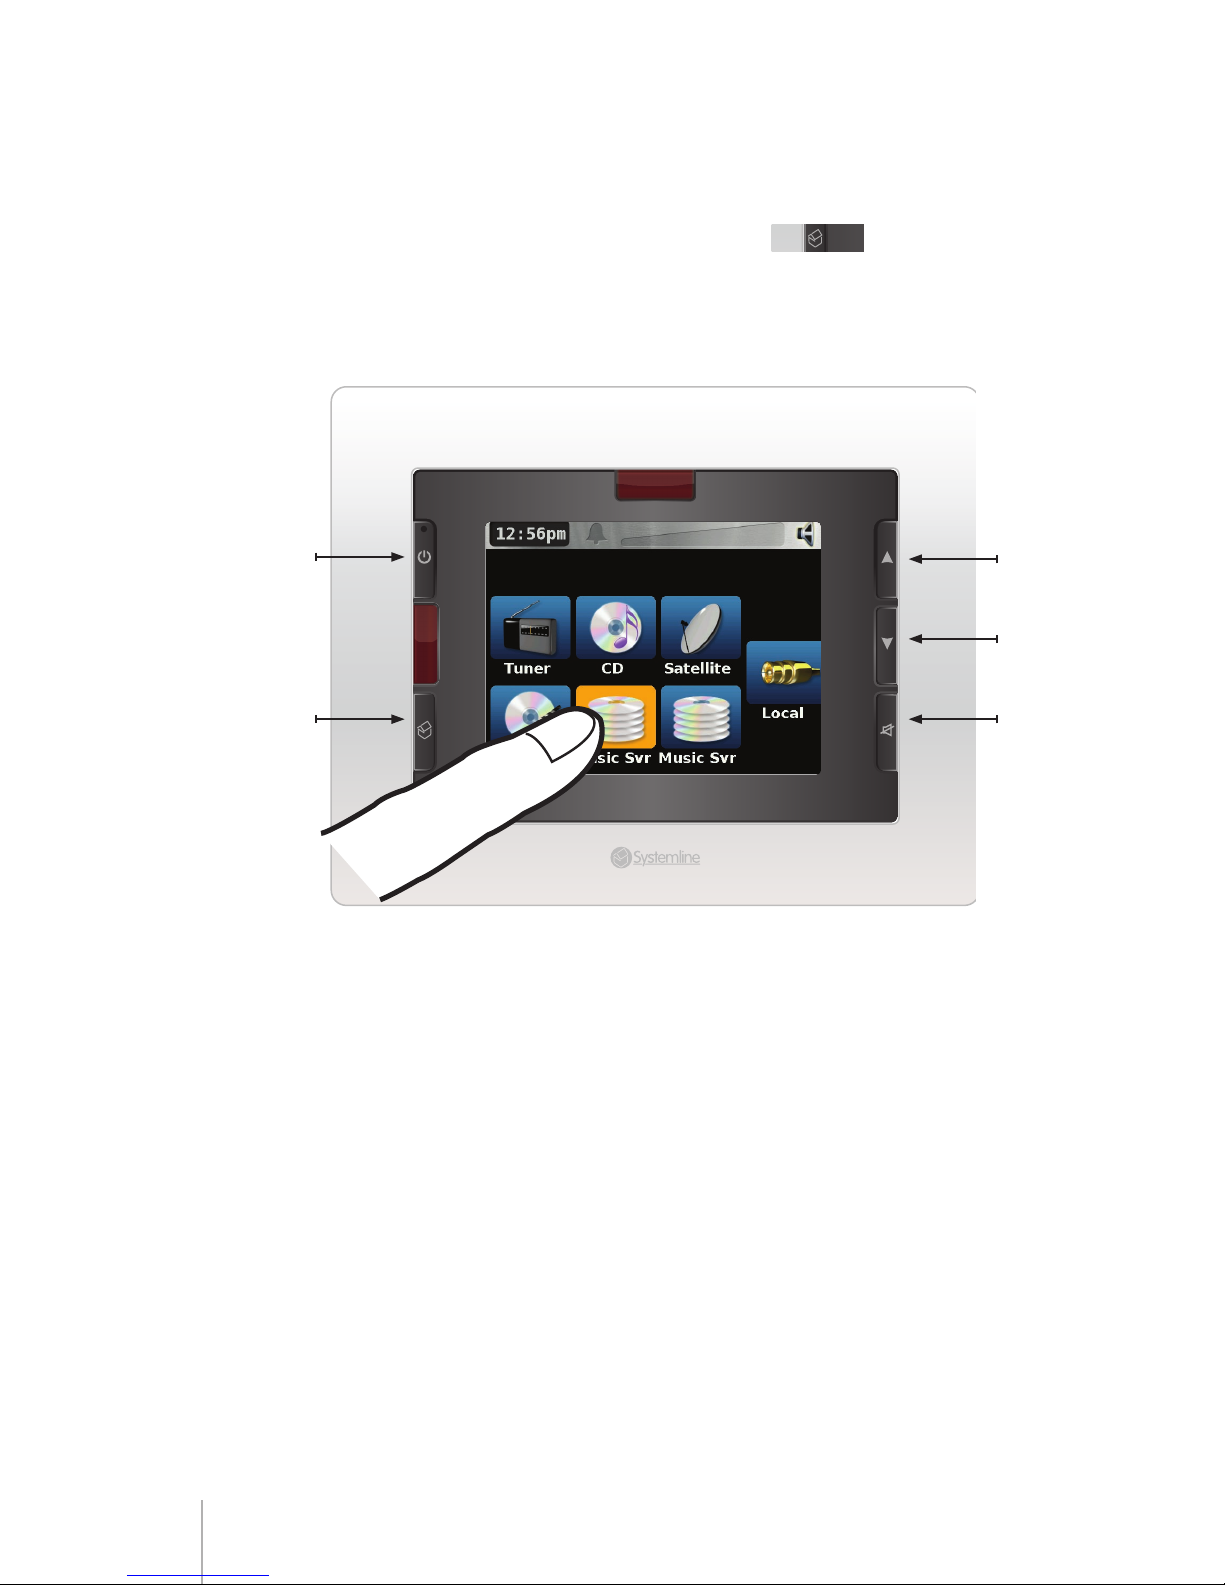
The starting point is the Home Screen. If you are not on the Home
Screen, simply press the Home button (
12.56pm
BBC Radio 1
BBC Radio 2
BBC Radio 3
BBC Radio 4 >>
) until the Home
Screen appears (the Home button is also a back button, so you may
need to click on this more than once).
Selecting a Music Server source from the home screen
➊
➋
Volume
Up
Volume
Down
Mute
From the Home Screen, click on the Music Server source icon. This
will take you to the “Play Screen”. From the play screen, you can
simply press play to start listening to music.
Page 11
Page 11
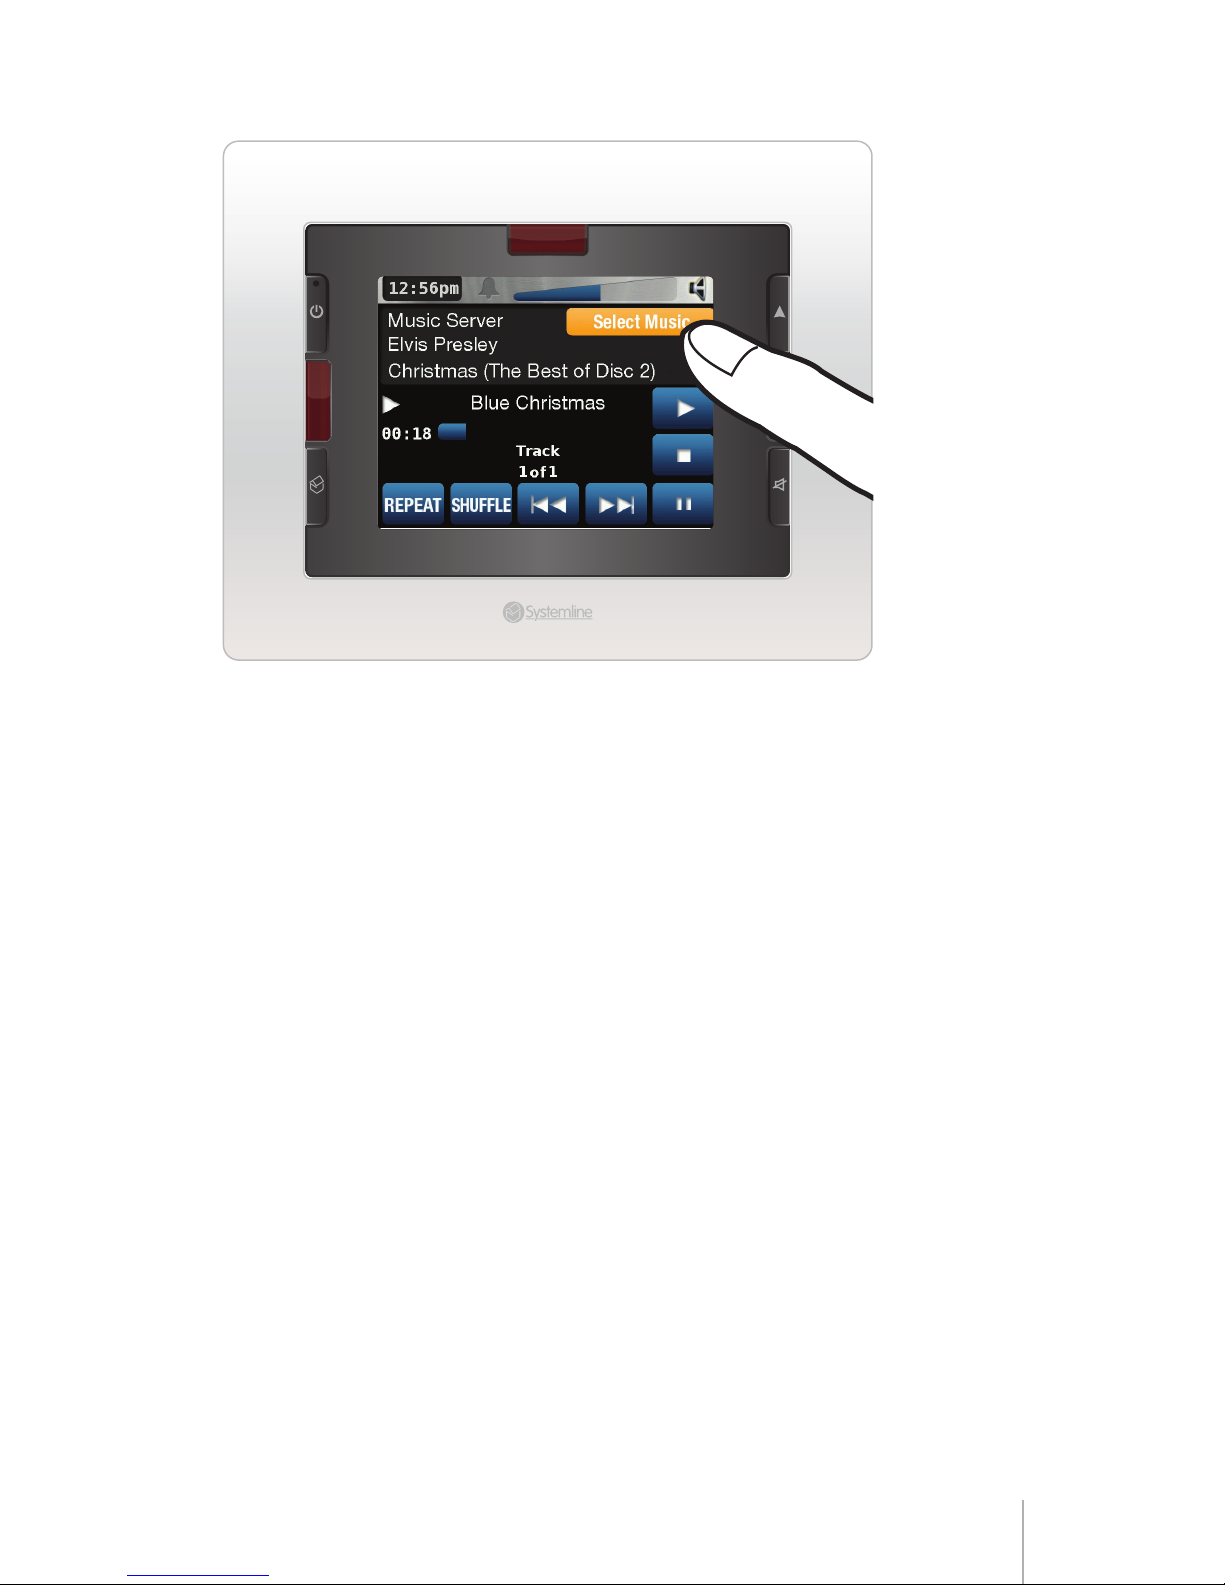
Server play screen
To select and navigate to your music selection, click on “Select
Music” button. This will take you to the Server Navigation screen.
Other “buttons” are for play, stop, pause, skip forward/back
etc. Certain buttons are two-way and will highlight orange when
activated.
The button layout will depend on the chosen sources selected
for use in the system.
Page 12
Page 1
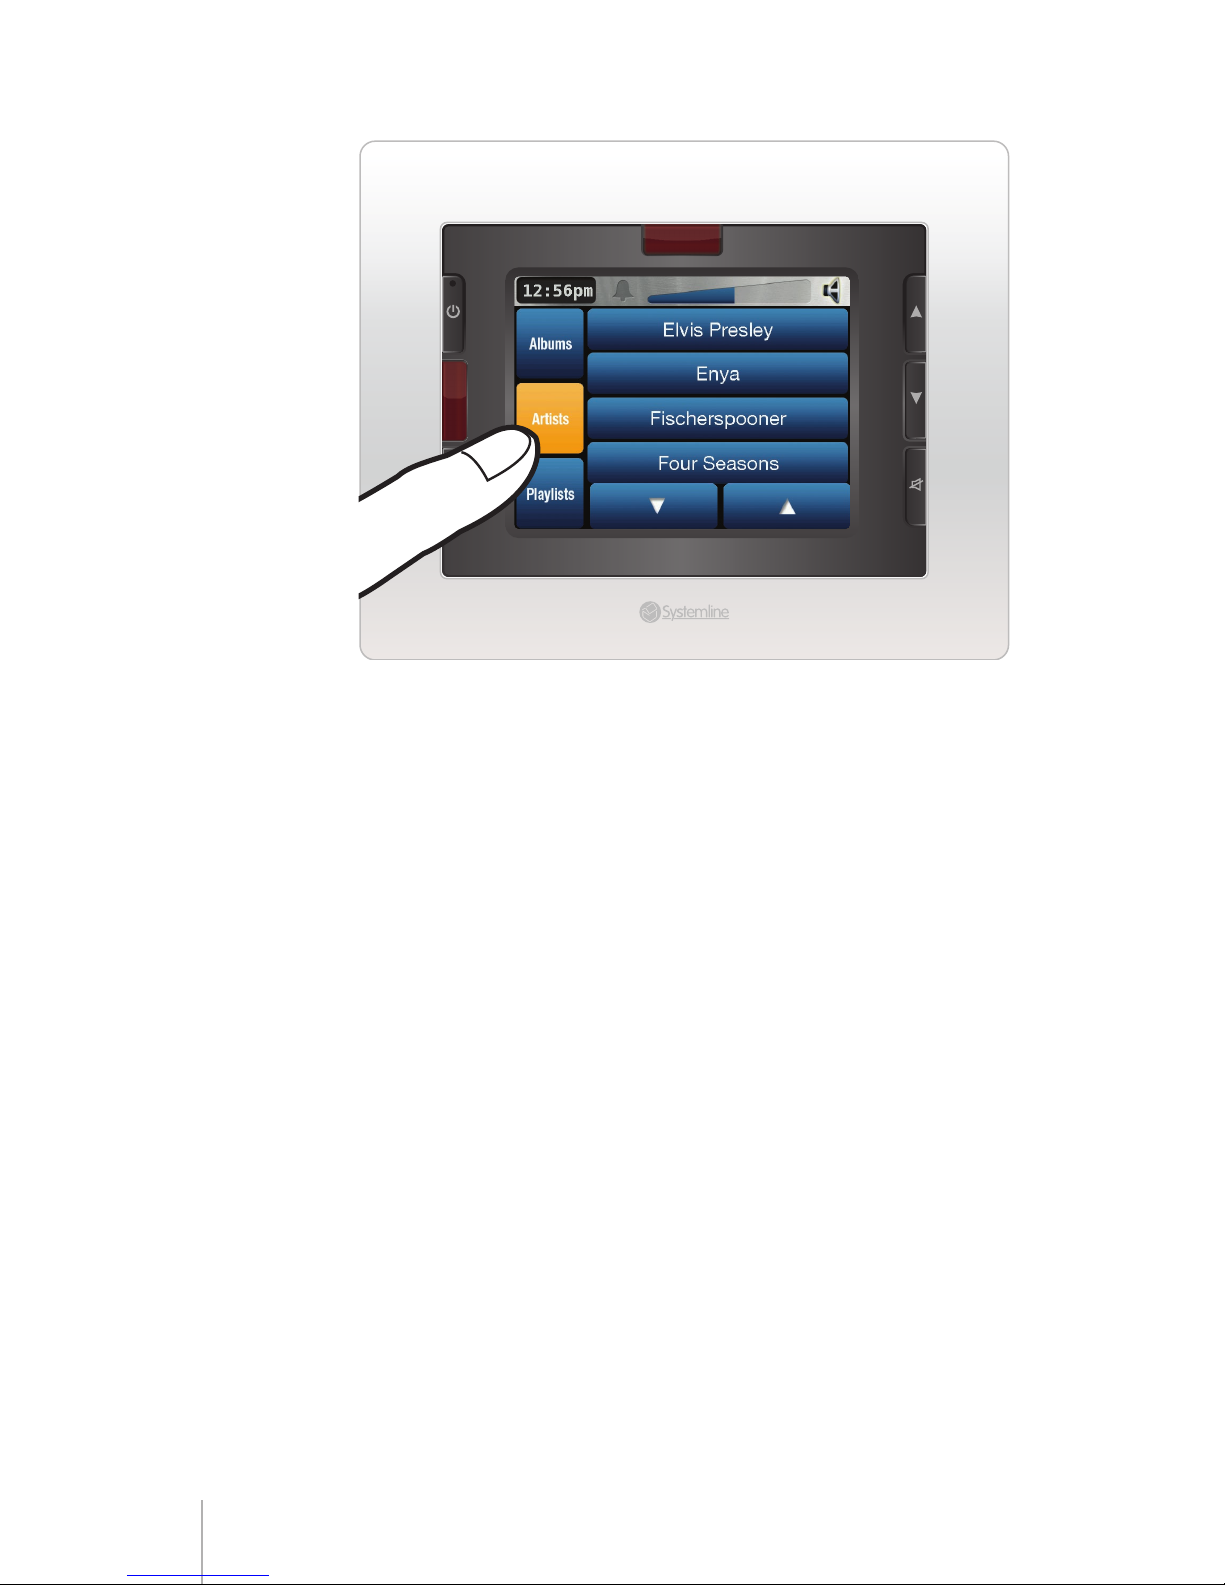
Server navigation screen
Music selection screen
You can choose music by either Album, Artist or playlists.
Playlists are selections of favourite tracks and/or albums usually
with a theme, such as “Pete’s favourite rock music”.
Selecting by album or playlist will take you straight to the Play
screen. Selecting by Artist will take you to an album list and
then to the Play screen. If at any time you wish to exit the Music
Selection Screen without changing the music, press the Home
button to revert to Play screen.
Page 13
Page 1
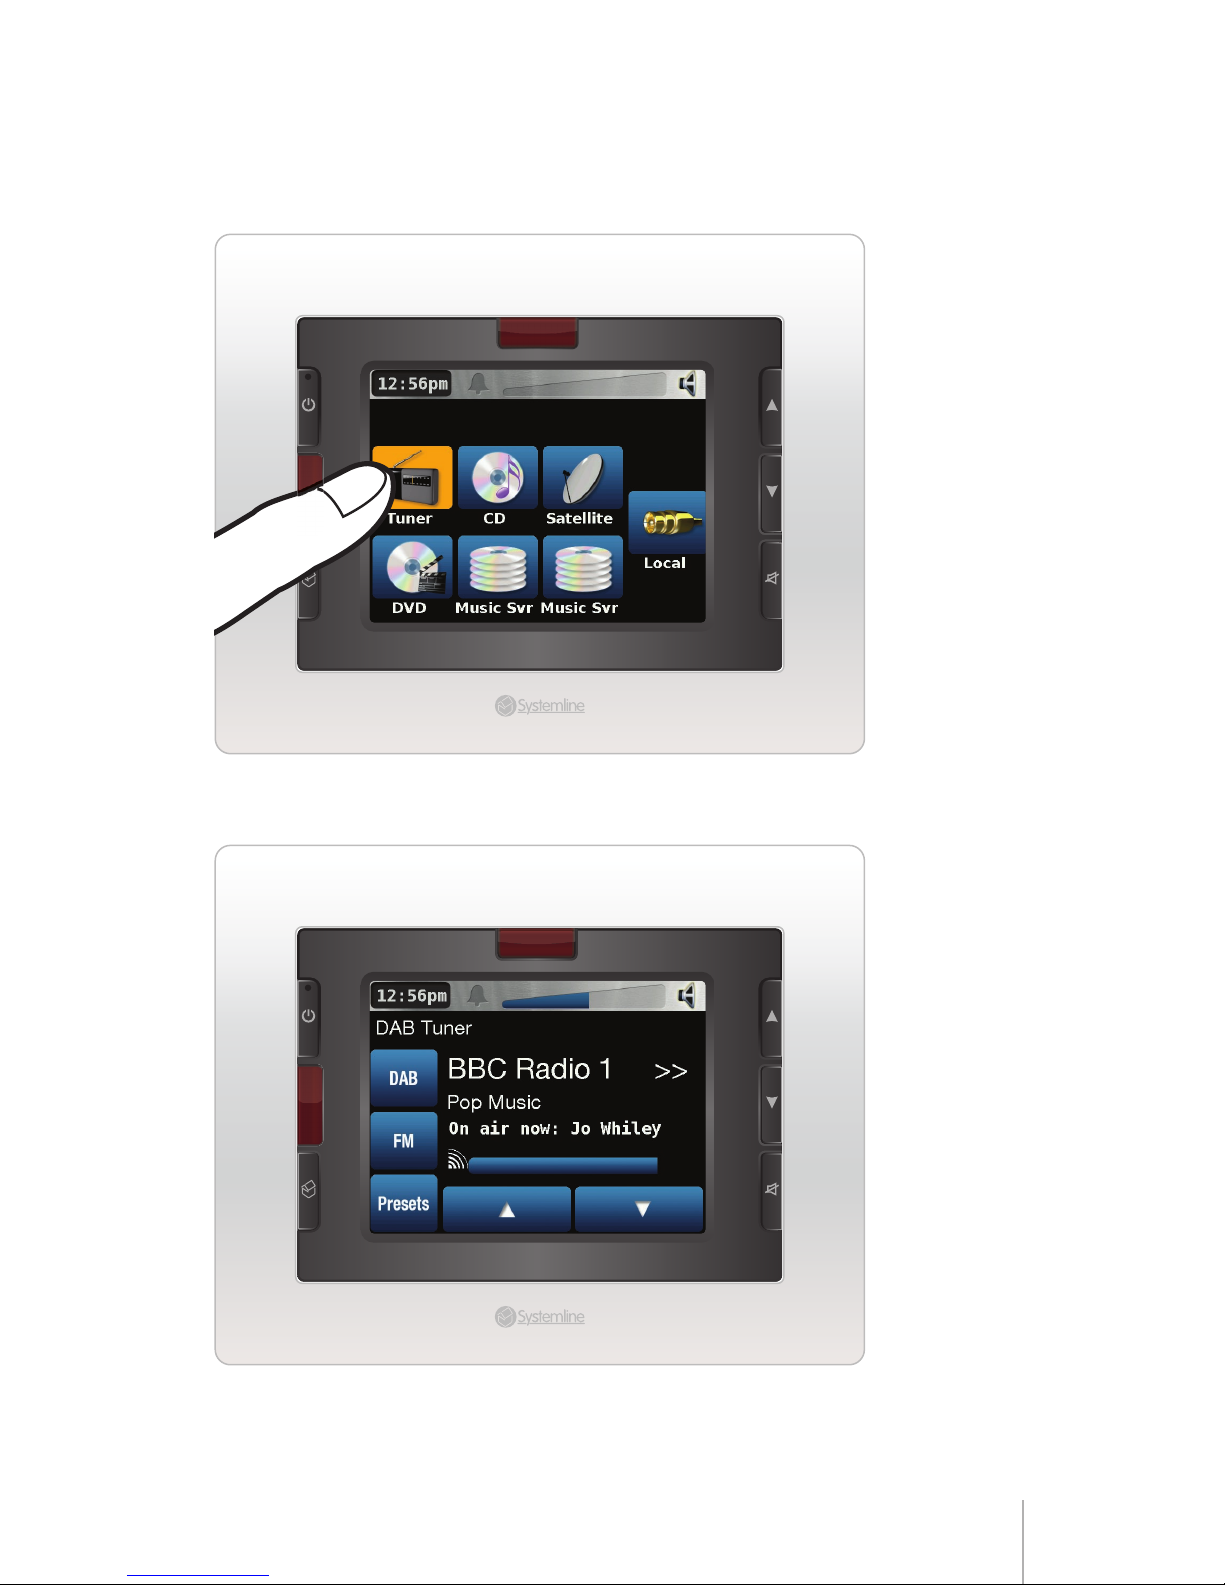
SELECTING TUNER FROM THE HOME
SCREEN
12.56pm
Tuner CD Satellite
DVD MUSIC
SERVER
MUSIC
SERVER
Local
Home
12.56pm
DAB
Presets
FM
DAB Tuner
Newsbeat - all the latest news
Email - newsbeat@bbc.co.uk
BBC Radio 1
Brings up Tuner play screen
Page 14
Page 1
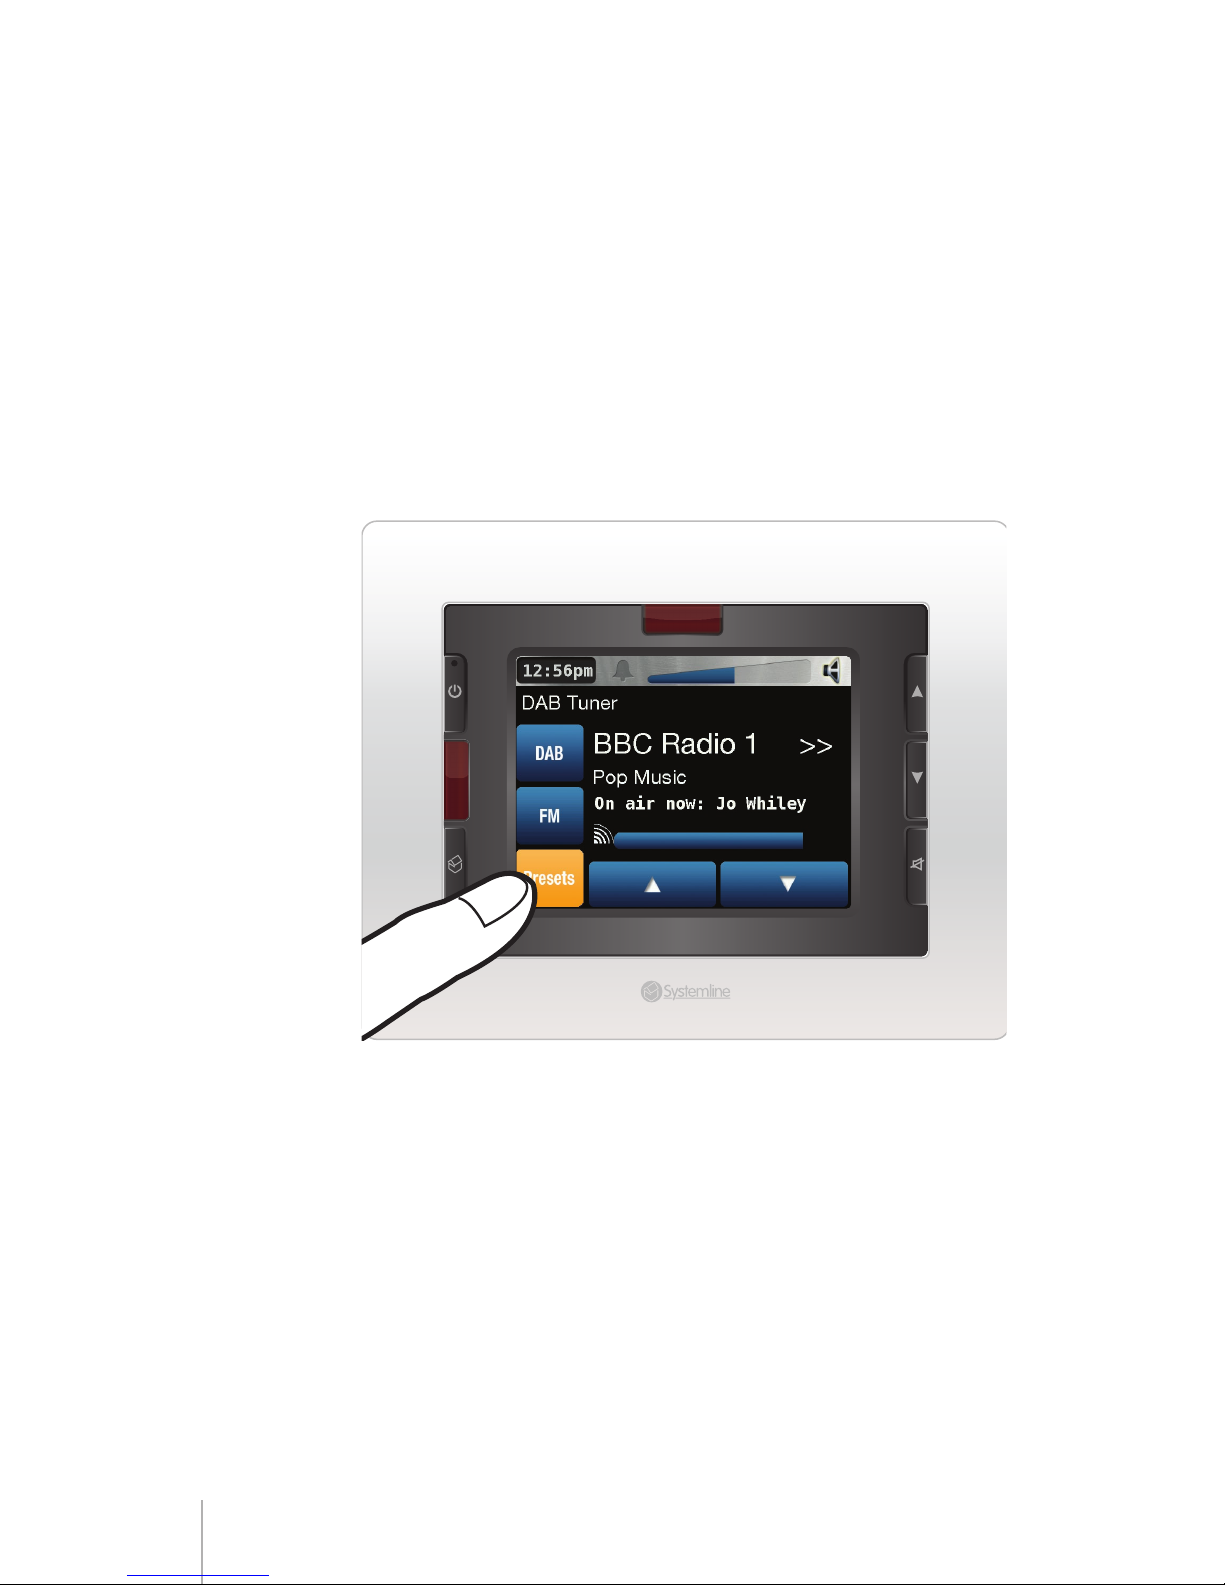
The Tuner consists of two screens. The first is the play screen
which will display the details of the selected radio station. This
will normally consist of the actual station name followed by its
genre and often some accompanying text. The text can consist
of up to 120 characters. To view this in its entirety, click on the
text to expand the field to show all of the text information. Click
again on the text to revert to normal display. A signal strength bar
completes the main display. On the left hand side there are buttons
to switch between DAB & FM. There is also a button to enter the
Pre-sets screen and two further buttons to tune up or down.
Note: In DAB mode, this will always scan to the next station, but in FM
mode, the Arcam tuner does not support this feature, so it just
adjusts the frequency.
12.56pm
DAB
Presets
FM
DAB Tuner
Newsbeat - all the latest news
Email - newsbeat@bbc.co.uk
BBC Radio 1
The tuner pre-sets screen
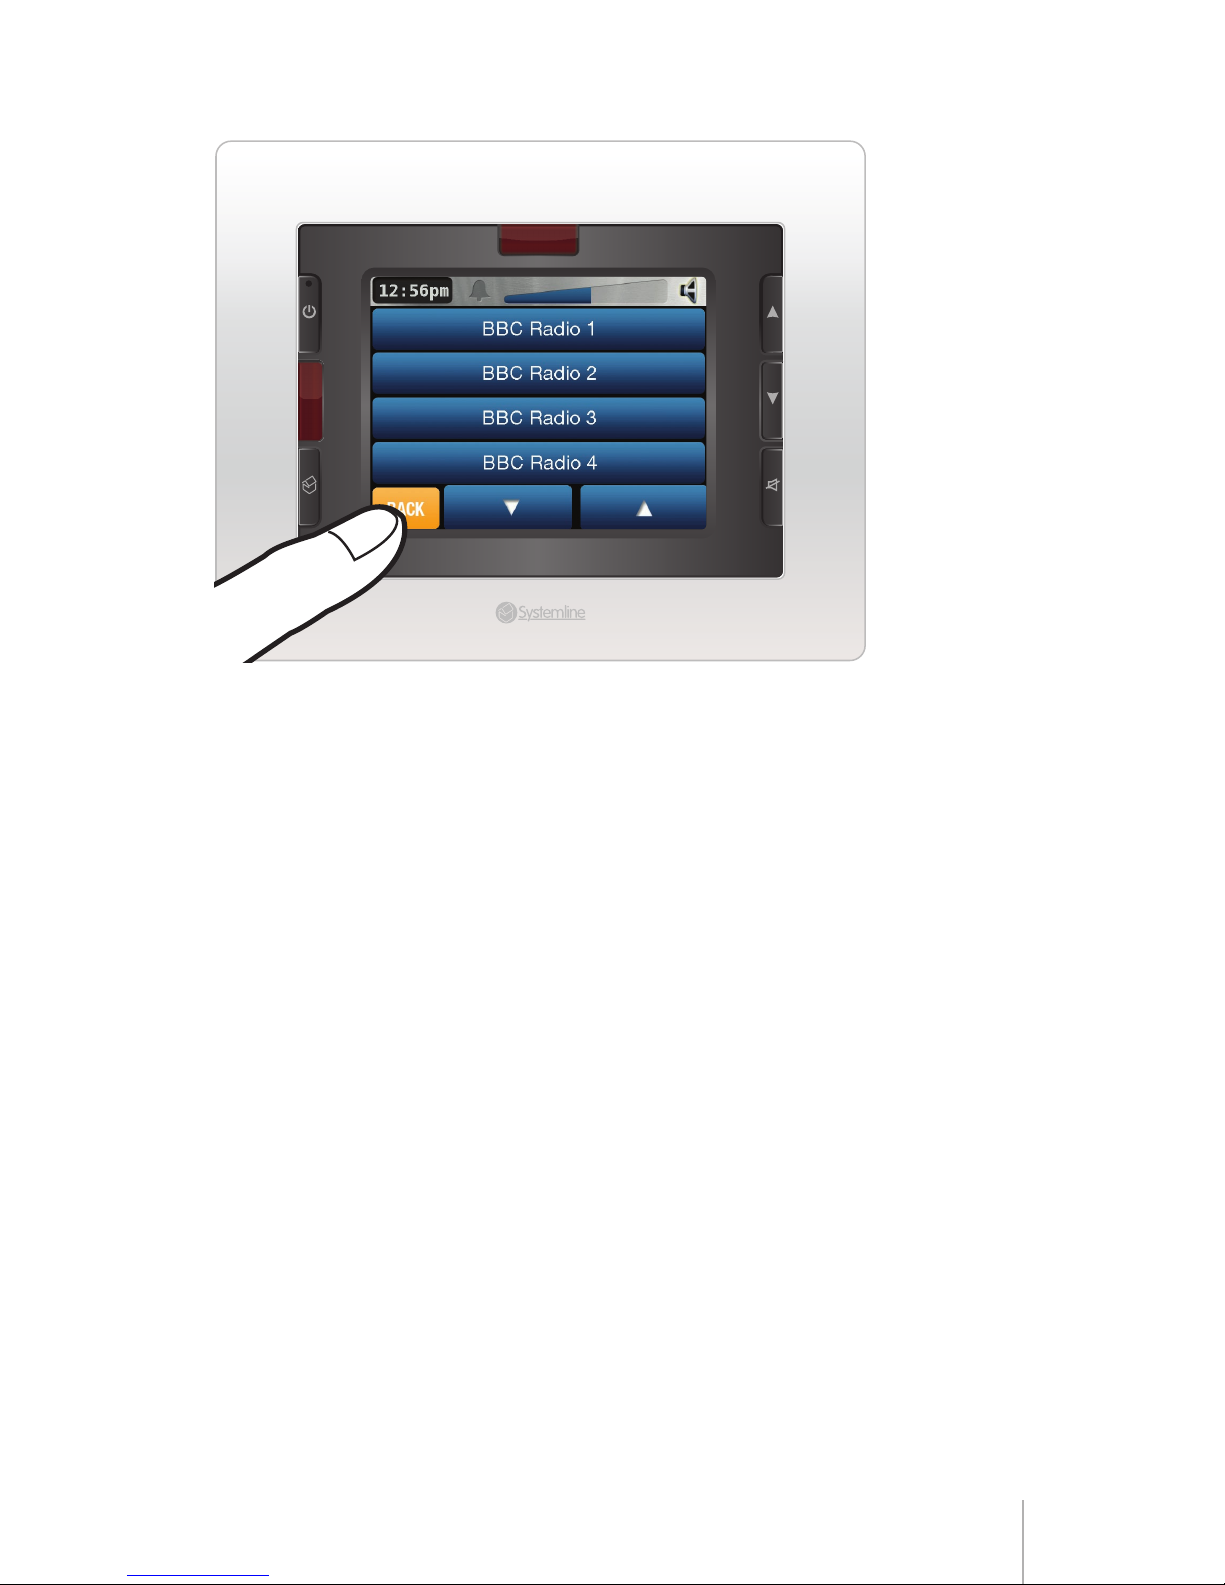
Click on the Pre-sets button on the play screen and the pre-sets
screen will appear. Up to 12 pre-set stations can be stored and
four of these are visible at a time. Scroll buttons at the bottom of
the screen enable you to scroll up or down to the next set of presets. The pre-set buttons are labelled automatically from the radio
station text field, so there is no need to manually label the buttons.
Note For each pre-set, the Arcam tuner takes about 30 seconds to load
the station text in to the pre-set text field of each of the Touch
Screens. Once loaded, this information will be retained until the
system is disconnected from the power supply.
Page 15
Page 1
12.56pm
Back
BBC Radio 1
BBC Radio 2
BBC Radio 3
BBC Radio 4 >>
To escape from this screen, either select a pre-set and this station
will appear (after a short delay) on the play screen. Alternatively
click on the back button (bottom left), or press the Home button to
return to the play screen.
Page 16
Page 1
BASIC CONTROLS
Depending on the source you have selected, you will either be
presented with a “play” screen for 2-way devices like the Arcam
DAB/FM tuner or Systemline Music Server, or a screen of “soft”
buttons to control one-way devices such as CD players, satelite
boxes etc. The video output of any A/V devices such as DVD
players or satellite boxes will automatically be switched to the
AV input of a TV (subject to the inclusion of a supported video
switching unit).
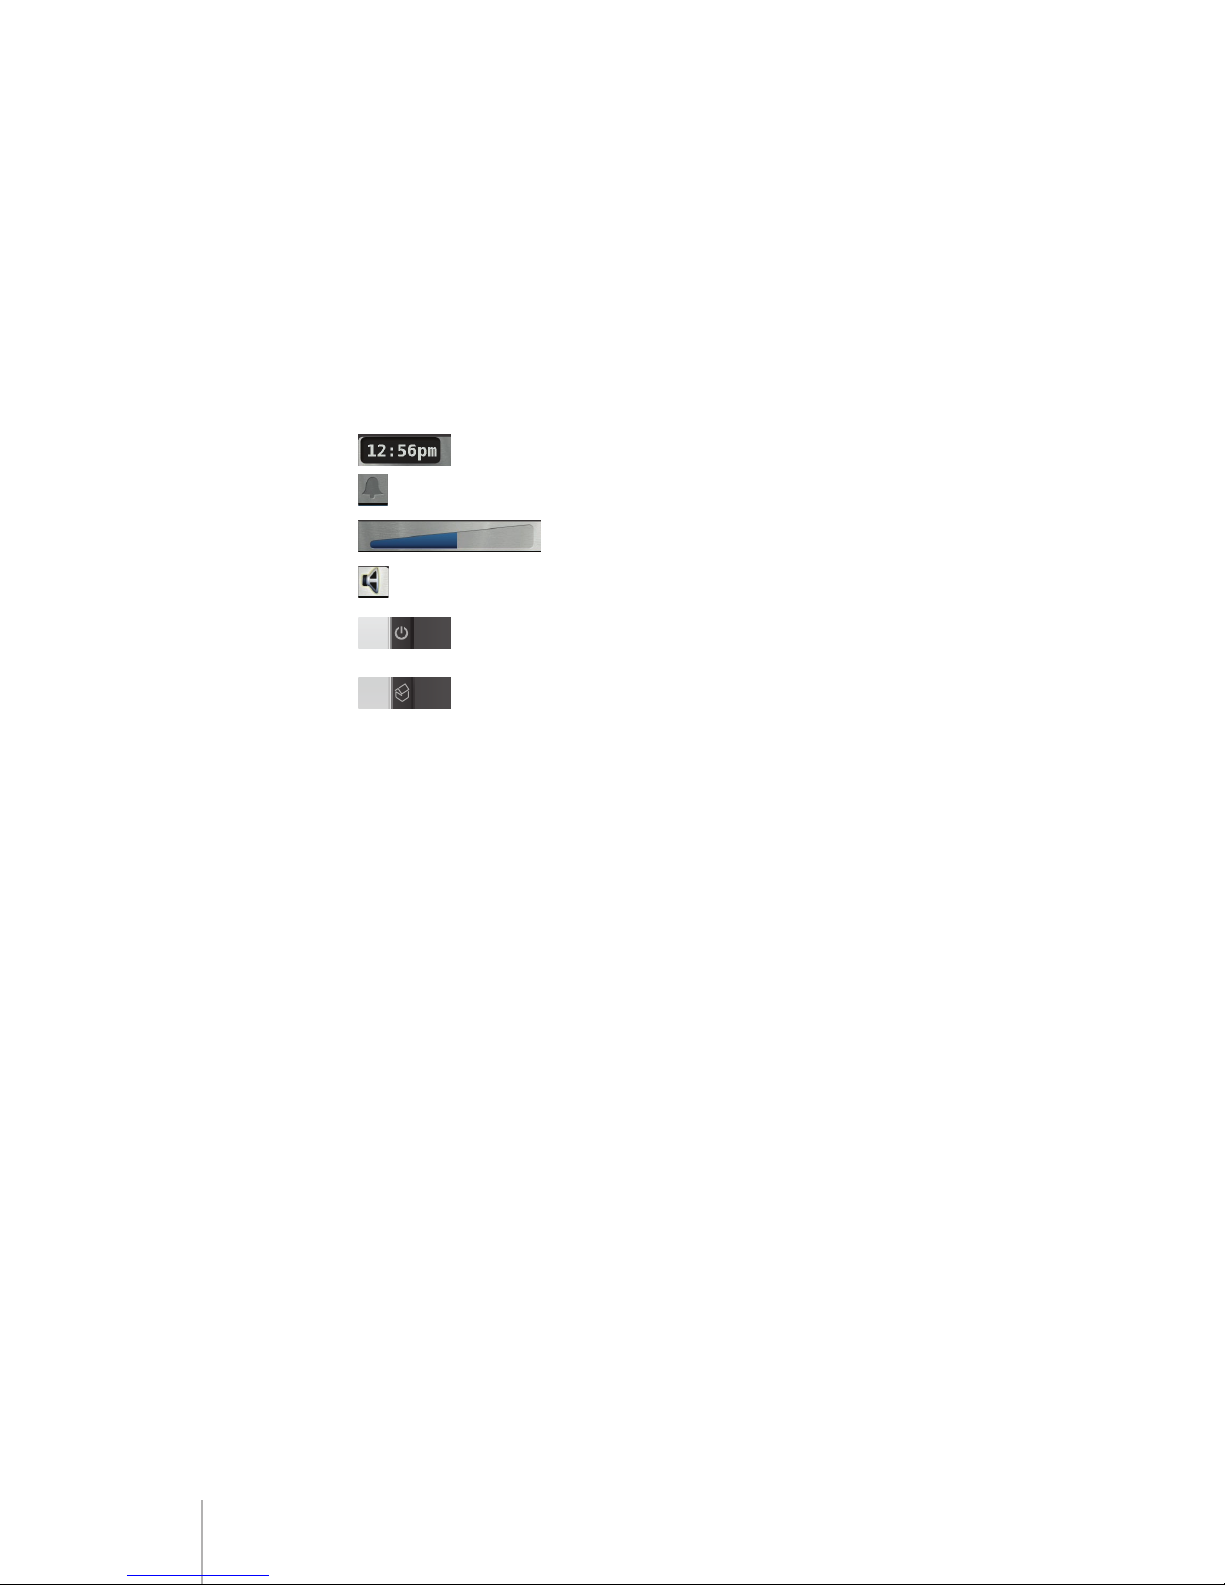
At the top of the screen left to right is:
12.56pm
Clock – time of day
Alarm bell – this will be dim if alarm is not set
Volume level bar – displays volume level
Mute – dim if muted
12.56pm
Pressing the Power button will always switch the
zone off
12.56pm
BBC Radio 1
BBC Radio 2
BBC Radio 3
BBC Radio 4 >>
Pressing the Home button will always revert to the
previous screen and then back to the Home screen
NOTE After about 10 minutes in standby, the back light will be switched
off. This is the “sleep” state.
ONE-WAY SOURCES (CD, SATELLITE, DVD ETC.)
These are mapped with a button layout to suit the particular source
device being controlled and this mapping will largely correspond in
terms of functionality with the buttons on the Systemline Modular
LRN7 handset. In the case of A/V devices, navigation is aided by
the display on the TV screen.
LOCAL INPUT
The local input is an input provided in the listening Zone. It may
just consist of a stereo audio input without IR control, or IR control
may have been provided for. If the former, then control from the
keypad is quite basic — just on/off & volume. If the latter, then full
(one-way) control is possible.
Page 17
Page 1
ALARM FEATURE
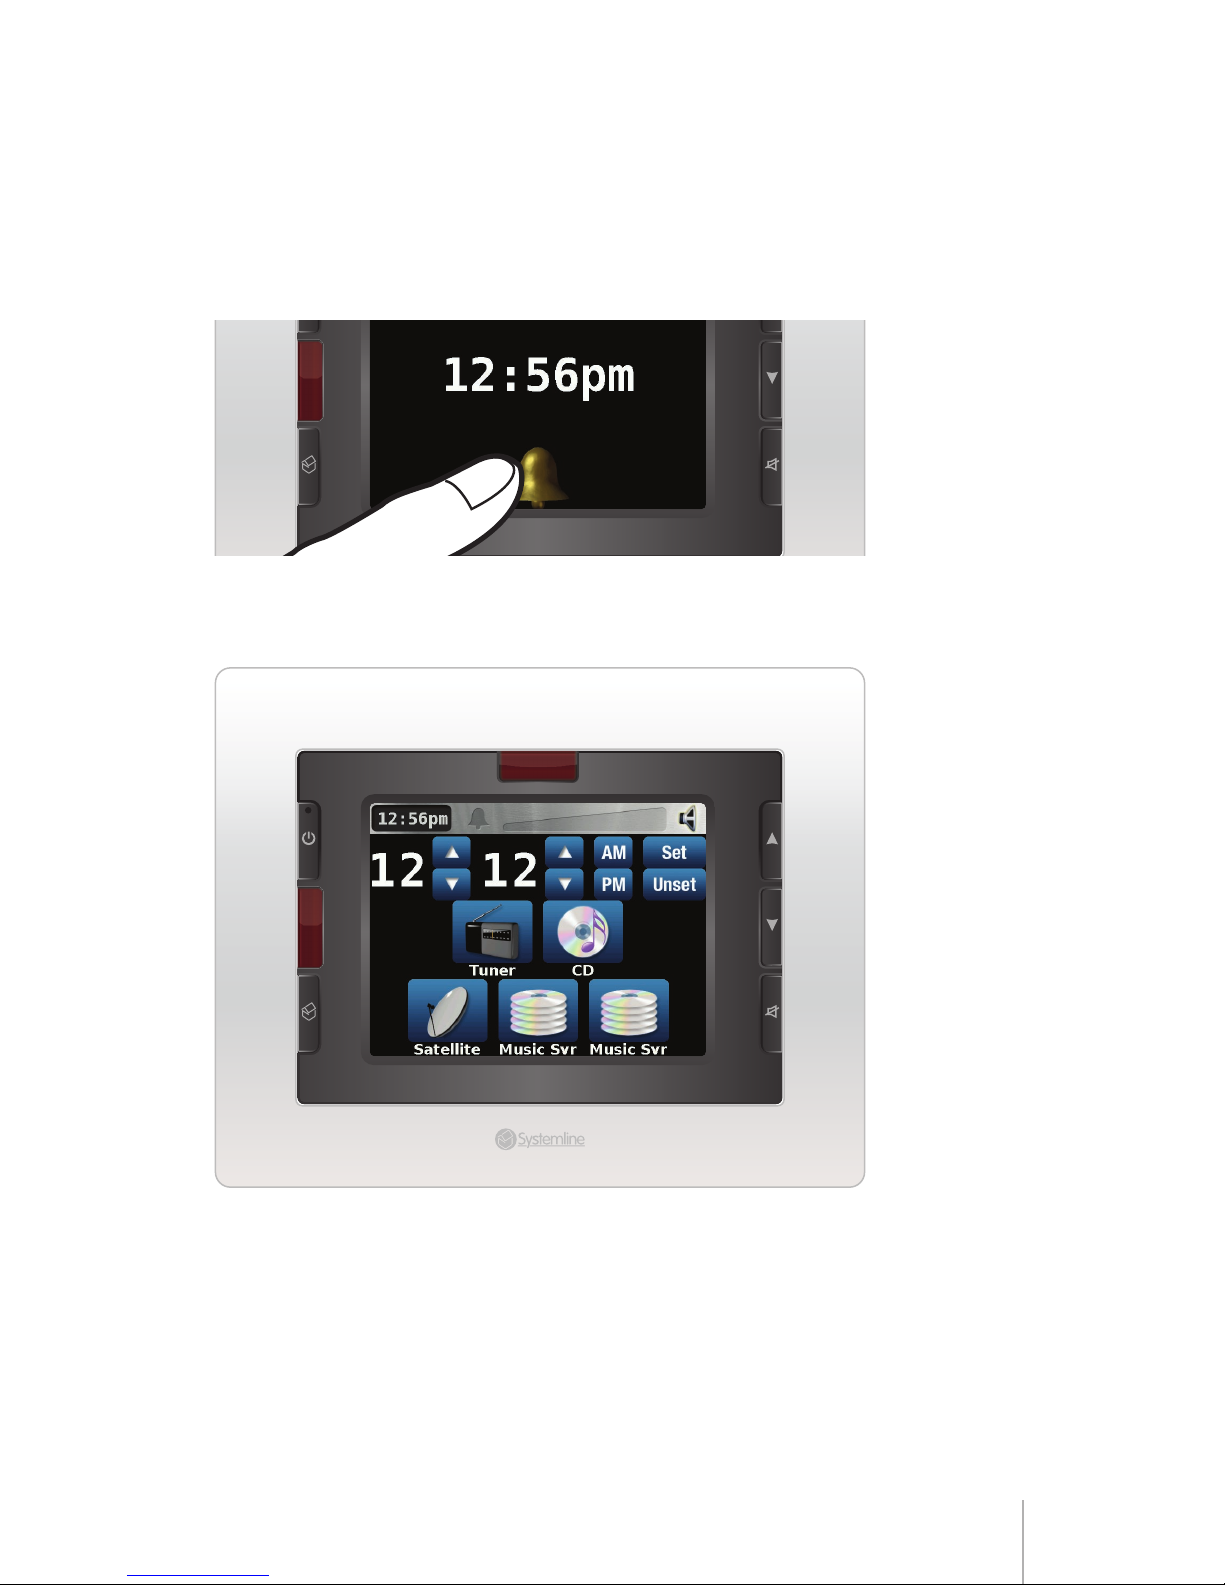
An alarm can only be set from the standby screen, so it is first
necessary to put the Zone into standby.
By clicking on the bell icon you will enter the alarm
screen
The Alarm Screen
Tune r CD
Sa tell ite
MUSIC
SERVER
MUSIC
SERVER
The alarm screen permits you to set an alarm time and to select
the source you want to be awakened by. The screen excludes
sources deemed to be unsuitable for this function such as DVD
players and non-IR inputs.
The set-up sequence is:
1 Set the alarm time by clicking on the scroll buttons
Page 18
Page 1
2 Select AM or PM
3 Select the source
4 Click
Set Alarm
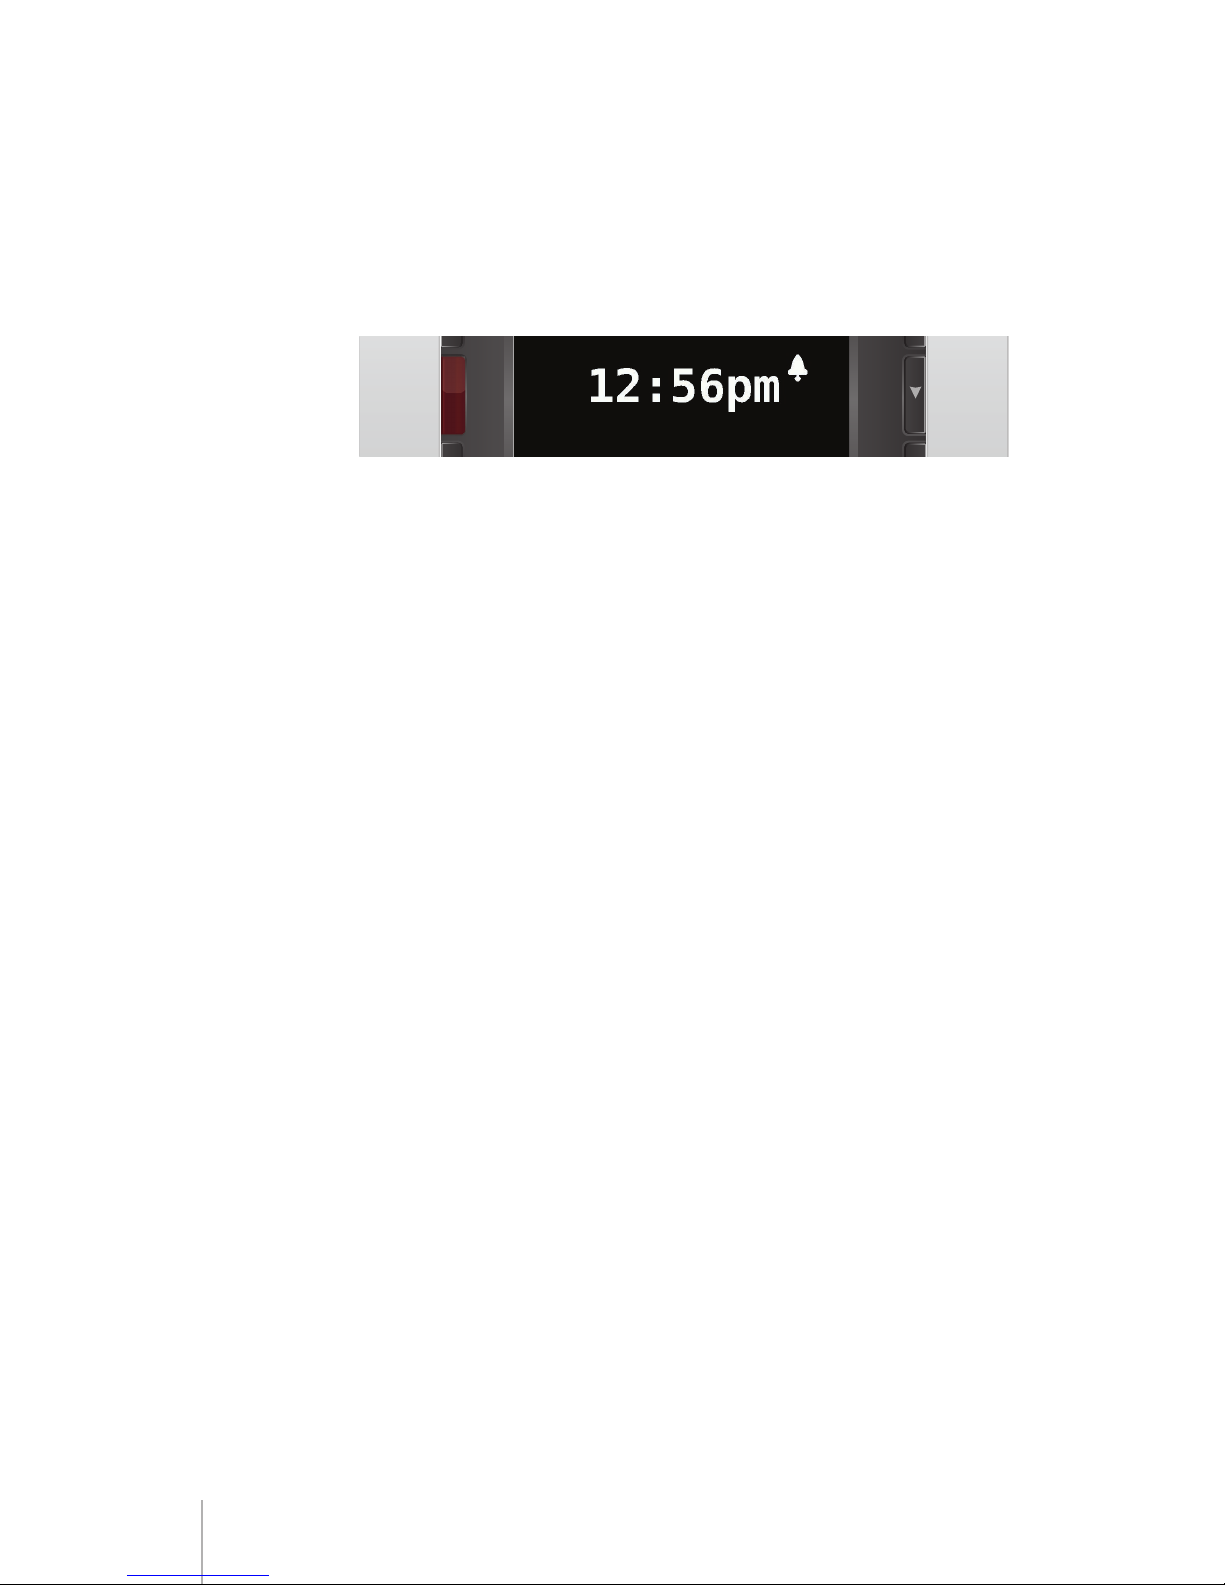
The system will then revert to the standby screen. The standby
screen now displays a small bell symbol to the right of the time
display.
Cancelling the Alarm
To unset the alarm, just click on the large bell symbol on the
Standby Screen and click the “unset” button on the Alarm screen.
AMBIENT LIGHT SENSITIVE DISPLAY
The Touch screen incorporates a light detector and this will
automatically adjust both the screen brightness and the back
illuminated hard button icons.
Note When the system is in sleep mode, only the small red LED on the
Power button will be illuminated.
Page 19
Page 1
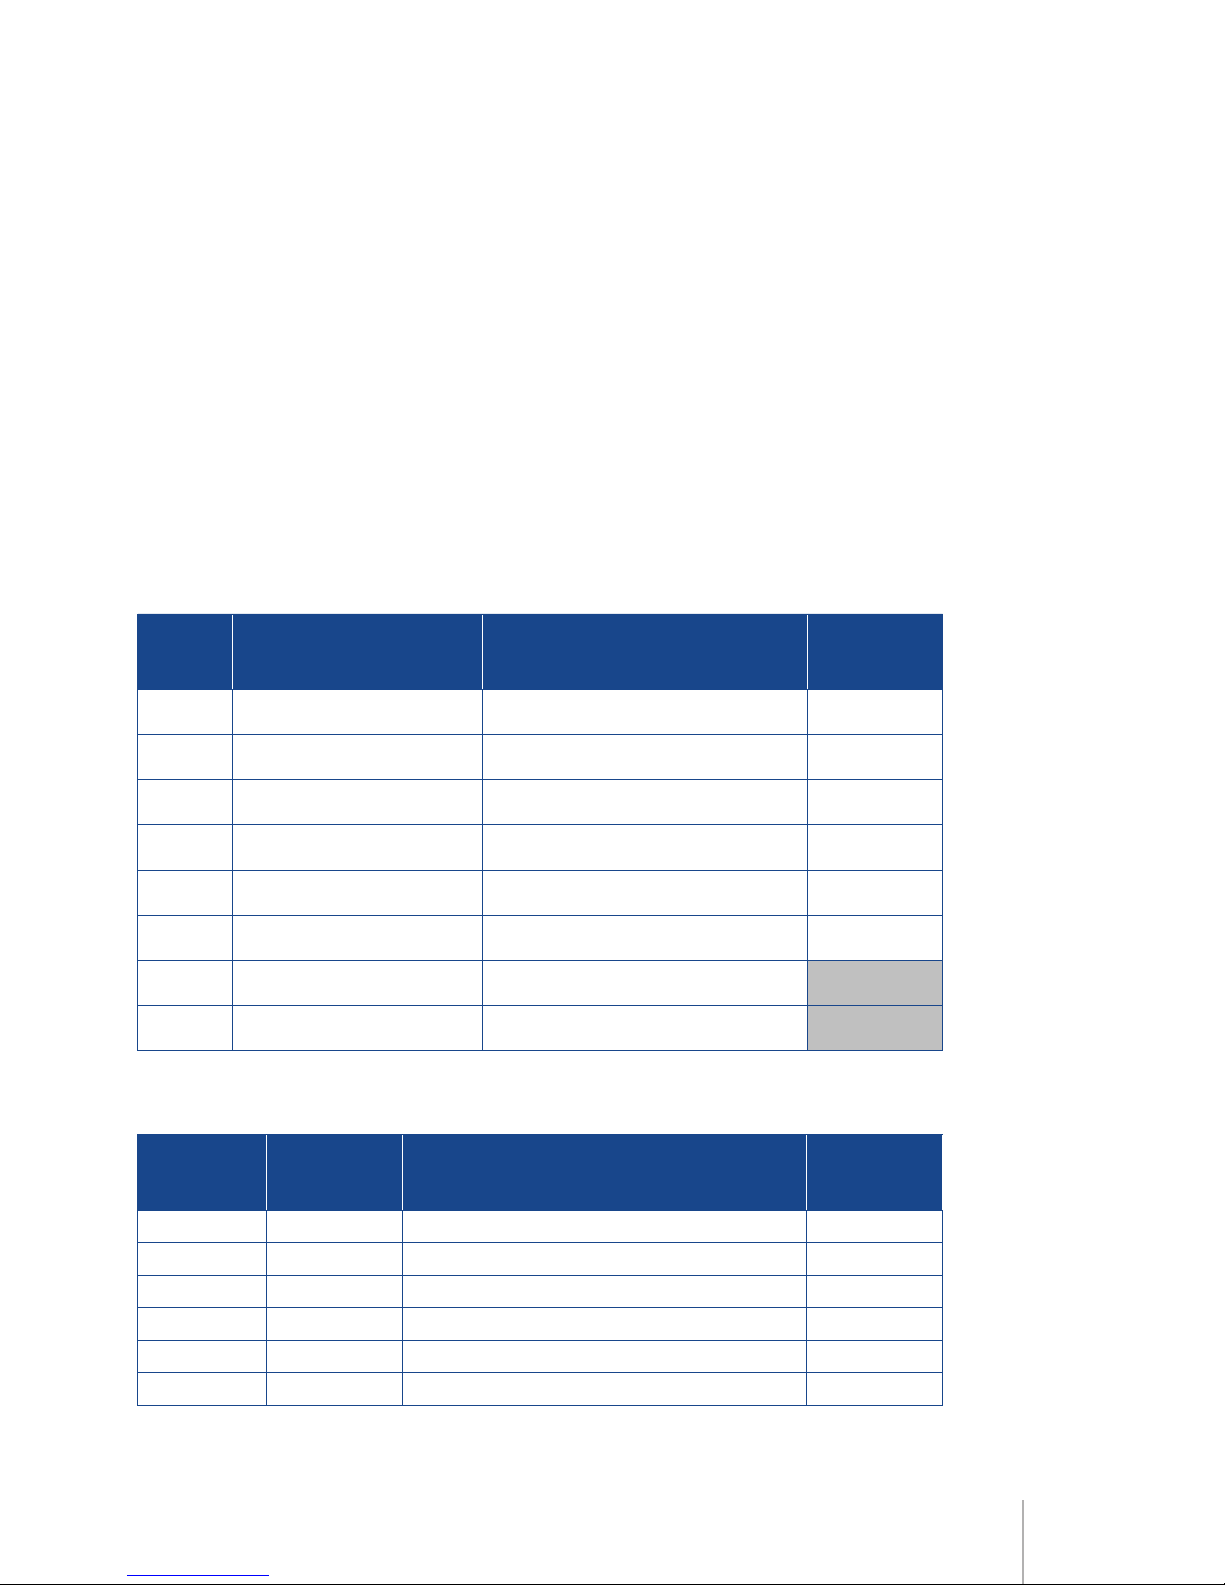
INSTALLATION DETAILS
INSTALLER
Address:
Contact Name:
Contact Number:
S6 Controller Serial No.:
ZONES
ZONE ROOM OR AREA SOURCES LOCATED IN ZONE
SOURCE
SELECTABLE
FROM OTHER
ZONES?
1
YES/NO
2
YES/NO
3
YES/NO
4
YES/NO
5
YES/NO
6
YES/NO
7
8
SOURCES
SOURCE
LRN7
LABEL
PRODUCT DESCRIPTION
SOURCE
LOCATED
IN ZONE
1 TUNER
2 DISC
3 SATELLITE
4 VIDEO
5 AUX1
6 AUX2
Page 20
Stortford Hall Industrial Park,
Dunmow Road, Bishops Stortford,
Hertfordshire CM23 5GZ
United Kingdom
www.armourhe.co.uk
Our policy is one of continuous product improvement, we reserve
the right to change the designs and specifications without notice.
All information is given in good faith. The manufacturer accepts
no responsibility for errors, omissions or incorrect assumptions.
Armour Home Electronics 2006
ZINS401-ISS1-26/10/2007
w w w . s y s t e m l i n e . c o . u k
 Loading...