

Page 1
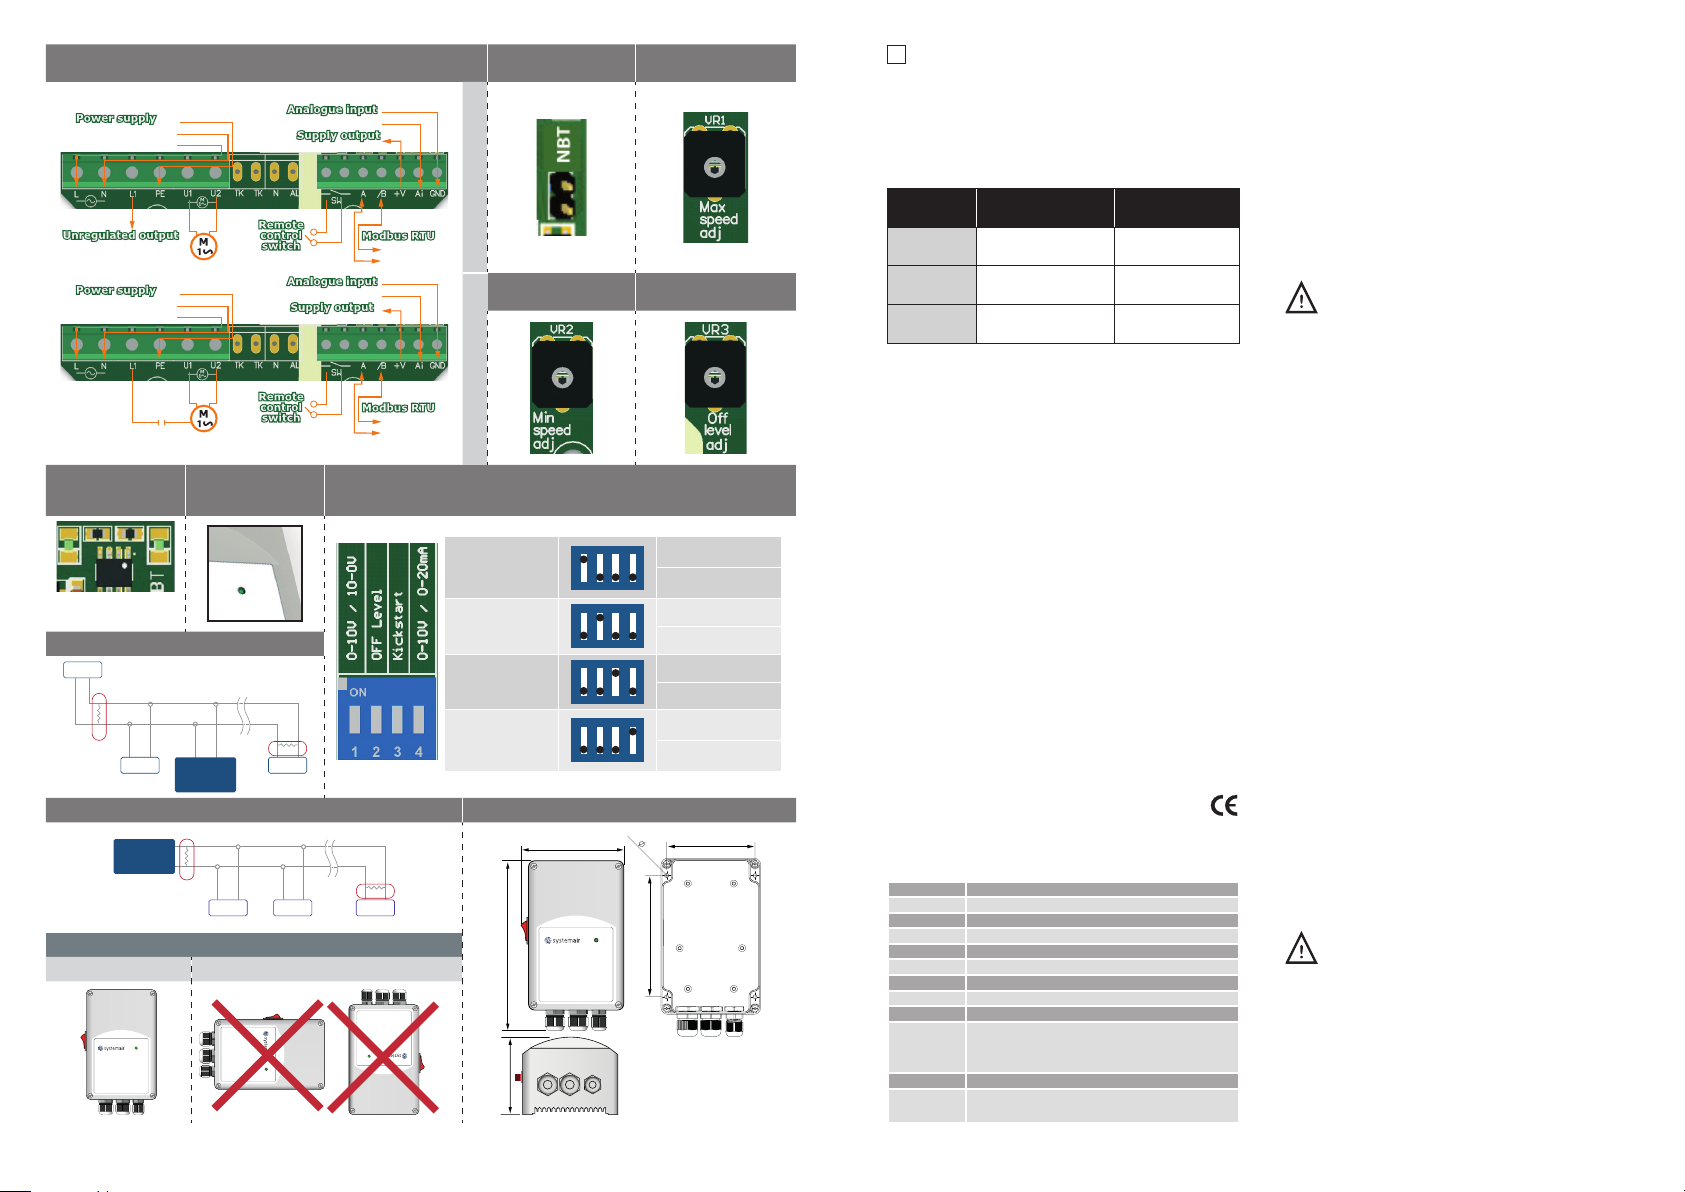
Fig. 1 Wiring diagrams
RX
4x
92
230 VAC 50 / 60 Hz
PE
N
L
U1
230 VAC / max. 2 A
230 VAC 50 / 60 Hz
PE
N
L
0—10 VDC / 0—20 mA
U2
0—10 VDC / 0—20 mA
+12 VDC / 1 mA
+12 VDC / 1 mA
/B
A
Fig. 2 Network bus
resistor jumper
2 - wire motor connection3 - wire motor connection
Fig. 4 Min. speed
trimmer
U1 U2
Fig. 6
Communication
detection indication
Example 1
Slave 1
NBT
NBT
Slave 2
U3
Fig. 7 Operating
indication (front
cover)
Master
RX
ТX
NBT
Slave n
/B
A
Fig. 8 DIP switch settings
Ascending / descending
mode selecon
(DIP switch, posion 1)
OFF level selecon
(DIP switch, posion 2)
Kick start / So start
selecon
(DIP switch, posion 3)
Input mode selecon
(DIP switch, posion 4)
Example 2 Fig. 9 Mounting dimensions
Master
Fig. 10 Mounting position
Acceptable Not acceptable
NBT
Slave 1
Slave 2
ТX
NBT
Slave n
205
ON
1 2 3 4
ON
1 2 3 4
ON
1 2 3 4
ON
1 2 3 4
124
Fig. 3 Max. speed
trimmer
Fig. 5 Off level trimmer
ON - Descending mode:
10—0 VDC / 20—0 mA
OFF - Ascending mode:
0—10 VDC / 0—20 mA
ON - enabled
OFF - disabled
ON - Kick start
OFF - So start
ON - Current mode
(0—20 mA)
OFF - Voltage mode
(0—10 VDC)
4,50
102
140
GB
MOUNTING & OPERATING INSTRUCTIONS
7726X NG-REE XXXS0 | Electronic fan speed controller
The 7726X NG-REE XXXS0 is an electronic speed controller which
controls the speed of single-phase voltage controllable electric motors.
It is equipped with Modbus RTU communication and provides a wide
range of functionalities: remote control options, adjustable off level,
min. and max. output voltage settings, and time-limited motor
operation initiated by a logic or switch signal.
Article codes
Max. rated current,
[A]
77264 NGREE 030S0
77268 NGREE 050S0
77269 NGREE 100S0
Intended area of use
• Fan speed control in ventilation systems
• Applications where Modbus communication or a timer function is
needed
• For indoor use only
Technical data
• Power supply: 230 VAC ± 10 % - 50 / 60 Hz
• Analogue input:
» voltage: 0—10 VDC / 10—0 VDC
» current: 0—20 mA / 20—0 mA
• Analogue input modes: ascending or descending
• Analog input functionality: Normal mode / Logic mode
• Remote control input: normal or timer functionality
• Regulated output: 30—100 % Us
• Max. output load: depends on the version
• Unregulated output, L1: 230 VAC (50 / 60 Hz) / max. 2 A
• Min. output voltage setting, Umin: 30—70 % Us (69—161 VAC),
selectable by trimmer or via Modbus
• Max. output voltage setting, Umax: 75—100 % Us (175—230 VAC),
selectable by trimmer or via Modbus
• Off level, adjustable by trimmer or via Modbus:
» 0—4 VDC / 0—8 mA for ascending mode
» 10—6 VDC / 20—12 mA for descending mode
• Kick start or soft start
• Low voltage supply output: +12 VDC / 1 mA for external potentiometer
• Modbus communication
• Operating indication:
» continuous green: normal operation
» blinking green: stand-by
• Overvoltage and overcurrent protection
• Enclosure: plastic R-ABS, UL94-V0; grey colour (RAL 7035)
• Protection standard: IP54 (according to EN 60529)
• Operating ambient conditions:
» temperature: -20—40 °C
» rel. humidity: < 95 % rH (non-condensing)
• Storage temperature: -40—50 °C
3,0
6,0
10,0
Fuse rating, [A]
F 5,0 A H 250 VAC
F 10,0 A H 250 VAC
F 16,0 A H 250 VAC
Standards
• Low Voltage Directive 2006/95/EC
• EMC Directive 2004/108/EC: EN 61326
• WEEE Directive 2012/19/EU
• RoHs Directive 2011/65/EU
Wiring and connections (see Fig. 1 Wiring diagrams)
L Supply voltage 230 VAC ± 10 % - 50 / 60 Hz
N Neutral
PE Earth terminal
L1 Unregulated output (230 VAC / max. 2 A)
U1, U2 Regulated output to the motor
SW Remote / timer switch
A Modbus RTU (RS485) signal A
/B Modbus RTU (RS485) signal /B
+V Supply output +12 VDC / 1 mA
Ai
GND Ground
Connections
Analogue input
(0—10 VDC / 0—20 mA / 10—0 VDC / 20—0 mA)
Logic input (Timer functionality)
(min. 2,5 VDC and > 30 ms )
Cable cross section: max. 2,5 mm
Cable gland clamping range: 3—6 mm / 5—10 mm
2
MOUNTING INSTRUCTIONS IN STEPS
Before you start mounting the controller read carefully “Safety and
Precautions”. Choose a smooth surface for an installation location (a
wall, panel and etc.).
Follow these steps:
1. Switch off the power supply.
2. Open the enclosure cover and x the unit to the wall or panel
using the provided dowels and screws. Mind the correct mounting
position and unit dimensions. (See Fig. 9 Mounting position and
Fig. 10 Mounting dimensions.)
3. Connect the motor / fan.
4. Connect L1 output for a 3-wire connection, controlled valve, etc.
(if necessary). See Fig. 1b Three-wire connection.
5. Select the required analogue input type and mode, start mode
and OFF level mode by the DIP switch on the board. (See Fig. 6 DIP
switch settings.)
6. Check if your unit starts or terminates the network
(see Example 1 and Example 2). If it does, put the NBT jumper onto
the pins. If it does not, leave the jumper open (see Fig. 2).
If an AC power supply is used with any of the units in a Modbus
network, the GND terminal should NOT BE CONNECTED to
other units on the network or via the CNVT-USB-RS485
converter. This may cause permanent damage to the
communication semiconductors and / or the computer!
7. Connect the power supply cable.
8. Adjust the max. speed by trimmer (if necessary). The default
setting is Us (230 VAC). See Fig. 3 Max. speed trimmer.
9. Adjust the min. speed by trimmer (if necessary). The default
setting is 30 % Us (69 VAC). See Fig. 4 Min. speed trimmer.
10. Adjust the OFF level value by trimmer (if necessary). The default
setting is 0 VAC. See Fig. 5 Off level trimmer.
11. Close the enclosure and x the cover.
12. Switch on the power supply.
13. Customise the factory settings to the desired ones, through
3SModbus software (if necessary). For the default factory settings
see Table Modbus register maps.
Verication of installation instructions
Follow the instructions below:
1. Switch on the mains supply.
2. Set the NBT jumper, DIP switch, Max. trimmer, Min. trimmer and
OFF level trimmer to desired positions / values. The factory settings
are as follows:
» NBT jumper is open (Network bus termination resistor is
disconnected);
» Ascending mode: 0—10 VDC / 0—20 mA
» Off level - OFF;
» Kick start disabled;
» Input voltage mode (0—10 VDC);
» Min. setting of the Min. speed trimmer
» Maximum setting of the Max. speed trimmer;
» Min. setting of the Off level trimmer.
3. Set the analogue input signal to the maximum value of 10 VDC
or 20 mA.
4. The connected motor will run at maximum speed or minimum speed
depending on the analogue input mode (ascending / descending).
5. If OFF level is enabled and descending analogue input mode is
selected, the motor will stop running.
6. Set the analogue input signal to the maximum value of 0 VDC
or 0 mA.
7. The connected fan will run at minimum speed or maximum speed
depending on the analogue input mode (ascending / descending).
8. If OFF level is enabled and ascending analogue input mode is
selected, the motor will stop running.
9. If OFF level is enabled and the input signal is equal to the value
of the OFF level, the speed of the motor will be the minimum speed in
ascending mode or the maximum speed in descending mode.
10. If the controller does not work according to the instructions
above, the wiring connections and settings need to be checked.
11. Check if both LEDs (Fig. 6) blink after you switch on your unit.
If they do, your unit has detected Modbus network. If they do not,
check the connections again.
Attention! The status of the LEDs can be checked only when
the unit is energised. Take the relevant safety measures!
OPERATING INSTRUCTIONS
Operation modes
In Modbus mode you control the parameters: Umax, Umin, Kick
start / Soft start, Off level enable / disable and Off level value through
Modbus registers.
In Standalone mode you control the parameters: Umax, Umin,
Kick start / Soft start, Off level enable / disable and Off level value
by means of the hardware settings (DIP switch, trimmers, jumpers).
In Normal mode if Off level is disabled, Softstart / Kickstart is
executed only once - after the controller is supplied; otherwise
Softstart / Kickstart is executed every time the controller is switched
on.
Page 2
When Timer mode is selected, the controller receives a pulse control
signal from the remote control switch.
When Logic mode is selected, the controller receives a pulse control
signal from the Ai input.
In both modes Timer mode and Logic mode the pulse width is to be
more than 30 ms; otherwise the signal is ltered.
Front panel LED indication
When the green LED on the front cover (Fig. 7) gives out a continuous
light, the controller operates in normal mode. When it blinks:
» the controller operates in remote control mode, or
» OFF level is enabled and the analogue input signal is below
the OFF level value.
Transport and stock keeping information
Avoid shocks and extreme conditions; stock in original packing.
Warranty information and restrictions
Two years from the delivery date against defects in manufacturing. Any
modications or alterations to the product after the date of publication
relieve the manufacturer of any responsibilities. The manufacturer
bears no responsibility for any misprints or mistakes in this data.
Maintenance
In normal conditions this product is maintenance-free. If soiled, clean
with a dry or dampish cloth. In case of heavy pollution, clean with a
non-aggressive product. In these circumstances the unit should be
disconnected from the supply. Pay attention that no uids enter the
unit. Only reconnect it to the supply when it is completely dry.
Attention! Use only fuses with type and rating specified
above; otherwise, loss of warranty will ensue.
NL
MONTAGE & GEBRUIKSVOORSCHRIFTEN
7726X NG-REE XXXS0 | Elektronische regelaar
De 7726X NG-REE XXXS0 is een elektronische snelheidscontroller
die de snelheid van een mono-fase spanning geregelde elektrische
motoren regelt. Deze is met Modbus RTU communicatie uitgerust en
voorziet u van een breed scala aan mogelijkheden: optie extern te
bedienen, instelbare Off level, min. en max. uitgangspanning regeling,
en een tijd gelimiteerde motor aansturing via een logische of schakel
ingang.
Artikel code
Toegestane max .
stroom, [A]
77264 NGREE 030S0
77268 NGREE 050S0
77269 NGREE 100S0
Gebruikstoepassing
• Ventilator snelheidsregelaar voor ventilatie systemen
• Toepassingen waar Modbus communicatie of een timerfunctie
gewenst is
• Uitsluitend voor binnen gebruik
Technische gegevens
• Voedingsspanning: 230 VAC ± 10 % - 50 / 60 Hz
• Analoge uitgang:
» Spanning: 0—10 VDC / 10—0 VDC
» stroom: 0—20 mA / 20—0 mA
• Analoge ingang modus: stijgend of dalend
• Analoge ingang functionaliteit: Normale modus / logic modus
• Extern bedieningsingang: normaal of timer functie
• Geregelde uitgang: 30—100 % Us
• Max. uitgang vermogen: hangt van de versie af
• Niet geregelde uitgang, L1: 230 VAC (50 / 60 Hz) / max. 2 A
• Min. uitgangsspannig instelling, Umin: 30—70 % Us (69—161 VAC),
in te stellen via trimmer of Modbus
• Max. uitgangsspannig instelling, Umax: 75—100 % Us
(175— 230 VAC), in te stellen via trimmer of Modbus
• Off level, instelbaar via trimmer of via Modbus:
» 0—4 VDC / 0—8 mA in stijgende modus
» 10—6 VDC / 20—12 mA in dalende modus
• Kick start of soft start
• Lage spanningsuitgang: +12 VDC / 1 mA voor externe
potentiometers
• Modbus RTU communicatie
• Bedrijfsindicatie:
3,0
6,0
10,0
Zekeringswaarde,
[A]
F 5,0 A H 250 VAC
F 10,0 A H 250 VAC
F 16,0 A H 250 VAC
» Continu groen: normale werking
» knippert groen: stand-by
• Overspanning en overstroom bescherming
• Behuizing: plastiek R-ABS, UL94-V0; grijs (RAL 7035)
• Standaard beveiliging: IP54 (volgens de EN 60529)
• Bedrijfsomgevingsvoorwaarden:
» temperatuur: -20—40 °C
» relatieve vochtigheid: < 95 % rH (niet-condenserend)
• Opslagtemperatuur: -40—50 °C
Standaarden
• Laagspanning richtlijn 2006/95/EC
• EMC richtlijnen 2004/108/EC: EN 61326
• WEEE richtlijn 2012/19/EU
• RoHs richtlijn 2011/65/EU
Bedrading en aansluitingen (zie Fig. 1 Aansluitschema)
L Voedingsspanning, 230 VAC ± 10 % - 50 / 60 Hz
N Nulgeleider
PE Aardingsklem
L1 Niet geregelde uitgang (230 VAC / max. 2 A)
U1, U2 Geregelde uitgang naar de motor
SW Extern / timer schakelaar
A Modbus RTU (RS485), signaal A
/B Modbus RTU (RS485), signaal /B
+V Voedingsuitgang + 12 VDC / 1 mA
Ai
GND Aarding
Connectie
MONTAGE VOORSCHRIFTEN IN STAPPEN
Voordat u start aan de installatie van de controller, lees dan zorgvuldig
de “Veiligheid en voorzorgsmaatregelen”. Zoek een gladde ondergrond
waar u op monteert (muur, paneel enz.).
Volg volgende stappen:
1. Schakel de voedingsspanning uit.
2. Open het deksel van de behuizing en bevestig de unit aan de
muur of paneel met de meegeleverde vijzen en pluggen. Let op de
correcte montage positie en de inbouwmaten van het toestel. (Zie
Fig. 9 Bevestigingspositie en Fig. 10 Bevestigingsafmetingen.)
3. Sluit de motor / ventilator aan.
4. Sluit L1 uitgang aan voor een 3-draads verbinding, klep sturing,
enz … (als nodig). Zie driedraads aansluiting.
5. Selecteer de benodigde analoge ingangstype en modus, start
modus en OFF level modus via de DIP schakelaar op de PCB. (Zie
Fig. 6 Dip schakelaar instelling.)
6. Controleer of uw toestel een netwerk start of afsluit (zie
Example 1 en Example 2). Als dit het geval is, plaatst u de NBT
jumper op de pins. Als dit niet het geval is, laat u de jumper weg.
(Zie Fig. 2.)
gevolg permanente schade aan de communicatie semiconductors en /
of computer toebrengen!
7. Sluit de voedingspanning en aarding kabels aan.
8. Stel de minimale snelheid in door de kleine trimmer. De standaard
instelling is Us (230 VAC). Zie Fig. 3 Max. snelheid trimmer.
9. Pas de min. snelheid via de trimmer aan (als nodig). Pas de min.
snelheid via de trimmer aan (als nodig). Zie Fig. 4 Min. snelheid
trimmer.
10. Pas de OFF level waarde aan via de trimmer (als nodig). De
standaard waarde is 0 VAC. Zie Fig. 5 Off level trimmer.
11. Sluit de behuizing en bevestig het deksel.
12. Schakel de voedingsspanning aan.
13. Pas de fabrieksinstellingen volgens uw gewenste waardes
aan, via onze 3SModbus software (als dit nodig is). Om de default
fabrieksinstelling te raadplegen zie Table Modbus register mappen.
Vericatie van de installatie instructie
Volg de instructies hieronder:
1. Schakel de voedingspanning in.
2. Zet de NBT jumper, DIP schakelaar, Max. trimmer, Min. trimmer
en OFF level trimmer in de gewenste positie / waardes. De
fabrieksinstellingen zijn als volgens:
Analoge uitgang
(0—10 VDC / 0—20 mA / 10—0 VDC / 20—0 mA)
Logische ingang (timer functie)
(min 2,5 VDC and > 30 ms )
Kabel diameter: max. 2,5 mm
Kabelwartel opspanbereik van de wartel: 3—6 mm /
5—10 mm
Als u een AC voeding gebruikt voor deze of andere toestellen
in een Modbus netwerk dan zal de GND connector NIET
AANGESLOTEN worden op andere toestellen binnen dit
netwerk of via de CNVT-USB-RS485 omvormer. Dit zal als
» NBT jumper is open (Netwerk bus eindweerstand is ontkoppeld);
» Stijgende modus: 0—10 VDC / 0—20 mA
» Off level – OFF;
2
www.systemair.com
Page 3

Timer mode Logic mode
U,
Remote
amplitude
Operate
Outpu
Operation time
Outpu
Operation time
Kick start enabled Switch control signal
[%]out
100
Umax
range
75
0
Kick start time Operation time
Controller
is off
t[s]
Soft start enabled
Switch control signal Ai control signal
SW
Holding
register 18
Soft start
duration
OFF
Stop
Soft
start
Timer
Umax
t
Start
Holding
register 18
Soft start
duration
Holding
register 21
Operation
timer
ONON OFF
Stop Start
t
t
t
t
Remote
Switch,
switch,
[VDC]
[VDC]
5 VDC
2,5 VDC
0
Stand-by Operate
Stand-by
Ai
>2,4
VDC
ON OFF
Soft
start
Holding
register 18
Timer
t
Umax
Soft start
Start
duration
ON
Holding
register 21
Operation
Stop Start Stop
timer
min 30 msmin 30 ms
Holding
register 18
Soft start
duration
OFF
t, [s]
Holding
register 21
Operation
timer
Voltage
Voltage
amplitude
range
range
t
t
t
» Kick start gedeactiveerd;
» Ingang spanningsmodus (0—10 VDC);
» Min. instelling van de Min. snelheid trimmer
» Maximum instelling van de Max. snelheid trimmer;
» Min. instelling van de Off level trimmer.
3. Stel het analoge ingangssignaal in op de maximale waarde
10 VDC of 20 mA.
4. De aangesloten motor zal aan maximale of minimum snelheid
lopen afhankelijk van de analoge ingangsmodi (dalend / stijgend).
5. Als de OFF level aan staat in de dalende analoge ingangsmodi,
zal de motor stoppen.
6. Stel het analoge ingangssignaal in op de maximum waarde van
0 VDC of 0 mA.
7. De aangesloten motor zal aan minimale of maximum snelheid
lopen afhankelijk van de analoge ingangsmodi (dalend / stijgend).
8. Als de OFF level aan staat in de stijgende analoge ingangsmodi,
zal de motor stoppen.
9. Als de OFF Level aanstaat en het ingangssignaal is gelijk aan
de waarde van de OFF level, zal de snelheid van de motor gelijk
zijn aan de minimum snelheid in stijgende en maximum snelheid in
dalende modus.
10. Als de controller niet volgens deze instructies zoals hierboven
werkt, moet men de bedrading als de instelling van het toestel nazien.
11. Controleer als beide LED’s (Fig. 6) kniperen als u het toetsel aan
zet. Bij knipperen, heeft uw toestel een Modbus netwerk gedetecteerd.
Als deze niet knipperen, controleer dan opnieuw de aansluitingen.
Attentie! De status van de LEDs kan enkel gecontroleerd
worden als het toestel aan staat. Neem de nodige
veiligheidsmaatregelen!
WERKINGSINSTRUCTIE
Bedienmodes
In Modbus modus heeft u invloed op volgende parameters: Umax,
Umin, Kick start / Soft start, Off level Aan / Uit, timer functie en de
Off level waarde via de Modbus registers.
In Standalone Modus heeft u invloed op volgende parameters: Umax,
Umin, Kick start / Soft start, Off level Aan / Uit en de Off level waarde
die via de hardware instelingen (DIP schakelaar, trimmers, jumpers).
In Normale modus tijdens dat de Off level uit staat, zal de soft start /
kick start maar een keer uitgevoerd worden – na dat de controller
gestart wordt; de soft start / kick start wordt enkel uitgevoerd elke
keer het toestel gestart wordt.
Wanneer Timer modus geselecteerd is, dan zal de controller zijn
controle signaal van de schakelaar ontvangen.
Wanner logische Modus geselecteerd is, dan zal de controller zijn
controle signaal van de Ai ingang ontvangen.
Tijdens de Timer modus als Logische modus moet de ingang puls
langer zijn dan 30 ms; anders zal het signaal weg gelterd worden.
Voorpaneel LED indicatie
Wanneer de groene LED op het voorpaneel (Fig. 7) continu blijft
branden, dan is de controller in werking. Als deze knippert:
» Dan is de controller in stand-by extern control modus, of
» De Off level staat aan en het analoge ingang signaal is onder
de Off level waarde.
Transport en bewaar informatie
Vermijd schokken en extreme condities; bewaar in originele
verpakking.
Garantie informatie en beperkingen
Twee jaar vanaf de leveringsdatum op fabricage fouten. Elke
t
aanpassing of verandering van het product ontheft de fabrikant
van alle mogelijke verantwoordelijkheid. De fabrikant wijst alle
verantwoordelijkheid af voor alle drukfouten of vergissingen in deze
data en aanpassingen of modicaties die zijn aangebracht na de tijd
van publicatie.
Onderhoud
Onder normale condities is dit een onderhoudsvrij product. Bij
vervuiling, reinig met een droge of licht vochtige doek. In geval van
sterke verontreiniging, reinig met een niet agressief product. Onder
deze omstandigheid koppel het toestel los van de voeding. Let erop
dat geen vloeistoffen het toestel kunnen binnentreden. Enkel terug
aansluiten als het toestel volledig droog is.
Attentie! Gebruik alleen zekeringen met type en waardes
zoals hierboven aangegeven; anders zal een verlies van de
garantie hier uitvolgen.
FR
INSTRUCTIONS DE MONTAGE ET DE MISE
EN SERVICE EN ÉTAPES
7726X NG-REE XXXS0 | Variateur électronique
L’7726X NG-REE XXXS0 est un variateur/régulateur électronique
qui contrôle la vitesse des moteurs monophasés contrôlables par
tension. Il est équipé de communication Modbus RTU et fournit un
large éventail de fonctionnalités : options de télécommande, «Off
level» (HORS- NIVEAU) réglable, réglages min. et max. de la tension
de sortie, et le fonctionnement du moteur limitée dans le temps lancée
par un signal logique ou par commutateur.
Code article
77264 NGREE 030S0
77268 NGREE 050S0
77269 NGREE 100S0
Courant nominal
maximum, [A]
1,5
3,0
6,0
Fusible, [A]
F 3,15 A H 250 VAC
F 5,0 A H 250 VAC
F 10,0 A H 250 VAC
REE 100S0 10,0 F 16,0 A H 250 VAC
Domaine d’utilisation
• Régulation de vitesse dans les systèmes de ventilation
• Applications où la communication Modbus ou une fonction de
minuterie est nécessaires
• Conçu pour usage intérieur
Données techniques
• Alimentation: 230 VAC ± 10 % - 50 / 60 Hz
• Entré analogique:
» Voltage: 0—10 VDC / 10—0 VDC
» courant: 0—20 mA / 20—0 mA
• Modes d’entrée analogique: ascendante ou descendante
• Fonctionnalité d’entrée analogique: Entrée télécommande: Mode
normal ou Mode minuterie
• Entrée télécommande: Mode normal ou Mode minuterie
• Sortie régulée: 30—100 % Us
• Sortie de tension maximale: dépend de l’article
• Sortie non régulée, L1: 230 VAC (50 / 60 Hz) / max. 2 A
• Règle la tension de sortie minimale, Umin: 30—70 % Us
(69— 161 VAC), ajustable par trimmer ou par Modbus RTU
• Règle la tension de maximale, Umax: 75—100 % Us
(175— 230 VAC), ajustable par trimmer ou par Modbus RTU
• «OFF level», ajustable par trimmer ou par Modbus RTU:
» 0—4 VDC / 0—8 mA pour mode ascendant
» 10—6 VDC / 20—12 mA pour mode descendant
• «Kickstart» ou «Softstart»
• Sortie alimentation bas tension: + 12 VDC / 1 mA pour
potentiomètre externe
• Communication Modbus
• Témoin de fonctionnement:
» vert continu: opération normale
» vert clignotante: stand-by
• Protection surtensions et surintensités
• Boîtier: plastique R-ABS, UL94-V0; gris (RAL 7035)
• Norme de protection: IP54 (selon EN 60529)
• Conditions ambiantes:
» température: -20—40 °C
» humidité relative < 95 % rH (sans condensation)
• Température de stockage: -40—50 °C
Normes
• Directive basse tension 2006/95/EC
• Directive EMC 2004/108/EC: EN 61326
• Directive WEEE 2012/19/EU
• Directive RoHs 2011/65/EU
Câblage et raccordements (voir Fig. 1 Schémas de câblage)
L Alimentation 230 VAC ± 10 % - 50 / 60 Hz
N Neutre
PE Masse
L1 Sortie non-réglée (230 VAC / max. 2 A)
U1 U2 Sortie régulée au moteur
SW Commutateur télécommande / minuterie
A Modbus RTU (RS485) signal A
/B Modbus RTU (RS485) signal /B
+V Sortie alimentation +12 VDC / 1 mA
Ai
GND Masse
Raccordements
Entrée analogique
(0—10 VDC / 0—20 mA / 10—0 VDC / 20—0 mA)
Entrée logique (fonctionnalité minuterie)
(min. 2,5 VDC et > 30 ms )
Section des ls: max. 2,5 mm
Plage de serrage presse étoupe: 3—6 mm /
5—10 mm
2
Page 4

INSTRUCTIONS DE MONTAGE EN ÉTAPES
[%]
20 mA
[VDC]/[mA]
Uout
)
AimaxOfflevel
-
Uout Umin
Umax Umin
AimaxOfflevel
Ai Offlevel
=
+
-
-
-
()
Uout
Umax Umin)
A
Ai
imax
=
-
(
Uout
)
A
Ai
imax
=
+
-
t[s]
Umax
range
Umin
range
Umax
Umin
0
0 VDC / 0 mA
Softstart time
Ai, 10 VDC / 20 mA
U, [%]out
100
75
70
30
Ai, 10 VDC / 20 mA
0 VDC / 0 mA
U
r
U
r
U
out
,
[%]
U
Avant de commencer le montage, veuillez lire attentivement les
«Mesures de sécurité et de précaution». Choisissez une surface lisse
comme emplacement d’installation (un mur, un panneau et etc.).
Suivez ces étapes:
1. Mettez sous tension.
2. Ouvrez le couvercle du boîtier et fixez l’unité au mur ou un
panneau en utilisant les vis et les chevilles fournies. Faites attention
à la position et les dimensions de montage. (Voir Fig. 9 Position de
montage et Fig. 2 Dimensions de montage.)
3. Connectez le moteur / ventilateur.
4. Connectez la sortie L1 pour un moteur à 3 ls, une vanne régulée,
etc. (si nécessaire). Voir Fig. 1b Trois ls raccordement.
5. Sélectionnez le type et le mode d’entrée analogique, mode de
démarrage et mode «OFF level» par l’interrupteur DIP. (Voir Fig. 6
Paramètres de l’interrupteur DIP.)
6. Vériez si votre appareil se trouve au début ou à la n du réseau
(Voir Example 1 et Example 2). Dans l’afrmative, mettez le cavalier
NBT sur les chevilles. S’il n’est pas le cas, laissez le cavalier NBT
ouvert. (Voir Fig. 2).
Si une alimentation AC est utilisée avec un seul appareil dans
un réseau Modbus la borne GND ne doit pas être connectée
aux autres appareils dans le réseau ou par CNVT-RS485-USB.
Cela peut causer de dommage permanent aux semi-
conducteurs de communication et / ou l’ordinateur!
7. Raccordez le câble de l’alimentation.
8. Ajustez la vitesse maximale par le trimmer (si nécessaire). Le
paramètre par défaut est Us (230 VAC). Voir Fig. 3 Trimmer de vitesse
min.
9. Ajustez les paramètres: Le paramètre par défaut est 30 % Us
(69 VAC). Voir Fig. 4 Trimmer de vitesse min.
10. Ajustez la vitesse minimale par le trimmer (si nécessaire). Le
paramètre par défaut est 0 VAC. Voir Fig. 5 Trimmer «OFF level».
11. Fermez le boîtier et xez le couvercle.
12. Mettez sous tension.
13. Personnalisez les paramètres d’usine à ceux souhaités, au moyen
du logiciel 3SModbus (si nécessaire). Pour consulter les paramètres
d’usine, voir Table 1 Registres Modbus.
Vérication des instructions d’installation
Suivez les instructions ci-dessous:
1. Mettez sous tension.
2. Mettez le cavalier NBT, l’interrupteur DIP, les trimmers Min.
et Max. et le trimmer «OFF level» dans les positions désirées. Les
réglages d’usine sont les suivants:
» Le cavalier NBT est ouvert (la résistance de terminaison de bus
est déconnecté);
» Mode ascendant: 0—10 VDC / 0—20 mA
» «OFF level» – OFF;
» «Kickstart» désactivé;
» Mode de voltage d’entrée (0—10 VDC);
» Réglage minimale de trimmer pour la vitesse minimale;
» Réglage maximale de trimmer pour la vitesse maximale;
» Réglage minimale de trimmer pour l’«OFF level»;
3. Mettez le signal d’entrée analogique à la valeur maximale de
10 VDC ou 20 mA.
4. Le moteur raccordé fonctionnera à la vitesse maximale ou
minimale selon le mode d’entrée analogique (ascendant / descendant).
5. Si l’«OFF level» est active et la mode d’entrée analogique
descendant est sélectionnée, le moteur s’arrête.
6. Mettez le signal d’entrée analogique à la valeur maximale de
0 VDC ou 0 mA.
7. Le moteur raccordé fonctionnera à la vitesse minimale ou
maximale selon le mode d’entrée analogique (ascendant / descendant).
8. Si l’«OFF level» est activé et la mode d’entrée analogique
ascendant est sélectionnée, le moteur s’arrête.
9. Si le «OFF level» est activé et le signal d’entrée analogique
est égal à la valeur de l’«OFF level», la vitesse du moteur sera la
vitesse minimale en mode ascendant ou la vitesse maximale en mode
descendent.
10. Si le régulateur ne fonctionne pas selon les instructions ci-dessus,
les connexions et les réglages doivent être vériés.
11. Vériez si les deux LED (Fig. 6) clignotent après que vous allumez
votre appareil. Si elles le font, votre appareil a détecté un réseau
Modbus . Si elles ne le font pas, vériez de nouveau les connexions.
Prudence! L’état des les LEDs peut être vérié que lorsque
l’appareil est sous tension. Prenez les mesures de sécurité
nécessaire!
MODE D’EMPLOI
Modes de fonctionnement
Dans le mode «Modbus» vous contrôlez les paramètres: Umax, Umin,
«Kickstart» / «Softstart», «OFF level» activé / désactive et valeur de
l’«OFF level» par les régistres Modbus.
Dans le mode «Standalone» vous contrôlez les paramètres: Umax,
Umin, «Kickstart» / «Softstart», «OFF level» activé / désactive et
valeur de l’«OFF level» par le hardware (interrupteur DIP, trimmers,
cavaliers).
Dans le mode «Normal», si l’ «OFF level» est désactivée, «Softstart» /
«Kickstart» sera exécutée une seule fois - après que le contrôleur est
allume; autrement «Softstart» / «Kickstart» sera exécuté à chaque
fois que le contrôleur est allumé.
Lorsque l’appareil est en mode «Minuterie», le régulateur reçoit son
signal de commande de l’entrée commutateur (SW).
Lorsque l’appareil est en mode «Logic», le régulateur reçoit son
signal de commande de l’entrée analogique (Ai).
Dans les deux modes «Minuterie» et «Logic» la largeur de pouls
doit être plus de 30 ms.
Témoin LED panneau avant
Lorsque le voyant vert sur la couverture (Fig. 7) donne une lumière
continue, le régulateur fonctionne en mode «Normal». Quand elle
clignote:
» Le régulateur fonctionne en mode «Télécommande», ou
» «OFF level» est activé et le signal d’entrée analogique est
inférieur à la valeur de l’«OFF level».
Informations sur le transport et le stockage
Évitez les chocs et des conditions extrêmes; stockez en emballage
d’origine.
Informations et restrictions sur la garantie
Deux ans après la date de livraison contre les défauts de fabrication.
Toute modication ou altération du produit après la date de publication
soulage le fabricant de toute responsabilité. Le fabricant ne porte
aucune responsabilité pour des erreurs d’impression ou des erreurs
dans ces données.
Entretien
Dans des conditions normales, ce produit ne nécessite aucun entretien.
En cas d’encrassement nettoyez avec un chiffon sec ou peu humide.
En cas de forte pollution, nettoyez avec un produit non agressif.
Dans ces conditions l’appareil doit être déconnecté de l’alimentation.
Faites attention à ce qu’aucun liquide entre dans l’appareil. Seulement
reconnectez à l’alimentation quand il est complètement sec.
Prudence! Utilisez uniquement des fusibles de type et
puissance indiquée ci-dessus; sinon, perte de la garantie peut
être prononcée.
DE
MONTAGE UND BETRIEBSANLEITUNG
7726X NG-REE XXXS0 | Elektronischer Drehzahl Controller
Die 7726X NG-REE XXXS0 elektronische Drehzahlregler steuern
automatisch die Geschwindigkeit der einphasige Spannung
steuerbaren Elektromotoren. Es ist mit Modbus RTU-Kommunikation
ausgestattet und bietet eine breite Palette an Funktionalitäten:
Fernsteuerungsmöglichkeiten, verstellbare off Niveau, min. und
max. Ausgangsspannungseinstellungen und zeitlich begrenztes
Motorbetrieb durch eine Logik oder Schaltsignal ausgelöst.
Artikelcodes
Bewertet max.
Strom, [A]
77264 NGREE 030S0
77268 NGREE 050S0
77269 NGREE 100S0
Bestimmungsgemäßer Einsatzgebiet
• Ventilatordrehzahlregelung in Lüftungsanlagen
• Anwendungen, bei denen die Modbus-Kommunikation oder eine
Timer-Funktion benötigt wird
• Nur für den Innenbereich
Technische Daten
• Stromversorgung: 230 VAC ± 10 % - 50 / 60 Hz
• Analogeingang:
» Spannung: 0—10 VDC / 10—0 VDC
» Strom: 0—20 mA / 20—0 mA
• Analogeingang Modi: aufsteigend oder absteigend
• Analogeingang Funktionalität: Normalmodus / Logic-Modus
• Fernsteuereingang Funktion: normal oder Zeitschaltuhr
• Geregelten Ausgang: 30—100 % Us
• Max. Ausgangslast: je nach Ausführung
• Ungeregelten Ausgang, L1: 230 VAC (50 / 60 Hz) / max. 2 A
3,0
6,0
10,0
Sicherungsnennstrom,
[A]
F 5,0 A H 250 VAC
F 10,0 A H 250 VAC
F 16,0 A H 250 VAC
Operational diagrams
Ascending / Descending input mode
Operating modes
Off level disabled Off level enabled
U
100
Umax
range
Umin
range
30
out
75
70
,
Umax
Umin
2
0
10 VDC
Ai,
U, [%]out
100
Umax
range
Umin
range
Umax
75
70
Umin
30
2
0
Off level range
Note: The operational diagrams for Descending mode are mirror images of the diagrams above for Ascending mode.
Descending mode
calculation formula
Ascending mode
calculation formula
Umax
Umin
-
(
Umax Umin
Descending
calculation formula
Ascending
calculation formula
=
Umax
-
Ai Offlevel
-
Kick start enabled Soft start enabled
U, [%]out
100
Umax
Umax
range
range
Umin
Umin
range
range
Umax
75
70
30
Umin
0
2
1
Kick start time
Kickstart time
Ai, 10 VDC / 20 mA
0 VDC / 0 mA
Ai, 10 VDC / 20 mA
0 VDC / 0 mA
t[s]
Umax
range
Umin
range
1
2
Soft start time
Kick start & off level Soft start & off level
U, [%]out
100
Umax
max
range
Umax
ange
75
70
Umin
min
range
Umin
ange
30
0
1
- Descending mode
- Ascending mode
2
2
1
Kick start time
Kickstart time
Ai, 10 VDC / 20 mA
0 VDC / 0 mA
Off level
Ai, 10 VDC / 20 mA
0 VDC / 0 mA
t[s]
Note: More details about EVS control functionalities you can nd in our mounting instruction
published on our site. Please follow the link: http://www.sentera.eu
100
Umax
max
range
range
Umin
Umin
range
range
30
Umax
75
70
Umin
1
0
2
Soft start time
Softstart time
Off level
10 VDC
20 mA
[VDC] /
[mA]
(
-
Umax Umin
Off level
Ai, 10 VDC / 20 mA
0 VDC / 0 mA
Ai, 10 VDC / 20 mA
0 VDC / 0 mA
t[s]
,Ai
Page 5

Input registers (See Table 1 Modbus register maps)
The input registers are read-only. Table 1 shows how the data is
organized in the input register sector. The measured data starts from
address 1 (30001) and ends at address 14 (30014). The other input
registers are not used. When they are addressed, they return 0.
All the data can be read by “Read Inputs Registers” command. Table 1
shows what the type of the returned data for each register is and
the way it should be interpreted. For example reading ‘300’ in input
register 1 means that the measured analogue input signal is 3,0 VDC
(or 6,0 mA), reading ‘50’ in input register 2 means that the output
voltage is 50 % Us (115 VAC).
Input register 1 (30001) shows the current value of measured
analogue input signal. This value depends on the selected analogue
input type. When voltage input is selected, the values vary in the
range of 0—1.000 (0—10,0 VDC). When current input is selected, the
values vary in the range of 0—1.000 (0—20,0 mA).
Input register 2 (30002) shows the current value of the output
voltage. This input register is overridden by holding register 31 if
output override control (holding register 8) is enabled. When output
override control is disabled, this input register shows the value of the
output voltage according to the selected operating mode. The output
voltage values vary in the range of 30—100 % Us (69—230 VAC).
Reading ‘0’ (0 VAC) indicates that the controller is off.
Input register 3 (30003) shows the type of the analogue input
signal. This input register is dened by holding register 11 or by the
hardware setting of position 4 of the DIP switch. The values are ‘0’
(for 0—20 mA) or ‘1’ (for 0—10 VDC).
Input register 4 (30004) shows the selected mode of the analogue
input. This input register is dened by holding register 12 or the
hardware setting of position 1 of the DIP switch (Fig. 8), according to
the selected operating mode. The values are ‘0’ (for descending mode)
or ‘1’ (for ascending mode).
Input register 5 (30005) shows the value of the maximum output
voltage. This input register is dened by holding regi ster 13 or the
hardware setting of the Max. trimmer (Fig. 3), according to the
selected operating mode. The register values are in range of 75—100
(75— 100 % Us VAC).
Input register 6 (30006) shows the value of the minimum output
voltage. This input register is dened by holding regi ster 14 or the
hardware setting of Min. trimmer (Fig. 4), according to the selected
operating mode. The register values are in range 30—70 % Us.
Input Register 7 (30007) gives information about the OFF level
state. In Standalone mode it contains the value set by position 2 of the
DIP switch (Fig. 6). In Modbus mode it contains the value of holding
register 15. It could be ‘0’ (disabled) or ‘1’ (enabled).
Input Register 8 (30008) gives information about the OFF
level value. In Standalone mode it contains the value set by the
OFF level trimmer (Fig. 5). In Modbus mode it contains the
value set by holding register 16. This value depends on the
selected analogue input type and mode. The register values can
vary from 0 to 40 (0—4,0 VDC / 0—8,0 mA) and from 60 to 100
(6,0—10,0 VDC / 12,0—20,0 mA). The values depend on the selected
analogue input type and mode.
Input Register 9 (30009) gives information about the kick start or
soft start selection. In Standalone mode the value corresponds to
the start type set by position 3 of the DIP switch. In Modbus mode it
contains the value set by holding register 17. The register values are
‘0’ (for soft start) or ‘1’ (for kick start).
Input Register 10 (30010) shows the state of the remote control
input. When it is disabled, the unit works in normal operating mode.
When the remote control input is enabled, the controller is in stand-by
mode. The register values are ‘0’ (for disabled) or ‘1’ (for enabled).
Input Register 12 (30012) shows the status of the unregulated
output L1. When the analogue input signal is below the value of the
OFF level (if enabled) or when the remote control input is disabled,
the output voltage of the unregulated output L1 is 0 = OFF (0 VAC).
Otherwise it is 1 = On (230 VAC).
Input Register 14 (30014) shows the operating status of the unit.
When the register value is 0 (Off), the controller is switched off. The
ON / Stand-by LED on the front panel is off. See Fig. 7 Operating
indication.
When the value is 1 (On), the controller operates according to the
control algorithm, and the analogue input signal is above the selected
OFF level value (if enabled). The ON / Stand-by LED (Fig. 7) gives
out continuous light.
The ON / Stand-by LED blinks and the register value is 2 (Stand-by)
when OFF level is enabled and the analogue input signal is below the
OFF level value.
Holding Registers (See Table 1 Modbus register maps)
These registers are read / write registers and they can be managed
with “Read Holding Registers” command, “Write single register” and
“Write Multiple Registers” commands. They are organised in parts
containing different kind of information. The registers that are not
used are read only. Writing on these registers does not return Modbus
error exception; however, it does not change anything either!
Part 1:
This part contains information about the unit and Modbus
communication settings.
Holding register 1 (40001) contains the address at which the
controller replies to the Modbus master unit. The default address is
‘1’. You can change it in two ways:
1. Send command “Write Single Register” with address ‘1’ and write
the new address value.
2. Connect only your unit to a master controller or PC application
and send the command “Write Single Register” to address ‘0’ (Modbus
broadcast address) and write a new address value.
The next two registers (2 and 3) contain Modbus settings.
Changing these registers you change the communication settings. The
default Modbus settings are 19200-E-1 as it is stated in the Modbus
Protocol Specication.
The next three registers (4, 5 and 6) are read only. They contain
information about the hardware and rmware versions.
Holding register 7 (40007) sets the operation mode of the controller.
There are two options: Standalone mode and Modbus mode. In
Standalone mode the controller is fully controlled by the analogue
input signal and the selected hardware settings. In Modbus mode the
settings can be controlled by the Modbus master controller.
Holding register 8 (40008) is used for output override control. The
setting is used to override the output voltage by a preselected value.
This value has greater priority over the calculated output voltage of
the integrated control algorithm. Only kick start / soft start can change
the output voltage value.
Holding registers 9 (40009) and 10 (40010) are not used. They
are read only.
Part 2:
Holding register 11 (40011) sets the analogue input signal type. The
default value is ‘1’ (0—10 VDC). ‘0’ is for 0—20 mA.
Holding register 12 (40012) denes the ascending / descending
analogue input mode. The default value is ‘1’ is for 0—10 VDC
(ascending voltage signal). The register values are ‘0’ for 10—0 VDC
and ‘1’ for 0—10 VDC when voltage signal is selected, and ‘0’ for
20— 0 mA and ‘1’ for 0—20 mA when current signal is selected.
Holding register 13 (40013) contains the maximum output voltage.
The default value is ‘100’ (100 % Us or 230 VAC). The register values
vary in the range of 75—100 (75—100 % Us).
Holding register 14 (40014) contains the minimum output voltage.
The default value is ‘30’ (30 % Us). The register values vary in the
range of 30—70 (30—70 % Us).
Holding register 15 (40015) sets the OFF level state. The default
value is ‘0’ (disabled). ‘1’ is for enabled.
Holding register 16 (40016) denes the OFF level. The default
value is ‘0’ (0 VDC). This value depends on the selected analogue
input type and mode. The register values vary in the ranges of
0—40 (0— 4,0 VDC) for ascending voltage signal and 60—100
(6,0— 10,0 VDC) for descending voltage signal. When current signal
is selected, the register values are in ranges of 0—40 (0—8,0 mA) for
ascending signal and 60—100 (12,0—20,0 mA) for descending signal.
Holding register 17 (40017) sets kick start or soft start. The default
value is ‘1’ (kick start). ‘0’ value is for soft start.
Holding register 18 (40018) contains kick start or soft start duration
time. The default value is ‘10’ (10 seconds). The register values vary
from ‘0’ to ‘60’ (0—60 seconds). This setting is accessible only in
Modbus mode.
Holding register 19 (40019) selects the remote control input
functionality. The default value is ‘0’ for normal mode. Value ‘1’ is for
timer mode. This setting is accessible only in Modbus mode. OFF level
mode is not used in timer mode.
Holding register 20 (40020) selects the analogue input functionality.
The default value is ‘0’ for normal mode; ‘1’ is for logic mode. This
setting is accessible only in Modbus mode.
Holding register 21 (40021) sets the value of the operation timer.
This holding register is accessible only in timer mode and / or logic
mode. The default value is ‘60’ (60 seconds). The register values can
vary from 0 to 200 (0—200 seconds). This setting is accessible only
in Modbus mode. The working time is equal to the sum of the kick
start / soft start duration time and the time value of the operation
timer. When a working time expires, only a remote control input or
analogue input can restart the unit.
The next holding registers 22 (40022)—30 (40030) are not
used. They are read only.
Holding register 31 (40031) overrides the output voltage value in
Modbus mode when output override is enabled. The override value
setting does not depend on the other settings except on the kick start
or soft start selection. The default value is ‘0’ (VAC). The register
value can vary in the range of 30—100 (30—100 % Us). It can be
also ‘0’ (0 % Us).
The next holding registers 32 (40032)—40 (40040) are not used.
They are read only.
• Minimale Ausgangsspannung Einstellung, Umin: 30—70 % Us
(69— 161 VAC), wählbar über Trimmer oder über Modbus
• Maximale Ausgangsspannung Einstellung, Umax: 75—100 % Us
(175—230 VAC), wählbar über Trimmer oder über Modbus
• Aus stufe, wählbar über Trimmer oder über Modbus RTU
» 0—4 VDC / 0—8 mA für aufsteigenden Modus
» 10—6 VDC / 20—12 mA für absteigende Modus
• Kickstart oder Soft Start
• Niederspannungsversorgung Ausgang: 12 VDC / 1 mA für externes
Potentiometer
• Modbus Kommunikation
• Betriebsanzeige:
» kontinuierliche grün: Normalbetrieb
» blinkt grün: Stand-by
• Überspannungs- und Überstromschutz
• Gehäuse: Kunststoff R-ABS, UL94-V0; grau (RAL 7035)
• Protektion Standard: IP54 (nach EN 60529)
• Betriebs-Zulässige Umgebungsbedingungen:
» Temperatur: -20—40 °C
» relative Luftfeuchtigkeit: < 95 % rH (nicht kondensierend)
• Lager Temperatur: -40—50 °C
Normen
• Niederspannungsrichtlinie 2006/95/EC
• EMC-Richtlinie 2004/108/EC: EN 61326
• WEEE-Richtlinie 2012/19/EU
• RoHs-Richtlinie 2011/65/EU
Verkabelung und Anschlüsse (siehe Fig. 1 Anschlussbild)
L Versorgungsspannung 230 VAC ± 10 % - 50 / 60 Hz
N Neutral
PE Erdungsklemme
L1 Ungeregelten Ausgang (230 VAC / max. 2 A)
U1, U2 Geregelten Ausgangs für die Motor
SW Remote / Zeitschaltuhr
A Modbus RTU (RS485) Signal A
/B Modbus RTU (RS485) Signal /B
+V Versorgungsausgang +12 VDC / 1 mA
Ai
GND Masse
Anschlüsse
MONTAGE UND BETRIEBSANLEITUNG IN SCHRITTEN
Vor Beginn der Montage durchlesen Sie die “Sicherheitsvorkehrungen”
der Controller. Wählen Sie eine glatte Oberäche für einen Montageort
(Wand, Panel und etc.).
Gehen Sie folgendermaßen vor:
1. Die Energieversorgung ausschalten.
2. Öffnen Sie den Gehäusedeckel und befestigen Sie das Gerät an
die Wand mit den mitgelieferten Dübel und schrauben. Beachten Sie
die richtige Einbaulage und Einbaumaße. (Siehe Fig. 1 Einbaulage
und Fig. 2 Einbaumaße.)
3. Anschluss des Motors / Ventilator.
4. Schließen Sie den L1 Ausgang für ein 3-Leiterschaltung
an, gesteuertes Ventil usw. (Falls erforderlich). Siehe Fig. 1b
Drei- Leiter- Anschluss.
5. Wählen Sie den gewünschten Analogeingangstyp und Modus,
Start-Modus und OFF-Modus-Ebene durch die Dip-Schalter auf der
Platine. (Siehe Fig. 6 Dip Schalterstellungen.)
6. Überprüfen Sie, ob Ihr Gerät startet oder das Netzwerk beendet
(siehe Example 1 und Example 2). Wenn ja, setzen Sie den
NBT- Jumper auf die Stifte. Wenn nicht, lassen Sie den Jumper offen
(siehe Fig. 2).
dauerhaften Schäden an den Kommunikationshalbleitern und / oder
des Computer führen!
7. Schließen Sie den Stromversorgungskabel an.
8. Stellen Sie die max. Geschwindigkeit durch Trimmer (falls
erforderlich) ein. Die Standardeinstellung ist Us (230 VAC). (Siehe
Fig. 3 Max. Drehzahl Trimmer.
9. Stellen Sie die Minimaldrehzahl durch die Trimmer (falls
erforderlich). Die Standardeinstellung ist 30 % Us (69 VAC). Siehe
Fig. 4 Min. Drehzahl Trimmer.
10. Stellen Sie die Off-Level Wert von Trimmer (falls erforderlich).
Die Standardeinstellung ist 0 VAC. Siehe Fig. 5 Off Level Trimmer.
11. Schließen Sie das Gehäuse und befestigen Sie die Abdeckung.
12. Einschalten der Stromversorgung.
Analogeingang
(0—10 VDC / 0—20 mA / 10—0 VDC / 20—0 mA)
Logikeingang (Timer-Funktion)
(min. 2,5 VDC und > 30 ms )
Kabelquerschnitt: max. 2,5
Kabelverschraubung Klemmbereich: 3—6 mm /
5—10 mm
Wenn ein AC–Netzteil mit einer der Einheiten in einem
Modbus-Netzwerk verwendet wert, darf man auf die GND
klemme keine anderen Geräten im Netzwerk oder der
USB- CNVT-RS485-Converter Anschließen. Dieses kann zu
2
13. Fertigen Sie die Werkseinstellungen auf die gewünschten
Parametern, durch 3SModbus-Software (falls erforderlich). Für die
Werks Einstellung siehe Table Registrierungseinträge.
Überprüfung der Installationsanweisungen
Gehen Sie folgendermaßen vor:
1. Einschalten der Stromversorgung.
2. Stellen Sie den NBT-Jumper, Dip-Schalter, max. Trimmer, Min.
Trimmer und Off-Level-Trimmer in die gewünschten Positionen /
Werte. Die Werkseinstellungen sind wie folgt:
» NBT Steckbrücke ist Offen (Network Busabschlusswiderstand
ist getrennt);
» Aufsteigend Modus: 0—10 VDC / 0—20 mA
» Aus stufe - OFF;
» Kick Start gesperrt
» Eingangsspannungsmodus (0-10 VDC);
» Min. Einstellung des Min. Geschwindigkeit Trimmer
» Max. Einstellung des Max. Geschwindigkeit Trimmer;
» Min. Einstellung des Off Level Trimmer.
3. Das analoge Eingangssignal einstellen auf den Maximalwert von
10 VDC bzw. 20 mA.
4. Der angeschlossene Motor wird mit maximaler Geschwindigkeit
oder Mindestgeschwindigkeit in Abhängigkeit von der AnalogEingangsmodus (aufsteigend / absteigend) laufen.
5. Wenn Off-Level aktiviert ist, und absteigend analogen
Eingangsmodus ausgewählt ist, stoppt der Motor.
6. Das analoge Eingangssignal einstellen auf den Maximalwert von
0 VDC oder 0 mA.
7. Die angeschlossenen Lüfter mit minimaler Drehzahl
oder Maximalgeschwindigkeit in Abhängigkeit von der
Analog- Eingangsmodus (aufsteigend / absteigend) laufen.
8. Wenn Off-Level aktiviert ist und aufsteigenden analogen
Eingangsmodus ausgewählt ist, stoppt der Motor.
9. Wenn Off-Level aktiviert ist und das Eingangssignal, gleich dem
Wert der Off-Level ist, wird die Drehzahl des Motors die minimale
Geschwindigkeit in aufsteigender Modus oder der maximalen Drehzahl
in absteigender Modus funktionieren.
10. Wenn der Regler nicht gemäß den Anweisungen Arbeitet, müssen
die Kabelverbindungen und die Einstellungen überprüft werden.
11. Überprüfen Sie, ob beide LEDs (Fig. 6) blinken, nachdem Sie
Ihres Geräts einschalten. Wenn dies der Fall ist, hat Ihr Gerät das
Modbus Netzwerk erkannt. Ist dies nicht der Fall, überprüfen Sie die
Anschlüsse wieder.
Achtung! Der Zustand der LEDs kann nur überprüft werden,
wenn die Einheit mit Energie versorgt wird. Nehmen Sie die
entsprechenden Sicherheitsmaßnahmen!
GEBRAUCHSANWEISUNG
Betriebsarten
In Modbus-Modus steuern Sie die Parameter: Umax, Umin, KickStart / Soft-Start, Off Level aktivieren / deaktivieren und Off Level
wert über Modbus-Register.
In Standalone-Modus Sie steuern die Parameter: Umax, Umin,
Kick-Start / Soft-Start, Off Level aktivieren / deaktivieren und Off
Level wert durch die Hardware-Einstellungen (Dip-Schalter, Trimmer,
Jumper).
In Normaler Modus, wenn Off-Level deaktiviert ist, Soft-Start /
Kickstart wird nur einmal durchgeführt, nach dem der Regler
eingeschaltet wird; ansonsten Soft Start / Kickstart wird jedes Mal
ausgeführt, wenn der Regler eingeschaltet wird.
Wenn Timer-Modus gewählt ist, empfängt die Steuerung ein Signal
von der Fernsteuerschalter.
Wenn Logik-Modus gewählt ist, empfängt die Steuerung ein Signal
vom Eingang Ai.
In beiden Betriebsarten Timer-Modus und Logik-Modus die
Impulsbreite muss mehr als 30 ms sein; andernfalls wird das Signal
geltert.
Frontseite LED-Anzeige
Wenn die grüne LED auf der Frontabdeckung (Fig. 7) ein Dauerlicht
gibt, arbeitet der Regler im Normalbetrieb. Wenn es blinkt:
» der Regler ist im Fernsteuermodus, oder
» der Off-Level ist aktiviert und das analoge Eingangssignal ist
unter dem Off-Level-Wert.
Transport und Lagerhaltung Informationen
Vermeiden Sie Erschütterungen und extremen Bedingungen; Lager
in Originalverpackung.
Gewährleistungsinformationen und Einschränkungen
Zwei Jahre ab Lieferdatum gegen Defekte in der Fertigung. Änderungen
oder Änderungen am Produkt nach dem Datum der Veröffentlichung
entlasten den Hersteller über alle Verantwortlichkeiten. Der Hersteller
haftet nicht für Druckfehler oder Irrtümer in diesem Daten.
Wartung
Unter normalen Bedingungen ist dieses Produkt wartungsfrei.
Falls verschmutzt, reinigen Sie mit einem trockenen oder leicht
feuchtem Tuch. Bei starker Verschmutzung, reinigen mit einem nicht
aggressiven Produkt. Unter diesen Umständen sollte das Gerät vom
Netz getrennt werden. Achten Sie darauf, dass keine Flüssigkeiten in
Page 6

das Gerät gelangen. Nur am Netz wieder Anschließen wenn das Gerät
völlig trocken ist.
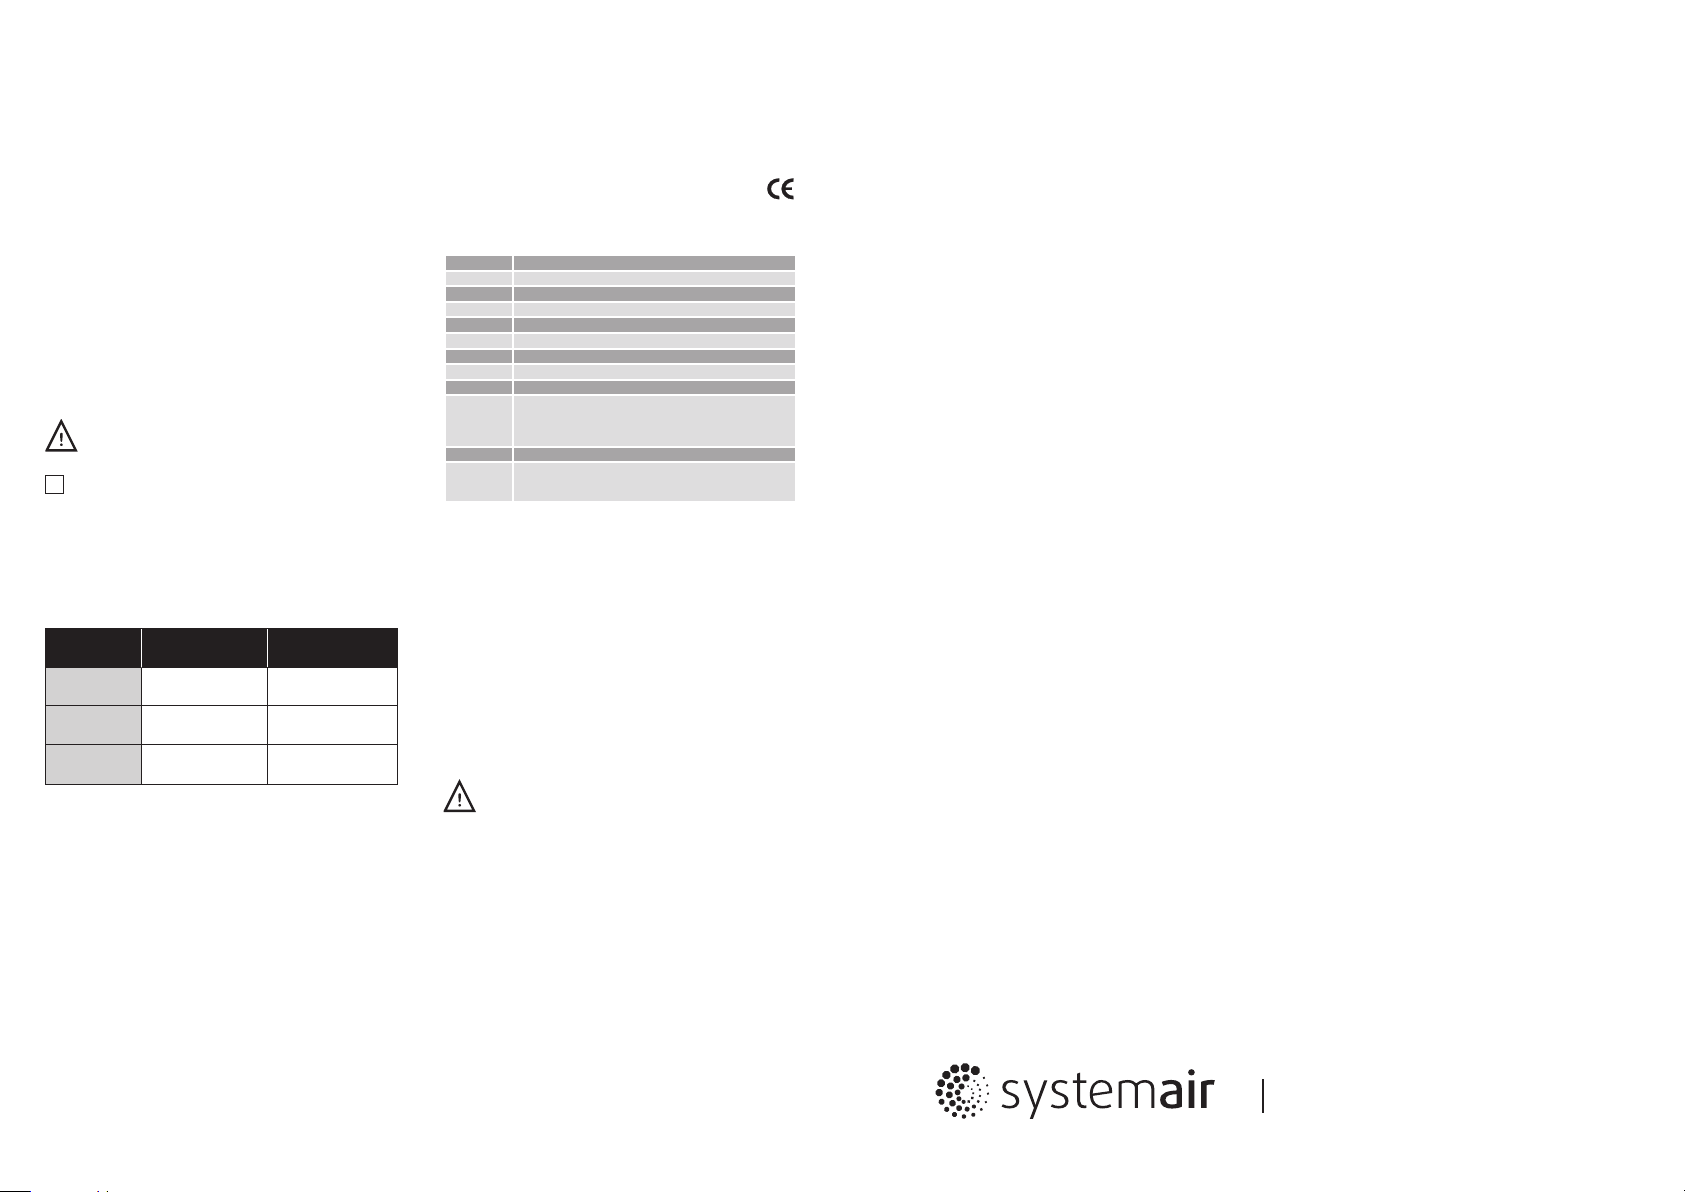
INPUT REGISTERS
Achtung! Verwenden Sie nur Sicherungen mit Typs und oben
speziziert; andernfalls wird Verlust der Garantie ergeben.
1 Analogue input level unsigned int.
2 Current output voltage unsigned int. Actual output voltage
3 Analogue input type unsigned int. Type of the selected analogue input 0—1
Ascending / descending
4
input mode
5 Maximum output voltage unsigned int. Maximum output voltage 75—100
6 Minimum output voltage unsigned int. Minimum output voltage 30—70
7 Enable off level unsigned int. Enables off level 0—1
8 Off level value unsigned int.
9 Kick start / soft start unsigned int. Selects kick start or soft start 0—1
10 Remote control input unsigned int. Remote control input 0—1
12 L1 control unsigned int. L1 control 0—1
14 ON/Stand-by LED unsigned int. ON/Stand-by LED 0—2
15-20 Reserved, returns 0
Data type Description Data Values
Analogue input value depending on the
selected analogue input type.
unsigned int.
Ascending or descending analogue input mode
depending on the selected analogue input type.
Off level value depending on the
selected analogue input type and
ascending / descending analogue input
mode.
MODBUS REGISTER MAPS
0—100
30—100
0 — 40
60—100
0
0—1
0 =
0 =
0 =
0 =
1 =
0 =
1 =
0 =
1 =
0 =
1 =
0 =
0 =
1 =
0 =
1 =
0 =
1 =
0 =
1 =
2 =
0 VDC
10,0 VDC
0 mA
20,0 mA
0 % Us
30 % Us
100 % Us
0—20 mA
0—10 VDC
10—0 VDC
0—10 VDC
20—0 mA
0—20 mA
75 % Us
100 % Us
30 % Us
70 % Us
Disabled
Enabled
Voltage
0 VDC
4,0 VDC
Current
0 mA
8,0 mA
Voltage
10,0 VDC
6,0 VDC
Current
20,0 mA
12,0 mA
soft start
kick start
Disabled
Enabled
Stand-by
100 =
100 =
30 =
100 =
75 =
100 =
30 =
70 =
Ascending mode:
0 =
400 =
200 =
Descending mode:
100 =
60 =
100 =
60 =
HOLDING REGISTERS
Device slave
1
address
Modbus baud
or
or
Off
On
Off
On
2
rate
3 Modbus parity unsigned int. Parity check mode 0—2 1
4 Device type unsigned int. Device type (Read only)
5 HW version unsigned int. Hardware version of the device (Read only) XXXX 0 x 0300 = HW version 3.00
6 FW version unsigned int. Firmware version of the device (Read only) XXXX 0 x 0150 = FW version 1.50
7 Operating mode unsigned int.
8 Output override unsigned int.
9-10 Reserved, returns 0
Analogue input
11
type
Ascending /
descending
12
analogue input
mode
Maximum
13
output voltage
Minimum output
14
voltage
15 Enable off level unsigned int.
16 Off level value unsigned int.
Kick start / soft
17
start
Kick start / soft
18
start duration
Remote control
19
functionality
Analogue input
20
functionality
21 Operation timer unsigned int.
22-30 Reserved, returns 0
Output override
31
value
32-40 Reserved, returns 0
If you want to nd out more about Modbus over serial line, please visit: http://www.modbus.org/docs/Modbus_over_serial_line_V1_02.pdf
Data type Description Data Default Values
unsigned int. Modbus device address 1—247 1
unsigned int. Modbus communication baud rate 1—4 2
3005
unsigned int.
unsigned int.
unsigned int.
unsigned int.
unsigned int.
unsigned int.
unsigned int.
unsigned int.
unsigned int.
Enables Modbus control and disables the DIP
switch and trimmers
Enables the direct control over the output.
Always settable. Active only if holding
register 7 is set to 1.
Selects the analogue input type of the
device. Always settable. Active only if
holding register 7 is set to 1.
Ascending / descending analogue input
mode. Depends on the selected analogue
input type. Always settable. Active only if
holding register 7 is set to 1.
Maximum settable output voltage. Always
settable. Active only if holding register 7
is set to 1.
Minimum settable output voltage. Always
settable. Active only if holding register 7
is set to 1.
Enables off level. Always settable. Active
only if holding register 7 is set to 1.
Off level value. Depends on the
selected analogue input type and
ascending / descending analogue input
mode. Always settable. Active only if
holding register 7 is set to 1.
Selects kick start or soft start. Always
settable. Active only if holding register 7
is set to 1.
Sets the duration time. Always settable.
Active only if holding register 7 is set to 1.
Sets the remote control input mode.
Depends on the selected kick start or soft
start mode. Always settable. Active only if
holding register 7 is set to 1.
Sets the analogue input functionality.
Depends on the selected kick start or
soft start. Always settable. Active only if
holding register 7 is set to 1.
Sets the operation time of the device
when Timer mode by remote control input
or Logic mode by the analogue input is
selected. The operation time is additional
to the kick start / soft start duration times.
Always settable. Active only if holding
registers 7 and 19 or / and 20 are set to 1.
Override value for the analogue output.
Always settable. Active only if holding
register 8 is set to 1.
0—1 0
0—1 0
0—1 1
0—1 1
75—100 100
30—70 30
0—1 0
0—40
60—100
0—1 1
0—60 10
0—1 0
0—1 0
0—200 60
0
30—100
75 =
100 =
30 =
160 =
40 =
40 =
0
100 =
60 =
100 =
60 =
60 =
200 =
0
30 =
100 =
1 =
2 =
3 =
4 =
0 =
1 =
2 =
0 =
Standalone mode
1 =
Modbus mode
0 =
1 =
0 =
1 =
0 =
1 =
0 =
1 =
0 =
1 =
Ascending mode:
0 =
0 =
Descending mode:
0 =
1 =
0 =
0 =
Normal mode
1 =
0 =
Normal mode
1 =
0 =
0 =
9.600
19.200
38.400
57.600
8N1
8E1
8O1
Disabled
Enabled
0—20 mA
0—10 VDC
10—0 VDC
0—10 VDC
20—0 mA
0—20 mA
75 % Us
100 % Us
30 % Us
00 % Us
Disabled
Enabled
Voltage
0 VDC
4,0 VDC
Current
0 mA
8,0 mA
Voltage
10,0 VDC
6,0 VDC
Current
20,0 mA
12,0 mA
Soft start
Kick start
60 s
Timer mode
Logic mode
0 s
200 s
0 % Us
30 % Us
100 % Us
or
0 s
 Loading...