

Page 1

User´s Manual
basic / classic / comfort
Page 2
All rights to these instructions are reserved. The only basis of claims made on SYSTECH GmbH respecting
the products described in this manual are the terms and conditions of business. Any further claims shall be
excluded. No guarantee can, in particular, be accepted for the correctness of the contents. Both the
contents of the manual and the product are subject to modification without prior notice.
© SYSTECH GmbH 2002
January 2002
All trademarks used are recognized.
Page 3

classic
comfort
Page 4
- 4 -
Safety Instructions
The name plate is on the rear of the central processing unit (CPU).
Make sure that the system voltage (V) specified on the name plate is
the same as your mains voltage.
Do not connect the CPU unless your mains supply circuit
provides grounding wires. Should the monitors and the
computers also be provided with protective ground
terminals, please note that video signal transmission to
ground necessitates noiseless ground wiring (cf. Trouble Shooting).
Protect the CPU from any influence of high temperatures, moisture and dust. The vents in cover
and bottom must not be covered at any time (e.g. by installing the unit on a carpeted floor).
Adequate ventilation to be safeguarded at all times.
Be sure that the mains plug has been unplugged before opening
the power supply unit. All maintenance and repair work should
be left to the skilled staff that has been trained for the purpose.
MKVision plus carries the “GS” and “CE” marks.
Page 5

- 5 -
Contents
STARTING MKVision plus ............................................................................................. 6
INSTRUCTIONS FOR OPERATION ................................................................................ 7
General............................................................................................................................................ 10
The "Clear" Feature ....................................................................................................................... 11
Image for All ................................................................................................................................... 12
...and All Participant PCs Locked................................................................................................... 13
Teacher Views Participant’s Image.............................................................................................. 14
...and Remote Controls Participant’s PC ...................................................................................... 15
Participants Views Teacher’s Image (...and Remote Controls Teacher) ................................ 16
Participant Views Participant’s Image (...and Remote Controls Participant............................. 17
Blanking All Participant PCs ........................................................................................................... 18
Individual Access to Sender ......................................................................................................... 19
Automatic Participant PC Scanning .............................................................................................. 20
Help Request from Participant ...................................................................................................... 21
Grouping.......................................................................................................................................... 22
Locking the control panel............................................................................................................... 23
Audio ................................................................................................................................................ 23
Special Feature Beamer ............................................................................................................... 24
Structured Control Panel for the “classic” Version? ................................................................... 25
Guarantee services & conditions.................................................................................................26
INSTRUCTIONS FOR INSTALLATION ......................................................................... 27
Parts List............................................................................................................................................. 28
System Organization...................................................................................................................... 29
Assigning the Participant Keys (to the terminal units) .................................................................. 33
Assigning the Teacher and Beamer Keys................................................................................... 34
Putting into Operation..................................................................................................................... 35
Trouble Shooting & Questions ..................................................................................................... 36
Brief Instructions............................................................................................................................... 40
Page 6
- 6 -
Switch (comfort)
comfort
basic
classic
Switch (basic / classic)
Starting MKVision Plus
MKVision plus has a main switch which is integrated
into the power supply unit and disconnects the system
from the mains, as well as a second switch, which is
accommodated in the control panel (see illustration).
The second switch will only be used to enable or
disable the control panel. Local work on the
networked computers can, however, continue
in any case (for which purpose the mains
switch needs to have been closed).
Each workstation is represented by a separate key in the control panel, the numbers 1...16 indicating the
participants’ workstations and the key “D” the teacher (see illustration above).
The control panel of the “comfort” version
mimics the position of the different workstations
in the room, which is why there are no numbers
as in the basic / classic versions.
A monitor seen from behind represents a participant’s
workstation, while the teacher’s monitor is shown
from the front and marked by the letter “D”.
Page 7

Instructions for Operation
Page 8

Page 9

- 9 -
Note
The following operating instructions start from the premise that your MKVision plus has been installed
completely and has been tested. Should this not be the case, please refer to the instructions for installation
or contact your dealer.
A short version of the operating instructions is included in the consignment and can be used as required.
Please note the recommendations concerning safety and putting into operation included in the instructions
for installation!
All rights to these instructions are reserved. The only basis for claims made on SYSTECH GmbH respecting
the products described in this manual are the terms and conditions of business. Any further claims shall be
excluded. No guarantee can, in particular, be accepted for the correctness of the contents. Both the contents
of the manual and the product are subject to modification without prior notice.
© SYSTECH GmbH 2002
January 2002
All trademarks used are recognized.
Page 10

- 10 -
General
Sender
One MKVision plus workstation is always in the send mode.
This is indicated by the pilot lamp representing this workstation.
Receiver
The same may be connected to one or several workstations (or none at all) that are in the receive mode.
Workstations connected as receivers will be identified by their flashing pilot lamps.
Select
When pressing and holding one key and at the same time momentarily touching additional keys, the
workstation kept pressed will become the sender, while the other monitors will assume a receive function.
Change Sender
Should yet another key be pressed once sender and receiver(s) have been selected, the workstation
concerned will become the new sender, while the previous sender returns to its own image.
Exclude Receiver
When pressing the key of a workstation already connected in the receive mode, this workstation will be
excluded from the list of receivers selected and return to its own image.
Add more Receivers
To extend the number of receivers, again press and hold the key of the present sender and select new
workstations as described.
The „D“ Key (Teacher)
The teacher’s station can be operated in the same manner as any of the other (participants’) workstations.
For special features, please refer to the section „teacher views and controls participant’s monitor/
computer“.
Automatic mouse/ keyboard lockout
If a participant is no longer able to view his/her screen, mouse and keyboard are automatically disabled.
The teacher can, in addition, use the remote control key to remote control a workstation that has been
activated as a sender.
Grouping
Under the “comfort” version, participants can be assigned to one of three groups. This is why the functions
“for all” and “blanking” only refer to the activated groups, which can be identified by lighted keys.
When supplied, all the participants are assigned to group A.
comfort
Page 11
- 11 -
The "Clear" Function
Features
The MKVision plus start condition is restored.
All the participants as well as the teacher see their own screens and can work on their own stations
without any restrictions.
The features “help” and “load image” are deactivated.
Procedure
Press the “clear” key.
Indicators
Once the “clear” key has been pressed, only the lamp in the “D” key (teacher) is on.
Principles
All the control functions are shown starting from this basic condition.
Teacher’s key is on
Page 12

- 12 -
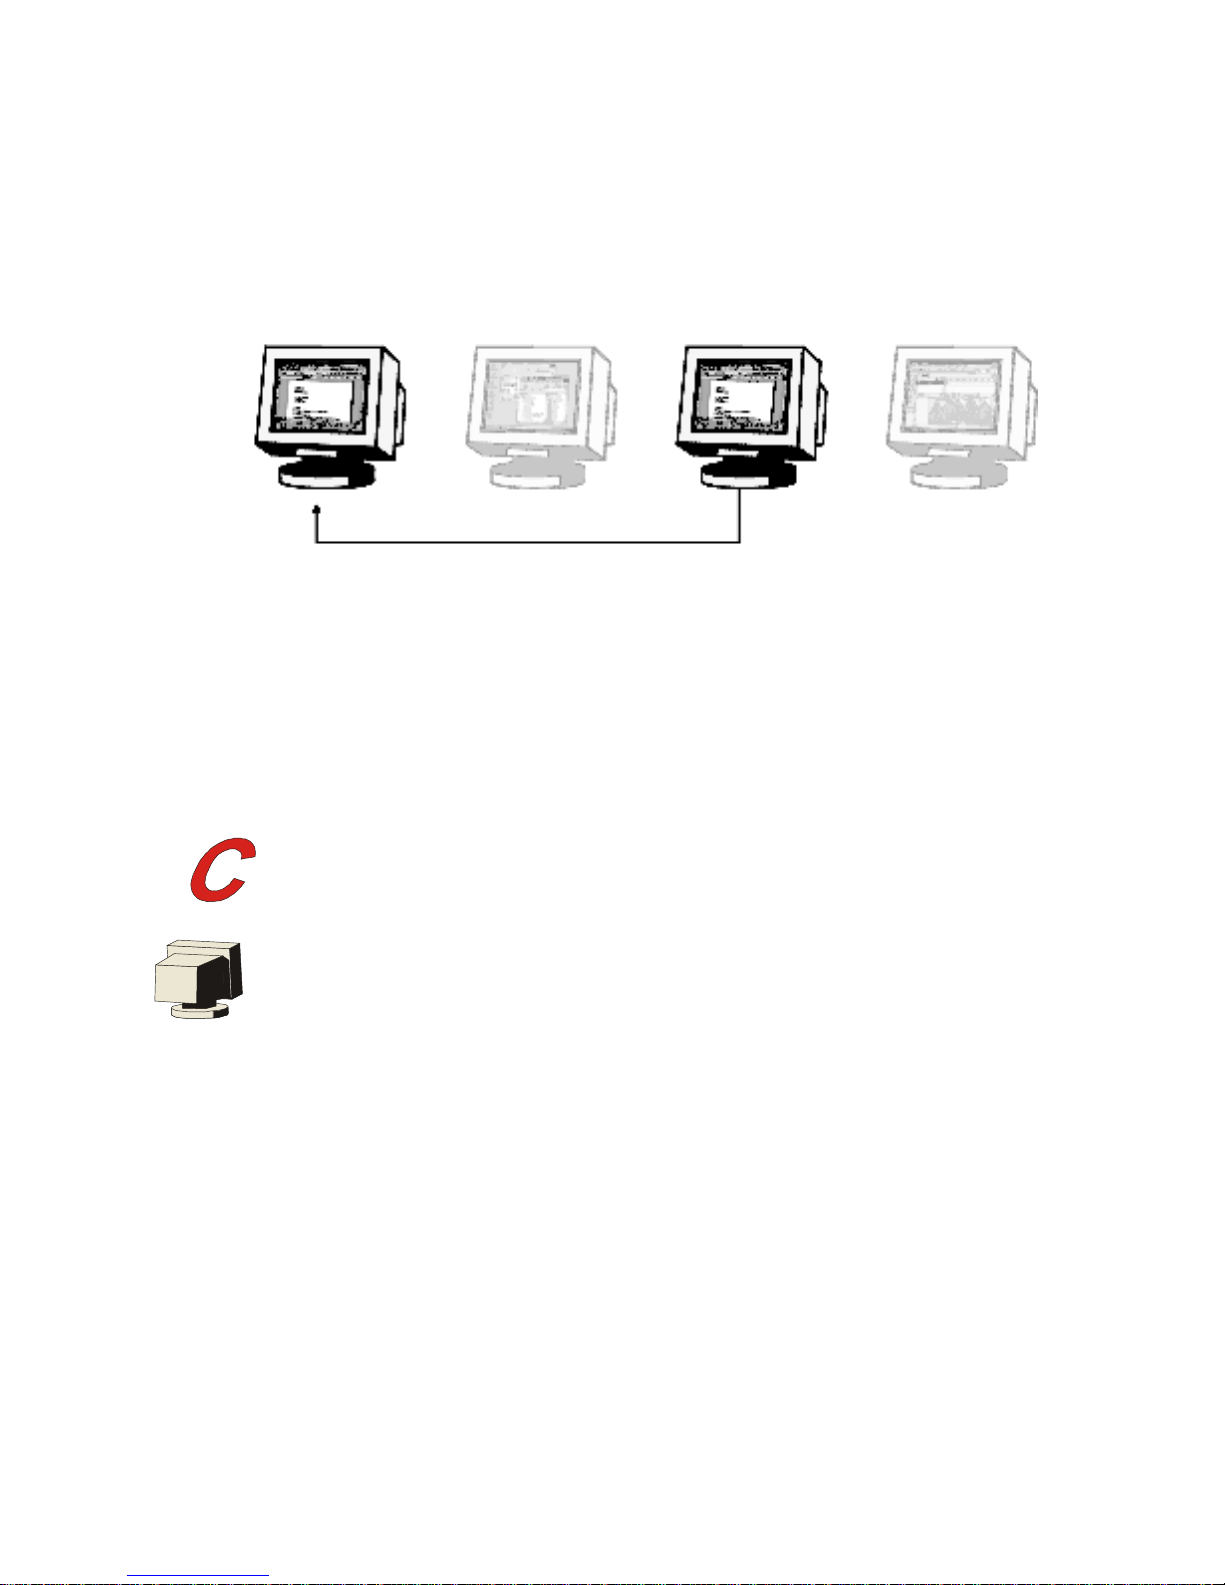
Image for All...
Features
All the participants (and the teacher) view the display of one particular participant (or that of the teacher)
on their own screens.
Procedure
To select a sender, touch the required key in the control panel. If the teacher is to be the sender, selection
can alternatively be made by simply pressing the “clear” key.
Then press “for all”.
To deactivate, again press the “for all” key (the selected sender is maintained), or the “clear” key (the
teacher is activated again as the sender).
Indicators
The lamps of the selected sender and the “for all” key are on.
Principle
The “for all” key is an independent On / Off switch, which makes all the workstations receivers at one
stroke (except for the sender selected at that moment). Any selection previously made will remain
unaffected (cf. “participant views participant’s image”). As long as the “for all” feature is active, all the
other features of the MKVision plus keyboard remain disabled.
With the “comfort” version, the display is only sent to the members of the active groups. This means that in
this case the groups that are to view the display may be defined before activating the feature by means
of the “for all” key.
comfort
Page 13

- 13 -
...and All Participant PCs Locked
Mouse and keyboard locked
In both the “classic” and “comfort” versions, the mice and keyboards of all computers (receivers) will, with
the only exception of the sender, automatically be locked whenever participants cannot view their own
display. The lock is released by deactivating the “for all” feature or by pressing the “clear” key.
lights up Sender lights up (example)
classic
comfort
Page 14
- 14 -
Teacher Views Participant’s Image ...
Features
Teacher views the image of a selected participant on his/her screen; the participants continue to view
their own screen image.
Procedure
Press "clear",
then select sender by momentarily touching
the relevant key (intended participant) in the control panel.
The teacher automatically becomes the receiver. To deactivate, simply press „clear“ again.
Optionally press the "remote control" key in addition (the participant’s computer is under remote control
from the teacher’s panel).
Indicators
The pilot lamp of the sender selected (participant) is lighted, that of the receiver (teacher) flashes.
Note:
Once the feature “Teacher views participant’s image” has been activated, the keys for other participants
can be pressed (without holding, etc.) to view additional workstations.
8
Page 15

- 15 -
comfort
comfort
classic
...and Remote Controls the Participant’s PC
Mouse and Keyboard Remote Control
If under your MKVision plus mice and keyboards are networked, you may additionally control the mouse
and keyboard of the participant, whose screen you view, from your own workstation. For that purpose just
additionally press “remote control”, thus automatically locking the participant’s mouse and keyboard. Using
“Remote control”, this feature can be activated and deactivated as required to interactively solve any
problems the participant may have.
Active remote control is indicated by the pilot lamp in the “remote control” key.
Procedure
Press "remote control"
To deactivate, press „remote control“ again or actuate „clear“.
Note:
Mouse and keyboard remote control can be activated only
- if the station in charge of remote control is viewing the participant’s screen
- in the station-to-station transmission mode, if just one sender and one receiver have been activated
Once the remote control key has been activated, the keys for other participants can be pressed to remote
control additional workstations.
Receiver Remote control Sender lighted
flashes lighted (example)
Page 16

- 16 -
Participant Views Teacher’s Image
...and Remote Controls Teacher
Features
One or several selected participants view the teacher’s image on their monitors; the teacher views his/
her own screen image.
Procedure
- Press and hold key “D”
- press one or several participant keys
- release “D”
- Deactivate by just actuating “Clear”.
Indicators
The pilot lamp of the selected sender (teacher) is lighted, those of the receivers (participants) flash.
Principles
When pressing and holding one participant key or the “D” key, normally the workstation kept pressed
becomes the sender, while the stations selected as a next step are defined as receivers.
Additional receivers may be added in the same way.
To “exclude” specific receivers, just press their keys again. This can only be done after key “D” has been
released.
Under MKVision „comfort“ the teacher may have his/her computer remote
controlled by one of the participants. To do so, establish a connection
with one of the participants (see above), then additionally press
„Remote control“. Now more participants can be connected.
Sender lighted Receiver flashing (example)
comfort
*
*hold teacher key
...
6
Page 17

- 17 -
comfort
...
*
*hold participant key
6
3
Participant Views Participant’s Image
...and Remote Controls Participant
Features
One or several selected participants receive the image of another participant on their monitors; the
teacher and the participants not involved view their own screen image.
Procedure
- Press and hold participant key (intended source)
- press one or several participant keys (intended receivers)
- release participant key (source); the teacher will automatically become
the receiver. Should that not be intended, eliminate by pressing the “D” key.
Deactivate by simply actuating “clear”.
Indicators
The pilot lamp of the sender selected (participant) is lighted, those of the receivers flash.
Principles
When pressing and holding one participant key or the teacher’s key (Dozent), it is normally the
workstation kept pressed that becomes the sender, while the stations selected as a next step are defined
as receivers. Additional receivers may be added in the same way.
To “exclude” specific receivers, just press their keys again. This can only be done after the sender key has
been released.
Under MKVision plus „comfort“ any participant may have his/her computer remote controlled by another
participant. To do so, establish a connection with one of the participants (as before),
then additionally press “remote control”.
Now more participants may be connected.
Receiver flashes Sender lighted
(example) (example)
Teacher flashes (if not deactivated)
Page 18

- 18 -
comfort
classic
Blanking All Participant PCs
Features
The PCs of all participants/active groups are blanked, the teacher and the participants of the non-active
groups continue to view their own screen images.
Procedure
Press the key “blanking”
To deactivate, again press the “blanking” key, or “clear”.
Indicators
Pilot lamp in the “blanking” key.
Should your MKVision plus permit mouse and keyboard networking, the mice and keyboards of all
participant computers will automatically be locked. The teacher can proceed as required. To release the
lock, deactivate the blanking feature, or press the “clear” key.
If the teacher should have remote controlled one of the workstations before activating this feature, remote
control will remain active. This allows the teacher to remote control the participant’s computer without the
participant viewing his/her screen.
lighted
Page 19

- 19 -
Individual Access to Sender
The teacher may single out any image (e.g. for illustration purposes) for individual retrieval by the
participants. By means of the „load image“ key, which is installed in all the participant workstations, each
participant may view this image.
Features
The “load image” key (lasso function) allows the participants to individually
view on their own screens an image selected by the teacher. All that
is needed is the stroke of a key, without the teacher having to become
active again. The key is a changeover switch, an LED signalling the
activated state.
Procedure
Select sender by momentarily touching the required key (normally and following “clear” this is the
teacher’s station). Release access by pressing the “sender is maintained” key.
To end access, again actuate “sender is maintained”, or press “Clear” (teacher again becomes the
sender).
Indicators
As access is released, the pilot lamp in the key “sender is maintained” lights up as well as that of the
sender selected.
Principles
The key “sender is maintained” has an ON/OFF feature; it may be activated or deactivated at any time.
When activated or following reset, the “individual access” feature is deactivated.
lighted (example)
Page 20

- 20 -
Automatic Participant PC Scanning
Features
The teacher is successively shown the screen images of all the workstations. Since in this case no other
MKVision plus features need to be operated, this is a very convenient way for the teacher to keep track
of the progress made at the participants’ workstations and to immediately intervene if there are any
problems.
Procedure
Press “scan” key.
Deactivate by pressing the “clear” key.
“scan” may also be pressed again to deactivate this feature. The teacher will in this case, however,
continue to view the participant screen last displayed.
Indicators
Pilot lamp in the “scan” key is on.
Programming the scan time
Keep the “scan” key pressed until it starts to flash.
Press the group keys A, B, C
to set a scan time of 2, 4 or 8 seconds.
Use “clear” to confirm and end programming (press the “clear” key
to briefly have the scan time set displayed).
The group keys are used to set the scan intervals:
2 sec (group key A), 4 sec (group key B), or 8 sec (group key C)
comfort
Page 21

- 21 -
Help Request From Participant
The teacher can allow participants to ask for discreet help.
Features
A key identified by a “life belt” at the participant’s
workstation allows each participant to ask the teacher
for discreet help.
Accelerated flashing of the lamp in the MKVision plus keyboard allows the teacher to identify the
participant calling for help and to acknowledge the help request.
Procedure
To activate the help request feature,
the teacher has to press the “life belt” key.
Once a help request is available, the teacher presses the required participant key in the MKVision plus
keyboard to acknowledge.
To deactivate this feature, press “clear” or again press the “life belt” key. In either case, any help requests
that may be active will be cancelled and acknowledged.
Indicators
LED in the “life belt” key lights up. An incoming help request in addition makes the lamp of the participant
key in the MKVision plus keyboard flash.
Once the teacher has acknowledged the request, both this lamp and the lamp in the participant’s “help”
button will go out, thus showing the participant that the teacher is aware of the help request.
Note:
When starting MKVision plus, this feature is deactivated.
With the feature activated the “load image” key and the participant’s “help” key may have to be pressed
a little bit longer.
comfort
Page 22

Grouping
The global features „for all“ and „blanking“ only affect the active groups.
Active groups can be identified by means of lighted lamps.
Assigning the participants to one of the three groups
To assign the participants to one of the three
groups A, B, or C, press the required key
longer than it flashes.
You may now actuate the keys of the participants
to be assigned to that group. Terminals already
assigned are indicated by an extinguished light.
Use „clear“ to end programming.
Groupkeys
- 22 -
...
8
comfort
Page 23

- 23 -
key-operated switch
basic
classic
comfort
comfort
switch
Audio transmission
Features
Should your MKVision plus include the optional audio transmission feature, you will automatically transmit
stereo sound together with the screen contents, provided this function has been activated. No additional
keys need to be operated for this purpose.
In case of a 1:1 connection (one sender, one receiver), a conference circuit can be activated in addition,
which permits communication with a student.
All that needs to be provided is an audio box for each workstation. This upgrading can proceed at any
time.
Procedure
Press “audio” key. Keep pressing this key to change between the two functions
“stereo sound included only” and “conference circuit”.
To deactivate, press the “clear” key.
Indicators
Pilot lamp in the “audio” key is lighted Conference circuit activated.
Pilot lamp not lighted Stereo sound is included only
(audio is switched off once the “clear” key has been operated)
Locking the Control Panel
Features
Operation of MKVision plus may be locked completely. This permits the participants to work locally at their
workstations – irrespective of the feature last activated.
Procedure
Actuate switch in the control board.
Actuate key-operated switch in the control board.
Page 24

- 24 -
basic
classic
comfort
Special Feature Beamer
Where required, the MKVision plus features may be extended by an LC display or a beamer.
The “basic / classic” versions do not provide neither a special function nor a key for this feature. With
these versions, the beamer is simply connected to the teacher’s terminal unit instead of or together with the
monitor.
Note:
Should the beamer be located at a certain distance (e.g. when ceiling mounted), the video signal may be
transmitted with some losses (reduced brightness, imperfect focus control). In such cases, the beamer and
the monitor should be connected by means of a video splitter (e.g. VS12, VS12L).
With the “comfort” version, the beamer is connected – like the participants’ monitors – by means of a
separate terminal unit (beamer unit). A separate computer is, however, not required.
This feature allows the teacher to centrally display any of the participants’ images, which the teacher may
even process on his/her own computer. Operation will in this case only proceed from the control panel.
Procedure
Simple activation / deactivation of the special beamer key connects the active sender to the beamer.
Beamer key
Page 25

- 25 -
Structured Control Panel for the “classic” Version
For rooms accommodating more than 16 workstations, the “classic” version may upon request come
complete with a structured control panel.
The additional “comfort” features help request, participant scanner, grouping and beamer will in this case,
however, not be available.
The participant workstations are assigned to the different keys as described in the installation instructions.
As, however, the 3 keys at the bottom right are reserved for groups A, B, and C of the “comfort” version,
no workstations can be assigned to these keys when using this panel in a “classic” system.
classic
?
Page 26

- 26 -
Guarantee Services and Conditions
SYSTECH GmbH furnish a 3-years guarantee for MKVision plus.
The guarantee is limited to free replacement or repair of defective components. Normally components
are immediately replaced to safeguard operability in the classroom.
The place of performance is Braunschweig. Liability for further damages of any kind is excluded.
Please do not hesitate to contact us also for any repair / replacement services you may require after
expiry of the guarantee period.
Please allow for a reaction period at our end of one workday plus delivery.
Page 27

Instructions for Installation
Page 28

Parts List
Before proceeding with installing the system, please make sure that all the components listed below are
actually available.
Depending on the number of workstations (including the teacher’s station) to be networked, each
MKVision plus consists of:
1 terminal unit (“participant box”) each per workstation
1 special cable each (“bus cable”)
for linking the teacher’s and the participants’ units
1 VGA cable each, HD connector, 15-pole, 1.8 m
1 participant key each, with approx. 1.5 m cable
1 keyboard cable each (for “classic” and “comfort”)
MiniDIN (2 m), possibly additional adapters for DIN keyboards
1 mouse cable each (for “classic” and “comfort”)
RS232 net: sub-D connector, 9-pole (2 m)
PS/2 net: MiniDIN (2 m)
optional 1 audio box with 3 cables (1 MiniDIN 8-pole, 2 with 3,5 mm connectors)
In addition:
1 power supply unit (with mains cable)
1 control panel* with 1 cable (RJ11 connector), 2 m
1 pair of terminating connectors
as well as
1 information manual
1 set of workstation labels
(basic / classic)
*comfort
- 28 -
*basic/classic
H
G
F
E
D
C
B
A
I
J
Page 29

System Organization
The terminal unit („Participant box“)
MKVision plus needs to have one terminal unit for each computer that is to be included in the system. The
terminal unit has to be integrated between the PC’s connections with the monitor, keyboard and mouse.
As they provide the inputs and outputs for the bus cables, the participant boxes also serve as connections
between the different workstations and the teacher.
The MKVision terminal units are small enough to be fitted into a cable duct if necessary.
The participant units carry a
schematic connection diagram.
When installed in a cable duct,
adequate clearance distance
between the terminal unit and other
energised lines has to be maintained!
Please note the relevant
safety regulations!
Each student workstation is called up by means of a key on the keyboard which will be described later.
When first starting the system, these keys have to be assigned to the different workstations as described
on page 33.
- 29 -
A
Page 30

- 30 -
PS/2
RS 232
RS232 mouse DIN keyboard
(using adapters)
PS/2 mouse PS/2 keyboard
Adam & Eve ....
MKVision plus provides for the connection of PS/2 computers or PCs with RS232 mouse socket (“serial
mouse”) and standard keyboard (5-pole DIN outlet).
It is (for the time being) not possible to combine PS/2 computers
and PCs with RS232 mouse socket within one MKVision plus system.
Should you nevertheless need to have PS/2 computers and standard PCs linked within one system, we
will inform you of any available options.
PS/2 computers and MKVision plus
The MKVplus terminal units have one
MiniDIN socket on each side, which are
intended for connection of the keyboard,
as well as an additional MiniDIN for connection of the mouse.
Use the extension cables (“MiniDIN-MiniDIN”) furnished to connect the PC’s mouse and keyboard
sockets with the marked sockets of the MKVplus terminal units. Please note the connection diagram on
each terminal unit. Now connect the mouse and the keyboard with the remaining sockets at the other end
of the MKVplus housing.
Standard PCs (keyboard: DIN connector, mouse: RS232) and MKVision plus
MKVplus terminal units, in addition, have one
SUB-D9 “male” and SUB-D9 “female” socket
for connection of RS232 mice. For keyboards
with DIN connectors, the adapters furnished
(MiniDIN-DIN) need to be used.
Use the extension cables furnished to connect the RS232 mouse socket with the serial PC port, and the
keyboard socket with the PC keyboard port (using one of the adapters furnished). Then plug the mouse
and the keyboard into the required sockets at the opposite end of the MKVplus terminal unit.
Page 31

System Organization
The audio box
If the MKVision plus comes with the (optional) audio function, the audio box for each workstation has to
be connected to the student line unit or terminal unit by means of the cable furnished (“MiniDIN 8-pole).
The other two cables with 3.5 mm connectors are used to connect the computer’s sound board with the
jacks at one end of the audio box, following which the headset is connected at the other end. Please note
the diagram on the audio box.
The front-end controller can be used for individual volume control.
The power supply unit
The power supply unit should be installed at a central point within the MKVision plus system to make sure
that units installed at the end of the bus cable are adequately supplied with power even in large systems
(cf. illustration p. 32).
Since the power supply unit does not incorporate any control elements, it may also be integrated in a
table base unit or the like.
Especially in large systems the unit may heat up considerably, therefore, please make sure that adequate
ventilation is safeguarded and that, in particular, the vents are not covered.
Installation
Position the power supply unit at a central point of MKVision plus!
Connect the power supply unit with a mains outlet (230 V!), using the power cable furnished.
- 31 -
G
J
Page 32

- 32 -
56AA78
12 34
power supply D
I
B
System Organization
The bus cables
Now the power supply unit and all the terminal units need to be connected. For this purpose, please use
the special bus cable furnished.
A bus structure is used for connection, which has two ends that
must be terminated by means of the
terminating connectors supplied.
Start at one end with one of the two
terminating connectors (A) using the
bus connection “MKV bus”, and then
install the bus cables proceeding
from unit to unit and including the
power supply unit.
The open end of the last unit finally
needs to be closed with the second
terminating connector.
Note:
The physical position of the units
within the bus has nothing to do
with the coding procedure
mentioned before.
The power supply unit, for instance, may be looped into the bus at any point.
For optimum video quality, the cable lengths should be as short as possible. Try
not to extend the bus cables by mating short lengths! If you should need longer
cable lengths, please let us know. We will assist you wherever we can.
Never use force when connecting a bus cable. This may damage the contacts!
The control unit (left: “basic / classic”, right: “comfort”)
Finally the control unit has to be connected, for instance with the teacher’s unit, for which purpose you use
the RJ11 cable; it can then be placed at a point that is easily accessible for the teacher. This finalises
MKVision plus installation.
Page 33

Assigning the Participant Keys
to the terminal units
1. Switch on the power pack to supply MKVision plus with power (normal operation).
2. Unplug the connector at the rear of the control panel.
3. Now keep the keys and pressed while restarting MKVplus
(i.e. plug in again the connector unplugged under point 2).
4. Release the keys after about 3 seconds.
5. Now all programmable keys are flashing.
Preparation: Arrange the keys on the keyboard as required
(e.g. to reflect the position of the workstations in the room)
1. Switch on the power pack to supply MKVision plus with power (normal operation).
2. Unplug the connector at the rear of the control panel.
3. Now keep the key pressed while restarting MKVplus
(i.e. plug in again the connector unplugged under point 2).
4. Keep this key pressed for about 3 seconds until all programmable keys are flashing.
5. Release the key.
6. Press the “load image” key at one of the workstations you want to program;
this will make the pilot lamp in the participant key light up.
7. In the control panel, press the key you want to be assigned to the workstation in question;
the pilot lamp in the panel and that of the participant key will go out.
(Repeat the last two steps for each of the other workstations to be programmed.)
8. Once all the workstations have been assigned to a key, press the “C” key in the control panel
to save the setting and check (e.g. by means of the “help request” feature.
Note:
Additional workstations may be programmed at any later date, without the previously programmed
stations losing their assignment.
- 33 -
comfort
basic
classic
Page 34

Assigning the Teacher and Beamer Keys
Teacher key:
Temporarily connect one participant button to the unit of the teacher’s workstation,
and
repeat steps 1-8 as described on page 33.
Instead of pressing a key for a participant workstation in the control panel,
press the teacher key "D" in Step 7.
Teacher key:
Temporarily connect one participant button to the unit of the teacher’s workstation,
and
repeat steps 1-6 as described on page 33.
Instead of pressing a key for a participant workstation in the control panel,
press the “blanking” key for blanking (keep pressed!),
and
in addition press the key for the teacher’s workstation.
The pilot lamp in the control panel as well as that in the participant button will go out.
Save by pressing the “C” key in the control panel.
Projector key (“beamer key”):
Temporarily connect one participant button to the beamer unit, and
repeat steps 1-6 as described on page 33.
Instead of pressing a key for a participant workstation in the control panel,
press the “help request release” key (keep pressed !),
and
in addition press the key for the beamer.
The pilot lamp in the control panel as well as that in the participant button will go out.
Again save by pressing the “C” key in the control panel.
- 34 -
basic
classic
comfort
Page 35

- 35 -
Putting into Operation
Important:
Before starting the system make sure that all the monitors used are
suited for the image refresh rate of all the networked units. When
transmitting a high-resolution image to a monitor not suited for the
purpose, this monitor may otherwise not be able to synchronize and
in the worst case it may be damaged.
Start by switching on the power supply unit (the “power on” lamp will light up). Now start MKVision plus
using the switch at the control panel, and only then start the computer (with MKVplus switched off, the
networked PCs may otherwise report an error – keyboard error, monitor error). Now all the computers
should be ready for use, i.e. all the monitors show the local screen image, and mouse and keyboard can
be used as required. This condition can be restored at any time when actuating the “C” key (“clear”
feature) on the control panel. A set of brief operating instructions will be furnished with MKVision plus.
Operating test
Start by actuating „clear“ in the control panel and then „for all“.
The image of the teacher’s computer should now be displayed on the monitors of all the workstations.
Again actuate „clear“ and then the keys of all the connected workstations.
The screen images of all the workstations will successively appear on the teacher’s monitor.
Now additionally actuate the „remote control“ key.
You will now be able to remote control the keyboard and mouse of the computer whose display you are
viewing on the teacher’s monitor.
Now actuate „clear“ and then „sender is maintained“ in the control panel.
Then go to all the workstations one after the other and press the „load image“ key in the control
unit installed there.
The pilot lamp in the key will light up, and the screen image of the teacher’s computer should appear on
the participant’s monitor. Again actuate the key to revert to your own image.
MKVision plus has now been tested for proper operation. For further options, please refer to the
instructions for operation.
Page 36

Trouble Shooting
Local screen displays are either distorted or not available, no reaction when keys are actuated
MKVision plus has not been switched on.
Please note that there are two switches. The CPU mains switch can always remain in its “on” position. If
mains voltage is available, the “power on” lamp will light up and MKVision plus control panel can be
switched on or off using the second switch in the control panel.
The monitor does not synchronize when an image is transmitted (oblique lines on the screen)
Incompatible horizontal frequencies (dissolution) of monitors and graphics cards.
Important!
Excessively high horizontal frequencies may destroy the monitor!
Set all graphics cards for a dissolution that is compatible
for the weakest monitor.
Transmission produces a „wobbling“ image or lines travel across the screen.
In your classroom the protective conductor is affected by offset voltages.
As generally the protective conductor is used for grounding the computers and as the
ground connection of the graphics cards also links up with the protective conductor, offset
voltages on the ground wire add up to the video signal transmitted. This is often the case
when the computers in the classroom use different mains outlets that are connected to
different phases of the lighting system. Wherever possible, try to have all the computers (and
monitors) use one supply source or have the electrician provide additional ground wire
connections directly in the classroom.
Local screens show colour error
The VGA or monitor cable connector has worked loose.
VGA or monitor cable is defective.
Connect both cables. Only if the fault does not occur again, can the unit itself assumed to be defective.
Image transmitted with distorted colours or serious reflections
Connector of at least one bus cable has worked loose.
Bus cable defective.
Terminating connector has not been provided or has worked loose.
Please check that connectors always fit properly.
For this purpose, tighten all locking screws!
- 36 -
Page 37

- 37 -
Trouble Shooting
The participant’s keyboard does not respond
Computer and keyboard connection of the participant’s unit have been interchanged.
Mouse and keyboard have been interchanged.
Individual workstations affected by disturbances
Check all the connectors for perfect connection; disturbances may also be caused if the connector of a
unit not immediately affected has come loose!
Connect monitor, keyboard and mouse of the workstation affected, without using the participant’s unit. If
the disturbance persists, the PC itself will be defective.
If you suspect a defect in one of the terminal units or a bus cable, just replace same by another unit of
MKVision plus. You may cut the system short for this purpose by moving the terminating connectors from the
bus ends towards the middle.
Mice and keyboards cannot be remote controlled when starting DOS programs.
Make sure that all the networked PCs have actually loaded a mouse driver even if the programs used
may not support a mouse (also see “Questions?”).
Neither mouse nor keyboard of the teacher’s computer work after remote control of participant X.
The last participant computer has crashed. Reset the system (“clear” key) and boot the computers of both
the teacher and the participant concerned.
Mice and keyboards operate in the local mode. When remote controlled, keyboard entries and
mouse operations do not work properly and produce „beeps“.
Should this be observed with all the participants’ computers, please check the teacher’s computer and the
relevant terminal unit, as mouse and keyboard connections may have been interchanged.
Should it occur only when some participant computers are remote controlled, please check the mouse and
keyboard connections of the terminal units concerned to make sure that the connections have not been
interchanged.
PS/2
Page 38

- 38 -
Trouble Shooting & Questions
Keyboard remote control does not work with all the participants’ computers. Local mouse and
keyboard operation are, however, not affected.
Check if as from a certain number all the participants’ PCs do longer permit remote control. Should this be
the case, replace the bus cable of the terminal unit concerned (this is the cable that connects the terminal
unit still operating with the “defective” one).
Mouse remote control does not work for all the participants’ computers. Local mouse and
keyboard operation is possible.
See keyboard remote control.
Questions
Can the participants’ computers be booted from the teacher’s terminal?
Yes, but...
In particular when networks are large it is tempting and obviously more convenient to change
configurations for the participants’ computers (CONFIG.SYS, AUTOEXEC.BAT) under remote control from
the teacher’s terminal.
Please note in this connection that MKVision should not be operated while booting the system, as otherwise
the computers concerned may not be able to find their keyboard and mouse. Should “keyboard error” or
“Maus nicht gefunden” (mouse not found) be reported, please reset MKVision and boot the relevant
participant computer by means of a hardware reset.
What do I have to observe with MKVision plus if one of the participants’ computers crashes when
under remote control?
Two situations are possible:
The computer that has crashed does not affect the mouse interface. In that case, remote control can be
deactivated, and the teacher is in a position to operate his/her own computer with mouse and keyboard;
the computer concerned can be booted either locally or under remote control using Strg+Alt+Entf.
Page 39

- 39 -
Questions
The computer that has crashed blocks the mouse interface. You will notice this when, in deactivating
remote control (teacher views own image), neither the teacher’s nor the participant’s mouse and keyboard
work.
The teacher’s mouse and keyboard are physically still connected with the participant’s computer. Switch
the system off for about 3 sec. and, after restart, boot the computer of the participant concerned as well as
your own computer using a hardware reset.
Does MKVision plus also work without a mouse?
Some programs running under DOS do not require a mouse and cannot even be used with a mouse. In
that case it seems to be logic not to install a mouse or mouse driver at all.
There are also special systems that are operated without a keyboard.
MKVision plus can work with both versions. A mouse need not necessarily be connected.
If no keyboard is connected, a PS/2 mouse needs to be used.
It is not possible to use an RS232 mouse only (“serial mouse”).
PS/2
RS 232
Page 40

( )
*
- 40 -
()
()
...
6
()
8
*
8
8
Brief Instructions
Feature Activate
Teacher views own screen ('clear')
(Teacher) screen to groups
Grouping
Teacher calls up student screen
Teacher to student
Student to other student
Blanking all groups
Mouse/keyboard remote control
Release "load image" function
Automatic scan
Release "help" function
Audio transmission / conference
*= keep pressed
( )= if required
Page 41

Deactivate Note
The teacher´s workstation is source, no workstation
receive, "load image" and "help" function not active
Selected source (teacher after "clear") is transmitted
to the active groups
The LEDs of the active groups are lighted,
actuate again to deactivate
Because of the „ teacher automation“ if suffieces
to just press the student key
Keep teacher key "D" pressed, select required student(s),
release teacher key
Include additional receivers as required (see under
"teacher to student")
Active groups blanked; mouse and keyboard locked
Exception: teacher and display (or beamer)
Receiver controls mouse and keyboard functions of the
student called up („remote control“)
With the function activated, students can individually
call up source
All student screens are successively called up
on the teacher’s monitor
"Help" function on/off, at the same time all help
requests are cancelled
Change between audio functions:
LED on: conference circuit activated
LED off: listening activated only
State of on : image source flashing: receiver
MKVision plus pilot lamps: off: uninvolved flashing quickly: help request
Brief Instructions
- 41 -
Page 42

Page 43

Grasseler Str. 56 • 38110 Braunschweig
Tel. +49-(0)5307 / 9609 - 0 • Fax +49-(0)5307 / 9609 - 11
Email service@systech.de • www.systech.de
Service
We will be pleased to assist you - also after expiry of the guarantee period.
Page 44

Grasseler Str. 56 • 38110 Braunschweig
Tel. +49-(0)5307 / 9609 - 0 • Fax +49-(0)5307 / 9609 - 11
Email vertrieb@systech.de • www.systech.de
Artikel-Nr. 13105
 Loading...