

Page 1
User Guide Manual
(ver2.2)
Page 2

www.looket.com
Thank you for choosing and
purchasing the Looket T5
model as your GPS navigation
and welcome to User Guide
Manual.
The device is very easy to use
and it takes you just few steps
to understand how it works.
User Guide Manual - 1
Page 3

www.looket.com
- CONTENTS –
1. Looket T5 Models .......................................................... 9
2. Before Starting Looket .................................................. 9
3. Designation ............................................................... 14
4. Main Menu ................................................................... 17
4.1. NAVIGATION Menu ............................................... 17
4.1.1. First Launch ................................................. 17
4.1.2. Designation of Navigation Screen ............... 19
4.1.3. Useful Function on Main Menu .................... 20
4.1.4. How to set Home Location .......................... 28
4.1.5. How to check or re-set GPS hardware ......... 29
4.1.6. Menu Bar on Navigation Screen .................. 29
4.2. DIAL Menu ............................................................. 33
4.2.1. How to receive a call ................................... 34
4.2.2. Call History .................................................. 35
4.3. MESSAGE Menu ..................................................... 36
4.3.1. Message View .............................................. 37
4.3.2. New Message ............................................... 38
4.4. PHONE BOOK Menu ............................................... 39
4.4.1. Phone Book Information ............................. 40
4.5. INTERNET Menu .................................................... 41
4.5.1. Favorites Page ............................................. 43
4.6. MULTIMEDIA Menu ............................................... 44
4.7. AV-in Menu ............................................................ 46
4.8. SPEED Indicator .................................................... 47
4.9. EMERGENCY SMS .................................................. 47
4.10. SETTING Menu............................................... 48
4.10.1. System ......................................................... 48
4.10.2. Volume & Backlight ..................................... 48
4.10.3. Phone .......................................................... 49
4.10.4. Internet ....................................................... 50
4.10.5. SIM Card ...................................................... 51
User Guide Manual - 2
Page 4

www.looket.com
4.10.6. Tracking ....................................................... 52
4.10.7. FM Transmitter ............................................ 53
4.10.8. About ........................................................... 54
5. Extra Function ............................................................. 55
5.1. USB Connection ..................................................... 55
5.2. Not Installed Software .......................................... 55
5.3. Sleep Function ....................................................... 56
5.4. Smart Power-off Function ..................................... 57
5.5. SIM Card Extracted ............................................... 57
5.6. Lower Battery Warning ......................................... 58
6. Trouble Shooting ......................................................... 59
7. Warranty ..................................................................... 61
8. Package & Accessory ................................................... 63
User Guide Manual - 3
Page 5

www.looket.com
- NOTICE & WARNING -
Reset - To reset a Looket T5, please turn off and on a switch
at the bottom of the device.
Installation
- Before installing a suction cup of a moun t, please clean and
inside of windshield and remove any dust or grease.
- Avoid placing your device and accessories near or in an air
bag deployment area. If not, may cause serious injury when
air bags inflate rapidly.
- Do not place unsecured on a dashboard.
- Do not mount where a driver's field of vision is blocked.
- Device is designed and approved for vehicle windshield
installation, hand-held only and body-worn use with the
supplied belt-clip and headset to meet FCC RF exposure
compliance requirements, other operating conf iguration are
not approved.
GPS (Global Positioning System)
- If taking long time to get GPS signal and find current
location, place it where it has a clear view of the sky. GPS
signals can be obstructed by ceilings, trees, nearby tall
buildings and the roof of the vehicle.
- Initial GPS f ix may take up to 2~10 minutes depending on
circumstances.
Important: Some vehicles with a coated or heat reflective
windshield may require on an external GPS antenna (not
included).
User Guide Manual - 4
Page 6

www.looket.com
- Fix initial GPS with a full charged battery. It will take longer
than before with a low battery.
- The Looket device is supporting a SiRFInstantFixII
technology, so it is able to receive signal more quickly from
GPS satellites and indicate a current location on the map
without waiting for long time.
- If there is no saved GPS satellites information or the saved
information is not enough, the SiRFInstantFixII function
would not be working normally. Also when receiving GPS
signal at first, the location error can be happened depending
on operating circumstances. Moreover, in case of not using
the device for over 3 days, the SiRFInstantFixII function
would not be operated.
※ SiRFInstantFixII technology
It can reduce warm starts, the typical PND start-up mode,
from over half a minute to as little as five seconds, and in
urban canyons the difference can be even more significant.
It does this while demonstrating excellent positional
accuracy, an important attribute for navigation devices. It
accomplishes this using sophisticated, patent-pending
algorithms that enable the PND to model the behavior of
visible GPS satellites during the day and predict their
position in the sky for up to three days in the future. It
continuously ref ines its calculations based on the latest data
it receives from the satellites being tracked every time the
PND is used. It performs these calculations completely
autonomously, without ever needing updates of any kind
from a network.
User Guide Manual - 5
Page 7

www.looket.com
Battery and Chargers
- Use only batteries and chargers included in the package
provided or officially approved by the manufacturer.
- Rick of explosion if batteries are replaced by an incorrect
type.
- Unauthorized batteries or chargers may harm the device
and any accidents or damages. This will not responsible for
the manufacturer.
- Dispose of used batteries according to the instructions.
- Never dispose of batteries or devices in a fire or heating
devices such as ovens or stoves.
- Never crush or puncture the battery or device. Avoid
exposing them to high external pressure, which can lead to
an internal short circuit and overheating.
- To protect the device against sudden current, connect a car
charger only after the car engine has been started.
- Connect the charger during operation. Low battery may
deteriorate GPS performance.
SIM Card and Memory Card
- Do not remove the card while the device is transferring or
accessing information, as it could result in loss of data
and/or damage to the card of device.
- Protect cards from strong shocks, static electricity, and
electrical noise from other devices.
- Frequent writing and erasing will shorten the life span of
memory cards.
- Do not touch gold-colored contacts or terminals with f inger s
or metal objects. If dirty, wipe the card with a soft cloth.
User Guide Manual - 6
Page 8

www.looket.com
Safety Warnings
- Looket T5 has the microphone on the front side and the
speaker on the back side. So if talking with the speaker to
the ear, the other cannot hear your conversation because
the microphone is on the opposite.
- Looket T5 is designed to make or answer a call like a phone
after mounted in a car.
- In case of using the unit as a portable device, we do not
recommend to use the telephone function.
- Do not put the speaker to the ear. I t is a portable device
with high volumes so it can damage your hearing.
- An ear set provided or approved by SysOnChip, Inc. is able
to be connected to the ear set port for phone
communication.
- A belt-clip provided and/or approved by SysOnChip, Inc. is
for body-worn use and that there should be no other
distance to maintain other than using the device with the
supplied belt-clip as specified to satisfy body-worn RF
exposure compliance.
- Please maintain a minimum of 20 cm between the device
and the body to avoid potential interference while being on
the unit as a portable device and/or using it in a vehicle
although the device has a voice communication function.
User Guide Manual - 7
Page 9

www.looket.com
- Do not use and/or leave the device in high or low
temperature and potentially explosive environments to
prevent permanent damage. Specially, do not leave the
device in the vehicle on hot summer days or during cold
winter nights.
- In case of not using the device for a long time, off the
power switch to protect the unit.
- The suction of the mount may be lost if left overnigh t, due
to condensation and low temperature.
- Wipe or dry the LCD screen of the device using a soft cloth.
- Do not use any liquid cleaners. It is a good idea to use a
LCD protection film .
- Do not allow the device to get wet - liquids can cause
serious damage. Do not handle the device with wet hands.
Water damage to the device can void the warranty.
- Do not expose the device and the memory card to magnetic
fields.
- Allow only qualif ied personnel to service the devic e. If not,
the device can be damaged and will void the warranty.
- The use of accessories that do not satisfy these
requirements may not comply with FCC RF exposure
requirements, and should be avoided.
User Guide Manual - 8
Page 10
www.looket.com
1. Looket T5 Models
Features
Models
Navigation O O
GSM/GPRS Support O O
Multimedia Player O O
FM Transmitter X O
AV-in X O
※ Models and features are subject to be changed without notice.
T500 T530
2. Before Starting Looket
◈ How to insert SIM card
1) Switch off before inserting SIM card.
2) Turn on a screw to open a cover.
3) Insert a SIM card and tighten up the
screw.
User Guide Manual - 9
Page 11
www.looket.com
◈ How to insert micro SD card
- Turn off before insert a
microSD card.
- Insert the microSD
card like a following
picture.
Be careful of the direction when inserting the card.
Do not remove the card while the device is powered on,
doing so may result in the device malfunction. We
recommend to turn off the device before removing the
card.
◈ How to install Windshield Mount
1. Push the suction base (A)
against the windshield.
2. Flip the base lever down (B) to
the locked position.
3. Adjust the angle of the
pedestal arm by tightening the
angle adjustment knob (C) at
the base to the desired angle.
User Guide Manual - 10
Page 12
4. Connect the cradle (D) on the
5. Adjust the angle and rotation of
6. Slide down the device on the
7. Connect them with a snap.
◈ How to install into Belt-clip
www.looket.com
dual T-tabs (E) on the pedestal
head.
the head by tightening the
head adjustment knob (F).
cradle from top to bottom.
1. Connect the cradle on the
dual T-tabs of the belt-clip.
2. Slide up the belt-clip with the
cradle on the back side of the
device from bottom to top.
3. Connect them with a snap.
User Guide Manual - 11
Page 13
www.looket.com
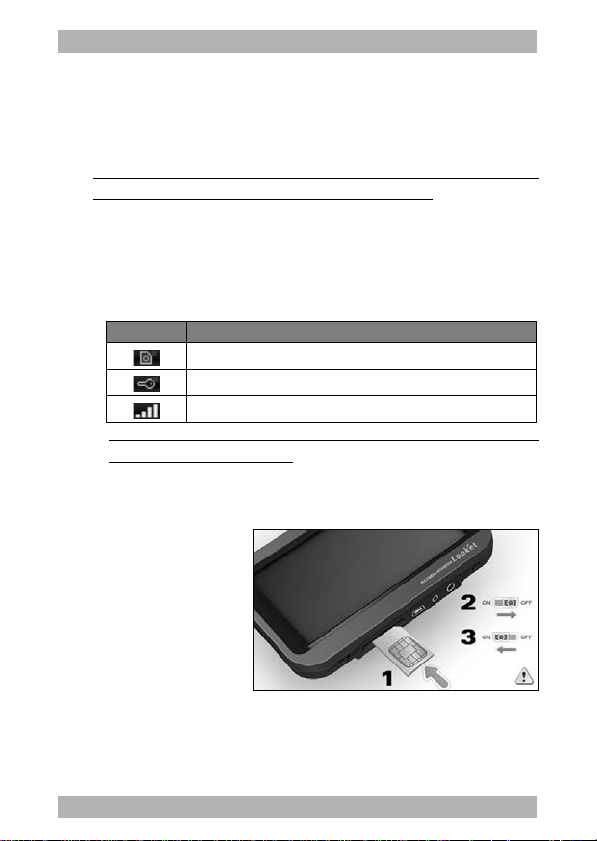
◈ Quick Guide of GSM/GPRS function
Precisely read following instructions before using GSM/GPRS function.
1) After turned off the device, insert a SIM card.
※ If the SIM card is inserted or taken out when the device is
turned on, it could result in damage to the card.
2) The cover of the SIM card slot should be closed tightly by
using a screwdriver. If not fit into the slo t, may be recognized
as no SIM card. So check below indication i cons at the right
bottom of the screen to understand status.
Icon Description
No SIM card
Disconnection of network service
Signal strength
※ If the SIM card is not inserted or the slot is open, the
GSM module power is cut.
3) If the slot is open while the devic e is working, the following
picture is displayed and the device is not operated.
On this occasion,
re-insert the SIM
card precisely and
close the slot cover
correctly.
Then supply power
into the device.
4) To send text messages, the setting of SMSC (Short Message
Service Center) should be checked on the menu; Setting
Phone.
User Guide Manual - 12
Page 14
www.looket.com
Confirm if SMSC value in the item ( ) is same with the
service provider.
If incorrect, select
Edit button to set
exact value. Then,
the messages can
be sent.
5) Set APN to browse the web on Setting Internet menu. To
use Internet, enter correct information from the service
provider.
6) To use Tracking function, it should be enabled on Setting
Tracking menu. As soon as it is available, the icon (
) is
indicated.
User Guide Manual - 13
Page 15
www.looket.com
3. Designation
① LED Indicator
- Red: An internal battery is charging.
- Blue: An internal battery is fully charged.
- Off: A power connector is disconnected.
- Blinking: GMS/GPRS is connected.
② Touch Screen
In the battery mode without connecting any chargers, the touch
screen is locked if not operating over 1 minute excepting running
the navigation, multimedia player as well as AV-in.
In case of the locked mode, the device is suspended (on the
sleep mode) if any touch is not occurred over 1 minute.
To unlock, please press the lock icon for 3 seconds and over.
User Guide Manual - 14
Page 16

www.looket.com
Microphone③
When the user makes or answers a call through GSM/GPRS
function, he can speak into a microphone.
※ If talking on the microphone to the ear, the other cannot hear
your conversation because the speaker is on the opposite.
④ Menu (SOS) Button / Sleep & Wake-up Button
A menu bar is come out when this button is pushed at the
contents supporting the menu in the application program. So the
application programs showing on the menu bar are able to be
conducted or set. Also, a SOS alert message is sent to a
predefined phone number as soon as clicked a Emergency SOS
button on the menu bar.
If it is pressed for 2 seconds and over, the device is suspended
(on the sleep mode). And it is waked-up when the button is
taped shortly.
⑤ External GPS Antenna Port
An external GPS antenna can be connected for better GPS
performance.
⑥ Power On/Off Switch
This switch controls main power of the Looket T5. If the swi tch is
off, the device is turned off, and when the switch is on, the
hardware of the device is reset. At this time, saved settings etc.
will be deleted.
The switch can be used for the hardware reset of the device and
to save the power for long time in case of being used as a
portable memory device without the external pow er
⑦ SIM Card Slot
This slot is to insert a SIM card.
User Guide Manual - 15
Page 17

www.looket.com
⑧ USB & Power Port
The device is able to be charged by an AC Adapter or Car
Charger provided or approved by SysOnChip, Inc. through the
port. Also, the unit can be used as an external portable memory
device by connecting with PC via the port.
⑨ Ear Set Jack
An ear set provided or approved by SysOnChip, Inc. is able to be
connected to the port for phone communication.
⑩ AV-in Port
If the rear camera of the vehicle or the external device
supporting AV output such as iPOD Video etc. is connected to the
Looket T5 enabling this function through the port, users can
enjoy the video on the screen.
※ The Looket T500 is not able to support this function.
⑪ Serial Port
The external device supporting communication by a serial cable is
connected to the Looket T5.
⑫ microSD Card Slot
This slot is to insert a microSD card.
⑬ Speaker
Do not put the speaker to the ear. The GPS navigation device
using in the vehicle has high volumes, so it can damage your
hearing.
※ If talking with the speaker to the ear, the other canno t hear
your conversation because the microphone is on the opposite.
User Guide Manual - 16
Page 18

www.looket.com
T
4. Main Menu
After turning on the Looket T5 for the f irst time, a follow ing screen
is appeared in case of the Looket T530 model.
4.1. NAVIGATION Menu
This User Guide Manual which is a quite simple manual to
follow will take you to understand how it works. For more
detail information, please download the manual on our website.
Also, you can consult Quick Guides on the settings menu from
the main menu of the navigation in the device.
To enter Quick Guides, please do as follow;
ouch screen → Tap Setting on menu →Quick Guides
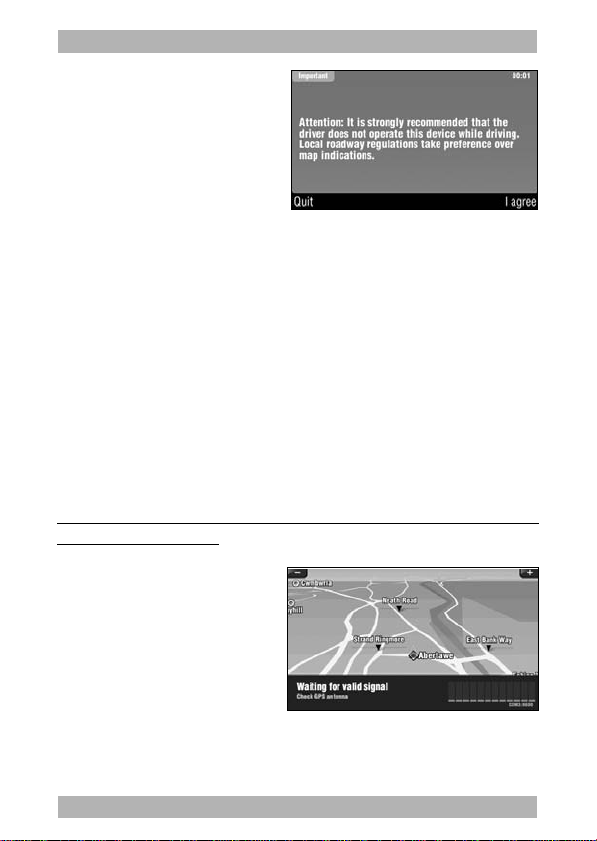
4.1.1. First Launch
When you conduct NAVIGATION first time, you should be asked to
set language, voice, map, GPS signal etc. All informatio n you set
will be saved in a SD card automatically after launch.
User Guide Manual - 17
Page 19
www.looket.com
1. Tap NAVIGATION on the
Main menu. After reading
the important message,
click I AGREE.
2. Select your language,
voice, distance units,
keyboard preference and
map.
3. After choosing your map, the device is auto-searching for GPS
signal, and then its COM port and baud rate which the device is
supporting will be set automatically.
4. You would probably see your current valid GPS position on the
map after successful launch.
5. If you tap anywhere on the map area, the Main menu of the
NAVIGATION is shown. On the bottom of the screen you can see
useful information about your current position - street name with
numbers.
※ The process of the first launch is subject to be passed according
to countries and maps.
After successful launch, you
would probably see your current
valid GPS position on the map.
If you see only grey screen after
launch, you should probably
check your GPS st atus first an d
wait for valid GPS signal.
It takes some time to get valid signal from available satellites. First of all,
tap on the grey screen to open the Main menu and f ind a GPS status
button.
User Guide Manual - 18
Page 20
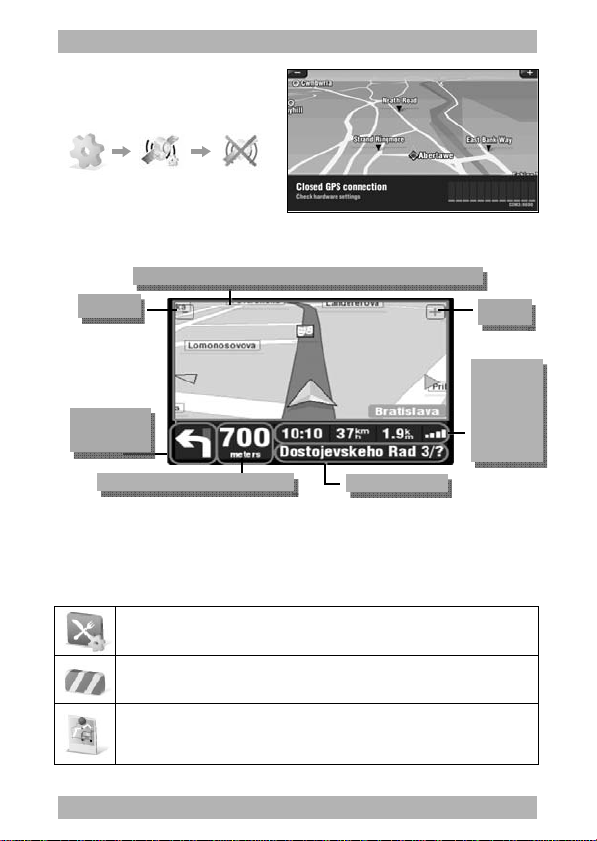
If a 'Closed GPS connection'
Tap
A
/
/
/
message is displayed, check if
the GPS module is turned on.
www.looket.com
Settings GPS
hardware
Tu rn GPS
module off
4.1.2. Designation of Navigation Screen
Zoom Out
Next Turning
Point*
* These information are shown only if you have already computed a route.
If the navigation pane displaying Arrival Time, Speed, Current Position, etc.
is tapped, the following context menu is appeared.
anywhere on the map area to open the Main menu
Distance to next turning point*
Current position
Show Important Places - this option will show your 2 POI
categories chosen close to your position.
Avoid Roadblock - set the circle on your map to avoid all street
blocked within circle area.
Memorize Position - this option lets you save and memorize
your actual position. Position will be automatically saved and
you can find it any time later in History.
Zoom In
rrival time
Speed
Distance
to finish
GPS signal
User Guide Manual - 19
Page 21

www.looket.com
4.1.3. Useful Function on Main Menu
4.1.3.1. Navigation to
If you click 'Navigation to...' on the Main menu, there a re various
ways to set your destination and plan your route easily. They will
give you great opportunity to choose just the perfect option for you.
User Guide Manual - 20
Page 22

www.looket.com
a) Address - standard way of navigating. You can choose in steps
Country, City, Street and number.
b) Favorite - this function allows you to navigate to one of your
favorite Points of Interest.
c) History - list of your memorized positions. Option to navigate to
memorized history entries or delete these entries is
available.
d) Point of Interest - navigate to Point of Interest: restaurant,
hotel, school, wine-room, etc.
e) ZIP Code - instead of name of the city, simply type in the zip
code will find the exact address.
f) Home - navigate to Home location saved by you who can set up
the home location in: Settings → Set home location.
g) Point on Map - choose your destination straight from the map.
h) Enter GPS position - navigate to exact GPS p osit ion en tered a s
longitude and latitude coordinate.
i) City Center - navig ate to straight the center of the chosen city.
You will be asked to look up the city within the
country.
j) POI in City - instead of navigating to address, you can simply
select POI of the chosen city and Sygic will f ind it for
you.
k) Last Valid Position - navigate to last GPS position received last
time GPS signal was available.
User Guide Manual - 21
Page 23

www.looket.com
In this guide, we'll show you how to use the Navigation to function
using the Address option.
1. Touch Address on the Main menu.
2. Select Country, City, Street and Number step by step.
Or f ind them using the keyboard on the screen.
3. Select your departure screen appears.
You can choose from three options - wait for valid signal, Last
valid position or Select from map. (Wait for valid signal and Last
valid position work properly when the GPS is turned on.)
4. As soon as the route is calculated, basic information on your
route is shown. Ask for more into deep route description by
pressing Details.
5. Select ac tive item you want t o avoid on route. If yo u click on
item, your route will be recalculated without these items.
※ Management of Favorites
There are two ways how to add the address and/or destination to
the Favorites.
1) Browse map on Main Menu
① Select the p oint (where you'd like to add on the Favorites) on
the map. Or tap Options - Find - Address and then you can
enter the exact address (or other options available).
② Click the Context menu butt on in the middle of the bottom
black title bar where you have several option (navigate there,
travel via, etc.).
③ Select Add as POI , th en tap Favorites.
2) Manage POI on Main Me nu
① Click Add POI.
② Choose Address (or other) to insert the place to Favorites.
③ Tap Favorites on 'Select or create a category' menu.
User Guide Manual - 22
Page 24

www.looket.com
Tap
p
4.1.3.2. Browse map
It is available to browse the entire map and search for your
destination or POI. By simple dragging, you will be able to scroll
through the map and explore new areas.
Browse map cursor informs you about targeted POI or street
Zoom
In/Out
using
zoom bar
Map scale
to o
en the Map options
< Options >
a)
destination. You can choose from the following options:
Address, Favorite, History, Point of Interest, Zip Code, Home,
Enter GPS position, City Center, POI in City, Last Valid Position.
b)
on the map. It may be useful if you get lo st on the map whi le
browsing it.
c)
regardless of its size or location on the map. This function is
available only if there is already a route calculated.
d)
e)
want/don't want to see on the map.
this button to open the Context menuTap this button
Find...
- allows you to quickly look up the desired
Show current position
Show entire route
Show city
- a selected city will be displayed on the map.
Show/Hide POIs
- will show your current position
- will display the entire route
- you can select the POIs that you
User Guide Manual - 23
Page 25

www.looket.com
< Context Menu >
a) Navigate there - Offers 3 possibilities; wait for valid
signal, last valid position, select from map.
b) Travel via - you can choose the destination throug h
which you want to travel. This function is available only
if you have already computed route.
c) Continue - information abou t the route, possibility
to modify the route.
d) Avoid - allows you to define the area on the map
that you want to avoid.
e) Add as POI - allows you to add the selected
position on the map as POI.
f) Find nearby POI - this function will display the
selected POIs that are located nearby your position.
4.1.3.3. Alternative route
It is easy to handle and offers several options how to change your
complete route plan within a few seconds.
a) Compute alternative - will recompute the route
using routes different from those used for the original
compute.
b) Avoid next... - set the circle on your map to avoid
all street blocked within circle area.
c) Travel via... - allows you to add the waypoints into
the computed route.
d) Reset to original - you will retur n to the original
route. Alternative routes will be cancelled.
e) Avoid traffic delays - allows you to avoid traffic
jam or other incidents that may occurs, you can avoid
part of the originally computed route (from 500m to
20km).
User Guide Manual - 24
Page 26

www.looket.com
4.1.3.4. Settings
When you tap Settings from the Main menu, you can modify Sygic
DRIVE and user's preferences.
The Settings menu includes;
Set to 2D (flat) view / Set 3D view
Set night / daylight / automatic colors
Disable / Enable sounds
Volume settings
GPS logs - you can record your GPS position and play back it.
Advanced settings - U-Turns, Auto zoom, Railway crossing
warning, Lane information, Backlight
settings, Standby mode, Antialias,
Information displayed in the navigation
window, Speed limit warning.
Planning preferences - select the way of route compute (the
fastest route or the route without
motorways).
Toll charge settings
Set vehicle type
GPS hardware
Signpost settings - see all directions, preferred direction or
disable signpost information.
Rotate display
Left / Right handed
Keyboard settin gs
Regional settings - distance unit setting, preferred ti me format
and geographical coordinates.
Set language
Set voice
Switch map - select your map folder.
Set home location
Backlight settings
Quick guides
User Guide Manual - 25
Page 27

www.looket.com
4.1.3.5. Traffic
The Looket T5 models are not supporting this function because the
devices do not have a TMC receiver.
4.1.3.6. Route
You have to first plan your route to get access to route options. I f
you haven't planned your route, the route button isn't available.
Here you can find all the further information about your route, you
can view the whole route in image slides or even watch the route
preview by using the route demonstration option.
a) Show route instructions - shows you the most
important turning points (whether to turn left or right)
on your route and distance between them.
b) Show route as image - will display the route as
images.
c) Show route summary - information about the
route, possibility to modify the route.
d) Show route demo - enables the demonstration of
the computed route.
e) Show on map - the computed route will be
displayed on the map.
f) Cancel route - the route will be cancelled.
4.1.3.7. Itinerary
It allows you to plan your business journey, trip and many more
directly from the comfort of your living room. Your planned route
can be saved, renamed, deleted.
User Guide Manual - 26
Page 28

www.looket.com
4.1.3.8. Manage POI (Point of Interest)
Various POIs are shown on the map such as airports, banks, bus
stations, hotels, parking garages, shopping centers, etc. You can
easily manage them and add your own POIs or there is also a
function which warns you when you'll be crossing the nearby POI.
a) Add POI - you can add POI and assign the icon.
b) Edit POI name - you can rename the POI that you
created.
c) Delete POI - you can delete the POI that you
created.
d) Delete POI category - you can delete the whole
category that you created.
e) Show / Hide POIs - select the POI which should
be displayed on the map.
f) Warn when near POI - select the POI, enter the
distance from your position, choose the warning
signal.
4.1.3.9. GPS status
Check 'valid satellites' or 'your valid position'.
Points of the compass
Satellite
Valid sign als from
position
satellites are filled
with green color
Modify hardware settings
User Guide Manual - 27
Page 29

www.looket.com
4.1.3.10. Memorize position
Save your cur r ent position i nto History.
4.1.3.11. Extras
Some additional applications (World Clock, Calculator, Unit
Convertor, Country Information) that might be useful on the road.
a) World Clock - set up the current time in three
world cities. Choose from more than 30 world cities.
b) Calculator - simply to use calculator available
directly.
c) Unit Converter - Currency, Length, Area,
Volume, Mass, Pressure, Power, Energy, Temperature
e) Country Information - speed limit, country
code, currency, etc. When crossing the country
border a window with basic country informational
automatically pops up.
4.1.3.12. Exit
Tap the button if you want to close down Navigation.
4.1.4. How to set Home Location
1. Ta p 'Set home location' on Setting menu.
2. After your home location has been saved, just click Home on
Navigation to menu to navigate home in the future.
※ If you don't have a home location saved, the device will prompt
you to set your home location when you click Home on
Navigation to menu.
User Guide Manual - 28
Page 30

www.looket.com
4.1.5. How to check or re-set GPS hardware
1. Tap Settings on Main menu and then click GPS hardware.
2. Check Turn GPS module button for activation GPS module.
(The icon should be same with the following picture.)
3. Tap 'Autodetect' to search COM port and baud rate automatically
and then wait to fix it. Or set following COM port and default
baud rate by your self after tap COM port and Baud rate.
COM port: COM3 / Baud rate: 9600
4.1.6. Menu Bar on Navigation Screen
If a 'M' (menu) button on the right side of the device is pressed
during running the navigation, the Menu bar is come up on the
right side of the screen. There are the indicators of the battery
status and 5 icons on the menu bar in case of the Looket T530.
- Volume / Backlight
- Dial
- BGM Plyaer
- Camera
- Emergency SMS
User Guide Manual - 29
Page 31

www.looket.com
4.1.6.1. Volume & Backlight / FM Transmitter Setting
The user is able to control the volume and backlight level.
Also, when tapped the FM transmitter icon, the fol lowing screen is
displayed to set the FM transmitter function.
In case of enabling the FM transmitter, the icon is bright and the
current set frequency is indicated on the icon. If the function is
disabled, 'OFF' is displayed on the icon.
※ The Car Charger, AC Home Charger or mini-USB Cable of the
Looket device is acted the part of the FM antenna. So it should be
connected with the charger or cable to use the FM Transmitter
function.
User Guide Manual - 30
Page 32

www.looket.com
p
4.1.6.2. Dial Button
If this button is clicked, you can make a call on this device.
4.1.6.3. BGM (Back Ground Music) Player
The user is able to listen to music with the navigation.
The BGM program plays the music in the 'Music' folder of the
inserted microSD card or internal memory in order of precedence.
Music file s which users would like to play in the BGM program can
be added to the Music folder of the microSD card or internal
memory.
Previous Play & StopNextVolume DownVolume U
User Guide Manual - 31
Page 33

www.looket.com
4.1.6.4. Camera Button
When this button is selected, the video signal from the AV port is
shown on the screen. If the vehicle has the rear camera, the image
from the rear camera is displayed on the screen.
The program is ended when touched the screen, and then the
Navigation screen comes up.
In case that the external AV is connected instead of the rear
camera, the video is supported but the sound is not provided during
the operation of the Navigation.
On the System menu of the Setting menu of the Main m enu, it is
able to set the video from the rear camera is shown autom atically
when the AV signal is occurred. As soon as the AV signal is
disconnected and the camera view is closed, the Navigation screen
is displayed. (The function will be useful in case of co nnecting the
rear camera signal with the reverse gear.)
If the AV signal is weak or it is not existed, the message, 'No Signal',
is shown on the screen.
[ View from Rear Camera ]
4.1.6.5. Emergency SMS Button
Please refer to
User Guide Manual - 32
Chapter 4.9. Emergency SMS
.
Page 34

4.2. DIAL Menu
www.looket.com
No Name
1
Status Indicator
2 Volume Controller
3
Dials
(when clicked ‘0’ for over 1 second, ‘+’ is displayed.)
4
Delete
5
Call (when tapped a phone number)
Call History (without inserting a phone number)
Last Call (when pushed a dial button for over 1 second)
6
End / Exit
7
T
8
+: click ‘0’ for over 1 second to make an international call
9
P:
10
Phone Book
User Guide Manual - 33
Page 35

www.looket.com
4.2.1. How to receive a call
If someone calls to your device, the following window comes up
and a bell rings. To answer the call, the Call button should be
clicked. But, if the user is under the situation that he can not
answer it, the End/Exit button is able to be selected, and the n the
window is closed after the call line is off.
The call is connected and
the screen is changed to
the following screen.
The telephone icon is
displayed on the leftbottom side of the
screen while talking over
the telephone.
The icon is disappeared
automatically as soon as
finished the call.
◈ While answering the call, all sound from other application
programs such as Navigation, Multimedia Player, AV
Receiver etc. are muted for the better conversation on the
phone. By such the principle, the voice is not out from the
FM radio when the FM transmitter function is enabled, so
the sound is made through the only speaker of the device.
If the icon is clicked to
finish the call or control
the volume level etc., the
Call program comes up.
User Guide Manual - 34
Page 36

www.looket.com
4.2.2. Call History
When tapped the dial button without inserting phone numbers, the
list of the last call history is appeared.
Icon Description
Sorting button.
List all history.
Sort received call history.
Sort dialed call history.
Sort missed call history.
Make a call.
Send messages.
Delete a selected one.
Delete all history.
Save a selected one into a phone book.
User Guide Manual - 35
Page 37

www.looket.com
4.3. MESSAGE Menu
In this menu, you can send and check as well as manage messages.
Icon Description
Sorting button.
List all messages.
Sort received call history.
Sort called history.
Sort missed call history.
Send new messages.
Make a call.
Delete a selected one.
Delete all messages.
Save a selected numbers into a phone book.
User Guide Manual - 36
Page 38

www.looket.com
4.3.1. Message View
When double-clicked a message on the list, it is able to see the
message in detail. If the message is locked here, the message is
protected.
Icon Description
Lock a selected message.
Unlock a selected message.
Forwarder a selected message.
Make a call.
Delete a message.
Save a numbers into a phone book.
User Guide Manual - 37
Page 39

www.looket.com
4.3.2. New Message
When tapped a new message icon on Message menu, a following
window is appeared to send a new message.
Icon Description
Add a phone number.
Delete a selected phone number.
Send a written message.
When clicked a Send icon, a following window is displaying unt il the
message is transferred.
User Guide Manual - 38
Page 40

www.looket.com
4.4. PHONE BOOK Menu
You can search, save and manage the phone number. Also, you can
call or send SMS to a selected number.
Icon Description
Sorting button.
Name sorting.
Phone number sorting.
Sort by a speed dial number
Make a call.
Send a message.
Delete a selected one.
Delete all lists.
Add a new one.
User Guide Manual - 39
Page 41

www.looket.com
4.4.1. Phone Book Information
The detail information can be checked when double-clicked a
selected one on the list.
Icon Description
Make a call.
Send a message.
Delete a selected one.
Delete a list.
Save edited information.
User Guide Manual - 40
Page 42

www.looket.com
4.5. INTERNET Menu
The Looket T5 is a connected GPS device. So you are able to access
web pages through GSM/GPRS.
You may incur additional charges for accessing the web and
downloading media.
The internet menu may be labeled differently depending on
your service provider.
In case of setting Internet at the first time, refer to
4.10.4. Internet
in Setting menu.
Chapter
Icon Description
Go to a previous page.
Go to a next page.
Go to URL.
Refresh a page.
Add a page to Favorite.
User Guide Manual - 41
Page 43

www.looket.com
If pushed a Menu button on Internet menu, the menu bar is come
up as follows;
- Volume / Backlight
- Keyboard
- Favorite link pages
- Camera
- Emergency SMS
When tapped a Keyboard
icon, a following window
is appeared.
- write ‘.com’
- hide a keyboard.
When tapped
When tapped
- English Small Letter - - English Capital Letter -
When tapped
When tapped
- Extended Small Letter - - Extended Capital Letter -
User Guide Manual - 42
Page 44

www.looket.com
4.5.1. Favorites Page
The LOOKET device provides Favorites function, so it is able to go
to web pages quickly that have been visited frequently.
Icon Description
Address of a default page
Go to a default page
Save to a default page
Title of favorite page
Go to a favorite page
Delete a favorite page
User Guide Manual - 43
Page 45

www.looket.com
4.6. MULTIMEDIA Menu
The Looket T5 models have a Multimedia Player. Various video,
audio, image files saved in a SD card will be able to be displayed.
※ Best resolution: 480 x 272 pixels
※ Supporting codec: mpeg, mpg, asf, wmv, avi, jpg
① Screen
- If the screen part is clicked, it is changed to the full screen.
② Status Bar
- The playing part is able to be selected by moving the bar.
③ Previous Button: Play the prior file.
④ Play / Pause Button
- Play or stop playing and ready to continue the current file.
⑤ Next Button: Play the foll ow ing file.
⑥ Edit: Open the window to edit the file list.
⑦ Set-up Button: Show the set-up screen.
⑧ Mute On/Off: Sound is on or off.
⑨ Volume Down Button
⑩ Volume Up Button
⑪ Play List
⑫ Exit: Close the program.
User Guide Manual - 44
Page 46

www.looket.com
* Edit Window of File List
T his is the edit window to make the file list w hich can be played
such as music, video, images.
① Showing the edited file list
② Delete the selected file on the file list
③ Delete all files on the file list
④ Select all file in the chosen folder of SD card
⑤ Cancel the selection of the file in the chosen folder of SD card
⑥ Display the file able to be playing in SD card
⑦ Add the checked file to the file list
⑧ Show the path of the selected folder
⑨ Close the file list editing window
* Setting Window
① Screen size setting
- Fit Best
- Fill Screen
- Stretch to Screen
② Play mode
- Repeat All (
- Random (
)
)
③ Exit
User Guide Manual - 45
Page 47

www.looket.com
4.7. AV-in Menu
The AV menu is to play the
video / sound from an external
AV input. If a device supporting
AV output such as iPOD Video
etc. is connected to the Looket
T5 (excepting the Looket T500),
the user can enjoy the video on
the screen.
If a user's vehicle has the rear camera which is connected to an AV
port on the Looket T5, the image from the rear camera is displayed
on the screen.
If there is no input signal from outside when AV is executed, the
screen with 'No Signal' message is displayed.
In this case, please check the AV input cable or the device handling
AV ou tput.
User Guide Manual - 46
Page 48

www.looket.com
4.8. SPEED Indicator
The Speed Indicator can be used to check current speed simply
without using navigation function. While GPS signal has been fixed,
current speed is indicated. (If the signal is weak, ‘- - -‘ is displayed.)
If tapping Km/h button, the speed unit is changed to MPH.
※ This program is executed when ‘M’ button is pressed on Main
menu.
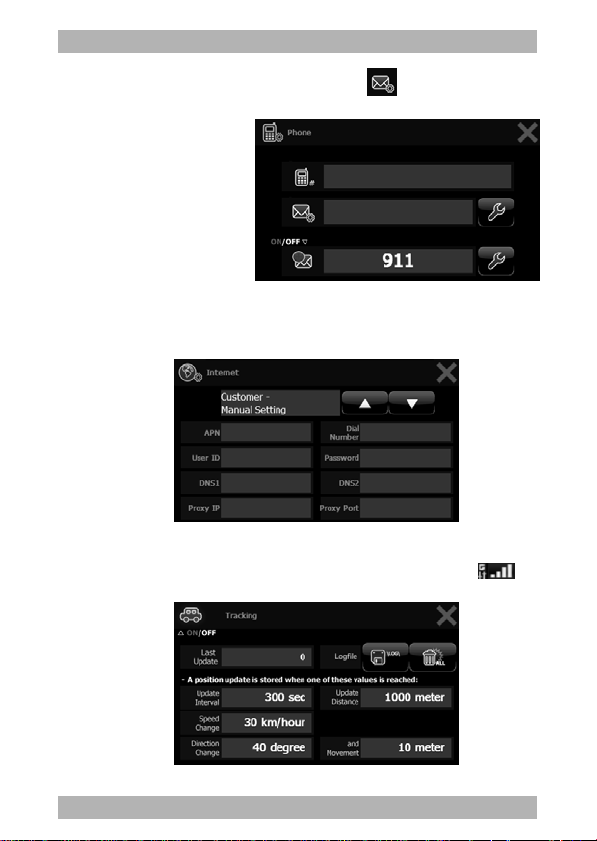
4.9. EMERGENCY SMS
In case of urgent situation such as a car accident, Emerg ency SMS
is sent at any time as soon as this icon is selected in the Menu bar.
The sending message is fixed as ‘SOS’ and the number is able to b e
changed on Setting SMS menu.
User Guide Manual - 47
Page 49

www.looket.com
4.10. SETTING Menu
4.10.1. System
1) OS version Information of Looket T5
2) Capacity of Flash Disk (HDD)
2) Capacity and ID Information of SD card
3) Language Selection
4) Recalibration of Screen: The touch pad can be recreated.
5) Auto Rear Camera
4.10.2. Volume & Backlight
The level of the volume and
backlight can be set and
controlled by moving the slide
bar.
User Guide Manual - 48
Page 50

4.10.3. Phone
Icon Name Description
User’s
Phone
Number
SMSC
(SMS
Center)
Editing
SMSC
Indicate a user’s phone number
automatically.
Indicate S MSC in form ation from SIM c ard.
If it is not entered or incorrect, message s
will not be sent.
Set SMSC value. Ask exact value to the
service provider.
www.looket.com
SOS
Message
SMS
Number
Setting
Set to enable / disable sending SOS
messages.
Editing the emergency SMS number.
User Guide Manual - 49
Page 51

www.looket.com
4.10.4. Internet
A service provider, APN, proxy IP, etc. should be set to use this
function.
The Looket device supports predefined APN lists depending on each
country and service provider basically. So the suitable service
provider in your area can be selected by searching with
/ buttons.
If the predefine d information is not correct, the user can edit the
APN list directly, and then the edited or new information is saved in
the Customer Manual Setting.
Before setting it, please confirm the exact information from your
local service provider.
User Guide Manual - 50
Page 52

4.10.5. SIM Card
Icon Name Description
SIM
Information
SIM
Lock/Unlock
PIN Code Customize PIN number.
Indicate saved information from SIM
card.
Lock / unlock SIM card with PIN code
input. If entered wrong PIN code over
3 times, need PUK code. In case of
over 10 times error for PUK code, it is
impossible to use the SIM card
anymore.
www.looket.com
User Guide Manual - 51
Page 53

www.looket.com
4.10.6. Tracking
In case that the
Tracking mode is on,
the device goes to the
LCD sleep mode to
keep the tracking
function in the Sleep
mode.
Icon Name Description
Tracking
On/Off
Tracking
Log Save
Tracking
Log Delete
Last update
Update Interval
Update Distance
Speed Change
Direction change and
Movement
Tu rn on/off Tracking function.
Save traveling route into flash memory
per definite period.
If tapped the button, the latest track log
is saved additionally.
Saved log messages can be checked by
USB connection.
The tracking log record is automatically
saved in 10MB size. In case of over more
log data, the oldest log is deleted.
If clicked the button, all log data is
deleted.
Indicate setting value from the server –
track.looket.com.
These setting can be changed in only
server. Changed settings are updated
when the device is connected to the
server.
※ LCD Sleep mode: a power save mode with LCD off and disabling
touch input and audio in/out function. In the mode, the battery is
been spending much more than the basic sleep mode.
User Guide Manual - 52
Page 54

www.looket.com
While the Tracking function is on, the device is working as a
following table. Valid GPS signal means GPS status with good
reception after booting. In case of the place such as in a building
where GPS signal can be reached, the device is not logging the
tracking information.
※ If the Tracking function is off, the tracking software is not
working.
Valid
GPS
signal
Invalid
GPS
signal
Valid GSM signal
(registered)
1. Logging current track
date.
2. reporting to tracking
server with condition
1. Keep last valid
location information.
2. Reporting to tracking
server with condition.
Invalid GSM signal
(unregistered)
1. Logging current track
data.
1. Keep last valid
location information.
4.10.7. FM Transmitter
If the frequency of FM radio in the car is set to the predefined
frequency on the FM Transmitter Setting menu, the user can enjoy
the sound from Looket T5 via the speaker connected to the FM
radio. At this time, all sound from the device is silent excepting only
voice from the phone.
The available frequency range is from 88.1 MHz to 107.9 MHz and it
can be selected by 0.1 MHz.
User Guide Manual - 53
Page 55

www.looket.com
※ How to Preset
1) Click Set and select
the frequency by
using Up / Down
icons.
2) Press the preset
button between 1 to
6
※ The Car Charger, AC Home Charger or mini-USB Cable of the
Looket device is acted the part of the FM antenna. So it should be
connected with the charger or cable to use the FM Transmitter
function.
4.10.8. About
You can check a model number, company information and URL.
User Guide Manual - 54
Page 56

www.looket.com
5. Extra Function
5.1. USB Connection
When a mini-USB cable is
connected to a device, a
left screen is appeared.
During the connection, the
device is recognized as a
portable storage device in
a PC, but other functions
are not working.
As soon as being disconnected, the device is re-booting and reset
to the Main screen.
In the PC, the device is shown as following portable storage
devices;
Portable disk 1: the internal flash memory of the device
Portable disk 2: saved logging files in the tracking device
Portable disk 3: microSD card if it is inserted
※ Notice:
- Each disk name can be changed depending on the system.
- When disconnecting the USB connection, recommend turning off
the device and remove the cable to protect the PC.
5.2. Not Installed Software
This message is displayed when the navigation software is not
installed in the internal flash memory or th e m ic roS D card.
※ Notice:
If the navigation software is installed in the microSD card, please
try to extract and re-insert it, then it will be able to be w orking
again.
User Guide Manual - 55
Page 57

www.looket.com
Please contact authorized distributors in your country if the
message has never disappeared.
5.3. Sleep Function
To operate power efficiently, the device is converted to the sleep
(suspended or power saving) mode in case of following situation.
When the Menu button is pushing over 2 seconds…
When disconnected the external power…
When the Smart Power-off mode is conducted…
A minute later after the touch screen is unlocked in the
battery mode without the external power connection.
Efficient power management and such.
The device is waked up from the sleep mode;
As soon as the Menu button is clicked.
When the external power is connected.
When receiving a call or SMS (text messages).
User Guide Manual - 56
Page 58

www.looket.com
※ LCD Sleep mode
While the Tracking function is enabled, the LCD sleep mode is
conducted when clicking a Sleep button. During this mode, it
disables using touch input and audio in/out function with LCD off to
save its power. (
In the mode, the battery is spend much m ore than the basic sleep
mode.
refer to Chapter 4.10.6. Tracking.
)
5.4. Smart Power-off Function
A following screen is
appeared when power is
not supplying.
If there is not any input
on the screen for 5
seconds, the device
goes to the sleep mode.
In case of tapping a Cancel button, the Smart Power-off function is
closed.
5.5. SIM Card Extracted
Do not open the SIM card slot a nd/or remove the SIM card while
the device is turned on. It could result in damage to the SIM card.
If the SIM card is extracted in operation, a following screen is com e
up.
To run the device
normally again, insert
the SIM card and close
the slot. Then, switch
on the device.
User Guide Manual - 57
Page 59

www.looket.com
5.6. Lower Battery Warning
When the battery lever is low, a following warning message is
shown.
As soon as it is appeared, please connect the charger such as the
car cigarette charger or the AC home charger to charge the device.
Then, the device will be able to be working again.
In case of not supplying power, the device goes to the sleep mode
a few second later from the warning message.
To run the device normally, we recommend to use the AC home
charger at all times.
User Guide Manual - 58
Page 60

6. Trouble Shooting
Trouble Solution
The device is
frozen or
locked up.
Power does
not turn on
when using
battery
power.
Something
wrong in the
LCD screen.
GPS signal is
not good.
Please reset the device by a Power On/Off
switch on the bottom side of the device.
The remaining battery power may be too low to
run the device.
Connect an AC adapter (or a car charger) to
the device and external AC power.
Check the Power On/Off switch on the bottom
side.
If it's dark, this can be from excessive
temperature. (Oper. temp.: -10 ~ +60 ℃ )
If it's hard to read, please check the back light
level.
If the screen freezes, please reset the device.
Make sure that the GPS receiver is adjusted to
the horizontal position and it has a clear view
of the sky.
GPS reception can be affected by below
circumstance.
- Bad weather
- Dense overhead obstacles
(e.g. tree s and tall buildings)
- Other wireless device in the car
- Metallic windshield coating
Looket optional external antenna will boo st the
performance.
www.looket.com
User Guide Manual - 59
Page 61

www.looket.com
No SIM Card
Ensured the SIM card is inserted or installed
correctly.
PIN Code Enter the PIN code supplied with the SIM card.
If entering the PIN code incorrectly over 3
PUK Code
times, the SIM card is blocked. Then the PUK
code supplied by the service provider must be
entered
May lose reception in areas with weak signals
or poor reception. Move to another area and
GSM signal is
try again.
not good.
Ensure you are not blocking the internal
antenna located in the left side of the device.
Not
sent/received
text
Ensure you entered the right address for text
messages.
messages
Another caller
Ensure the microphone is covered.
can not hear
your
speaking.
If using a headset, check it is properly
connected.
Ensure you are not blocking the internal
Audio quality
of the call is
poor.
antenna located in the left side of the device.
May lose reception in areas with weak signals
or poor reception. Move to another area and
try again
If you have some problems using Looket T5, which you are not able to
solve them by yourself, we are always welcome to contact us.
User Guide Manual - 60
Page 62

www.looket.com
7. Warranty
※ Limited Warranty
SysOnChip, Inc. warrants Looket T5 against defects in material and
workmanship, under normal use and service, for one (1) year from
the date of purchase only with the proof of purchase. And the
warranty period might vary depending on the region, dealer, retailer
or sales contract.
The warranty period of a rechargeable battery and consumables are
six (6) months from the date of purchase.
Incompatibility is not a defect covered by SysOnChip’s warranty. If
the product is found to be defective in material or workmanship
during this period, SysOnChip or one of its authorized distributors
will, at its option, repair or repl ace the defective product without
charge when furnished with proof of retail purchase. If you ship the
product to SysOnChip or one of authorized distributors, you mus t
use the original container or equivalent and the shipping charges is
your responsibility. SysOnChip or distributors will bear shipping
charges for returning the product.
This warranty does not apply to any product which has been
subjected to alteration, unsealing or disassembly and detached
warranty or serial number label at any case.
SysOnChip is not responsible for incidental or consequential
damages resulting from breach of any express or implied warranty,
including damage to property and, to the extent permitted by law,
damages for personal injury. This warranty is in lieu of all other
warranties including implied warranties of merchantability and
fitness for a particular purpose.
User Guide Manual - 61
Page 63

www.looket.com
※ LCD Warranty
Looket T5 is a portable device, therefore the free warranty cannot
apply to LCD when it damaged from misusing or abuse.
※ Power supplies and cables
Any damages from using power supplies or cables which are not
provided or officially approved by the manufacturer cannot be
included in the warranty and are not responsible for SysOnChip.
※ Looket Service Center
If the device is found to be defective, please read the warranty
term firstly and contact retailers or us to be repaired or replaced.
E-mail, call or fax to the following service center for help with your
Looket device.
E-mail: sales@sysonchip.co.kr
Phone: +82-42-864-4665
Fax: +82-42-864-4664
Service hours: 9:00 to 18:00 (GMT+9:00)
Monday to Friday
Location:
th
4
floor, Singwan Building, KT Bukdaejeon Br.,
138 Gajeong-dong, Yuseng-gu, Daejeon,
305-350, The Rep. of Korea (South Korea)
User Guide Manual - 62
Page 64

8. Package & Accessory
◈ Basic Unit Package
www.looket.com
Looke
t T5
Car Charger
USB Cable
Bracket
Car Mount
User Guide Manual
Belt-clip
◈ Optional Accessory
AV Cable
AC Adapter
External GPS
Ear-set
Antenna
* Package contents might vary depending on countries without notice.
* Specification and features are subjected to be changed without notice.
User Guide Manual - 63
Page 65

www.looket.com
4F., Singwan Bldg., KT Bukdaejeon Brach Office,
138 Gajeong-dong, Yuseong-gu,
Daejeon, 305-350, The Rep. of Korea
Tel: +82.42.864.4665
Fax: +82.42.864.4664
E-mail: sales@sysonchip.co.kr
Web-site: www.looket.com
www.sysonchip.co.kr/eng
Copyright ⓒ SysOnChip, Inc. 2009
All rights reserved. Reproduction, transfer, distrib ution or storage of
parts or all of the contents in this document in any form without the
prior written permission of SysOnChip, Inc. is prohibited . Ot her
product and company names mentioned herein may be trademarks
or trade names of their respective owners.
User Guide Manual - 64
 Loading...