

Page 1

User Guide Manual
(ver1.6)
Page 2

www.looket.com
Thank yo u fo r cho osing and
purchasing the Look et N6
model as your GPS navig ation
and welcom e to User Guide
Manual.
The device is very easy to use
and it takes you just few step s
to understand how it works.
User Guide Manual - 1
Page 3

www.looket.com
- CONTENTS –
1. Looket N6 Models .......................................................... 9
2. B efore Starting Looket .................................................. 9
3. Des ignation ............................................................... 11
4. Main Menu ................................................................... 14
4.1. N AVIGATION Menu ............................................... 14
4.1.1. F irst Launch ................................................. 14
4.1.2. Des ignation of Navigation Screen ............... 16
4.1.3. U seful Function on Main Menu .................... 17
4.1.4. How to set Home Location .......................... 25
4.1.5. How to check or re-set GPS hardware ......... 26
4.1.6. How to set TMC ........................................... 26
4.1.7. Menu Bar on Navigation Screen .................. 27
4.2. MU LTIMEDIA Menu ............................................... 30
4.3. B luetooth Menu ..................................................... 32
4.3.1. B efore you start ........................................... 32
4.3.2. Get ting Started ............................................ 33
4.3.3. Hands-fr ee Calling ....................................... 34
4.4. Video- in Menu ....................................................... 36
4.5. SETTING Menu ...................................................... 37
4.5.1. Sys tem ......................................................... 37
4.5.2. Volume & Backlight ..................................... 37
4.5.3. B luetooth ..................................................... 38
5. Ex tra Function ............................................................. 41
5.1. U SB Connection ..................................................... 41
5.2. N ot Installed Software .......................................... 42
5.3. Sleep Function ....................................................... 42
5.4. Smart Power-off Function ..................................... 43
5.5. Lower Battery Warning ......................................... 44
6. T rouble Shooting ......................................................... 45
7. Warrant y ..................................................................... 46
8. P ackage & Accessory ................................................... 48
User Guide Manual - 2
Page 4

www.looket.com
- NOTICE & WARNING -
Reset - To reset a Looket N6, please turn off and on a switch
on the top of the device.
Installation
- Before installing a suction cup of a mount, please clean and
inside of windshield and remove any dust or grease.
- Avoid placing your device and accessories near or in an air
bag deployment area. If not, may cause serious injury when
air bags inflate rapidly.
- Do not place unsecured on a dashboard.
- Do not mount where a driver's field of vision is blocked.
- D evice i s des igned and appr oved f or v ehicle windshield
installation, han d-held only to meet FCC RF exposure
compliance requirements, othe r o perating conf iguration are
not approved.
GPS (Global Positioning System)
- I f taking long tim e to g et G PS sig nal and f ind curre nt
location, place it wher e it has a clear view of th e sky. GPS
signals c an be o bstructed by c eilings, tr ees, nearby t all
buildings and the roof of the vehicle.
- Initial GPS fix may take up to 2~10 minutes depending on
circumstances.
Important: Some vehicles with a coated or heat reflective
windshield m ay req uire on a n e xternal GPS a ntenna (n ot
included).
User Guide Manual - 3
Page 5

www.looket.com
- Fix initial GPS with a full charged battery. It will take longer
than before with a low battery.
- The Loo ket dev ice is supporting a Si RFInstantFixII
technology, so it is ab le to receive signal m ore quickly from
GPS sa tellites a nd ind icate a current l ocation on t he m ap
without waiting for long time.
- If there is no sav ed GPS sate llites information or the sav ed
information i s not e nough, th e SiRFIn stantFixII f unction
would no t be working no rmally. A lso when receiving G PS
signal at f irst, the location error can be happened dependi ng
on op erating circumstances. Moreover, i n ca se o f no t u sing
the device f or o ver 3 da ys, th e SiRFIn stantFixII f unction
would not be operated.
※ SiRFInstantFixII technology
It can red uce warm start s, the typ ical PND star t-up m ode,
from over half a minute to as little as five seconds, and in
urban canyons the di fference can be ev en more significant.
It do es this while demo nstrating exc ellent po sitional
accuracy, a n im portant attrib ute f or nav igation devices. I t
accomplishes thes e us ing s ophisticated, pat ent-pending
algorithms tha t enab le th e PN D to m odel th e b ehavior of
visible GPS s atellites duri ng the da y and pr edict their
position in th e sky f or u p to th ree da ys in t he f uture. It
continuously refines its calculations based on the late st data
it receives from the sa tellites being tr acked ev ery tim e t he
PND is used. I t p erforms t hese cal culations completely
autonomously, wit hout ev er ne eding updates o f an y kind
from a network.
User Guide Manual - 4
Page 6

www.looket.com
Battery and Chargers
- Use onl y b atteries and charg ers inc luded in the p ackage
provided or officially approved by the manufacturer.
- Ri ck o f expl osion i f bat teries ar e r eplaced by an i ncorrect
type.
- Una uthorized batteries or c hargers may harm the d evice
and any accidents or damages. This will not responsible for
the manufacturer.
- Dispose of used batteries according to the instructions.
- Nev er di spose o f bat teries o r devices i n a f ire o r heat ing
devices such as ovens or stoves.
- Nev er c rush or punct ure t he bat tery o r dev ice. A void
exposing them to high externa l pr essure, which can lead to
an internal short circuit and overheating.
- To protect the device against sudden current, connect a car
charger only after the car engine has been started.
- Conn ect th e char ger during o peration. Low b attery ma y
deteriorate GPS performance.
Memory Card
- Do not remove the card while the device is transferring or
accessing inf ormation, as it c ould re sult i n l oss o f d ata
and/or damage to the card of device.
- Pro tect card s f rom s trong shoc ks, sta tic el ectricity, and
electrical noise from other devices.
- F requent wri ting and er asing wi ll s horten the l ife s pan o f
memory cards.
- Do not touch gold-colored contacts or terminals with fingers
or metal objects. If dirty, wipe the card with a soft cloth.
User Guide Manual - 5
Page 7

www.looket.com
Safety Warnings
- Looket N6 has the mi crophone on the front si de and the
speaker on the b ack side. So if talk ing with the sp eaker to
the ear, the o ther canno t hear your c onversation because
the microphone is on the opposite.
- Looket N6 is designed to make or answer a call via
Bluetooth connection with the phone after mounted in a car.
- In case of using the unit as a portable device, we do not
recommend to use the Bluetooth hands-free function.
- Do not p ut th e speaker to the ear. I t is a p ortable d evice
with high volumes so it can damage your hearing.
- An ear set provided or approved by SysOnChip, Inc. is able
to b e conne cted to the ear set p ort f or p hone
communication.
- Please ma intain a mi nimum of 20 c m between the devi ce
and the body to avoid potential interference while bei ng on
the uni t as a po rtable dev ice a nd/or us ing it i n a v ehicle
although the device has a voice communication function.
- Do no t use and/or lea ve the device in high or low
temperature an d potentia lly explosive envir onments to
prevent permanent damage. Spec ially, do no t l eave t he
device in the vehicle o n ho t s ummer days or d uring c old
winter nights.
User Guide Manual - 6
Page 8

www.looket.com
- In ca se o f no t usi ng the de vice f or a lo ng tim e, off t he
power switch to protect the unit.
- The suction of the mount may be lost if left overnight, due
to condensation and low temperature.
- Wipe or dry the LCD screen of the device using a soft cloth.
- D o no t use an y liquid cleaners. It is a g ood idea to u se a
LCD protection film.
- Do not al low the d evice t o g et w et - liquids can ca use
serious damage. Do not handle t he device wi th wet hands.
Water damage to the device can void the warranty.
- Do not expose the device and the memory card to magnetic
fields.
- Allow only qualified personnel to service the device. If not,
the device can be damaged and will void the warranty.
- T he use of access ories t hat d o not s atisfy the se
requirements m ay not com ply w ith FCC R F exp osure
requirements, and should be avoided.
FCC Verification
This device complies with part 5 of the FCC Rules. Operation
is sub ject to the f ollowing tw o c onditions; (1 ) This d evice
may not ca use harmful i nterference, and (2) this dev ice
must accept any interference received, including interference
that may cause undesired operation.
User Guide Manual - 7
Page 9

www.looket.com
U.S.FEDERAL COMMUN ICATIONS COMM ISSION RADIO
FREQUENCY INTERFERENCE STATEMENT
INFORMATION TO THE USER
NOTE: Thi s equipment has been t ested and f ound t o co mply
with the limits for a Class B digital device pursuant to Part 15 of
the FCC Rules
There limits ar e designed to provide r easonable p rotection
against harmful Interference in a residential installation.
This equi pment gener ates, uses , and c an r adiate r adio
frequency energy and, if Not installed and used in accor dance
with the instructions, may cause harmful Interference to r adio
communication. Howev er, there is no g uarantee that
interference will not occur in a particular Installation.
If this equipmen t does cau se ha rmful in terference to r adio or
television r eception, Whi ch c an be det ermined by t urning the
equipment off and on, the user is encouraged to try to correct
the interference by one or more of the following measures;
Reorient or relocate the receiving antenna.
Increase t he se paration b etween the eq uipment and
Connect the equipmen t into an outlet of a circu it
Connect the deal er o r an experi enced r adio/TV
Changes o r mo dification no t exp ressly appr oved by t he part y
responsible f or Compliance c ould v oid the u ser’s auth ority to
operate the equipment.
Connecting of peripherals requires the us e of gr ounded
shielded signal cable.
.
receiver.
difference from that to which the receiver is connected.
technician for assistance.
User Guide Manual - 8
Page 10

www.looket.com
1. Loo ket N6 Models
Features
Models
Navigation O O O
Multimedia Player O O O
Bluetooth Support X O O
Video-in X O O
TMC X X O
※ Models and features are subject to be changed without notice.
N600 N 630 N 670
2. Befor e Starting Looket
◈ How to insert micro SD card
- Turn off before putting
a microSD card.
- Insert the microS D
card li ke a f ollowing
picture.
Be careful of the direction when inserting the card.
Do no t r emove the ca rd while the device is po wered on ,
doing so ma y r esult in the dev ice mal function. W e
recommend t o turn o ff t he dev ice bef ore r emoving t he
card.
User Guide Manual - 9
Page 11

www.looket.com
◈ How to install Windshield Mount
1. Push th e su ction b ase
(A) against the
windshield.
2. Flip the base lever down
(B) to the lock ed
position.
3. Adjust the ang le of the
pedestal arm by
tightening t he ang le
adjustment k nob (C) at
the b ase to the d esired
angle.
4. Connect t he cr adle (D)
on th e du al T -tabs (E)
on the pedestal head.
5. Adjust the ang le and
rotation o f the head b y
tightening the head
adjustment knob (F).
6. Mount the device on the
connector (G) of th e
cradle.
7. Connect th em with a
snap.
User Guide Manual - 10
Page 12

www.looket.com
3. Designation
① Microphon e
When you mak e and/or answer calls through B luetooth hands free function, you can speak into the microphone.
② Power On/Off Button
When switched off and on, th e hardware of the device is r eset.
At this time, saved settings etc. will be deleted. The switch can
be used f or the hard ware reset of the d evice and to sav e the
power for long time in case of being used as a portable memory
device without external power.
③ Menu Button
A menu bar i s come o ut when t he but ton is pus hed at t he
contents supporting the menu in the application program. So the
application pr ograms s howing o n t he menu bar are abl e t o be
conducted or set.
④ External GPS Antenna Port
An external GPS antenna provided or approved by SysOnChip is
able to be connected.
User Guide Manual - 11
Page 13

www.looket.com
⑤ Charging Status Indicator
- Red: An internal battery is charging.
- Blue: An internal battery is fully charged.
- Off: A power connector is disconnected.
⑥ mini USB & Power Port
The device can be used as an external portable memory device
by connecting with PC via the port. Also, it is able to be charged
by an AC Adap ter o r Car Charger pr ovided o r appr oved by
SysOnChip.
⑦ Mounti ng Connector Port
The d evice can b e conne cted with a cr adle, and p ower is
supplied from the c radle. Also, the device can receive data from
RS232 serial port and Video-in port (optional) on the cradle.
⑧ mini SD Card Slot
Be careful of the direction when it is inserted.
⑨ Ear-phone Jack & TMC Antenna Port
It is able to enjoy the sound from the device via earphones while
the device is using as a portable player.
Also, an exter nal TMC antenna pr ovided or appr oved by
SysOnChip is c onnected t o the port t o us e the TM C (T raffic
Messaging Channel) function. If you purchased or possessed the
Looket N6 model supporting the TMC function, you will be able to
access your ow n desti nation f aster than befor e with up- to-date
traffic information via the external TMC antenna.
※ Only Looket N670 i s supporting the TMC function. Therefore,
you are not able to use the TMC service with other models.
⑩ Speaker
Enjoy sound from the device through the internal speaker.
User Guide Manual - 12
Page 14

www.looket.com
◈ Cradle
① Mounti ng Connector
N6 models are connected to the cradle and able to supply power
as well as r eceive dat a f rom R S232 s erial and AV-in (op tional)
through the connector.
② Power Port
A Car Char ger or AC Ho me Ch arger pr ovided o r appr oved by
SysOnChip is able to be connected to the port.
③ Video-in Port
If a r ear c amera o r ext ernal devi ce suppo rting Vi deo o utput is
connected to the N6 enabling this function through the port, you
can enjoy the video on the screen.
※ The N630 & N670 are only able to support this function.
④ Mounti ng Hole
A mount provided or approved by SysOnChip is connected to the
cradle.
⑤ RS232 Serial Port
An external device is able to be connected through this port.
User Guide Manual - 13
Page 15

www.looket.com
T
4. Main Menu
After turning on th e Lo oket N 6 f or th e f irst time, N avigation,
Multimedia, Bluetooth, Video-in can be sele cted (in case of th e
Looket N630 and N670 models).
4.1. NAVIGATION Menu
This Us er Guid e Manual w hich i s a q uite sim ple m anual to
follow w ill ta ke y ou to u nderstand how it w orks. F or m ore
detail i nformation, pl ease do wnload t he ma nual o n our website.
Also, you can co nsult Quick Guides on the setti ngs menu from
the main menu of the navigation in the device.
To enter Quick Guides, please do as follow;
ouch screen → Tap Setting on menu →Quick Guides
4.1.1. First Launch
When you conduct NAVIGATION f irst time, you should be ask ed to
set language, v oice, m ap, GP S s ignal et c. A ll i nformation you set
will be saved in a SD card automatically after launch.
User Guide Manual - 14
Page 16

www.looket.com
1. T ap NA VIGATION on t he
Main m enu. A fter read ing
the i mportant mes sage,
click I AGREE.
2. Sele ct y our lang uage,
voice, dis tance unit s,
keyboard pr eference and
map.
3. After choosing your map, the device is auto-searching for GPS
signal, and t hen its COM port and baud rate which the device is
supporting will be set automatically.
4. Y ou wo uld pr obably see your current v alid GP S position on the
map after successful launch.
5. I f y ou tap an ywhere o n the m ap area, the Mai n m enu of t he
NAVIGATION is shown. On the bottom of the screen you can see
useful information about your current position - street name with
numbers.
※ The process of the first launch is subject to be passed according
to countries and maps.
After s uccessful l aunch, you
would probably see your current
valid GP S position on the map.
If you see only grey screen after
launch, y ou should pr obably
check your GPS status f irst a nd
wait for valid GPS signal.
It takes some time t o get valid signal from available satellites. First of all ,
tap on th e g rey screen to open th e Main m enu and find a GP S status
button.
User Guide Manual - 15
Page 17

www.looket.com
Tap
A
/
/
/
If a ' Closed GPS connection'
message is di splayed, c heck if
the GPS module is turned on.
Settings GPS
hardware
Turn G P S
module off
4.1.2. Designation of Navigation Screen
Zoom Out
Next Turning
Point*
* These information are shown only if you have already computed a route.
If the navigation pane displaying Arrival Time, Speed, Current Position, etc.
is tapped, the following context menu is appeared.
anywhere on the map area to open the Main menu
Distance to next turning point*
Current position
Show I mportant Places - t his o ption w ill s how y our 2 POI
categories chosen close to your position.
Avoid Roadblock - set the circle on your map to avoid all street
blocked within circle area.
Memorize P osition - this o ption le ts you s ave a nd m emorize
your actual po sition. P osition wi ll be au tomatically sa ved and
you can find it any time later in History.
Zoom In
rrival time
Speed
Distance
to finish
GPS signal
User Guide Manual - 16
Page 18

www.looket.com
4.1.3. Useful Function on Main Menu
4.1.3.1. Navigation to
If y ou c lick 'Navi gation to.. .' o n t he Ma in m enu, there a re various
ways t o set y our destination and plan your ro ute eas ily. They will
give you great opportunity to choose just the perfect option for you.
User Guide Manual - 17
Page 19

www.looket.com
a) Address - standard way of navigating. You can choose in steps
Country, City, Street and number.
b) Favorite - this function allows you to navigate to one of your
favorite Points of Interest.
c) History - list of your memorized positions. Option to navigate to
memorized his tory en tries or d elete t hese en tries i s
available.
d) Point of Interest - nav igate to P oint o f Inte rest: res taurant,
hotel, school, wine-room, etc.
e) ZIP Code - instead of name of the city, simply type in the zip
code will find the exact address.
f) Home - navigate to Home location saved by you who can set up
the home location in: Settings → Set home location.
g) Point on Map - choose your destination straight from the map.
h) Enter GPS position - navigate to exact GPS position entered as
longitude and latitude coordinate.
i) City Center - navigate to straight the ce nter of the cho sen city.
You will be asked to look up the city within the
country.
j) POI in Ci ty - instead of navi gating to address, you can simply
select POI of the chosen city and Sygic will find it for
you.
k) Last Valid Position - navigate to last GPS position received last
time GPS signal was available.
User Guide Manual - 18
Page 20

www.looket.com
In this guide, we'll show you how to use the Navi gation to function
using the Address option.
1. Touch Address on the Main menu.
2. Select Country, City, Street and Number step by step.
Or find them using the keyboard on the screen.
3. Sel ect your departure screen appears.
You c an choose from three opt ions - wait for valid s ignal, L ast
valid position or Select from map. (Wait for valid signal and Last
valid position work properly when the GPS is turned on.)
4. As soon as the route is ca lculated, basic information on y our
route i s shown. A sk fo r m ore i nto d eep ro ute description b y
pressing Details.
5. Select a ctive item you wa nt to avoid o n route. I f yo u click o n
item, your route will be recalculated without these items.
※ Management of Favorites
There are t wo ways how to add t he address and/or destination to
the Favorites.
1) Browse map on Main Menu
① Select the point (where you'd like to add on the Favorites) on
the m ap. Or tap Op tions - Find - A ddress and then y ou ca n
enter the exact address (or other options available).
② Click the Co ntext m enu b utton in t he m iddle of the b ottom
black title bar wher e you have several option (navigate there,
travel via, etc.).
③ Select Add as POI , then tap Favorites.
2) Manage POI on Main Menu
① Clic k Add POI.
② Choose Address (or other) to insert the place to Favorites.
③ Tap Favorites on 'Select or create a category' menu.
User Guide Manual - 19
Page 21

www.looket.com
Tap
p
4.1.3.2. Browse map
It i s a vailable to br owse the ent ire map and search f or y our
destination o r P OI. B y s imple dr agging, y ou wi ll be abl e t o s croll
through the map and explore new areas.
Browse map cursor informs you about targeted POI or street
Zoom
In/Out
using
zoom bar
Map scale
to o
en the Map options
< Options >
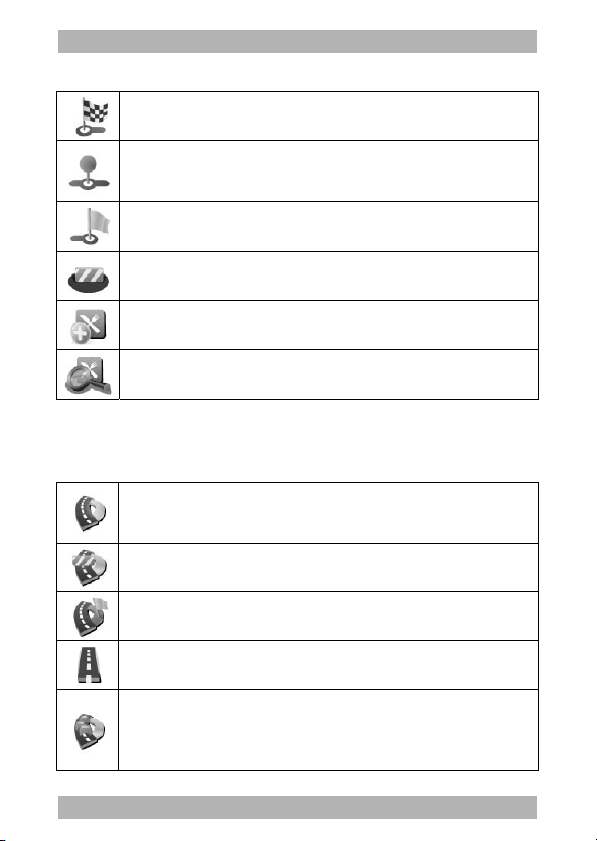
a)
Find...
destination. Y ou can choose from th e f ollowing o ptions:
Address, Favorite, History, Point of Interest, Zip Code, Home,
Enter GPS position, City Center, POI in City, Last Valid Position.
b)
Show current position
on the map. It may be useful if you get lost on the map while
browsing it.
c)
Show enti re route
regardless of its siz e or location on the map. This function is
available only if there is already a route calculated.
d)
Show city
e)
Show/Hide POIs
want/don't want to see on the map.
User Guide Manual - 20
this button to open the Context menuTap this button
- a llows you to qu ickly look u p th e d esired
- w ill show your current position
- wi ll d isplay t he e ntire r oute
- a selected city will be displayed on the map.
- you c an select t he PO Is t hat you
Page 22
www.looket.com
< Context Menu >
a) Navigate there - Offers 3 possibilities; wait for valid
signal, last valid position, select from map.
b) Travel via - you can choose the destination through
which you want to travel. This function is available only
if you have already computed route.
c) Continue - i nformation ab out th e ro ute, p ossibility
to modify the route.
d) Avoid - allows you to define the area on the map
that you want to avoid.
e) Add as POI - a llows you to ad d the selected
position on the map as POI.
f) Find nearby POI - t his f unction w ill d isplay th e
selected POIs that are located nearby your position.
4.1.3.3. Alternative route
It is easy to handle and offers several options how to change your
complete route plan within a few seconds.
a) Compute alternative - will r ecompute t he r oute
using r outes differ ent fr om those used f or the o riginal
compute.
b) Avoid next... - set the circle on y our map to av oid
all street blocked within circle area.
c) Travel via... - allows you t o add the wayp oints into
the computed route.
d) Reset t o original - y ou w ill retur n to the o riginal
route. Alternative routes will be cancelled.
e) Avoid traffic delays - allows you to avoid traffic
jam or othe r inc idents that may occurs, you can avoid
part of the originally computed r oute ( from 500 m to
20km).
User Guide Manual - 21
Page 23

www.looket.com
4.1.3.4. Settings
When you tap Settings from the Main menu, you can modify Sygic
DRIVE and user's preferences.
The Settings menu includes;
Set to 2D (flat) view / Set 3D view
Set night / daylight / automatic colors
Disable / Enable sounds
Volume settings
GPS logs - you can record your GPS position and play back it.
Advanced s ettings - U- Turns, Auto zoom, Railway c rossing
warning, La ne inform ation, Backlight
settings, St andby m ode, An tialias,
Information displ ayed in t he navigation
window, Speed limit warning.
Planning p references - select t he way of route compute (the
fastest route o r t he route w ithout
motorways).
Toll charge settings
Set vehicle type
GPS hardware
Signpost s ettings - s ee a ll di rections, p referred directi on or
disable signpost information.
Rotate display
Left / Right handed
Keyboard settings
Regional settings - distance unit setting, preferred time format
and geographical coordinates.
Set language
Set voice
Switch map - select your map folder.
Set home location
Backlight settings
Quick guides
User Guide Manual - 22
Page 24
www.looket.com
4.1.3.5. Traffic
The only Looket N670 is supporting this function. These options are
available; S witch Of f/On T MC Warnings, Op timize R oute, T MC
Options, Show All Incidents on Map, Update Now Current Traffic.
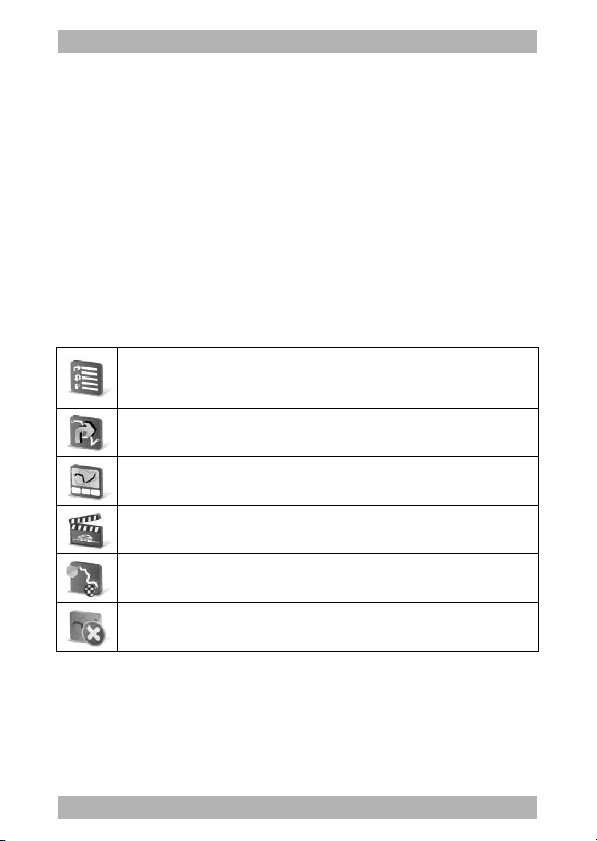
4.1.3.6. Route
You hav e to f irst plan your route to g et access to route op tions. If
you hav en't pla nned y our rou te, the rout e but ton is n't av ailable.
Here you can find all the f urther information about your route, you
can view the wh ole route in ima ge slides o r even watch the r oute
preview by using the route demonstration option.
a) Show route instru ctions - show s y ou t he mos t
important tur ning points (whether to turn lef t or rig ht)
on your route and distance between them.
b) Show ro ute as image - w ill d isplay t he ro ute a s
images.
c) Show r oute summary - inf ormation ab out th e
route, possibility to modify the route.
d) Show ro ute demo - enable s the demon stration of
the computed route.
e) Show on m ap - the co mputed r oute will be
displayed on the map.
f) Cancel route - the route will be cancelled.
4.1.3.7. Itinerary
It allows you to plan your business journey, trip and many more
directly f rom the comf ort of y our livi ng r oom. Y our p lanned r oute
can be saved, renamed, deleted.
User Guide Manual - 23
Page 25

www.looket.com
4.1.3.8. Manage POI (Point of Interest)
Various POIs are shown on t he map such as air ports, b anks, b us
stations, hot els, park ing gar ages, s hopping c enters, et c. Y ou c an
easily manage them and add y our own POIs o r ther e is also a
function which warns you when you'll be crossing the nearby POI.
a) Add POI - you can add POI and assign the icon.
b) Edit POI name - you can rename the POI that you
created.
c) Delete P OI - y ou ca n dele te th e POI t hat y ou
created.
d) Delete POI category - y ou can delete t he whole
category that you created.
e) Show / Hid e POIs - se lect the P OI which should
be displayed on the map.
f) Warn when near POI - se lect the POI, enter the
distance f rom y our po sition, c hoose t he w arning
signal.
4.1.3.9. GPS status
Check 'valid satellites' or 'your valid position'.
Points of the compass
Satellite
Valid signals from
position
satellites are filled
with green color
User Guide Manual - 24
Modify hardware settings
Page 26

www.looket.com
4.1.3.10. Memorize position
Save your current position into History.
4.1.3.11. Extras
Some ad ditional ap plications (W orld Clo ck, Calcu lator, Un it
Convertor, Country Information) that might be useful on the road.
a) World Clock - set up the cu rrent tim e i n three
world cities. Choose from more than 30 world cities.
b) Calculator - sim ply t o us e calc ulator av ailable
directly.
c) Unit Conv erter - Curren cy, Leng th, Area,
Volume, Mass, Pressure, Power, Energy, Temperature
e) Country In formation - speed lim it, country
code, currency, etc . Whe n cross ing t he c ountry
border a windo w with bas ic country in formational
automatically pops up.
4.1.3.12. Exit
Tap the button if you want to close down Navigation.
4.1.4. How to set Home Location
1. Tap 'Set home location' on Setting menu.
2. After your home location has been saved, just click Home on
Navigation to menu to navigate home in the future.
※ If you don't have a home location saved, the device will prompt
you to se t y our home loca tion when y ou click Home on
Navigation to menu.
User Guide Manual - 25
Page 27

www.looket.com
4.1.5. How to check or re-set GPS hardware
1. Tap Settings on Main menu and then click GPS hardware.
2. Check Turn GPS module button for activation GPS module.
(The icon should be same with the following picture.)
3. Tap 'Autodetect' to search COM port and baud rate automatically
and t hen w ait to f ix it . Or s et f ollowing C OM po rt and def ault
baud rate by yourself after tap COM port and Baud rate.
COM port: COM3 / Baud rate: 9600
4.1.6. How to set TMC
The Looket N670 c onnected with an ext ernal TMC antenna is only
available for TMC service.
1. Click Settings on Main menu and then tap GPS hardware.
2. Select Wizard and autodetect GPS receiver port.
3. Tap yes when you are asked, "Do you have TMC receiver?".
4. Click GNS and set following COM port and baud rate.
COM port: COM2 / Baud rate: 38400
User Guide Manual - 26
Page 28

www.looket.com
4.1.7. Menu Bar on Navigation Screen
If a 'M ' (menu) button on t he right si de o f the device is pressed
during runn ing t he naviga tion, t he Men u bar is come up on th e
right s ide of th e scree n. T here are ind icators of the B luetooth,
battery status and 4 icons in case of the Looket N630 & N670.
- Volume & Backlight
- Bluetooth Hands-free
- Music Player
- Video-in
4.1.7.1. Volume & Backlight
It is ab le to control t he
volume and b acklight lev el
by moving the slide bar.
4.1.7.2. Bluetooth Hands-free Button
If it is clicked, the Bluetooth
hands-free pr ogram is
conducted. Wh en it is
available, t he bac kground
color of the icon is blue. And
if t he bac kground c olor is
white, it m eans the
Bluetooth is disabled to use.
User Guide Manual - 27
Page 29

www.looket.com
4.1.7.3. BGM (Back Ground Music) Player
The user is able to listen to music with the navigation.
The B GM p rogram p lays the m usic in the ' Music' f older of th e
inserted microSD card or internal memory in or der of p recedence.
Music files which users w ould like to p lay in the B GM program can
be ad ded to the Mu sic f older of t he m icroSD card or in ternal
memory.
Icon Description
User Guide Manual - 28
Play previous music
Play or Stop music
Play next music
Volume up
Volume d own
Page 30

www.looket.com
4.1.7.4. Video-in Button
When t his but ton i s s elected, the v ideo s ignal f rom t he V ideo-in
port is shown on the screen. If the vehicle has the rear camera, the
image from the rear camera is displayed on the screen.
The pr ogram i s ended when t ouched the scr een, and then th e
Navigation screen comes up.
In case that the external Video is connected instead of the rear
camera, the video is supported but the sound is not provided during
the operation of the Navigation.
On the System menu o f the Setting menu of the Main menu, it is
able to set the video from the rear camera is shown automatically
when the vide o signal is occu rred. As s oon as the signal i s
disconnected and the camera view is closed, the Navigation screen
is displayed. (The function will be useful in ca se of co nnecting the
rear camera signal with the reverse gear.)
If the signal is weak or it is not existed, the message, 'No Signal', is
shown on the screen.
[ View from Rear Camera ]
User Guide Manual - 29
Page 31

www.looket.com
4.2. MULTIMEDIA Menu
The Lo oket N6 models have a Multimedia Player. V arious v ideo,
audio, image files saved in a SD card will be able to be displayed.
※ Best resolution: 480 x 272 pixels
※ Supporting codec: mpeg, mpg, asf, wmv, avi, jpg
① Screen
- If the screen part is clicked, it is changed to the full screen.
② Status Bar
- The playing part is able to be selected by moving the bar.
③ Previous Button: Play the prior file.
④ Play / Pause Button
- Play or stop playing and ready to continue the current file.
⑤ Next Button: Play the following file.
⑥ Edit: Open the window to edit the f ile list.
⑦ Set-up Button: Show the set-up screen.
⑧ Mute On/Off: Sound is on or off.
⑨ V olume Down Button
⑩ V olume Up Button
⑪ Play List
⑫ Exit: Close the program.
User Guide Manual - 30
Page 32

www.looket.com
◈ Edit Window of File List
This is the ed it window to m ake the f ile list which can b e played
such as music, video, images.
① Showing the edited file list
② Delete the selected file on the file list
③ Delete all files on the f ile list
④ Select all file in the chosen folder of SD card
⑤ Cancel the selection of the f ile in the chosen folder of SD card
⑥ Display the f ile able to be playing in SD card
⑦ Add the checked file to the file list
⑧ Show the path of the selected folder
⑨ Close the f ile list editing window
◈ Setting Window
① Scree n size setting
- Fit Best
- Fill Screen
- Stretch to Screen
② Play mode
- Repeat All (
- Random (
)
)
③ Exit
User Guide Manual - 31
Page 33

www.looket.com
4.3. Bluetooth Menu
The Looket N6 with Bluetooth function can be connected with other
Bluetooth devices to experience wireless conveniences br ought b y
Bluetooth technology.
The Hands-f ree Pr ofile (HFP), Seri al P ort Prof ile (S SP), A udio
Advanced Distribute Profile (A2DP) and Audio Video Remote Control
Profile (AVRCP) are strongly supported.
4.3.1. Before you start
♦ Mak e sure your p hone, stereo head sets, or othe r B luetooth
devices you want to connect with is powered on.
♦ The approximate communication range for Bluetooth
technology is up to 30 feet (10 meters).
♦ The Looket N6 is based on the Bluetooth
®
specification, but it is
not 100% guaranteed to work with all phones in the markets, so
some function buttons will be di sable for use i f your pho ne f ails
to be supported.
1) A message box “The Bl uetooth device is not li censed. This
application will run on evaluation mode with limited functionality”
will p op up to i nform u ser tha t it i s eval uation copy and is no t
authorized.
2) The duration for an ongoing call is onl y three m inutes. The call
will be automatically hung up when the ongoing call is over three
minutes.
3) The file can be transferred is 5M at max.
4) The A2DP connection only can be kept five minutes at max.
®
wireless
User Guide Manual - 32
Page 34
www.looket.com
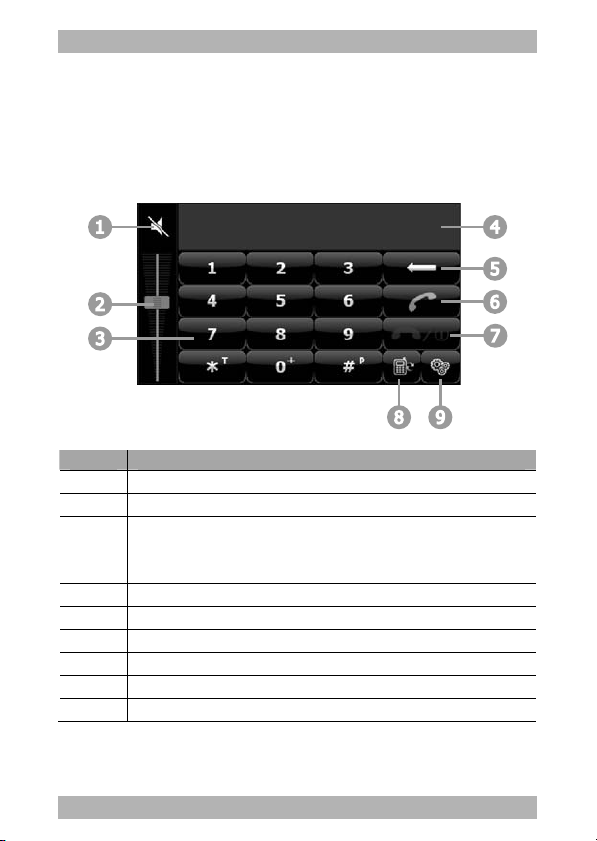
4.3.2. Getting Started
Please make the Bluetooth func tion enabled on the Setting menu,
and also set th e conne ction t o the m obile p hone w ith a b uilt-in
Bluetooth function to use the Bluetooth hands-free.
No Name
1
2
3
4
5
6
7
8
9
Mute On/Off
Volume Controller
Dial Pad - Tap & hold ‘*’ to insert the T character.
- Tap & hold ‘0’ to insert the + character.
- Tap & hold ‘#’ to insert the P character.
Status Indicator
Delete
Call
End / Exit
Convert to a call to the mobile phone or the hands-free
Setup
User Guide Manual - 33
Page 35

www.looket.com
Status Indicator Contents
Bluetooth Off Bluetooth is disable.
No Connection Bluetooth is not connected.
Wait… Wait for the Bluetooth connection.
Last Call Make a call to the last call number.
♦ Bluetooth connection
Bluetooth connection has to exist between device and mobile phone
or other B luetooth-enabled devices such as laptop, desktop before
getting start to use any profiles and features.
When the i con of the Setup in the B luetooth window is clicked, the
Bluetooth Se tting is appear ed. Please ref er to Chapter 4 .5.2.
Bluetooth to understand how to make the Bluetooth connection.
4.3.3. Hands-free Calling
4.3.3.1. Making a Call
Type the phone number and then press the Call button.
※ Tapping ‘*’ over 1 second to input ‘+’.
User Guide Manual - 34
Page 36
www.looket.com
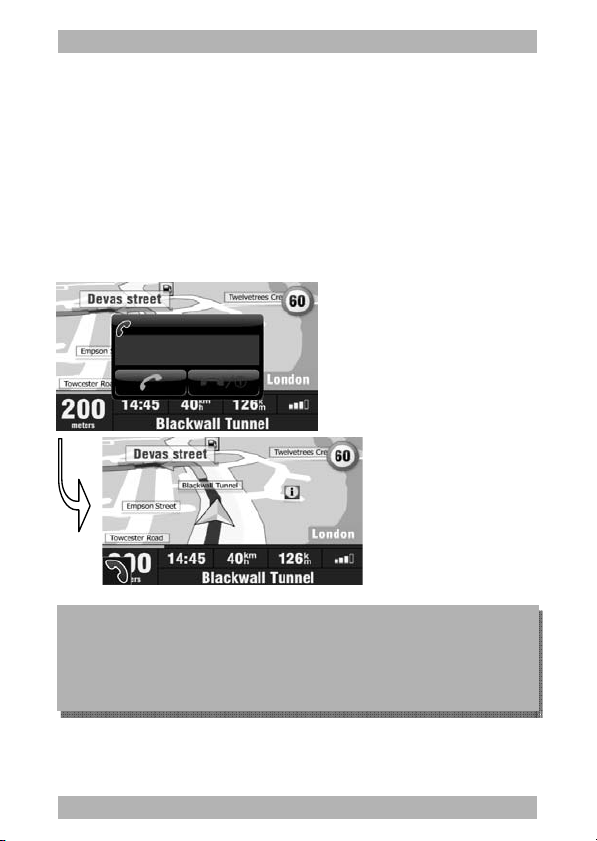
4.3.3.2. Receiving Calls
When a cal l comes in aft er your mobile phone was con nected with
the Looket N6 via Bluetooth, the following window comes up and a
bell rings. To answer the call, the Call button should be clicked. But,
if you are und er the s ituation not to b e ab le to an swer it, the
End/Exit b utton is ab le to b e selec ted, and then the w indow i s
closed after the call line is off.
The call is connected and
the screen is changed to
the following screen.
The tele phone icon is
displayed on the left bottom s ide of the
screen while talking over
the telephone.
The ic on is di sappeared
automatically as soon as
finished the call.
If t he icon is c licked t o
end the call or adjust the
volume, the B luetooth
program comes up.
◈ While t he c all i s r eceived by the Bl uetooth han ds-free, al l
sound from other application programs such as Navigation,
Multimedia Player, V ideo-in e tc. is m uted f or the b etter
conversation on the phone.
User Guide Manual - 35
Page 37

www.looket.com
4.4. Video-in Menu
The Video-in menu is to play video from an external Video input. If
a dev ice supporting Video output s uch as iPOD Vi deo etc . is
connected to the cradle of the Looket N6 (excepting the N600), the
user can enjoy the video on the screen but without sound.
If a user's v ehicle has t he r ear camer a whic h is conne cted to a
Video-in port o n the cr adle of the Looket N6, th e image f rom th e
rear camera is displayed on the screen.
If there is no input signal from outside when Video-in is executed,
the screen w ith 'No Si gnal' mes sage is di splayed. I n t his case,
please check the V ideo input cabl e o r the devic e hand ling Video
output.
User Guide Manual - 36
Page 38
www.looket.com
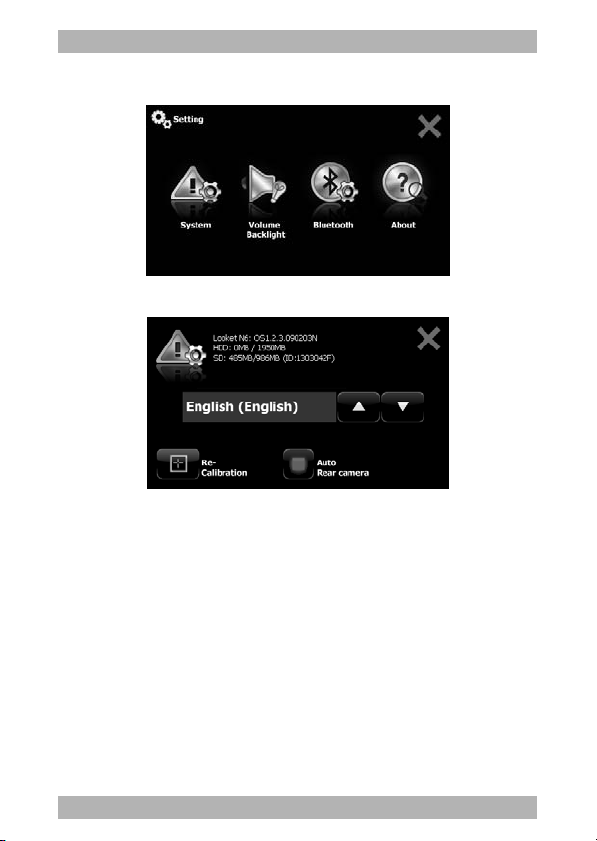
4.5. SETTING Menu
4.5.1. System
1) OS version Information of Looket N6
2) Intrinsic ID Information of SD card
3) Language Selection
4) Re-Calibration
5) Auto Rear Camera Option On/Off
In case of th e v ehicle with the r ear camer a, the scr een
automatically displays the camera image when the signal like the
change to the reverse gear is inputted to Video-in.
4.5.2. Volume & Backlight
It is ab le to con trol the v olume and backlight level b y moving the
slide bar.
User Guide Manual - 37
Page 39

www.looket.com
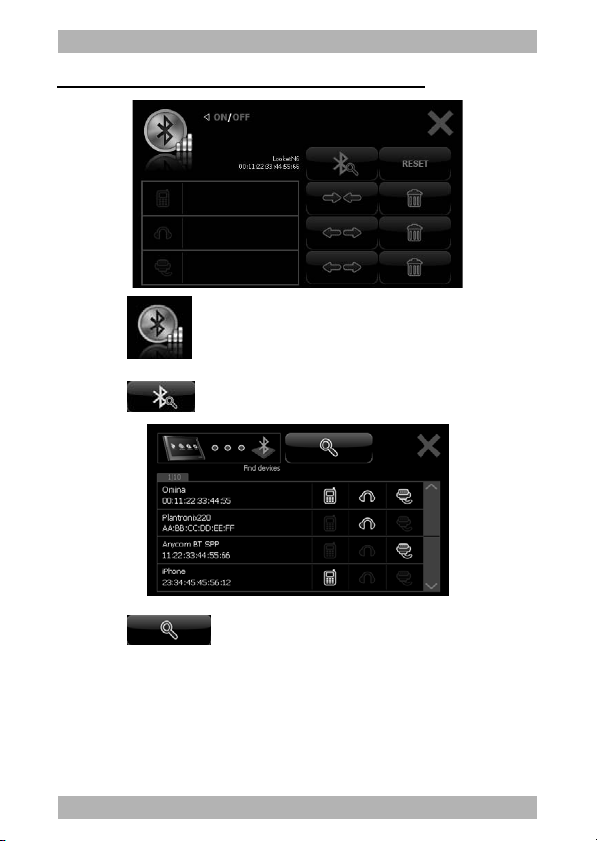
4.5.3. Bluetooth
It is able to enable or disable to use the Bluetooth function and set
the connection to the mob ile phone w ith a built-in Bluetoo th
function and other wireless devices for exchanging data through the
Bluetooth wireless feature.
Icon Description
Bluetooth f unction On (blue) / Of f
(grey).
Search Bluetooth devices.
Reset the connection history.
Connected devices. (Mobile Pho ne /
Headset / Serial Device)
Information of connected device.
Connect / Di sconnect the pai red
device.
Delete the connected device.
Exit button.
User Guide Manual - 38
Page 40
www.looket.com
♦ How to search & connect Bluetooth devices
1) Click
to enable a Bluetooth function.
2) Click
to search pages.
3) Click
to search Bluetooth devices.
4) Listed the devices that can be connected.
5) Select one i con among Mobile Phone, Headset, Ser ial icons to
make the Bluetooth connection (pairing with the selected device).
User Guide Manual - 39
Page 41

www.looket.com
6) I nput ‘0000’ (4 z ero) at t he pai red devi ce i f t he pi n c ode i s
needed during the process.
7) If it is c onnected, the information of the paired device is listed
on the Bluetooth setting screen.
8) Click to
connect the service.
9) The icon
is changed if its service is enabled to use.
◈ Please refer to the ma nual of the mob ile phone about how
to connect the p hone with the Bluetooth function for more
detail information.
◈ Generally, the mo bile phone s upporting the B luetooth
Hands-free profile can be c onnected to the Looket N6. But,
some part icular mo bile pho nes ar e not abl e t o be
compatible with the device.
User Guide Manual - 40
Page 42

www.looket.com
5. Extra Function
5.1. USB Connection
When a mini -USB c able is co nnected to a dev ice, a l eft sc reen is
appeared. Durin g the conne ction, the d evice is recog nized as a
portable storage device in a PC, but other functions are not working.
As soon as being disconnected, the device is re-booting and r eset
to the Main screen.
In PC, the device is shown as following portable storage devices;
Portable disk 1: the internal flash memory of the device
Portable disk 2: saved logging files in the tracking device
Portable disk 3: microSD card if it is inserted
※ Not ice:
- To protect data, do not ex ecute Navigation or Mul timedia Player
before connecting the USB cable.
- Each disk name can be changed depending on the system.
- When disconnecting the USB connection, recommend turning off
the device and remove the cable to protect the PC.
- Disconnect the device from the cradle before connecting the USB
cable between the device and PC.
User Guide Manual - 41
Page 43

www.looket.com
5.2. Not Installed Software
This m essage is d isplayed w hen the nav igation sof tware i s n ot
installed in the internal flash memory or the microSD card.
※ Not ice:
If the navigation software is installed in the microSD card, please
try to extract and re-insert it, then it w ill be able to b e w orking
again.
Please co ntact authorized d istributors in y our coun try if t he
message has never disappeared.
5.3. Sleep Function
User Guide Manual - 42
Page 44

www.looket.com
To oper ate p ower ef f iciently, the device is c onverted to the sl eep
(suspended or power saving) mode in case of following situation.
When the Menu button is pushing over 2 seconds…
When disconnected the external power…
When the Smart Power-off mode is conducted…
Efficient power management and such.
The device is waked up from the sleep mode;
As soon as the Menu button is clicked.
When the external power is connected.
5.4. Smart Power-off Function
A following screen is appeared when power is not supplying.
If there is n ot a ny inp ut on the screen f or 5 se conds, the d evice
goes to the sleep mode.
In case of tapping a Cancel b utton, the Smart Power-off function is
closed.
User Guide Manual - 43
Page 45

www.looket.com
5.5. Lower Battery Warning
When the b attery le ver i s low, a f ollowing wa rning m essage is
shown.
As soon as it is appear ed, please con nect the cha rger su ch as the
car cigarette charger or the AC home charger to charge the device.
Then, the device will be able to be working again.
In case of not supplying power, the device goes to the sleep mode
a few second later from the warning message.
To run the devi ce norma lly, w e recomme nd to use t he AC h ome
charger at all times.
User Guide Manual - 44
Page 46

www.looket.com
6. Trouble Shooting
Trouble Solution
The devi ce i s
frozen or
locked up.
Power d oes
not t urn on
when using
battery power.
Something
wrong i n the
LCD screen.
GPS signa l is
not good.
If you hav e some probl ems u sing Look et N6, which you ar e not abl e t o
solve them by yourself, we are always welcome to contact us.
Please re set the d evice b y th e P ower On/ Off
switch on the bottom side of the device.
The remaining battery power may be too low to
run the device.
Connect an AC adapter (or a car charger) to the
device and external AC power.
Check th e P ower On /Off switch on th e bot tom
side.
If it's dark, this can be from excessive
temperature. (Oper. temp.: -10 ~ +60 ℃ )
If it's hard to read, please check the back light
level.
If the screen freezes, please reset the device.
Make su re that the GPS r eceiver is adjusted to
the horizontal position and it has a clear view of
the sky.
GPS r eception c an be a ffected by bel ow
circumstance.
- Bad weather
- Dense overhead obstacles
(e.g. trees and tall buildings)
- Other wireless device in the car
- Metallic windshield coating
Looket optional externa l ante nna will boost the
performance.
User Guide Manual - 45
Page 47

www.looket.com
7. Warranty
※ Limited Warranty
SysOnChip, Inc. warrants Looket N6 against defects in material and
workmanship, under normal use and service, for one (1) year from
the dat e o f purc hase o nly wi th t he pr oof of pur chase. And t he
warranty period might vary depending on the region, dealer, retailer
or sales contract.
The warranty period of a rechargeable battery and consumables are
six (6) months from the date of purchase.
Incompatibility is no t a def ect covered by SysOnChip’s w arranty. If
the pr oduct is f ound t o be def ective i n materi al o r wo rkmanship
during t his peri od, S ysOnChip o r one o f it s aut horized distributors
will, a t its op tion, rep air or rep lace t he d efective p roduct w ithout
charge when furnished with proof of retail purchase. If you ship the
product to S ysOnChip or on e of author ized d istributors, you mu st
use the original container or equivalent and the shipping charges is
your responsibility. SysOnChip or di stributors wil l bear shipping
charges for returning the product.
This warr anty d oes not apply to an y produc t which ha s been
subjected t o a lteration, uns ealing o r di sassembly and det ached
warranty or serial number label at any case.
SysOnChip is not r esponsible f or inc idental o r conseque ntial
damages resulting from breach of any express or implied warranty,
including damage to property and, to the extent permitted by law,
damages f or p ersonal in jury. T his warr anty is in lieu of a ll o ther
warranties incl uding i mplied w arranties of me rchantability and
fitness for a particular purpose.
User Guide Manual - 46
Page 48

www.looket.com
※ LCD Warranty
Looket N6 is a portable dev ice, therefore the free warranty cannot
apply to LCD when it damaged from misusing or abuse.
※ Power supplies and cables
Any damages f rom us ing po wer s upplies o r c ables whi ch ar e not
provided o r o fficially appr oved by t he manuf acturer c annot be
included in the warranty and are not responsible for SysOnChip.
※ Looket Service Center
If t he devi ce is found to be def ective, pl ease r ead t he w arranty
term firstly and contact retailers or us to be repaired or replaced.
E-mail, call or fax to the following service center for help with your
Looket device.
E-mail: sales@sysonchip.co.kr
Phone: +82-42-864-4665
Fax: +82-42-864-4664
Service hours: 9:00 to 18:00 (GMT+9:00)
Monday to Friday
Location:
th
floor, Singwan Building, KT Bukdaejeon Br.,
4
138 Gajeong-dong, Yuseng-gu, Daejeon,
305-350, The Rep. of Korea (South Korea)
User Guide Manual - 47
Page 49

www.looket.com
8. Package & Accessory
◈ Basic Unit Package
Looke
t N6
Cradle
Car Mount
Car Charger
USB Cable
User Guide Manual
◈ Optional Accessory
Video-in Cable
AC Adapter
External GPS Antenna
* Package contents might vary depending on countries without notice.
* Specification and features are subjected to be changed without notice.
User Guide Manual - 48
Page 50

This equipment has been tested and found to comply with the limits for a Class A digital device, pursuant to part 15 of the FCC Rules.
These limits are designed to provide reasonable protection against harmful interference in a residential installation. This equipment
generates, uses and can radiate radio frequency energy and, if not installed and used in accordance with the instructions, may cause
harmful interference to radio communications. However, there is no guarantee that interference will not occur in a particular
installation. If this equipment does cause harmful interference to radio or television reception, which can be determined by turning the
equipment off and on, the user is encouraged to try to correct the interference by one or more of the following measures:
ˍ Reorient or relocate the receiving antenna.
ˍ Increase the separation between the equipment and receiver.
ˍ Connect the equipment into an outlet on a circuit different from that to which the receiver is connected.
ˍ Consult the dealer or an experienced radio/TV technician for help.
Caution: Any changes or modifications to this device not explicitly approved by manufacturer could void your authority to operate this
equipment.
This device complies with part 15 of the FCC Rules. Operation is subject to the following two conditions: (1) This device may not
cause harmful interference, and (2) this device must accept any interference received, including interference that may cause undesired
operation.
This equipment complies with FCC radiation exposure limits set forth for an uncontrolled environment. This equipment should be
installed and operated with minimum 20 cm between the radiator and your body. This transmitter must not be collocated or operating
in conjunction with any other antenna or transmitter unless authorized to do so by the FCC.
www.looket.com
User Guide Manual - 49
Page 51
www.looket.com
4F., Singwan Bldg., KT Bukdaejeon Brach Office,
138 Gajeong-dong, Yuseong-gu,
Daejeon, 305-350, The Rep. of Korea
Tel: +82.42.864.4665
Fax: +82.42.864.4664
E-mail: sales@sysonchip.co.kr
Web-site: www.looket.com
www.sysonchip.co.kr/eng
Copyright ⓒ SysOnChip, Inc. 2010
All rights reserved. Reproduction, transfer, distribution or storage of
parts or all of the contents in this document in any form without the
prior written permission of SysOnChip, Inc. is prohibited. Other
product and company names mentioned herein may be trademarks
or trade names of their respective owners.
User Guide Manual - 49
 Loading...