

Page 1

User Manual v.1.0
Looket PMP
Page 2

2
Notices for safety
Note
Thank you for your purchasing the Looket PMP (P20 / P30 / P40).
Please carefully read this user guide instruction before using the product.
Online information and Product Registration
You can find more information about the player and register your unit in Looket website.
http://www.looket.com
The firmware upgrade news will be provided through registered e-mail address.
Your unique product serial number and model no. can be found on the back side of the product.
Information and instruction in the manual is subject to change without notice at any time.
Disclaimer and limitation of liability
Sysonchip, Inc. and its affiliated companies assume no responsibility for any damages and loss
resulting from the use of this manual and also by deletion of data as a result of malfunction, dead
Welcome
battery, or misuse of the product in any way.
Neither the manufacturer, importers nor dealers is responsible for any accidental damage including bodily
injury or any damage resulting from misuse or unsuitable operation by you
The information on this manual is prepared with the current player specification. The manufacturer is
adding new features to the product and may persistently apply new technologies hereafter.
All standards may be changed at any time without notice.
Page 3

Table of contents
3
Before Using
- Certifications & Copyrights
- Notice for safety
- Caution
- Unit package
- Designation
- Designation
Getting Started
- Turn on / Turn off
- Charging the battery
- Connecting AV out port
- Cable connection for recording
- USB cable connection
Operation
- Video player
- Audio player
-FM Radio
- Photo viewer
- File browser
- Recording
-Setup
4
11
19
Additional Information
49
Page 4

Before Using
4
Page 5

Certifications & Copyrights
- Certifications
CE, FCC, MIC
- Copyrights
* The software, video and audio which have an intellectual property are protected by copyright
and international laws. It is definitely each user’s responsibility when he/she reproduce or distribute
the contents created using Looket PMP.
* SysOnChip has all the rights of the patent, literary property, and intellectual property related to this
5
manual. You shall not reproduce any part of this manual unless authorized by SysOnChip.
Using any part of this manual without any official permission from SysOnChip is strictly illegal.
Page 6

Notice for safety
Notices for safety
⊙ If water or other liquids are present, power off the player and unplug the AC adapter.
⊙ If smoke or smell emit from player or adapter, power off the player and unplug the AC adapter.
⊙ Unplug adapter when it is not in use.
⊙ When it is electrical storms, unplug the AC adapter. Electrical shock can result.
⊙ Use only the supplied power adapter (AC) authorized by the manufacturer. Using with other power
supply are strictly out of warranty with any reason.
⊙ Do not overload a single power circuit because of overheating or fire.
⊙ Firmly unplug the adapter into the wall socket.
⊙ Do not place heavy objects on the power cable. Do not twist power cable.
6
⊙ Do not touch power adapter with wet hand because of electrical shock.
⊙ Do not use or leave this Looket PMP near a stove or fire.
⊙ Do not look at the LCD light directly at a close distance.
⊙ Keep out of the reach of children.
⊙ Do not use while walking or driving, which may cause any injury or accidents.
⊙ Do not attempt to disassemble or modify this Looket PMP, AC adapter, and any accessories included.
⊙ LCD may be temporarily discolored at the very low or too high temperature.
Page 7

7
!
⊙ Never connect or disconnect the power plug with wet hand.
⊙ Do not leave Looket PMP in places of high temperature, such as in a sun-heated car.
⊙ Do not damage the AC adapter cord by pulling it and do not attempt to extend it.
⊙ Do not drop or put pressure or strong impact on Looket PMP.
⊙ Keep this Looket away from magnetic objects (credit cards, floppy disk, etc.).
⊙ Do not take a picture or leave Looket PMP with the lens aimed directly at the sun.
⊙ If the Looket is subjected to a sudden temperature change, for example by bringing it from a cold
place into a warm room, condensation may form on the inside. Use the device after the temperature
difference has subsided.
⊙ Use only the supplied Li-ion battery authorized by the manufacturer. Using with other battery may
cause severe problems, accidents or critical damages on Looket PMP, which will be strictly out of
warranty.
Caution
Page 8

Unit package
Looket PMP
Data CD
AV Cable
USB Host Cable
USB Slave Cable
Earphones
AC Adapter (110 ~ 240V)
Quick Manual
Lithium-ion Battery 2EA
8
RCA Adapter (optional)
Carrying Case (optional)
Remote Controller (optional)
* Package contents might vary depending on countries without notice.
Page 9

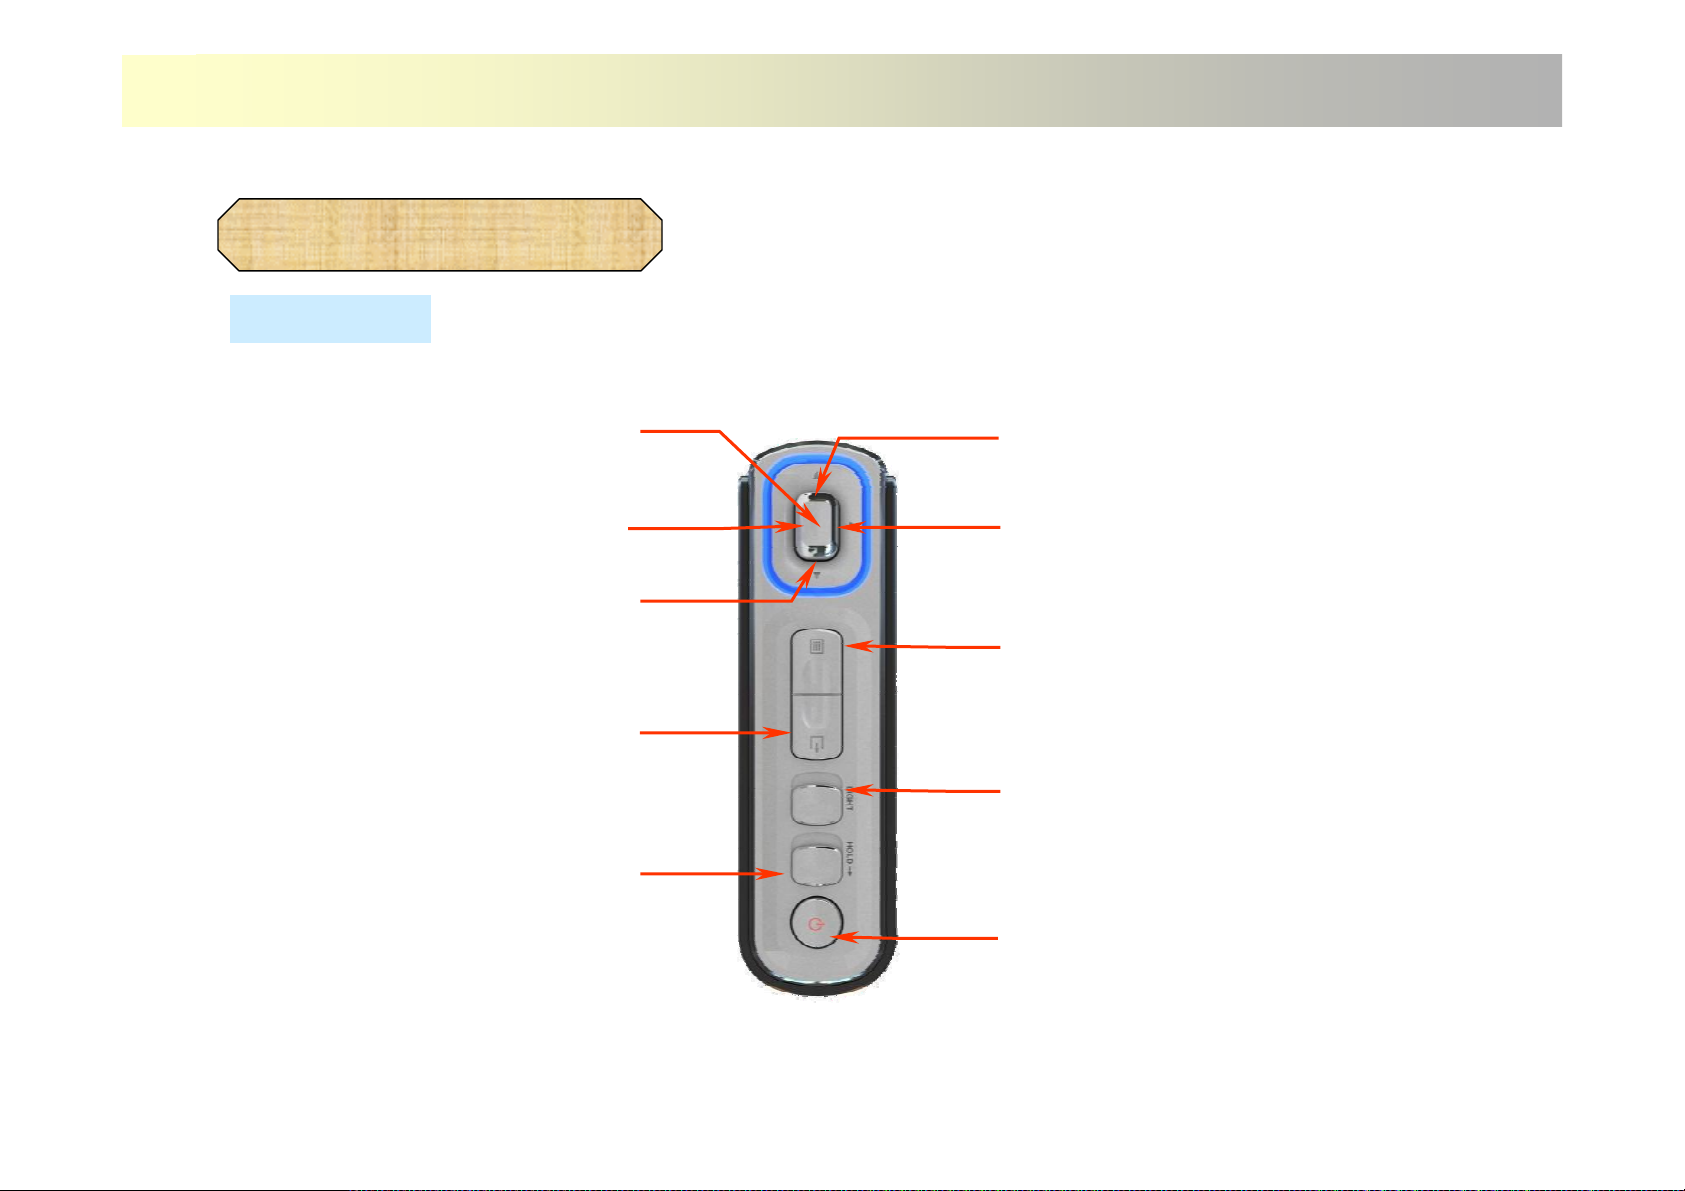
Designation
1) Dual Stereo Speaker
9
17) HDD LED
2) TFT LCD
3) Charging LED
(Blue / Blinking)
4) Navigation Key
or Joystick
5) Escape Button
6) Menu Button
7) Hold Switch
8) LCD Off Switch
9) Power Off Button
10) Remote Control
Connector(optional)
11) AV Out / Earphones
Connector
12) AV In Connector
13) USB Host / Slave
Connector
14) Power Connector
(5V, 1.5A)
15) Battery Cover Lock
16) Stand
Page 10

Designation
1) Dual Stereo Speaker: Built-in stereo sound speaker
2) TFT LCD : 16.7 Million color display & QVGA LCD
3) Charging LED : Blinking - during charging / Blue light on - after full charging
4) Navigation Key : 5 Directional switch. Up, Down, Left, Right, Enter
5) Escape Button : Return to previous menu or escape the current mode.
6) Menu Button : Popup setup menu
7) Hold Button : Navigation key, menu, and ESC button are freezed. Only power button is operated.
8) LCD Off Button : LCD On/Off Selection
9) Power On/Off Button : Press and hold it for 2 sec.
10
10) Remote Control Connector : Connector for an optional remote controller/FM transmitter
11) AV Out / Earphone Connector : Connector for other AV products like a television, a projector, or earphones.
12) AV In Connector : Connector for other AV products like a television, digital camcorder, VTR or DVD for recording.
13) USB Host / Slave connector : Host function – Connect with other USB products(Memory, Digital camera, etc)
Slave function – Connect with PC for data copy
14) Power connector
15) Battery cover Lock
16) Stand
17) HDD LED
Page 11

Getting Started
11
- Turn on / Turn off
- Charging the battery
- Connecting AV out port
- Cable connection for recording
- USB cable connection
(Slave connection & Host connection)
- Disconnecting USB connection
Page 12

Turn on / Turn off
1) Press the POWER button of the left side for 2-sec. You will see the light of HDD LED
on top cover
2) If LCD off switch is selected, the warning message will appear in LCD as below for
short moment.
12
Press the power
button for 2 seconds
Warning !
LCD Off switch is enable
Page 13

Charging the battery
Before using Looket PMP, the battery must be fully charged.
• Open the battery cover.
• Put Lithium-ion battery in Looket PMP.
• Close the battery cover. And lock the battery cover switch.
• Connect Looket PMP with AC adapter, and then plug the adapter into the wall socket.
• The charging blue LED will be blinking during charging, and turn on once it is fully charged.
• To start Looket PMP, press and hold the POWER button for 2 sec.
※ Low battery display
13
Low Battery
Page 14

Connecting AV out port
Looket PMP can be usable with other electronic products like TV, VTR, Beam Projector, etc.
1) Connect the AV out connector of Looket PMP with the AV cable included in the package.
The AV cable consists of phone jack and RCA jack.
2) Enter SETUP menu, and change ‘Composite Out’ to ‘ON’.
On/Off selection
14
TV
VTR
Projector
Page 15

Cable connection for recording
※ Looket can be input signal of other AV products
• Open the AC/DC jack cover and insert the phone jack of the AV cable into the AV IN connector.
• Connect the RCA jack of AV Cable to the cable of other AV product like the picture 1.
In case other AV product has different connector type, see right bottom picture.
15
Camcorder
VTR
Other products
다른 전자 제품이 RCA 잭인 경우 다른 전자 제품이 RCA 잭이 아닌 경우
Page 16

USB cable connection
Connecting to PC
• Connect the Looket USB cable included in the package to the USB port of your PC
• During USB connection with PC, do not operate any key of Looket PMP.
• If any Movie, Audio, FM, or Photo player is executed, escape from the play mode. Otherwise
USB cannot connected.
※ When the PC have Window98 Second version O/S, please install the driver from the enclosed CD.
16
Type ‘B’
Type ‘A-male’
Page 17

USB cable connection
Connect to other USB products
• Connect the Looket USB Host cable included in the package to your other USB products
such as USB memory sticks, digital cameras, memory card readers, etc.
• Refer to ‘File Browser’ function.
Type ‘A-Female’
17
Type ‘B’
USB Memory stick
Digital camera
Memory Card Reader
Page 18

Disconnecting USB connection
※ To disconnect the USB connection from your PC, follow the below instructions.
- Click the ① picture in the right bottom side of screen..
①
- Click the right button of your mouse when you see the message ②.
②
- When you see the ③ message, now you may unplug the USB cable from your Looket and computer.
18
③
- If you see the message ④, finish the program you are using for Looket properly and start the disconnecting
procedure again.
④
Page 19

Operation
19
- Video Player
- Audio Player
-FM Radio
- Photo Viewer
- File Browser
- Recording
-Setup
Page 20

Video player
Getting started
(1) Press and hold the power button (2) Select the Video Player in the main menu
and press in the middle of navigation key.
20
(3) Choose the movie file when
you see the file structure like
below.
(5) Choose “Yes” to play continuously,
choose “No” to start from the beginning.
(4) If the file was stopped in the middle before,
it will ask you to start from beginning or
continuously.
Play this movie continuously?
Yes No
Page 21

Video player
LCD display
21
Volume
Battery status
No SMI file warning
Caption area
Play time
Proceeding bar
Page 22
Video player
Key operation
22
Press middle joystick :
pause and resume
Press and hold :
Rewind 8 sec.
Volume down
Popup setup menu
LCD off
Volume up
Press and hold :
Fast forward 8 sec.
Go to previous menu
Hold key
Power On/Off Button
Press and hold it for 2sec.
Page 23

Video player
Menu contents
23
LCD Brightness : By clicking navigation button to the left and right,
the brightness of LCD screen can be changed.
Composite Out : Select AV out by using left and right button of
navigation key.
TV Standard : Choose AV out signal between NTSC mode and
PAL mode by using left and right button of navigation
key.
BookMark : Enable book mark function which memorize the stop
point of movie play by using left and right button of
navigation key
Show Caption : Choose showing caption file on the LCD screen or
not by using left and right button of navigation key
Caption Color : Choose the color or caption text between yellow
and white by using left and right button of navigation
key.
Page 24

Video player
Codec information
24
When choosing the file whose codec cannot be
supported by Looket, the warning message will appear.
In some files, only audio codec can be supported.
Click ‘Yes’ for the next movie.
BookMark operation
During movie play, if you stop it by clicking ESC
button, you will see the message like right side when
you restart the movie play. It memorizes only recently
played movie.
To see the movie continuously, press Yes.
To enable this function, turn on the Bookmark in
Setup menu.
Spider Man.avi
This file is Not supported!
Play next movie continuously?
Yes No
Play this movie continuously?
Yes No
Page 25

Audio player
Getting started
(1) Press and hold the power button. (2) Select Audio Player and press in the middle of
25
navigation button in the main menu.
(4) The selected music file will be played.
(3) Music file and folder in the Audio directory
will be seem on the screen.
Page 26

Audio player
LCD display
Play button
(Previous, Play, Next, Stop, Pause)
26
Current time
Volume
Battery status
Music file name
Playback time
Bit rate
Proceeding bar
Playing effect
Playback time
Sampling rate
Page 27

Audio player
Key operation
Press middle joystick:
pause or resume
27
Volume up
Press quickly : Select the previous song file.
Press for 1-sec.: Rewind current playing
song
Volume down
Popup setup menu
LCD off
Press quickly: Select the next song file.
Press for 1-sec.: Fast forward current
playing song
Go to previous menu
Hold key
Power On/Off Button
Press and hold it for 2 sec.
Page 28

Audio player
Menu contents
28
Play Mode Three modes are in the play menu
Normal, Shuffle, Repeat
Volume The Volume has 0~25 stages.
Equalizer Select with left and right button on navigation key.
There are 6 equalizer mode.
Normal, Classic, Dance, Rock, Pop, User
Page 29

Audio player
Setting User mode in equalizer
29
Select USER in the equalizer
mode and press in the
middle of navigation key.
After finishing USER mode,
you can see the color of
frequency is back to white.
With navigation key, change the
spectrum as you like.
One step is 1dB.
When finishing one frequency’s
spectrum, move to other frequency
with navigation key and set the
spectrum.
After setting spectrum, press in
the middle of navigation key to set.
Page 30

FM Radio
Getting started
(1) Press and hold the power button. (2) Select FM radio in the main menu and
30
press in the middle of navigation key.
(4) To go to Preset mode, press menu button.
Move to the frequency you want to listen
and press select button.
(3) To move the frequency of radio, press left
or right button of navigation key.
Page 31

FM Radio
LCD display
Stereo / Mono Indicator
31
Current Time
Volume
Battery Status
Current Frequency
Preset List
Page 32

FM Radio
Key operation
Press middle joystick:
Save selected frequency to the
preset list
Press quickly: Frequency decreases
by 50kHz.
Press it fo1 sec.: automatic
frequency searching
32
Volume up
Press quickly :
Frequency increases by 50kHz.
Press it for 1 sec.: automatic frequency
searching
Go to previous menu
Volume down
Popup setup menu
LCD off key
Hold key
Power On/Off
Press and hold it for 2 sec.
Page 33

Photo viewer
Getting started
33
(2) Select the Photo Viewer in the main menu
(1) Press and hold the power button.
(5-2) When you press the select button,
the image will be enlarged by twice.
and press in the middle of navigation key.
(5-1) To rotate the picture, press
the up and down button
in the navigation key.
(3) Select the file you want to see
with the up and down button
in the navigation key.
(4) The image of selected file will be
shown on LCD screen.
Page 34

Photo viewer
Key operation
Press middle joystick :
Zoom in/out : normal, 2x, 4x
34
Rotate image CW
Previous image
Next image
Rotate image CCW
Popup setup menu
LCD off key
Go to previous menu
Hold key
Power On/Off
Press and hold it for 2sec.
Page 35

Photo viewer
Menu contents
Image Info
35
Decide which of the file information will be shown
among the file name, size, resolution etc.
Select On / Off to set.
Enable automatic slide view function.
Slid Show
Time
※ Note
After rotating image, the zoom function cannot be used
and after zoom the picture, the rotating function cannot be used.
Select the time interval to move to the next photo.
(2 sec, 5sec, 10sec)
To change to the manual slide view, select ‘off’.
Page 36

File browser
Getting started
(1) Press and hold the power button. (2) Select the File browser in the main menus
36
and press select button.
(4) Press menu button to see the other available
menus in the file browser.
(Copy, Delete, Move, Setup)
(3) To move to other folder, press
left and right button in the navigation key.
Page 37

File browser
Key operation
37
Press middle joystick:
Play selected file or change directory
Change directory / file area
Down cursor
Popup setup menu
LCD off key
Up cursor
Change directory / file area
Go to previous menu
Hold key
Power On/Off
Press and hold it for 2sec.
Page 38

File browser
Copying files
38
(1) Move cursor to the file
that you want to copy.
(3) Press select button
(4) Move to the folder where
you want to copy the file to
and press menu button.
(There will be message.)
(2) Press menu button and
select copy.
Message contents :
Move to the folder to place the file
and press MENU to copy.
(5) When the process completed,
the message will disappear.
Page 39

File browser
Moving files
39
(1) Move cursor to the file
that you want to move.
(3) Press select button
(4) Move to the folder where
you want to move the file to
and press menu button.
(2) Press menu button and
(There will be message.)
(5) When the process completed,
select ‘move’.
Message contents :
Move to the folder to place the file
and press MENU to move.
the message will disappear.
Page 40

File browser
Deleting files
40
(1) Move cursor to the file
that you want to delete.
(4) Press menu button. .
(3) Press select button
(There will be message.)
(2) Press menu button and
select ‘Del’.
Message contents :
Are you sure to delete the file?
(5) When the process completed,
the message will disappear.
Page 41

Recording
Getting started
(1) Press and hold the power button. (2) Select the Recording in the main menus
41
and press select button.
(5) To stop the recording, press ESC button.
The files created will be placed in the
recording folder.
(4) When there is not input signal
“Low Signal” message will be
appear on the screen.
Low Signal
Please Connect AV IN
Select : Recording
ESC : Previous Menu
Page 42

Recording
Key operation
42
Press middle joystick
Start recording
No operation f or recording
No operation f or recording
LCD off key
No operation for recording
No operation for recording
Goto previous menu
Hold key
Power On/Off
Press and hold it for 2sec.
Page 43

Setup
Select the Setup in the main menus and
press select button.
43
LCD display
Video Setup, Audio Setup, Photo Setup, System
Setup are in the Set up menu. By choosing menu
button in other player mode, you can connect
directly to setup menu.
About each menu’s setup except system set up,
please refer to the each menu.
Page 44

Setup
System Setup – LCD Sleep
44
To save the battery, you can enable the LCD sleep function.
There are option for 1 min, 5min, 10min and off.
When any audio or video file is not played, and there isn’t any
input signal to the device, the device can disconnect the
signal to LCD temporarily screen to save the power
consumption.
And you can also use LCD off button in the left side of unit.
Page 45

Setup
System Setup – Power Sleep
45
To save the battery, you can enable the LCD sleep function.
There are option for 1 min, 5min, 10min and off.
When any audio or video file is not played, and there isn’t any
input signal to the device, the device can turned off automatically
to save the power consumption.
And you can also use power off button in the left side of unit.
Page 46

Setup
System Setup – Inner Speaker
46
This unit have built-in stereo speaker.
When you plug in the earphones to the Looket, the built-in
speaker will be disabled.
But if you want to save the battery more, you can turn off the
built-in speaker power when you use the earphones.
Page 47

Setup
System Setup – Date Time
47
You can set the date and time.
When you turn on the device first time, the time might not be
correct depending on your countries.
Please set the right date and time for your location.
When the unit is not used for a long time, the time can be
initialized.
Press select button in
Date time menu.
Use the navigation key to set the
time and date.
Press select button when you
complete the time setting.
Page 48

Setup
System Setup – Firmware Update
48
다음 단계에 따라 Firmware Update를실행한다.
※ Update를하기전에AC Adapter를 반드시 연결하여야 한다.
→본PMP의 최상위 폴더에 Upgrade할파일을USB를 이용하여
PC에서 복사한다.
→ PMP의 상위 메뉴에서 Setup으로 들어간다.
→ Setup메뉴 중에서 System을 선택한다.
→ System 메뉴 중에서 Firmware Update를 실행한다.(좌측그림)
→ 화면에 Update를 실행할 것인지를 다시한번확인하는메시지
창이 뜨고 ‘Yes’를 선택하면 Update가 실행된다.
→ Update가 실행되는 도중에는 절대로 전원을 Off하거나 기타 다른
동작을 하지 않도록 주의하여야 한다.
Page 49

Additional Information
49
Page 50

Trouble Shooting
Trouble Solution
The product will not power on or any function is
not operate.
Nothing is displayed on the LCD screen.
Nothing can be heard in speaker.
When connecting TV, the screen is not displayed
or not clear.
50
Check the rechargeable batteries are not charged.
Check the battery's anod and cathod are correctly connected.
Check the system folder is deleted by mistake.
If yes, copy the System folder from C D to the device.
Check the LCD ON/OFF switch.
When the LCD switch is OFF, the screen will not displayed.
Check the LCD brightness in the setup menu.
When the LCD i s too dark during daytime, the screen mi g ht not be seen well.
Check the speaker in setup menu.
Check the earphones are connected.
When using earphones, the built-in stereo speaker does not operate.
Check the TV standard in setup m enu.
There is 'Beep' sound in the earphones.
There is too m uch noise in FM radio or the sound
is not clear.
The movie file of audio file is not played or only
sound is played in movie file.
The video or photo file is displayed in small er size
than the screen.
My computer cannot recognize Looket.
Check the 'AV out' in the Setup menu. I t should be off when you use earphones..
This device use same port for earphones and AV out.
Check the earphones are connected completely.
The radio use the earphones as antenna, s o the earphone should be connected.
The inside of building or inside of subway might not be good place to get the strong signal.
This can be happen when the codec is not supported by the device.
Please play the file in computer and if it played without problem, convert the file with provided
converter program.
D uring editing movie file, if the screen is set to fixed size, this can be happen.
Check the power of the unit.
Except for Windows 2000, XP, you need to instak tge driver file in other operating system.
Use the other USB cable or other port of com puter. When you use extention cable, please
check the cable is connected fully.
Depending on the hardware of some computer, the Looket might not be recognized. Please
contact us to solve this problem.
Page 51

Specification
File Formats
51
Video
Audio
Image
Support Codec
Support File Format
Output Format
Encoding
Support Codec
Encoding
Support File
MPEG4 Simple profile, XviD, WMV9
Divx3.11, 4, 5, 5pro
AVI, ASF, WMV
NTSC / PAL
Composite video output 75Ohm
MPEG 4 simple profile, ASF file format
MP3, WMA, AC3, OGG, G.726
G.726
JPEG, BMP, GIF
Page 52

Specification
Technical Specification
52
Display
HDD
Interface
Audio
FM Radio
Dimension
Scalability
Operating temperature
Optional Accessory
Power Source
3.5” TFT Landscape LCD, 16.7 Million color, QVGA 320x240 pixel
Viewing angle : 60 degrees(Right & Left)
20GB, 1.8 inch, FAT32
USB2.0 Slave(max 480Mbps)
USB1.1 Host full speed
Audio output : Max 40mW
Bandwidth : 8 ~ 96kHz
Bit rate : 32kbps ~ 320kbps
SNR : 97.0dB
Bandwidth : 87.5MHz ~ 108MHz
SNR : 60.0dB
Antenna : earphones
77.5 mm(L) × 104 mm(W) × 23 mm(D)
Firmware upgradeable
5℃ ~ 45 ℃
Remote control & FM transmitter
Internal : Replaceable and rechargeable, Lithium-ion battery
External : Home charger(AC adapter DC 5V 1A)
Page 53

Warranty
Sysonchip, Inc. warrants Looket PMP against defects in material and workmanship, under
normal use and service, for one (1) year from the date of purchase.
The warranty period of a rechargeable battery and consumables are six (6) months from
the date of purchase. The Serial sticker on the battery should not be detached for the
warranty.
Incompatibility is not a defect covered by Sysonchip’s warranty. If the product is found to
be defective in material or workmanship during this period, Sysonchip or one of its
authorized distributors will, at its option, repair or replace the defective product without
charge when furnished with proof of retail purchase. If you ship the product to Sysonchip
or one of authorized distributors, you must use the original container or equivalent and the
shipping charges are responsible for you. Sysonchip or distributors will bear shipping
charges for returning the product.
53
This warranty does not apply to any product which has been subjected to alteration,
unsealing or disassembly in any cases.
Sysonchip is not responsible for incidental or consequential damages resulting from breach
of any express or implied warranty, including damage to property and, to the extent
permitted by law, damages for personal injury. This warranty is in lieu of all other
warranties including implied warranties of merchantability and fitness for a particular
purpose.
Page 54

Warranty limitations and exclusions
This warranty applies only to the original consumer purchaser and is not assignable or transferable.
This warranty does not apply to any product which has been subjected to misuse, misapplication,
abuse, abnormal use, negligence, alteration or accident, or any product having its serial number
altered or removed.
This warranty does not apply to any defects or damage directly or indirectly caused by or resulting
from the use of unauthorized replacement parts and/or service performed by unauthorized person.
===============================================================
Some jurisdictions do not allow the exclusion or limitation of incidental or consequential damages, so the above limitations
or exclusion may not apply to you. This limited warranty gives you specific legal right, and you may also have other rights
that vary from jurisdiction to jurisdiction
※ HDD, LCD warranty
Looket PMP is portable device, ther efore the free warranty cannot apply to HDD and LCD when it damaged from misusing
or abuse.
54
※ Power supplies and cables
Any damages from using power supplies or cables which are not provided or officially approved by the manufacture cannot
be included in the warranty.
Service Information
Homepage : http://www.looket.com or http://www.looket.co.kr
E-mail : sales@sysonchip.co.kr
Address : 14Fl. Sahakyeongum Bldg., Dunsan-Dong, Seo-gu, Daejeon, 302-828, Korea
Phone : ++82 42 864 4665 (ext.105)
FAX : ++82 42 864 4664
Page 55

FCC NOTICE
THIS DEVICE COMPLIES WITH PART 15 OF THE FCC FULES.
OPERATION IS SUBJECT TO THE FOLLOWING TWO CONDITION:
(1) THIS DEVICE MAY NOT CAUSE HARMFUL INTERFERENCE, AND
(2) THIS DEVICE MUST ACCEPT ANY INTERFERENCE RECEIVED,
INCLUDING INTERFERENCE THAT MAY CAUSE UNDERSIRED
OPERATION.
This equipment has been tested and found to comply with the limits for a Class B digital device, pursuant to part 15 of the FCC Rules.
These limits are designed to provide reasonable protection against harmful interference in a residential installation. This equipment generates, uses
and can radiate radio frequency energy and, if not installed and used in accordance with the instructions, may cause harmful interference to radio
communication. However, there is no guarantee that interference will not occur in a particular installation. If this equipment does cause harmful
interference to radio or television reception, which can be determined by turning the equipment off and on, the user is encouraged to try to correct
the interference by one or more of the following measures :
- Reorient or relocate the receiving antenna.
- Increase the separation between the equipment and receiver.
- Connect the equipment into an outlet on a circuit difference from that to which
the receiver is connected.
- Consult the dealer of an experienced radio/TV technician for help.
NOTE : The manufacturer is not responsible for any radio or TV interference cau sed by un authorized modifications to this equipment.
Such modifications could void the user’s authority to operate the equipment.
 Loading...