

Page 1

N5N5
User Guide Manual
(ver1.0)
Page 2

Thank you for choosing and
purchasing the Looket N5 model
as your GPS navigation and
welcome to | Guide Manual.
The device is very easy to use and
it takes you just few steps to
understand how it works.
Page 3

- CONTENTS -
Looket N5 Models ................................................................... 3
How to insert SD card ............................................................. 3
Designation ............................................................................ 4
Main Screen ........................................................................... 5
NAVIGATION Menu ................................................................. 5
First Launch ......................................................................... 5
Designation of the navigation screen ...................................... 7
Useful function on the main menu ......................................... 8
How to set your home location ............................................ 14
How to chech or re-set GPS hardware .................................. 15
How to set TMC .................................................................. 15
Menu Bar on Navigation Screen ........................................... 16
Warning ............................................................................. 19
MUSIC / MULTIMEDIA Menu .................................................. 20
Music Player ....................................................................... 20
Multimedia Player ............................................................... 21
BLUETOOTH HANDS-FREE Menu ............................................ 23
How to receive a call ........................................................... 24
AV-in Menu ........................................................................... 25
SETTING Menu ..................................................................... 26
System ................................................................................. 26
Bluetooth ........................................................................... 27
FM Transmitter ................................................................... 29
Trouble Shooting ................................................................. 30
Warranty .............................................................................. 31
User Guide Manual - 2
Page 4
User Guide Manual - 3
* Models and features are subject to be changed without notice.
N510 N530 N570
O
O
O
X
X
X
X
O
O
O
O
O
O
X
O
O
O
O
O
O
O
Navigation
Bluetooth Hands-free
Music Player
Multimedia Player
FM Transmitter
AV-in
TMC
Models
Features
Looket N5 Models
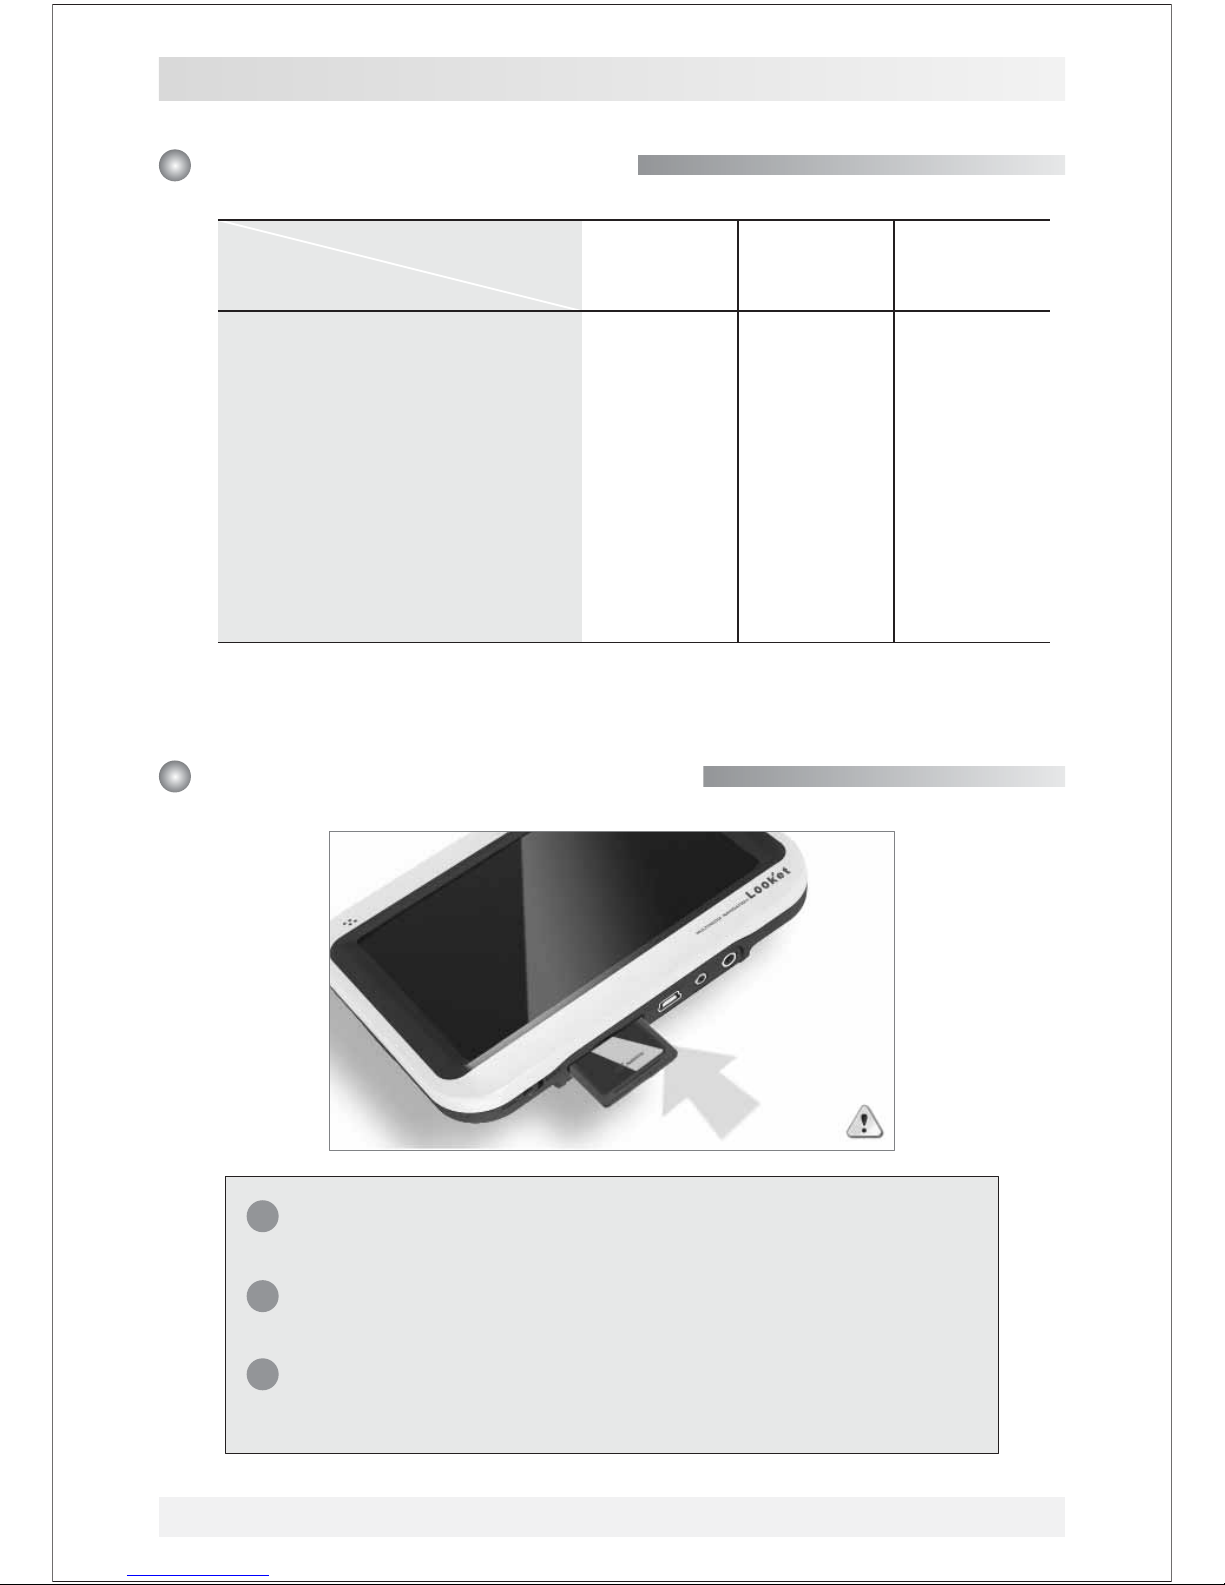
How to insert SD card
www.looket.com
Be careful of the direction when the SD card is
inserted.
Do not remove SD Card while the device is powered
on, doing so may result in the device malfunction.
In case of removing SD card, the device is reset
automatically.
!
!
!
Page 5

1
2
3
4
5
6 7 8 9
ྙ Sleep & Wake-up or Reset Button
If it is clicked shortly, the device is suspended (on the sleep mode).
But if it is pressed for 2 seconds and over, the software reset is
conducted.
* Software Reset
Please press and hold the reset button (ྙ)forover2
seconds.
* Hardware Reset
Totruntothefactoryresetorconducthardwarereset,please
turn off & on the device by the power on/off switch (ྜྷ).
ྚ Charge Status Indicator
- Red: An internal battery is charging.
- Blue: An internal battery is fully charged.
- Off: A power connector is disconnected.
ྛG Microphone
ྜ Menu Button
ྜྷ Power On/Off Switch
ྞ SD Card Slot
ྟ USB & Power Port
ྠ TMC Antenna Port
ྡ AV-in Port
Designation
User Guide Manual - 4
Page 6
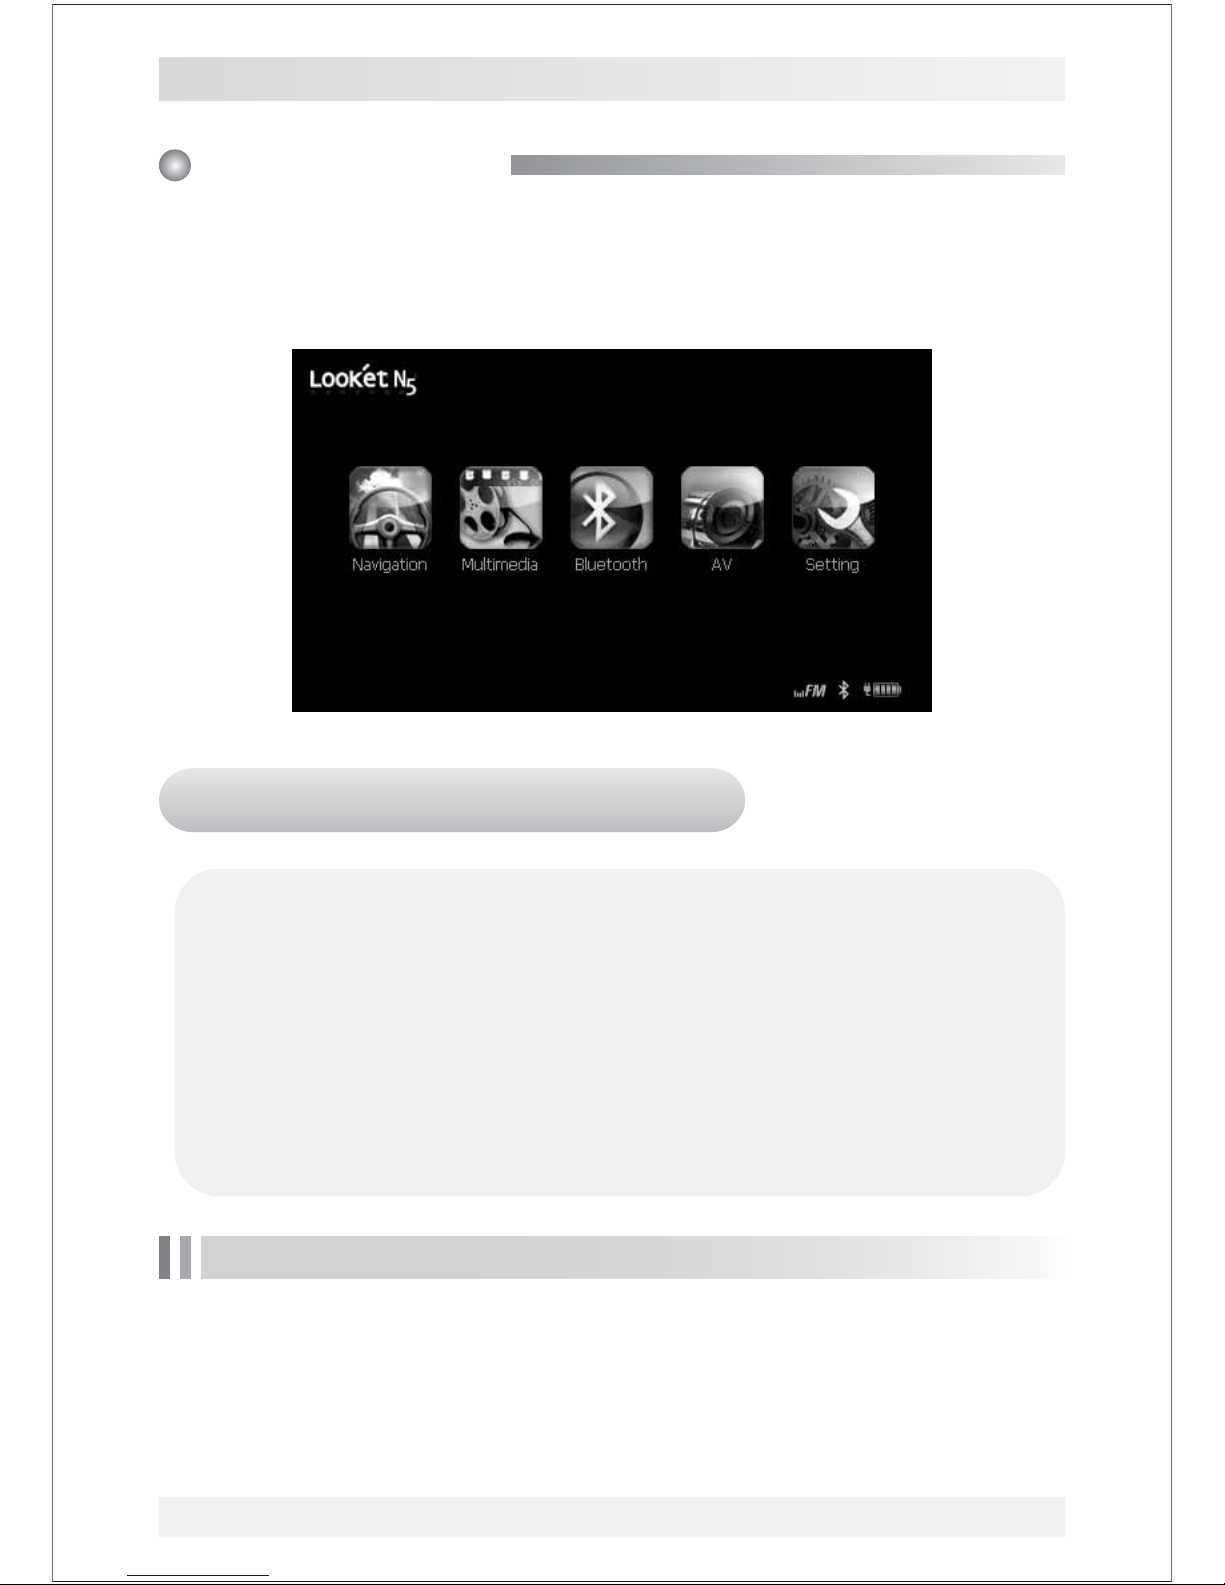
After turning on the Looket N5 for the first time, Navigation,
Multimedia, Bluetooth, AV, Setting can be selected (in case of the
Looket N530 and N570 models).
Main Screen
This User Guide Manual which is a quite simple manual to
follow will take you to understand how it works. For more detail
information, please download the manual on our web-site.
Also, you can consult Quick Guides on the settings menu from
the main menu of the navigation in the device.
To enter Quick Guides, please do as follow;
Touch screen ˧ Tap Setting on menu ˧ Quick Guides
NAVIGATION Menu
First Launch
When you conduct NAVIGATION first time, you should be
asked to set language, voice, map, GPS signal etc. All
information you set will be saved in a SD card automatically
after launch.
www.looket.com
User Guide Manual - 5
Page 7
1. Tap NAVIGATION
on the Main menu.
After reading the
important message,
click I AGREE.
2. Select your
language, voice,
distance units,
keyboard
preference and
map.
3. After chose your map, the device is auto-searching for GPS
signal, and then its COM port and baud rate which the device is
supporting will be set automatically.
4. You would probably see your current valid GPS position on the
map after successful launch.
5. If you tap anywhere on the map area, the Main menu of the
NAVIGATION is showed. On the bottom of the screen you can see
useful information about your current position - street name with
numbers.
The process of the first launch is subject to be passed according
to the country and maps.
User Guide Manual - 6
Page 8
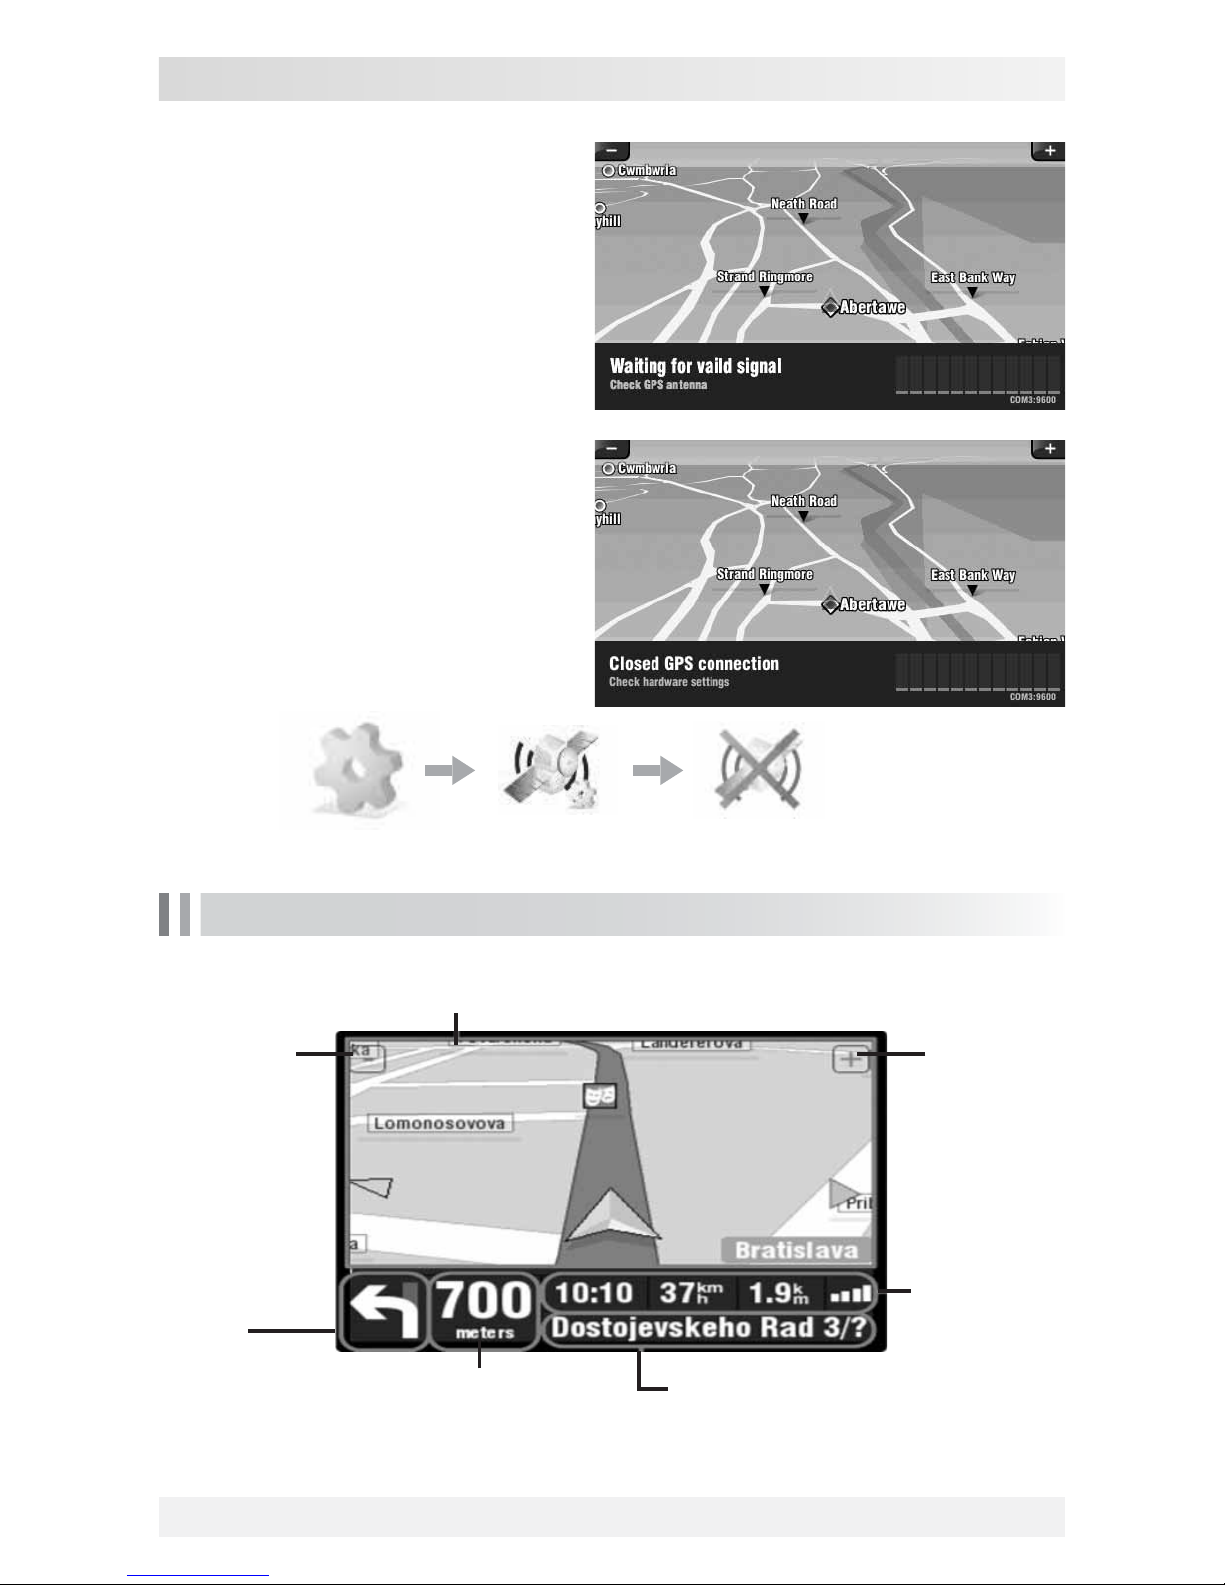
Designation of the navigation screen
Tap anywhere on the map area to open the Main menu
Zoom Out Zoom In
Arrival time
/ Speed
/ Distance
to finich
Current position
Next turing
Point*
Distance to next turing point*
* These information are showed only if you have already computed a route.
www.looket.com
User Guide Manual - 7
After successful launch, you
would probably see your current
valid GPS position on the map. If
you see only grey screen after
launch, you should probably
check your GPS status first and
wait for valid GPS signal. It takes
some time to get valid signal
from available satellites. First of
all, tap on the grey screen to
open the Main menu and find
GPS status button.
If the 'Closed GPS connection'
message is displayed, check if
the GPS module is turned on.
Settings GPS hardware Turn GPS module Off
Page 9
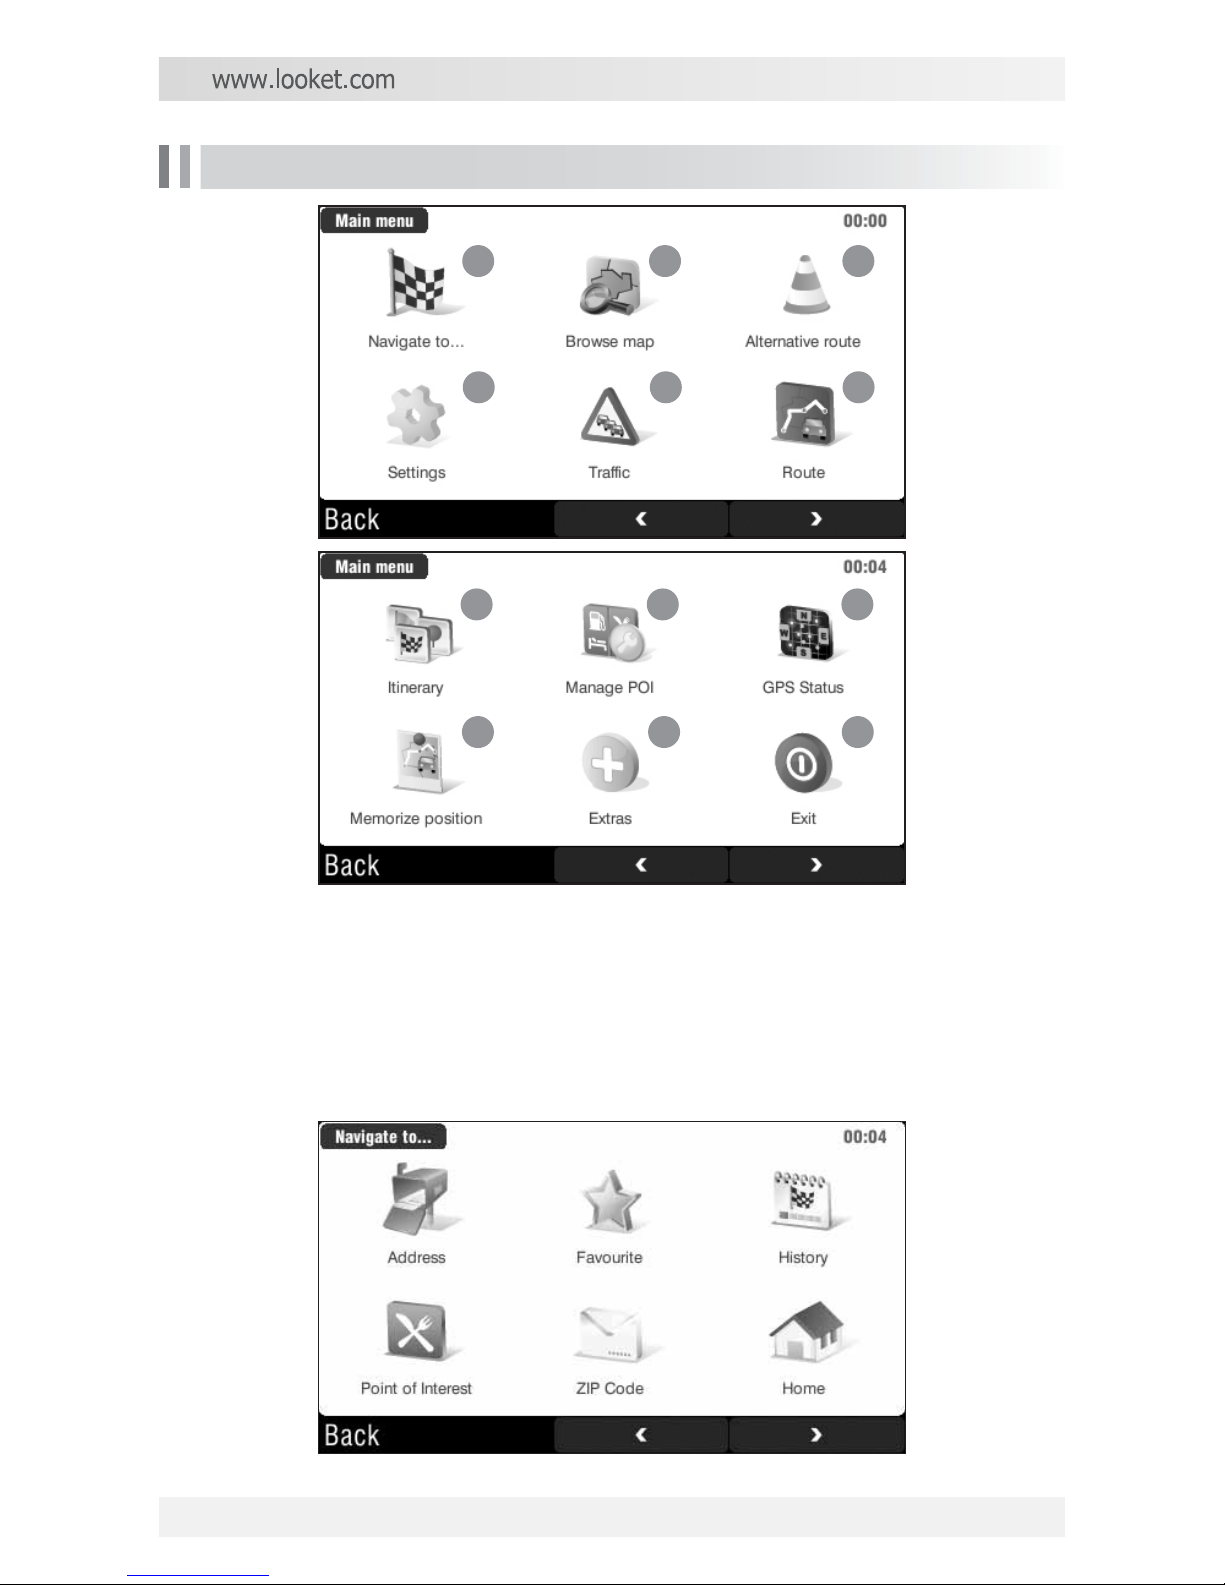
Useful function on the main menu
1) Navigation to
If you click 'Navigation to...' on the Main menu, there are
various ways to set your destination and plan your route easily.
They will give you great opportunity to choose just the perfect
option for you.
1 2 3
4 5 6
7 8 9
10 11 12
User Guide Manual - 8
Page 10
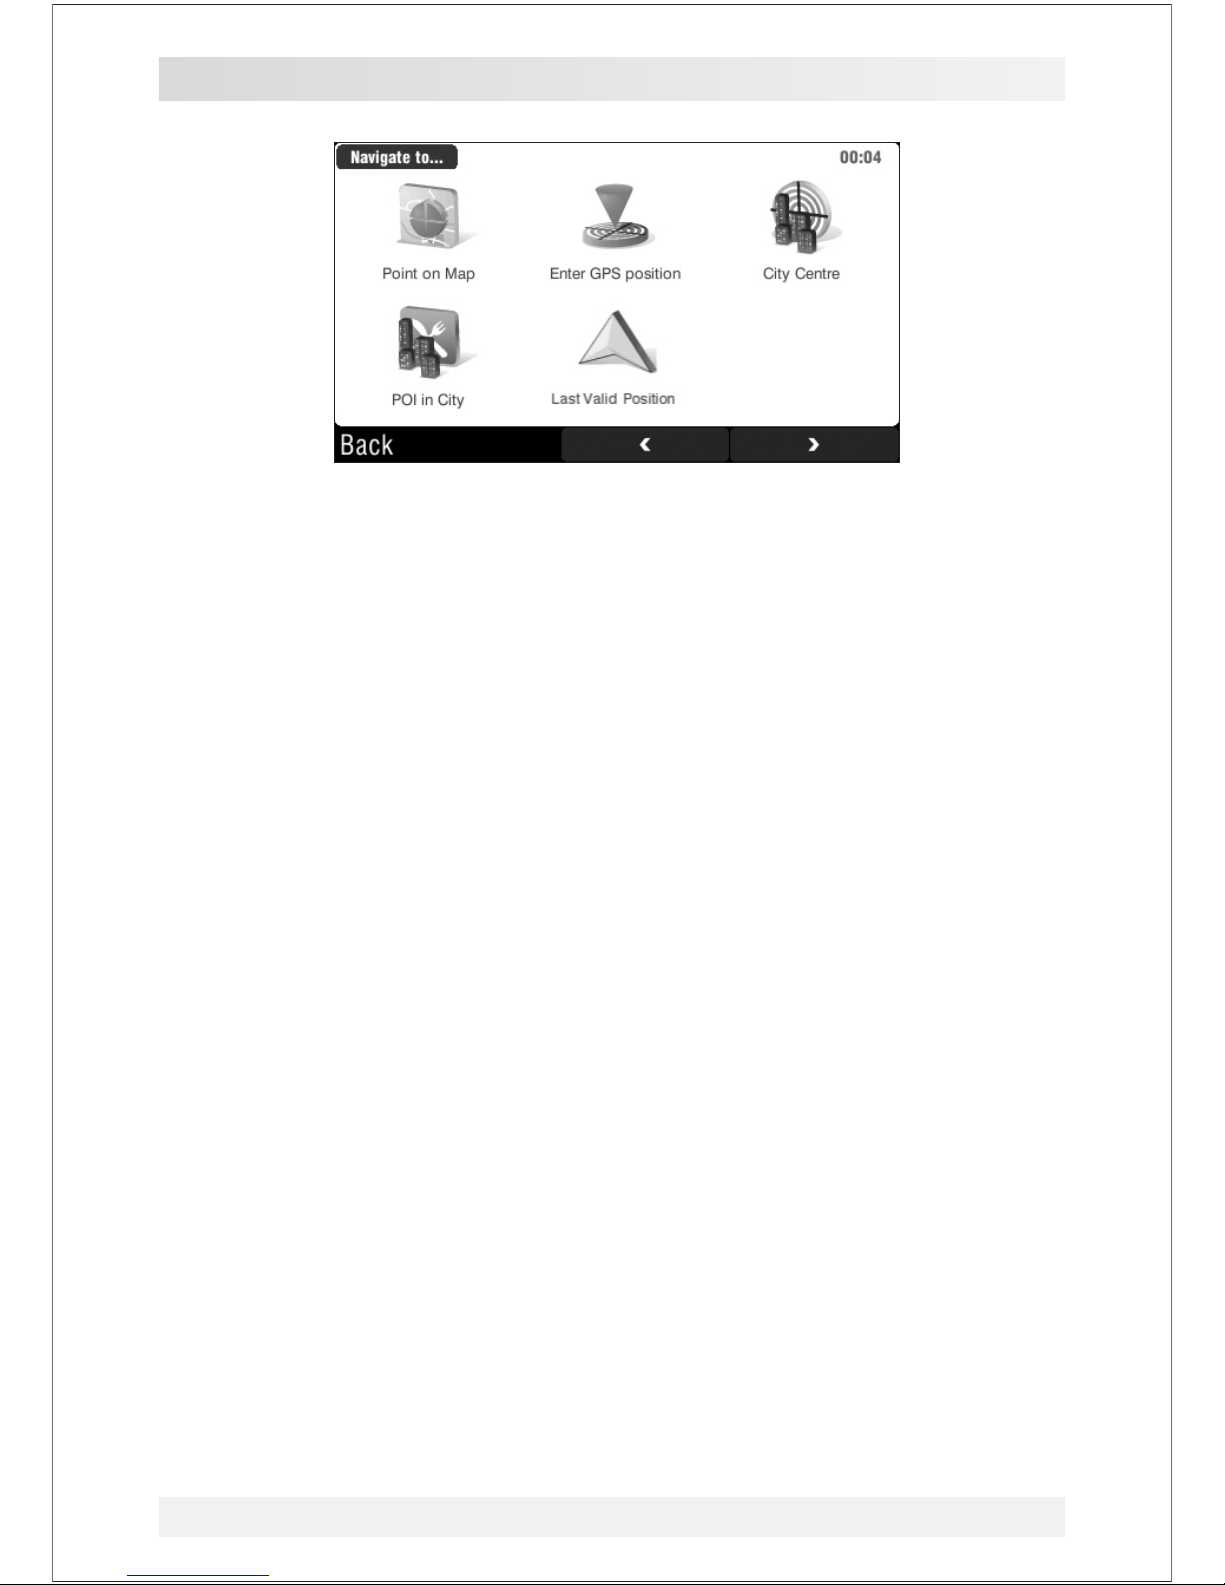
In this guide, we'll show you how to use the Navigation to function
using the Address option.
1. Touch Address on the Main menu.
2. Select Country, City, Streen and Number step by step.
Or find them using the keyboard on the screen.
3. Select your departure screen appears.
You can choose from three options - wait for valid signal, Last valid
position or Select from map.
(Wait for valid signal and Last valid position work properly when
the GPS is truned on.)
GManagement of Favorites
There are two ways how to add the address and/or destination to
the Favorites.
1) Browse map on Main Menu
ྙG Select the point (where you'd like to add on the Favorites) on
the map. Or tap Options - Find - Address and then you can enter the
exact address (or other options available).
ྚ Click the Context menu button in the middle of the bottom
black title bar where you have several option (navigate there,
travel via, etc.).
ྛ Select Add as POI , then tap Favorites.
2) Manage POI on Main Menu
ྙ Click Add POI.
ྚ Choose Address (or other) to insert the place to Favorites.
ྛ Tap Favorites on 'Select or create a category' menu.
www.looket.com
User Guide Manual - 9
Page 11

2) Browse map
If you tap 'Browse map' on the Main menu, it is available to
browse the entire map and search for your destionation or POI.
By simple dragging, you will be able to scroll through the map
and explore new areas.
3) Alternative route
You can set which roads should be added or avoided. And also
you can also avoide the traffic delays and much more. As in the
case with the route button, alternative route button is also
available after you'll plan your main route.
Browse map cursor informs you about targeted POI or street
Map scale
Zoom
In/Out
using
zoom bar
Tap this button to open the Contex menuTap this button
to open the Map options
User Guide Manual - 10
Page 12

4) Settings
When you tap Settings from the Main menu, you can modify
Sygic DRIVE and user's preferences.
The Settings menu includes;
5) Traffic
Set to 2D (flat) view / Set 3D view
Set night / daylight / automatic colors
Disable / Enable sounds
Volume settings
GPS logs
Advaced settings
Planning preferences
Toll charge settings
Set vehicle type
GPS hardware
Signpost settings
Rotate display
Left handed
Keyboard settings
Regional settings
Set language
Set voice
Switch map
Set home location
Backlight settings
Quick guides
The only Looket N570 model supports this function.
www.looket.com
User Guide Manual - 11
Page 13

6) Route
You have to first planned your route to get access to route
options. If you haven't planned your route, the route button isn't
available. Here you can find all the further information about your
route, you can view the whole route in image slides or even
watch the route preview by using the route demonstration option.
1
Show route instructions
2
Show route as images
1 2 3
4 5 6
User Guide Manual - 12
Page 14

3
Show route summary
4
Show route demo
5
Show on map
7) Itinerary
It allows you to plan your business journey, comfortably from
your home.
www.looket.com
User Guide Manual - 13
Page 15

8) Manage POI (Point of Interest)
Various POIs are showed on the map such as airports, banks,
bus stations, hotels, parking garages, shopping centres. You can
easily manage them and add your own POIs or there is also a
function which warns you when you'll be crossing the nearby POI.
9) GPS status - check 'valid satellites' or 'your valid position'.
10) Memorize position - save your current position into History.
11) Extras - following options (World Clock, Calculator, Unit
Convertor, Country Info) are available.
12) Exit - tap the button if you want to close down Navigation.
How to set your home location
1. Tap 'Set home location' on Setting menu.
2. Afte your home location has been saved, just click Home on
Navigation to menu to navigate home in the future.
If you don't have a home location saved, the device will
prompt you to set your home location when you click Home on
Navigation to menu.
User Guide Manual - 14
Page 16

How to check or re-set GPS hardware
1. Tap Settings on Main menu and then click GPS hardware.
2. Check Turn GPS module button for activation GPS module.
(The icon should be same with the following picture.)
3. Tap 'Autodetect' to search COM port and baud rate
automatically and then wait to fix it. Or set following COM port
and default baud rate by your self after t ap COM port and Baud
rate.
COM port: COM3
Baud rate: 9600
How to set TMC
Only the Looket N570 model connected with an external TMC
antenna is available for TMC service.
1. Click Settings on Main menu and then tap GPS hardware.
2. Select Wizard and autodetect GPS receiver port.
3. Tap yes when you are asked,
"Do you have TMC receiver?".
4. Click RoyalTek as GNS and set following COM port and
baud rate.
COM port: COM2
Baud rate: 38400
www.looket.com
User Guide Manual - 15
Page 17

Menu Bar on Navigation Screen
If a 'M' (menu) button on the right side of the device is
pressed during running the navigation, the Menu bar is
come up on the right side of the screen. There are the
indicator of the battery status and 4 icons for BGM,
Camera, Bluetooth and FM Transmitter on the menu bar in
case of the Looket N530 & N570.
-BGM
- Camera
- Bluetooth Hands-free
- FM Transmitter
1) BGM (Back Ground Music) Button
The user is able to listen to MP3 music with the navigation.
The BGM program plays the music in the Music folder of the
inserted SD card in order of precedence. MP3 files which users
would like to play in the BGM program can be added to the
Music folder of the SD card.
NextPrevious Play & Stop
Volume Down Volume Up
User Guide Manual - 16
Page 18

2) Camera Button
When this button is selected, the video signal from the AV port
is shown on the screen. If the vehicle has the rear camera, the
image from the rear camera is displayed on the screen.
The program is ended when touched the screen, and then the
Navigation screen comes up.
In case that the external AV is connected instead of the rear
camera, the video is supported but the sound is not provided
during the operation of the Navigation.
On the System menu of the Setting menu of the Main menu, it
is able to set the video from the rear camera is shown
automatically when the AV signal is occurred. As soon as the
AV signal is disconnected and the camera view is closed, the
Navigation screen is displayed. (The function will be useful in
case of connecting the rear camera signal with the reverse
gear.)
If the AV signal is weak or it is not existed, the message, 'No
Signal', is shown on the screen.
www.looket.com
User Guide Manual - 17
[ View from Rear Camera ]
Page 19

3) Bluetooth Hands-free Button
If this button is clicked, the Bluetooth hands-free program is
conducted.
When the Bluetooth is available, the background color of the
icon is blue. And if the background color is white, it means the
Bluetooth is disabled to use.
4) FM Transmitter Button
When tapped this icon, the screen is displayed to set the FM
transmitter function.
In case of enabling the FM transmitter, the icon is bright and
the current set frequency is indicated on the icon. If the
function is disabled, 'OFF' is displayed on the icon.
User Guide Manual - 18
Page 20

www.looket.com
User Guide Manual - 19
Place a device where it has a clear view of the sky. GPS
signals can be obstructed by ceilings, trees, nearby tall
buildings and the roof of the vehicle.
Initial GPS fix may take up to 2 ~ 10 minutes depending
on circumstances.
Please fix initial GPS with a full charged battery. It'll take
longer than before with a low battery.
Vehicles with a coated or hear reflective windshield may
require on an external GPS antenna (not included).
To protect the device against sudden current, please
connect a car charger only after the car engine has been
started.
Use only power supplies included in the unit package
provided by the manufacturer or officially approved by the
manufacturer.
Connect a car charger during operation. Low battery may
deteriorate GPS performance.
Unauthorized power supplies may harm the device and
any accidents or damages from this will not responsible for
the manufacturer.
Before placing the suction cup, clean the inside of
windshield and remove any dust or grease.
The suction may be lost if left overnight, due to
condensation and low temperature.
Do not leave the device in an vehicle with high
temperature.
Warning
Page 21

Music Player
The only Looket N510 model has a Music Player.
Music files are able to be stored from PC to SD card through SD
card reader. All files which extension are mp3 in the SD card are
listed on the screen of the Music Player.
Status of current play (STOP, PLAY, PAUSE) EXIT
Play
NextStop Pause Previous
Random
Repeat all music files
Repeat one music file
Play all music files once
Select Equalizer mode:
POP, Classic, Jazz, Rock
Current position
/ Total paly time
Processing bar
Volume bar
Mute On/Off
MUSIC / MUTIMEDIA Menu
User Guide Manual - 20
Please insert SD card before starting the Music Player. Also,
before you take out SD card, please exit the player and go
back to the main screen. If SD card is taken out while the
Music Player is running, it will harm the device which will
not be working normally.
In case of removing SD card, the
device is reset automatically.
!
Page 22

Multimedia Player
The Looket N530 & N570 have a Multimedia Player. Various
video, audio, image files saved in SD card will be able to be
displayed.
Best resolution: 480 x 272 pixels
Supporting codec: mpeg, mpg, asf, wmv, avi, mp3, jpg
1
10
12
9
2
43 5 6 7 8
11
www.looket.com
User Guide Manual - 21
ྙ Screen
- If the screen part is clicked, it is changed to the full screen.
ྚ Status Bar
- The playing part is able to be selected by moving the bar.
ྛ Previous Button: Play the prior file.
ྜ Play / Pause Button
- Play or stop playing and ready to continue the current file.
ྜྷ Next Button: Play the following file.
ྞ Edit: Open the window to edit the file list.
ྟ Set-up Button: Show the set-up screen.
ྠ Mute On/Off: Sound is on or off.
ྡ Volume Down Button
ྡྷ Volume Up Button
ྣ Play List
ྤ Exit: Close the program.
Page 23

* Edit Window of File List
This is the edit window to make the file list which can be played
such as music, video, images.
User Guide Manual - 22
1
2 3 4 5
6
7 8 9
ྙ Showing the edited file list
ྚ Delete the selected file on the file list
ྛ Delete all files on the file list
ྜ Select all file in the chosen folder of SD card
ྜྷ Cancel the selection of the file in the chosen folder of SD card
ྞ Display the file able to be playing in SD card
ྟ Add the checked file to the file list
ྠ Show the path of the selected folder
ྡ Close the file list editing window
ྙ Screen size setting
- Fit Best
- Fill Screen
- Stretch to Screen
ྚGGPlay mode
- Repeat All ( )
- Random ( )
ྛGGExit
* Setting Window
1 2
3
Page 24

BLUETOOTH HANDS-FREE Menu
To use the Bluetooth hands-free function, please make the
function enabled on the Bluetooth menu of the Setting menu,
and also set the connection to the mobile phone with a built-in
Bluetooth function.
1
2
3 4
5
6
7
8 9
Status Indicator
Contents
Bluetooth Off
No Connection
Wait...
Last Call
Bluetooth is disable.
Bluetooth is not connected.
Wait for the Bluetooth connection.
Make a call to the last call number Switch.
www.looket.com
User Guide Manual - 23
Page 25

How to Receive a Call
If someone calls to the user's mobile phone connected with the
Looket N5 via Bluetooth, the following window comes up and a
bell rings. To answer the call, the Call button should be clicked.
But, if the user is under the situation that he can not answer it,
the End/Exit button is able to be selected, and then the window
is closed after the call line is off.
The call is connected and
the screen is changed to
the following screen.
The telephone icon is
displayed on the leftbottom side of the screen
while talking over the
telephone.
The icon is disappeared
automatically as soon as
finished the call.
If the icon is clicked to
finish the call or control
the volume level etc.,
the Bluetooth program
comes up.
While the call is received by the Bluetooth hands-free, all
sound from other application programs such as Navigation,
Multimedia Player, AV Receiver etc. is muted for the better
conversation on the phone. By such the principle, the voice is
not out from the FM radio when the FM transmitter function
is enabled, so the sound is made through the only speaker of
the Looket N5.
!
User Guide Manual - 24
Page 26

AV-in Menu
The AV menu is to play the video / sound from an external AV
input. If a device supporting AV output such as iPOD Video etc. is
connected to the Looket N5 (excepting the Looket N510), the
user can enjoy the video on the screen.
If a user's vehicle has the rear camera which is connected to an
AV port on the Looket N5, the image from the rear camera is
displayed on the screen.
If there is no input signal from outside wehn AV is executed, the
screen with 'No Signal' message is displayed.
In this case, please check the AV input cable or the device
handling AV output.
User Guide Manual - 25
www.looket.com
Page 27

SETTING Menu
System
1) OS version Information of Looket N5
2) Intrinsic ID Information of SD card
3) Language Selection
4) Recalibration of Screen: The touch pad can be recreated.
5) Auto Power Option On/Off
When the power supply is shut off using the power connector
such as a cigar charger or an AC charger, this function is to
convert the device to the sleep mode automatically.
In case of enabling Auto Power Off, if the power supply is cut off
like turning off the ignition of the vehicle, the pop-up dialog with
the Power Off message is come up to inform to turn the power
off. Then the device is automatically turned off 5 seconds later
and the sleep mode is conducted.
6) Auto Rear Camera Option On/Off
In case of the vehicle with the rear camera, the screen
automatically displays the camera image when the signal like the
change to the reverse gear is inputted to AV.
User Guide Manual - 22
Page 28

Bluetooth
ྙ Bluetooth Function On (blue) / Off (grey)
ྚG Name of Bluetooth Device
ྛG Address of Bluetooth Device
ྜG Connected Mobile Phone Name through Bluetooth
ྜྷG Pairing Mode Button to be converted or returned
ྞG Reset Button to delete all connected devices lists and connect
a new mobile phone
ྟG Indicator showing Bluetooth Connection Status
www.looket.com
User Guide Manual - 27
It is able to enable or disable to use the Bluetooth function and
set the connection to the mobile phone with a built-in Bluetooth
function through the hands-free profile.
1
32
4
5 6 7
Page 29

How to connect Bluetooth Hands-free
1. Click the Bluetooth button to make it enabled.
2. Indicate the name and address of the Bluetooth device.
3. Display 'Ready' in the widow of the status indicator.
4. Press the Pairing Mode button to wait for the connection.
5. Click the Pairing Mode button again and then convert to the
ready status.
6. Search the device in the mobile phone supporting the Bluetooth
hands-free function.
7. Request the service search to the found Looket-N5 device.
8. Demand the connection after selecting the hands-free profile.
9. Input '0000' (4 zero) if the pin code is needed during the
process.
10. When it is connected, the name of the connected mobile
phone device is shown.
User Guide Manual - 28
Please refer to the manual of the mobile phone about how to
connect the phone with the Bluetooth function for more detail
information.
The Bluetooth of the device supports only the hands-free
function. While pairing the Bluetooth connection on some mobile
phones, various service such as Headset, Hands-free, Stereo
Headset etc. are showing on the menu of the phone. At this
moment, the Hands-free should be selected to be connected with
the device through Bluetooth. (In case of choosing Headset or
Stereo Headset, it will not be connected between the device and
the mobile phone.)
Generally, the mobile phone supporting the Bluetooth Handsfree profile can be connected to the Looket N5. But, some
particular mobile phones are not able to be compatible with the
device.
!
!
!
Page 30

FM Transmitter
If the frequency of FM radio in the car is set to the predefined
frequency on the FM Transmitter Setting menu, the user can
enjoy the sound from Looket N5 via the speaker connected to the
FM radio. At this time, all sound from the device is silent
excepting only voice from the Bluetooth hands-free.
The available frequency range is from 88. 1 M Hz to 107.9 MHz
and it can be selected by 0.1 MHz.
How to Preset
1) Click Set and select the frequency by using Up/Down icons.
2) Press the preset button between 1 to 6.
User Guide Manual - 29
www.looket.com
Page 31

If you have some problems using Looket N5, which you are not able to
solve them by your self, we are always welcome to contact us.
The device
is frozen or
locked up.
Solution
Trouble
Power does
not turn on
when using
battery
power.
Something
wrong in
the LCD
screen.
GPS signal
is not good.
Please reset the device by pressing a Reset
button on the left side of the device for 2 seconds
and over.
If this doesn't help, please do a hardware reset
by the Power On/Off switch.
The remaining battery power may be too low to
run the device.
Connect an AC adapter (or a car charger) to the
device and external AC power.
Check the Power On/Off switch on the bottom
side.
If it's dark, this can be from excessive temperature.
(Operating temp.: -10 ~ +60 )
If it's hard to read, please check the back light
level.
If the screen freeze, please reset the device.
Make sure that the GPS receiver is adjusted to
the horizontal position and it has a clear view of
the sky.
GPS reception can be affected by below
circumstance.
- Bad weather
- Dense overhead obstacles
(e.g. trees and tall buildings)
- Other wireless device in the car
- Metallic windshield coating
Looket optional external antenna will boost the
performance.
Trouble Shooting
User Guide Manual - 30
Page 32

Warranty
SysOnChip, Inc. warrants Looket N5 against defects in material
and workmanship, under normal use and service, for one (1)
year from the date of purchase only with the proof of purchase.
And the warranty period might vary depending on the region,
dealer, retailer or sales contract.
The warranty period of a rechargeable battery and
consumables are six (6) months from the date of purchase.
Incompatibility is not a defect covered by SysOnChip¡'s
warranty. If the product is found to be defective in material or
workmanship during this period, SysOnChip or one of its
authorized distributors will, at its option, repair or replace the
defective product without charge when furnished with proof of
retail purchase. If you ship the product to SysOnChip or one of
authorized distributors, you must use the original container or
equivalent and the shipping charges is your responsibility.
SysOnChip or distributors will bear shipping charges for returning
the product.
This warranty does not apply to any product which has been
subjected to alteration, unsealing or disassembly and detached
warranty or serial number label at any case.
SysOnChip is not responsible for incidental or consequential
damages resulting from breach of any express or implied
warranty, including damage to property and, to the extent
permitted by law, damages for personal injury. This warranty is
in lieu of all other warranties including implied warranties of
merchantability and fitness for a particular purpose.
Limited Warranty
www.looket.com
User Guide Manual - 31
Page 33

Looket N5 is a portable device, therefore the free warranty
cannot apply to LCD when it damaged from misusing or abuse.
LCD Warranty
Any damages from using power supplies or cables which are
not provided or officially approved by the manufacturer cannot
be included in the warranty and are not responsible for
SysOnChip.
Power supplies and cables
Basic Unit Package
•LooketN5
•Bracket
• Car Mount
•USBCable
• Car Charger
• Quick Start Guide
Opational Accessory
•ACAdapter
•AVCable
• External GPS Antenna
• TMC Antenna
* Package contents might vary depending on countries without notice.
THIS DEVICE COMPLIES WITH
PART 15 OF THE FCC RULES
User Guide Manual - 32
Page 34

Copyright ཱྀ SysOnChip, Inc. 2008
All rights reserved. Reproduction, transfer,
distribution or storage of parts or all of the contents
in this document in any form without the prior
written permission of SysOnChip, Inc. is prohibited.
Other product and company names mentioned
herein may be trademarks or trade names of their
respective owners.
4F., Singwan Bldg., KT Bukdaejeon Brach Office,
138 Gajeong-dong, Yuseong-gu,
Daejeon, 305-350, The Rep. of Korea
Tel: +82.42.864.4665
Fax: +82.42.864.4664
E-mail: sales@sysonchip.co.kr
Web-site: www.looket.com
www.sysonchip.co.kr/eng
Page 35

Do Not.
Any changes or modifications to the equipment not expressly
approved by the party
responsible for compliance could void user’s authority to operate
the equipment.
Page 36

 Loading...