

AXM-209C User Manual
Note :
1. Reharge the batteries to full the first
time you insert new batteries for use.
2. Don’t recharge if no batteries are
loaded.
3. Be sure use only the recharge cable to
recharge the batteries. Any other
incompatible facilities should not be used.
4. Only NI-MH 600mAh 1.2V AAA batteries authorized should be used.
5. The recharge cable should not be used
to recharge other devices.
6. Power Saving Mode:
A. Suspend Mode :
Keep mouse stationary for 10 minutes,
mouse will be automatically
set to Suspend Mode. Press
left button to wake up the
mouse again.
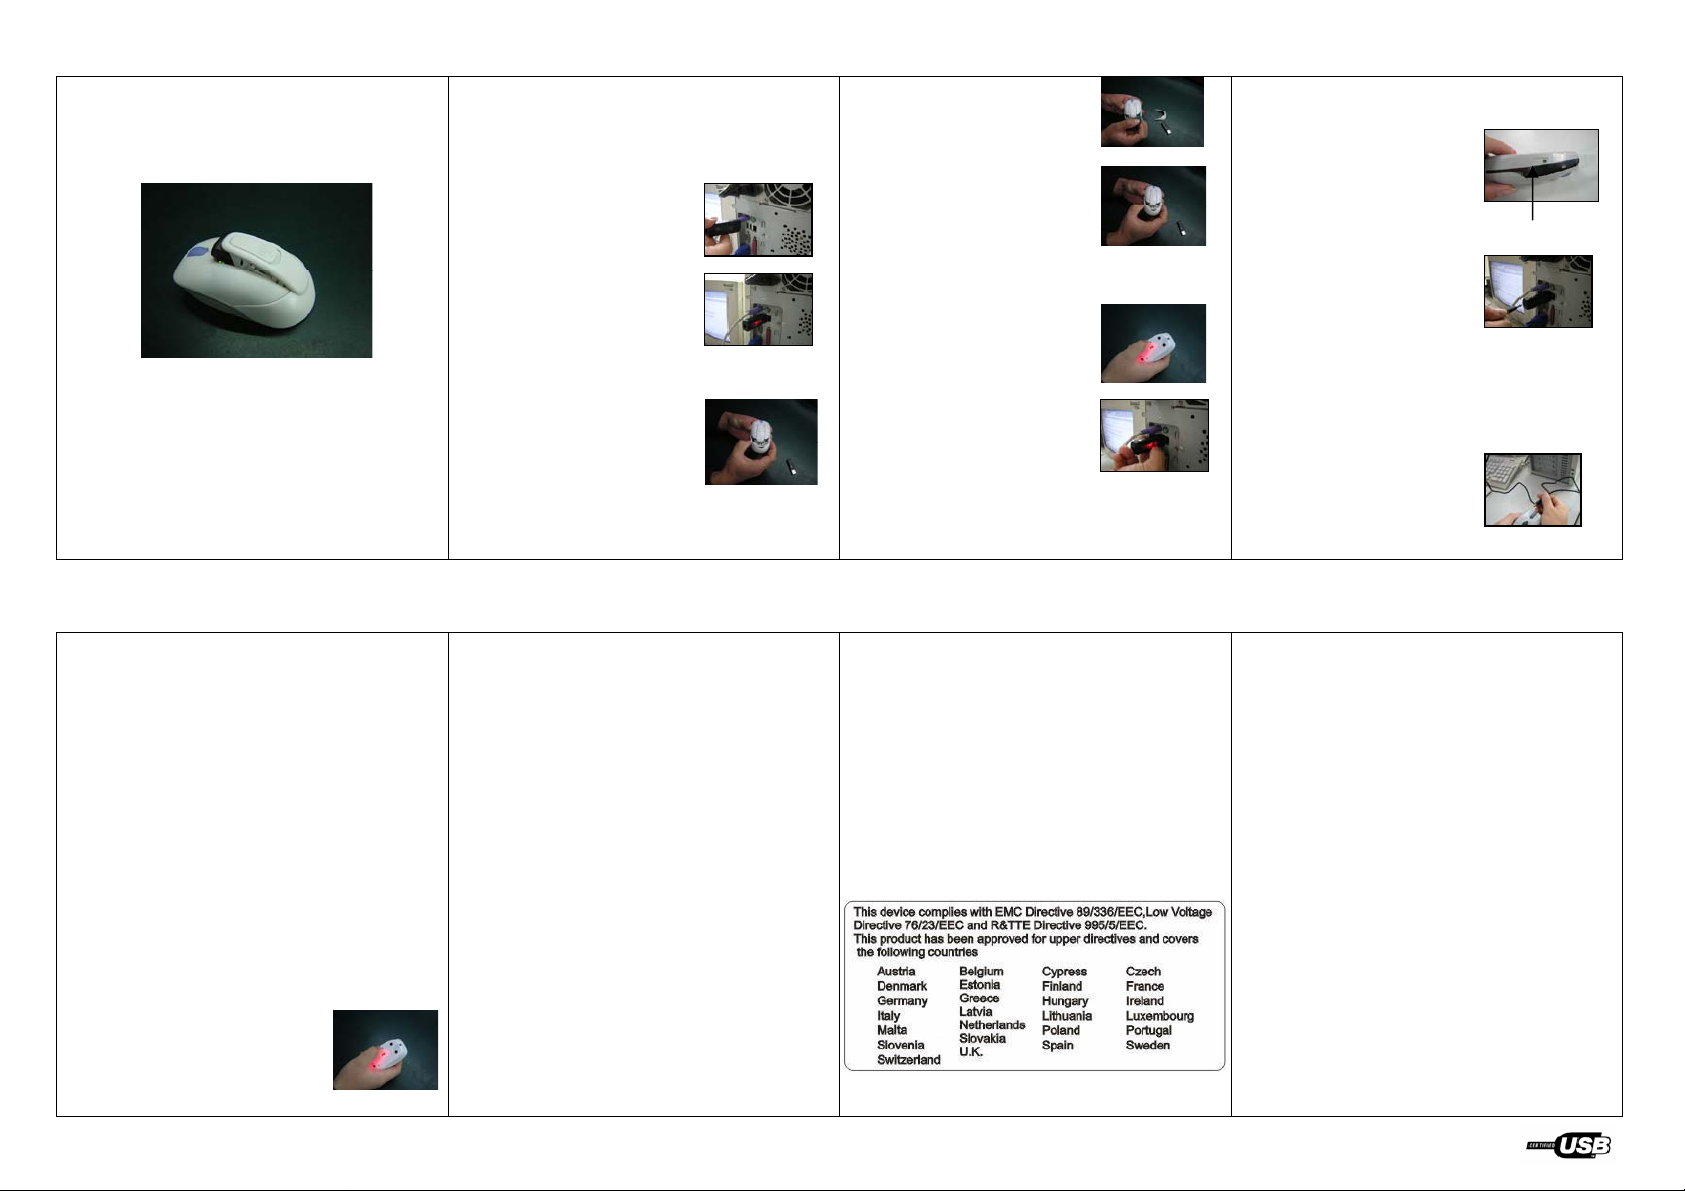
AXM-209C Wireless Optical Mouse User Manual
1. Connecting with Computer:
The first time you take out this mouse and
receiver from the packing, Factory Preset ID
enables Plug and Play function.
Plug the Receiver into PC
USB Port . Under Win2000
or higher , wait for the OS to
detect the RF device. Under
Win98 or lower installation
of driver for the device is
necessary.
Insert the batteries into
the mouse and move it for a while , then it
starts working .
2. Inserting Batteries:
A. Push the battery cover
compartment backward
and open it .
B. Power Off Mode :
When you wish to set the mouse to power
off mode, press mouse ID for 3 seconds .
The Optical Led will flash once and then
fade out showing mouse power is already
off. Press ID switch for waking up agai n .
7. Trou ble Shooting:
A. When mouse doesn’t respond, check
the battery power status, and link ID again.
B. Be sure the DC Jack and USB plug are
connected properly to the respective mouse
and USB port of the PC.
C. Check the battery pole if the optical Led
is still off after inserting batteries.
D. Please do use the accessories (recharge
cable) attached. If recharge cable is
defecive, then Nokia charger (5.03V/500mA
regulated voltage function) can be used.
B. Insert 2 AAA batteries
Into compartment with
correct orientation .
C. Slide the battery cover
into the compartment and
close the cover .
3. ID Link:
When Factory ID has been changed or
wish to be changed , link
ID as below :
A. Press the ID button on
the bottom of the mouse .
B. Press the ID button on
the top of the receiver. If
the led on it starts blinking
rapidly , ID Link is OK .
! ID linking should be completed within
10 seconds or connection would be failed
E. Check the recharge cable if it is well
connected when Low Battery alert Led
never fades out.
F. Ask for maintenance solution from
your retailer and engineer . Personally
taking apart is prohibited after trouble
happened.
4. Low Battery Alert:
When batteries power drops down to 2V,
the alert Led on the left side
of the mouse starts flashing.
Please charge batteries for
four hours and not exceed
24 hours. Alert Led
5. Charge Batteries:
A. Plug 1.0mm DC Jack
of the recharge cable Into
mouse DC socket .
B. Connect the USB plug of the recharge
cable to the USB port of the PC. Batteries
recharge begins and the alert
Led of the mouse lighten constantly .
C. When Alert Led Fades
out, battery is full and be
sure to disconnect the
recharge cable .
This equipment has been tested and comply with the limits for a
class B digital device, pursuant to Part 15 of the FCC Rules. These
limits are designed to provide reasonable protection. This equipment
generates, uses and can radiated radio frequency energy and, if not
installed and used in accordance with the instructions, may cause
harmful intererence to radio communications. However, there is no
guarantee that interference will not occur in a particular installation if
this equipment does cause harmful interference to radio or television
reception, which can be determined by turning the equipment off and
on, the user is encouraged to try to correct the interference by one or
more of the following measures:
-Reorient or relocate the receiving antenna.
-Increase the separation between the equipment and receiver.
-Connect the equipment into an outlet on a circuit different from
that to which the receiver is connected.
-Consult the dealer or an experienced radio/TV technician for
help.
Changes or modifications not expressly approved by the party
responsible for compliance could void the user’s authority to operate
the equipment.
The antenna(s) used for this transmitter must not be co-located or
operating in conjunction with any other antenna or transmitter
FCC Note :
 Loading...