


AQUI
RF Crystal Mouse
AGM-9200

N
ote: the manufacturer is not responsible for any radio or tv
interference caused
by unauthorized modifications to this equipment. such
modifications could void
the user's authority to operate the equipment.

Table of Contents
R&TTE Compliance......................................................................................i
Safety............................................................................................................i
Federal Communications Commission Radio (FCC) Statement..............i
INTRODUCING THE AQUI ....................................................................1
Package Contents.......................................................................................1
System Requirements ................................................................................1
Features.......................................................................................................2
AQUI RF Crystal Mouse Components .......................................................2
INSERTING BATTERIES....................................................................... 3
SETTING UP THE AQUI........................................................................4
USING THE AQUI ..................................................................................6
INSTALLING THE iWARE SOFTWARE ...............................................7
USING THE SOFTWARE.....................................................................11
Power Savings Mode................................................................................12
A WORD ABOUT ERGONOMICS.......................................................13
TROUBLESHOOTING .........................................................................14
Mouse not detected ..................................................................................14
Mouse doesn’t work after changing batteries........................................14
Cursor doesn’t move properly on the screen.........................................14

INTRODUCING THE AQUI
Congratulations on your purchase of the AQUI RF Crystal Mouse,
which combines an innovative ergonomic design with all the features
and convenience of wireless technology.
The AQUI RF Crystal Mouse has a scroll wheel/middle button that can
be assigned various functions such as Web or word processor page
scrolling, or launching applications such as Windows Explorer.
The AQUI needs no software to operate. The USB or PS/2 interface
makes it completely Plug and Play in all supported operating systems.
The mouse uses two AA batteries. The receiver is powered by the USB
or PS/2 interface on the PC.
Package Contents
After you have unpacked the AQUI RF Crystal Mouse, check the contents to make sure the following items are included.
One mouse
One RF receiver
Two AA batteries (for the mouse)
This quick guide
USB to PS/2 adapter
One floppy disk with application software
If any of the above items are missing or appear damaged, contact your
dealer immediately. Do not throw the shipping carton away in case you
need to ship your AQUI RF Crystal Mouse.
System Requirements
Windows ME/2000/98/95/NT 4.0 or later
USB or PS/2 port
FDD drive (for application software installation)
1
Features
Wireless radio frequency (RF) technology
Programmable button emulates middle mouse button and
provides many advanced functions such as scrolling in Web
pages and text editors, opening programs, or selecting previous/next slide in Powe rPoint
Plug and Play compliant
Compatibility: PS/2 Interface: Windows ME/2000/98/95/NT4.0
USB Interface: Windows ME/2000/98
Compatible with PowerPoint and all other Windows-compatible
presentation programs
Compatible with IE and Netscape Web browsers
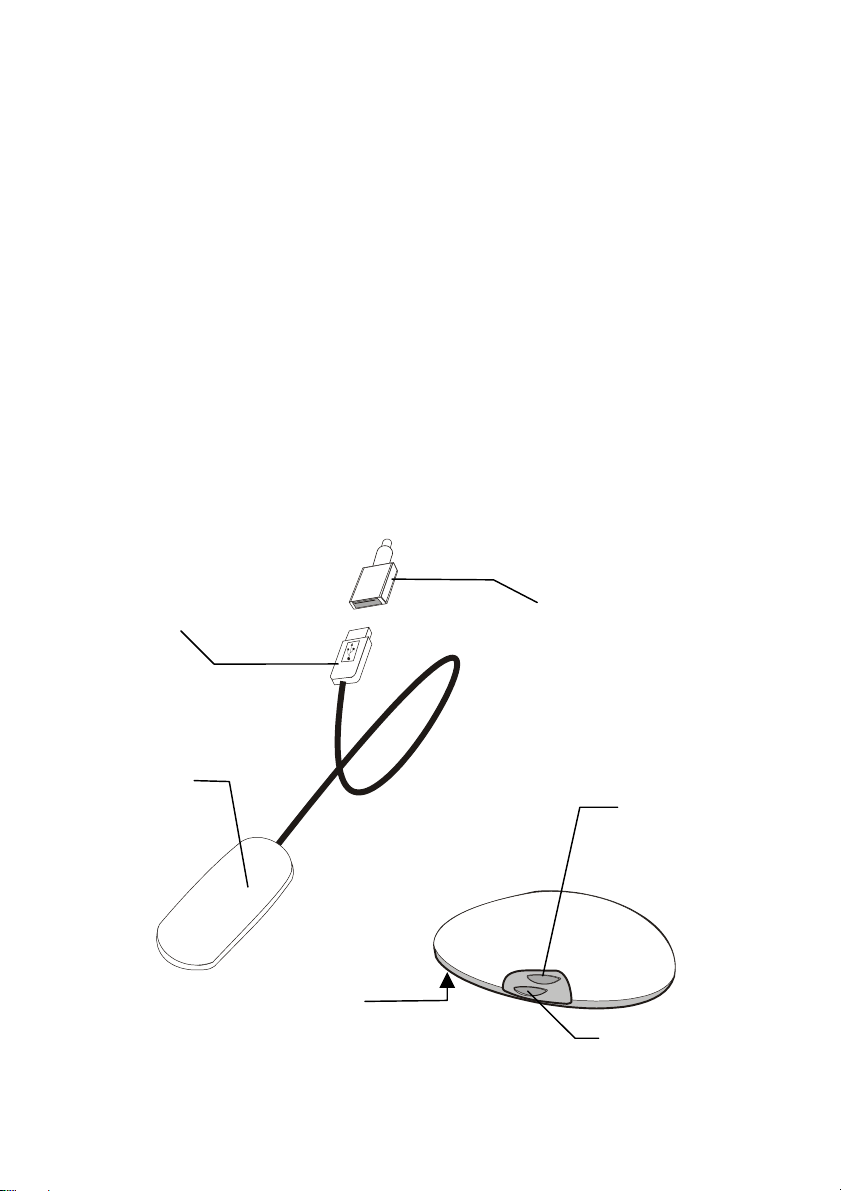
AQUI RF Crystal Mouse Components
The AQUI RF Crystal Mouse consists of a mouse and receiver. The
following illustration shows the main components:
USB connector
RF receiver
USB to PS/2
adapter
Scroll wheel/middle
mouse button
Left mouse button
(underneath)
Right mouse button
2

INSERTING BATTERIES
The AQUI RF Crystal Mouse requires two AA batteries to operate. Refer to
the following instructions and illustrat ions for i nsertin g the batte ries:
1. Turn the AQUI RF Crystal Mouse over.
2. Press (A) with your finger
and open the battery cover
compartment in the direction
of the arrow (B):
3. Insert two AA batteries into
the compartment. Ensure
that you orient the batteries
according to the polarity
markings inside the battery
compartment.
4. Slide the battery compartment
cover into the slots (A) and
swing the cover closed (B):
A
B
A
B
3

SETTING UP THE AQUI
Your AQUI RF Crystal Mouse receiver connects to the USB or PS/2
port on your computer.
Note! Insert the batteries before connecting the AQUI RF Crystal Mouse.
Refer to the previous section.
Refer to the following instructions and illustrations to connect the AQUI
RF Crystal Mouse to your PC:
1. Turn off your computer.
2. Plug the USB connector
on the RF receiver cable
into the USB port on your
computer.
If you want to connect to
your computer’s PS/2
port, use the USB to PS/2
adapter.
Connect the adapter to
the RF receiver and then
connect the receiver to the
computer’s PS/2 port as
shown:
4

3. Place the RF receiver and
the mouse in the proper
location for your computer.
Note! Refer to the section on
ergonomics later in the quick
guide for more information on
Place the receiver at least 8
inches (20 cm)
from electrical
devices such as
the computer or
monitor.
8 inches
setting up your workstation.
4. Turn on the computer. If your OS is Windows 98, the Add New Hardware
Wizard starts. Insert your Windows 98 CD into the CD-ROM drive. Follow the instructions on the screen. Use the <Tab> key to move among
items on the screen and press <Enter> to make selections. If the OS is
Windows ME/2000/XP, the USB driver is installed automatically.
5. Use a bent paper clip to
press the RF receiver connect switch (A), and then
A
press the mouse connect
switch (B).
B
Note! Repeat Step 6 when con-
Connect switches
necting the AQUI RF Crystal
Mouse for the first time and after
replacing the batteries.
Note! You can also press the receiver
connect switch (A) to awaken the
computer from suspend mode.
Ensure that the mouse is working. If the mouse does not respond to
mouse movement, repeat Step 6 to ensure that a connection has been
made. If it still is not working, refer to the Troubleshooting section at the
end of this guide.
5

USING THE AQUI
The innovative buttons on the AQUI RF Crystal Mouse make it easier
than ever to use standard mouse functions.
The mouse is equipped with two buttons and a scroll wheel/middle button:
Press down on the front of the mouse
to activate the left mouse button.
Press here to activate the
right mouse button.
Scroll the wheel back and forth
or press here to activate the
middle mouse button.
The AQUI RF Crystal Mouse’s left button is activated by pressing down
on the front of the mouse. Use your thumb to press the right mouse
button. Use your thumb to press or scroll the scroll wheel/middle button.
Note! The AQUI has an 800-dpi sensor, which makes cursor sensitivity ex-
ceptionally high. If you are browsing the Web and make a selection
with the right mouse button while accidentally moving the cursor, the
selection will not be made. Ensure that you hold the cursor steady
while making selections.
6

7

INSTALLING THE I WARE SOFTWARE
The AQUI RF Crystal Mouse comes with software to enhance its function. The software is located on the bundled floppy disk.
Note! Connect your AQUI RF Crystal Mouse before installing the software.
Refer to the previous section.
Follow these instructions to install the software for the AQUI RF Crystal
Mouse:
1. Insert the application software floppy disk into the
floppy disk drive.
2. Click Start, Run. Type
“A:\Setup.exe” in the Run
Open text box (where A is
the letter of your floppy
drive) and click OK. The
iWare mouse installation
program starts.
3. Click Next.
4. Select “3 Button Wheel
Mouse,” and click Next.
8

5. Select “USB Port” or “PS/2
Port” and click Next.
6. Click Next to accept the
default directory or browse
to the desired directory.
7. Click Next to accept the
default folder or type a new
folder name.
9

8. Click Next to start copying
files to your computer.
9. Click Finish to complete the
installation.
10. When the computer has
restarted, an iWare mouse
icon appears in the taskbar.
iWare mouse
icon
10

USING THE SOFTWARE
After your computer restarts, the iWare Mouse icon appears at the
lower right side of your screen in the taskbar:
iWare
Mouse
Double-click the iWare Mouse icon in the taskbar to open the iWare
Mouse Setting screen. The following table describes the iWare Settings:
Wheel Tab
Wheel Mode
These two items define the operation of
the scroll wheel:
• System default (Intelli-Mouse)
mode: this option sets the wheel
scrolling function as Microsoft’s IntelliMouse standard.
• Enhance scroll mode: enables en-
hanced scroll mode.
Note! Experiment with these two modes;
after some practice, choose the mode that
best suits your work habits.
Wheel Speed
These items enable you to set how fast
the page scrolls on the screen:
• Scroll # lines per scroll unit: sets
the number of text lines that the page
will scroll.
• Scroll one page per scroll unit: sets
the screen to scroll one complete
page at a time.
11

Button Tab
Enables you to set the middle button
function. Choose the function from the
drop-down list.
About Tab
Provides the iWare software version.
Refer to this screen when updating the
software to ensure that you have the most
recent version.
Power Savings Mode
The AQUI mouse features a power saving mode to save battery power.
The optical sensor indicates the power saving mode. Refer to the following table:
Mouse in use
1 second
inactivity
10 seconds
inactivity
10 minutes
inactivity
1 hour
inactivity
Optical sensor illuminates
Optical sensor dims to indicate power saving mode.
The mouse re-activates full power mode every 20
milliseconds.
Optical sensor flashes quickly. The mouse reactivates full power mode every 100 milliseconds.
Optical sensor flashes slowly. The mouse reactivates full power mode every 500 milliseconds.
Optical sensor flashes slowly. The mouse reactivates full-power mode every 2.5 seconds.
Note! The mouse cursor is delayed slightly when you begin using the mouse after one hour of inactivity.
12

A WORD ABOUT ERGONOMICS
Ergonomics is the study of how people with their different physical
characteristics and ways of functioning relate to their working environment (the furnishings and machines they use). The goal of Ergonomics
is to incorporate comfort, efficiency, and safety into the design of keyboards, computer desks, chairs, and other items in an effort to prevent
physical discomfort and health problems in the working environment.
If your budget permits, buy ergonomically designed furniture such as
chairs, shelves, and desks that fit your physical characteristics and work
methods.
You can create an ergonomically improved workstation without spending much money. Following are a few tips to help you work effectively
without a lot of physical discomfort:
• Keep your forearms, wrists, and hands in a relaxed position, with your
elbows at your side.
• Position the keyboard and mouse so that you do not have to reach for
them.
• Don’t strike the keys too hard; type with a soft touch.
• Keep your thighs parallel to the floor and your feet flat on the floor or on
a footrest.
• Use a chair that provides good back support.
• Try to place the monitor so that there is little glare from the sun on the
monitor.
• Walk around the room every hour.
• Every half-hour look away from the computer screen for a few minutes.
• Vary your tasks throughout the day.
• Avoid resting your wrists on sharp edges.
13

TROUBLESHOOTING
Mouse not detected
If the AQUI RF Crystal Mouse doesn’t respond to activity, follow these
steps:
1. Ensure that the receiver is properly connected to the USB or PS/2 port
(refer to SETTING UP THE AQUI on page 4).
2. Ensure that the batteries have been installed correctly (refer to INSERTING
BATTERIES page 3).
3. Ensure that there are no IRQ or I/O address conflicts. Refer to your operating system user’s manual for information on resolving IRQ and I/O address
conflicts.
Mouse doesn’t work after changing batteries
If the AQUI RF Crystal Mouse doesn’t respond to activity after replacing
the batteries, follow these steps:
1. Ensure that you have established a connection between the RF receiver
and the mouse (refer to SETTING UP THE AQUI on page 4).
2. Ensure that the batteries have been installed correctly (refer to INSERTING
BATTERIES page 3).
3. Ensure that the batteries are not discharged.
Cursor doesn’t move properly on the screen
If the cursor doesn’t move or the motion is erratic, follow these steps:
1. Ensure that you have established a connection between the RF receiver
and the mouse (refer to SETTING UP THE AQUI on page 4).
2. Change the position of the RF receiver. There should be a distance of at
least 8 inches (20 cm) between the receiver and any electrical appliance
(such as speakers, the monitor, or the computer).
3. Ensure that the mouse batteries are not discharged. If they are discharged
replace them (refer to INSERTING BATTERIES page 3).
14
 Loading...