

Page 1

One
Setup Guide
Model: G11
Page 2

Welcome to the Syrp family
Before you start filming, there are a few simple steps
to follow to ensure your Genie One is assembled
correctly and you’re shooting smoothly.
This guide will walk you through the correct Genie
One set up, as well as some helpful tips.
Additional resources can be found at
support.syrp.co
Page 3
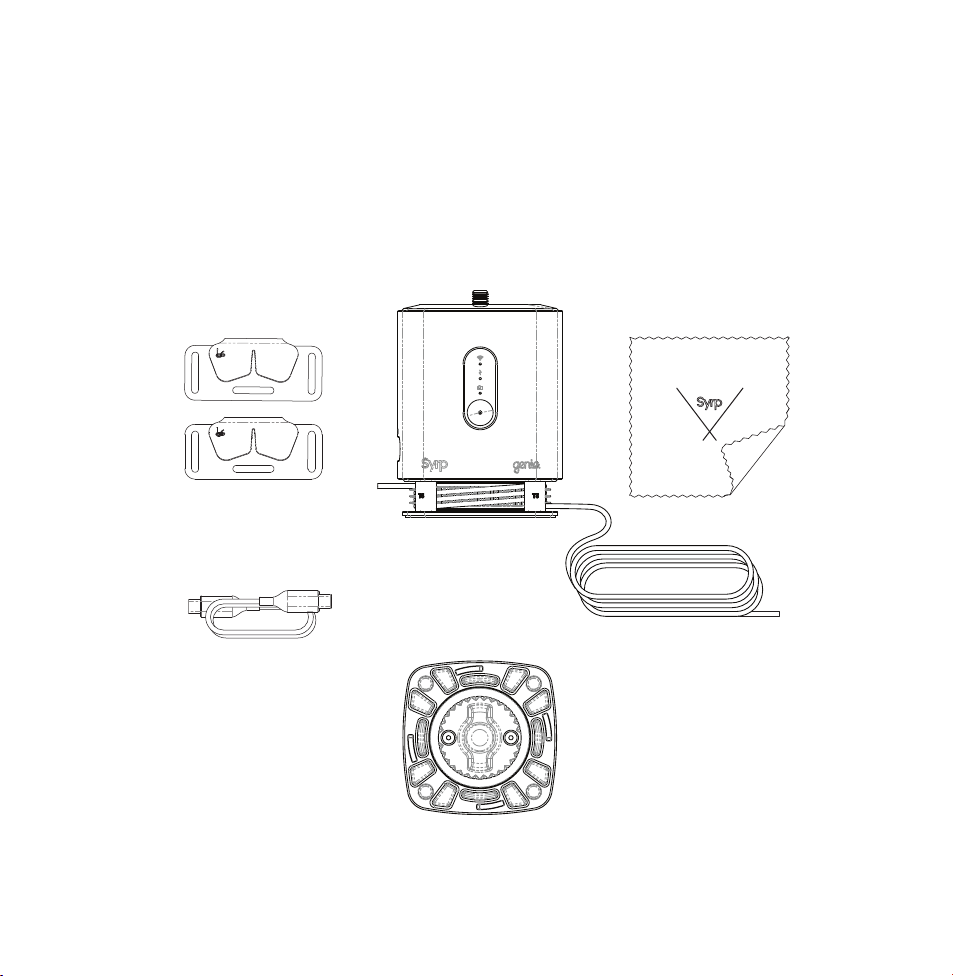
What’s in the Box
Genie One
Rope Hooks
USB-C to USB-A
Charging Cable
Lens Cloth
Genie Linear Accesory
Incl. Genie Rope
Genie Panning Accesory
Page 4
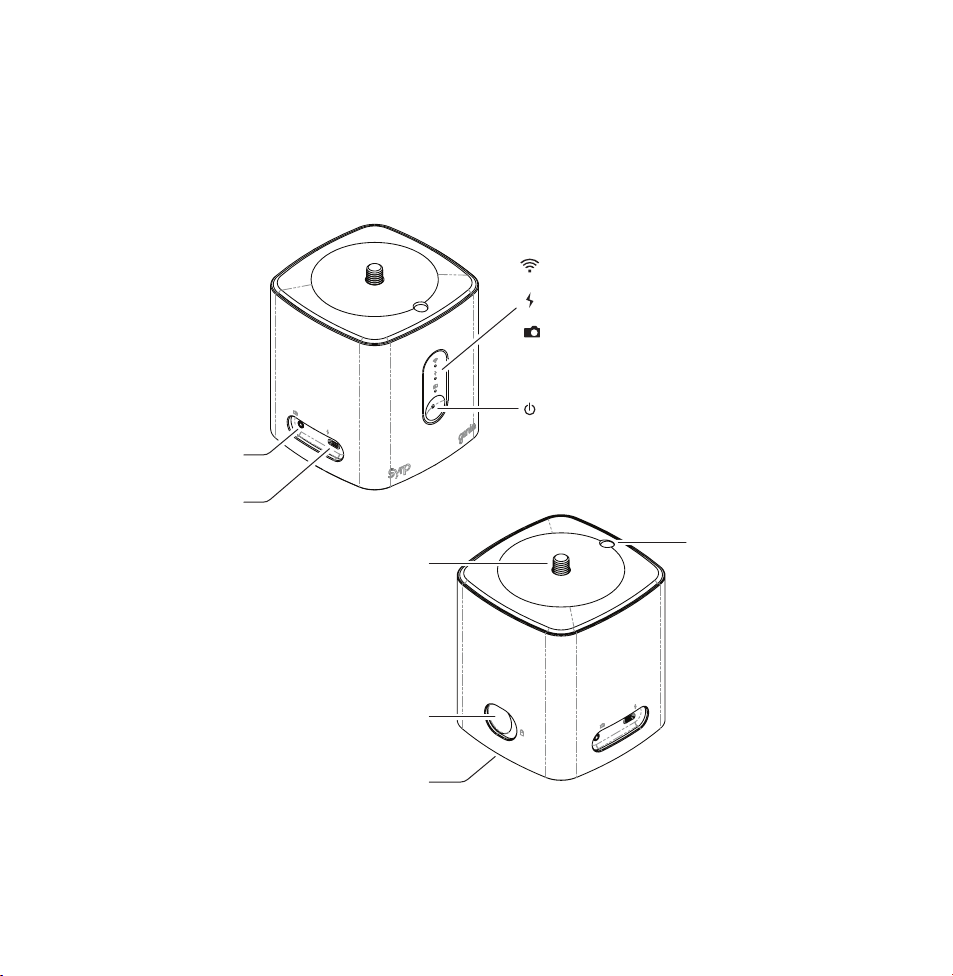
Camera Port
USB-C Port
Genie One
Wireless connection light
Charging light
Camera recording light
Power Button
Bubble level
3/8" Camera Screw
Quick Release Lock
Panning/Linear Base
Page 5
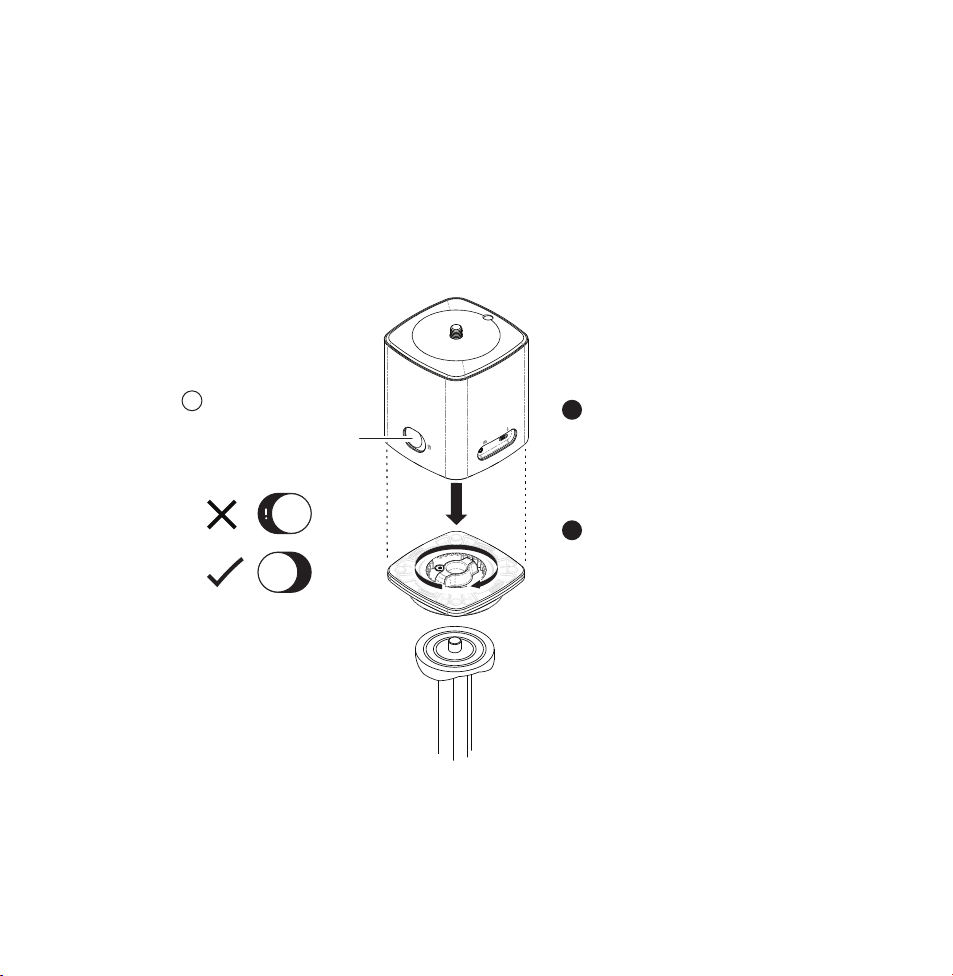
!
IMPORTANT
Ensure the Quick
Release button is in the
lock position and there
is no orange showing.
Mounting for
Panning Movement
Twist the Panning Accesory
1
camera screw knob onto the
Tripod 3/8” camera screw.
Align the Genie One with the
2
Panning Accessory and firmly
press it into the base until you
hear a click.
Page 6

!
IMPORTANT
Ensure the Quick
Release button is in the
lock position and there
is no orange showing.
Mounting for
Linear Movement
1
2
Twist the Linear Accessory
camera screw knob onto the
Slider carriage 3/8” camera
screw
Align the Genie One with the
Linear Accessory and firmly
press it into the base until you
hear a click.
Page 7

Tie off the Genie Rope
Tie off the Genie rope to both ends of your track using the
7
supplied rope hooks. Make note of the correct direction of
the rope as illustrated.
Rope should tie off on the rope
hooks on the same side as it
exits the linear plate, creating
the smallest angle.
Rope Tie Off Method
Page 8

Screw your camera and ballhead to the Genie One 3/8”
7
camera screw
!
IMPORTANT
Do not lift the Genie and or
attached equipment by the
camera. Always detach first
and transport separately.
Mount Camera
Page 9
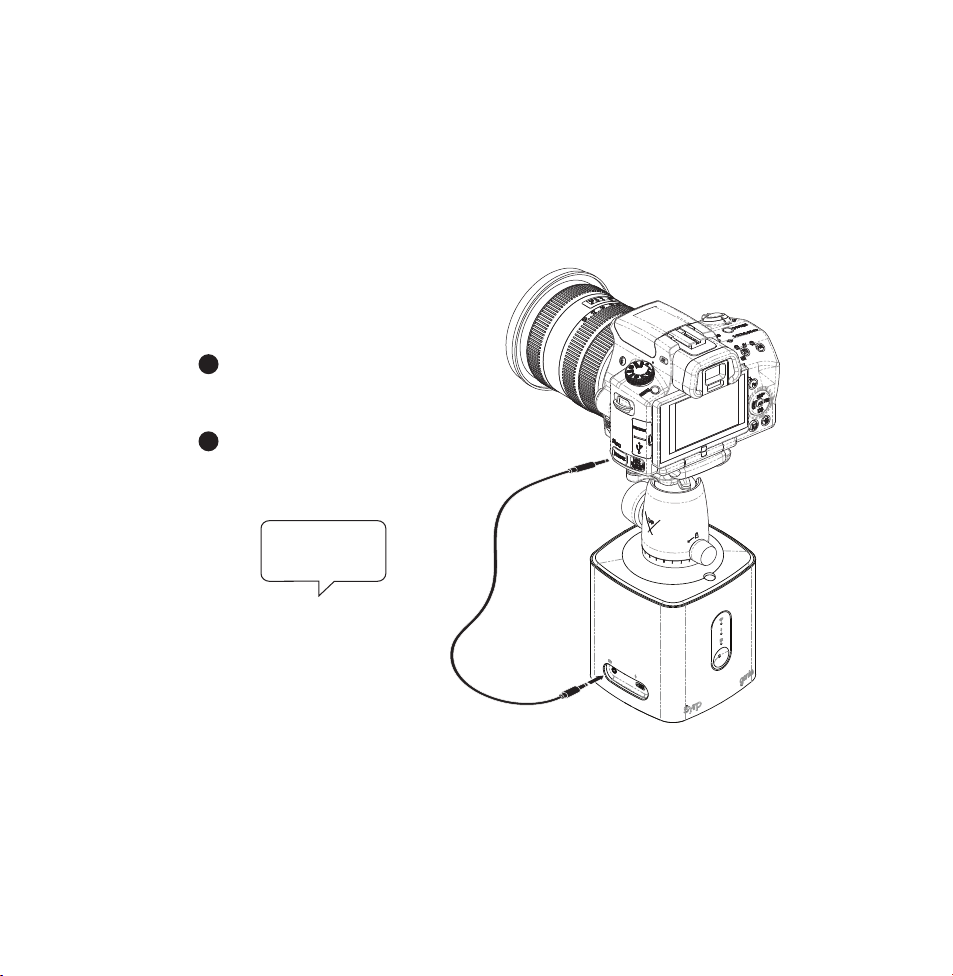
Camera Control
Plug the 2.5mm jack-end of a Syrp
1
Shutter Link Cable into the Genie
One Camera Port.
Connect the opposite end of the
2
Shutter Link Cable into the remote
port of your camera.
The shutter cable
is not required for
video recording
Page 10

Connect to the
Genie One
Turn on the Genie One, press
1
the on button once.
2
Turn Bluetooth on in your mobile
device settings.
Download the Syrp Genie App
3
4
Open the Syrp Genie App.
Continued overleaf.
Page 11

App Connect
Tap the CONNECT icon.
1
2
Select your Genie or multiple
GENIE ONE
One
Tracking
GENIE ONE
One
Tracking
Genies to link to more than
one Genie.
Tick confirms Connection.
3
CONNECTION
4
Press CONNECTION to
return to Home menu
Page 12

Charging
Plug the USB cable into a wall
1
charger, laptop or USB port.
!
IMPORTANT
Only use a power supply
rated as USB-C 5V/1-3A
2.5hrs*
2
Plug the USB-C plug into the
Genie One charging port.
Charge time is 2.5hrs with a
*
5V/3A power supply.
Orange light indicates
charging, green is
charged
Page 13

Threading the Linear Plate
Thread an untied end of the rope into the bottom of the roller
1
where it’s marked ‘IN’ following the arrow.
Thread the rope end through to the bottom of the next roller
marked ‘OUT’.
Ensure the rope is sitting at the bottom of the roller.
Continue to thread the rope through the next 2 rollers
2
marked T5.
Repeat the above steps 3 more times, stacking each wind
3
above the last.
Ensure each rope sits individually in the grooves of the
Guide Rollers
Continued overleaf.
The Capstan is pre-wound,
avoid removing unless
absolutely necessary
Page 14

Checking the Linear Plate
Turn the linear plate so you are looking face on to the Guide
4
Rollers. The rope should pull freely and you should see the
following:
A
B
A
The rope entering the linear plate where the roller is marked ‘IN’
4 Rows of rope wound around the Linear Plate one above the
B
other
C
The rope exiting the linear plate where the roller is marked
‘OUT’
C
Page 15

Genie Quick Tips
When recording photographs always, set your camera and
lens to manual focus (MF). If set to Auto Focus (AF) the
camera can misfire leading to missed frames.
Turn image review OFF on your camera. On some cameras,
image review can cause missed frames in your time-lapse.
Page 16

Firmware Tips
If you’re having difficulty updating the Firmware, try these
tips.
• Try to update on a different device. If it works you can go
back to using your original device.
• Do not connect to other Bluetooth devices while updating.
It's best to turn off other nearby Bluetooth devices
completely, or the update may fail.
• Try the update from a different location; in some situations
unknown interference can cause a failed update.
For more information visit support.syrp.co
Page 17

Stay in Touch
We hope that the Genie One helps to expand your
7
creativity and assists in making better films. Please stay in
touch with us, join our community and show us your work.
www.syrp.co
http://youtube.com/syrpey
vimeo.com/syrp
instagram.com/syrp_
https://www.facebook.com/syrp.co
twitter.com/syrp_
syrp@syrp.co.nz
32 Crummer Rd
Auckland 1021
New Zealand
Ph.+64 9 360 9570
Page 18

 Loading...